
At some point, you will want to add new content to your Teenage Engineering EP-40 Riddim. I bought my EP-40 as a loop machine. I like interacting with it — bringing layers in and out, blasting a siren, adding FX, etc.
My favorite reggae and dub loop producer is Dubmatix (artist Jesse King). Dubmatix produces sound libraries for Renegade Audio, which can be found on Loopmasters and other on-line retailers.
Dubmatix has been super-generous over the years releasing free taster and gift packs. Keep an eye on the Dubmatix web site or get on the Dubmatix mailing list.
I like to pay back generosity and have purchased several Dubmatix sample packs. I also have a zillion taster packs which are a good way to dip your toe in the water before buying.
Today, I want to show how I processed and imported the Renegade Audio Dub Yard Funk taster pack into EP-40. Dub Yard Funk is volume 40 in the reasonably-priced Dub Pack series. A Dub Pack is a construction kit with the instrument parts broken into pre-trimmed loops and sounds. Loop duration runs from 10 seconds up to a minute, depending upon title.
It’s like Dub Packs are made for the EP-40 Riddim, except for loop size. Out of the carton, the EP-40 is stuffed with 92MBytes of factory content and eight artist songs. That leaves 36MBytes free for your own content and one project (number nine). [Someday I will explore project and sample management after getting the nerve to delete factory-installed artist projects.] Thus, we gonna need to do some trimmin’ and squeezin’ to get Dub Pack loops into EP-40.
Instead of diving into a full 250MByte Dub Pack and swimming around, I downloaded the Dub Yard Funk taster pack from Loopmasters. That way you can follow along and experiment on your own. Plus, I like the sound of this pack! It’s easier to do monkey-work when you like what you’re hearing. 🙂
The Dub Yard Funk taster pack contains twelve WAV files:
RA_DYF_77_Abm_Bass_Gtr_Main.wav
RA_DYF_77_Abm_Gtr_Music_Combo_3.wav
RA_DYF_77_Abm_Gtr_Music_Combo_Echo_2.wav
RA_DYF_77_Abm_Guitar_Wah.wav
RA_DYF_77_Abm_Keys_Skank_Combo_2.wav
RA_DYF_77_Abm_Melodica_Skank.wav
RA_DYF_77_Abm_Vox_2.wav
RA_DYF_77_Full_Drum.wav
RA_DYF_77_Mixed_1.wav
RA_DYF_77_Mixed_Perc_6.wav
RA_DYF_77_Perc_Flexatone.wav
RA_DYF_77_Tops_2.wav
Each file is 12.9MB in size with a 29 second duration. Clearly, these ain’t gonna fit into my EP-40’s free space (36MB). Sample format is 44,100Hz, 24-bit stereo. Going lo-fi will squeeze things down.
Listening to the full drums or skanks, for example, one realizes that there is a lot of redundancy here. Fortunately, the audio is aligned across files and it is possible to select and trim loop-length excerpts across all of the files.
Here’s how to do a quick chop-job in SONAR. (Yes, it’s ancient Cakewalk Home Studio, again.) First, set the project tempo (77BPM). The correct project tempo makes it easier to snatch two or four bar loops. Next, drag each file into an SONAR audio track. I decided not to include the full mix, RA_DYF_77_Mixed_1.wav, because we can and will layer the individual pieces/parts interactively on the EP-40 in Live State. Tweak the project tempo to fine-tune time alignment to the start of each measure.
The next few steps use SONAR’s audio clip capabilities. Turn on looping and choose loop start and end points. Press play and listen for glitches. Tweeze the project tempo (or loop points) if you must. When everything sounds good, select all of the tracks loop bars. Go into the Edit menu and choose Split. Enable the Split At Selection option and click OK.
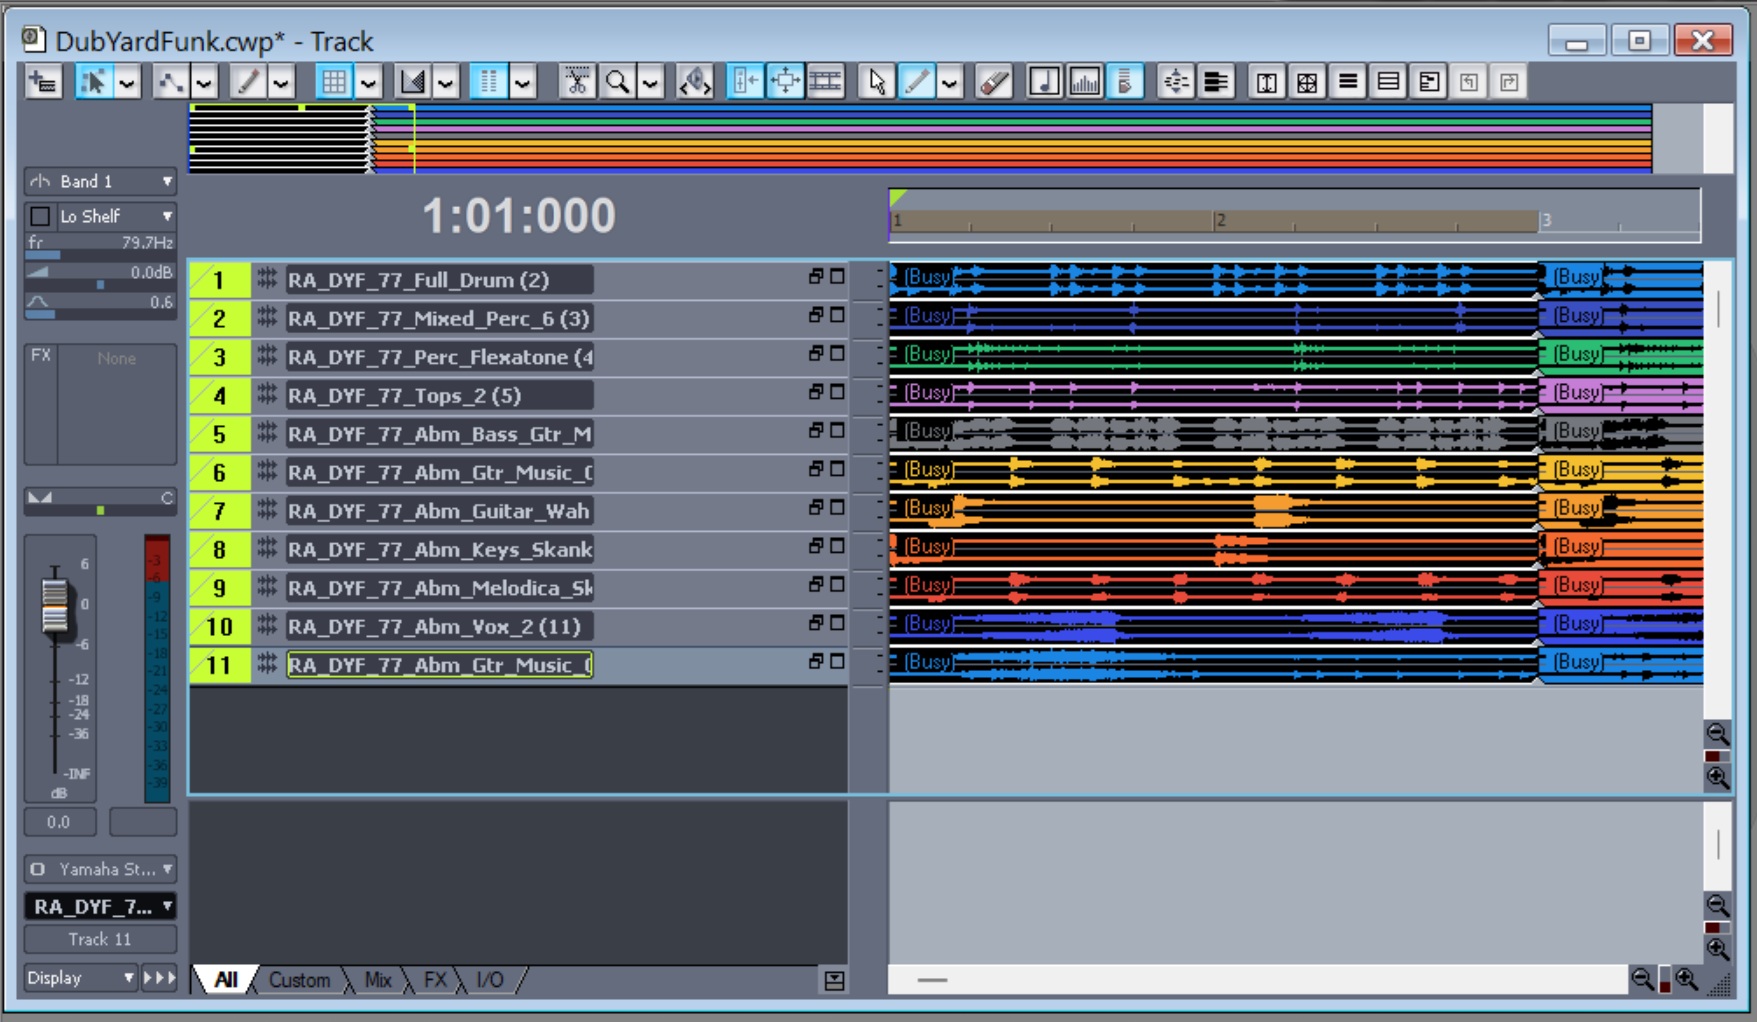
SONAR clips ready for export
At this point, you should have a four bar clip for each stem as shown in the track screenshot. Go to the File menu and choose Export > Audio. Under Source Category, choose Tracks from the drop-down list. Choose the target audio format. I went with 20,250Hz, 16-bit stereo in order to reduce file size. Enter a short identifier (e.g., “tt”) in the file name field to make SONAR happy and click Export. SONAR should now write eleven (or whatever) WAV files where each WAV file is a four-bar clip in the specified audio format.
I got the following files. What did you get?
tt-RA_DYF_77_Abm_Bass_Gtr_Main (6)-5.wav
tt-RA_DYF_77_Abm_Gtr_Music_Combo_3 (7)-6.wav
tt-RA_DYF_77_Abm_Gtr_Music_Combo_Echo_2 (12)-11.wav
tt-RA_DYF_77_Abm_Guitar_Wah (8)-7.wav
tt-RA_DYF_77_Abm_Keys_Skank_Combo_2 (9)-8.wav
tt-RA_DYF_77_Abm_Melodica_Skank (10)-9.wav
tt-RA_DYF_77_Abm_Vox_2 (11)-10.wav
tt-RA_DYF_77_Full_Drum (2)-1.wav
tt-RA_DYF_77_Mixed_Perc_6 (3)-2.wav
tt-RA_DYF_77_Perc_Flexatone (4)-3.wav
tt-RA_DYF_77_Tops_2 (5)-4.wav
SONAR appended “tt” at the front of every file (clip) name. These names are way too long for the Teenage Engineering Sample Tool, so I renamed them to:
    dyf-bassAbm-77.wav  dyf-echoAbm-77.wav
    dyf-combAbm-77.wav  dyf-flex-77.wav
    dyf-drum-77.wav     dyf-keysAbm-77.wav
    dyf-meloAbm-77.wav  dyf-vox2Abm-77.wav
    dyf-perc-77.wav     dyf-wahAbm-77.wav
    dyf-tops-77.wav
I renamed the files using a short batch file. [Windows.] I found out — the hard way — that the EP Sample Tool likes sample names 16 characters or shorter. My names are 14 characters or less (excluding the “.wav” extension). The output files are much smaller: 540KB or roughly 6MB for all eleven files. That’ll fit!
I did the chop job with SONAR. Your DAW probably has similar features. [Note to self: try Ableton Live Intro.] The basic procedure is:
- Create a new project and set its tempo.
- Import the audio stems (files) into time-aligned tracks.
- Tweak the tempo to improve alignment.
- Set loop points, listen and adjust.
- Select the loop regions.
- Trim and/or split to isolate the regions across all tracks.
- Export the isolated regions to individual WAV files.
I suggest studying DAW features to select, trim and export audio stems en masse. It took reading, trial and error to get things going in SONAR.
By the way, I’ve tried editing and trimming audio files individually to produce fixed-length loops (i.e., all loops have the same length (N samples)). The above method is much faster and less labor-intensive because you can operate on multiple stems/loops in one swack.
The final step is to import the loop files into the EP-40 ecosphere. Connect an EP-40 to your computer and fire up the Teenage Engineering Sample Tool in your web browser. (The browser must support Web MIDI.) If you get an alert box saying “teenage.engineering wants to control and reprogram your MIDI device”, click the Allow button. The app searches for your EP-40 (make sure it’s ON!) and displays the familiar tabbed directory of its samples.
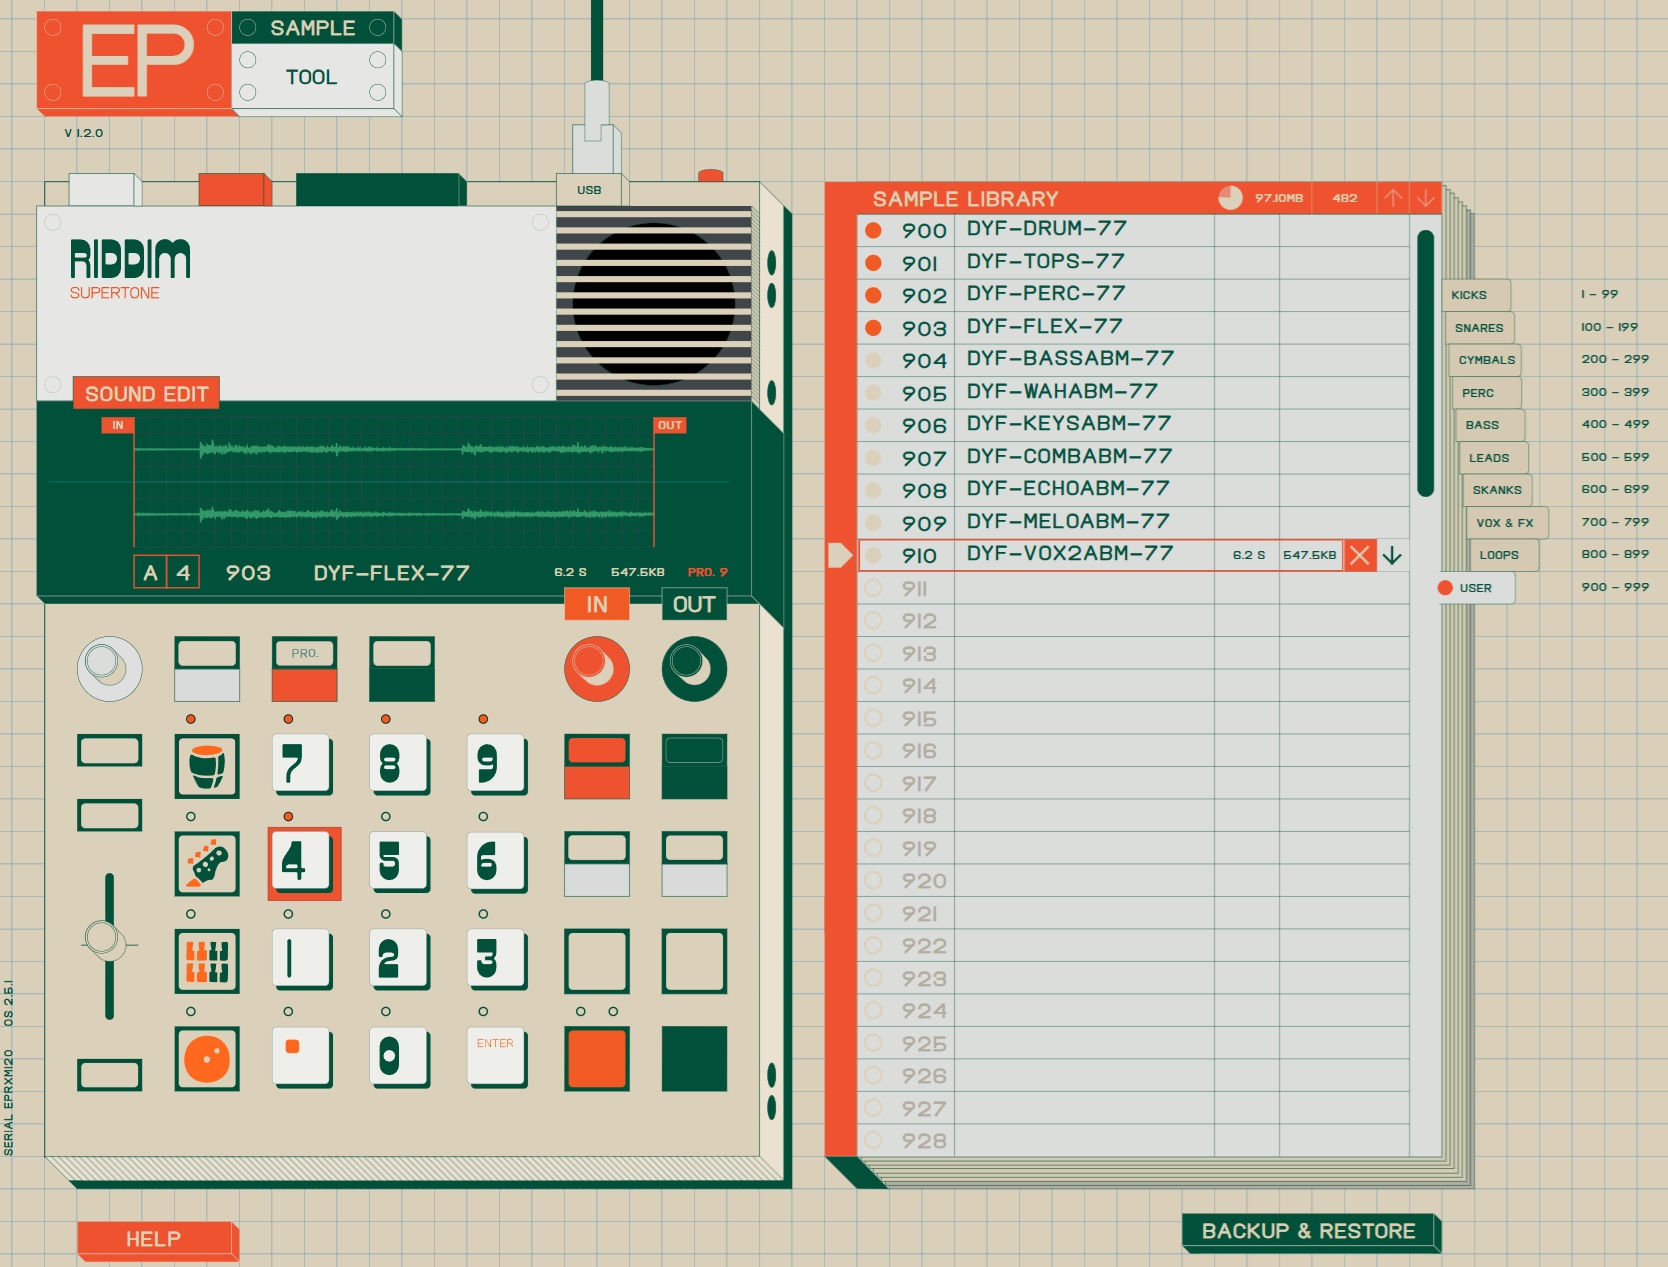
Dub Yard Funk on board the EP-40
Now it’s time to drag the clip WAV files to the EP-40. Once the sample files are in the directory, you can assign each sample to a pad by dragging it from the directory to a pad. You will need to get into Sound Edit and set the pad play mode to one-shot, key, legato or loop. [See my EP-40 PDF cheat sheets.]
Give it a try! Dubmatix taster packs are good for learning and practice. Be sure to buy the full packs and keep Dubmatix mixing!
Copyright © 2026 Paul J. Drongowski