
There’s nothing like the visceral thrill of pulling out all of the stops on a 60s combo organ and shrieking away! If you own one of these vintage keyboards, you also know the agony and the sorrow of old, failing electronics.
When I was a teenager, I always wished for a Vox Continental or Jaguar with that really cool Z-shaped chrome stand. The Continental was waaay out of my price range; I earned my keep by mopping floors in a donut shop and kitchen. The more modestly priced Jaguar came too late. Instead, I had a low-end, Farfisa Mini Compact Deluxe and a flip-top SB-12 Ampeg bass amp. (The amp is worth far more than the organ today!)
One of my dreams is to recreate a combo organ which looks and sounds like a Vox Continental with innards based on reliable, modern components. A key goal is avoid the wiring nightmare of the old top-octave generator/divider implementations in order to improve overall reliability and to make assembly as easy as possible. My vision is to build a fiery red Tolex-covered chassis filled with a 49-key MIDI controller and low-cost tone generation circuitry. Low weight is also important as the wood chassis and chrome stand will be pretty heavy by themselves.
This page describes an Arduino- and sample-based prototype of the tone generator. The hardware consists of an Arduino UNO (about $30USD) and a Narbotic Instruments MidiVOX shield (another $30). $60 total for the tone generator is a reasonable cost. The MidiVOX shield has a standard 5-pin MIDI input which is connected to a 37-key Roland SK-88Pro Sound Canvas controller. The shield provides a Microchips Technology MCP4921 12-bit digital-to-analog converter (DAC) which communicates with the Arduino through its Small Peripheral Interface (SPI) port. The MCP4921 is readily available and is used in other Arduino DAC/audio shields.
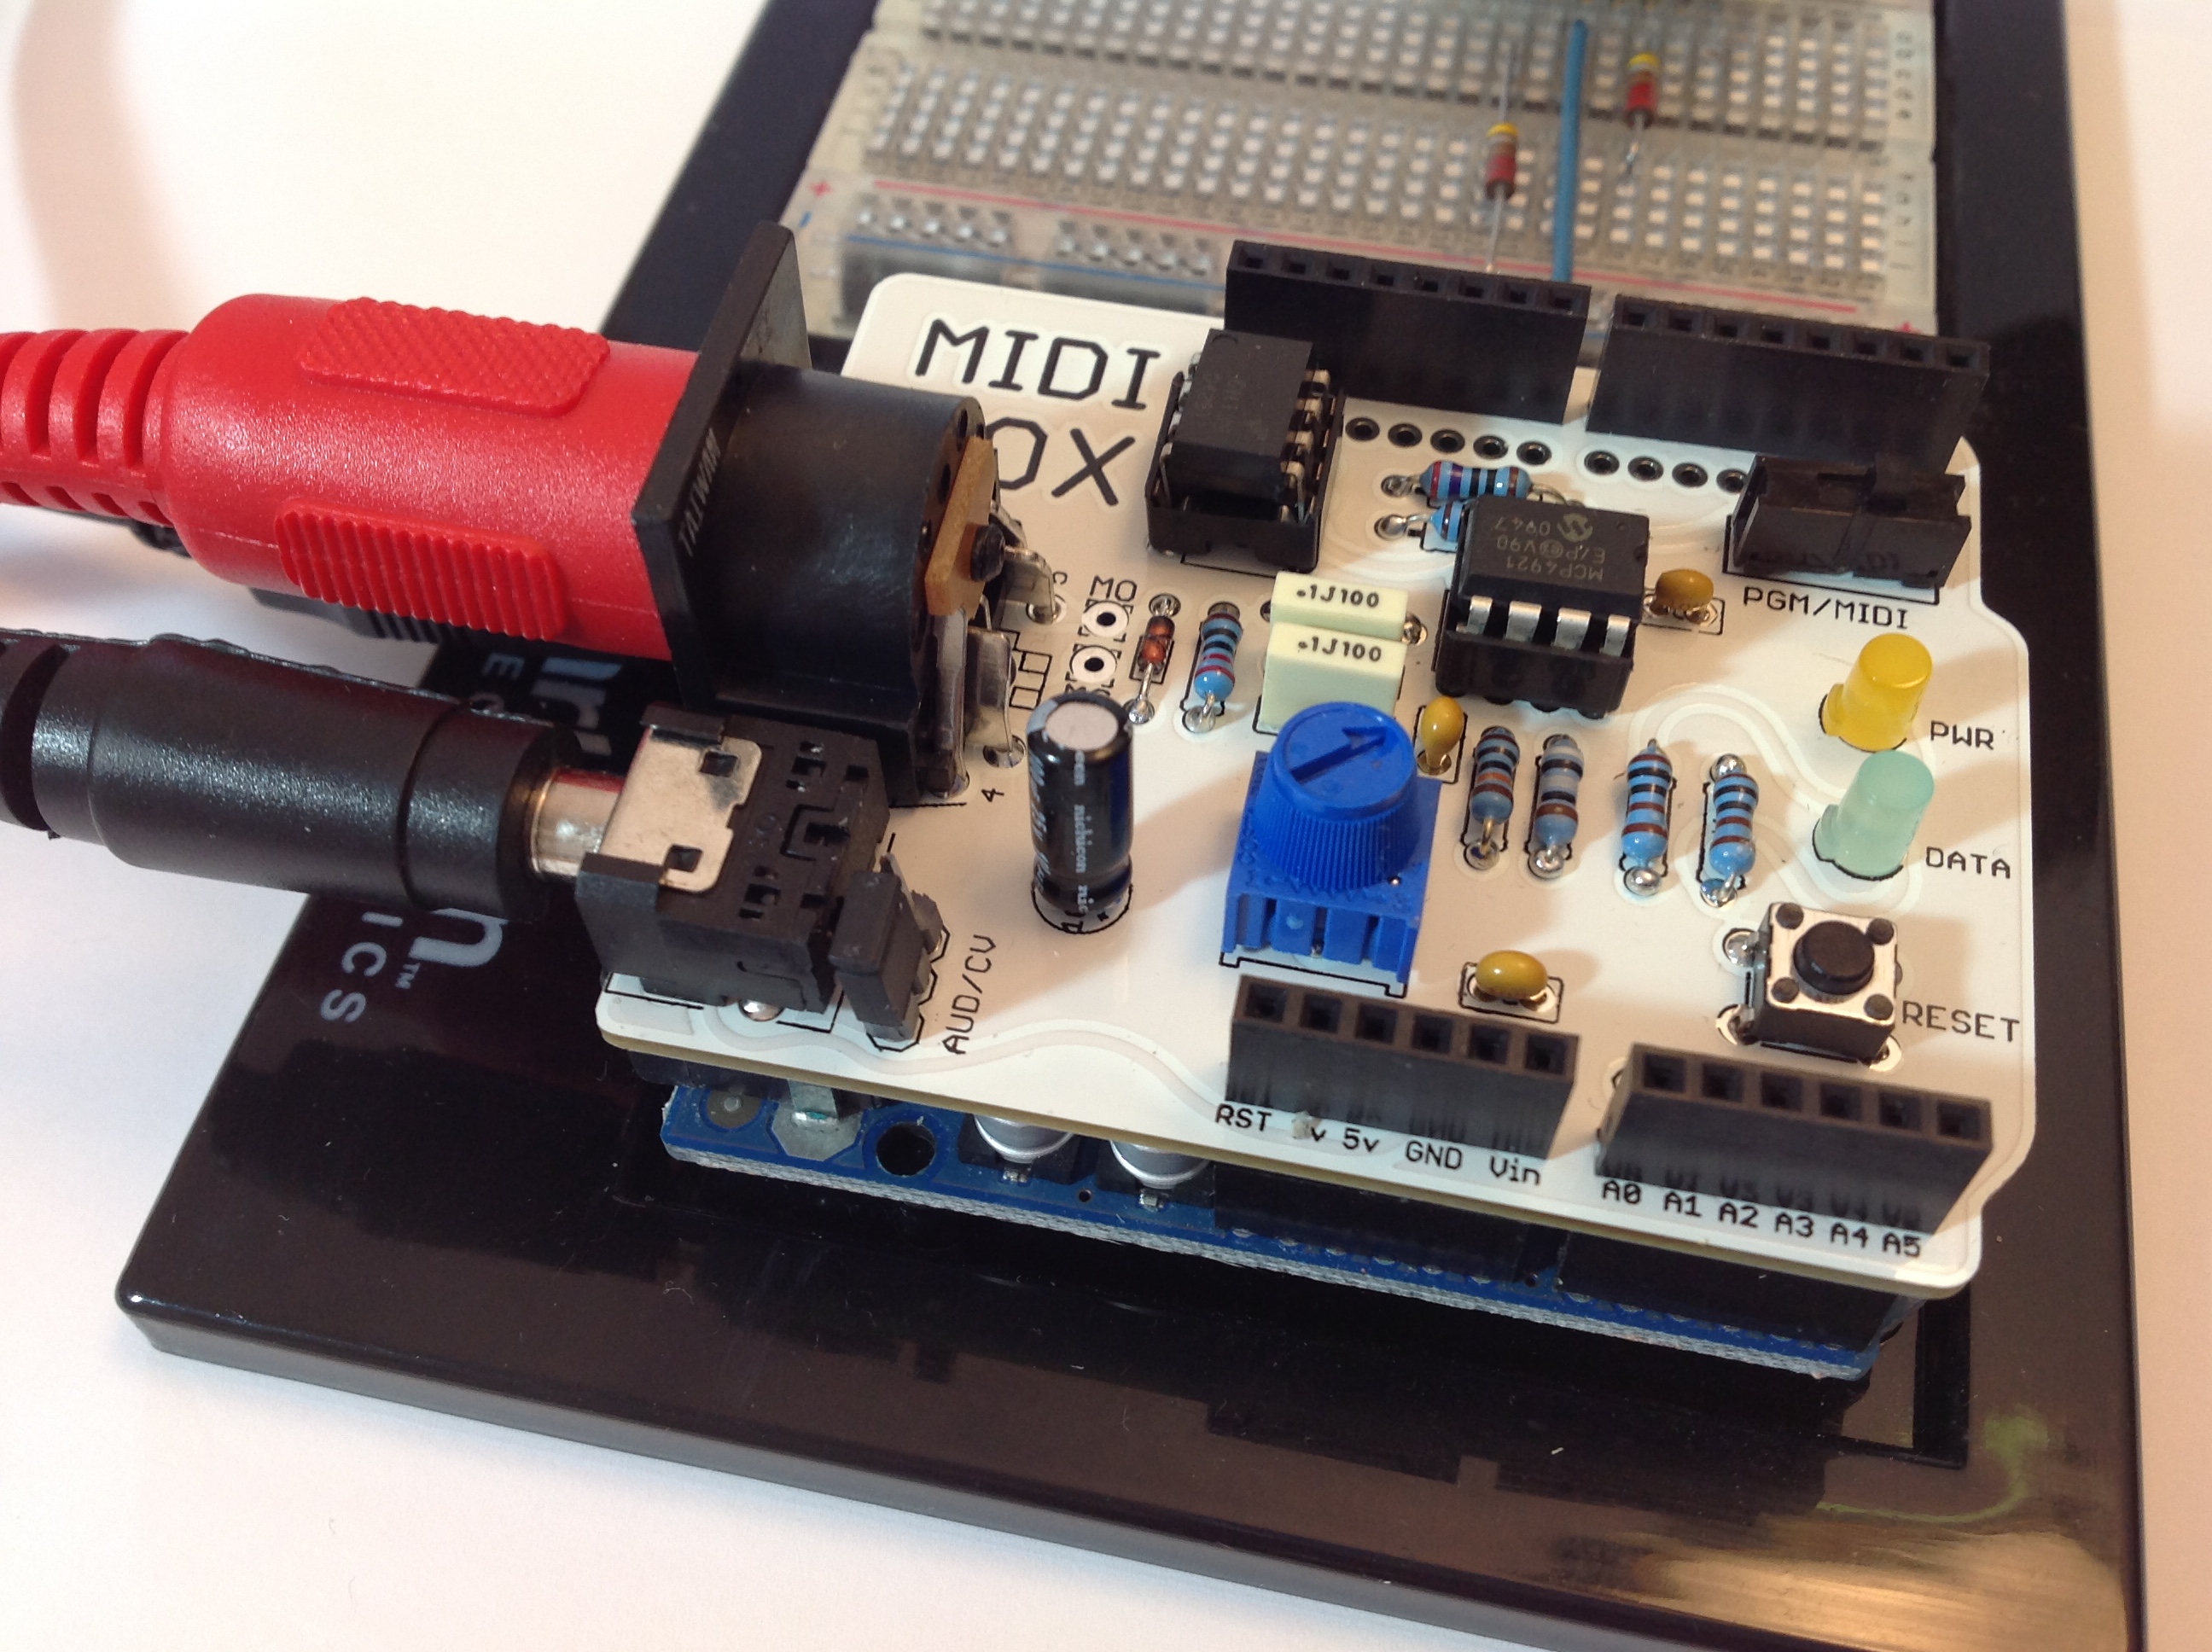
Unfortunately, the Narbotic Instruments MidiVOX shield is no longer made and sold. It is a dirt simple design, however, and should be easy to cobble together from parts. You can read more about the shield here and at the Narbotics web site.
The goal of this prototype is to see how hard I can push an Arduino for sample playback. The Arduino UNO is not a fast computer; the processor is a slow 16MHz Atmel ATMEGA328P. Not to keep you in suspense, the Arduino UNO can play reliably five separate notes at a 22,050Hz sample rate. This is enough to be dangerous when playing “House of the Rising Sun.”
The key insight
Most sample playback implementations use a form a direct digital synthesis (DDS) to pitch-shift samples in real time. DDS is not a light-weight computation. DDS maintains a phase accumulator for each tone and increments the phase accumulator by the pitch-appropriate phase increment with each sample clock tick. The accumulated phase is translated to a wavetable index and the sample value is read out from the wavetable. The accumulated phase usually falls between two wavetable entries, so interpolation is needed to compute an intermediate sample value. Floating point arithmetic is far too slow for real time and fixed-point arithmetic is usually performed instead. Overall, DDS puts a heavy load on a slow microcontroller like the Arduino and polyphony is low — very low.
The Arduino does not have a lot of computing mojo, but it does have a fair bit of program memory — 32KBytes — which is rarely filled to capacity. Sketches (i.e., Arduino programs) can store read-only data in program memory by compiling pre-initialized variables and arrays with the PROGMEM keyword. Thus, it makes sense to trade space (PROGMEM bytes) for compute cycles.
The main drawback of DDS is all of the arithmetic associated with non-integer phase accumulation and phase increments. The non-integer phase values and arithmetic arise from pitch-shifting a single organ waveform from its base pitch. The approach taken in this prototype stores twelve organ waveforms, one waveform for each of the twelve fundamental musical tones. The tone generator steps through each waveform using integer phase increments: 1, 2, 4, 8, and 16. When the phase increment is one, the waveform is played back at its fundamental pitch. When the phase increment is two, the waveform plays back at twice its fundamental pitch because the phase accumulates twice as fast. And, so on. We can cover the four octave range of the combo organ using these five integer phase increments.
Waveforms
A waveform is stored as an array of 16-bit signed samples. The samples were recorded at 20,050Hz. I recognized early on that 44,100Hz is too aggressive to achieve much polyphony. Plus, combo organs are not exactly “hi-fi” and grunge can only add to their sonic character.
Each of the twelve waveforms is a single audio cycle. The default loop start and end points are the first and last samples in the waveform array. When playback reaches the end of a waveform, it repeats (loops) around.
The fundamental, root pitch of each waveform is the lowest keyboard pitch to be played. Those who are familiar with the top octave generator/divider approach might be surprised as the taken approach is more like “bottom octave generator/multiplier.” Bottom octave is desirable because the lowest keyboard pitch for a musical tone has the most individual samples per waveform. The lowest keyboard pitch plays back at maximum audio resolution at the 20,050Hz sampling rate. When the phase increment is two, playback skips through the waveform array with a stride of two. This halves the audio resolution. When the phase increment is 16, the stride is 16 and the audio resolution is lowest. Thus, it makes sense to record and store the lowest musical tones, then “under sample.”
A twelve tone set of waveforms occupies 20% of program memory (PROGMEM). The tone generation and control code requires 10% of program memory. I recorded two sets of combo organ waveforms: a Vox-type waveform and a Farfisa-type waveform. Both types are “all stops out:”
- The Farfisa-type is all tabs down: all timbres and footages.
- The Vox-type is all drawbars out: all footages (including mixture) and both the flute and sawtooth drawbars.
No subtlety here! Overall, the prototype uses 50% of available program memory. I could add two more sets of waveforms without running out of capacity.
Playback
Sample playback is conceived as five generators. Each generator is controlled by six variables:
- generating: Generator status (enabled or disabled)
- genNote: MIDI note number of generated tone
- index: Current index into the wavetable
- numOfSamples: Number of samples in the wavetable
- stepSize: One of 1, 2, 4, 8 or 16
- sampleArray: Pointer to the wavetable
The generator variables are stored in six arrays which are indexed by generator number.
Playback is driven by timer interrupts. Arduino TIMER1 is a 16-bit timer. It is configured to generate an interrupt at an approximate 22,050Hz rate. Sample playback is performed in the interrupt handler for TIMER1. When an interrupt is taken, each enabled generator:
- Reads a sample from the appropriate wavetable.
- Adds the scaled sample to an accumulator (dacValue).
- Adds the step to the index.
- Checks the new index value and performs wrap-around if required.
After all five generators have produced and accumulated a scaled sample value, the final accumulated value (dacValue) is written to the DAC via SPI. Sample values must be scaled in order to avoid clipping and distortion.
Code is tuned for time-critical and non time-critical operation. Non-critical operation like initialization of generator variables uses a loop and variable index to access generator parameters. In this case, loop overhead is not detrimental to performance. Loops are unrolled in time-critical code. The unrolled loop code uses hard-coded, numeric constants as array indices instead of indexing by the loop variable (the infamous “i“). Presumably, the compiler emits efficient direct addresses for memory read or write operations from/to generator variables. (This needs to be verified.)
Here are links to the source code files for the sketch.
| Farf.h | Farfisa waveform arrays |
| Vox.h | Vox waveform arrays |
| Tables.h | Generator-related tables |
| ComboOrgan.ino | Interrupt handling, setup and loop code |
MIDI
MIDI communication and message parsing is performed by the standard Arduino MIDI library. Be sure to download and install the latest version of the library (at least version 4.2). The standard library is worth its weight in gold as interpretation of a live, real world MIDI message stream is not trivial.
The sketch registers a MIDI note on handler (handleNoteOn()) and a MIDI note off handler (handleNoteOff()). The note on handler scans the generators looking for an idle generator. If and when it finds an idle generator, it configures the generator to play back the desired MIDI note. If all generators are busy, the incoming note is dropped on the floor. Note stealing is not performed.
The note off handler scans the generators looking for the generator producing the note specified by the note off message. If and when it finds the associated generator, it disables the generator and makes it available.
The main sketch loop is very simple. It calls the MIDI library read() function to read and parse incoming MIDI messages. The rest of the sketch loop tests the MidiVOX reset button and turns off all generators when the button is pressed. The reset capability is very handy during stress testing and debugging! The button could be programmed to change between Farfisa and Vox waveforms, among other possible uses.
Vibrato (and demo)
Vibrato (LFO modulated pitch) is a big part of the 60s organ sound. The current prototype does not implement vibrato. I believe that vibrato can be implemented by slowly speeding up and slowing down the sample playback rate. I hope to try this design in the future. In the meantime, the combo organ prototype works and is reliably solid. Thus, it makes sense to publish the current code as a baseline implementation.
One way to modify the sound, naturally, is off-board electronics. Behringer make the UV300 Ultra Vibrato guitar pedal. I stumbled across this inexpensive ($25USD) pedal while experimenting with vibrato and tremolo circuits. The UV300 has knobs for vibrato speed and depth. It sounds quite good and clean for such an inexpensive pedal, so why not?
Here are two short MP3 demo files. (Name that tune.) The first file is the Farfisa-type wave in action. The second file is the Vox-type wave. The Vox sound is brighter than the Farfisa due to the mixture footages. In both examples, I kick in the UV300 vibrato part way through the demo.
Future prospects
The “bottom octave generator” successfully achieves five note polyphony with a 20,050Hz sampling rate. This technique could be applied to any synthesizer design, possibly a paraphonic synthesizer with a common analog filter and envelope generator. I recommend giving it a try in your own design. It really saves a lot of computation and design complexity over full DDS.
Update 22 July 2016: If you’re into retro, be sure to check out the Arduino lo-fi beat box project. Filled with lo-fi TR-808 goodness!