Recall that our goal is to create a Yamaha Genos™ custom voice with an overlapping split zone between upper and lower instruments. The first step started with factory preset voices to build a split voice using Yamaha Expansion Manager (YEM). The second step used XML Notepad to change the high and low note limits. These steps are demonstrated in the third article in this tutorial series.
The next and final step in our project goes way beyond “extra credit.” The split voice that I created has hard cut-off points for the lower and upper voices. I wanted to take things further and produce a smooth blend across the key range where the upper and lower voices overlap. This problem proved to be more involved than I first thought! Solving this problem turned into a learning experience. 🙂
If you want to experiment on your own, download the ZIP file with the PPF file, UVF files and Java code (SplitVoices_v1.0.zip).
Many synthesis engines implement a form of key scaling in which a parameter (e.g., amplitude, filter cut-off frequency, etc.) changes across the notes of the keyboard. Key scaling allows subtle effects like making higher notes brighter than lower notes. Amplitude key scaling changes volume level across the keyboard. My plan is to use AWM2 amplitude key scaling to make a smooth cross-blend of the upper and lower split voices.
The example voice that we are creating consists of a bassoon in the left hand and two layered oboes in the right hand. I call this voice “2 Oboes & Bassoon” because it is very similar to an MOX patch that gets a lot of play. The table below summarizes the voice design.
| Element | Name | Note lo | Note hi | Vel lo | Vel hi | Pan |
|---|---|---|---|---|---|---|
| 1 | Oboe Hard v3 | G#2 | G8 | 101 | 127 | 0 |
| 2 | Oboe Med V3 | G#2 | G8 | 1 | 100 | 0 |
| 3 | Bassoon Med St R | C-2 | E3 | 1 | 100 | 0 |
| 4 | Bassoon Hard St R | C-2 | E3 | 101 | 127 | 0 |
| 5 | [V-645 El-1] | G#2 | G8 | 1 | 127 | 0 |
Sharp-eyed readers will notice that the velocity ranges are slightly different than the ranges in the third article. I found that the ranges used in the original MOX patch design made a more playable, easier to control voice.
At this point, I must caution the reader that I’m about to dive into the guts of an AWM2 voice. I assume that you’re familiar with AWM2 synthesis and its voice architecture. If not, I recommend reading the Yamaha Synthesizer Parameter Manual and the introductory sections about voice architecture in either the Montage, Motif or MOX reference manuals.
I suggest exploring a few Genos factory voices using XML Notepad or Notepad++ in order to see how the voices are structured and organized. Drill down into the XML voiceEelement entities. You will see several elementBank entities which are the individual key banks within the voice element.
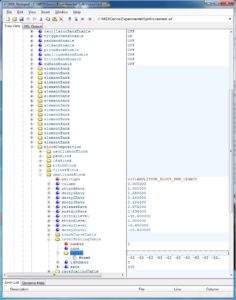
You should see a blockComposition entity, too. This entity has parameters for the oscillator, pan, LFO, pitch, filter and amplitude synthesis blocks. For our purposes, we need the amplitudeBlock because the amplitude key scaling table is located within this block. The table is located within the levelScalingTable entity. See the example screenshot below. [Click screenshots to enlarge.]
An amplitudeBlock may be located in either of two places within the XML tree:
- It may be part of the
blockCompositionbelonging to thevoiceEelement, or - It may be part of the
blockCompositionbelonging to eachelementBankentity.
In the first case, the parameter amplitudeBankEnable is OFF. In the second case, the the parameter amplitudeBankEnable is ON. Please remember this setting because it was a hard-won discovery. If it seems like the amplitude scaling is not taking effect, check amplitudeBankEnable and make sure it is consistent with the XML structure! The voice definition is flexible enough to allow block parameter specification at the voiceEelement level and, optionally, for each key bank at the elementBank level.
Knowledge of the XML structure is important here. I found that the bassoon voice elements defined the amplitudeBlock at the elementBank level. That meant an instance of the levelScalingTable for each of the seventeen (!) elementBank entities. Since the table contents are the same in every element bank, I did major surgery on the XML tree. I created a single amplitudeBlock at the voiceEelement level and deleted all of the amplitudeBlock entities at the element bank level. Fortunately, XML Notepad has tree cut and paste. I also set amplitudeBankEnable to OFF. (Eventually.)
Once the XML tree is in the desired form, it becomes a matter of setting each levelScalingTable to the appropriate values. A scaling table consists of 128 integer values between -127 and +127. It is stored as one long text string. Each value is the amplitude level offset associated with its corresponding MIDI note. MIDI note numbers run from 0 to 127.
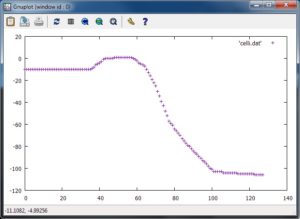
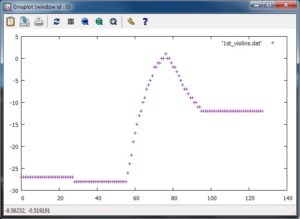
At first, I used the level scaling tables from the “SeattleStrings p” voice as source material. This voice is a nice blend of the five string sections: contrabass, celli, violas, second violins and first violins. Each level scaling table emphasizes its section in the blend. Here are two screen snaps plotting the level scaling tables for the celli and first violins.
Although I abandoned this approach, in retrospect, I think it’s viable. I abandoned ship before I understood the purpose of amplitudeBankEnable. Also, I had not yet developed enough confidence to shift the table up (or down) 12 values in order to compensate for the octave position of the waveforms.
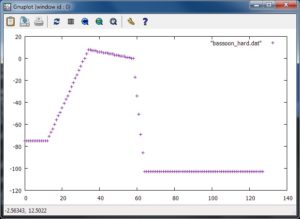
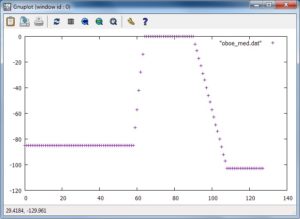
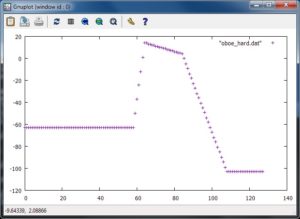
Instead, I decided to control the table contents and to make the tables myself. The MOX (Motif and Montage) define amplitude level scaling using four “break points.” Each break point consists of a MIDI note and level offset. The offset is added to the overall voice volume level and defines the desired level at the corresponding MIDI note. The offset (and resulting volume level) is interpolated between break points. (See the Yamaha Synthesizer Parameter Manual for details.) I wrote a Java program to generate a level scaling table given four break points. The program source code appears at the end of this article (bugs and all).
Here are the break points that I used. I took inspiration from the MOX break points for its “2 Oboes & Bassoon” patch.
                      BP1      BP2      BP3      BP4
                   --------  -------  -------  -------
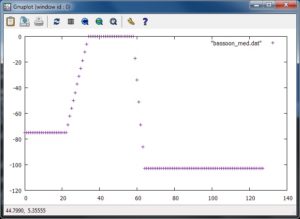
    Bassoon Med    A#-1 -75  A#0  +0  A#2  +0  E3 -103
    Bassoom Hard   C-1  -75  A#0  +8  A#2  +0  E3 -103
    Oboe Med       A#2  -85  E3   +0  F#5  +0  C7 -103
    Oboe Hard      A#2  -63  E3  +14  C5   +4  C7 -103
I ran the program for each set of break points, generating four tables. Table plots are shown below. [Click to enlarge.]
Each table file contains one long line of 128 integer values. In order to change a level scaling table, first open a table file with a text editor (e.g., notepad, emacs, etc.), select the entire line, and copy it to the clipboard. Then, using XML Notepad, navigate to the appropriate levelScalingTable in the XML and replace the content of the #text attribute with the line in the clipboard. Save the UVF (XML) voice file. Save early, save often.
Copy the UVF file to the correct YEM pack directory as demonstrated in the third article. It’s important to be careful at every step in the process because we are making changes directly to YEM’s internal database. We don’t want to introduce any errors into YEM’s pack representation and cause a malfunction that needs to be backed out. Be sure to keep plenty of back-up copies of your work just in case.
Fire up YEM, open the “2 Oboes & Bassoon” voice for editing, and test. Enable each voice element one at a time and play the keys in the overlapping zone. You should hear the instrument fade-in or fade-out as you play through the zone.
With the offsets given above, I needed to shift each of the tables either “up” (bassoon) or “down” (oboes) to get a better blend. If you take a little off the front of a table (say, 4 values) be sure to add the same number of values to the end of the table. The table must be 128 values in length.
The blending issue is best resolved up front by defining different break points. Of course, the table files must be regenerated, but this is a little bit safer than trimming and lengthening the tables in-place within the XML. Laziness has its advantages and dangers.
If you require background information about YEM, the first article in this series discusses Yamaha Expansion Manager. The second article covers XML Notepad and how it can be used to work around limitations in YEM. The third article, mentioned earlier, demonstrates creation of the basic “2 Oboes & Bassoon” voice.
There are a few other posts related to voice editing with YEM. Check out this short article about creating a PSR/Tyros Mega Voice using YEM. Take a peek at the article about the design and implementation of my jazz scat voices. Then, download the scat expansion pack for PSR-S770/S970 and Tyros 5, import it into YEM, and take things apart.
One final note, I produced the plots shown in this article with the GNU open source GNUPLOT package. Visualization is essential to getting things right. There are other tools to visualize level scaling tables such as spreadsheet charting.
Copyright © 2018 Paul J. Drongowski
Source code: GenScalingTable.java
//
// GenScalingTable: Generate level scaling table from break points
//

import java.io.* ;

/*
 * Author:   P.J. Drongowski
 * Web site: http://sandsoftwaresound.net/
 * Version:  1.0
 * Date:     15 February 2018
 *
 * Copyright (c) 2018 Paul J. Drongowski
 *               Permission granted to modify and distribute
 *
 * The program reads a file named "breakpoints.txt" and generates
 * a Yamaha  * amplitude level scaling table. The table is written
 * to standard out. The table is one long string (line) containing
 * 128 integer values ranging from -127 to +128.
 *
 * The breakpoint file contains four break points, one break point
 * per line. A breakpoint is a MIDI note name and an offset.
 * Collectively, the break points form a curve that controls
 * how the Genos (synth) voice level varies across the MIDI note
 * range (from 0 to 127). The curve extends to MIDI notes C-2
 * and G8.
 *
 * Exampe "breakpoints.txt" file:
 * A#2 -85
 * E3 +0
 * F#5 +0
 * C7 -103
 *
 * The file syntax is somewhat brittle: use only a single space
 * character to separate fields and do not leave extraneous
 * blank lines at the end of the file.
 */

public class GenScalingTable {
    static String[] bpNotes = new String[4] ;
    static int[] bpOffsets = new int[4] ;
    static int[] bpNumber = new int[4] ;
    final static boolean debug_flag = false ;

    final static String[] noteNames = {
	"C-2","C#-2","D-2","D#-2","E-2","F-2","F#-2","G-2","G#-2","A-2","A#-2","B-2",
	"C-1","C#-1","D-1","D#-1","E-1","F-1","F#-1","G-1","G#-1","A-1","A#-1","B-1",
	"C0","C#0","D0","D#0","E0","F0","F#0","G0","G#0","A0","A#0","B0",
	"C1","C#1","D1","D#1","E1","F1","F#1","G1","G#1","A1","A#1","B1",
	"C2","C#2","D2","D#2","E2","F2","F#2","G2","G#2","A2","A#2","B2",
	"C3","C#3","D3","D#3","E3","F3","F#3","G3","G#3","A3","A#3","B3",
	"C4","C#4","D4","D#4","E4","F4","F#4","G4","G#4","A4","A#4","B4",
	"C5","C#5","D5","D#5","E5","F5","F#5","G5","G#5","A5","A#5","B5",
	"C6","C#6","D6","D#6","E6","F6","F#6","G6","G#6","A6","A#6","B6",
	"C7","C#7","D7","D#7","E7","F7","F#7","G7","G#7","A7","A#7","B7",
	"C8","C#8","D8","D#8","E8","F8","F#8","G8"
    } ;

    public static int findNoteName(String note) {
	for (int i = 0 ; i < noteNames.length ; i++) {
	    if (note.equals(noteNames[i])) return( i ) ;
	}
	System.err.println("Unknown note name: '" + note + "'") ;
	return( 0 ) ;
    }

    // Put scaling values for a segment of the scaling "graph"
    public static void putTableValues(int startNote, int startOffset,
				      int endNote, int endOffset) {
	// Don't put any values if (startNote == endNote)
	if (startNote != endNote) {
	    int numberOfValues = Math.abs(endNote - startNote) ;
	    double foffset = (double) startOffset ;
	    double difference = (double)(endOffset - startOffset) ;
	    double delta = difference / (double)numberOfValues ;
	    for (int i = 0 ; i < numberOfValues ; i++) {
		System.out.print(Math.round(foffset) + " ") ;
		foffset = foffset + delta ;
	    }
	}
    }

    public static void main(String argv[]) {
	int bpIndex = 0 ;

	// Read break points (note+offset), one per line
        try {
	    FileInputStream fstream = new FileInputStream("breakpoints.txt") ;
	    DataInputStream in = new DataInputStream(fstream) ;
	    BufferedReader br = new BufferedReader(new InputStreamReader(in)) ;
	    String strLine ;
	    while ((strLine = br.readLine()) != null) {
		String[] tokens = strLine.split(" ") ;
		if (bpIndex < 4) {
		    bpNotes[bpIndex] = tokens[0] ;
		    bpOffsets[bpIndex] = Integer.parseInt(tokens[1]) ;
		    bpNumber[bpIndex] = findNoteName(tokens[0]) ;
		    bpIndex = bpIndex + 1 ;
		}
	    }
	    in.close() ;
	} catch (Exception e) {
	    System.err.println("Error: " + e.getMessage()) ;
            e.printStackTrace() ;
        }

	// Display the break point values
	if (debug_flag) {
	    for (int i = 0 ; i < 4 ; i++) {
		System.err.println(bpNotes[i] + " " + bpNumber[i]
				   + " " + bpOffsets[i]) ;
	    }
	}

	// Generate the key scaling table to the standard output
	putTableValues(0, bpOffsets[0], bpNumber[0], bpOffsets[0]) ;
	putTableValues(bpNumber[0], bpOffsets[0], bpNumber[1], bpOffsets[1]) ;
	putTableValues(bpNumber[1], bpOffsets[1], bpNumber[2], bpOffsets[2]) ;
	putTableValues(bpNumber[2], bpOffsets[2], bpNumber[3], bpOffsets[3]) ;
	putTableValues(bpNumber[3], bpOffsets[3], 128, bpOffsets[3]) ;
    }
}

