
Here is the design of my first project with littleBits Arduino. I wanted to pull together a quick audio project to check out the littleBits modules and to hear some square waves through the littleBits synth speaker. Pretty much, I wanted to test the Arduino as a simple note sequencer and oscillator (tone source).
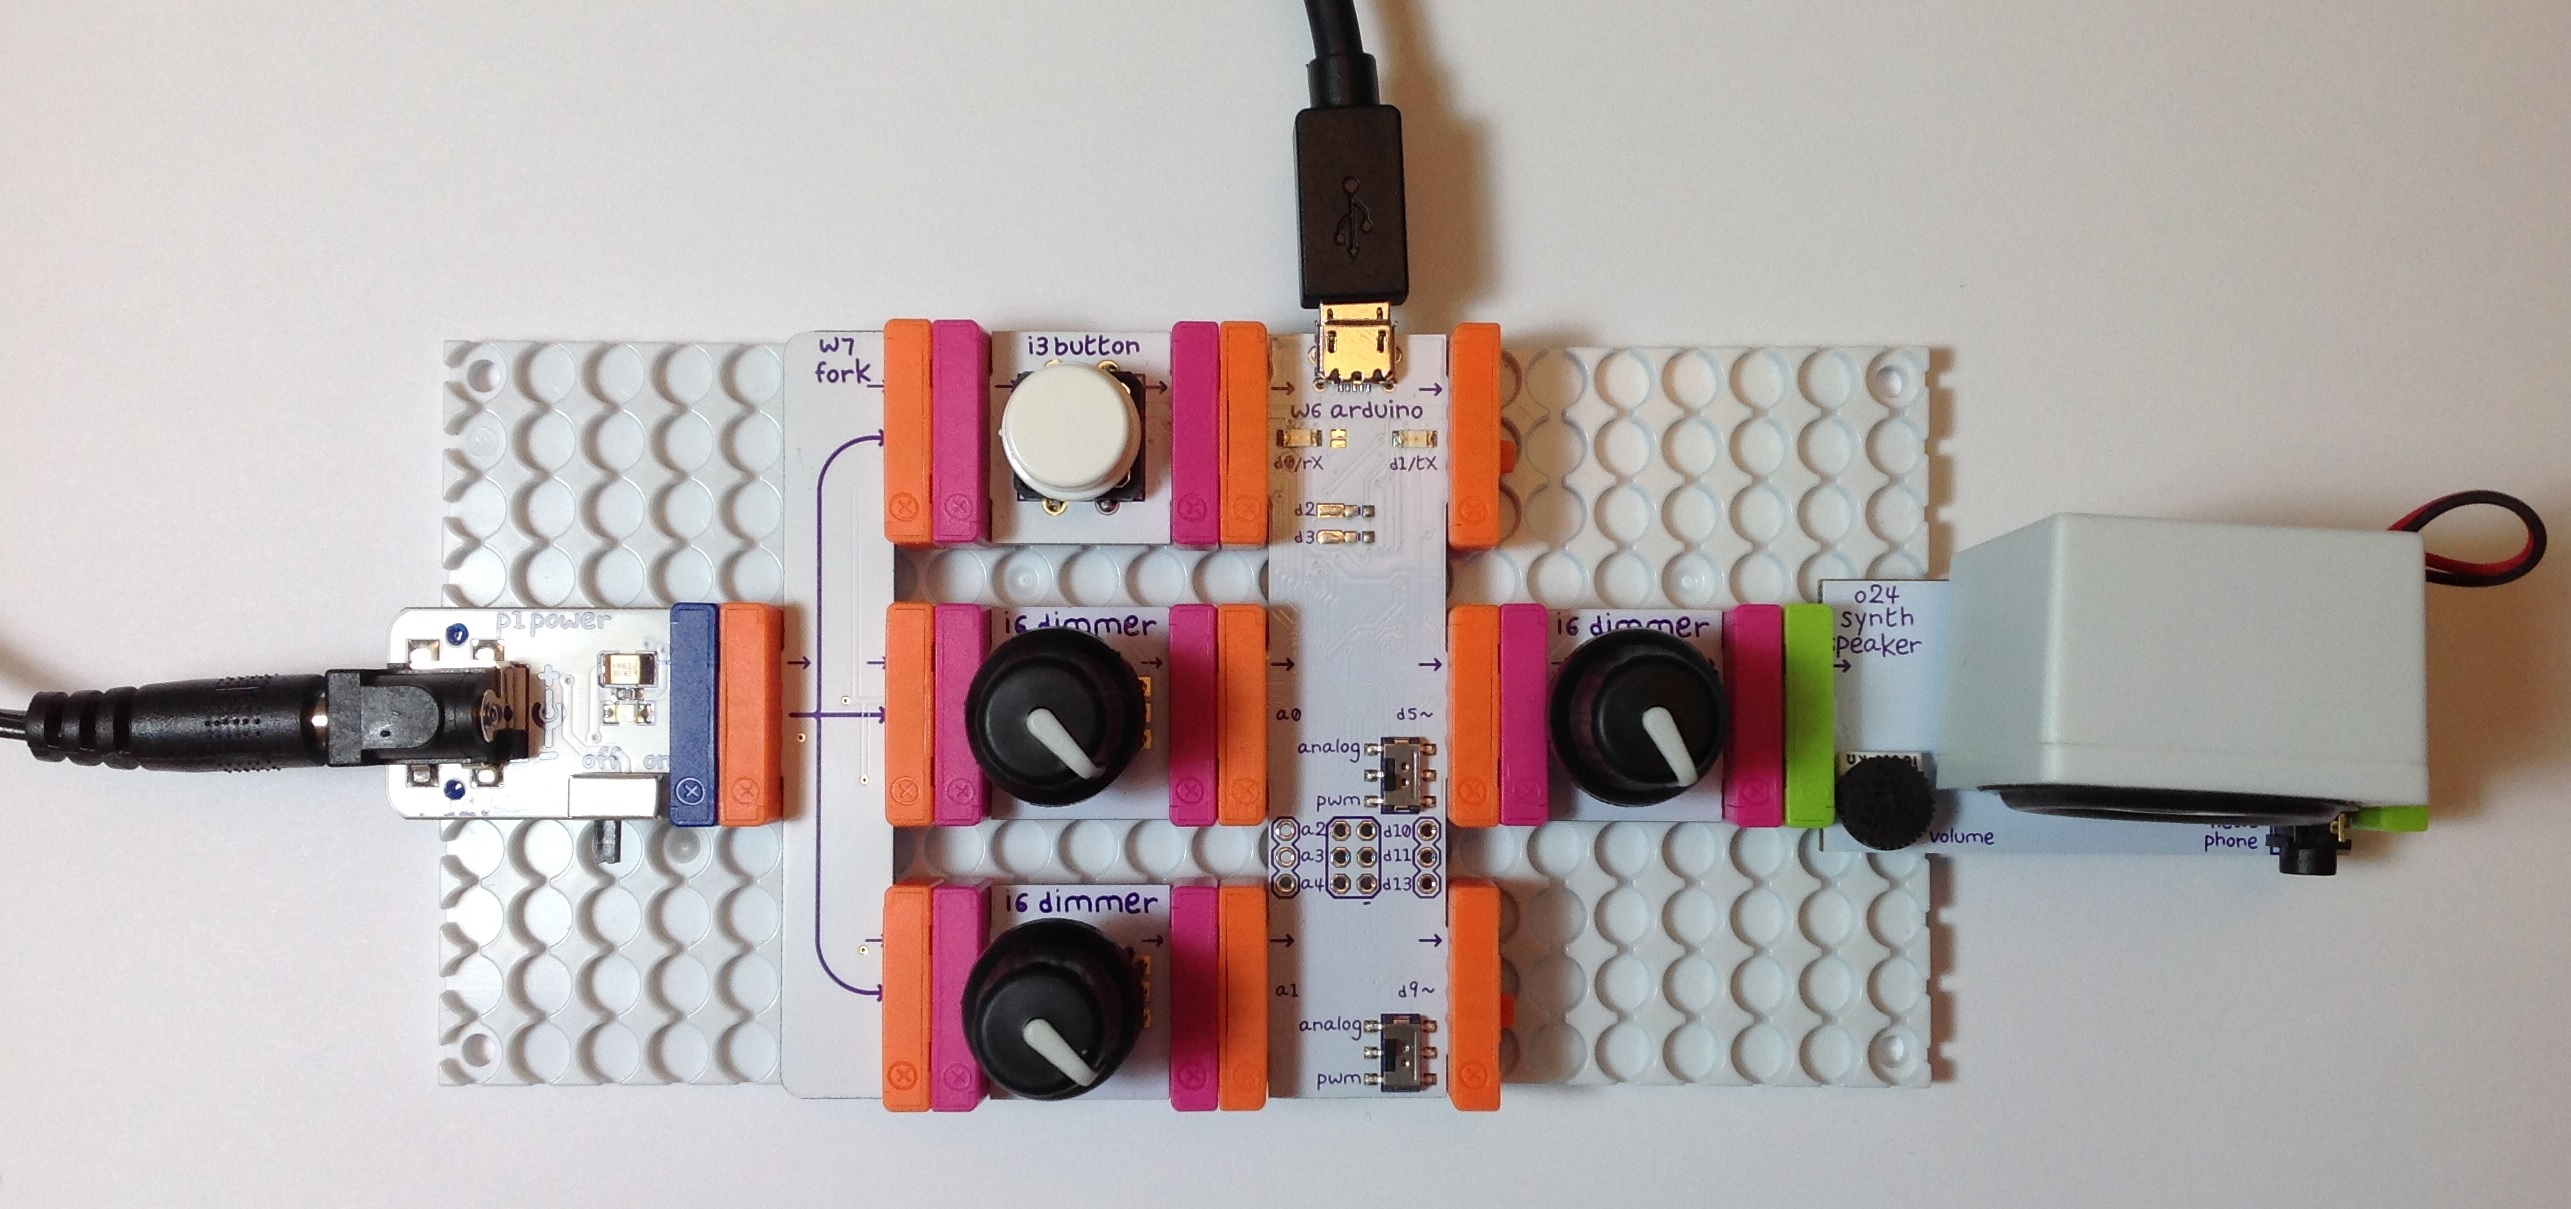
The picture below shows the littleBits circuit. The circuit is a fairly conventional Arduino configuration. (Click on the image for full resolution.)
- Power and fork modules on the left to provide power.
- A few input ‘Bits to control the Arduino — in this case, one button and two dimmers.
- The littleBits Arduino module in the middle.
- A synth speaker connected to one of the Arduino outputs (pin D5) through a dimmer volume control.
The synth speaker volume pot is max’ed out all the way (cranked all the way to the right). The dimmer provides a hand-friendly volume control. All of the dimmers are dressed up with plastic knobs, by the way.
The fastest way to play musical notes is to use the Arduino tone() function. This function generates a square wave (50% duty cycle) on an output pin. The first argument specifies the pin:
tone(pin, frequency)
and the second argument specifies the frequency (an unsigned int which gives the frequency in Hertz). There is an alternative version of the function that takes a third parameter (the duration in milliseconds), but I didn’t use that form of the function. My sketch takes care of duration.
The program, ToneTest.ino, includes two files:
- ToneFreq.h: Defines symbolic constants for the notes in the standard equal-temper scale and defines an array,
noteFrequencies[], that is a table of tones in the standard scale. - ToneNote.h: Defines standard note durations (e.g., SIXTEENTH, EIGHTH, QUARTER, etc.) given in milliseconds.
The second include file, ToneNote.h, uses the symbol TEMPO to compute the length of the standard durations. The symbol TEMPO must be defined in the main program before using one of the standard note durations in a musical sequence.
The first declaration defines Arduino pin 5 (D5) as the pin for tone generation:
int tonePin = 5 ;
The next three declarations define variables that control tone generation:
    int noteIndex = 0 ;
    int note = 0 ;
    int duration = 0 ;
The variable noteIndex is an index into the sequence[] array. It points to the current note which is playing. The variable note is the frequency of the current note. The variable duration counts down the number of delay ticks remaining in the current note.
The next set of defines and declarations specify the data which drive sequencing and note generation.
    #define TEMPO   (90)
    #define REST    -1
    #define SEQUENCE 18
    int sequence[SEQUENCE][2] = {
      NOTE_As2, EIGHTH,
      REST,     SIXTEENTH,
      NOTE_Gs3, SIXTEENTH,
      REST,     EIGHTH,
      NOTE_As3, EIGHTH,
      REST,     EIGHTH,
      NOTE_C3,  EIGHTH,
      NOTE_Cs3, EIGHTH,
      NOTE_D3,  EIGHTH,
      NOTE_Ds3, EIGHTH,
      REST,     SIXTEENTH,
      NOTE_As3, SIXTEENTH,
      REST,     EIGHTH,
      NOTE_Cs4, EIGHTH,
      REST,     EIGHTH,
      NOTE_G2,  EIGHTH,
      NOTE_Gs2, EIGHTH,
      NOTE_A2,  EIGHTH
    } ;
First, I define the TEMPO at 90 beats per minute (BPM). REST is a sentinel value in the sequencing data that denotes a musical rest. No sound is generated during a rest. SEQUENCE is the number of notes and rests in the musical sequence to be looped and performed. Finally, I declare a two dimensional array, sequence[] and the musical performance to be initialized into the array.
The setup() function:
    void setup() {
      // Start playing the first note in the sequence
      // This note could be a pick-up!
      noteIndex = 15 ;
      note = sequence[noteIndex][0] ;
      duration = sequence[noteIndex][1] ;
      if (note != REST) {
        tone(tonePin, note) ;
      }
    }
initializes the variables that control note sequencing and generation. I could have started with the first note in sequence[] at index 0, but chose to start with a few pick-up notes beginning at index 15. I read the note frequency and duration from sequence[]. The first column in the array contains note frequencies and the second column contains durations. If the note is not a musical rest, then I play the note using tone().
The sketch’s loop() function has five responsibilities:
- To delay execution for one millisecond.
- To decrement the duration remaining.
- To detect an expired note and stop tone generation.
- To select the next note to be played.
- To start playing the next note.
The loop() function does this over and over again. It steps through the sequence[] array and goes back to the beginning when it reaches the end of the array. Thus, the function literally loops the sequence!
Here is the code for loop().
    void loop() {
      delay(1) ;
      duration-- ;
      if (duration <= 0) {
        // Current note has expired.
        noTone(tonePin) ;
        // Find the next note to be played
        if (noteIndex >= (SEQUENCE-1)) {
            noteIndex = 0 ;
        } else {
            noteIndex += 1 ;
        }
        note = sequence[noteIndex][0] ;
        duration = sequence[noteIndex][1] ;
        // Start playing the next note
        if (note != REST) {
          tone(tonePin, note) ;
        }
      }
    }
The statements correspond pretty well to the respnsibilities that we assigned to the function.
Try running the example with pin D5’s switch in the “analog” position and in the “pwm” position. The switch enables (analog) and disables (pwm) low pass filtering on the pin. The “analog” position should sound quiet and mellow because the low pass filtering is attenuating (decreasing) some of the frequency content in the audio signal. The “pwm” position should sound loud and harsh because it has all of the harmonic nasties in the square wave (50% duty cycle).
If you have the littleBits envelope, filter and delay modules, try putting them in the audio signal chain before the dimmer and the synth speaker. Tweak away and have fun!
Here are links to the source code just in case you missed them the first time through:
ToneTest.ino: Main sketch
ToneFreq.h: Note frequencies
ToneNote.h: Note durations
Update 16 June 2016: Due to hardware/software limitations, the Arduino tone() function may not play frequencies below NOTE_B2 (123 Hz) correctly.
Update: 28 June 2016. If you enjoyed this project and have the littleBits Synth Kit, then check out an expanded version of the tone sequencer which drives the filter and envelope modules.
Copyright © 2016 Paul J. Drongowski