Smart Pianist: Sheet music tutorial

Whew! We’ve come a long way on our trip through the Yamaha Smart Pianist™ app. So far, I’ve covered three ways to play along with your favorite music:

Today I’m going to discuss another way: playing along with PDF sheet music.

And, guess what? I finally found and tried “Backing Conductor“!

PDF scores

Interpreting PDF sheet music is a really cool capability and learning aid. However, you need to keep in mind that Smart Pianist is a work in progress. There are gaps and limitations. I’ll mention these issues as I go along.

The biggest limitation — Smart Pianist does not handle scanned sheet music. Yamaha is upfront about this limitation. So, if you’re hoping to use your own scanned sheets, forget about it.

Yamaha recommends “commercially available PDF scores.” Unfortunately, this description is pretty vague and hard to apply in practice, that is, when you’re buying a sheet music PDF from an on-line site. Quoting the Smart Pianist manual:

“Commercially available PDF score” refers to score data that is sold commercially as data in PDF format. It does not include data such as scanned or photographed printed scores that have been saved in PDF format.

In some cases, you may not be able to playback the corresponding Song even if you import a commercially available PDF score. For these cases, the playback button will not be shown. Even when you can playback the corresponding Song, the playback may not match that of the PDF score.

Give Yamaha credit for transparency; they are quite aware of SP’s current limitations.

So, I did some experiments. I did a lot of experiments. I had the best luck with true piano scores having at least right- and left-hand parts. I buy most of my sheet music from Sheet Music Direct (SMD). Their service is good although their PDFs are price-y. [Wait for a sale or subscribe to PASS in order to save money.] In SMD’s terminology, you should look for the following kinds of arrangements:

  • Piano, Vocal & Guitar Chords (Right-Hand Melody)
  • Piano, Vocal & Guitar Chords
  • Piano Solo
  • Piano & Vocal
  • Easy Piano
  • Very Easy Piano

Uh, yeah, you get the idea. Avoid guitar TAB, guitar chords/lyrics, lead sheet/fake book, and Real Book.

Skirting Real Book is a major bummer because I like Hal Leonard’s Real Book series (e.g., Real Rock Book, Real Pop Book, Real R&B Book, etc.) The Real Book lead sheets are scanned.

Here’s the sixty-four dollar question, “How do I know if a PDF contains scanned music?” If the notation or text obviously looks hand-drawn or furry, it’s a scan. High resolution scans can fool you. I inadvertently purchased a scanned version of Pink Floyd’s “Us and Them”, for example.

If you can, magnify a PDF page 600 percent. If the text and notation look smooth, you should be good. If you see jaggies, small gaps or fuzz, pass it by. Not all on-line sheet music retailers support zoom capability, which is how I got fooled.

I would avoid lead sheets in general even if they are not scanned. Usually, Smart Pianist will play the melody and will not play the chords. At this point in time, I believe Smart Pianist needs a full right- and left-hand arrangement for chord analysis. SP doesn’t seem to interpret chord symbols above the staves. I hope Yamaha is working on this problem; it would be totally cool to drive auto-accompaniment from the chord symbols alone.

Let’s get playing

Assuming that we have a suitable sheet music PDF, let’s get going. PDF songs are stored in the “User Songs” category. Tap the four-leaf clover icon at the top of the screen and go to the top-level menu. Tap the big Song button in the top-level menu. [Click images to enlarge.]

Select a sheet music PDF song

Smart Pianist displays the now-familiar song selection page. Tap “User Songs” and scroll to the song that you want to load. In this case, I’m using a PDF for Carole King’s “It’s Too Late”. Tap the PDF song and hit the Done button in the upper right corner of the screen.

Tap the Import icon at the top of the screen to import a PDF into the “User Songs” directory. Tap the Edit icon if you want to select a PDF song from “User Songs”.

Score display for “It’s Too Late” PDF

SP analyzes the sheet music PDF and then displays the sheet music score. SP displays a minimized control panel at the top of the screen. You have instant access to seven functions:

  • Clover icon: Tap to go to the top-level menu
  • Song name: Tap to return to song selection
  • Record button: Record your performance
  • Play button: Play the sheet music score
  • Metronome button: Start/stop the metronome
  • A-B button: Loop a portion of the score
  • Guide button: Turn on the Guide function

Tap the triple-dot icon to see even more options!

Full size sheet music control panel

Tap the triple-dot and SP displays a much bigger control panel. You get the functions that I just mentioned plus more:

  • Song position slider: Go to any measure in the score
  • Tempo: Change the playback tempo
  • Part: Turn parts on and off
  • Style name: Choose an auto-accompaniment style for Backing
  • Registration icon: Save or recall a registration
  • Balance Mixer icon: Balance playback and performance levels
  • Settings icon: Change Song Settings

That’s a lot of stuff. Usually, you will change a few settings and minimize the control panel for serious playback and performance. Otherwise, that big old panel hides the score!

Control panel occasionally hides chord symbols

Unfortunately, even the minimized control panel occasionally hides chord symbols and other parts of the score. I hope Yamaha fixes this behavior in a future update. It’s a drag to be playing along and, whoops, what are those mystery chords? It’s like having a musical pop-quiz right in the middle of a song. Not good.

You might decide that certain Parts are annoying. The Part buttons in the expanded control panel let you turn Parts ON and OFF. Left and Right are self-explanatory. The Others Part refers to a melody line that may (or may not) appear in the score. The Backing Part is Backing Conductor! More about Backing Conductor in a minute.

Set Part levels in the Balance Mixer

You may decide that certain Parts are too loud or too soft. Tap the balance Mixer icon in order to set Part levels. Maybe you want to make your own performance louder or make the backing quieter? The Balance Mixer is the place to set Part levels.

Goods and bads

As I said, Smart Pianist is a work in progress. It does some things very well:

  1. Analyze a piano score and play back the right and left hand parts.
  2. Play the melody (Others) staff correctly.
  3. Follow repeat symbols.
  4. Follow brackets such as first ending, second ending and so forth.

A standard repeat will be taken only once. Pop music (like “It’s Too Late”) has instrumentals which are usually marked with a repeat. The performer is expected to improvise as much as they want (or the audience can tolerate). Forget extended solos, SP repeats only once.

Beware! One giant leap past a score marking

Smart Pianist ignores score markings such as “D.S. al Coda”. If you see a textual song structure marking, prepare for surprises. SP occasionally blows through a coda marking and you’re suddenly flying through hyperspace to the next grand staff, wherever that may be musically.

I don’t think Smart Pianist does much of anything with textual markings and symbols above the staves, including chord symbols. Yamaha have much work left to do.

The A-B repeat button lets you mark a section of music for practice. SP’s A-B repeat has the same quirks as Yamaha arranger keyboards. Playback does not smoothly loop, that is, you get a pause between B and A when the repeat is taken. I suppose this behavior is OK for practice, but you won’t be able to loop a section and jam.

Backing Conductor

As you might expect, sheet music (PDF) score playback sounds stiff and mechanical. The music feels like an over-quantized MIDI file with life squeezed out of it.

The so-called “Backing Conductor” feature may be more to your liking. Backing Conductor turns on auto-accompaniment and feels more musical.

Use Backing Conductor for auto-accompaniment

Expand the control panel to its full size by tapping the three dots icon. Smart Pianist offers four Parts: Backing, Others, Left and Right. The buttons turn their respective Parts ON and OFF. Turn on “Backing” and Smart Pianist enables the Style selection button.

Select an auto-accompaniment style

Tap the Style selection button and choose a style. I like to use “Cool 8Beat” for “It’s Too Late”. This is where you can express your creativity, so feel free to try different styles and tempos.

With Backing Conductor enabled, the Play button starts auto-accompaniment. If a Part is too loud or too soft, tap the Mixer icon at the bottom of the expanded control panel. Then move the sliders to adjust the mix.

Song Settings mixer

Song Settings offers a mixer of its own. Tap the Song Settings icon in the lower right corner of the expanded control panel. SP displays the Song Settings page. Tap “Mixer” to bring up the Mixer tab. The Song Settings mixer gives you detailed control over individual parts: Pan, Reverb Type, Reverb Level and Volume. There are Master controls on the right-hand side of the screen. The buttons across the top of the mixer turn individual parts ON and OFF.

One important oversight by either Yamaha or me — you can’t change the instrument assigned to Others Part (channel 3, above). Those strings drive me crazy!

Smart Pianist deep dives

At this point, I hope you have learned more about Smart Pianist than your average YouTube video. 🙂 Smart Pianist is a surprisingly deep application when it is paired with a CSP-series digital piano (series 100 or series 200).

Here are links to a few related deep dive articles:

Copyright © 2025 Paul J. Drongowski

Smart Pianist: Re-image a song with style

Today, I want to build on my Smart Pianist audio-to-score tutorial. The audio-to-score feature lets you play along with an audio song selected from your music library.

Did you know, you can re-imagine an audio song using a CSP auto-accompaniment style? Let’s find out how.

Audio-to-score recap

I assume that you read the audio-to-score tutorial. Just in case you haven’t, here’s a brief recap. The screen captures below summarizes the process of selecting an audio song in your music library. [Click on images to make them larger.]

How to select and load an audio song

Drill down from Smart Pianist’s top-level menu. You first display the top-level menu by hitting the “four leaf clover” icon in the upper left hand corner of the screen. Touch the Song button and you’re on your way.

After Smart Pianist (SP) analyzes the audio song, it displays a basic score in familiar music notation. SP’s analysis discovers the song tempo and key signature, finds the underlying chords, and discovers “sections” corresponding to verse, chorus, bridge, etc. SP produces the score by applying an accompaniment pattern to the chords. Here, we’re going with the most basic pattern, block chords.

I’m using Carole King’s classic “It’s Too Late” as a running example.

“It’s Too Late” chord chart and score

In addition to a notated score, SP can display a chord chart — kind of a lead sheet. It contains the chords and section information. You might find it easier to follow and play from the chord chart. It’s your choice.

Imagine

You might already know about Smart Pianist’s auto-accompaniment styles. No doubt, you’ve seen the “Style” button in the top-level menu. The auto-accompaniment engine is lurking behind the audio song and sheet music songs, too. [I’ll get to sheet music songs in a future blog post.]

Click on the Song Settings icon in the upper right hand corner.

Song Settings Arrangement tab

Smart Pianist displays the Song Settings page with six tabs along the left hand side: Arrangement, Playback, Score, Chord, Mixer and Song Edit. On the Arrangement tab, Smart Pianist offers two backing options: Original (the audio song) and Arrange (auto-accompaniment). Tap the “Arrange” button to select auto-accompaniment.

Style categories (choose one)

And, now, you choose a Style. Tap the style name in Arrangement settings and Smart Pianist displays menus through which you can choose a style. If you don’t want to venture too far out of the ordinary, I recommend either “Cool 8Beat” or “Easy 8Beat 2” for “It’s Too Late”.

Style selection examples

The CSP and CVP pianos have literally hundreds of styles to choose from. I recommend printing the list of styles in the Data List PDF for your keyboard model. Keep the hardcopy handy; It will make navigation and style selection easier.

SP will use the selected style to play back the song. Go back to the score display and try it.

A few fix-ups: Edit chords

Once you’re back on the score display (or chord chart), tap the play button and hear the result. Smart Pianist and the CSP will play the song in the chosen style.

My audio song has a short anticipation between the Am7 and D chords during verses. (“Anticipation” means played slightly ahead of the beat.) My ears and hands accommodate the notated anticipation when playing against the audio song itself. But, uh-oh. The D chords come too fast with auto-accompaniment and the verses sound glitchy.

Time to correct a few chords. Smart Pianist does its best to detect chords and put them in the right place within the chord chart (or score). However, the D chords are hard-quantized to quarter notes. That makes the verses glitchy.

What I want to do is move the D chords (verses only) back one quarter note to the beginning of the following measure (bar). Unfortunately, SP does not have a move operation. We have to do it the hard way.

Chord edit pop-up menu

When you touch and hold on a chord, Smart Pianist gives you a few options: Copy, Paste (if a chord is in the clipboard), Delete and maybe Undo. Touch and hold the D chord and tap Copy. Touch and hold the D chord and tap Delete. Touch and hold the first beat of the next measure. Tap Paste. Yeah, this is a lot of monkey-work…

I tried a different method, but I can’t say it is easier than copy, delete, paste. I changed each D (verses only) to an Am7. Smart Pianist is smart enough (!) to merge the new Am7 into the old Am7 on the first beat of the bar. Then, I set the chord on beat 1 of the next measure to D6. Based on most sheet music for “It’s Too Late”, those ought to be D6 chords. [Smart Pianist doesn’t always get chord extensions right.]

Fixed-up chord chart and score

Try auto-accompaniment with the fixed-up chord chart and score. Ah, that’s much better, no glitches.

Re-imagine

After chord timing is squared away, let your imagination run wild. Try different styles.

“Dance → Chill Out → Chillout 1” takes “It’s Too Late” to a different place. Pull the tempo back and go downtempo.

Go R&B and choose “Soul & R&B → Modern R&B → Euro Hip Hop”. Trying new styles for an old song is fun!

Balance the mix via Song Settings

Sooner or later, you will feel like the auto-accompaniment is too loud or maybe your solo instrument is too quiet in the mix. Tap the mix icon in the lower left corner of the screen. SP displays a mixer. Move the sliders up and down to (re)balance elements in the mix.

Remix the band members in the style

You can also change individual elements in the style mix. Go to the Song Settings page and tap the Mixer tab. Ride the faders up and down. Tap the instrument icon at the top of a channel to turn the channel on or off. You can mess with pan and reverb type and reverb level, too.

Save everything in a registration

It took a bit of effort to get everything just so. You wouldn’t want to do all that every time you want to play “It’s Too Late”. That’s what Smart Pianist registrations are for.

Save all settings in a registration

Tap the registration icon in the lower left corner of the screen. Smart Pianist pops up the registration dialog box. Tap “Save Current Setting”.

SP displays another dialog box asking for the registration name.

Enter the name of the new registration, e.g., “Its_Too_Late”. Tap the Save button.

Let’s say that your took a coffee break and want to return to “It’s Too Late”. Tap the registration icon. Then tap “Its_Too_Late” in the list of registrations.

Recall “It’s Too Late” with one touch

Smart Pianist remembers virtually everything about the song, so you won’t need to go through that long set-up process again. Arranger people keyboard use song-specific registrations all the time. It’s a great way to store and organize your work.

Have fun and use your musical imagination!

Copyright © 2025 Paul J. Drongowski

Smart Pianist Audio-to-score tutorial

The Smart Pianist audio-to-score feature generates playable notation (a score!) from an audio song (e.g., MP3, AAC, etc.) Check this short Smart Pianist demo video. Kraft Music has a longer demo video featuring Gabriel Aldort from Yamaha.

Audio-to-score is so cool, Yamaha uses it to tease CSP series and CVP-800/900 series sales. That’s right, you need a CSP or CVP-800/900 to unlock audio-to-score in Smart Pianist. If you don’t own one of these models, you can still generate a chord chart using Smart Pianist or the Yamaha Chord Tracker app.

Smart Pianist has Chord Tracker technology inside. This tech analyzes an audio file and extracts the chords. It also identifies the tempo, key, and song sections (verse, chorus, etc.)

Smart Pianist can display a chord chart — sort of a lead sheet without melody. [Smart Pianist cannot extract melody. Yamaha is probably working on that…] If you know chords, you can play along with the audio song. Smart Pianist highlights the current position in the song making it easy for you, the player, to follow and play the next chord, or play your own melody to fit the current chord.

Not everyone knows chords. Possibly, you may feel musically stuck and want to try a new complementary keyboard part to fit an audio song. That’s where audio-to-score comes into play.

Smart Pianist has a “library” of forty accompaniment patterns. The patterns range from simple “block” chords to arpeggiated chords in both even (straight) time and triplets.

Smart Pianist applies your chosen pattern to the chord chart and displays the result on a grand staff. The word “chosen” is important because you select the pattern from the available accompaniment patterns to fit what your inner arranger wants to hear. This is a handy capability if you’re stuck for ideas and want to try something new with your hands. [It’s a more interesting practice tool than Hanon exercises, too.]

Example song: It’s Too Late

After launching Smart Pianist, tap the “clover” menu in the upper left hand corner of the screen.

Smart Pianist displays the top-level menu shown above. [Click the image to enlarge.] Tap the Song button to select and play a song (audio, MIDI, or PDF score).

Smart Pianist displays the Song screen with playback controls on the left-hand side of the screen. Touch “Tap here and select a Song” to drill down and find a song to analyze and play.

SP displays the Song Selection screen. For this example, an audio song, I tapped “Music Library” and navigated to the backing track for “It’s Too Late”. Tap the Done button to load and analyze the selected song (“It’s Too Late” by Carole King).

SP displays a score using the default accompaniment pattern, “Basic 1”.

Before discussing score patterns, let’s take a look at the chord chart. Tap the Chord button at the bottom of the screen. The backing track is in the key of A minor.

SP displays the chord chart containing the chords that it found and extracted during analysis. If you know Carole King’s music — and “It’s Too Late”, in particular — there are chord extensions (major sevenths and minor sevenths) everywhere. Smart Pianist (and Chord Tracker) does a good job with major and minor triads, but chord extensions and alternate bass notes, not so much. Fortunately, you can change an individual chord by tapping the chord in the chart and editing it.

The score is derived from the chord chart by applying a score accompaniment pattern. Tap the Score button at the bottom of the screen to return to the score. Tap the Song Settings button (icon) in the upper right corner of the screen.

Smart Pianist displays the Song Settings. Tap the Arrangement tab on the left side of the screen and go to the Accompaniment Score Pattern.

Smart Pianist displays a scrollable, drop-down list of the available accompaniment patterns. In this case, the pattern is “Basic 1”. Check out the diagram at the bottom of the screen. This diagram illustrates how the pattern will lay down notes in the right- and left-hand parts. “Basic 1” does simple block chords. Compare the diagram against the score.

Take a look at the three examples shown above. [Click to enlarge, of course.] The examples show how four simple “block” patterns affect the score display. The block patterns all produce block chords with simple left-hand bass notes.

Here are two more examples using arpeggio accompaniment patterns. Choosing new, different patterns is a way to get some practice and to try different keyboard arrangements.

List of all accompaniment patterns

Smart Pianist provides forty accompaniment score patterns:

  • Even – Block [Chords]
    • Basic 1 – 4
    • 8Beat 1 – 3
    • 16Beat 1 – 2
    • Pop Rock, Disco Twist, Ska
    • Beguin, Bossa, Samba, March
  • Even – Arpeggio [Broken Chords]
    • Easy Arpeggio 1 – 4
    • 8Beat Arpeggio 1 – 3
  • Even – Combination
    • Easy Pop 1 – 2
    • 8Beat Pop 1 – 2
  • Triplet – Block [Chords]
    • 8Beat Triplet 1 – 2
    • Triplet Ballade
    • Jazz 1 – 3
    • Blues
    • March Triplet
  • Triplet – Arpeggio [Broken Chords]
    • Slow Rock 1 – 2
  • Triplet – Combination
    • Swing Jazz
    • Slow Jazz

“Even” means straight time and “triplet” means triplet time division.

That’s a lot of screens and diagrams to browse through. In order to save both of us time, I gathered all of the pattern diagrams together (below). Enjoy!

Copyright © 2025 Paul J. Drongowski

Smart Pianist Even – Basic patterns

Smart Pianist Even – Genre patterns

Smart Pianist Even Arpeggio and Combination

Smart Pianist Triplet accompaniment patterns

Smart Pianist MIDI files and SysEx

Today’s blog post is for MIDI nerds although other folks might want a peek at the tech behind Smart Pianist (SP) and CSP series digital pianos.

MIDI doesn’t get too much attention anymore, however, MIDI is a key player (pun intended) in SP/CSP. Smart Pianist communicates with a CSP piano over four different kinds of electronic link:

  • USB cable
  • Wi-fi wireless
  • Bluetooth wireless
  • 5-pin MIDI cables

Yamaha could have crafted a unique protocal for each type of link, incurring a lot of duplicate effort. Instead, Yamaha sends MIDI messages over all four kinds of electronic link, making extensive use of proprietary System Exclusive (SysEx) messages. This is intelligent software engineering — one protocol to rule them all. Operation is seamless and transparent no matter how a user chooses to connect.

We’ve seen undocumented (hidden) SysEx messages before. Yamaha Chord Tracker and Musicsoft Downloader transfer MIDI files and other types of files to and from Yamaha arranger workstations using MIDI SysEx. Yamaha’s proprietary SysEx messages send file system commands like change directory, list directory, and copy file.

Today’s scenario

When a user selects a song, Smart Pianist does its best to display a score and synchronize song playback with the score. SP supports three kinds of songs: audio songs from your music library, MIDI songs, and PDF song scores. During playback, SP highlights the current position in the song score display so you can play along on the keyboard. If your keyboard is a CSP series digital piano, the CSP animates the Stream Lights, guiding your fingers. [You can turn off the Stream Lights or simply ignore them. Whatever.]

I went with the most frequently demonstrated use case: selecting and playing an audio (MP3) song from my music library. To keep everything small and fast, I prepared a short 6-bar version of the garage band classic “Louie, Louie”. I called the song “Shorty, Shorty”. 🙂

Since “Shorty, Shorty” is an audio song, Smart Pianist analyzes the audio and discovers:

  • The tempo,
  • The time signature,
  • The key signature, and
  • Song sections (like verse and chorus).

SP, like Chord Tracker, identifies chords and creates a chord chart. [Shown above, click image to enlarge.]

Ah, there’s the old, familiar I-IV-v progression (A-D-Em-D). So far, we’ve seen Chord Tracker do this sort of thing, too.

Smart Pianist generates the score display using the extracted chord progression. It applies a score template to the chord chart and displays a play-along score.

In this case, the score template is a basic one using block chords as shown in the screenshot above. If you don’t like block chords, you can dip into the Score Settings menu and choose a different template like arpeggios (i.e., broken chords).

When you tap the Play button, Smart Pianist plays the audio and sends MIDI messages to the CSP digital piano, e.g.,

F0 43 73 01 52 25 26 00 00 05 02 00 01 45 01 03 00 01 01 F7 
F0 43 73 01 52 25 26 00 00 05 02 00 01 40 01 03 00 01 01 F7 
F0 43 73 01 52 25 26 00 00 05 02 00 01 3D 01 03 00 01 01 F7 
F0 43 73 01 52 25 26 00 00 05 02 00 01 2D 01 03 00 01 01 F7 
                                       ^^
                                 MIDI note number

These MIDI messages control the Stream Lights. HEX 45, 40, 3D and 2D are MIDI notes A3, E3, C#3, and A1, respsectively. They are the notes of the first chord in “Shorty, Shorty”.

Arrange mode

Smart Pianist has a cool mode called “Arrange Mode”. Arrange Mode turns off audio playback and enables CSP auto-accompaniment. When you switch to Arrange Mode, Smart Pianist generates a MIDI file containing all of the chord and score information. SP sends the data to the CSP in a MIDI file, named “AppSong.mid”. You don’t see any of this; it’s transparent.

When SP goes into Arrange Mode, it sends a proprietary SysEx message telling the CSP to receive a Standard MIDI File (SMF):

F0 43 73 01 52 25 26 10 00 01 00 00 1A 00 
45 58 54 45 52 4E 41 00 4C 3A 2F 41 70 70 53 00 6F 6E 67 2E 6D 69 64
00 00 00 00 00 04 3A F7 

The HEX values in the second line are the song name:

    EXTERNAL:/AppSong.mid

The SMF itself is encoded into MIDI messages that I call “packets”. Smart Pianist sends the SMF in one or more packets (i.e., one long SysEx message per packet).

Really nerdy stuff: Each packet is (at most) 586 bytes in length, except the final packet, which may be shorter. A full packet contains 572 data bytes which encode a portion of the SMF. SMF bytes are divided into runs of eight bytes. Bytes within a SysEx message must be 127 (0x3F) or less. The first byte in a run indicates the highest order bits (positionally) for the next seven bytes in the run.

Yes, this was a pain in the neck to decode by hand. 🙁

I won’t reproduce Shorty, Shorty’s raw packets (SysEx messages) as the packets are rather long.

Ready Player One

When you tap the on-screen play button, SP tells the CSP to play the MIDI file. Smart Pianist sends the following SysEx message:

F0 43 73 01 52 25 26 01 01 04 00 05 01 00 01 00 00 01 01 F7 

Playback is synchronized. The CSP piano is the timing master in Arrange Mode and SP tracks playback in the score (or chord chart). Smart Pianist highlights the current song position in the score/chord display.

Standard MIDI File: AppSong.mid

So, what’s inside the generated MIDI song file? I managed to intercept the generated Standard MIDI File (SMF), “AppSong.mid” and manually decoded the packets.

The SMF starts with standard MIDI headers:

    00 4D 54 68 64 
     ^  M  T  h  d
    00 00 00 01 06 00 00 00 
              ^
    01 01 60 00 4D 54 72 6B 
              ^  M  T  r  k
    00 00 02 10 24 00 
          ^

Values marked by a caret “^” are the special bytes which appear at the beginning of eight byte runs. It was a pain to identify and apply these special bytes. The SysEx messages in the rest of the article are cleaned up and simplified.

Without surprise, the first MIDI messages are GM Reset and XG System On:

F0 7E 7F 09 01 77             GM Reset
F0 43 10 4C 00 00 7E 00 F7    XG System On

Next are song set-up directives (MIDI meta-events):

FF 58 04 04 02 18 08          Beat (Song Meta)
FF 59 02 03 00 00             Key signature (Song Meta)
FF 51 03 07 50 3A             Tempo (Song Meta) 
FF 7F 06 43 73 0A 00 04 01    Score ?? (Yamaha Meta)
FF 7F 05 43 7B 0C 01 02 0F    Guide Track Flag (Yamaha XF Meta)
FF 58 04 04 02 18 08          Beat (Song Meta)

After set-up, the MIDI file starts playback:

F0 43 60 7A F7                Rhythm Start (Yamaha)
FF 58 04 04 02 18 08          Beat (Song Meta)
Note ON A1                    velocity=1, channel=2
Note ON C#3                   velocity=1, channel=1
Note ON E3                    velocity=1, channel=1
Note ON A3                    velocity=1, channel=1

The rhythm start command starts the CSP auto-accompaniment engine. The Note ON messages turn on the Stream Lights for the first chord. Channel 2 is the left-hand part and channel 1 is the right-hand part.

According to the definition of the MIDI Key LED Mode SysEx message, the note velocity determines the behavior of the Stream Light LEDs:

  • Velocity = 0: LED off
  • Velocity = 1: LED flash
  • Velocity = 2: LED on

Up to two channels (e.g., left and right part) can be specified and controlled.

Next, the MIDI file contains a Section Control SysEx message:

F0 06 43 7E 00 08 7F F7       Section Contol (MAIN A, ON)

This message tells the auto-accompaniment engine to use the MAIN A section of the currently selected style. [Oh, yeah, you get to choose the style on Smart Pianist’s Style page.]

Then, we hit the first Chord Control SysEx message:

F0 43 7E 02 36 00 7F 7F F7   Chord Control (A Maj, no root)

Check the CSP-170 Data List PDF for all MIDI event definitions including how chords are encoded in Chord Control messages.

Thereafter, it’s Note ON messages to change the Stream Lights and Chord Control messages to change chords. Finally, at the end of the score, it’s time to stop:

70 43 60 7D 77               Rhythm Stop
FF 2F 00                     End Of Track

That’s it! End Of Track is an SMF meta-event that marks the end of the MIDI data in the SMF.

I hope our MIDI file tour inspires your own investigations — maybe crafting a custom Standard MIDI File of your own. Get those lights flashing!

Copyright © 2025 Paul J. Drongowski

Smart Pianist, CSP and ChordPro

Yamaha repurposes hardware and software technology all the time. The Yamaha CSP series digital pianos (CSP-100 series and CSP-200 series) and Smart Pianist borrow a lot of technology from the Yamaha Genos and PSR arrangers. Yamaha Chord Tracker users know that Smart Pianist also has Chord Tracker technology inside.

Chord Tracker provides a number of Smart Pianist-like features. Chord Tracker analyzes an audio song, extracts its chords, and displays the chords in a chart. Like Smart Pianist, Chord Tracker follows the chord chart while playing back the original audio file. Pretty much anyone can use Chord Tracker in this way to figure out the chords to a song and play along.

Genos and PSR arranger people, however, get extra goodies. Chord Tracker can send the chords to the arranger for playback. Even better, you get to choose the accompaniment style. Want to re-imagine a song as a country tune? You can do it.

Extended ChordPro

Chord Tracker sends the chords to an arranger in a Standard MIDI File (SMF). Instead of notes, the chords are represented in Yamaha System Exclusive MIDI messages.

When I analyzed the file format and chord messages, my first thought was “ChordPro”!

You’ve probably seen ChordPro on the Interwebs. It’s that simple text format for song lyrics and chords. I extended ChordPro adding a few new features to make musical time explicit and precise. (Original ChordPro relies on the musician for time.) Then I wrote a Java program to translate an Extended ChordPro song to an SMF suitable for playback on a Yamaha arranger. Check out an Extended ChordPro demo.

Playback ChordPro Example

Well, guess what? Smart Pianist and CSP-170 can play back SMFs generated from Extended ChordPro songs.

Here is a short ChordPro snippet for Steve Winwood’s “Can’t Find My Way Home”.

{t: Can't Find My Way Home}
{key: D}
{artist:Blind Faith}
{time: 4/4}
# Style: SongwriterBallad (stylecode: 5980)
{stylecode: 5980}
{tempo: 96}

{start_accomp}

# Introduction
[C][*IA]
{c: Introduction}
[Csus2:2][*MB] ---- [G/B:2] ---- [Gm/Bb:2] ---- [D/A:2] ---- 
[F:2] ---- [G:2] ---- [D] --------
[Csus2:2] ---- [G/B:2] ---- [Gm/Bb:2] ---- [D/A:2] ---- 
[F:2] ---- [G:2] ---- [D][*FB] --------

{c: Verse 1}
Come [Csus2:2][*MB] down off your [G/B:2] throne, and 
[Gm/Bb:2] leave your body a- [D/A:2] -lone.
[F:2] Some- [G:2] -body must [D] change.
[Csus2:2] You are the rea- [G/B:2] -son, I've been
[Gm/Bb:2] waiting so [D/A:2] long.
[F:2] Some- [G:2] -body holds the [D][*FC] key.

An Extended ChordPro song begins with a header containing the title, artist, key, tempo, time signature and auto-accompaniment style. After the header, you hit the {start_accomp} directive which tells the arranger (Genos, PSR or CSP) to start playing.

The rest of the Extended ChordPro file consists of chords, e.g.,

    [C]   [Csus2:2]   [G/B:2]   [Gm/Bb:2] ...

section control directives, e.g.,

    [*IA]  [*MB]   [*FC] ...

and lyrics (plain text). Oh, yeah, you can throw in comments, too, e.g.,

    {c: Introduction}
    {c: Verse 1}

The Java program (cp2mid) translates the chords, directives and lyrics into an arranger-ready Standard MIDI File.

So, what do we get after we import the SMF into Smart Pianist? The screenshot above [click to enlarge] is the score. The chord symbols and lyrics appear with the staves. There aren’t any notes because the SMF doesn’t have any notes; it’s contains only chords and lyrics.

The chord chart looks familiar. But, hey! Smart Pianist display lyrics interspersed with chords. I never saw Chord Tracker do that.

The final screenshot shows the lyrics alone. All of those dashes (“—-“) come from the Extended ChordPro song. They are placeholders during instrumental interludes.

Summary

Today’s example demonstrates a different way to use Smart Pianist and CSP digital pianos. If you own both a Yamaha arranger workstation and a CSP, you should be able to transfer Chord Tracker SMFs to Smart Pianist and the CSP.

If you want to know more about Extended ChordPro and its implementation, please see:

Copyright © 2025 Paul J. Drongowski

Smart Pianist: MIDI song tutorial

I have an extensive collection of MIDI songs that are tweaked for the PSR-S950 and Genos (gen 1) arranger workstations. Let’s see what Yamaha Smart Pianist does with them!

Transfer the MIDI files

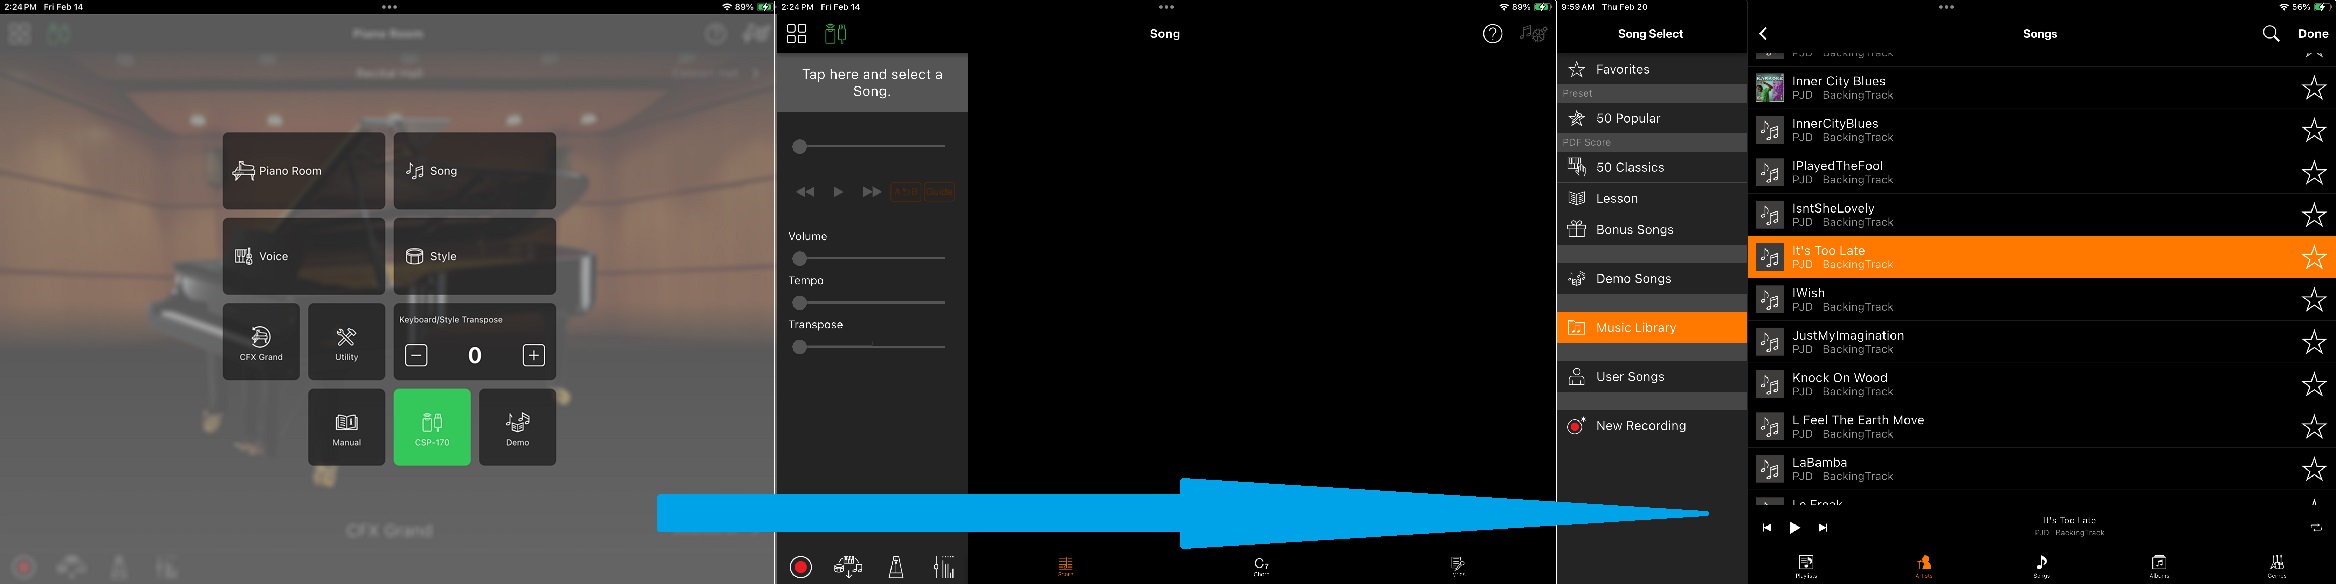
The first step is transferring the MIDI files from Windows PC to my iPad. I gathered about 100 Standard MIDI Files (SMF) into a directory, “MIDI”, with three subdirectories:

  • GM: General MIDI and General MIDI 2
  • S950: XG files tweaked for the PSR-S950
  • Yamaha: XG files purchased from Yamaha Musicsoft

The subdirectories reflect different vintages and format. I went with PSR-S950 because its voices are a subset of the CSP-170 voices. GM, GM2 and XG are compatible with CSP-170. Depending upon source and phase of the moon, a MIDI file may or may not have chord and lyric data. The XG files from Yamaha Musicsoft are more likely to have chords and lyrics (so-called XF format), but that is not a slam dunk. [Click on images to enlarge them.]

iTunes File Sharing seemed like the fastest way to move 100+ files. Unfortunately, no joy. iTunes found the Smart Pianist storage area without problem with four subdirectories under “Smart Pianist Documents”:

  • demo_audio
  • user_audio
  • user_midi
  • user_pdf

I tried to copy MIDI files into “user_midi” directly. Nope, iTunes won’t do it. The best I could do is to add files to the top-level “Smart Pianist Documents” directory.

That just didn’t seem right. So, I e-mailed a ZIP file containing the MIDI files to myself and downloaded the ZIP into the Files folder on the iPad. I tried to import the ZIP into Smart Pianist directly. It unzipped OK, but Smart Pianist expects to see one or MIDI files, not subdirectories! No joy, again.

Oh, dear. There isn’t any way to organize the MIDI files into folders (or categories) inside Smart Pianist. A linear list of 100+ MIDI files is not convenient or scalable. C’mon, Yamaha, you can do better.

Fortunately, Smart Pianist’s import dialog has a “Select All” option — if you can find it. I had to select the first file and scroll to the bottom of the list of files to find the “Select All” button. Might be a good idea to display “Select All” at the top of the dialog box like right away?

Well, after all this futzing around, I got all 100+ MIDI files imported into Smart Pianist.

Score, chords and lyrics

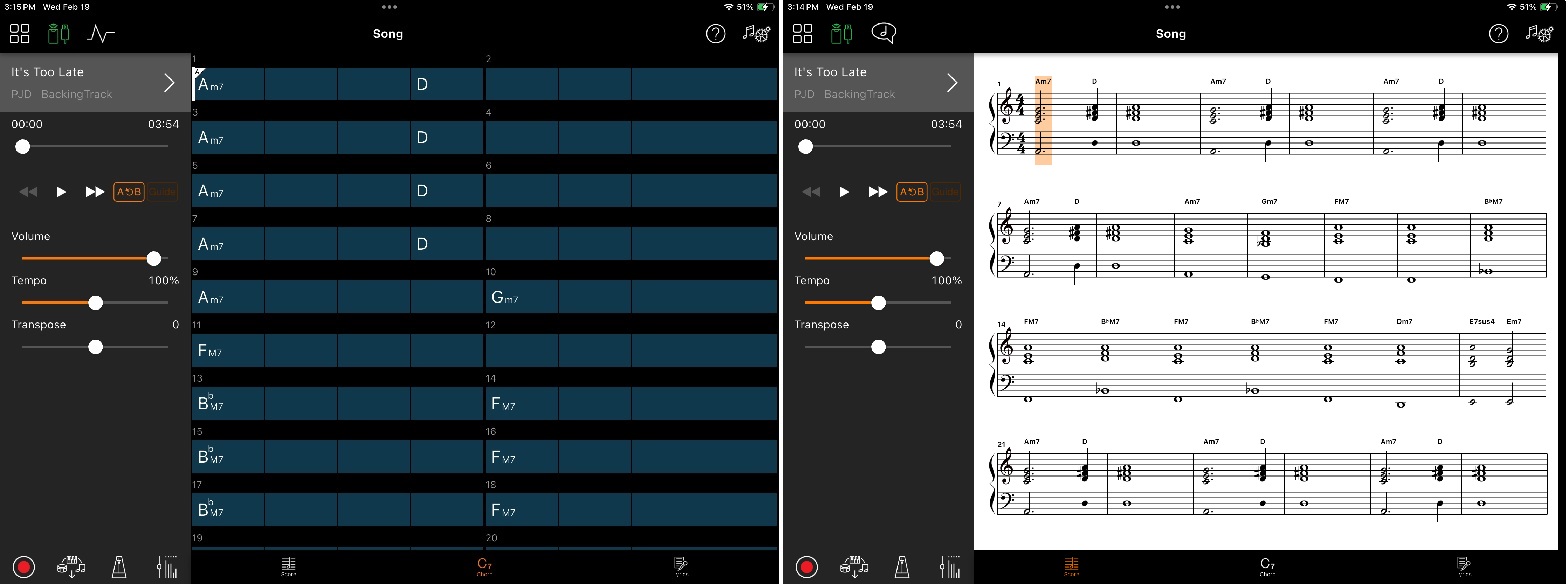
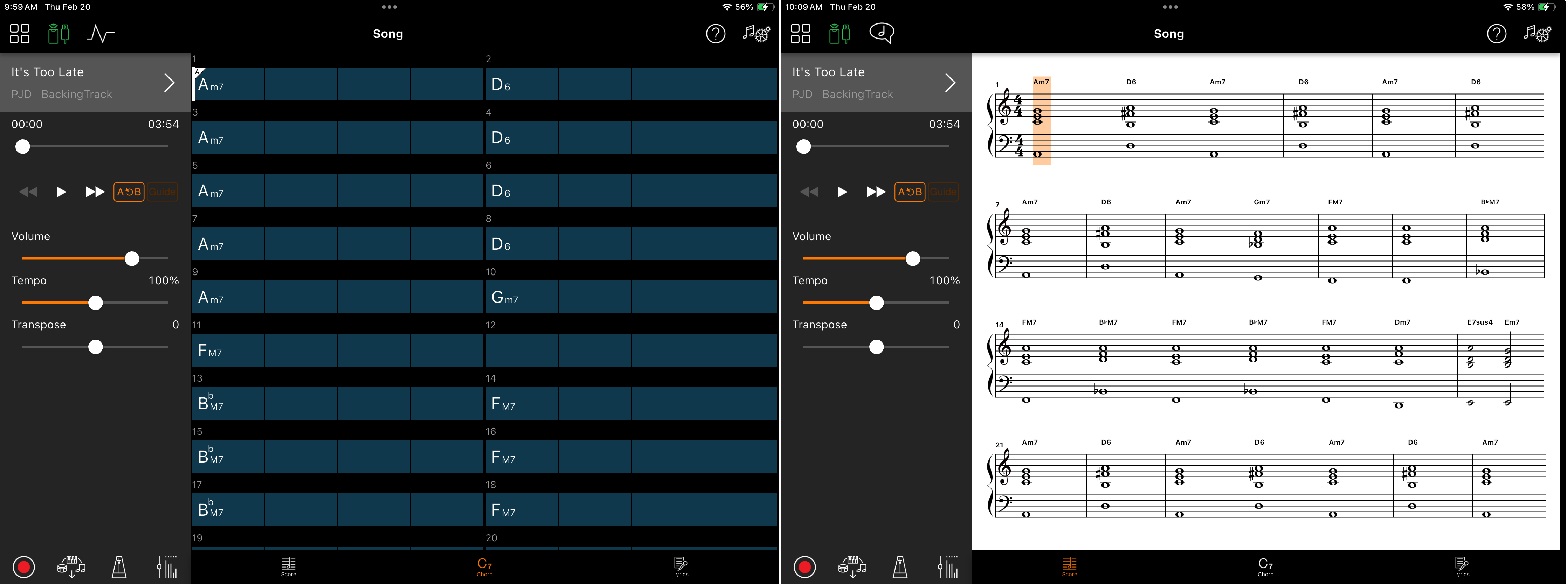
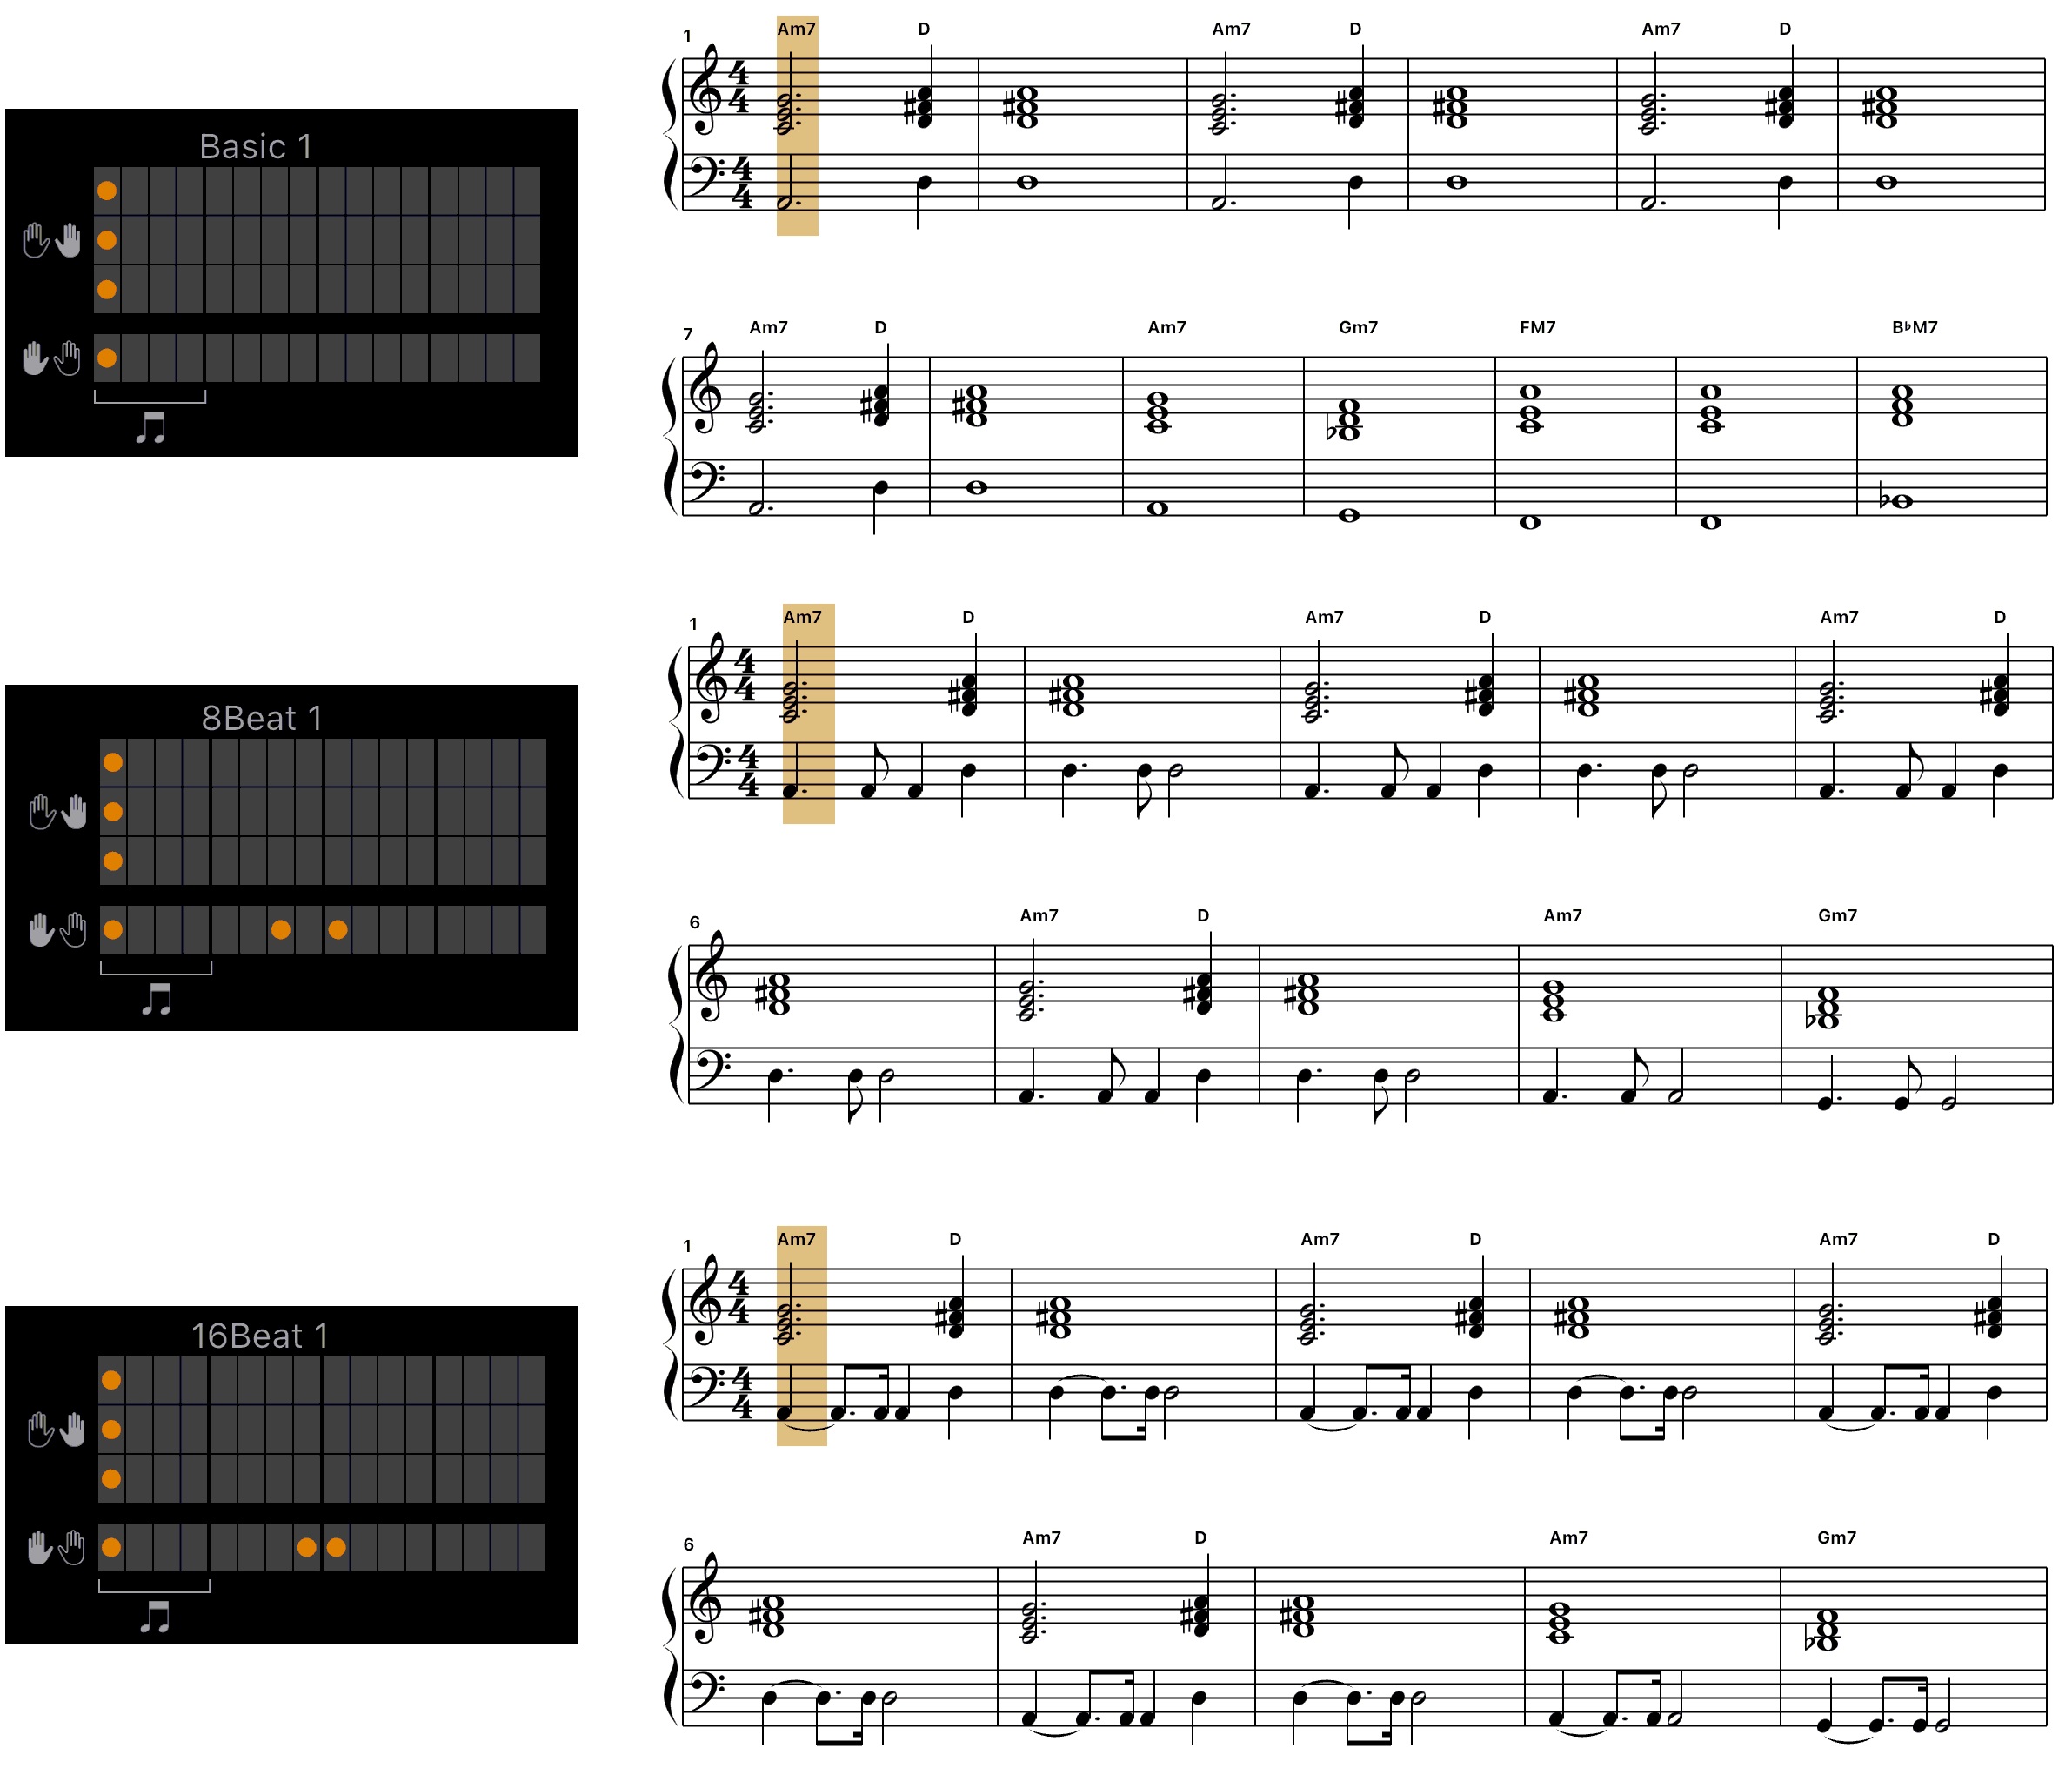
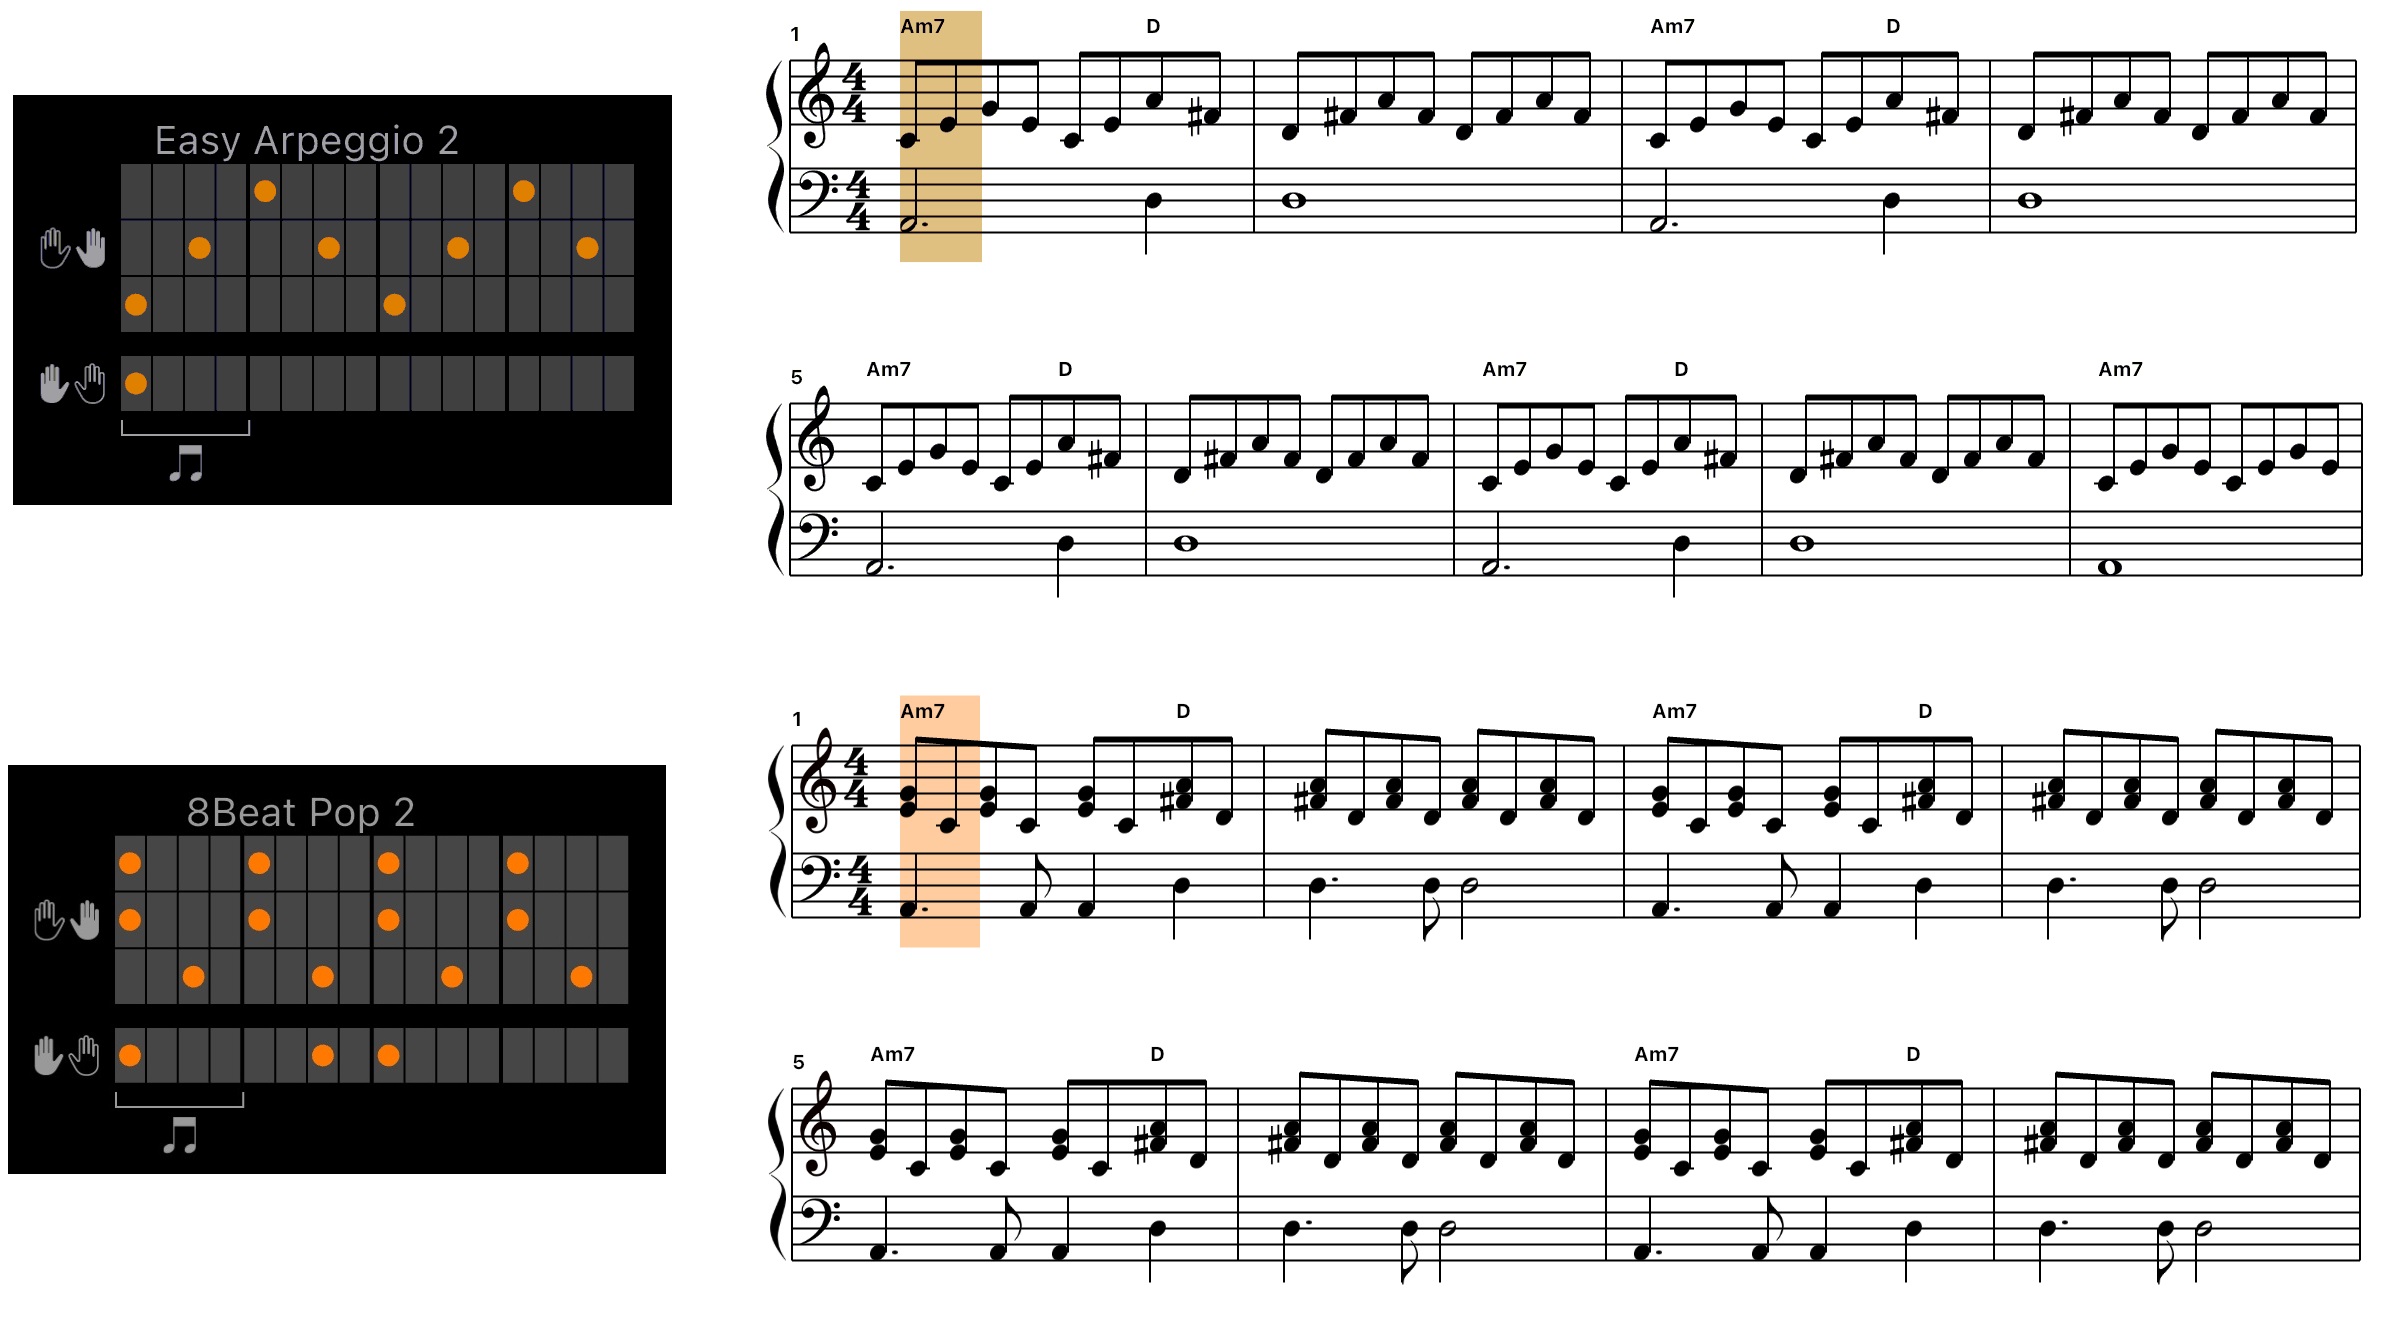
When you select a MIDI song, Smart Pianist looks for three kinds of data in the MIDI file: score (e.g., tracks with notes in them), chords and lyrics. Three buttons at the bottom of the screen let you select one of these three views during playback.

Smart Pianist displays some kind of score, typically the melody track, maybe a left-hand bass track. If Smart Pianist can’t make sense of the MIDI, it displays empty measures (e.g., whole note rests).

Chords and lyrics are optional in MIDI files and your mileage will vary. Smart Pianist will display chords and lyrics, if the relevant MIDI data are available.

How did Smart Pianist do?

No, I didn’t test 100 MIDI songs. 🙂 I chose four songs for testing:

  • Brown-Eyed Girl by Van Morrison
  • Every Little Thing by The Police
  • Let’s Stay Together by Al Green
  • I Wouldn’t Want To Be Like You by Alan Parsons

Brown-Eyed Girl, Every Little Thing and Let’s Stay Together are XG MIDI songs purchased from Yamaha. Most likely, they should have chord and lyric data (XF format). I Wouldn’t Want To Be Like You started life as a TUNE 1000 Karaoke General MIDI file and it contains lyrics.

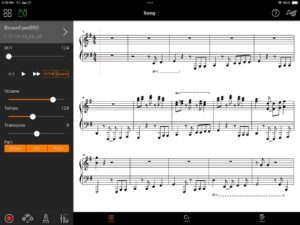
In the case of Brown-Eyed Girl, Smart Pianist generated a score which looks like a combination of a bass line and the opening guitar riffs.

No chords were found, so you don’t get anything useful on the Chords page. I improvised the chords from the score when playing along. Then again, I have a good working knowledge of musical harmony. A beginner or inexperienced player would be lost.

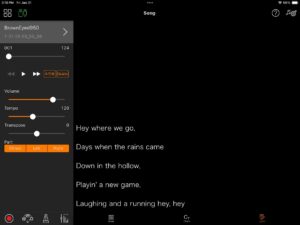
The Brown-Eyed Girl MIDI file has embedded lyrics. Here’s the problem, tho’. What if I want to sing the lyrics and play a piano part? I can’t do it because, in Smart Pianist, by default, you get the piano score or the lyrics, not both at the same time. [We’ll remedy that in a few minutes. Please keep reading.]

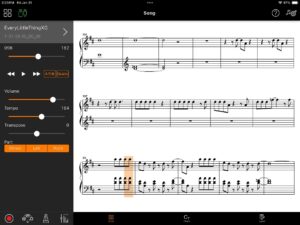
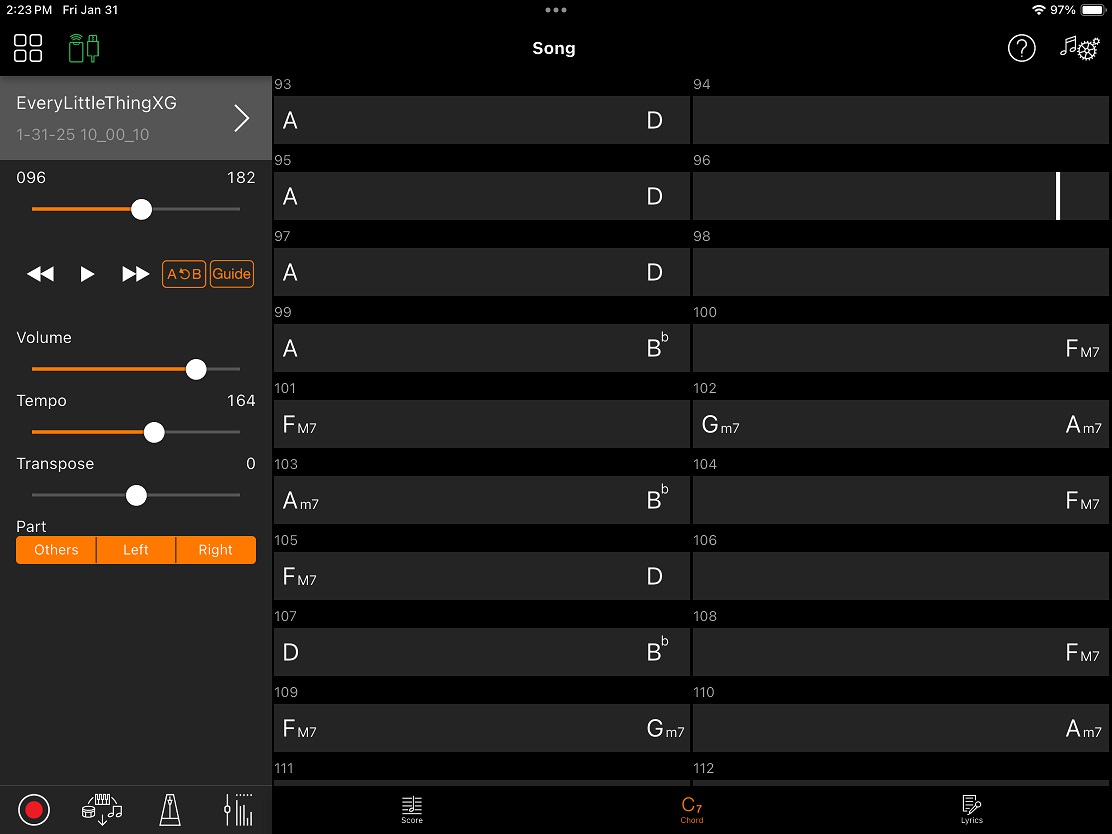
Next up, Every Little Thing She Does Is Magic. Smart Pianist displays some form of score.

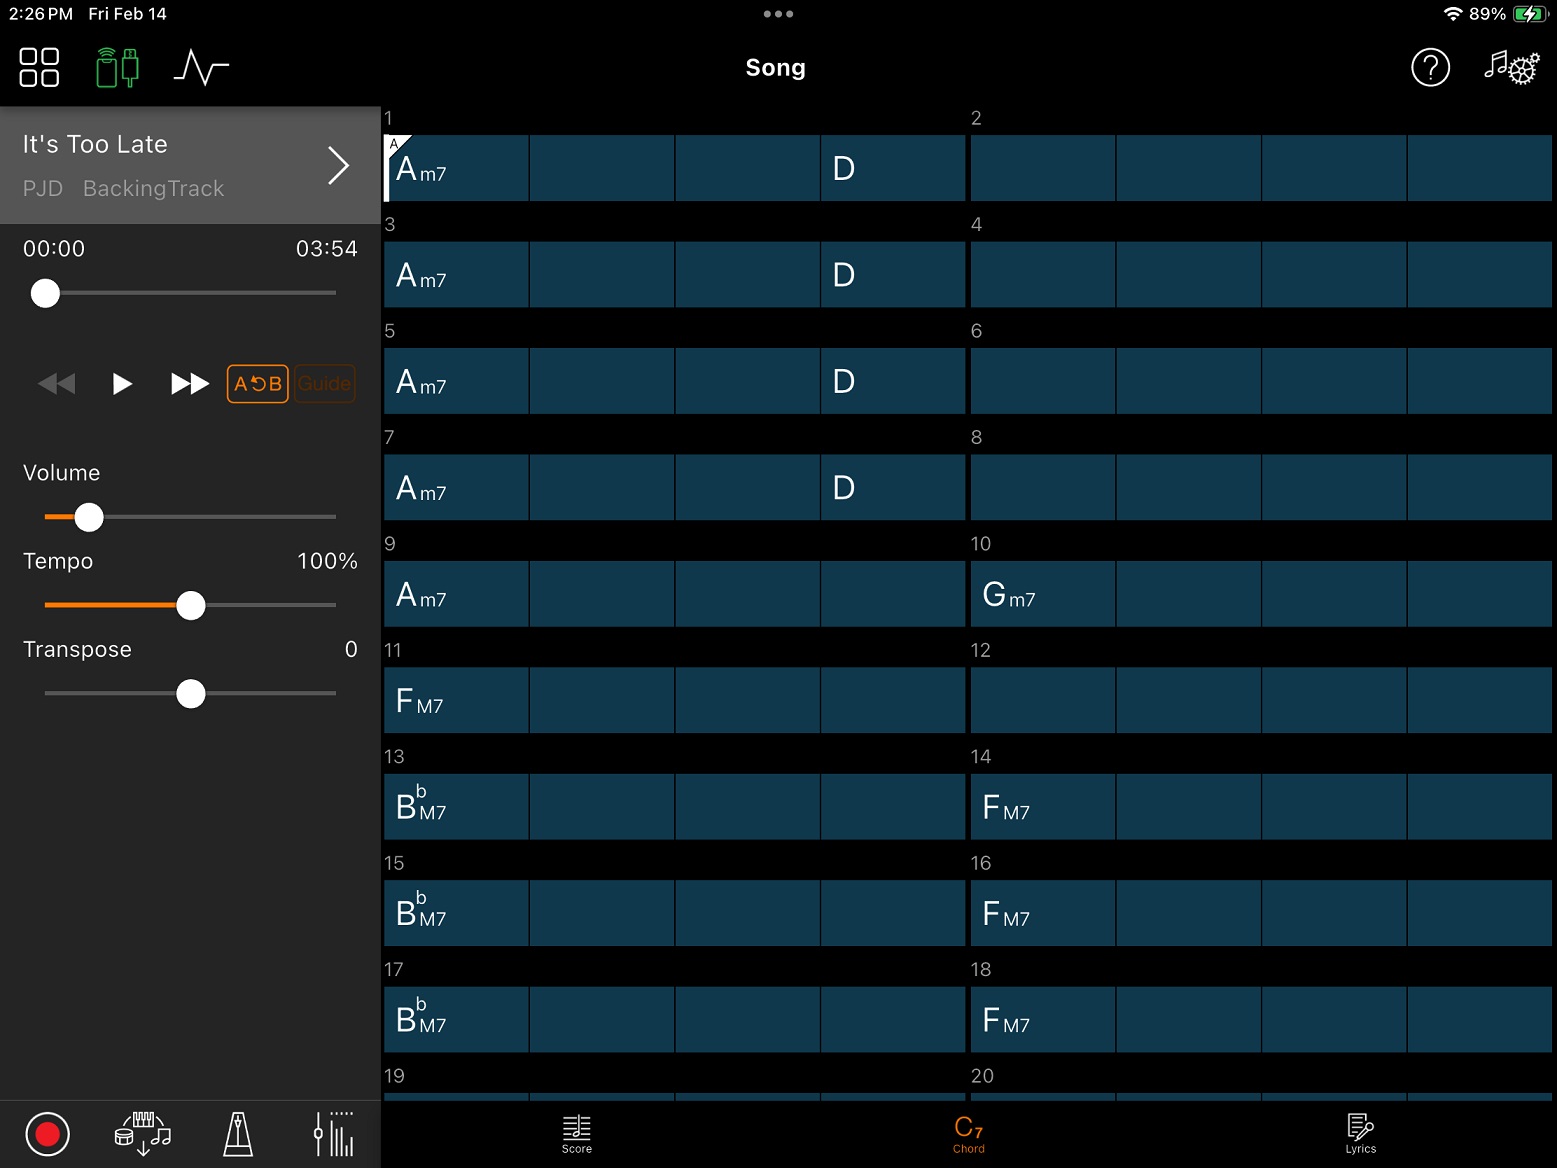
And it displays chords, too. I found the chord display to be the most helpful and I played along with the song ny following the Chord page. Not bad. If you are a Chord Tracker user, you’ll recognize the chord chart structure and format.

No lyrics were found in Every Little Thing, so you’re on your own. Maybe invite Sting over to sing. 🙂

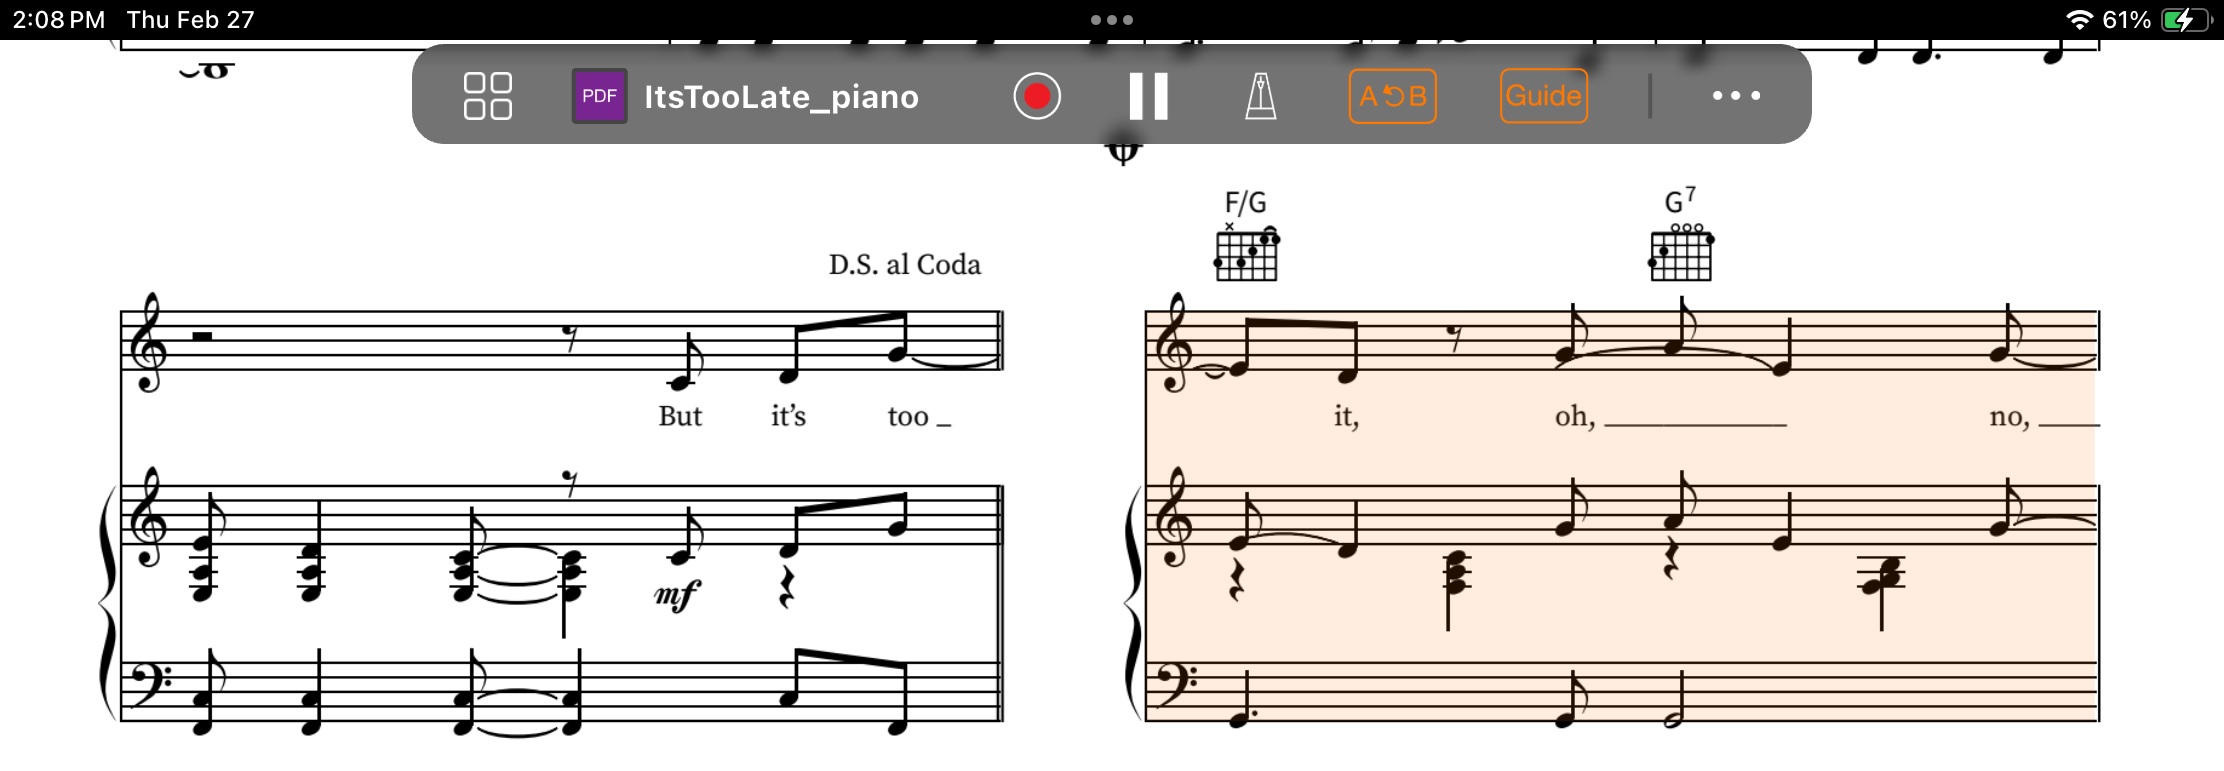
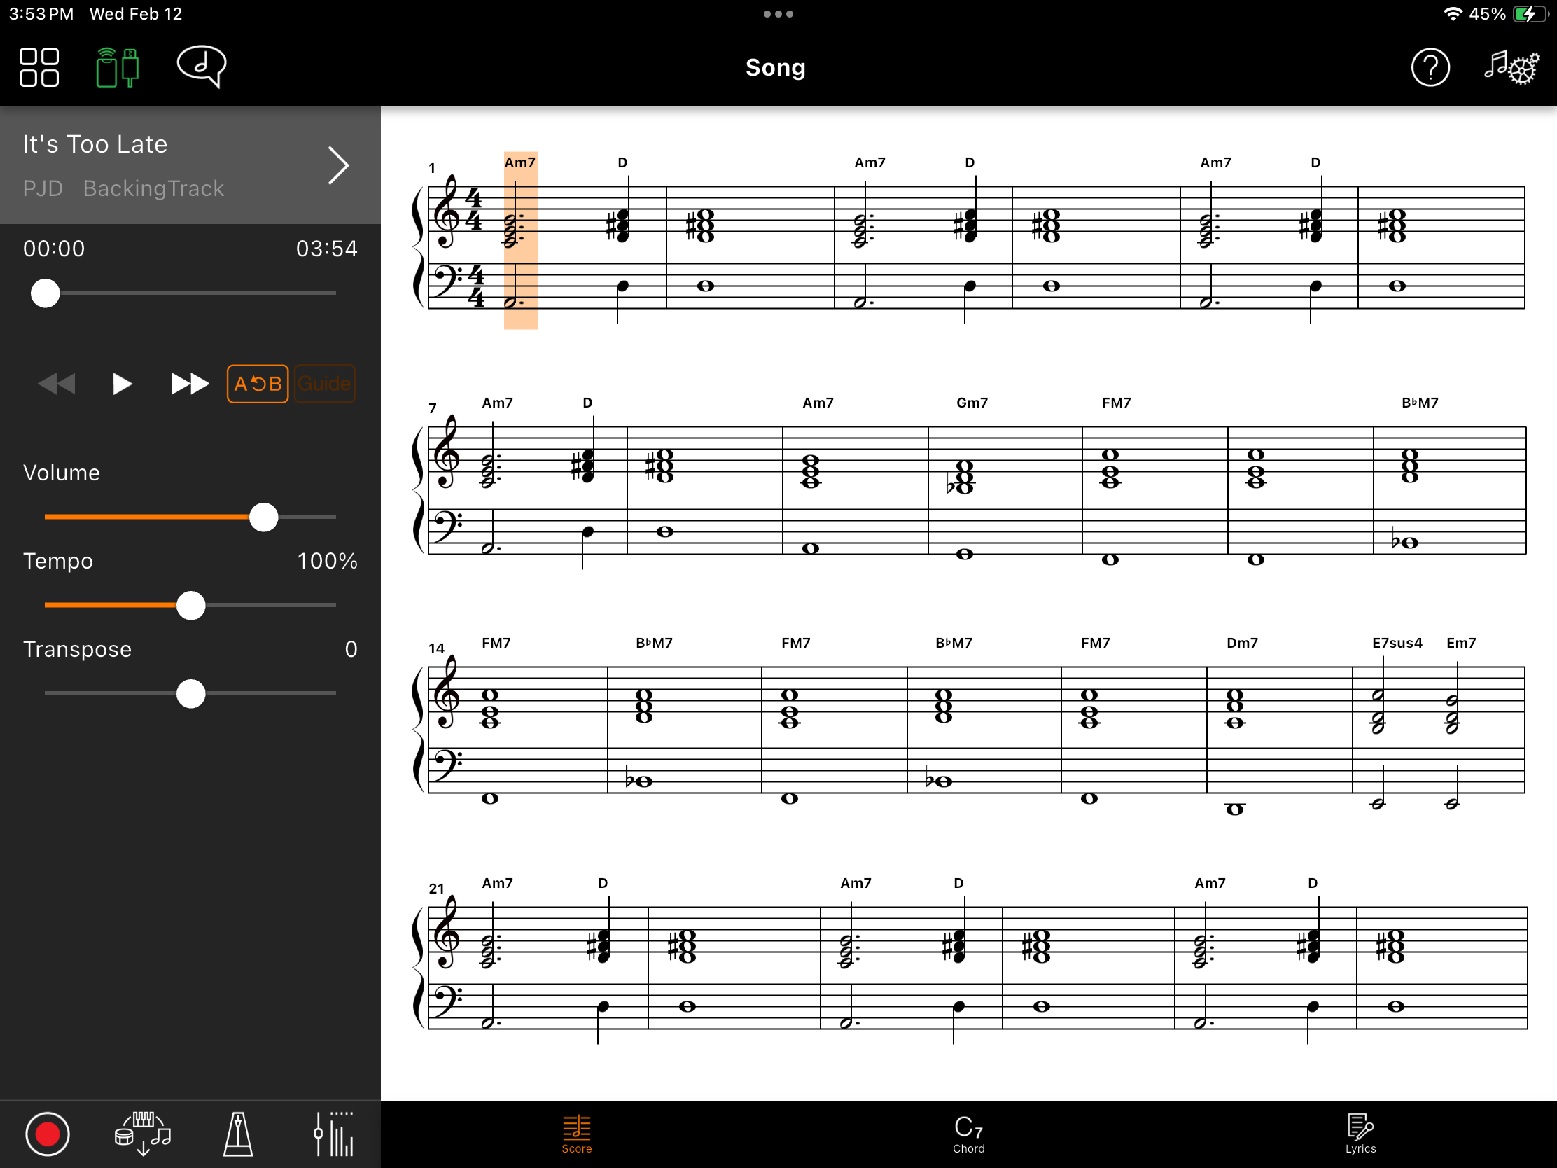
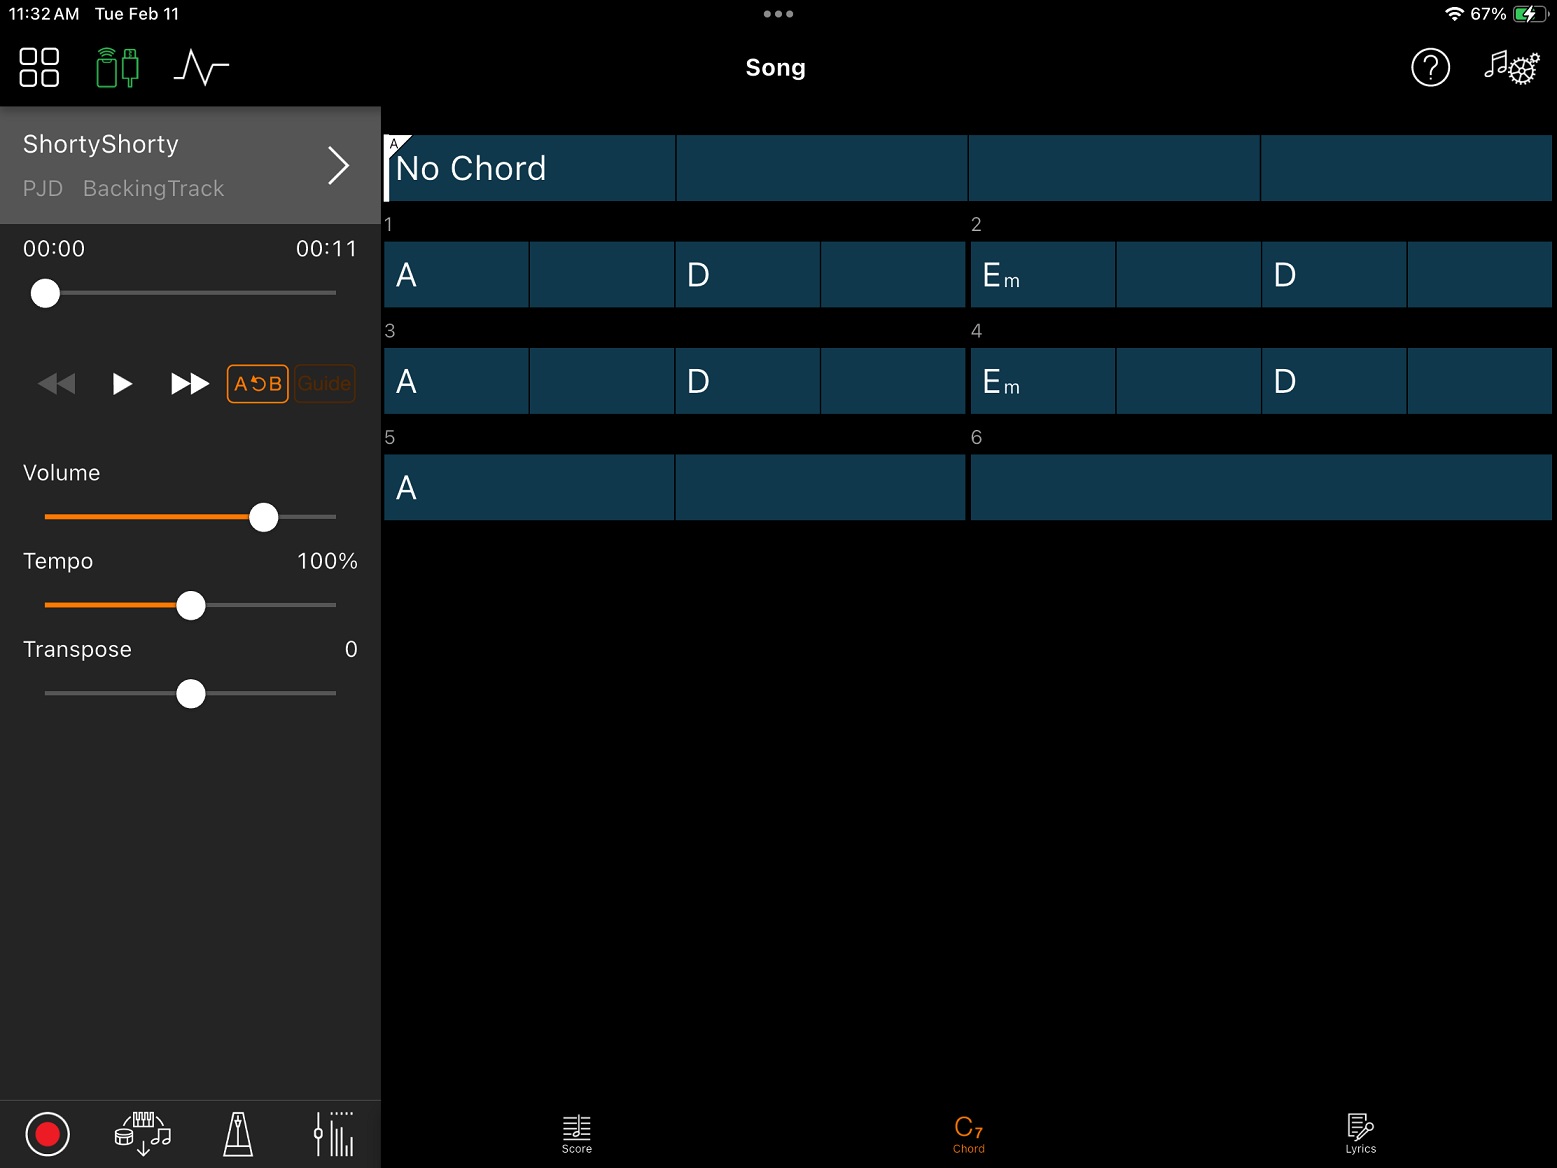
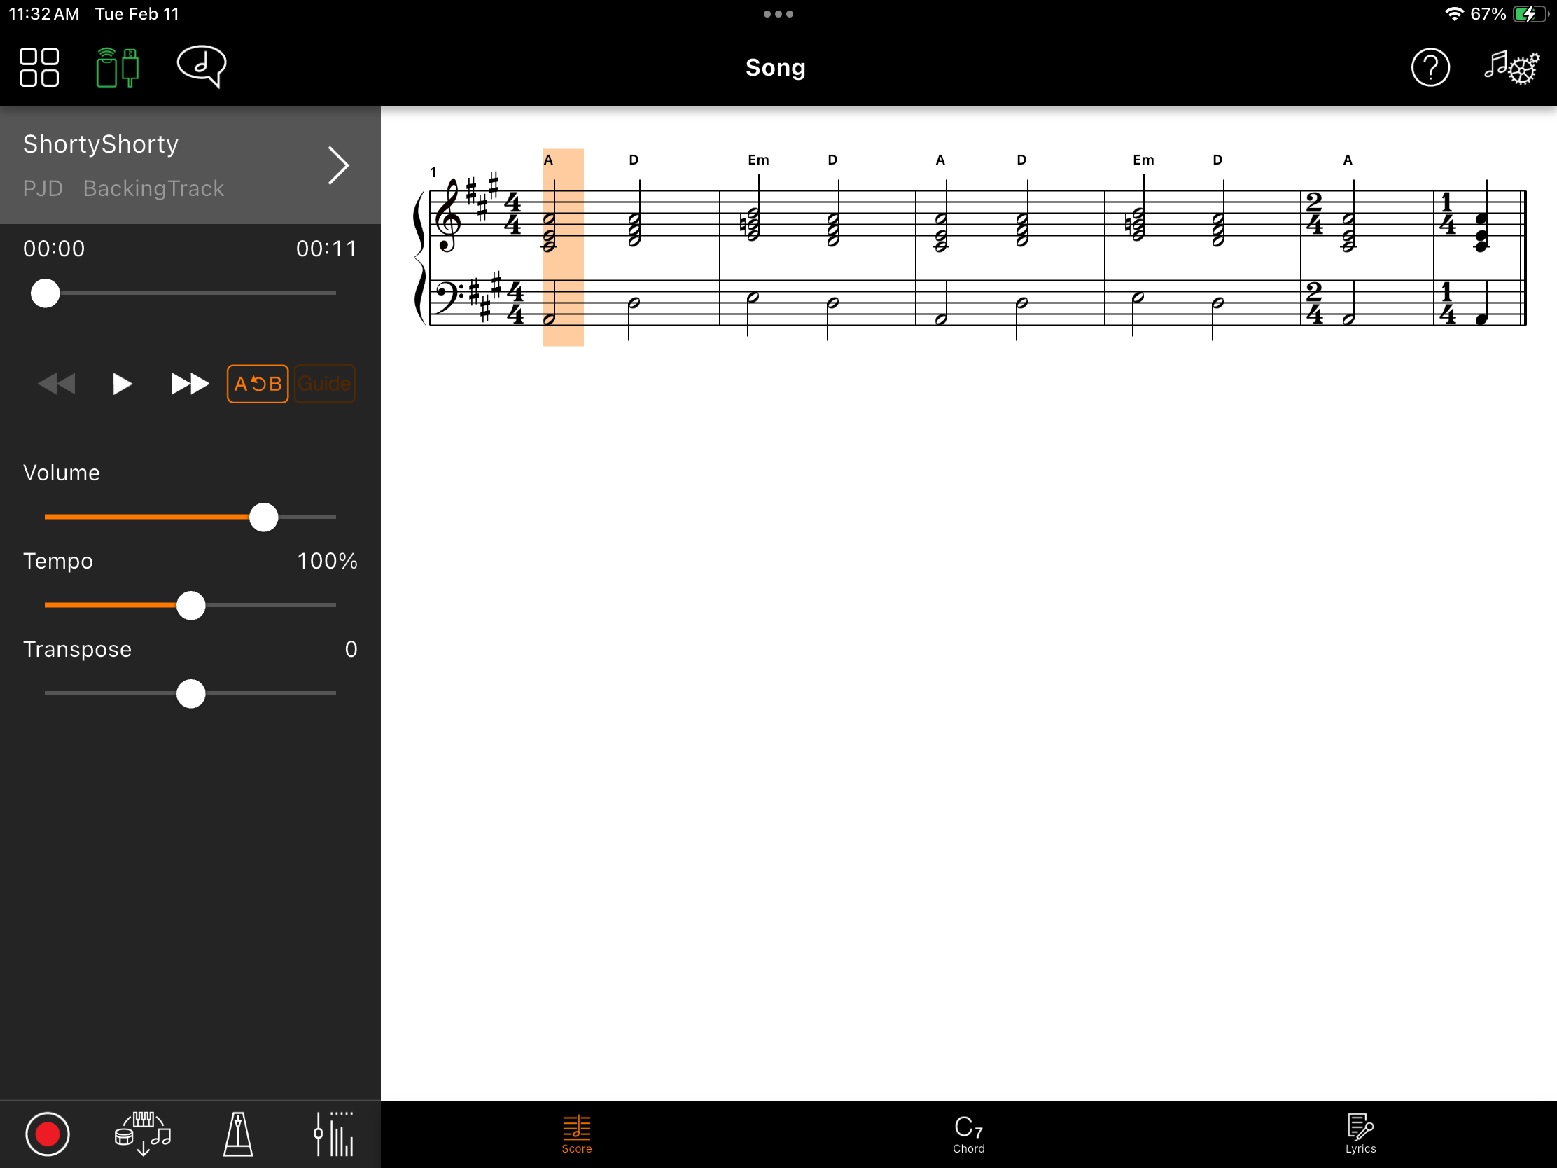
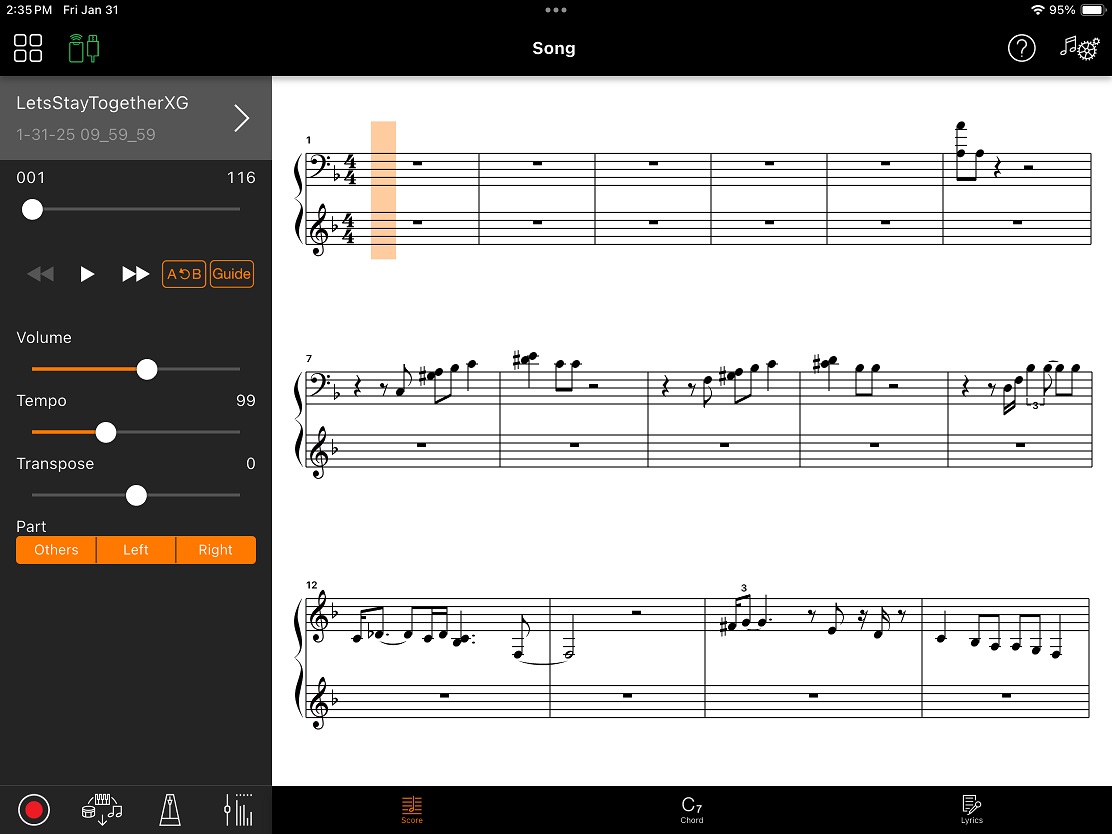
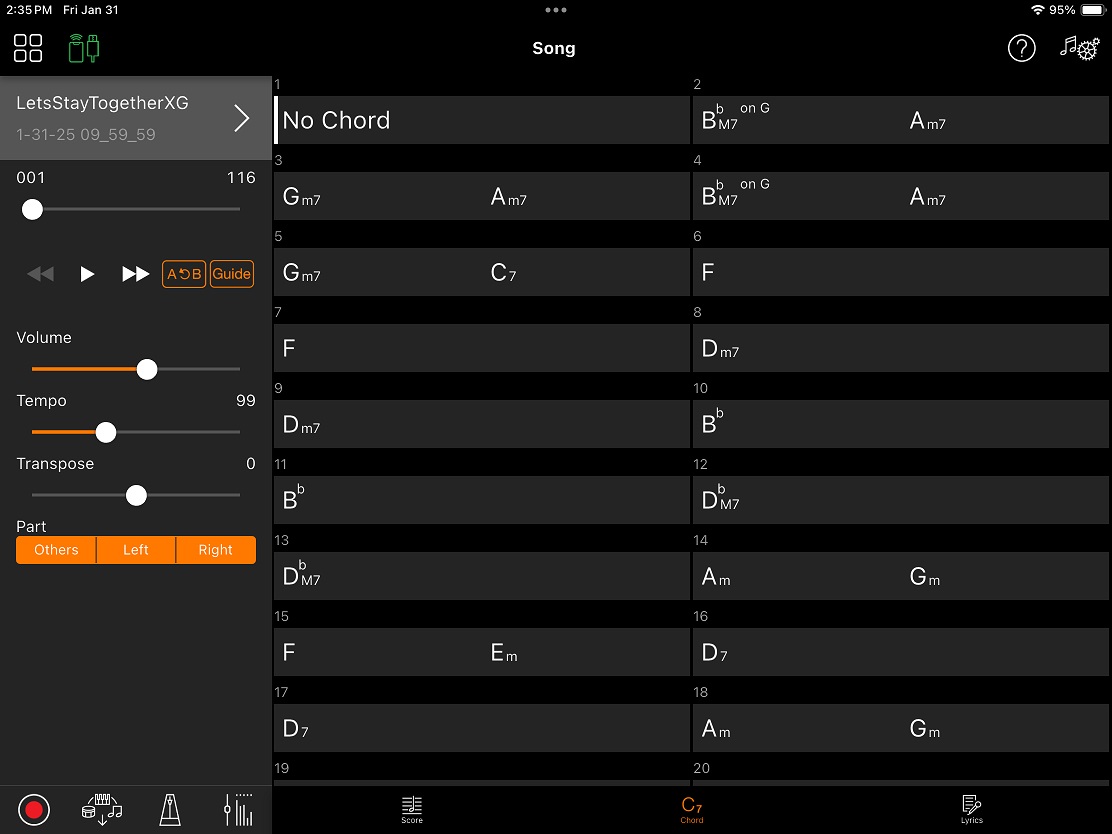
Smart Pianist produced a score for Let’s Stay Together. Looks like the melody line to me.

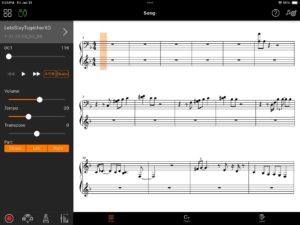
The Let’s Stay Together MIDI file has chord data and Smart Pianist displays chords. No lyrics, tho’, so the Lyrics page is empty.

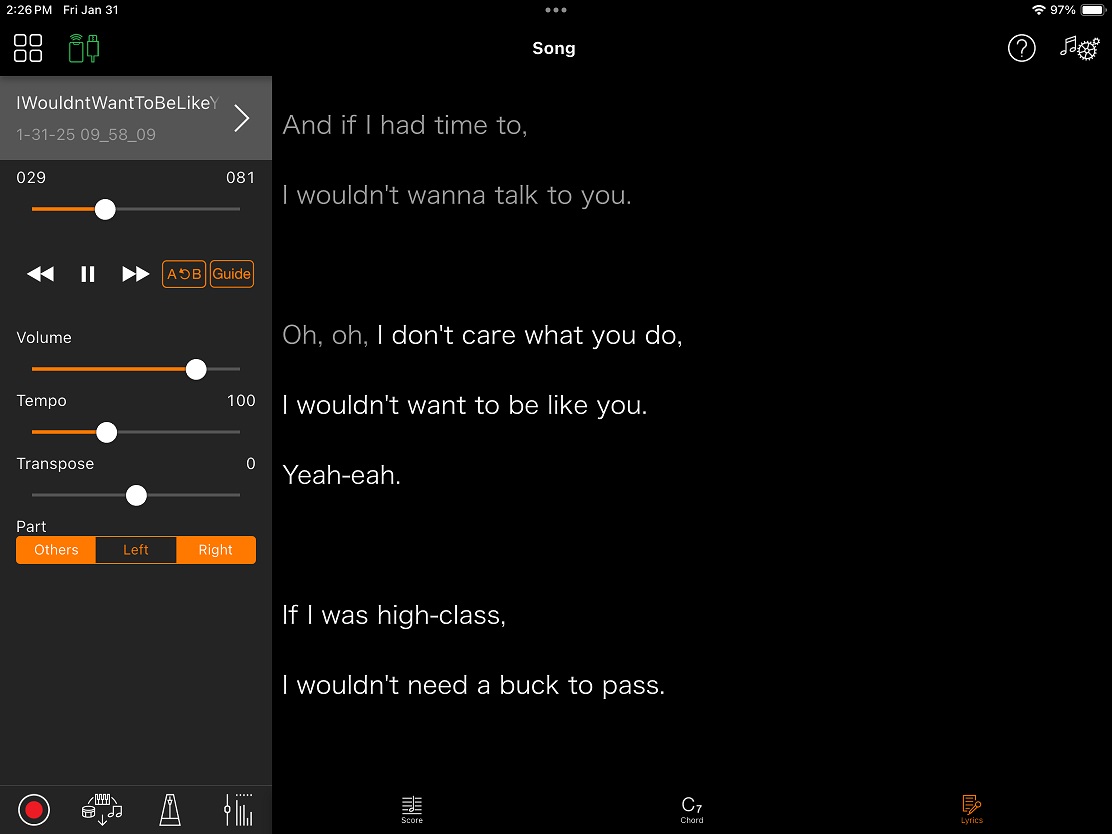
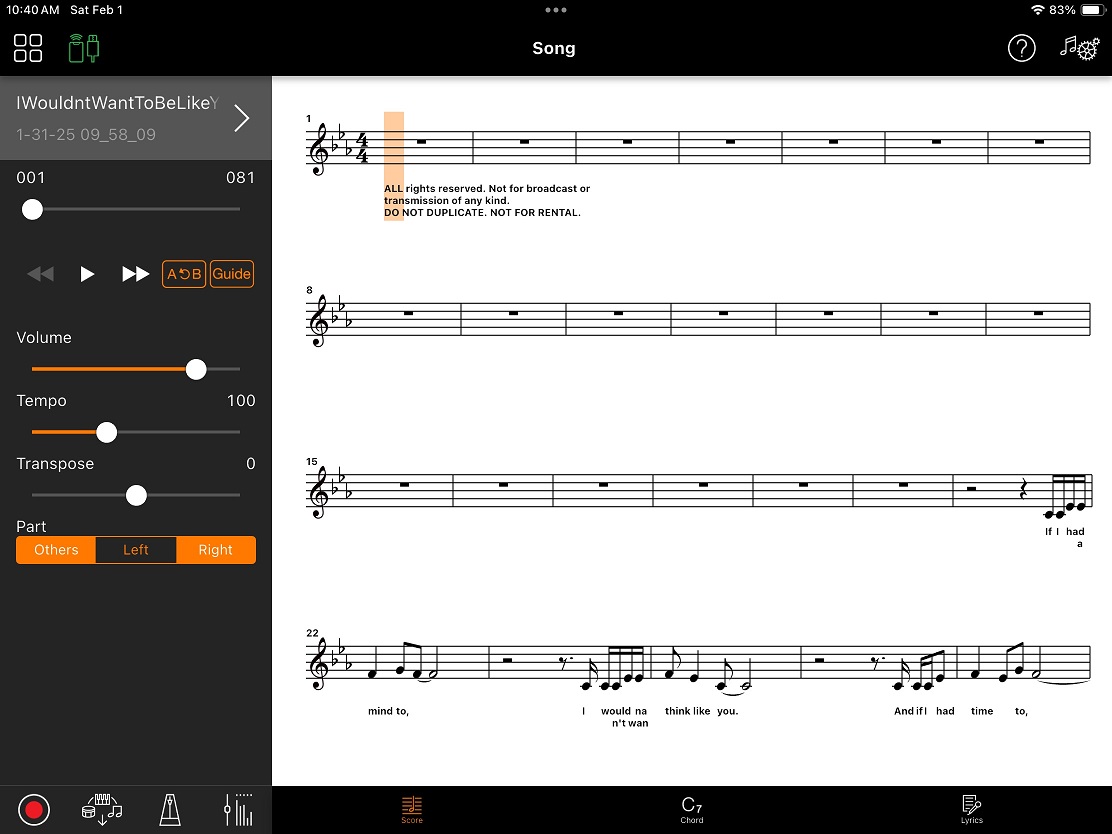
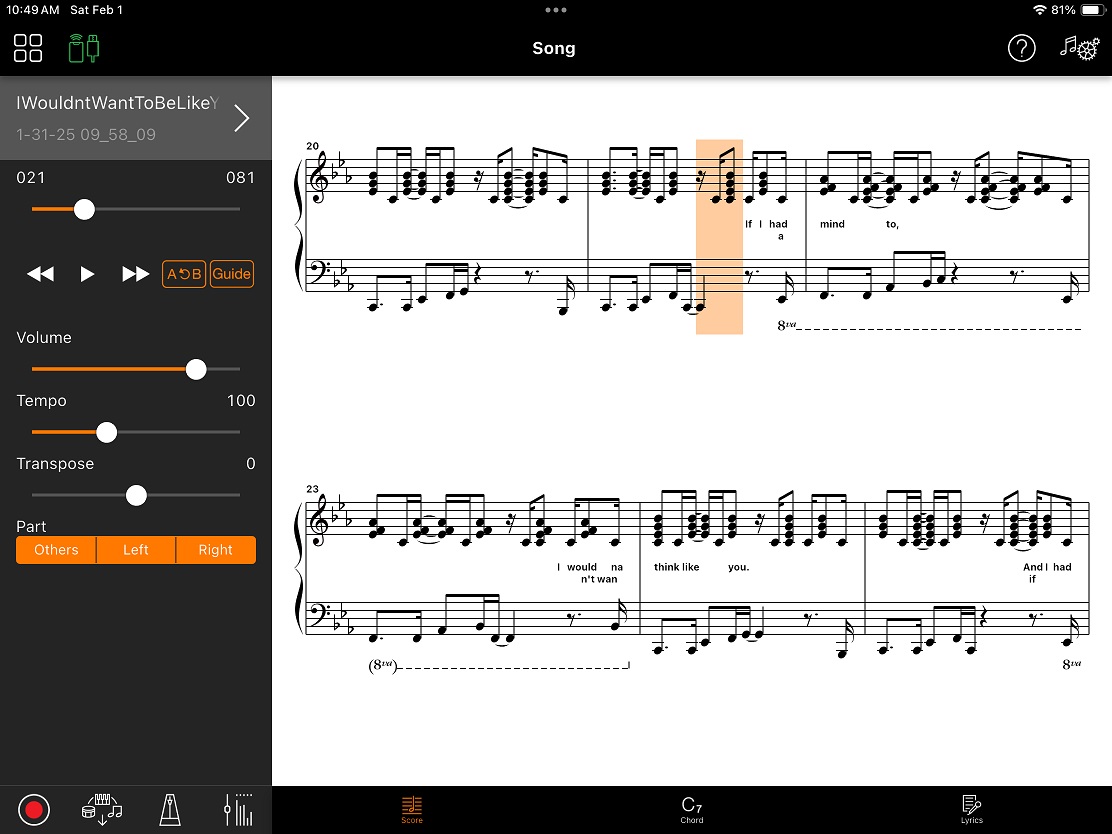
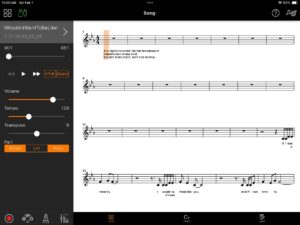
Smart Pianist displays a score for I Wouldn’t Want To Be Like You. It looks like the melody part, so the first N measures are blank during the instrumental introduction. Play by ear and fool around on a Cm7 scale…

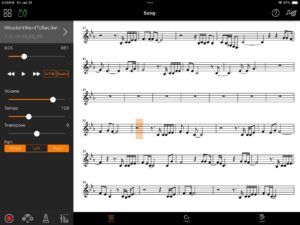
Smart Pianist didn’t find chord data — no surprise as GM doesn’t support chord meta-events. You do get lyrics. TUNE 1000 was good with lyrics. It’s a shame TUNE 1000 as a company died over 15 years ago.

Smart Pianist displays what it can and you can have fun with it. Still, you may feel disappointed. Let’s try to make things better.
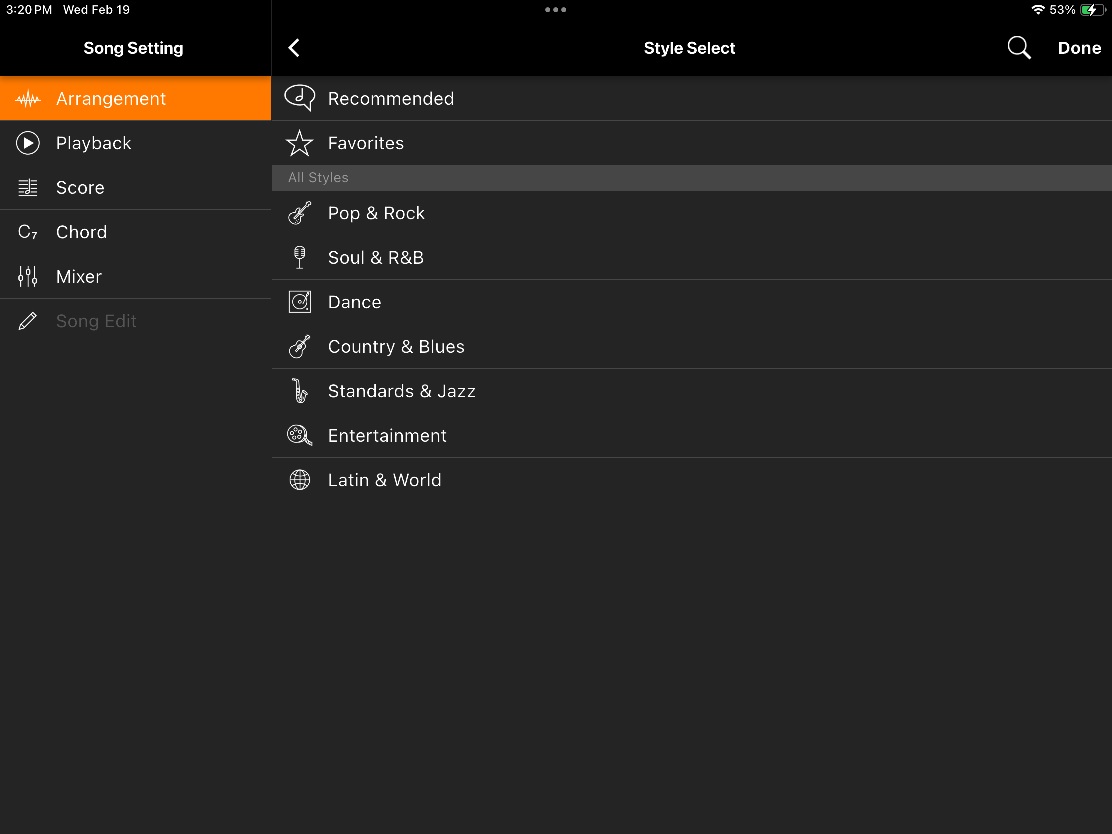
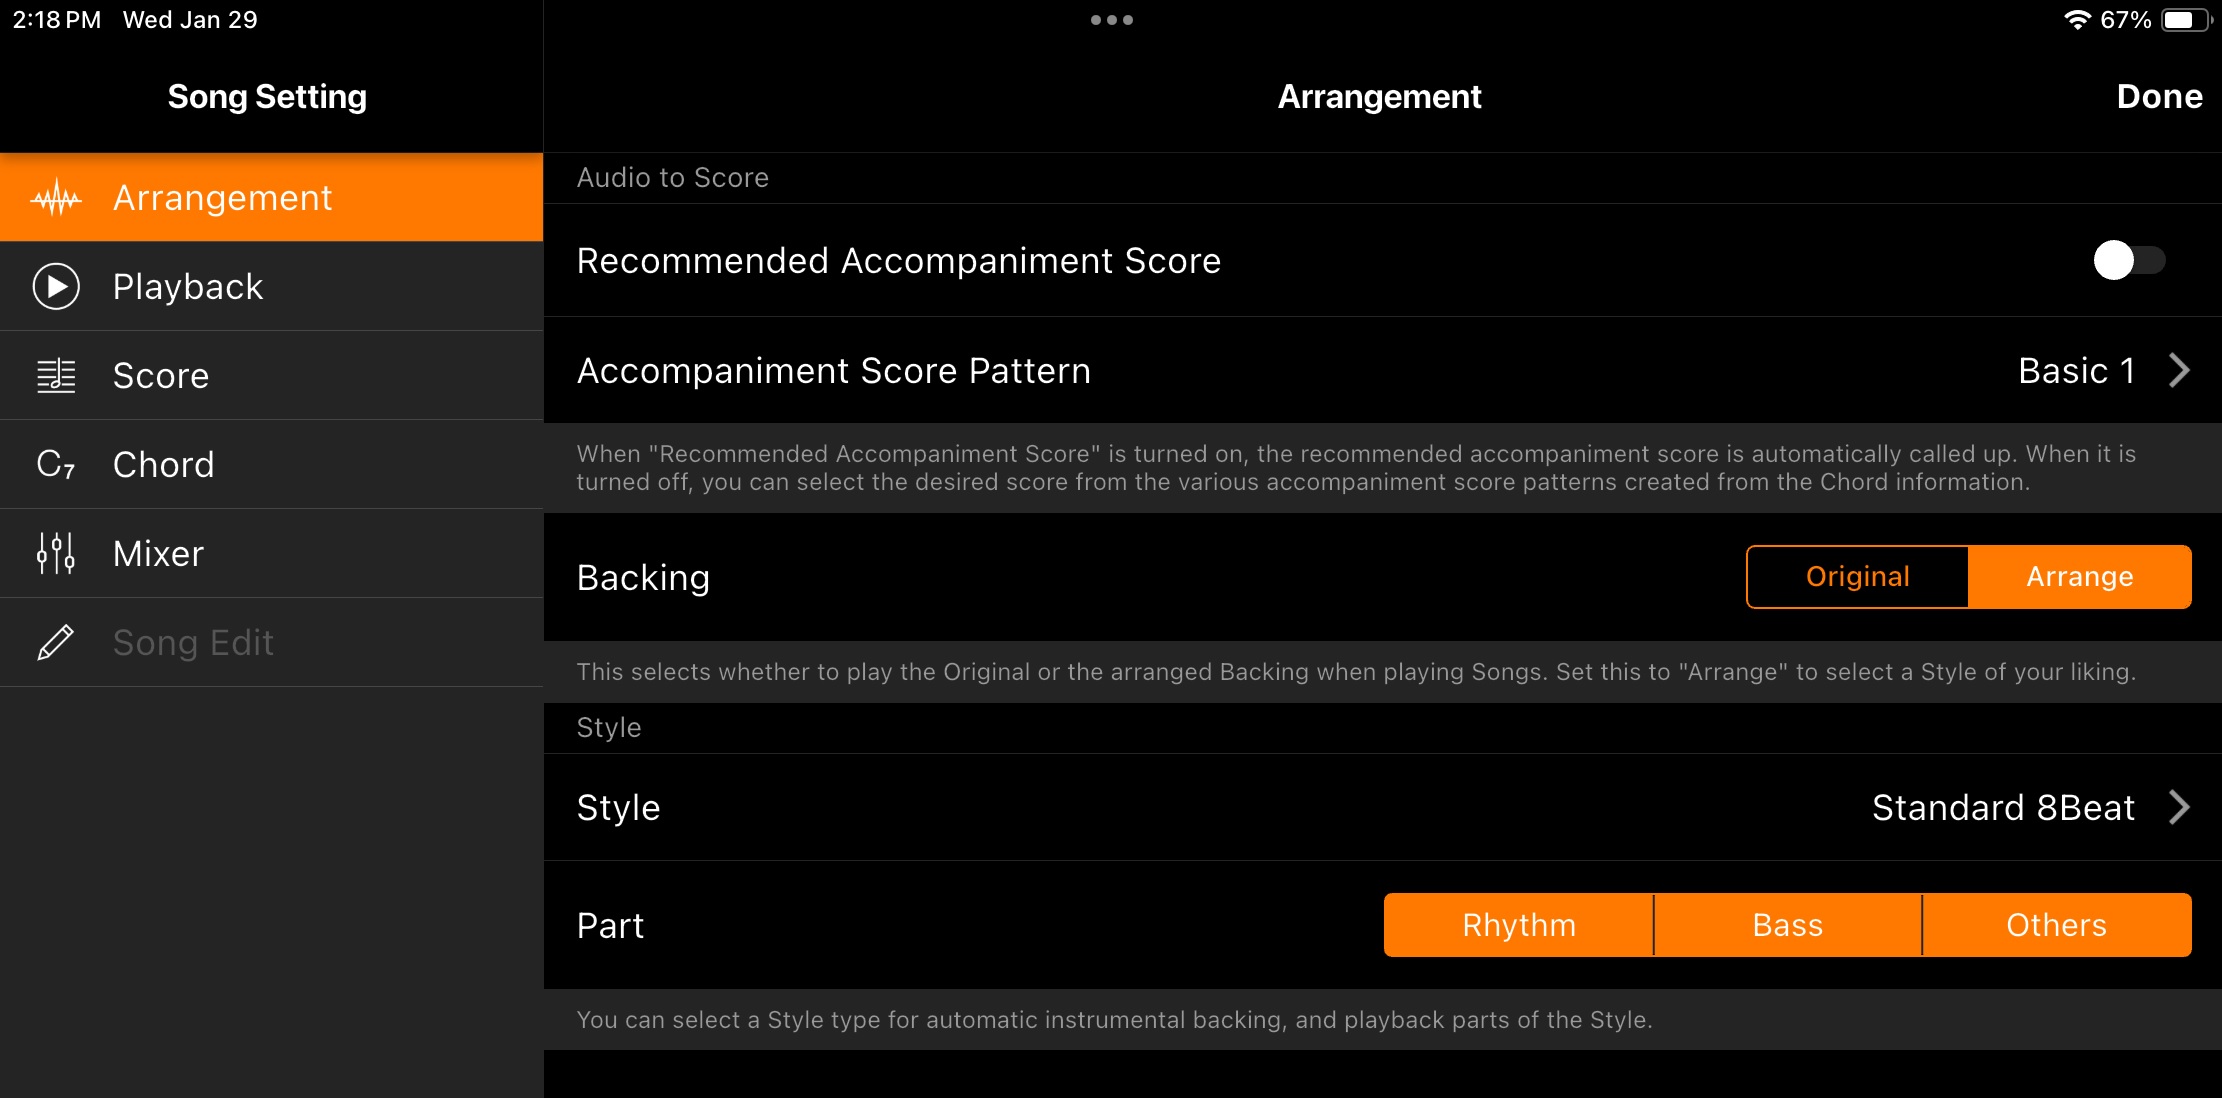
Song Settings

Up to this point in the tour, we Smart Pianist’s default Song Settings and went with them. Yamaha borrowed many ideas and features from its arranger workstations. Song Settings are the gateway to those features.

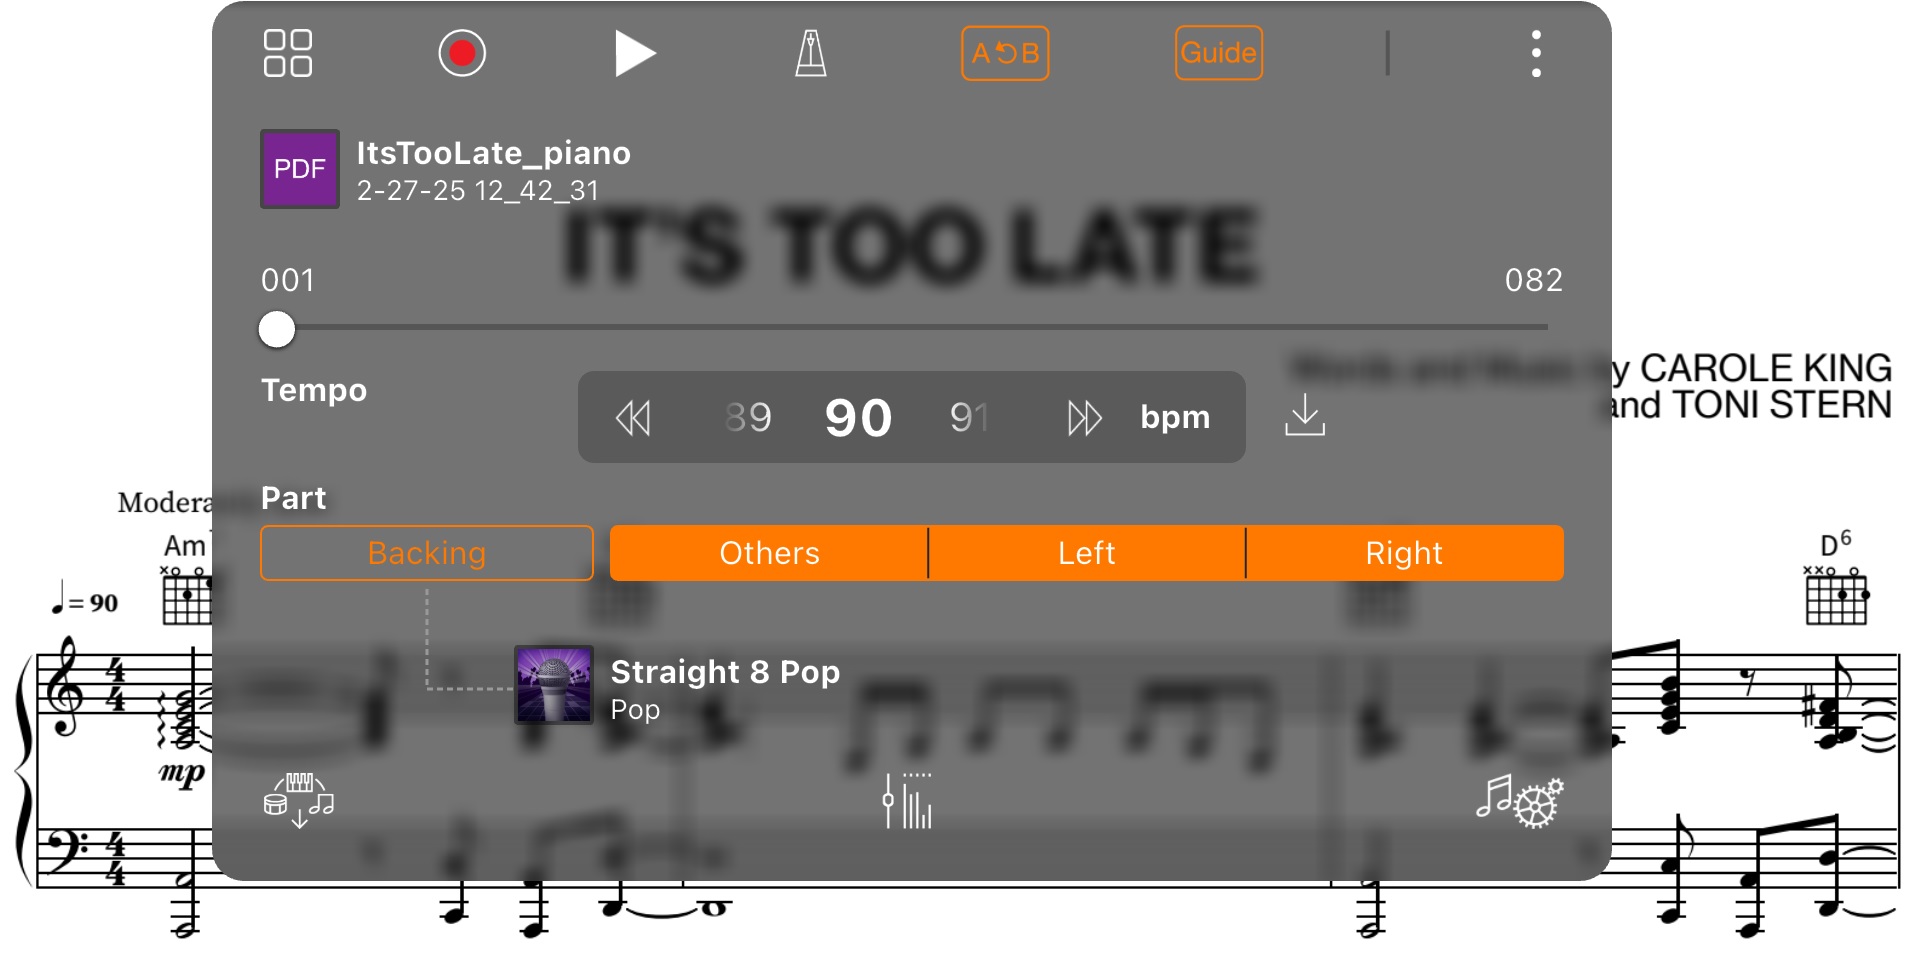
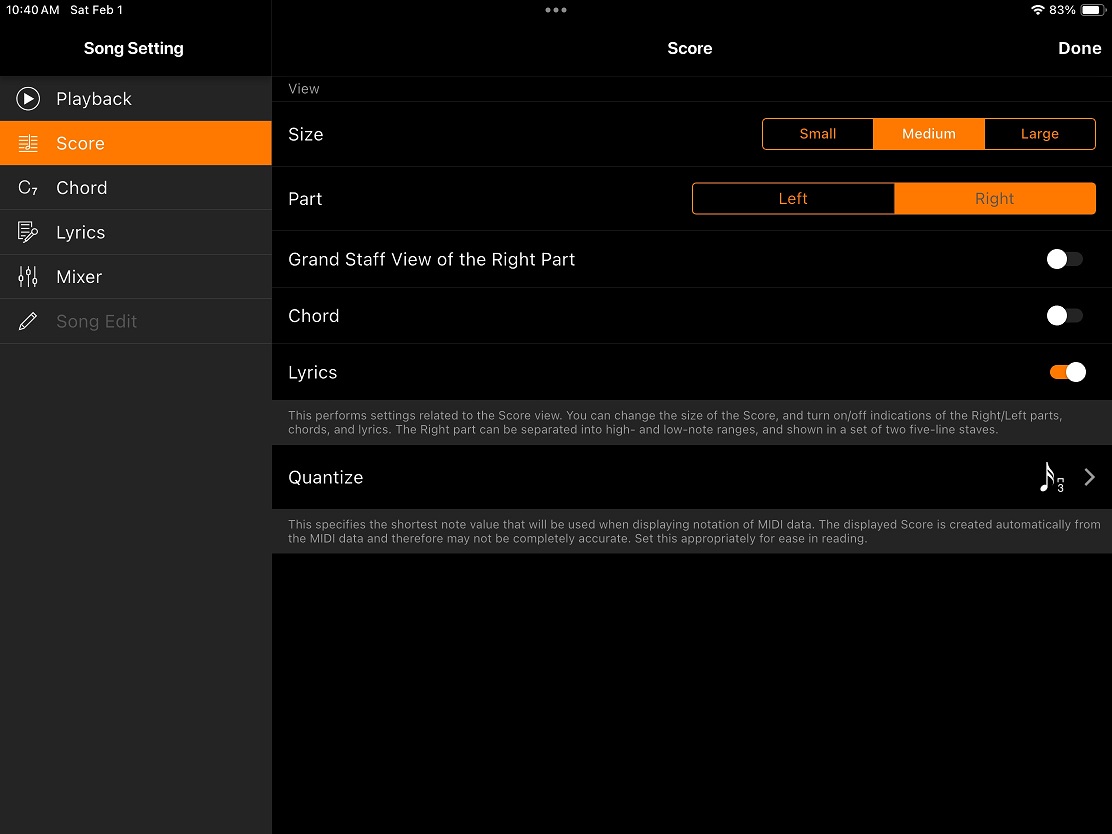
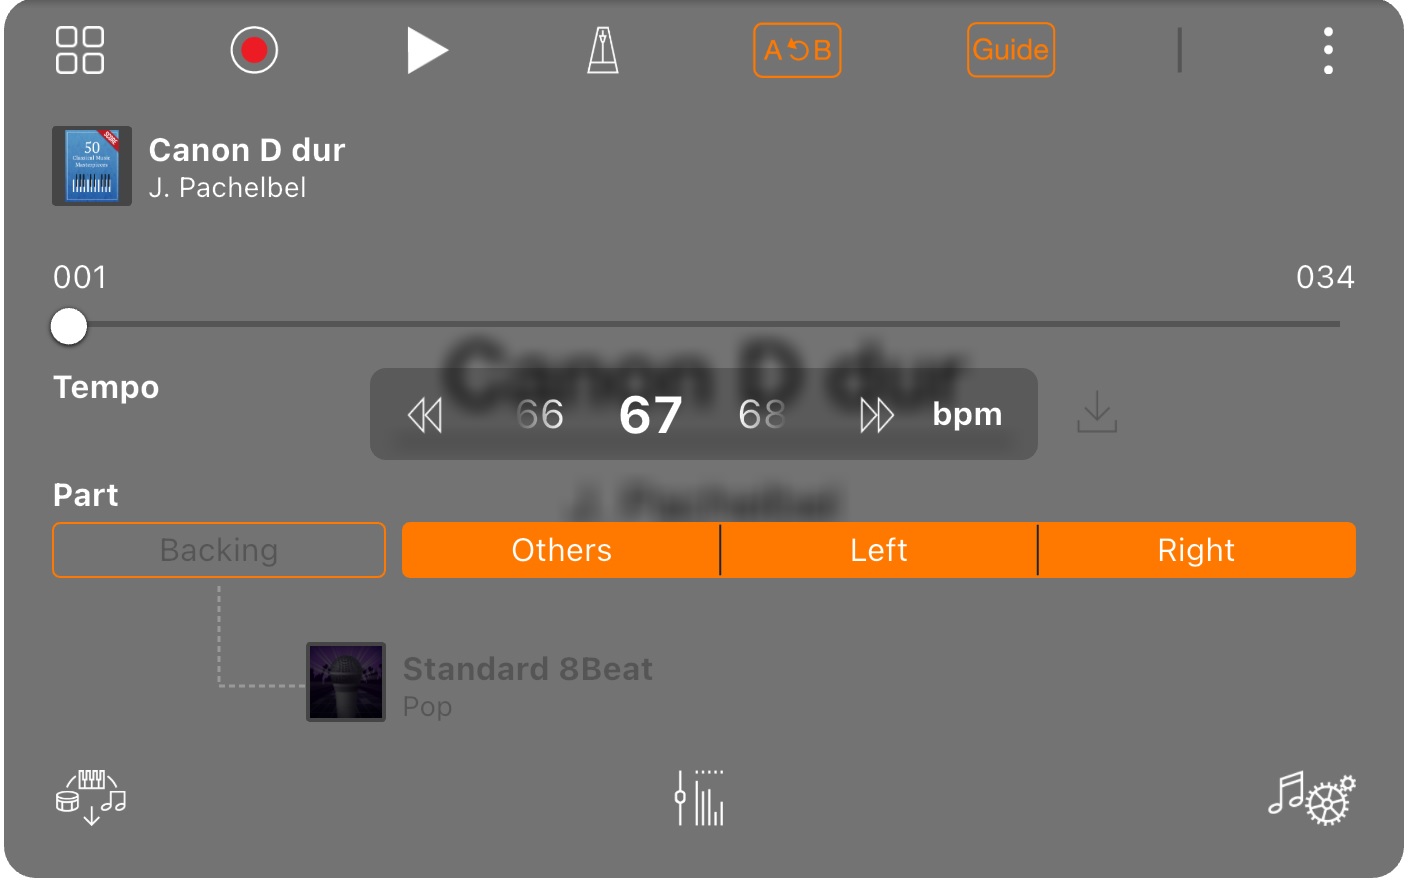
I want to display lyrics on the Score. Tap the Song Settings icon in the upper right-hand corner of the screen. Then tap “Score” to select the Score Settings page.

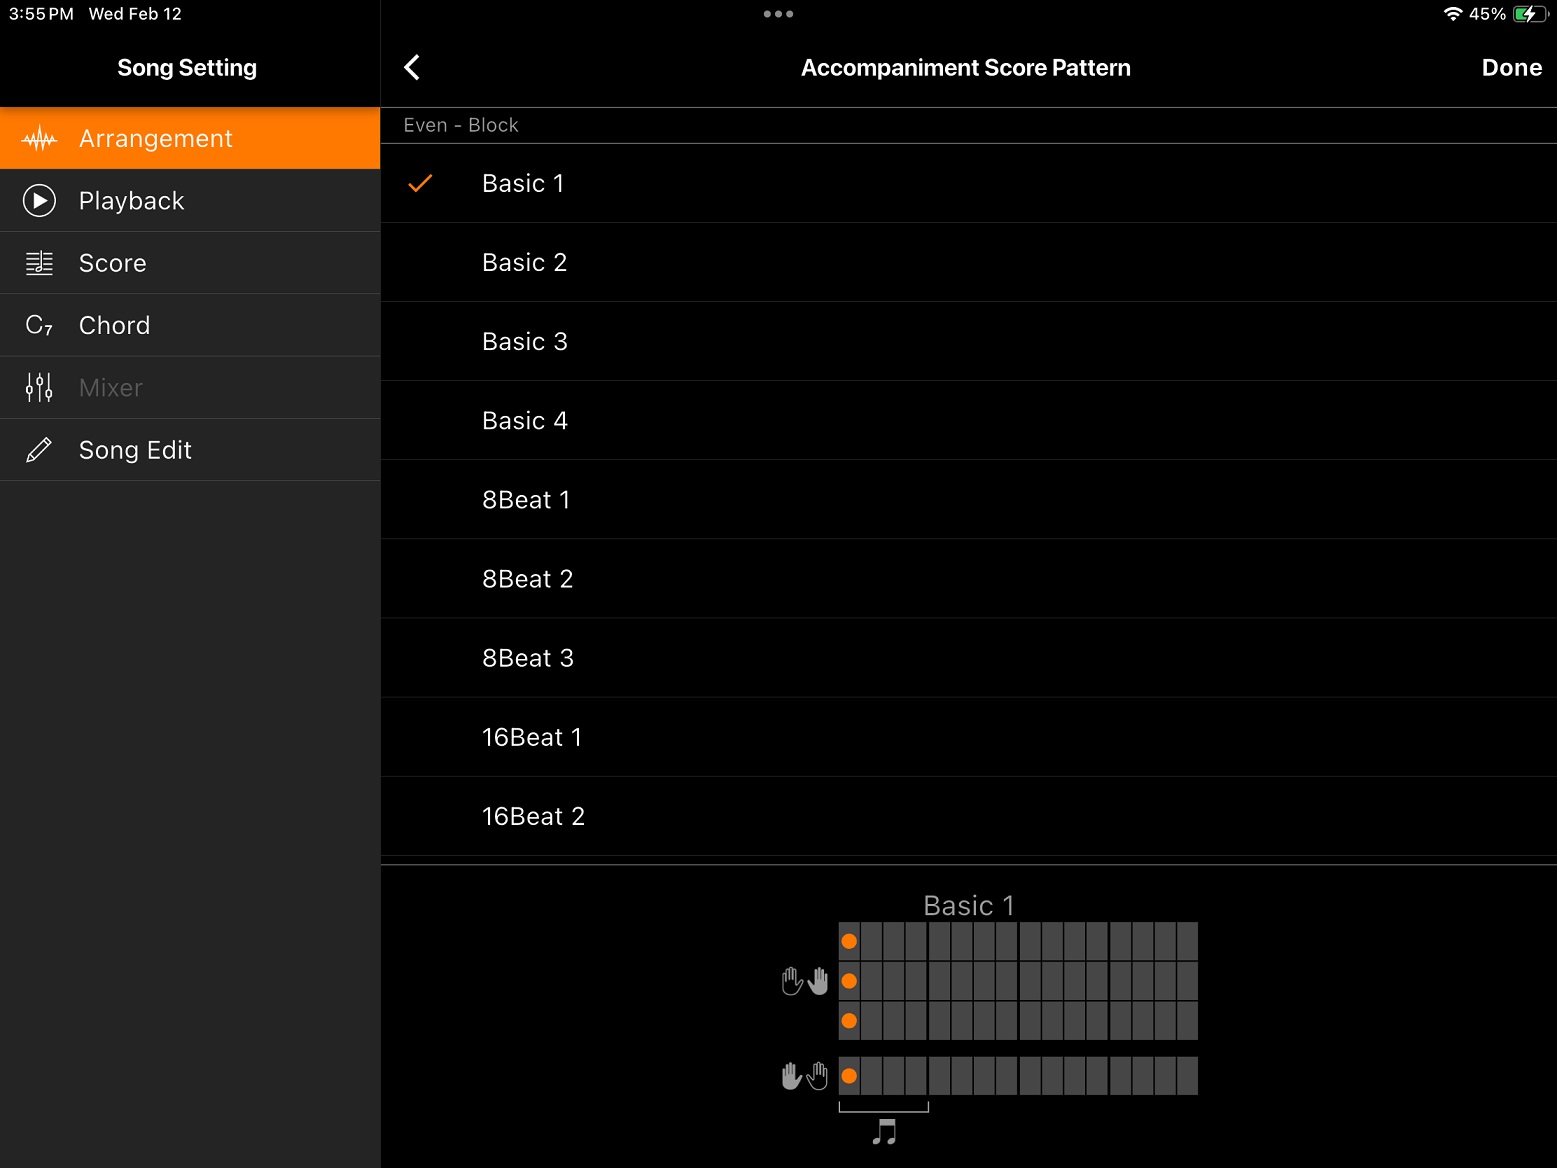
The Score Settings page has six settings:

  • Choose the score display size: Small, Medium or Large.
  • Display the Left- and/or Right-hand parts
  • Display the Right-hand part on a grand staff (treble plus bass clef)
  • Display chords in the Score
  • Display lyrics in the Score
  • Set note quantization (granularity of the time grid)

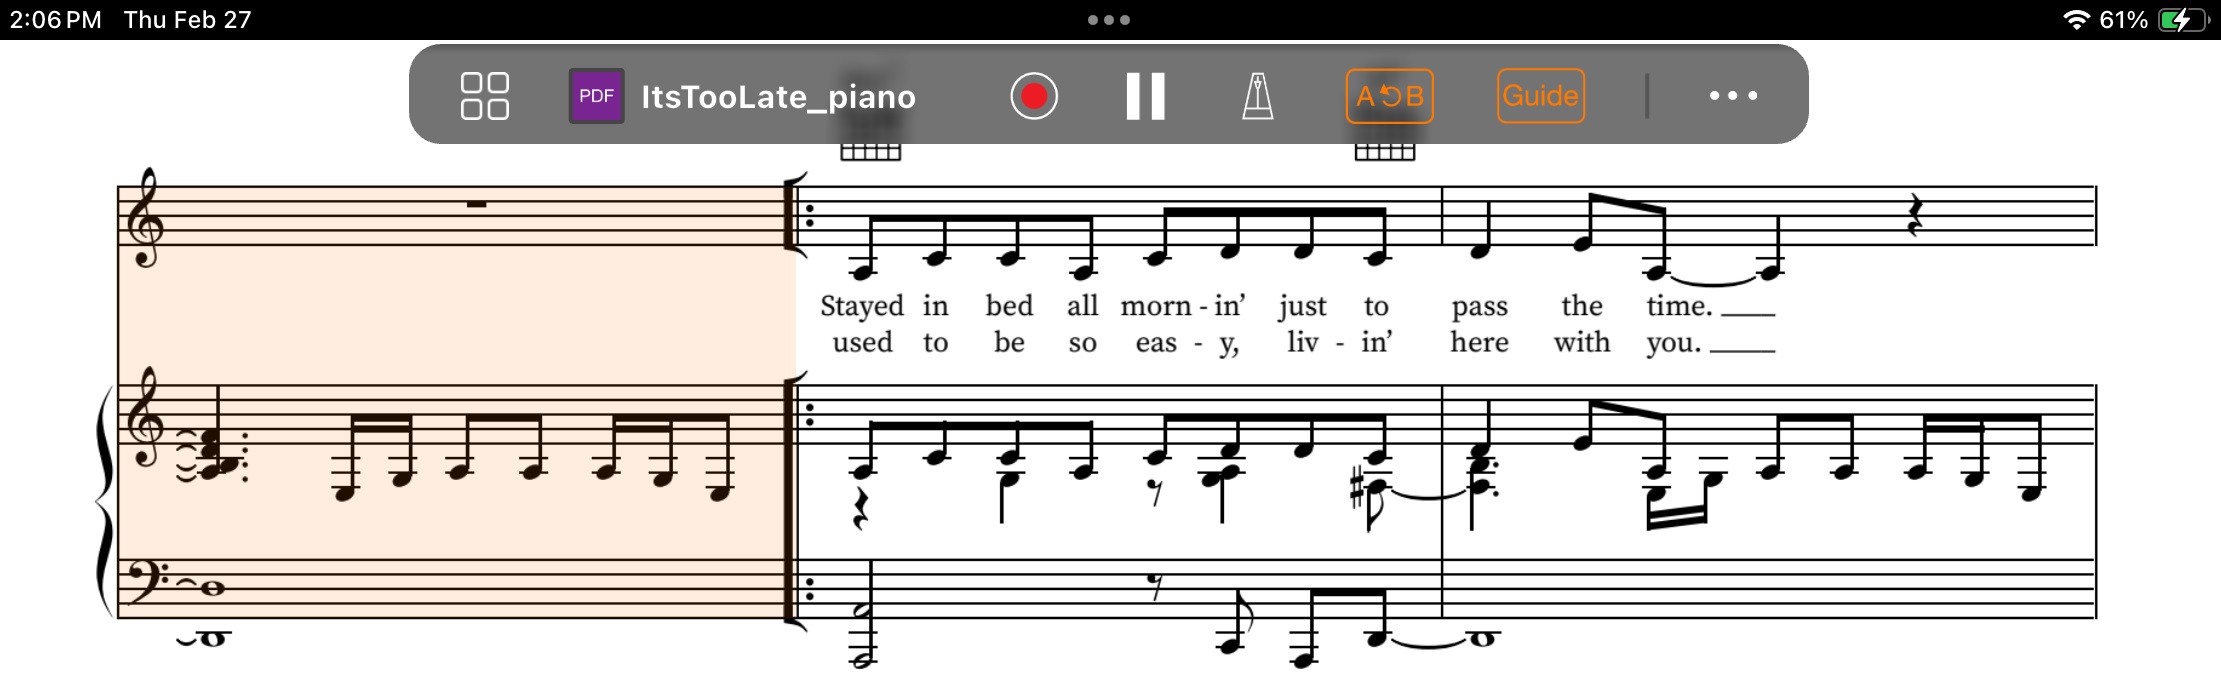
The I Wouldn’t Want To Be Like You MIDI file doesn’t have chord data, so I left Chord disabled. I turned Lyrics on. I tried turning a Left-hand part on, but Smart Pianist wouldn’t let me. [More about that in a second.]

The screen grab above shows the result. Smart Pianist displays the Score and, behold, lyrics appear below the melody line!

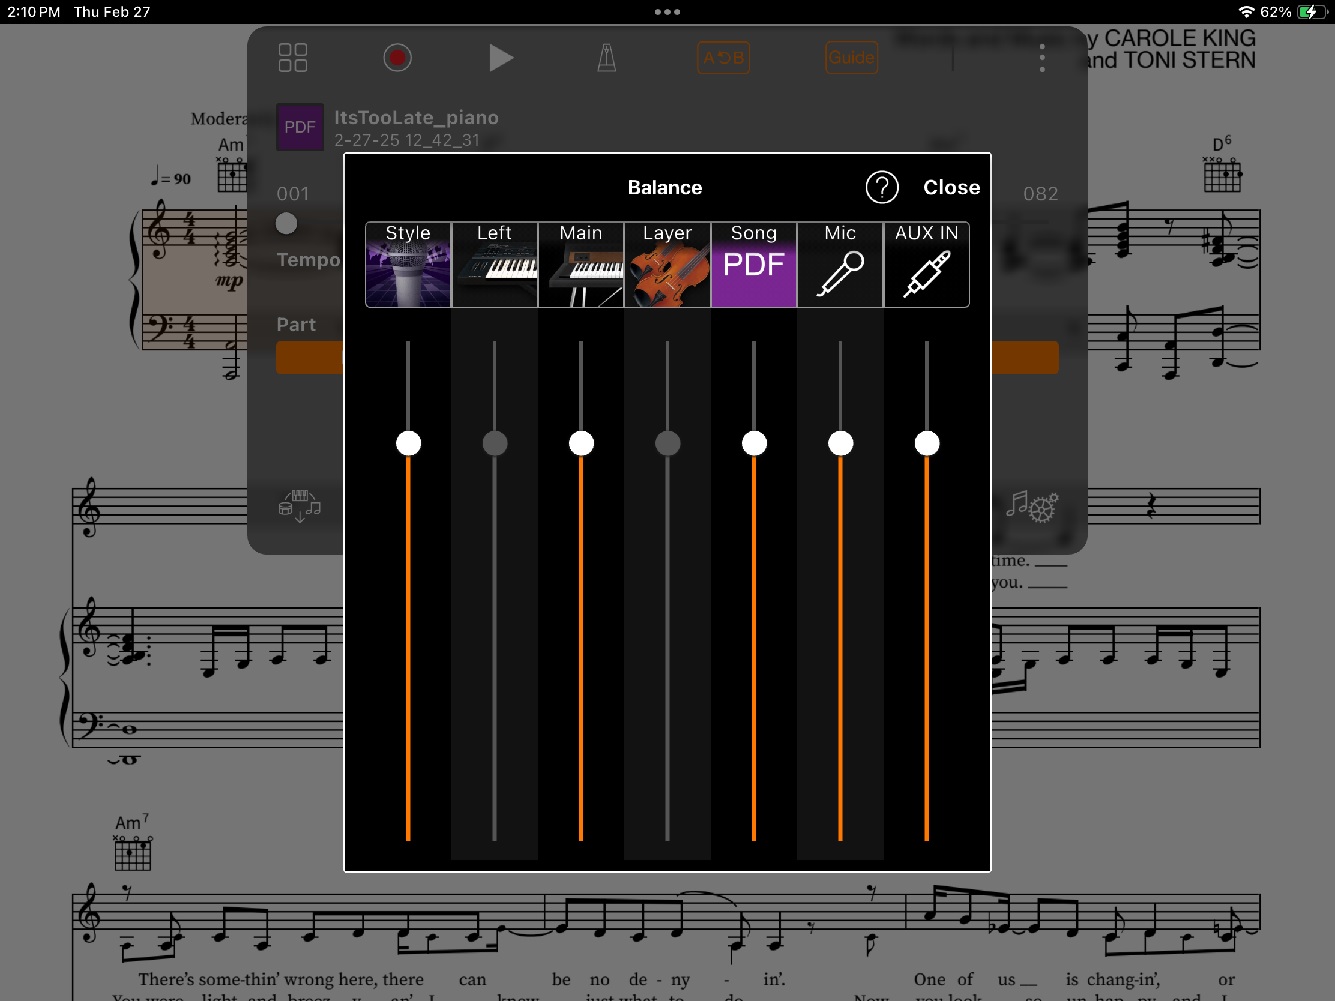
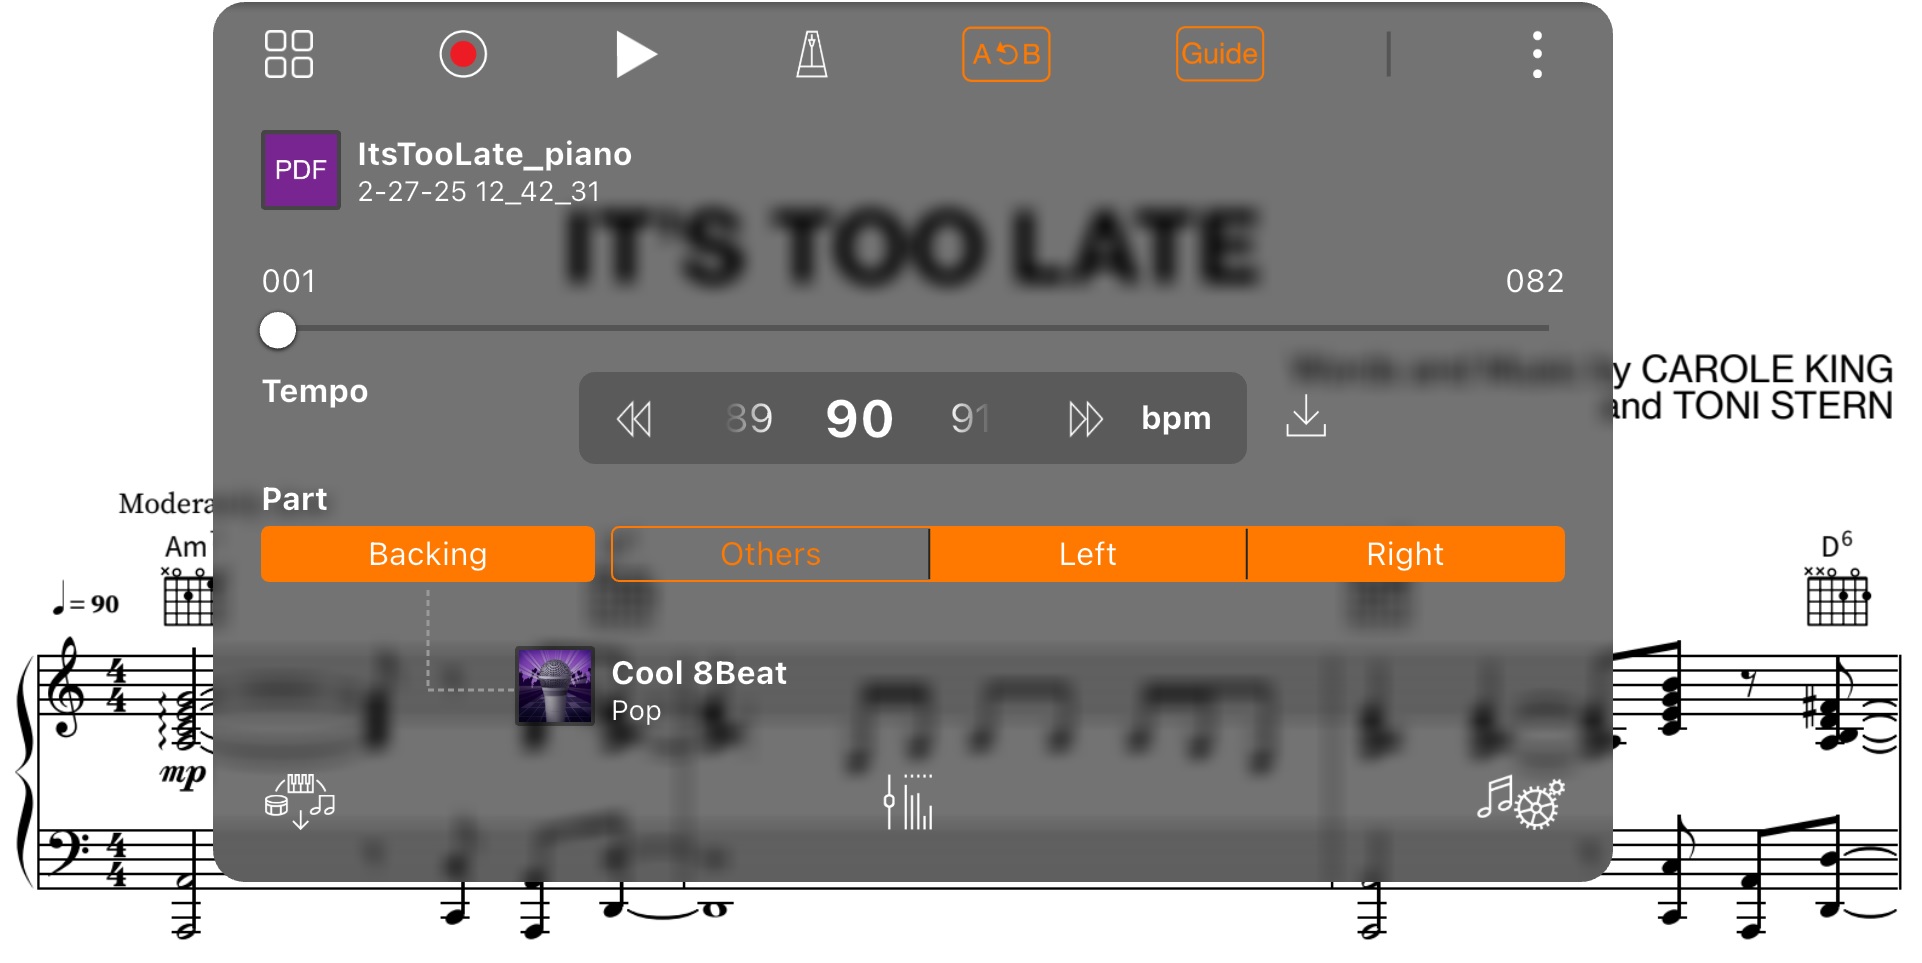
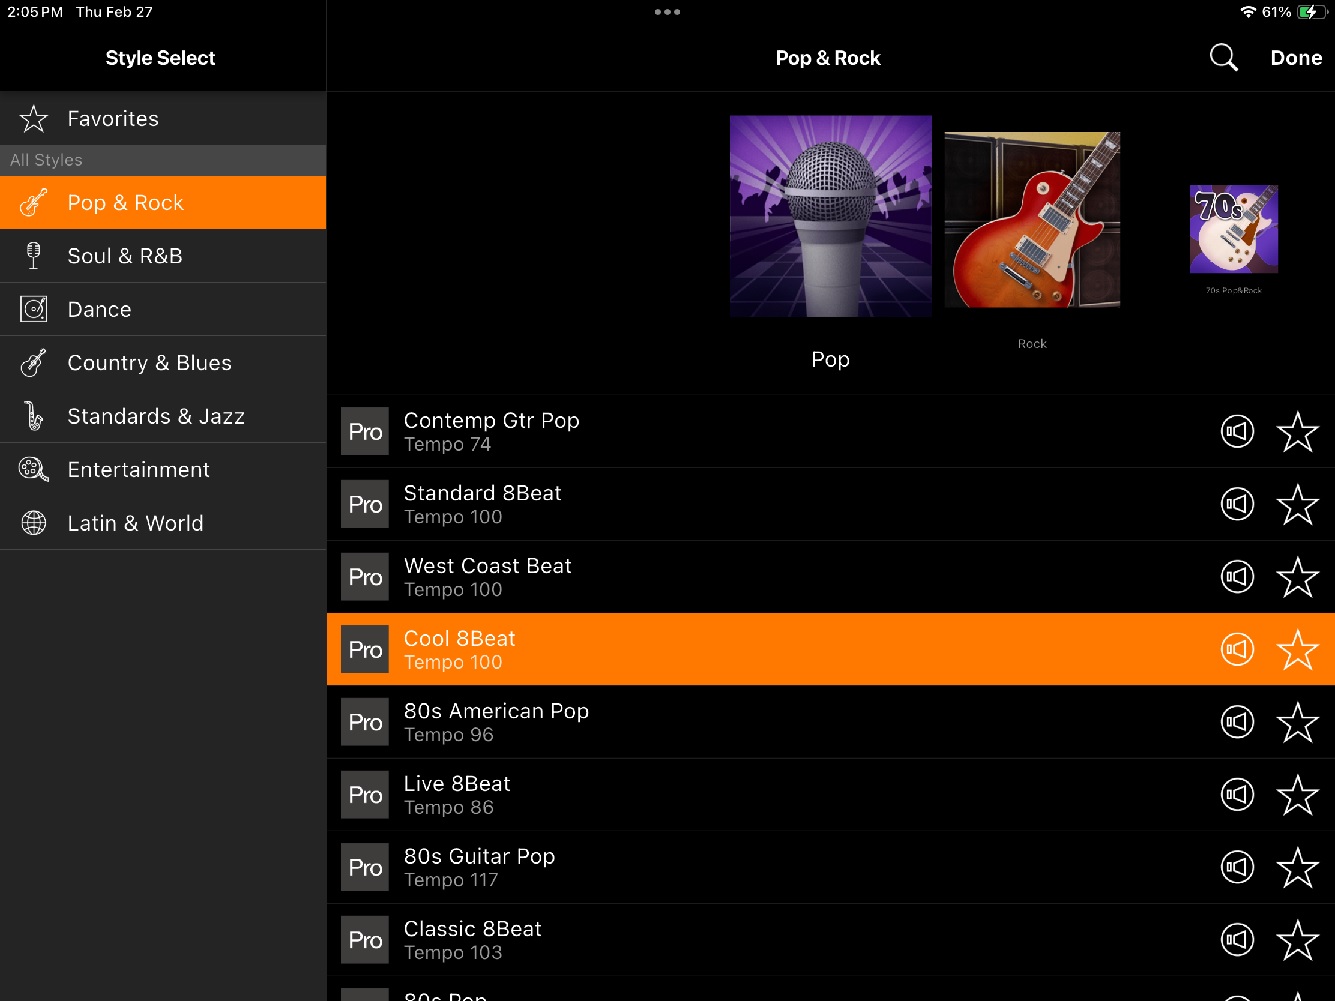
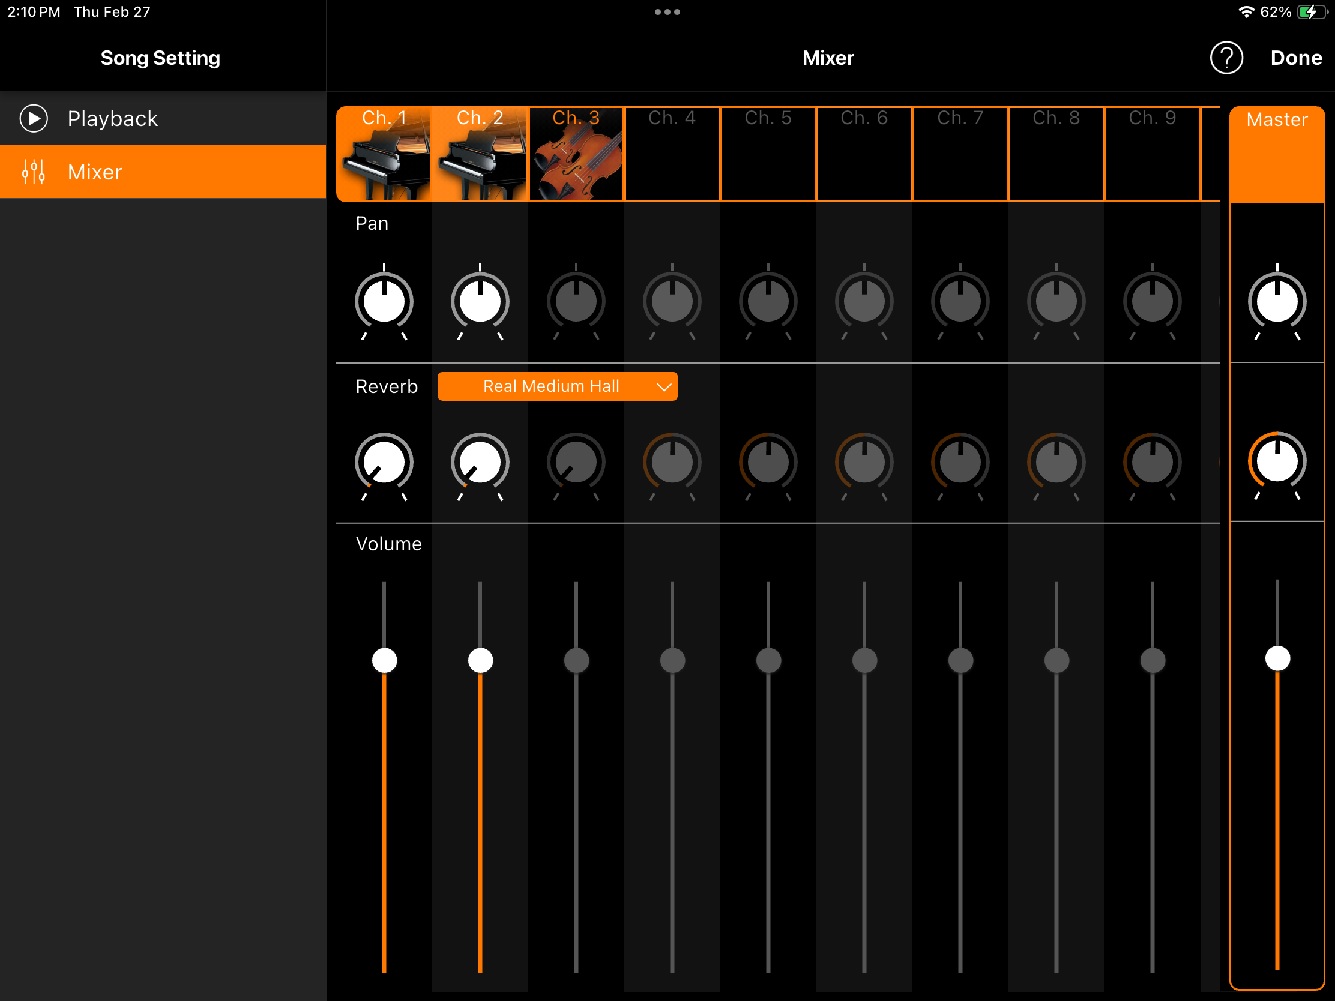
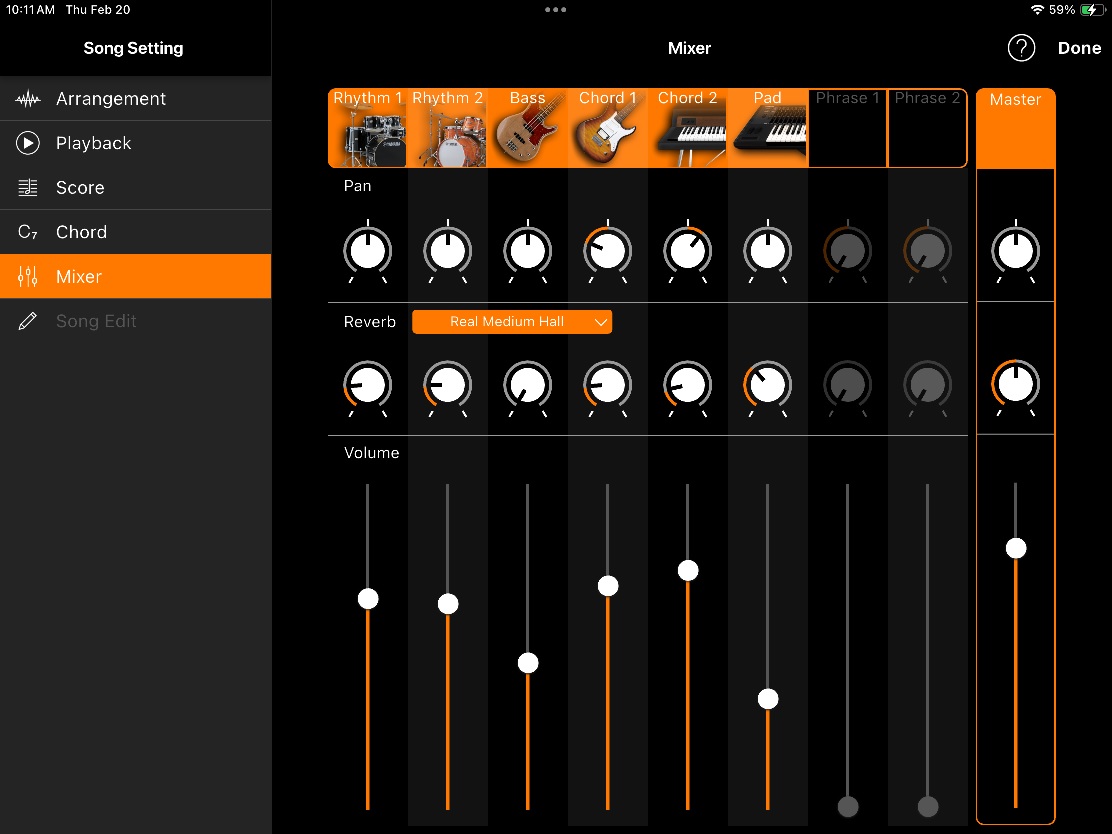
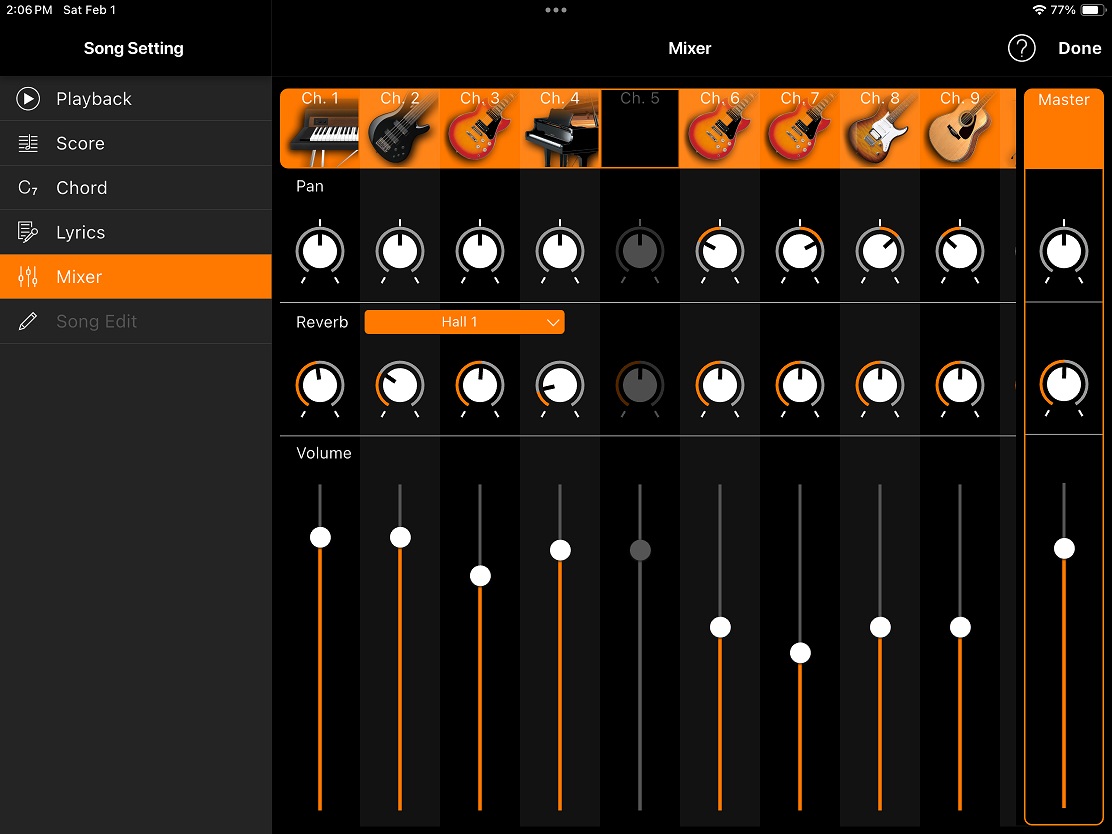
Instead of the melody, I really want to play chords and comp along with the song. In order to find a MIDI song track with the kind of part that I want to play, I opened the (MIDI) Mixer tab in the Song Settings.

The MIDI Mixer shows the instrument type which is assigned to each MIDI channel. (A MIDI song may have up to 16 channels.) Channel 1 has an electric piano (EP) which plays during the entire song. Channel 2 has a fretless bass. These MIDI channels are good candidates for the score.

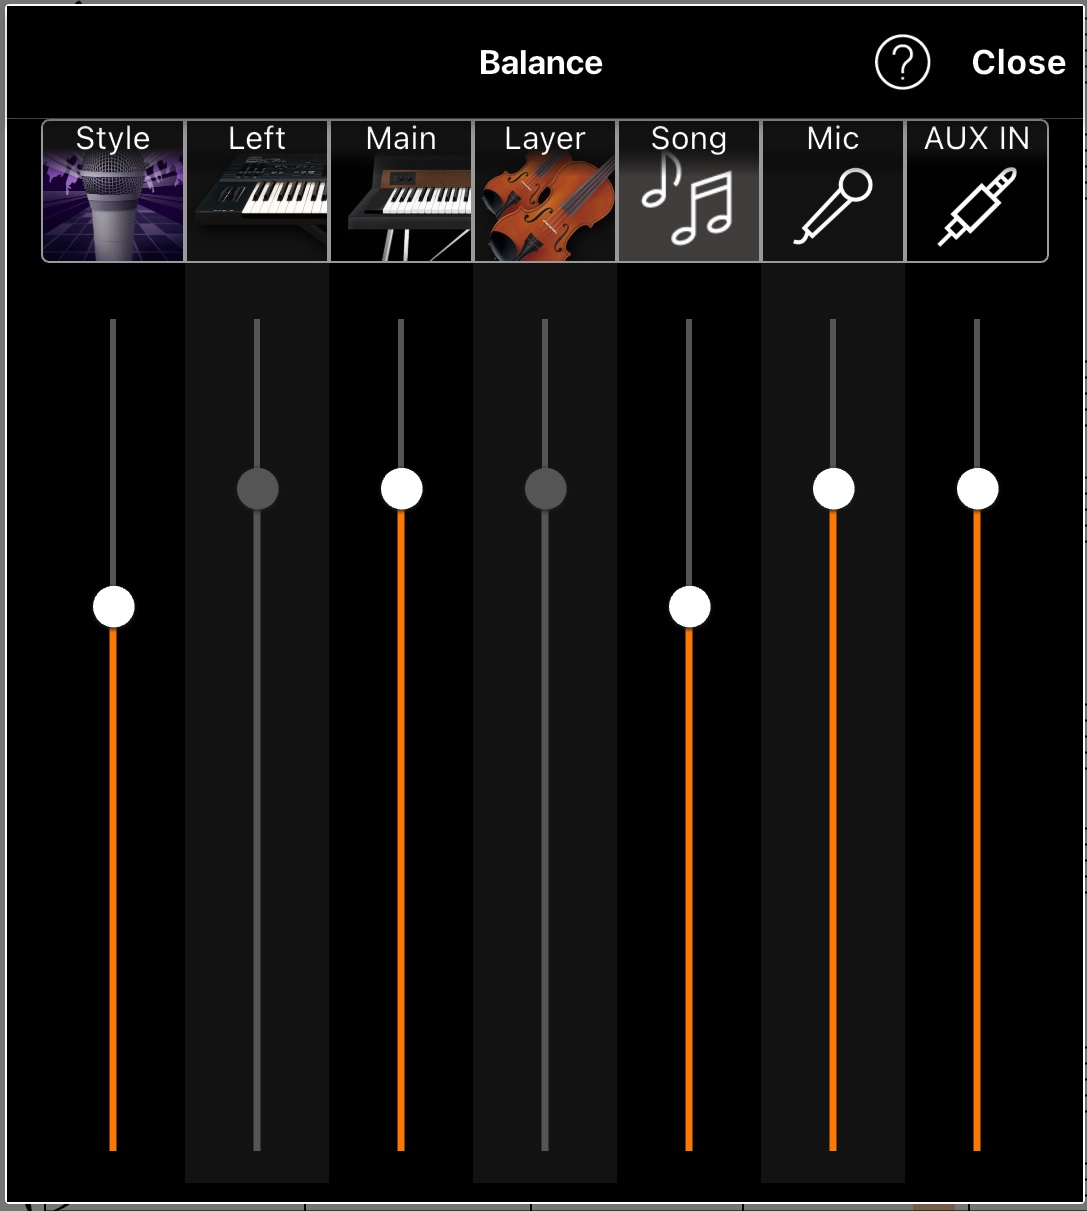
While we’re on the MIDI Mixer page, please note that you can set the volume, pan and reverb send for each instrumental part (channel). The Master knobs and slider set the overall pan, reverb send and volume level for the MIDI song. You can use the MIDI Mixer to re-mix the backing song!

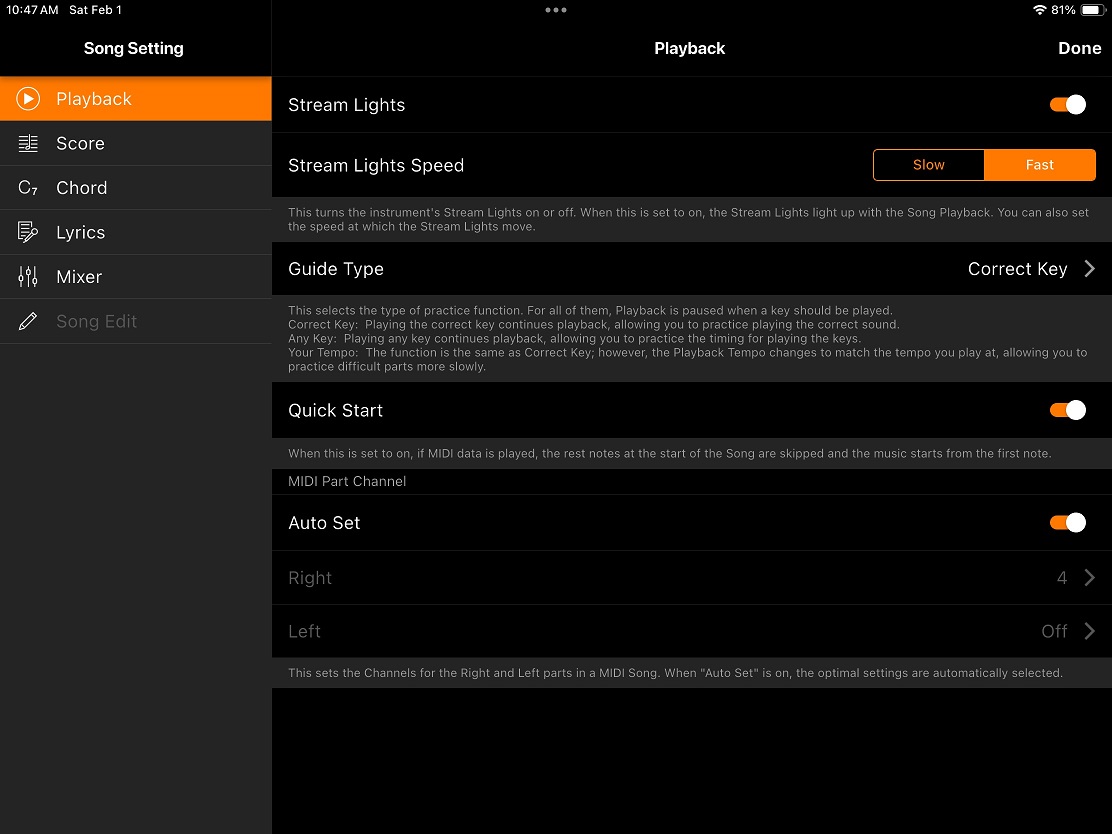
Now select the Song Settings Playback tab. Here you can turn the Stream Lights on and off, set the Stream Lights speed, etc.

Check out the MIDI Part Channel settings at the bottom of the page. By default, Auto Set is turned on. This instructs Smart Pianist to find appropriate MIDI channels to display in the score. Notice that Right is set to MIDI channel 4 and Left is off. A-ha! That’s why we saw the melody part (channel 4) in the score and why the Left-hand part is disabled.

Some inside baseball — TUNE 1000 the company is defunct, but their lasting contribution is the Karaoke (KAR) MIDI file format. Channel 4 in karaoke-land is the melody channel.

Turn off Auto Set.

Next, set the Right MIDI channel to 1 (the electric piano) and set the Left MIDI channel to 2 (the fretless bass). Tap the Done button to return to the Score display.

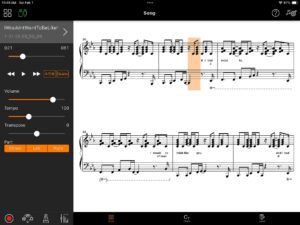
Voila! The Score shows the electric piano part in the upper staff and the fretless bass part in the lower staff. And, the Score still has the lyrics. This is just what I wanted.

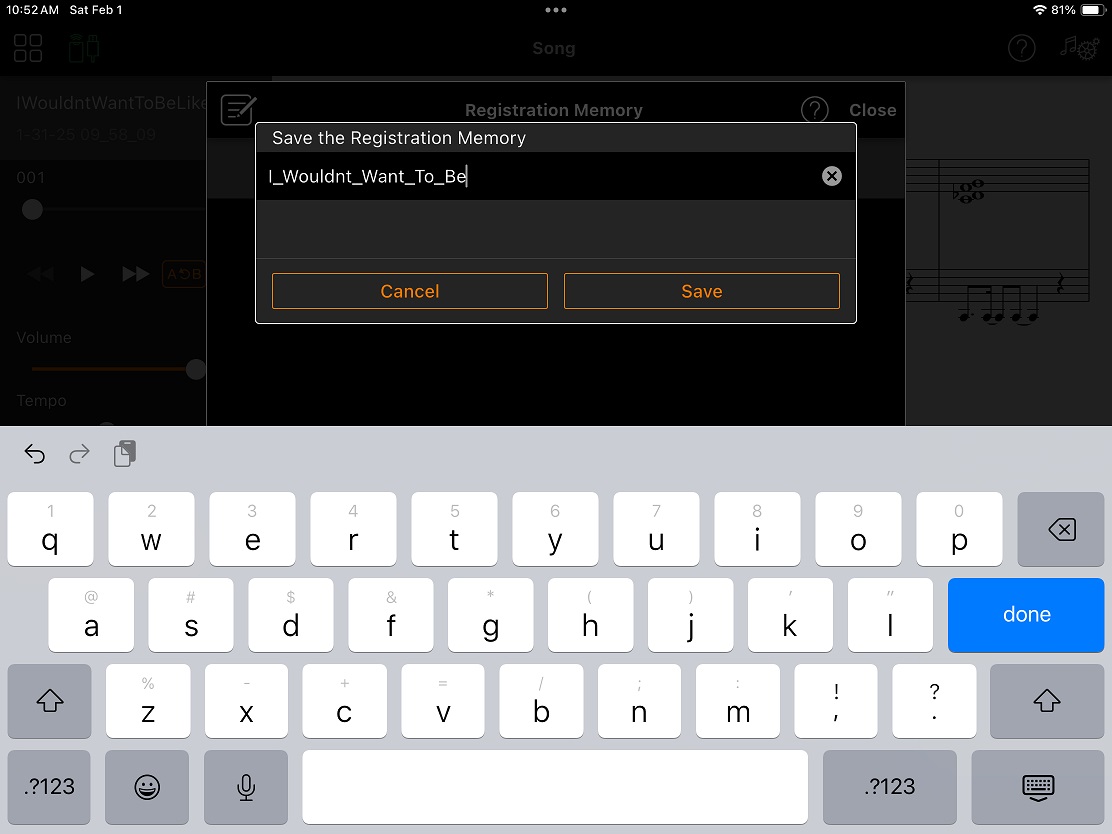
I don’t blame you if you feel a little tired after menu diving. You wouldn’t want to do that every time. That’s where Smart Pianist registrations come to the rescue. Tap the Registration icon in the lower left corner of the screen.

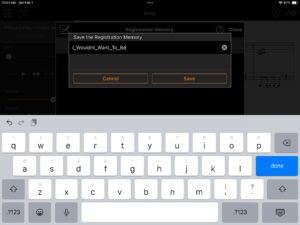
Smart Pianist pops up a dialog box asking for the name of the new Registration to be saved. Enter the name (I_Wouldnt_Want_To_Be) and tap the Save button. Smart Pianist saves all of the Song Settings. So the next time you want to play this song, just recall the Registration.

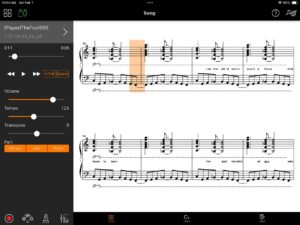
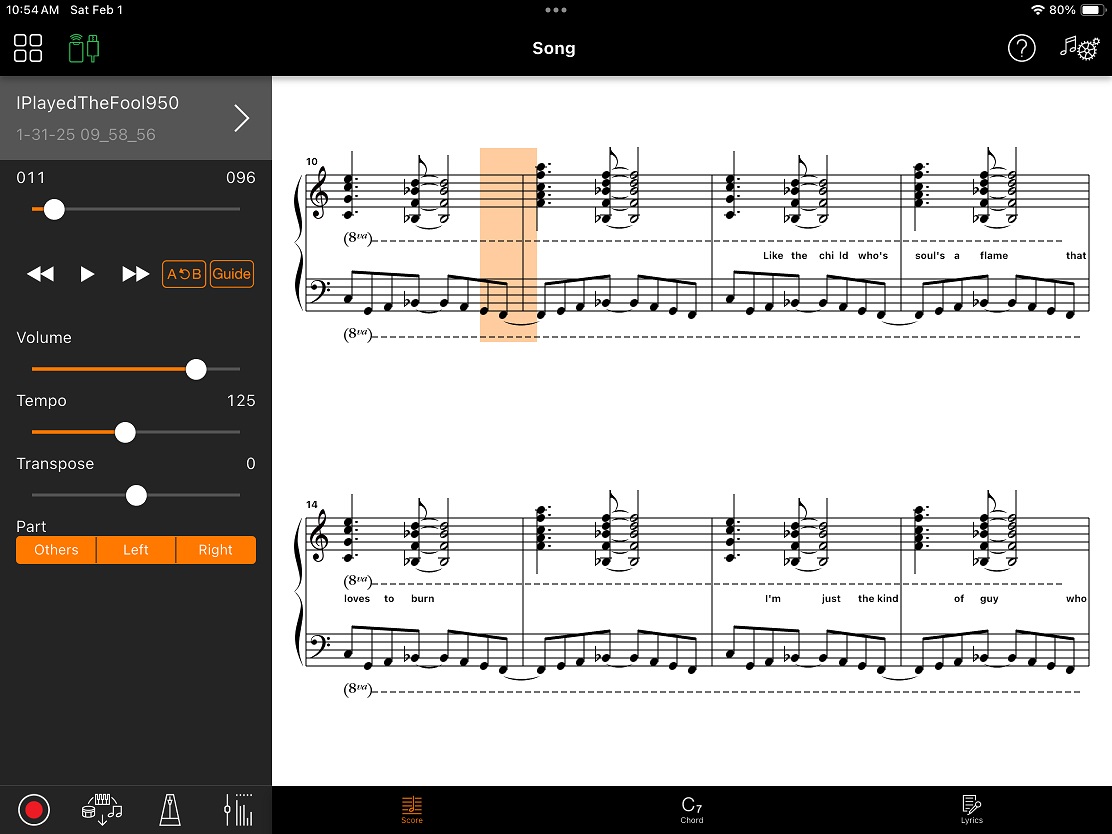
Here’s a bonus! I changed to a different MIDI song: I Played The Fool (by Southside Johnny and the Asbury Jukes). Smart Pianist applied the same, existing Song Settings and, by dumb luck, it displayed a nice right-hand part for comping, the bass line in the left-hand, and the lyrics. How good is that?

Well, I hope that you learned some new Smart Pianist tricks. Don’t be afraid to dive into the Song Settings and tweak the Score to your liking.

Copyright © 2025 Paul J. Drongowski

The quest for Backing Conductor

Yamaha released a new version of the Smart Pianist app. The release notes list three new features:

  • Backing Conductor (CSP Series, CVP Series and P-S500 only)
  • A-B Repeat for PDF scores
  • Scores for the 50 Classics are distributed and displayed via PDF

The Backing Conductor sounded intriguing and I was anxious to jump on it right away.

I noticed that the CSP Series 200 models require a Firmware Update for Backing Conductor. Be sure to check the downloads page for your CSP.

The Apple App store pushed version 3.6.0 to my iPad. No problem there. The screen shot (above) shows Smart Pianist 3.6.0 (January 15, 2025) running and firmware 1.09a installed on the CSP-170. Hopefully, firmware version 1.09a is good because Yamaha never stated if an update is required for the CSP 100 series.

What is Backing Conductor?

The big question: “What is Smart Pianist Backing Conductor?” At this point in time, Yamaha have not publicized any additional information. The Smart Pianist guide, such as it is, has not been updated.

Yamaha software engineering believes that they design intuitive user interfaces (apparently). No documentation required! Quite frankly, if one of my CS students made such a statement, they would have been corrected and marked down. Seriously. 🙁

And so began my quest for “Backing Conductor.”

Post-install splash screens

At one point in my quest, I deleted the Smart Pianist app and re-installed it. Below are two rather informative post-install screens which highlight Smart Pianist’s capabilities.

Blink or idly flip by and you will miss these highlights. Forever — they won’t be repeated.

Yamaha should distribute the example score “New York Hustle”. It appears in other examples. By the way, “Hustle” is misspelled as “Hastle” in the second splash screen. Sorry, I live with a professional editor…

Start-up splash screens

Every time you start up Smart Pianist and connect to your instrument, you will be treated to a different splash screen. Again, don’t blink because you will miss something.

Here are three of the screens which highlight new features in version 3.6.0. Yeah, I know. What are they and how do I use them?

“Backing Conductor” gets mentioned again without details.

Backing Conductor, finally

Finally, I hit on the fourth of these elusive splash screens (below).

Oh, now I see what I should look for!

When a PDF is displayed, Smart Pianist displays this playback control box at the top. Folks who have used earlier versions of Smart Pianist recognize the three part buttons: Others, Left and Right. Backing Conductor adds a new part button: Backing. I guess when Backing is turned ON, you can change the auto-accompaniment style, in this case, Cool 8Beat.

There’s “New York Hustle” and “Hastle”, again.

Taco Bell’s Cannon

Now that I have a clue, let’s try a PDF score: Canon D dur by Pachelbel.

Uh, oh. The Backing button and accompaniment style are greyed out. What gives? In this case, Smart Pianist plays back the PDF score without backing.

One of my big frustration using Smart Pianist is what appears to be inconsistent behavior and options. There must be rules governing behavior and user operations. The rules probably differ by the content/media type:

  • PDF score (PDF file)
  • MIDI song (Standard MIDI File)
  • Audio song (MP3, AAC, etc.)
  • Chords extracted from an audio song

I wish Yamaha would explicitly write down the dos and don’ts for each data type. Explicit rules would set expectations straight and reduce frustration.

Bonus screen

To round things out, here is the Song Settings Arrangement screen for Audio to Score playback.

In this screen, you can choose the accompaniment score pattern to be used when displaying the extracted score and you can choose the backing style. I like the ability to turn different backing parts off (on) individually. Sometimes ya just want a beat, sometimes a beat plus bass, and sometimes a full backing.

Summary

I hope my difficulties have not discouraged you. Maybe you’ll be a little bit smarter then I when you sit down with Smart Pianist.

Before ending, I want to mention my top Smart Pianist want: the ability to add new styles to Smart Pianist. I’m not asking for Style Creator as one finds in the arranger workstations — simply the ability to load new styles and play new backing styles. There are so many user-contributed styles (including my own!), the ability to load and play with new styles would give CSP a huge boost.

Copyright © 2025 Paul J. Drongowski

Yamaha stage keyboards: What’s next?

Lately, I’ve been contemplating the future of the Yamaha Stage keyboard line: the YC organ and CP digital piano. Both keyboard lines are mature; the CPs were released in January 2019 and the YCs were launched a year later in January 2020. Both models have received updates (including new voices). The latest updates, however, feel like “life extension” updates while new models are in the latter stages of development.

Does it make sense to merge the two product lines and reduce the number of SKUs? That would be a bit of challenge for Yamaha as organ-focus and piano-focus are defining features for the YC and CP, repsectively. In terms of sound, the updates have brought both lines closer together even though the front panels and user interface remain distinct. The YC got a lot of additional AP and EP voices bringing it into CP territory.

Then there is the “CK effect.” The CK is an all-rounder with drawbars, CP-like front panel controls and a set of secondary sounds which, frankly, leave both YC and CP wanting. So, given CK, it should be possible to merge the two stage keyboard product lines. Right?

These thoughts prompted me to take a look under the hood of both YC and CP. Gigantic, purpose-built front panels aside, YC and CP are brother and sister as far as digital electronics are concerned. There are a few differences on the analog side such as CP’s balanced XLR outputs. Of course, the keybeds are different, too, in keeping with organ-, EP- and AP-focus.

Yamaha Stage CP block diagram (click to enlarge)

Let’s tour stage CP first. The primary digital components are:

  • Yamaha SWX09 CPU and DSP (248MHz internal clock)
  • Yamaha SWP70 tone generator (191.9232MHz internal clock)

The SWX09 integrates an ARM Cortex host processor, an unspecified DSP core, and a raft of external interfaces. SWX09 also contains an AWM2-compatible tone generator and effects/mixing section. In stage CP, the wave ROM, wave RAM and DSP RAM interfaces are unused. Board real estate is wired for DSP SDRAM; the board position is unpopulated.

Without SWX DSP RAM, the CP models cannot implement Virtual Resonance Modeling (VRM).

The SWX09 is a mainstay in the Yamaha CLP digital piano line. The SWX09 is the primary workhorse component in the CLP-685 and P-515 digital pianos, for example. The P-515 and CLP-685 each have 256MBytes of wave ROM which should give us a rough idea of the size of the CFX and Bösendorfer waveforms (samples). [The CLP and P-515 EPs are relatively old and probably aren’t very big in comparison.]

We see the SWP70 tone generator throughout Yamaha’s many product lines, so it’s not surprising to see it in the stage CP, too. The CP has 2GBytes of NAND flash waveform memory. Its SWP70 has DSP RAM and wave RAM. DSP RAM supports effect processing and Wave RAM caches in-flight (most recently used) waveform samples. The SWP70 has its own unpopulated DSP RAM position, labelled “For future model”.

Yamaha Stage YC block diagram (click to enlarge)

Not to leave anyone in suspense, the future model is YC. The YC SWX09 gets DSP SDRAM and the SWP70 gets its second DSP RAM channel filled. The CP is mainly a sample-playback engine while YC implements a Virtual Circuit Modeling organ engine in addition to sample-playback. I’m guessing that the SWX09 DSP hosts the all-important rotary speaker effect.

The YC’s waveform memory is the same capacity as CP: 2GBytes total waveform NAND flash. 2GBytes may seem gargantuan versus P-515’s 256MBytes. Pianos are memory hogs and with all of the updates, those 2GByte waveform memories may be full up (or close to capacity).

It will be interesting to see where Yamaha takes the Mark II stage keyboards. Here’s a few thoughts.

The CK61/CK88 gave Yamaha valuable experience with integration of organ, piano and other sampled voices. They have a lot of available content (voices, waveforms) and software IP (organ and rotary speaker simulation, AWM2, FM, VRM). If they combine their experience with existing technology, they could issue three models:

  • 61 Semi-weighted waterfall keys (organ focus)
  • 73 BHS weighted keys (EP focus)
  • 88 GEX piano-action keys (AP focus)

Unifying the YC and CP designs into one reduces the number of separate SKUs from five to three and increases economy through scale.

There’s a lot of competitive pressure to produce an all-in-one stage keyboard. Nord (Clavia) have not been sitting on their hands and the Nord Stage (4) marches on! Yamaha’s own Montage M series shows the way, packing all-rounder functionality into a single keyboard.

As to new technology, announcements for the CLP-800 series Clavinova pianos are touting “a new tone generator chip with increased computational power” and imply that the new TG chip enables enhanced Virtual Resonance Modeling. An SWX10, perhaps? I’d like to see both VRM and VCM organ technology in the same package.

      
                 Physical
    Keyboard   Waveform Mem  Expansion mem
    ---------  ------------  -------------
    CLP-685      256 MBytes
    P-515        256 MBytes
    PSR-SX900      2 GBytes     1 GByte
    PSR-SX700      1 GByte    400 MBytes
    DGX-670      512 MBytes
    CSP-170        1 GByte

Copyright © 2024 Paul J. Drongowski

Yamaha announce the Clavinova CLP-800 series

Yamaha have announced the much-anticipated CLP-800 series Clavinova digital pianos.

Personally, I was hoping for a significant bump over the CLP-785, the main reference point for this post. The CLP-785 — and now the CLP-885 — are the flagship “spinet” models. Although I enjoy my CSP-170, my dealer offers an attractive trade-in, trade-up plan which I would exercise given the right motivation. After a quick glance through the Owner’s Manual and Data List, my ardor cooled, sad to say.

Yamaha CLP-845 digital piano

The user interface (i.e., front panel and key functions) and choice of keybed (e.g., GrandTouch and GrandTouch-S) remain largely the same. The piano engine features the same capabilities as the CLP-700 series:

Secondary voices and the XG (GS, GM2) sound set remain the same. Please see the CLP-800 series comparison table as lower-end models may elide specific features and voices.

The CFX Grand and Bösendorfer are the featured pianos, and include Binaural Sampling. The CLP-800 series adds two new acoustic piano voices: Chill Out Piano and Lo-Fi Piano. The same Fortepianos are offered: Scarlatti, Mozart, Beethoven, and Chopin Pianos. All other secondary voices are the same in the CLP-800 series. No big upgrades.

The classical and lesson song lists and rhythm list are the same.

The CLP-800 series Owner’s Manual has many revisions for readability. The different organization makes it difficult to make an exact features by feature comparison between the series. I haven’t spotted any gotta-have new features.

Yamaha have made significant changes in the built-in sound system(s):

Component      CLP-885                  CLP-785
-------------  ------------------------  ------------------------
Amplifiers     (45 W + 30 W + 40 W) × 2  (50 W + 50 W + 50 W) × 2

Speakers       (16 cm with diffuser +    (16 cm + 
               8 cm with diffuser +      8 cm + 
               2.5 cm (dome) with        2.5 cm (dome) +
               Bidirectional Horn) × 2,  transducer) × 2,
               Spruce Cone Speaker       Spruce Cone Speaker

You will find similar changes in spec for other models, should you look at the CLP-800 series comparison chart.

Yamaha have given the DSP effect types a modest boost by adding “Effect types used for a specific Voice”. These effect types are:

    VCM EQ 501             Virtual Circuit Modeling (VCM) vintage EQ
    Comp Distortion        Compressor stage followed by distortion
    Vintage Phaser Stereo  VCM analog vintage phaser
    Stereo Overdrive       Stereo overdrive distortion
    Damper Resonance       Simulates grand piano damper resonance
    Hall 5                 REV-X hall reverb

Yamaha arranger and synth enthusiasts will recognize these effect types. They are DSP algorithms that are typically applied to electric piano and other keyboard voices.

Initial Reaction

My initial reaction is “Big-whoop”. [“Disappointment” for those of you who are not familiar with American sarcasm.]

The big functional change appears to be the use of “diffusers” in the built-in sound system. The CLP-800 Web page has a big chart comparing sound system components. The chart made me feel like I was buying a PA system, not a piano. Yamaha need to find a different way to promote this technology — something to make the technology approachable and cuddly to the average customer. Way too techie!

Frankly, I’m left cold. Since I’m happy with my CSP-170, I cannot find a compelling reason to upgrade to the CLP-800 product line (or the CLP-885, in particular). Guess that trade-up option is going to go unexercised…

Why the underwhelming Clavinova Series 800 update?

We know — from Yamaha’s quarterly call with analysts and investors — that the bottom has fallen out of the world-wide market for home digital pianos. China, in particular, is slow. Possibly, Yamaha did not feel the need or want to drive the home digital piano market too hard at this point in time. Perhaps they are saving bigger updates for the future when the market is more favorable?

This doesn’t mean that the CLP-800 series are bad pianos. I liked the Yamaha CLP-785 very much. As far as I’m concerned, personally, CLP-885 doesn’t give me a compelling reason to upgrade.

Technical footnote

The CLP-700 and CLP-800 series generate high resolution velocity and acceleration data with each MIDI note ON message. Two MIDI continuous controller (CC) messages are generated:

    CC#19    Key acceleration
    CC#88    High-resolution velocity prefix

By “prefix”, I suspect Yamaha mean the high order byte of an extended velocity data value. If you intend to use a “Grand Expression” digital piano with a personal computer-based software instrument (e.g., Modartt Pianoteq, Arturia Piano V, etc.), you will need to filter out or map these “extra” MIDI messages. Check the MIDI Implementation Chart for your model and software instrument (VST).

Copyright © 2024 Paul J. Drongowski

Ain’t no April Fool: piano evoce ß

The Japanese Yamaha site posted information about a new app called “piano evoce ß”. I’m going to quote the site as translated by the Google:

This is an AI ensemble app that extracts the vocal part of your song and plays it back along with your performance. Feel free to enjoy playing together with your favorite songs!

Practicing the assigned songs alone will not increase your motivation. I want a session buddy who can arrange things freely! I want to be able to play my favorite songs with chords!

This software is a beta version service released primarily for technical verification and service experiments. We hope to continue to make improvements based on the opinions of our users.

piano evoce ß appears to be the next evolutionary step in the Chord Tracker family:

1. Connect your electronic piano/keyboard to your Mac via MIDI.
2. Analyze your own songs.
3. Start playing! When you play the chord displayed on the screen, the vocal part will follow your performance.

To use piano evoce ß, you need to register for a Yamaha Music ID account (free of charge).

Now, that’s pretty neat. Here’s my guess: Yamaha combined a vocal stem extractor with Chord Tracker. The screens look very similar to Chord Tracker. Given the reference to “service” and the need to have a Yamaha account, the heavy lifting (vocal stem extraction) is performed by Yamaha software running on one of its servers. There’s a bunch of terms and conditions to read and accept — Yamaha and its friggin’ lawyers.

The app has two ways of following the vocal part (quoting the usual minimalist manual):

  • Gentle tracking mode: This mode gently follows your playing. The high degree of freedom allows you to arrange and play chords. Even if the performance stops in the middle of a song, the tempo will slow down, but playback will not stop. The AI listens to your chords and sense of rhythm, understands your playing pace, and sings in a way that feels natural to the AI. Avoid sudden tempo changes, and try playing together to create an ensemble.
  • Perfect tracking mode: This mode waits and follows your performance. It will wait until you play at least one note that makes up the correct chord. AI will play according to the timing of your performance. Be sure to play in time with the chord changes.

Can’t wait to try this! I’m guessing it will be available for Clavinova digital pianos and Yamaha arranger keyboards. Bad news for Windows users: “piano evoce ß can be used with macOS 12.0 or higher”. Not a word about Windows.

Copyright © 2024 Paul J. Drongowski