Combo organ: Reface YC

Checking out organ-related threads in the music forums, combo organs get short shrift while most folks focus on the Hammond B-3 tonewheel sounds. Today’s post will (almost) ignore the B-3…

Organ-focused keyboards from Nord, Hammond, Yamaha and others have combo organ emulations in addition to tonewheel synthesis. All offer two vintage flavors: Vox and Farfisa. Nord and Hammond throw in pipe organ, piano, EP and instrument emulations, too, making for full all-rounders.

Drawbar control abounds! In the case of Vox, each physical Nord drawbar corresponds to a Vox Continental drawbar footage (with possible extensions). Nord Electro 6, for example, offers 16′, 8′, 4′, 2′, II, III, IV and sine. The 16′, 8′, 4′, IV and sine are basic Continental tones. Nord’s emulation kicks the basics up to dual-manual, Continental II territory by adding a 2′ footage and two overtone mixtures, II and III. The mixtures consist of the following ranks:

  • II: 5 1/3′ and 1 3/5′ pipes
  • III: 2 2/3′, 2′ and 1′ pipes
  • IV: 2 2/3′, 2′, 1 3/5′ and 1′ pipes

The III and IV mixtures add the Hammond-like overtones missing from the original Continental. Hammond employ a similar Vox drawbar assignment in the Sk1/Sk2 series.

Discrete voice (tab) stops pose a minor problem: How to provide discrete On/Off control with sliders (drawbars)? In the case of Farfisa emulation, Nord and Hammond assign each Farfisa tab to a drawbar:

    Drawbar  Farfisa (Nord)  Farfisa (Hammond) 
------- -------------- -----------------
1 Bass 16' Bass 16'
2 Strings 16' Strings 16'
3 Flute 8' Flute 8'
4 Oboe 8' Oboe 8'
5 Trumpet 8' Trumpet 8'
6 Strings 8' Strings 8'
7 Flute 4' Flute 4'
8 Strings 4' Piccolo 4'
9 2 2/3 Strings 4'

The Hammond voice set is the same as the Farfisa Combo Compact. The Combo Compact Deluxe replaced the Piccolo 4′ voice with a bright 2 2/3′ overtone tab, adding a bit of Hammond-like whistle. The Nord voice set covers the Combo Compact Deluxe model.

Yamaha have taken their own approach to combo organ emulation with the YC61. The YC61 synthesizes tonewheel tones through Virtual Circuit Modeling (VCM) that emulates the sound of analog tonewheels and associated circuitry. Vox (YC61 organ model F2) and Farfisa (model F3) sounds are produced using frequency modulation (FM) synthesis. The YC61 also provides a sine wave “combo” model (F1). The YC61 drawbars bring in the usual drawbar footages with the exception of the 1′ drawbar which is disabled in all FM models (F1, F2, and F3).

Gotta wonder if we can port the F1, F2 and F3 FM organs to Montage and MODX?

Thanks to the frapping pandemic, I have yet to play a YC61. (Grrr.) However, I have played the Nord Electro 6D and Hammond Sk1. Both provide excellent combo organ sounds. Pipe organ (Nord and Hammond) is a big plus for a church player. I give Nord’s orchestral samples and library the edge over Hammond.

Yamaha Reface YC

Yamaha Reface YC promises tonewheel and combo organ sounds on the cheap. By and large, it delivers. I have really worked the Reface YC as a rehearsal instrument and as a gig instrument in church. That said, here are some detailed observations (positive and negative).

Reface YC Typical Vox and Farfisa settings (Source: Yamaha)

I roll my eyes a bit whenever anyone posts about how they “wish the Motif XF (Montage, MODX) had the Reface YC technology inside.” News flash, the Reface YC shares much of its technology with Motif XF, Montage and MODX already. Yamaha simply repackaged and revoiced the basic AWM2 DNA in a wonderfully accessible form. Wisely, Yamaha reacted to the warm user reception and reaction caused by the YC and its popular pal, the Reface CP. Yamaha is now taking it to the bank with the current full-sized CP and YC keyboards.

The Reface YC emulates five different organ models:

  • H: Hammond tonewheel
  • V: Vox transistor organ (1960s)
  • F: Farfisa transistor organ (1960s)
  • A: Acetone transistor organ (1970s)
  • Y: Yamaha transistor organ (1972)

The Reface YC drawbars, buttons and sliders directly map to Hammond organ drawbars and controls. What about the combo organs?

I stripped away all of the effects (percussion, chorus, distortion, reverb, etc.) and sampled each of the five voices (8′ foot pipe, middle C). The five waveforms are pictured below. The H and V waves, especially, have a sinusoidal shape. The nasal F wave is truly unique. [Click image to enlarge.]

Reface YC waveforms (middle C, 8′ organ stop)

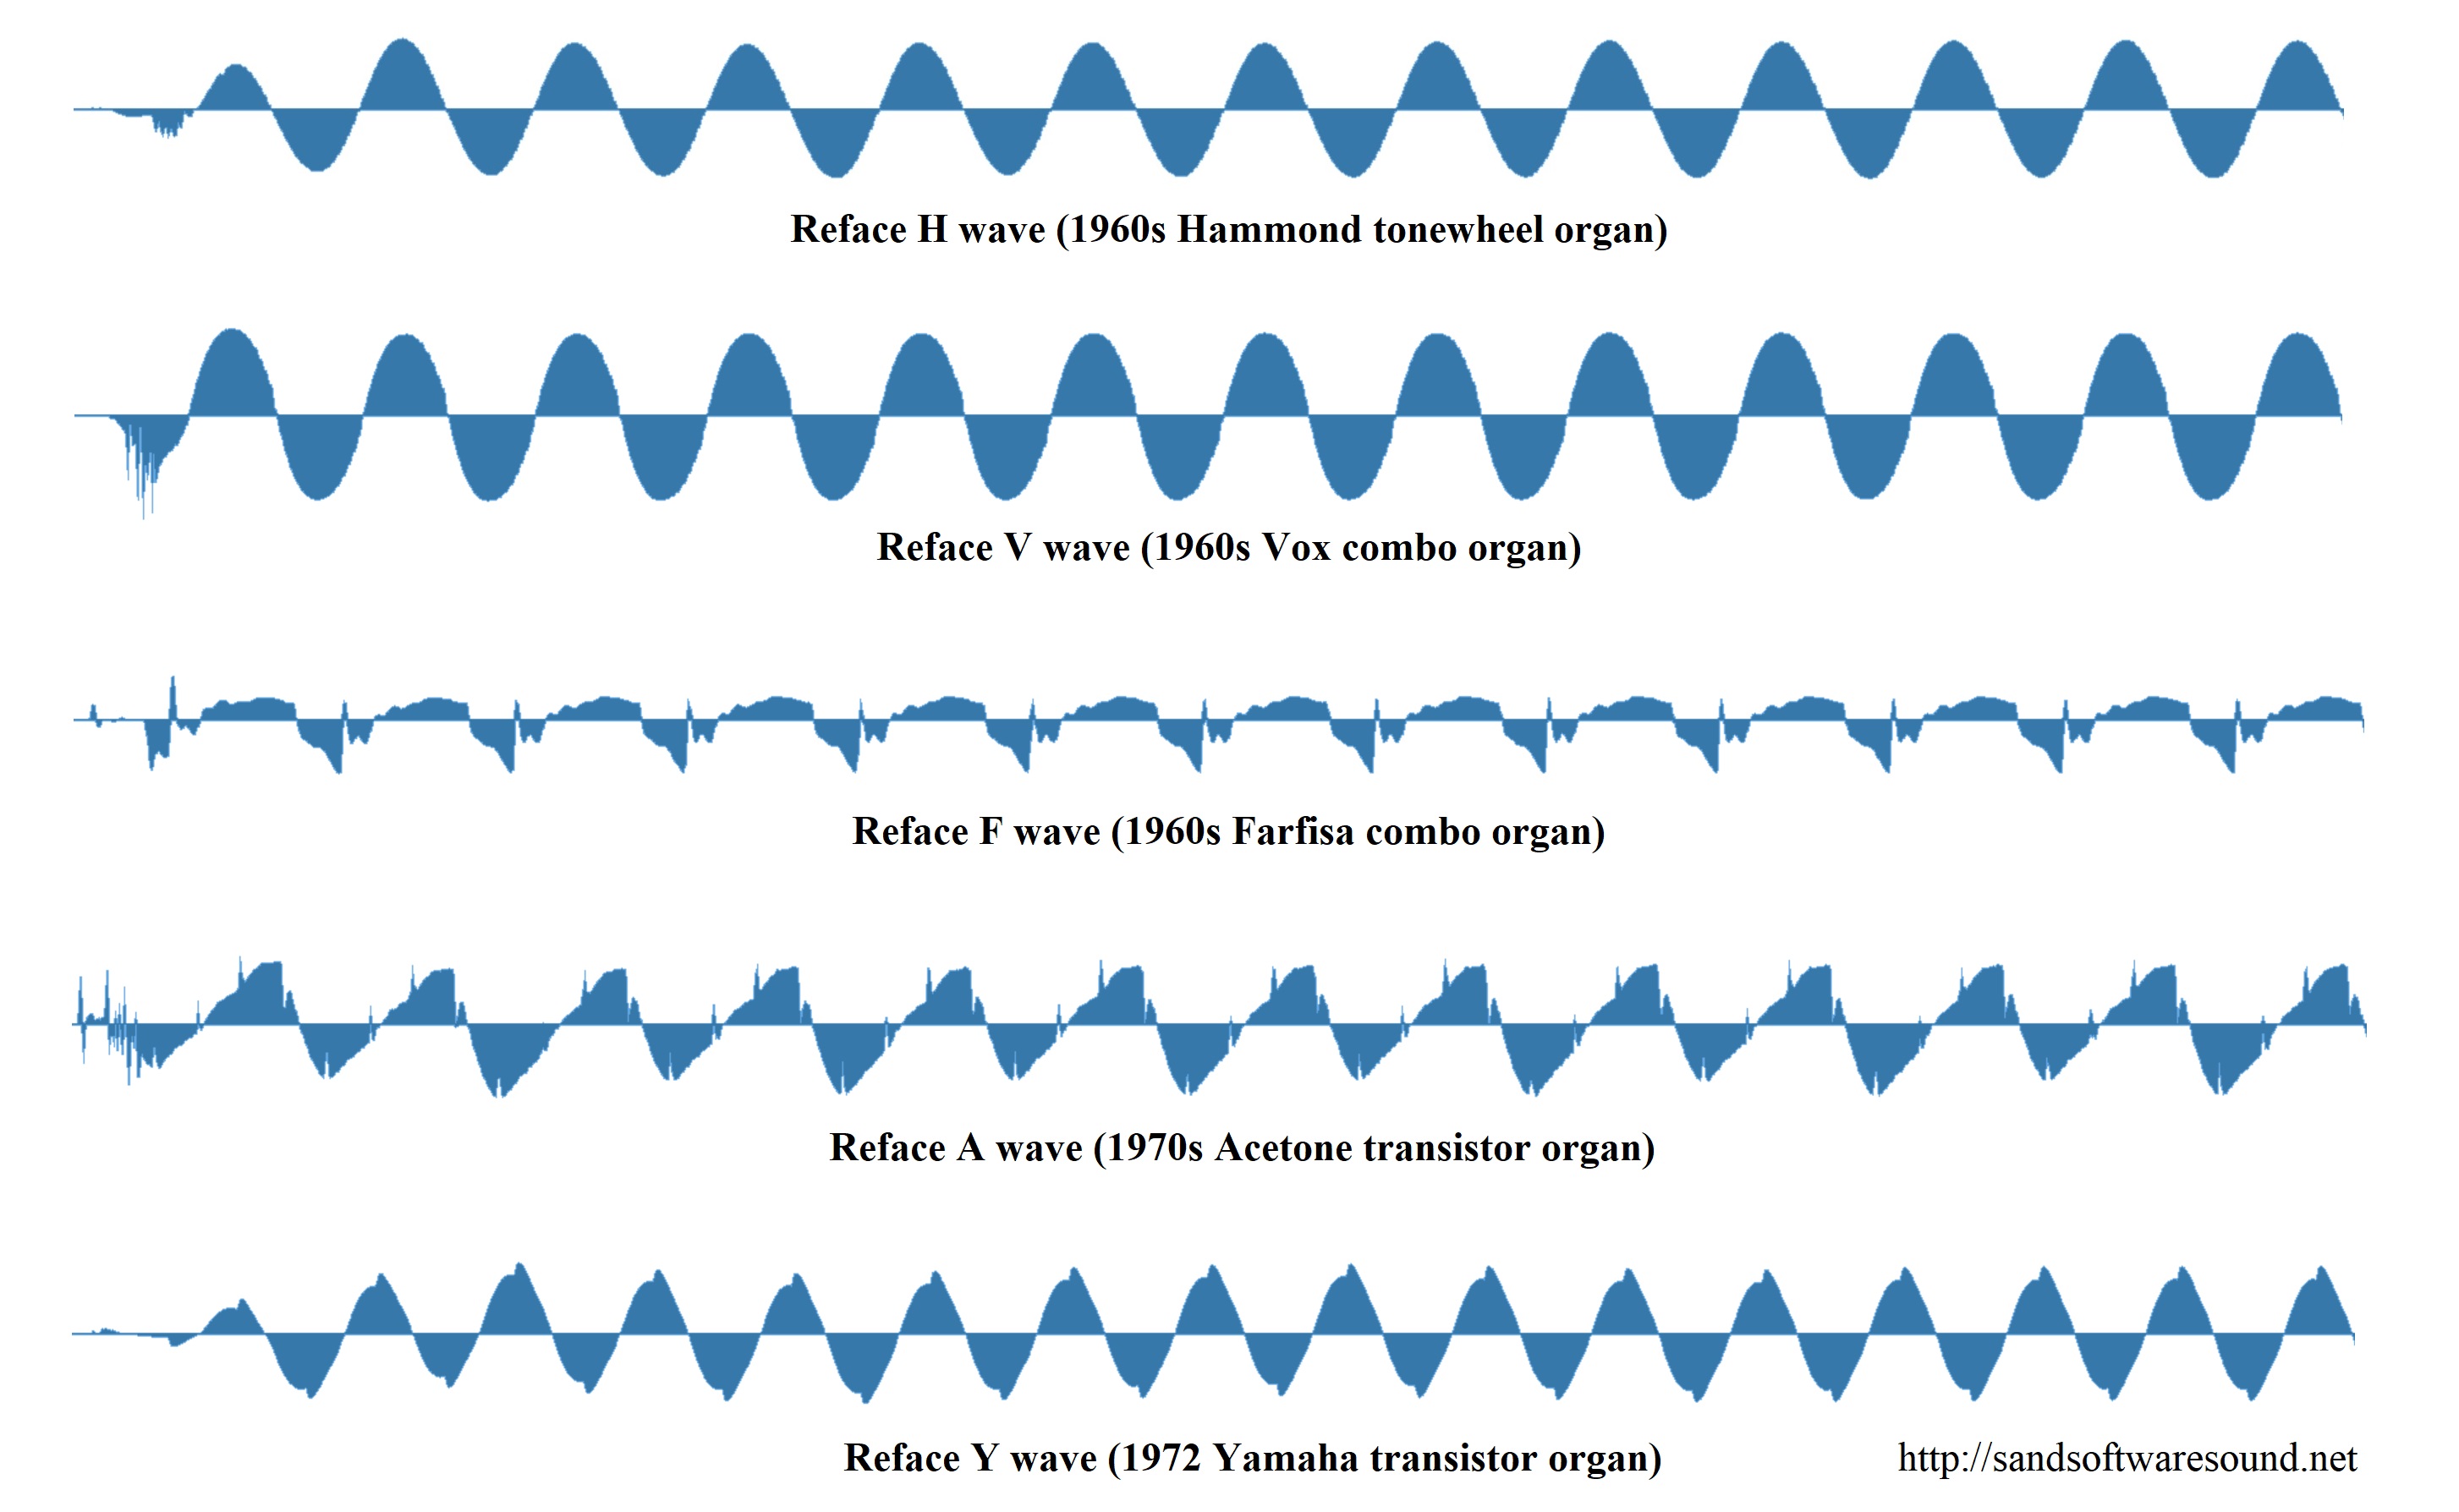
Since the Vox Continental had drawbars itself, the YC drawbars correspond to a single Vox drawbar sound (the V wave) played back at the appropriate footage (pitch). The YC Vox is based on a single Vox wave, just like the Montage (MODX and Motif XF). In Montage land, this is the “Vx Drawbar1-3” waveform. In the “you get want you pay for” department, the YC Vox does not have the reed and sine drawbars/sounds, and you must dial in the II, III, and IV mixtures yourself.

For the sake of authenticity, one should never put a combo organ through the rotary speaker effect. Trust me. Most of us in the 60s could barely afford an organ and an amp, let alone buy a Leslie. Then there is the issue of getting to the gig. Everything needed to fit into the back of Dad’s car!

The YC Farfisa, Acetone and Yamaha organ implementations follow the same design as the Vox. Each of the four combo organs (V, F, A and Y) consist of a single wave played back at different pitches according to drawbar footage.

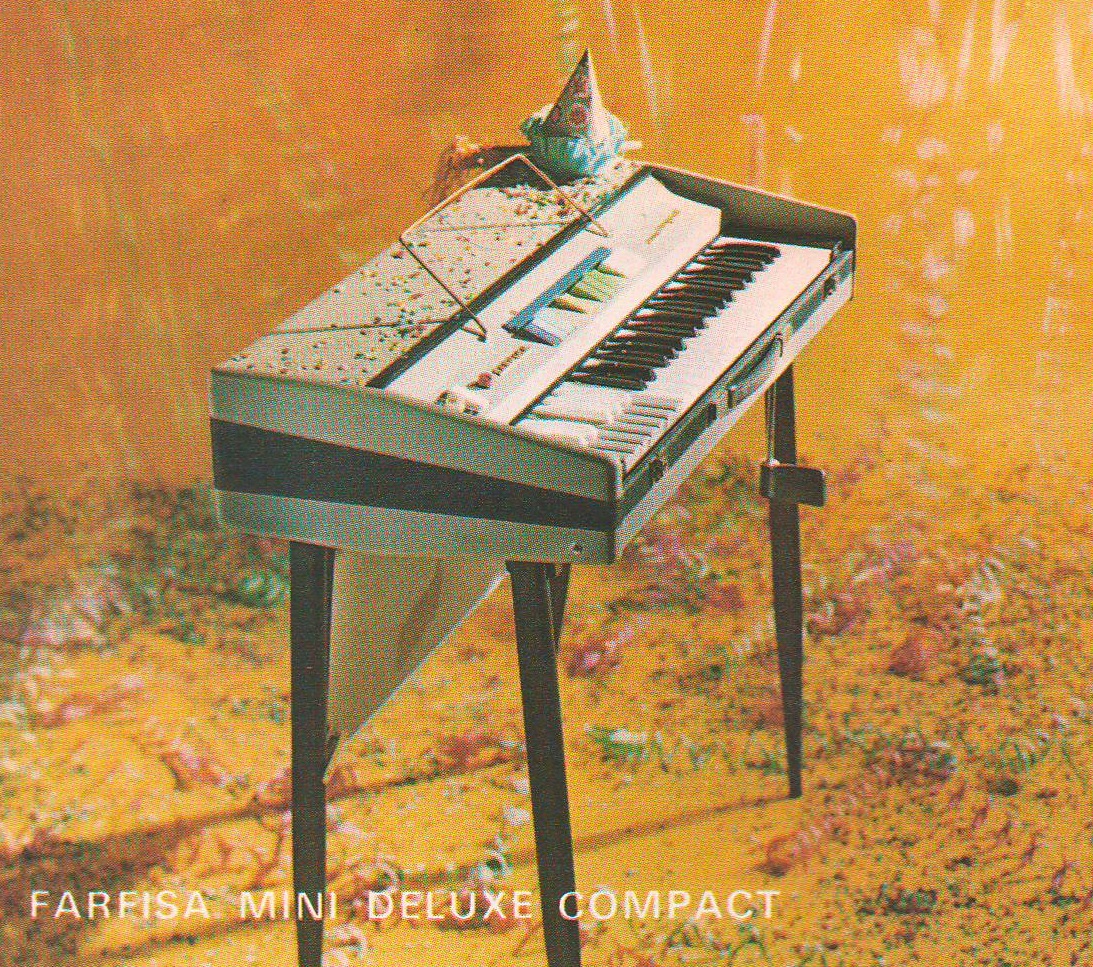
Listening to the stripped down F wave, my first thought was “Accordion!” The 60s Farfisa organs were designed by accordion makers and I believe that the raspy Farfisa tone is their intentional attempt to build an electronic accordion. [Memories of Mom and Dad saying, “Why don’t you play accordion and learn a few wedding songs?” Who knew?] The name “Farfisa” is a contraction of “Fabbriche Riunite De Fisarmoniche”, the company formed by pre=World War 2 Italian accordian makers Settimio, Soprani, Scandalli, and Frontallini. It ain’t an accident, folks.

Thus, in terms of control, the Reface YC is quite unlike a real Farfisa Combo Compact with its discrete voice tabs. Once again, you pay more for Nord or Hammond and you get more authenticity. That doesn’t mean you can’t get a decent Farfisa tone out of Reface YC. It’s raspy enough for Wooly Bully and other cover songs. The chosen F wave is versatile and, well, Farfisa voices are pretty much the same wave filtered differently. The screaming Tone Boost is missing in action, though.

I give the Reface YC an A- and B+, respectively, for Vox and Farfisa authenticity. I don’t have any direct experience with Acetone and early Yamaha organs — just the soundtracks of old Japanese kaiju (monster) movies. The YC sounds realistic enough.

I experimented with YC percussion in isolation, too. Each of the Reface combo organ voices has its own distinctive percussion. I recommend trying this at home as some of the settings are almost clav-like and would do in a pinch. A few settings remind me of the 1970s Crumar Roadrunner electronic piano — the most crap-tastic electronic piano ever made. Yes, I owned one, played one, and sold it off as fast as humanly possible. 🙂

After analyzing the Reface YC, I understand better how Yamaha teased organ voices from modest hardware. I also have renewed respect for the Montage (MODX, Motif XF) organ voicing and real-time control. The Montage, MODX and Motif XF have all the sonic materials necessary to meet and/or best the Reface YC. Still, you can’t throw a Montage or a MODX into a tiny bag and jump on the bus, train or plane.

DIY drawbar control

If you want to add a few drawbars via MIDI, try my Sparfun Danger Shield drawbars project. Or, at least read my Sparkfun Danger Shield review.

Crumar D9U DIY MIDI drawbar controller

I also gave the Crumar D9U drawbar kit a spin:

The Crumar D9U is a DIY, Arduino-compatible drawbar kit. This series of articles describe my experience from beginning to end and include C code. Don’t want DIY? Then try the ready-made Crumar D9X.

Copyright © 2021 Paul J. Drongowski

Combo organ: Montage, MODX, Genos

Contemporary workstation instruments offer several options for combo organ emulation. Every workstation has at least a few internal combo organ waveforms. Korg Kronos, for example, has two Vox organ waves built in. Even the lowly Korg microKorg XL+ has two Vox waveforms (DWGS single cycle).

Yamaha MODX and Montage — my focus in this article — have a good variety of Vox and Farfisa waveforms. Yamaha Genos has a lesser endowment as we’ll see. Yamaha Reface YC shares sonic DNA (AWM2 and effects) with the Motif XF and will be the subject of a future post.

Motif, Motif ES and Motif XS

Models in the early Motif series primarily base combo organ patches on two waveforms:

  • Portable Electronic: Vox-y tone
  • Compact Electronic: Farf-y tone

You can hear these waveforms at work in the Tiny Combo Bars 1 performance and the Tiny Combo Bar 2 performance. The patches layer three are more elements playing Portable Electronic or Compact Electronic (respectively). Each element is filtered differently: low pass, band pass and high pass. The net effect is like several distinctive tab stops or drawbars pulled at once.

These waveforms are very old, going back to the original Motif (maybe S80) in the early 2000s. I’ll bet dollars to donuts that the Portable Electronic waveform is the basis for the 60’sOrgan voice (MSB: 0, LSB: 116, PC: 18) in PSR and Tyros keyboards. The 60’sOrgan voice was the sole combo organ mainstay in the arranger line for a loooong time.

Motif XF, Montage, MODX

Motif XF got a big shot of combo juice. Motif XF added several combo organ waveforms:

  • Fr All Tabs
  • Fr Bright Boost
  • Fr Flute
  • Fr String Lo
  • Fr String Hi
  • Fr Trumpet
  • Fr Piccolo
  • Fr Pedal
  • Fr KeyOff
  • Vx Drawbar1-3
  • Vx DrawbarIV
  • Vx KeyOff

The Farfisa (Fr) waveforms support emulation of specific Farfisa features: individual voice tabs (flute, string, trumpet and piccolo), the wicked Bright Boost knee lever, bass keys (pedal), and key off sound. The Fr All Tabs waveform covers one of the most common use cases — all of the tab stops turned on. Subtlety was not a hallmark of sixties combo organ music. 🙂

The Vox (Vx) Vx Drawbar1-3 waveform covers the three Continentel footage drawbars while the mixture drawbar is handled by the Vx DrawbarIV waveform. The Vox waveforms include a Vox key-off noise.

In terms of voice programming, one uses note shift to achieve different footage ranks. Passive filtering is emulated through filter type (low pass, band pass, high pass) and cutoff frequency. Of course, everything can be routed into insert effects for distortion, amp simulation, and other grunge.

Since Montage and MODX inherit all things Motif, these waveforms and the Motif performances are there for you. The Montage and MODX sliders allow control over individual voice elements. For example, choose the Raspy Tabs performance and assign slider control to element level. The Fr Raspy Tabs waveform-to-element assignment is:

El# Waveform     KeyLo KeyHi VelLo VelHi Coarse Level Cutoff XA Ctrl 
--- ------------ ----- ----- ----- ----- ------ ----- ------ -------
1 Fr String Lo C2 G8 1 127 0 97 255 Normal
2 Fr Trumpet C2 G8 1 127 0 82 255 Normal
3 Fr Flute C2 G8 1 127 24 120 236 Normal
4 Fr Pedal C-2 B1 1 127 0 127 160 Normal
5 Fr String Hi C2 G8 1 127 19 24 236 A.SW2 On
6 Fr KeyOff C2 G8 1 127 6 87 80 Key Off

Different tabs are brought in and out by moving the corresponding slider. Assignable switch 2 turns on additional brightness. The low keyboard octaves play the bass (pedal) tones. Overall, this is a fairly controllable representation of a wheezy Farfisa Compact.

Because the sliders are not discrete, you can probably make up Farfisa tones which aren’t entirely authentic. But, really, should one care? 😉

Vox performances have similar control-ability. Here is the waveform-to-element assignment in the Vx Full Bars performance:

El# Waveform      KeyLo KeyHi VelLo VelHi Coarse Level Cutoff XA Ctrl 
--- ------------- ----- ----- ----- ----- ------ ----- ------ -------
1 Vx Drawbar1-3 C-2 G8 1 127 0 75 255 Normal
2 Vx Drawbar1-3 C-2 G8 1 127 12 77 255 Normal
3 Vx Drawbar1-3 C-2 G8 1 127 24 91 255 Normal
4 Vx DrawbarIV C-2 G8 1 127 0 127 250 Normal
5 Vx KeyOff C-2 G8 1 127 4 68 85 Key Off

The first three sliders control the 16′, 8′ and 4′ Vox drawbar settings and the fourth drawbar controls the Mixture (IV) tone. Go ahead, just everything to eleven. 🙂

Montage and MODX FM

But, wait, there’s more! Montage and MODX have two FM combo voices: BOX FM Combo Organ and FM YC Combo Organ. Although these performances don’t sound authentic to my ears, they provide starting points for further programming. I haven’t heard the YC61 as yet, but I wonder if the YC61 combo emulations can be ported to Montage and MODX?

Genos

As I mentioned earlier, the arranger series has been historically short on combo organ sounds, relying on the old 60’sOrgan voice. Wheezy, raspy Farfisa tones are noticably absent. The 60’sOrgan voice sounds like the Portable Electronic waveform on which the Motif 1967 Keys performance is based.

Tyros 4 and Motif XF were introduced at approximately the same time. They certainly were together in the development lab during late 2009. Tyros 4 added four combo organ voices:

  1. 60sComboOrgan1: VoxContiComb1_Full_NoVib waveform
  2. 60sComboOrgan2: VoxContiComb1_Full_VibOn waveform
  3. 60sComboOrgan3: VoxCombi4NoVib waveform
  4. 60sComboOrgan4: VoxCombi4NoVib091117 waveform

Voices 1 and 2 capture one Vox Continental drawbar combination (Comb1) and voices 3 and 4 capture a second combination (Combi4).

Voices 1 and 3 are without vibrato. Voices 2 and 4, unfortunately, have an excessive amount of vibrato — almost painfully so. When I use voices 2 and 4 in a MIDI sequence, I dial down the vibrato depth using MIDI CC#77 messages. Vibrato frequency is about 5Hz. I also remove touch sensitivity by setting:

  • Velocity sensitivity depth to zero, and
  • Velocity sensitivity offset to 114.

An organ voice should not respond to touch (key velocity) — ever.

PSR, Tyros and Genos players shouldn’t forget the “hidden” Italian 60s organ voice (It60’sOrgan) in the GM2 sound set. On PSR and Tyros, you’ll find It60’sOrgan within the Legacy voices Organ subfolder. On Genos, you need to download GM2 and XG user voices to the USER voice folder. (See this thread in the PSR Tutorial Forum.) Of course, you can select
It60’sOrgan from a DAW (MSB: 121, LSB: 2, PC: 17) .

All-in-all, you can get a nice Vox tone out of Genos. Farfisa is still missing in action, tho’. Kind of an odd shortcoming of a keyboard with styles and a user base that want to play popular hits from days past.

In the next post, I’ll compare Reface YC combo organs against Montage/MODX (Motif XF). The result may surprise you.

Copyright © 2021 Paul J. Drongowski

Customizing the Sonogenic voice editor

Back to the Yamaha SHS-500 Sonogenic voice editor…

Thanks to Brent at Keyboard Corner for suggesting a different set of default voices in my MIDI Designer-based Sonogenic voice editor. Back when I released the editor, I was hoping that folks could customize the user interface, changing or adding their own buttons and controls. Brent downloaded the editor, got everything running, and hit a roadblock with MIDI Designer. That’s understandable because I doubt if anyone can dive right into MIDI Designer as easily as diving into the menu of a synth.

So, smart guy, how do you change bank select and program change? Here’s a sequence of screen shots that may help. [Not so easy a year later, is it? 🙂 ]

MIDI Designer ordinarily runs in its operational mode, that is, the buttons, sliders and other controls are live and send MIDI. In order to make changes, one needs to enter Design Mode (edit mode). With the Sonogenic voice editor loaded, tap the More menu button, then tap the Design button under “Tools”.

MIDI Designer More menu

You should see a floating button widget saying “Exit Design Mode”. If you see that, you’ll know that you’re in Design Mode.

MIDI Designer button (control) properties in Design Mode

Tap a button or other control to select it. MIDI Designer outlines the selected button (or control) in red. Double tap the button (or control) to display and change its properties.

In this case, I double tapped the “QuackLd” button. If you want to name the button something else, tap the “Label” field and change the button name.

Button MIDI properties

To send a different MIDI message, tap the MIDI icon in the lower left corner of the Properties dialog box. MIDI Designer should display the control’s MIDI properties. The Sonogenic QuackLd voice has the following bank select and program change values:

  • Bank select MSB: 0
  • Bank select LSB: 112
  • Program change: 84

Values for the other SHS-500 preset voices are listed in the Yamaha Sonogenic SHS-500 Reference Manual.

Tap the “MIDI Off → On” field to edit the program change value. Tap the “Channel – Bank #” field to change the MIDI channel, bank select MSB value and bank select LSB value. You should probably leave the channel value alone.

MIDI Designer channel and bank select dialog box

The “Channel, Bank MSB, LSB” dialog box displays three spinning number dials (kind of like a slot machine) where the first column is MIDI channel, the second column is bank select MSB and the third column is bank select LSB. Spin the dials to get the setting you want. Tap the return arrow in the upper left corner when you’re finished. To leave a dialog box, just tap a blank area in the user interface background.

MIDI Designer actions

Tapping the Actions icon in the lower right corner of the Properties dialog box displays MIDI Designer actions. Use the “Delete” action to delete the control. Use “Copy” and “Make Similar” to copy the control.

General MIDI voice example

The buttons for the Sonogenic General MIDI (GM) voices are similar. Here, I selected and double tapped the “Vibraphone” button.

General MIDI voice selection properties

Again, tapping the MIDI icon in the dialog box displays the MIDI message properties for the button. The GM voices adhere to the GM standard program change values. However, you must send zero for both bank select MSB and LSB to properly switch the Sonogenic.

Tap the Exit Design Mode button to leave Design Mode. Then test your changes with the Sonogenic. Also, you probably should save the modified MIDI Designer interface following the directions in my original article.

Hopefully, this tutorial is enough to get you started with customization!

Copyright © 2021 Paul J. Drongowski

Combo organ tone generation

Combo organs got me into this mess. 🙂

Back in the day, I played a Farfisa Mini Compact Deluxe. Even though it didn’t have many tabs or reverb, it was enough to cover Wooly Bully and the rest of the Top 40 hits. I always wanted a Vox, but the Jaguar and Continental were always out of my financial reach.

Farfisa Mini Compact Deluxe organ

Farfisa and Vox each had their own distinctive tone. The Farfisa is raspy and nasal. The Vox is brighter and more cutting. Farfisa offered more vibrato options while Vox is just ON/OFF. Either one could quease (or cheese) your stomach when overdone. 🙂

Vox Continental organ

There are several great on-line resources if you would like to know more about Farfisa, Vox and some of the lesser competitors (e.g., Gibson, Fender, Acetone). My two favorite sites are Combo Organ Heaven and The Vox Showroom. It’s also fun to browse E-bay and Reverb.com for vintage organ gear and spare parts. I also recommend the book “Classic Keys” by Alan S. Lenhoff and David E. Robertson.

Internally, the 1960’s Vox and Farfisa models employed tone generation boards — one board for each of the twelve semi-tones in an octave. Each board consisted of an oscillator for the highest pitch (e.g., C6) and dividers for the corresponding pitches one or more octaves down (e.g., C5, C4, C3). A schematic for the Farfisa Mini Compact Deluxe tone generator board is shown in the picture below.

Farfisa tone generator circuit

The oscillator is, essentially, a square wave generator and the divider stages are a ripple carry counter. The square wave generator feeds the counter and each stage of the counter divides down by a power of 2, thereby producing the lower octaves. The square wave generator is on the left with five divider stages arrayed to the right.

Each board has different capacitor values (C1A to C5A) depending upon base pitch (C to B). The generator is tuned by a variable inductor coil. This darned coil was delicate back in the 1960’s and cost me an expensive repair when I tried to tweak the F# tuning. If you’re contemplating ownership of such a vintage instrument, don’t suffer delusions about the fixing and maintaining a vintage beast. Sixty or seventy years on, these critters are difficult to maintain.

Once the basic tones are generated, they are sent through a rat’s nest of wires comprising the key and bus bar switching network. Then, the individual (bus bar) signals are mixed and go to filters. Farfisa and Vox have different filters, giving each brand a distinctive voicing flavor. Farfisa routed its signals into a switched passive filter network while Vox sent its signals into drawbars. The Farfisa filters are switched in and out by the front-panel voice tabs while the Vox allows a mix of flute and reed tones. The Vox Jaguar employed an approach similar to Farfisa (tabs), letting Vox offer a cheaper alternative to the Continental.

Vox Continental drawbar circuit

The picture above shows the Vox Continental drawbar schematic. Key contacts switch signals onto four bus bars: 16′, 8′, 4′ and Mixture. The four main drawbars (1, 2, 3, and 4) mix the incoming ranks into a single signal which goes to the so-called sine and reed drawbars (5 and 6). Drawbar 5 filters the incoming square waves producing a sine-like, flute tone. Drawbar 6 doesn’t filter the incoming square waves and produces a brighter, reed tone.

If you would like to know more about Farfisa and Vox internals, I recommend getting acquainted with ElectroTanya. ElectroTanya is an on-line server providing service manuals for current and old gear. You can download up to five service manuals for free each day. The user interface is a little funky, but ElectroTanya is a terrific resource for out-of-print manuals. Here are links to the keyboards mentioned in this blog post:

Please keep these designs in mind. The oscillator/divider approach gave birth to the top-octave tone generator design that reduced the cost and complexity of organ tone generator boards. Thank you large scale integration (LSI).

Martinec wrote two of the best free combo organ VST emulations ever: Combo Model F and Combo Model V. You can still find copies of the Martinec VSTs on the Web. Get your combo groove on!

Arduino people should check out my sampled 60s Combo Organ (MidiVOX). I managed to get four voice polyphony out of an Arduino! Lo-fi heaven.

Copyright © 2021 Paul J. Drongowski

Curtis Electromusic Specialties

Tom Oberheim plans to bring back the TVS-Pro in the form of the TVS Pro Special Edition. The TVS-Pro Special Edition consists of a 3-octave keyboard, sequences and two Synthesizer Expansion Modules (SEM). The two modules are flexibly assigned to the keyboard, sequencer, etc. Designed by Tom Oberheim and manufactured by Marion Systems. Gordon Reid reviewed the original Two Voice Pro in Sound on Sound (July 2016).

To my ear, Tom Oberheim, OB-Xa and Curtis Electromusic Specialties (CES) are synonymous. And that brings me to today’s offerings from CES circa 1981.

OK, OK, Dave Smith, Prophet-5, Pro-One, and Curtis Electromusic Specialties are synonymous, too. Pro-One (CEM 3340, CEM 3310, CEM 3320) — wish I had that one back… 🙂

Doug Curtis was an analog synthesis circuit genius and founded Curtis Electromusic Specialties (CES) in 1979. Doug’s fertile mind and CES produced what is arguably the most successful line of commercial integrated circuits (IC) for analog synthesis.

I’m happy to share my collection of CES brochures, data sheets and schematics, all in PDF:

Unlike data sheets posted at some other sites, these data sheets are complete (not just the first two pages). The preliminary data sheets are hand-drawn — now that’s preliminary!

The SynthSource newsletter contains an interview with Tom Oberheim titled “Giving the musician more for his money.” Doug’s chips made Tom’s successful OB-X synths (OB-X and OB-Xa) physically and economically feasible. The OB-Xa used the entire CES chip line: 3310, 3320, 3330, 3340 and 3360.

The newsletter also announces the CEV 3301 Evaluation Board hosting one each of the CEM 3310, CEM 3320, CEM 3330 and CEM 3340. At that time, PAiA Electronics sold both CES chips and the CEV 3301 Evaluation Board. I bought ’em all. 🙂 The CEV 3301 PDF covers design, construction details, board layout and schematics. I’ve posted pictures (below) of the unpopulated CEV 3301.

Curtis Electromusic CEV 3301 Evaluation board (trace side)
Curtis Electromusic CEV 3301 Evaluation board (component side)

Have fun and stay healthy!

Copyright © 2021 Paul J. Drongowski

E-mu Systems and SSM ICs

E-mu Systems and Solid State Micro Technology for Music (SSM) were pioneers in analog synthesis. E-mu Systems was founded in 1971 by Dave Rossum, Steve Gabriel and Jim Ketcham. Solid State Music Technology was founded by Ron Dow and John Burgoon in 1974. E-mu, of course, is renown for its ground-breaking Emulator keyboard.

E-mu and SSM developed several integrated circuits (IC) for analog synthesis. Also in that era (1978), Curtis Electromusic Specialties (CES) introduced their own line of analog synthesis chips.

In 1978, I was finishing up my stint in Silicon Valley and heading to grad school at the University of Utah — as far east as my meager savings could take me. Little did I know that Ercolino Ferretti at the U was investigating computer music and I would soon enjoy his expertise and banter!

Nonetheless, I was interested in building my own synth gear and I wrote to E-mu/SSM for information about the SSM demonstrator board and their chips. Here are three PDFs covering the E-mu/SSM offerings in 1978:

Check out these prices!

  • SSM 2010 VCA: $12.50
  • SSM 2020 DVCA: $7.50
  • SSM 2030 VCO: $10.00
  • SSM 2040 VCF: $10.00
  • SSM 2050 TG: $7.50

Good luck finding E-mu/SSM chips today. They’re worth their weight in gold.

Copyright © 2021 Paul J. Drongowski

SN76477 Complex Sound Generator

Things are going to take a vintage turn during the next few weeks. I’m knocking out a few 60’s backing tracks, returning to classic combo organ sounds. As a teen, I owned and played a Farfisa Mini Compact Deluxe. As a neophyte engineer, I was also interested in rolling my own gear — a great entry-way to audio electronics. [Not drugs.]

Thanks to our move, I uncovered, literally, a small number of brochures and data sheets from the 70’s and 80’s era. Today’s subject is the Texas Instruments SN76477 Complex Sound Generator.

TI SN76477 Complex Sound Generator pin out

The SN76477 was an all purpose, mixed signal (digital+analog) noise maker, appearing in games, toys and other mass market consumer electronics. Its temperature stability was none-to-good, making it a poor choice for musical instrument design. It excels, however, at cheesy 1980’s sound effects.

TI SN76477 Complex Sound Generator block diagram

I built the SN76477 sound demonstration circuit (below) into a “busy box” for our son. Unfortunately, the busy box and the SN76477 is lost and gone. Only the data sheets and application notes remain in its place. If you find an SN76477, it’s most likely a “pull” from an old toy and probably not new old stock (NOS).

TI SN76477 Sound demonstration circuit

Here are links to the SN76477 data sheets and application guide. All of the files are PDF.

I apologize for the yellow pages, but we are talking true vintage! The sound development system schematic is brittle and requires careful handling.

TI wrote a very compresensive SN76477 guide, so there isn’t too much point in detailing the SN76477 here. If you’re going to experiment with the SN76477, the TI guide is a must-read. The guide describes a few of the internal circuits as well as sample application circuits.

Copyright © 2021 Paul J. Drongowski

RPi 4 tuning: The code

I hope you have enjoyed my series of articles about Raspberry Pi 4 performance events, measurement and tuning:

Today, I want to wrap up the series with C code.

Please don’t forget my Performance Events for Linux tutorial and learn to make your own Raspberry Pi 4 (Broadcom BCM2711) performance measurements. The commands in the PERF tutorial apply to x86, AMD64 and other architectures, too.

Before getting too far, here is the link to the ZIP file with the code. 🙂 The main source files are:

  • makefile: The make file (duh!)
  • pe_assist.h: Performance event helper header
  • pe_assist.c: Performance event helper functions
  • pe_cortex_a72.h: A72-specific helper header
  • pe_cortex_a72.c: A72-specific helper functions
  • pe_test.c: pe_assist check-out test
  • pe_matrix.c: pe_assist matrix multiply example
  • a72_test.c: A72-specific check-out test
  • a72_walk.c: A72-specific array walk kernel
  • a72_matrix.c: A72-specific matrix multiply
  • a72_misp.c: A72-specific branch mispredict kernel
  • a72_chase.c: A72-specific pointer chasing kernel

There are a few surprises, too, such as earlier versions of code, etc.

The programs self-monitor, that is, they call perf_event_open() to configure, control and read the performance counters. perf_event_open() has many parameters, so I wrote helper functions assisting counter configuration, control and access. There are two flavors: architecture independent and Cortex-A72 specific. The architecture independent functions are defined in pe_assist.* and the A72-specific functions are defined in pe_cortex_a72.*. The architecture independent functions should work on x86, etc., too.

Aside from the two check-out tests, the rest of the source modules are workloads. These are the programs that I used to collect data for the articles about Cortex-A72 performance measurement, analysis and tuning. Feel free to bash away at everything!

Helper functions

As I mentioned above, I separated the helper functions into architecture independent and Cortex-A72 specific modules. The architecture independent helper functions handle Linux performance counter set-up, control and read back:

  • peInitialize(): Initialize/reset the helper module:
  • peMakeGroup(): Make a counter group
  • peAddLeader(): Add leader event to the group
  • peAddEvent(): Add an event to the group
  • peStartCounting(): Start the counter group
  • peStopCounting(): Stop the counter group
  • peResetCounters(): Reset the counters
  • peReadCount(): Read an event count
  • pePrintCount(): Print and event count

The interface is “lite” and uncomplicated. It’s just enough to get the job done. Sometimes during early days, there is a temptation to build the Taj Mahal. I prefer to build something simple and get experience before building up and out. This simple interface proved to be good enough.

perf_event_open() supports simple event counting and sampling. If you’re familiar with perf stat, you’ve already seen simple event counting, AKA counting mode. perf stat measures events across the entire run of an application program. Self-monitoring is similar except you insert measurement code into the application program around the critical code that you wish to measure. perf stat doesn’t require code modification or recompile, but it doesn’t let you focus on particular critical loops or whatever. Self-monitoring is a little bit more effort, but it allows focus.

The usage model is straightforward:

  1. Initialize the module data structures.
  2. Create a performance event group.
  3. Add a leader event to the group.
  4. Add other events (up to 6 events for Cortex-A72) to the group.
  5. Start the counter group.
  6. Execute the workload or critical inner loops.
  7. Stop the counter group.
  8. Read and print the event counts.

Since this sequence is a recurring pattern, I also wrote a few functions which target common types of measurements such as:

  • peMeasureInstructionEvents()
  • pePrintInstructionEvents()
  • peMeasureDataAccessEvents()
  • pePrintDataAccessEvents()

These functions configure the pre-defined “symbolic” events which the Linux kernel has preselected for the platform architecture. Thus, you should be able to use the pe_assist.* module on any Linux box.

The Cortex-A72 module, pe_cortex_a72.*, use “raw” event identifiers for configuration. The available events are defined in pe_cortex_a72.h and they are specific to ARM Cortex-A72. I rely mainly on the Cortex-A72 events because then I know exactly which A72 events I am measuring. The Cortex-A72 module calls the low-level helper functions and it exports only targeted measurement functions:

  • a72MeasureInstructionEvents()
  • a72PrintInstructionEvents()
  • a72MeasureDataAccessEvents()
  • a72PrintDataAccessEvents()
  • a72MeasureTlbEvents()
  • a72PrintTlbEvents()

Take a peek inside one of the test programs and you’ll see how to call the helper modules.

Internal design

perf_event_open() is the Swiss Army knife of performance counter configuration and control. On Linux, all counter-related operations go through this single kernel call.

perf_event_open() allows control of individual counters, of course. However, it also provides a way to control a group of counters. One can save additional trips in and out of the kernel through counter groups. Instead of making six calls to start six counters, one only needs to make one perf_event_open() call to start an entire group of six events.

A Cortex-A72 group consists of one to six event counters. Each group has a distinguished member: the leader event. You can start, stop and reset the entire group by referring to the leader. Because the group members usually share characteristics like the process (ID) to be measured, the CPU set, flags, etc., it makes sense to define all of these common properties for an entire group. This approach reduces the number of parameters to be passed around during configuration.

In keeping with the “lite” philosophy, the helper module keeps the common flags and such in a few variables and arrays. The group and leader definition functions establish group-wide values for the member events in the group. That’s all there is to it, so hack away! The “lite” approach was good enough 99% of the time, so you might not need to dip into the helper modules at all.

Copyright © 2021 Paul J. Drongowski