Performance events on Raspberry Pi 4: Tips

Performance measurement and tuning experiments with Raspberry Pi 4 are well-underway. Here are a few quick observations and tips.

Linux provides two entries into performance measurement: Performance Events for Linux (PERF) and the kernel performance counter interface (perf_event_open()). PERF is an easy-to-use tool suite and is the best place to start explorations. If you want to measure an application without modifying its code, this is for you.

PERF is built on the kernel performance counter interface. The interface consists of two calls: perf_event_open() and its associated ioctl() functions. The kernel interface is suitable for self-monitoring, that is, adding calls to an application in order to measure its internal operation. Performance counters provide two modes of operation: counting and sampling. Counting mode is most appropriate for self-monitoring. I’m currently writing code that makes self-monitoring a bit easier and hope to post the code when it’s ready.

In the meantime…

Installation

PERF and perf_event_open support are not usually installed with your typical Linux distribution. Originally, PERF was available solely as part of the Linux tools package. Well, it seems like somewhere along the way, Ubuntu and Debian diverged. Ubuntu installs PERF with Linux tools:

    sudo apt-get install linux-tools-common 
sudo apt-get install linux-tools-common-$(uname -r)

As PERF depends heavily upon kernel facilities and interfaces, you should install the version of PERF that matches the installed kernel.

Raspberry Pi OS (once known as Raspian) is a Debian distro. Shucks, wouldn’t you know it, Debian installs PERF differently:

    sudo apt install linux-perf

There are different packages for buster and stretch (the current versions of Raspberry Pi OS and Debian at the time of this writing).

    https://packages.debian.org/buster/linux-perf 
https://packages.debian.org/stretch/linux-perf

Installing on buster produces output like:

    XXX@raspberrypi:~ $ sudo apt install linux-perf 
password for XXX:
Reading package lists… Done
Building dependency tree
Reading state information… Done
The following additional packages will be installed:
linux-perf-4.9
Suggested packages:
linux-doc-4.9
The following NEW packages will be installed:
linux-perf linux-perf-4.9
0 upgraded, 2 newly installed, 0 to remove and 107 not upgraded.
Need to get 1,275 kB of archives.
After this operation, 2,735kB of additional space will be used.
Do you want to continue? [Y/n]

Versioning gotcha

And, of course, it’s never that simple. My version of Raspberry Pi OS (buster) is expecting PERF version 5.4. When you enter “sudo perf list” or any other PERF command on the command line, the shell runs the script /usr/bin/perf. The script checks the version of PERF against the kernel and complains when versions don’t match. The Debian install pulled version 4.9, not 5.4.

Rather than sort out versioning, I’ve been entering “perf_4.9” instead of “perf“. This work-around bypasses the perf script which checks versions. Since PERF is now fairly mature, it all seems to work. At some point, I’ll sort out the versioning situation and install 5.4. In the meantime, full steam ahead!

Getting started

Here’s a few PERF commands to get you started:

    perf stat --help 
perf list sw
perf stat
perf top -a
perf top -e cpu_clock
perf record
perf report

The stat approach uses counting mode to measure software and hardware events triggered by an application program (“<cmd>”). The top approach displays event counts dynamically in real-time like the ever-popular “top” utility program. The record and report approach uses sampling to produce performance reports and profiles.

For additional usage information, check out the Linux performance analysis tutorial. There are several other fine tutorials and helpful sites on the Web. Many of the tutorials show use on x86 (Intel and AMD) systems, not Raspberry Pi and ARM. For that, I recommend my own three part tutorial:

  • Part 1 demonstrates how to use PERF to identify and analyze the hottest execution spots in a program. Part 1 covers the basic PERF commands, options and software performance events.
  • Part 2 introduces hardware performance events and demonstrates how to measure hardware events across an entire application.
    Part 3 uses hardware performance event sampling to identify and analyze hot spots within an application program.

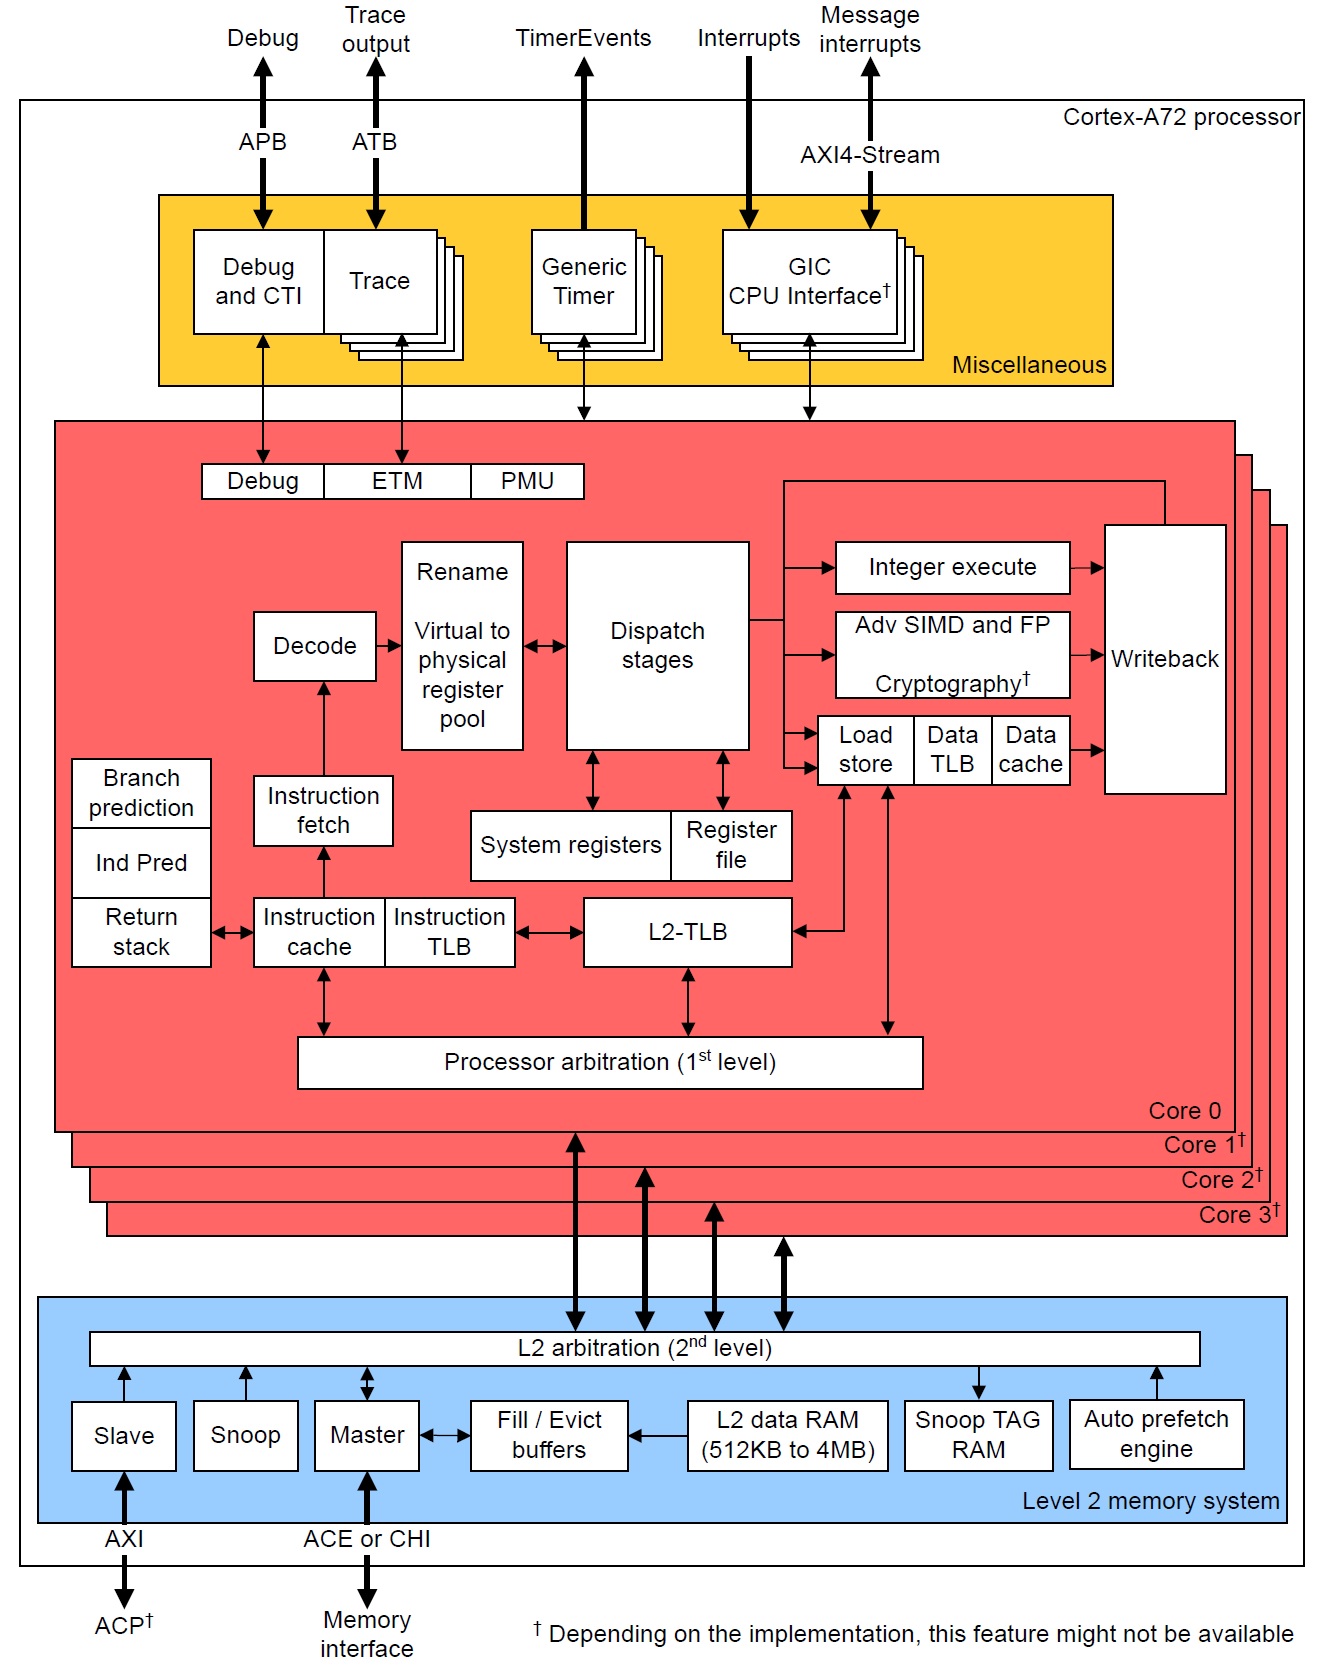
In addition to usage, I offer information and guidance concerning ARM micro-architecture. This information is especially helpful when you get into hardware performance events. Check out my summaries of the ARM11 and ARM Cortex-A72 micro-architectures. ARM11 covers Raspberry Pi models 1, 2, and 3 (BCM2835 and BCM2836), while the Cortex-A72 summary covers the Raspberry Pi 4 (BCM2711).

Other helpful on-line resources are:

Paranoia!

Performance measurement is fraught with security issues and holes. The kernel developers implemented a control flag file, /proc/sys/kernel/perf_event_paranoid which sets the level of access and vulnerability when taking measurements. Quoting the Linux man page:

    The perf_event_paranoid file can be set to restrict access 
to the performance counters.
2 allow only user-space measurements (default since
Linux 4.6).
1 allow both kernel and user measurements (default
before Linux 4.6).
0 allow access to CPU-specific data but not raw
tracepoint samples.
-1 no restrictions.
The existence of the perf_event_paranoid file is the
official method for determining if a kernel supports
perf_event_open().

If you’re operating in a fairly closed, single-user environment, then set the content of the file to 0 or -1.

Read the perf_event_open() man page

I recommend reading the perf_event_open() man page. If you’re just starting your journey into performance measurement, you will be overwhelmed by the detail at first. However, just let the information wash over you and know that it’s there. The tutorials don’t always mention the perf_event_paranoid flag and other low-level details. Reading the man page should help you across future stumbling blocks and will enhance your understanding of events, counting and sampling.

Want to learn more about Raspberry Pi 4 (Cortex-A72 / Broadcom BCM2711) performance tuning? Please read:

Copyright © 2020 Paul J. Drongowski

Raspberry Pi 4 ARM Cortex-A72 processor

Raspberry Pi 4 (RPi4) is a big step beyond the earlier models 1, 2 and 3. Both desktop interaction and browsing are snappier and don’t have that laggy feel. I haven’t even thought (yet) about the RPi4’s music making and synthesis potential!

The Raspbeery Pi 4 is powered by a new processor from Broadcom: the BCM2711. The BCM2711 is an improvement over the BCM2835/2836 used in earlier models. Like the BCM2836, main memory is external. I’m running an RPi with 4GB of RAM (LPDDR4-3200 SDRAM, 3200Mb/s, dual channel). The old RPi2 has only 1GB of RAM. The BCM2711 supports Gigabit Ethernet (1000 BaseT) while the old RPi2 is just 100Megabit Ethernet. Faster Internet speed makes updates and browsing so much faster.

The RPi4 is a quad-core ARM Cortex-A72 processor clocking at 1.5GHz. The old RPi2 is a 900MHz quad-core ARM Cortex-A7 processor. The old BCM2835 is a member of the ARM11 family (ARM1176JZF-S, to be exact). The ARM Cortex-A72 within the BCM2711 has a much improved CPU core and memory subsystem.

The old ARM1176 is a relatively simple beast. It is a single issue machine, that is, it issues a single instruction per cycle. The ARM1176 core has eight pipeline stages and three execution pipes: 1. ALU, shift, saturation, 2. Multiply-accumulate, and 3. Load/store.

The Cortex-A72, on the other hand, performs 3-way instruction decoding and can issue as many as five operations per cycle. It is an out-of-order superscalar machine allowing speculative issue. That is waaay more sophisticated than the ARM1176, putting the Cortex-A72 on the same level as x86 superscalar machines. In fact, it translates ARM instructions into micro-ops like most modern x86 superscalar processors. It even performs micro-op fusion in some cases. The Cortex-A72 performs register renaming, letting micro-ops (instructions) execute when program data are ready (out-of-order execution, in-order retirement).

The Cortex-A72 issues micro-ops to eight execution pipelines:

  • Branch: Branch micro-ops
  • Integer 0: Integer ALU micro-ops
  • Integer 1: Integer ALU micro-ops
  • Integer Multi-Cycle: Integer shift-ALU, multiply, divide, CRC and sum-of-absolute differences micro-ops
  • FP/ASIMD 0: ASIMD ALU, ASIMD misc, ASIMD integer multiply, FP convert, FP misc, FP add, FP multiply, FP divide and crypto micro-ops
  • FP/ASIMD 1: ASIMD ALU, ASIMD misc, FP misc, FP add, FP multiply, FP square root and ASIMD shift micro-ops
  • Load: Load and register transfer micro-ops
  • Store: Store and special memory micro-ops

Up to 5-way issue and a larger number of independent execution pipelines permit more fine-grained parallelism than ARM1176. Of course, the compiler must know how to exploit all of this parallelism, but the potential is there. The ARM Cortex-A72 Software Optimization Guide specifies the number of execution cycles and pipeline units for each kind of ARM instruction. This information is incorporated into a compiler and guides the choice and scheduling of machine instructions.

ARM Cortex-A72 block diagram

The Cortex-A72 allows speculative execution. Without speculation, a CPU must wait at each conditional program branch until the direction is decided and instruction fetch can proceed along the chosen branch. The Core-A72 processor predicts branch direction (speculates) and aggressively issues instructions along predicted branches. The Cortex-A72 branch predictor is also improved over ARM1176. (I’m still digging into details.) If a branch is mispredicted, speculative results are discarded. So, it’s important to have a good branch predictor.

The Cortex-A72 can perform a load operation and a store operation every cycle because it has separate load and store pipelines. The ARMv8-A instruction set architecture (ISA) allows arbitrary data alignment and access. However, the Cortex-A72 hardware penalizes load operations that cross a cache-line (64-byte) boundary and store operations that cross a 16-byte boundary. Programmers (and compilers) should keep that in mind when laying down data structures in memory.

Like all modern high-performance computers, the Cortex-A72 organizes physical memory into a hierarchy with the fastest/smallest memory (registers) near the arithmetic/logic unit (ALU) and the slowest/largest memory (RAM) far away and off-chip. The registers and RAM are connected to intervening levels of memory — the caches:

          Register          Fast, but small 
|
Level 1 caches
|
Level 2 cache
|
RAM Big, but slow

Data and instructions are read (and written) in efficient chunks making data and instructions available when needed by the registers and ALU. The chunks are called “cache lines.” Thanks to cache memory, programs run faster when they (re)use data that are close together in memory (i.e., occupy the same cache line) and are the most recently accessed. These notions are called “spatial locality” and “temporal locality.”

The following table is a quick summary of the level 1 and level 2 cache structures of the ARM1176 and Cortex-A72.

Feature ARM1176 Cortex-A72
L1 I-cache capacity 16KB 48KB
L1 I-cache organization 4-way set associative, 32B line 3-way set associative, 64B line
L1 D-cache capacity 16KB 32KB
L1 D-cache organization 4-way set associative, 32B line 2-way set associative, 64B line
L2 cache capacity 128KB 1MB
L2 cache organization Shared, 8-way set associative, 64B line Shared, 16-way set associative, 64B line

Each core has an Instruction Cache (I-Cache) and Data Cache (D-Cache). The four cores share the Level 2 (L2) cache.

As you can see, the RPi4 (BCM2711) has larger caches and a bigger cache line size (64 bytes) than ARM11. RPi4 programs are more likely to find instructions and data in cache than earlier RPi models.

Contemporary processors have one or more memory management units (MMU) that break physical RAM into logical pages. This scheme is called “virtual memory.” The MMU translate logical program addresses (from loads, stores and instruction fetches) into physical RAM addresses. Address translation has its own memory hierarchy:

   Translation registers       Fast, but only a single mapping 
|
Level 1 TLBs
|
Level 2 TLB
|
RAM Big page tables, but slow

Page tables in RAM are maps that describe the layout of pages in the operating system and application programs. Translation lookaside buffers (TLB) are cache-like hardware structures that hold the most recently used (MRU) address translation information, i.e., where a logical page is located in physical memory. TLBs greatly speed up the translation process by keeping MRU page table information on-chip within the CPU.

Cortex-A72 has larger translation lookaside buffers (TLB) than ARM1176, as summarized in the table below. With larger TLBs, a program can touch more locations in memory without triggering a performance robbing page fault — an event which brings page translation information into the CPU from relatively slow RAM.

Feature ARM1176 Cortex-A72
D-MicroTLB capacity 10 entries 32 entries
D-MicroTLB organization Fully assoc, 1 lookup/cycle Fully assoc, 1 lookup/cycle
I-MicroTLB capacity 10 entries 48 entries
I-MicroTLB organization Fully assoc, 1 lookup/cycle Fully assoc, 1 lookup/cycle
L2 TLB capacity 256 entries 1024 entries
L2 TLB organization Unified, 2-way set assoc Unified, 4-way set assoc

Each core has a Data Micro-TLB (D-MicroTLB), Instruction Micro-TLB (I-MicroTLB), and Level 2 (L2) TLB. (In ARM1176 terminology, the L2 TLB is called the “Main TLB”).

In summary, the RPi4’s BCM2711 processor is a powerhouse even though it won’t knock that gaming machine off your desktop. 🙂 If you’ve been waiting to dive into Raspberry Pi or to upgrade, please don’t hesitate any longer.

I’m getting the itch to play with RPi4’s hardware performance counters and post results. In the meantime, check out my summary of the ARM11 micro-architecture. If you would like to know more about performance measurement and events in ARM1176-based Raspberry Pi’s, please see my Performance Events for Linux (PERF) tutorial.

Also, I have uploaded all of my teaching notes about computer design, VLSI systems and computer architecture:

These resources should help students and teachers alike!

Copyright © 2020 Paul J. Drongowski

Raspberry Pi 4 mini-review

Success with the RTL-SDR Blog V3 software defined radio (SDR) inspired me to try SDR on Raspberry Pi. I pulled out the old Raspberry Pi 2, updated to the latest Raspberry Pi OS (Buster), and installed CubicSDR and GQRX.

Both CubicSDR and GQRX ran, but performance was unacceptably slow. Audio kept breaking up, possibly due to a small audio buffer and/or insufficient CPU cycles. The poor old Raspberry Pi 2 Model B (v1.1) is a 900MHz Broadcom BCM2836 SoC, a quad-core 32-bit ARM Cortex-A7 processor. The RPi 2 has 1GB of RAM. If you would like to know more about its internals, please read about the BCM2835 micro-architecture and performance analysis with PERF (Performance Events for Linux).

Time to upgrade! I had been meaning to retire the Black Hulk — a 2011 vintage power-sucking LANbox with a Greyhound-era dual-core AMD processor. Upgrading gives me the opportunity to try the latest Raspberry Pi 4 and gain a lot of desktop space. The image below shows my office work space including the Black Hulk and the intsy RPi 4.

Raspberry Pi 4 running CubicSDR software defined radio

I decided to accessorize a little and purchased a Raspberry Pi branded keyboard and mouse. The Raspberry Pi keyboard is a small chiclet keyboard with an internal hub. The internal hub is a welcome addition and postpones the need for an external USB hub. The keyboard has a decent enough feel. It is smaller than the Logitech which it replaces, giving me more desktop space albeit with a slightly cramped hand feel. The Raspberry Pi mouse is just OK. I like the splash of color, too, a nice break from boring black and grey.

Raspberry Pi 4 is faster without question. The desktop and web browser are snappier. RPi 4 boosts the Ethernet port to 1000 BaseT (Gigabit) and you can see it.

The Raspberry Pi 4 is a 1.5GHz Broadcom BCM2711, a quad-core 64-bit ARM Cortex-A72 processor. I ran an old naive matrix multiplication program and it finished in 0.6 second versus 2.6 seconds on the Raspberry Pi 2. Naturally, I’m curious about the speed-up. I hope to dig into the BCM2711 micro-architecture.

Raspberry Pi 4 PCB (Broadcom BCM2711 and 4GB RAM)

I recommend upgrading to Raspberry Pi 4 without hesitation or reservations. I bought the Canakit PI4 Starter PRO Kit at Best Buy, not wanting to wait for delivery. The kit includes an RPi 4 with 4GB RAM, black plastic case, Canakit power supply, heat sinks, cooling fan, micro HDMI cable, USB card reader, NOOBS on a 32GB MicroSD card, and a Canakit power switch (PiSwitch). It seemed like the right combination of accessories.

By the way, you might want to consider the newly announced Raspberry Pi 400. It integrates a Raspberry Pi 4 and keyboard into one very compact unit. Its price ($70USD) is hard to beat, too.

The PiSwitch sits between the USB-C power supply and the RPi4, and is a convenient desktop power ON/OFF switch. Canakit could be a little more forthcoming about proper power up and power down sequencing. When powering down, I let the monitor go to sleep before turning power off. This should give the Raspberry Pi OS time to sync and properly shut-off.

I recommend checking the connecters on your monitor before placing any kind of web order. My HP monitor does not support HDMI, doing DisplayPort, DVI-D and VGA. The Canakit cable is micro-HDMI to HDMI. I bought a mini-HDMI to DVI-D cable on-line and wound up waiting after all! No way I’m paying Best Buy prices for a cable. 🙂

Assembly is a piece of cake. The processor and case fit together without screws or other hardware. The case fit and finish is good and holds together well just by fit alone. I installed the heat sinks, but not the fan. If I run into thermal issues, I will add the fan.

I didn’t bother with the NOOBS MicroSD card as I already had Buster installed. I see the value in NOOBS for beginners who don’t want to deal with disk images and such. I will probably repurpose the NOOBS card.

The only annoyance is due to the Raspberry Pi OS package manager. The add/remove software interface shows waaaaay too much detail. I want to install CubicSDR and GQRX, but where the heck are they? Why do I have to sort through a zillion libraries, etc. when searching on “SDR”? I installed via command line apt-get — a far more convenient and direct method.

The higher processor speed and bigger RAM pay off — no more glitchy audio. After trying both CubicSDR and GQRX, I prefer CubicSDR. I didn’t have any issues configuring for HF reception in either case. You should read the documentation (!) ahead of time, however.

I hope this quick Raspberry Pi 4 rundown is helpful.

Copyright © 2020 Paul J. Drongowski