Vocaloid keyboard announced

At long last, Yamaha have announced their Vocaloid™ keyboard, the VKB-100. The VKB-100 is a keytar design similar to the prototype shown at the “Two Yamahas, One Passion” exhibition at Roppongi Hills, Tokyo, July 3-5, 2015.

More details will be released in December 2017. However, this much is known:

  • Lyrics are entered using a dedicated application for smart phones and tablets via Bluetooth.
  • VY1 is the built-in default singing voice.
  • Up to 4 Vocaloid singers can be added using the application.
  • Four Vocaloid voices will be available: Hatsune Miku, Megpoid (GUMI), Aria on the Planets (IA), and Yuzuki Yukari.
  • Melody is played by the right hand while the left hand adds expression and navigates through the lyrics.
  • A speaker is built-in making the VKB-100 a self-contained instrument.

The VKB-100 was demonstrated at the Yamaha exhibition booth at the “Magical Mirai” conference held at the Makuhari Messe, September 1-3, 2017. Price is TBD.

VY1 is a female Japanese voice developed by Yamaha for its own products. VY1 does not have an avatar or character like other Vocaloid singers. This makes sense for Yamaha as they can freely incorporate VY1 in products without playing royalties or other intellectual property (IP) concerns.

The Vocaloid keyboard has had a long evolution, going through five iterations. The first three models did not use preloaded lyrics. Instead, the musician entered katakana with the left hand while playing the melody with the right hand. This proved to be too awkward and Yamaha moved to preloaded lyrics. The left hand controls on the neck add expression using pitch and mod wheels. The left hand also navigates through the lyrics as the musician “sings” via the instrument. The current lyrics are shown in a display just to the left of the keyboard where the musician can see them.

Yamaha will release more information on the Vocaloid keyboard site.

If you want to get started with Vocaloid and don’t want to spend a lot of Yen (or dollars), check out the Gakken NSX-39 Pocket Miku. Pocket Miku is a stylophone that plays preloaded Japanese lyrics. The NSX-39 also functions as a USB MIDI module with a General MIDI sound set within a Yamaha XG voice and effects architecture.

Be sure to read my Pocket Miku review and browse the resource links available at the bottom of the review page.

Copyright © 2017 Paul J. Drongowski

Vox VX50KB keyboard amplifier

With all of the new Korg keyboards, I missed the announcement of the Vox VX50KB keyboard amplifier. The VX50KB is part of the new Vox VX50 series of amplifiers. All the amps in the series have a street price of $229.99 and are currently shipping.

The VX50KB is a three channel keyboard amplifier that drives 50 Watts into an 8 inch, two-way coaxial speaker. Like the new Continental, the VX50KB warms up the sound with Nutube. Weight is an easy to wrangle 9 pounds (4.1 kg).

In the keyboard realm especially, sound quality depends upon the speaker and cabinet as a system. The VX50KB design is a bass reflex structure.

I’ll defer any judgement about sound quality until I hear one in action. Fat, deep organ tones quickly reveal any bass flatulence as well as the speaker’s ability to move air in the low frequency range. Oddly enough, mid-rangy French horns reveal flatulence, too. Strings are good for testing “boxiness” or “graniness.” If you want to hear grain, just listen to any amplifier in Roland’s KC series. The KC tweeters are inadequate.

September 1st goes to Korg

September 1st.

While rumors of Yamaha GENOS abound and Roland prepare to redefine the future (again), Korg drop:

Holy smokes! Normally this much excitement is reserved for Winter NAMM. Everybody wants a piece of Christmas season sales!

The KROSS 2 is an update of the KROSS synthesizer workstation. Not to be outdone by the Yamaha MX update, Korg has added two colors: dark blue and a limited edition red marble. The KROSS 2 boasts increased polyphony (from the previous 80 voices to 120 voices) and more preset sounds (from the previous 809 presets to 1,075 presets). There is a new stand, too.

The PA700 and PA1000 are updates on the PA600 and PA900 arrangers. You could kind of see the update coming as prices dropped on the PA600 and PA900 in recent months. The instruments have a new, maroon-ish color. Exapnsion memory is increased (PA1000: 600MB, PA700: 256MB). In addition to new voices and styles, the PA1000 update includes interactive KAOSS FX. KORG’s advertising is promoting the color touch panel and songbook, both of which are strong differentiators for the Korg line.

The big news is the Vox-branded Continental. It’s much more than an organ and includes acoustic piano, electric piano, drawbar organ, COMPACT organ (AKA Farfisa), strings, brass and more. Other notable features are the semi-weighted waterfall keyboard and Nutube valve drive. This puts the Connie in square competition with the Nord Electro 5d. The price is Nord-class, too: about $1,999 USD for the 61-key model. (There’s a 73-key model, too, $2,199 street.)

Aesthetically, the Connie has the old Vox color, but the narrower (and much lighter!) body looks chopped. The stand is not nearly as elegant as the old “S” stand. Nonetheless, it’s great to see a manufacturer take a crack at the old classic!

Copyright © 2017 Paul J. Drongowski

Montage tidbits

Martin Harris. Now, there’s a person who loves his job!

Even though the camera work is a little shaky, I recommend the Montage demonstration by Martin Harris of Yamaha.

Martin’s demo concentrates on acoustic and electric pianos, section and solo strings, brass, Irish whistle and pads — all from a cinematic perspective. Not much EDM here.

I like Martin’s demonstrations because he adds information about sample and voice development. Even though he calls it a “whistle stop tour,” it’s more like a tour of the world. Yamaha have traveled the world to sample the best instruments and players. Here are a few examples as mentioned by Martin:

  • Section and solo strings: Seattle
  • Brass: Los Angeles (L.A. horns)
  • Classical men’s choir: Germany
  • Classical boy’s choir: Estonia
  • Flamenco guitar: Madrid
  • Brazilian percussion: Sao Paulo
  • Turkish percussion: Istanbul
  • Iranian percussion: Tehran
  • Middle Eastern percussion: Bahrain
  • Irish whistle: Ireland

Before people complain about the cost of a top-of-the-line keyboard like the Montage or Tyros, they really should take the cost and time of sampling and voice development into account!

The Montage CFX grand piano is all new sampling. Martin stated the compressed total waveform size as 300 Mbytes, approaching 1 GBytes uncompressed. At demo time (April 2016), the Montage CFX was the biggest sampled piano in the Yamaha line. The Rhodes and Wurlitzer electric pianos are also new sampling.

Guitars also got an update. Martin and Gibson steel guitars were sampled. The sampled Telecaster is a $60,000, 1957 vintage Tele. Martin mention how, in the past, Yamaha removed the dirt from samples. Today they leave in some of the idiosynracies, charm and character.

If you enjoyed Martin’s demo, here are a few blog posts to check out. Last April, I made a list of new waveforms in the Montage vs. the Motif XF. I also wrote a thought piece about waveform memory size and sample development.

New sound development, including sampling, is a continual, on-going process at Yamaha. In an era when waveform memory is relatively big and inexpensive, sound developers need to work overtime in order to fill available memory space. I think the limiting factor now is the amount of time and human resources available to produce new samples and to program new expressive voices.

Copyright © 2017 Paul J. Drongowski

Reface MIDI pin-out

The Yamaha Reface series keyboards have a small DIN-6 connector that carries both MIDI IN and MIDI OUT signals. The keyboards ship with an adapter that converts DIN-6 to two standard 5-pin DIN connectors. Plug in the adapter cable, connect with standard MIDI cables, and you’re good to go.

A few people on the Yamaha Synth site inquired about the Reface MIDI pin-out. Their questions piqued my curiosity leading to a dive into Yamaha service manuals. The results are posted below along with some essential background information about MIDI signaling.

Use this information at your own risk. That goes for anything on my site!

Although I’ve assembled many boards and kits, I make horrible cables. I much prefer to use commercial MIDI adapters and cables. Life is too short to debug and repair shoddy, unreliable cables. Plug and play solutions are the most flexible; you never know when you’ll need a different configuration of female sockets and male plugs. Adapters like the Yamaha Reface adapter are the most flexible, reliable solution although they are product specific.

The Yamaha part number for the Reface MIDI adapter cable (MD6P-DIN) is ZP893500. If you are a USA customer, you can order the cable on-line from Yamaha 24×7. Last I checked, the cable is also available from the on-line retailer Full Compass. I’ve ordered from both Full Compass and Yamaha 24×7 in the past and they both get a thumbs up.

MIDI background information

If you’re going to do anything with MIDI hardware or software, I strongly recommend becoming a member of the MIDI Association. Please take a look at the MIDI circuit reference design:

This is the original electrical specification diagram. It’s good enough to understand MIDI operation. The original circuit has been superceded by version 1.1 which includes important additions for 3.3 Volt operation and reduced radio frequency interference (RFI). Register to become a member and download the new reference circuit.

As the MIDI specification notes, “The MIDI circuit is a 5mA current loop; logical 0 is current ON.” The MIDI sender and the MIDI receiver are optically isolated. The sender (MIDI OUT) controls an LED embedded within the receiver’s opto-isolator (MIDI IN).

The DIN connector on the MIDI OUT side has the following pins:

  • Pin 1: No connection (NC)
  • Pin 2: Ground
  • Pin 3: No connection (NC)
  • Pin 4: Connected to +5V (3.3V) through a current limiting resistor
  • Pin 5: Serial data output (UART TX)

The DIN connector on the MIDI IN side has the following pins:

  • Pin 1: No connection (NC)
  • Pin 2: No connection (NC)
  • Pin 3: No connection (NC)
  • Pin 4: LED anode (+)
  • Pin 5: LED cathode (-)

Pin 2 may optionally be connected to ground through a capacitor. Please see the current MIDI specification for more info. (Become a member!)

The goal is to turn the opto-isolator LED ON and OFF. The LED polarity (direction of current flow) is important. The MIDI sender turns the electrical current ON and OFF, that is, it turns the LED ON and OFF. This action sends a serial stream of bits from the sender to the receiver.

While writing, it occurred to me — the MIDI Association never formally named these signals. Thus, you get my names like “the thingy connected to the anode of the LED.”

Example: PSR-S910

The following diagram is the MIDI IN and MIDI OUT circuit within the Yamaha PSR-S910 arranger workstation. [Click on the image to enlarge.] I went back to this older product because it uses a transistor pair on the MIDI OUT side, just like the Reface series. That should make it easier to match up the MIDI signals with the Reface DIN-6 pins. Recent products employ a logic gate instead of a transistor pair to switch current through the MIDI loop.

Please note that the S950 MIDI signals are exactly what we expect knowing the MIDI reference design. The “extra stuff” suppresses RFI among other things.

Example: Reface CS

The diagram below depicts the Reface CS MIDI interface circuit (with a few edits for brevity and format). The Reface circuit is similar to the S910 circuit.

Here are the MIDI signals at the Reface DIN-6 pins:

  • Pin 1: MIDI IN, Ground via decoupling capacitor
  • Pin 2: MIDI OUT, Ground
  • Pin 3: MIDI IN, LED cathode (-)
  • Pin 4: MIDI OUT, TX serial data
  • Pin 5: MIDI IN, LED anode (+)
  • Pin 6: MIDI OUT, pull-up to 3.3V

Please note the DIN-6 pin numbering, position and connector orientation!

Now, let’s match up the Reface DIN-6 pins to regular MIDI DIN-5 pins. The MIDI IN match ups are:

       MIDI IN      MIDI IN
    Reface DIN-6   MIDI DIN-5      Function
    ------------  ------------   -------------
                     Pin 1       No connection
        Pin 1        Pin 2       Ground via decoupling capacitor
                     Pin 3       No connection
        Pin 5        Pin 4       LED anode (+)
        Pin 3        Pin 5       LED cathode (-)

I put the MIDI DIN-5 pin numbers in ascending order. The MIDI OUT match ups are:

      MIDI OUT      MIDI OUT
    Reface DIN-6   MIDI DIN-5      Function
    ------------  ------------   -------------
                     Pin 1       No connection
        Pin 2        Pin 2       Ground
                     Pin 3       No connection
        Pin 6        Pin 4       Pull-up to 3.3V
        Pin 4        Pin 5       TX serial data

At this point, I suggest grabbing your Reface MIDI adapter cable and tracing the DIN-6 to DIN-5 connections with a continuity checker. This is the best way to come to grips with the real-world connections and signal/pin positions.

Copyright © 2017 Paul J. Drongowski
Reface and PSR-S910 diagrams are Copyright © Yamaha Corporation

Pocket Miku: Module review

So far, I’ve posted several articles with resources for the Yamaha NSX-1 eVocaloid integrated circuit and the Gakken Pocket Miku (NSX-39), which is based on the NSX-1 chip. (See the bottom of this page for links.) This post pulls the pieces together.

Pocket Miku is both a vocal stylophone and a Yamaha XG architecture General MIDI (GM) module. There are plenty of Pocket Miku stylophone demos on the Web, so I will concentrate on Pocket Miku as a module.

Pocket Miku connects to your PC, mobile device or whatever over USB. The module implements sixteen MIDI channels where channel one is always assigned to the Miku eVocaloid voice and channels 2 to 16 are regular MIDI voices. As I said, the module follows the XG architecture and you can play with virtually all of the common XG features. The NSX-1 within Pocket Miku includes a fairly decent DSP effects processor in addition to chorus and reverb. The DSP effect algorithms include chorus, reverb, distortion, modulation effects, rotary speaker and a lot more. Thus, Pocket Miku is much more than a garden variety General MIDI module.

My test set up is simple: Pocket Miku, a USB cable, a Windows 7 PC, Cakewalk SONAR and a MIDI controller. Pocket Miku’s audio out goes to a pair of Mackie MR5 Mk3 monitors. The MP3 files included with this post were recorded direct using a Roland MicroBR recorder with no added external effects.

The first demo track is a bit of a spontaneous experiment. “What happens if I take a standard XG MIDI file and sling it at Pocket Miku?” The test MIDI file is “Smooth Operator” from Yamaha Musicsoft. Channel 1 is the vocal melody, so we’re off to a fast start right out of the gate.

One needs to put Pocket Miku into NSX-1 compatibility mode. Simultaneously pressing the U + VOLUME UP + VOLUME DOWN buttons changes Pocket Miku to NSX-1 compatibility mode. (Pocket Miku responds with a high hat sound.) Compatibility mode turns off the NSX-39 SysEx implementation and passes everything to the NSX-1 without interpetation or interference. This gets the best results when using Pocket Miku as a MIDI module.

Here is the MP3 Smooth Operator demo. I made only one change to the MIDI file. Unmodified, Miku’s voice is high enough to shatter glass. Yikes! I transposed MIDI channel 1 down one octave. Much better. Pocket Miku is singing whatever the default (Japanese) lyrics are at start-up. It’s possible to send lyrics to Pocket Miku using SysEx messages embedded in the MIDI file. Too much effort for a spontaneous experiment, so what you hear is what you get.

Depending upon your expectations about General MIDI sound sets, you’ll either groan or think “not bad for $40 USD.” Miku does not challenge Sade.

One overall problem with Pocket Miku is its rather noisy audio signal. I don’t think you can fault the NSX-1 chip or the digital-to-analog converter (DAC). (The DAC, by the way, is embedded in the ARM architecture system on a chip (SOC) that controls the NSX-1.) The engineers who laid out the NSX-39 circuit board put the USB port right next to the audio jack. Bad idea! This is an example where board layout can absolutely murder audio quality. Bottom line: Pocket Miku puts out quite a hiss.

The second demo is a little more elaborate. As a starting point, I used a simple downtempo track assembled from Equinox Sounds Total Midi clips. The backing track consists of electric piano, acoustic bass, lead synth and drums — all General MIDI. Since GM doesn’t offer voice variations, there’s not a lot of flexibility here.

I created an (almost) tempo-sync’ed tremolo for the electric piano by drawing expression controller events (CC#11). My hope was to exploit the DSP unit for some kind of interesting vocal effect. However, everything I tried on the vocal was over-the-top or inappropriate. (Yes, you can apply pitch change via DSP to get vocal harmony.) Thus, Miku’s voice is heard unadulterated. I eventually wound up wasting the DSP on a few minor — and crummy — rhythm track effects.

I created four lyrical phrases:

A summer day           Natsu no hi
f0 43 79 09 00 50 10 6e 20 61 2c 74 73 20 4d 2c 6e 20 6f 2c 43 20 69 00 f7

Your face              Anata no kao
f0 43 79 09 00 50 10 61 2c 6e 20 61 2c 74 20 61 2c 6e 20 6f 2c 6b 20 61 2c 6f 00 f7

A beautiful smile      Utsukushi egao
f0 43 79 09 00 50 10 4d 2c 74 73 20 4d 2c 6b 20 4d 2c 53 20 69 2c 65 2c 67 20 61 2c 6f 00 f7

A song for you         Anata no tame no uta
f0 43 79 09 00 50 10 61 2c 6e 20 61 2c 74 20 61 2c 6e 20 6f 2c 74 20 61 2c 6d 20 65 2c 6e 20 6f 2c 4d 2c 74 20 61 00 f7

The Japanese lyrics were generated by Google Translate. I hope Miku isn’t singing anything profane or obscene. 🙂

I did not create the SysEx messages by hand! I used the Aides Technology translation app. Aides Technology is the developer of the Switch Science NSX-1 Arduino shield. The application converts a katakana phrase to an NSX-1 System Exclusive (SysEx) message. Once converted, I copied each HEX SysEx message from the Aides Tech page and pasted them into SONAR.

Finally, the fun part! I improvised the Miku vocal, playing the part on a Korg Triton Taktile controller. What you hear in the MP3 Pocket Miku demo is one complete take. The first vocal section is without vibrato and the second vocal section is with vibrato added to long, held notes. I added vibrato manually by drawing modulation (CC#1) events in SONAR, but I could have ridden the modulation wheel while improving instead.

The overall process is more intuitive than the full Vocaloid editor where essentially everything is drawn. Yamaha could simplify the process still further by providing an app or plug-in to translate and load English (Japanese) lyrics directly to an embedded NSX-1 or DAW. This would eliminate a few manual steps.

Overall, pre-loaded lyrics coupled with realtime performance makes for a more engaging and immediate musical experience than working with the full Vocaloid editor. If Yamaha is thinking about an eVocaloid performance instrument, this is the way to go!

The pre-loaded lyric approach beats one early attempt at realtime Vocaloid performance as shown in this You Tube video. In the video, the musician plays the melody with the right hand and enters katakana with the left hand. I would much rather add modulation and navigate through the lyrics with the left hand. This is the approach taken for the Vocaloid keytar shown on the Yamaha web site.

Here is a list of my blog posts about Pocket Miku and the Yamaha NSX-1:

I hope that my experience will help you to explore Pocket Miku and the Yamaha NSX-1 on your own!

Before leaving this topic, I would like to pose a speculative question. Is the mystery keyboard design shown below a realtime eVocaloid instrument? (Yamaha U.S. Patent number D778,342)

The E-to-F keyboard just happens to coincide with the range of the human voice. Hmmmm?

Copyright © 2017 Paul J. Drongowski

Yamaha CSP pianos: First take

Yamaha just announced the Clavinova CSP series of digital pianos. There are two models: CSP-150 and CSP-170. The main differences between the 170 and 150 are keyboard action (NWX and GH3X, respectively) and sound system (2 x 45W and 2 x 30W, respectively). USA MSRP list prices are $5,399 to $5,999, and $3,999 to $4,599 USD.

These are not stage pianos. They are “furniture” pianos which complement and fit below the existing CLP line.

Here’s my imagined notion of the product pitch meeting:

Digital piano meets arranger meets Rock Band. Let’s say that you don’t have much (any) musical training, but you want to play along with Katy Perry. Sit down at the CSP with your smart device, install the Smart Pianist app and connect via Bluetooth. Call up “Roar” in the app and get a simple musical score. Start the song, follow the LEDs above the keys and play along with the audio. The app stays in sync with the audio and highlights the notes to be played on each beat. So, if you learned a little bit about reading music, you’re good to go.

Sorry, a little bit more than an elevator pitch, but this is first draft writing! 🙂

That is CSP in a nutshell. The CSP is a first-rate piano and it has a decent collection of non-piano voices and arranger styles. The CSP even includes the Hammond-ish “organ flutes” drawbar organ voices. So, if you want to jam out with electric guitar, you’re set. If you want to play chords with your left hand and freestyle it, the CSP is ready.

If you’re looking for a full arranger workstation, though, you’re missing some features. No pitch bend wheel, no mod wheel, no multipads, no accompaniment section (MAIN, FILL, …) buttons. No voice editing; all voices are preset.

And hey, there’s no display either! The Smart Pianist app is your gateway to the CSP feature set. You can select from a few voices and styles using the FUNCTION button and the piano keyboard, but you need the app to make full use of the CSP. Eliminating the CLP’s touch panel, lights and switches takes a lot of cost out of the product, achieving a more affordable price point.

I could see the CSP appealing to churches as well as home players given the quality of the piano and acoustic voices. Flipping the ON switch and playing piano is just what a lot of liturgical music ministers want. The more tech savvy will dig in. Pastors will appreciate the lower price of the CSP line.

From the perspective of an arranger guy, the CSP represents a shift away from the standard arranger. For decades, people want to play with their favorite pop tunes. In order to use a conventional arranger (no matter what brand), the musician must find a suitable style and the musician must have the musical skill to play a chord with the left hand, even if it’s just the root note of the chord. Often the accompaniment doesn’t really “sound like the record” and the player feels disappointed, unskilled and depressed. Shucks, I feel this way whenever I make another attempt at playing guitar and at least I can read music!

The CSP is a new paradigm that addresses these concerns. First, the (budding) musician plays with the actual recording. Next, the app generates a simplified musical score — no need to chase after sheet music. The score matches the actual audio and the app leads the player through the score in sync with the audio. Finally, the CSP’s guide lights make a game of playing the notes in the simplified score.

We’ve already seen apps from Yamaha with some of these features. Chord Tracker analyzes a song from your audio music library and generates a chord chart. Kittar breaks a song down into musical phrases that can be repeated, transposed and slowed down for practice. The Smart Pianist app includes Chord Tracker functionality and takes it to another level producing a two stave piano score.

Notice that I said “a score” not “the score.” Yamaha’s audio analysis only needs to be good enough to produce a simple left hand part and the melody. It does not need to generate the full score for a piece of music. Plus, there are likely to be legal copyright issues with the generation of a full score. (A derivative work?)

Still, this is an impressive technical feat and is the culmination of years of research in music analysis. Yamaha have invested heavily in music analysis and hold many patents. Here are a few examples:

  • U.S. Patent 9,378,719: Technique for analyzing rhythm structure of music audio data, June 28, 2016
  • Patent 9,117,432: Apparatus and method for detecting chords, August 25, 2015
  • U.S. Patent 9,053,696: Searching for a tone data set based on a degree of similarity to a rhythm pattern, June 9, 2015
  • U.S. Patent 9,006,551: Musical performance-related information output device, April 14, 2015
  • Patent 9,275,616: Associating musical score image data and logical musical score data, March 1, 2016
  • U.S. Patent 9,142,203: Music data generation based on text-format chord chart, September 22, 2015

The last patent is not music analysis per se. It may be one of several patents covering technology that we will see in the next Yamaha top of the line (TOTL) arranger workstation.

I think we will be seeing more features based on music analysis. Yamaha’s stated mission is to make products that delight customers and to provide features that are not easily copied by competitors. Yamaha have staked out a strong patent position in this area let alone climbing over the steep technological barrier posed by musical analysis of audio.

Copyright © 2017 Paul J. Drongowski

A jaunt into Cold War history

This started out as a simple investigation. Then …

Folks who usually visit this site will wonder if their browser landed in the right place. Fear not. In addition to music and computation, I dabble occasionally as an amateur historian — computation and communications, mainly, early Cold War.

First, two book recommendations:

  • Garrett M. Graff, “Raven Rock,” Simon & Schuster, 2017.
  • Sharon Weinberger, “The Imagineers of War,” Alfred A. Knopf, 2017.

Both books are extensively researched, well-written and good reads.

Mr. Graff covers the vast scope of American efforts to provide continuity of government (COG) in the face of a national emergency, nuclear war in particular. This topic is difficult enounh due to its scope, but he also thoroughly manages to cover six decades post World War II.

Ms. Weinberger tells the story of the Department of Defense (DoD) Advanced Research Projects Agency (ARPA). Many people simply associate ARPA with “The Internet,” but ARPA’s history and contributions are much broader than that. Her description of ARPA’s role in the Vietnam War is especially enlightening, further showing how wrong things went.

ARPA held the charter for America’s first attempt at ballistic missile defense: Project DEFENDER. Reading about Project DEFENDER reminded me about a series of National Security Action Memoranda (NSAM) written during the Kennedy and Johnson administrations. These memoranda document key decisions and directives made by the president and the national security staff. Several of these memoranda assign the “highest national priority,” DX, to certain defense-related projects. Project DEFENDER is one of those assignees (NSAM-191).

DX priority (also known as “BRICK-BAT”) was created by the Defense Production Act (DPA) of 1955. David Bell, directory of the Bureau of the Budget in the Kennedy administration, wrote an excellent, concise summary of the importance and practical significance of DX priority:

“This national priority rating system was established in 1955 primarily for the purpose of alleviating development and production bottlenecks for major national projects of the greatest urgency. … This indication aids any project which is assigned the DX rating in matters such as: The assignment of the most highly quality personnel by contractors and government agencies; the scheduling of effort on the National Test Ranges; and in the competition for the allocation of all resources including financial support.” [David E. Bell, Memorandum for Mr. Bundy, “Request for DX Priority Rating for Project DEFENDER,” September 25, 1962.]

At the time, ten programs had DX priority:

  1. ATLAS weapon system and required construction
  2. TITAN weapon system and required construction
  3. MINUTEMAN (ICBM) weapon system and required construction
  4. POLARIS fleet ballistic missile weapon system (including Mariners I & II and submarines, submarine tenders and surveys)
  5. NIKE-ZEUS guided missile weapon system and required construction (research and development only)
  6. Ballistic Missile Early Warning System (BMEWS) including Project DEW DROP
  7. SAMOS (satellite-borne visual and ferret reconnaissance system)
  8. DISCOVERER (satellite guidance and recovery)
  9. MERCURY (manned satellite)
  10. SATURN booster vehicle (1,500,00 pound-thrust, clustered rocket engine)

All ten programs were key to the Cold War effort at that time: ICBMs, reconnaissance, and manned space flight. Taken together, these projects represented roughly 25 percent of the defense budget, leading Secretary of Defense McNamara to caution against overuse of the DX priority.

On September 23, 1963, President Kennedy signed NSAM-261 giving highest national priority (DX) to Project FOUR LEAVES. The White House diary for that day indicates that Project FOUR LEAVES is a military communication system. One of the enduring mysteries to this day is the exact system to which “Project FOUR LEAVES” refers.

One investigator, Robert Howard, claims that the White House Diary on the JFK library site describes FOUR LEAVES as a “military communication system.” (See “September 23, 1963,” if you can.) I have not been able to verify this personally due to a technical issue with the diary finding aid.

Reading Mr. Garrett’s book encouraged me to return to this mystery. We know from many different sources that the Kennedy administration was highly concerned about the vulnerability and survivability of the federal government under nuclear attack. I recommend the following resources about this subject as its scope is well beyond a blog post:

  • L. Wainstein, et al., “Study S-467 The Evolution of U.S. Strategic Command and Control and Warning, 1945-1972”, Institute for Defense Analyses, June 1975.
  • Thomas A. Sturm, “The Air Force and the Worldwide Military Command and Control System,” USAF Historical Division Liaison Office, August 1966.
  • David E. Pearson, “The World Wide Military Command and Control System: Evolution and Effectiveness,” Air University Press, Maxwell Air Force Base, Alabama, June 2000.
  • Bruce G. Blair, “Strategic Command and Control,” The Brookings Institution, 1985.

Given the nature of the projects with DX priority at that time, it is plausible to assert that Project FOUR LEAVES is a military communication system for command and control of nuclear war.

At first, I was inclined to think of the four leaves as the four major components of the National Military Command System. In February 1962, Secretary of Defense McNamara approved a National Military Command System (NMCS) consisting of four elements:

  1. The National Military Command Center (NMCC)
  2. The Alternate National Military Command Center (ANMCC) Site R
  3. The National Emergency Command Post Afloat (NECPA)
  4. The National Emergency Airborne Command Post (NEACP)

In October 1962, he issued a DoD directive on the World-Wide Military Command and Control System (WWMCCS) that included these elements. According to DoD Directive 5100.30, “Concept of Operations of the World-Wide Military Command and Control System”, 16 October 1962:

The NMCS is the priority component of the WWMCCS designed to support the National Command Authorities (NCA) in the exercise of their responsibilities. It also supports the Joint Chiefs of Staff in the exercise of their responsibilities.

The NCA consists only of the President and the Secretary of Defense or their duly deputized alternates or successors. The chain of command runs through the President to the Secretary of Defense and through the Joint Chiefs of Staff to the commanders of the Unified and Specified Commands.

By October 1962, these elements were well-established and the development of AUTOVON with its hardened sites was underway. The list omits the (then) highly secret government Mount Weather relocation site (also called “HIGH POINT” or euphemistically, the “Special Facility.”) There is a big difference in the secrecy attached to AUTOVON vs. HIGH POINT. The latter is rarely mentioned or discussed in Kennedy era memoranda even by its euphemistic name.

One needs to consider the strategic situation at the time. American assets were increasingly threatened by land- and submarine-based Soviet ICBMs. Warning time and reaction time was, at best, fifteen minutes, making it unlikely that the president could make it safely to the most survivable NMCS element, NEACP. The leadership also feared pre-placement of nuclear devices cutting warning and reaction time to zero. Given the small number of leadership nodes and short warning time, I cannot overemphasize the acute danger and probability of a successful decapitation strike against the highest levels of the American govenment (the NCA). The American leadership was aware of this vulnerability and feared it.

The only practical recourse was to increase redundancy, to preposition successors and delegates, and to make targeting more difficult for the Soviets. (Compounding the problem was the inadequacy of laws governing succession. This was before the 25th Amendment and makes for an interesting analysis including constitutionality.) The government needed to increase the number of relocation sites, to provide communication between sites and established command nodes, to provide the means to identify a lawful presidential successor, and to provide the means of issuing an emergency war order (EWO).

Thus, I’ve come to believe that FOUR LEAVES refers to the AT&T “Project Offices” as described in Mr. Grass’s book. In addition to AUTOVON, AT&T were contracted to design and construct five highly secret, hardened bunkers:

  • A site to support the ANMCC (Site R).
  • A site to support HIGH POINT.
  • A relocation site in Virginia, south of the D.C. relocation arc.
  • A deep relocation site in North Carolina.
  • A relay station between the relocation site in Virginia and the deep site in North Carolina.

The sites were linked by a troposcatter radio system. AUTOVON, by way of comparison, was interconnected by coaxial cable and microwave communications. The Project Office sites are often conflated with AUTOVON, but this confusion is likely intentional in order to provide cover for the Project Office construction and locations.

As a system, an important likely goal was continuing communication with the most survivable element of NMCS, NEACP. NEACP’s duty was to orbit at the eastern end of the Post Attack Command and Control System (PACCS). The EWO issued by the NCA aboard NEACP would be sent via multiple air-to-air and ground channels to bases and missile fields in the American mid-west. NEACP’s orbital area is determined by its ability to inject the EWO via air-to-air and air-to-ground links, and by its ability to avoid and survive a Soviet barrage attack. Thus, NEACP needs a large area well-outside of the D.C. relocation arc which, quite frankly, would be an unimaginable thermonuclear horror during an attack.

The relocation site in North Carolina was the southern terminus of the chain. Local folklore describes the buried structure as several stories tall — much bigger than the one- or two-story cut and cover bunkers used by AUTOVON. Very likely, this site, known by locals as “Big Hole,” was a major emergency leadership node. Survival of this site and its peers depended upon absolute secrecy.

Is this analysis proof that Project FOUR LEAVES is the AT&T relocation project? No, but it does point in that direction. If FOUR LEAVES is the construction of the five Project Office sites, DX priority would compel AT&T to give highest priority to personnel, equipment, material and schedule above AUTOVON. Given the acute danger of nuclear decapitation, time was of the essence.

What of the five Project Office sites today? The relay station (Spears Mountain 5, Virginia) has been shut down. It is now the private property of its homeowner. (You Tube video) Troposcatter radio is no longer needed, supplanted by the redundancy and higher bandwidth of fiber optic networks and satellite communication. “Big Hole” has been mothballed.

The site in Virginia near Mount Weather is now a site of controversy. AT&T applied for a permit to construct a “data center” on the site. The permit was publicly contested and AT&T stopped the project (Project Aurelia) when publicity became too great. See the Loudoun County Council and Loudoun Now for additional information.

Peters Mountain remains in operation.

Copyright © 2017 Paul J. Drongowski

Pocket Miku software resources

This page is a collection of resources for using and programming Gakken Pocket Miku, also known as the “NSX-39”. It starts out with a cheat sheet for using Pocket Miku, moves on to Web-based applications, and finishes with customization and MIDI System Exclusive (SysEx) messages.

Be sure to read the Pocket Miku user’s guide before starting. The material below is not a hand-holding tutorial!

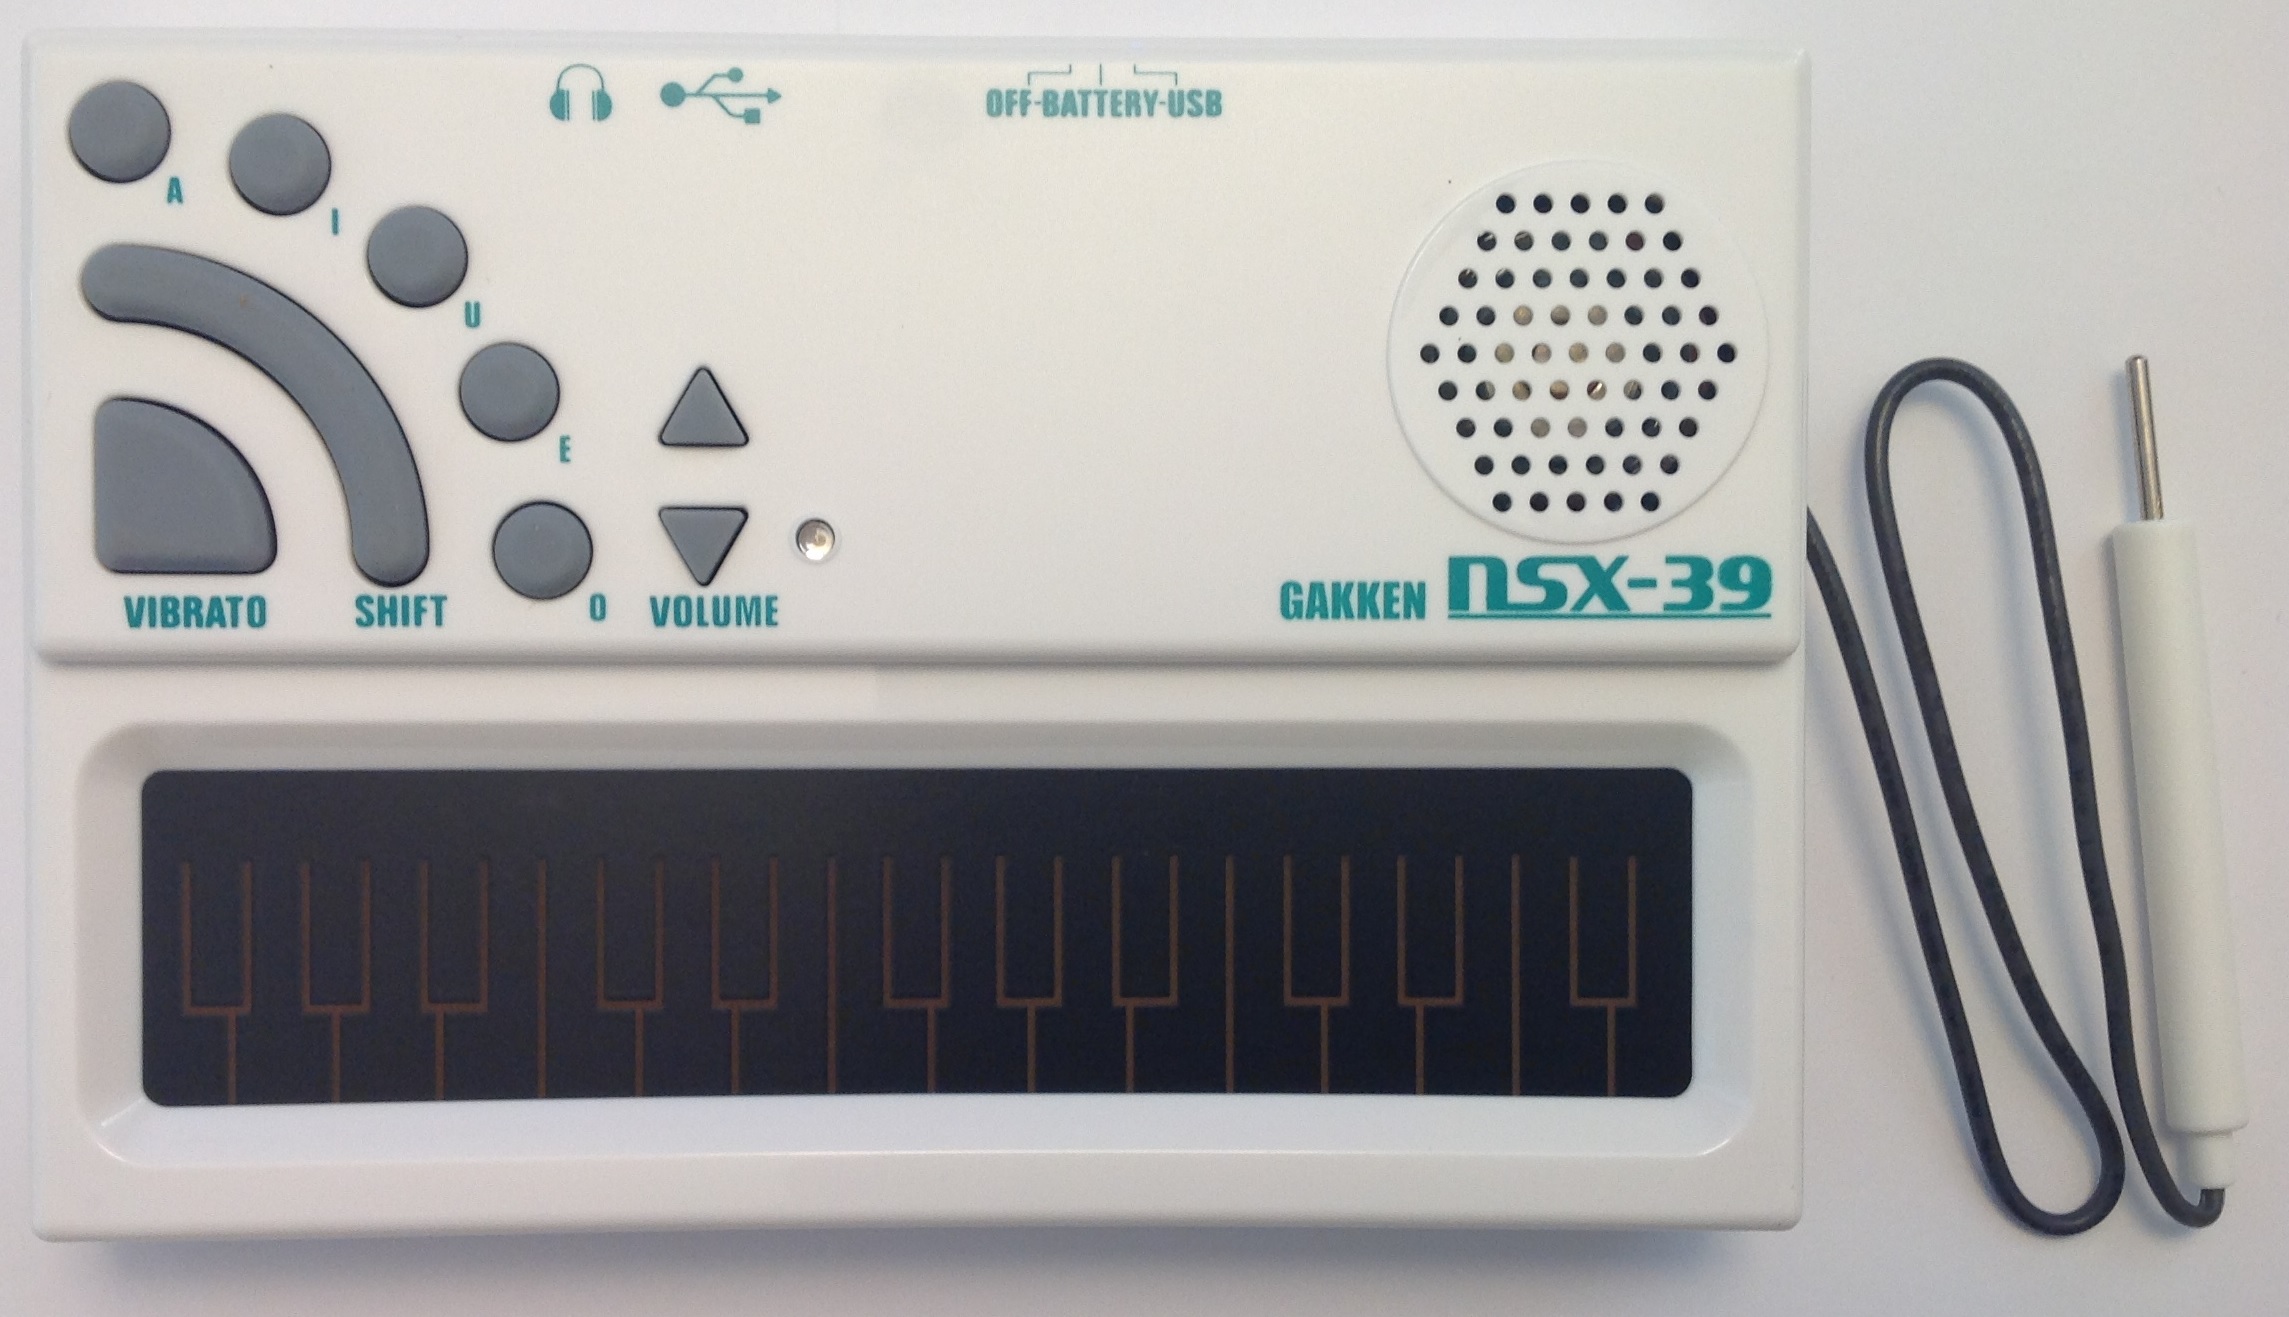
Pocket Miku cheat sheet
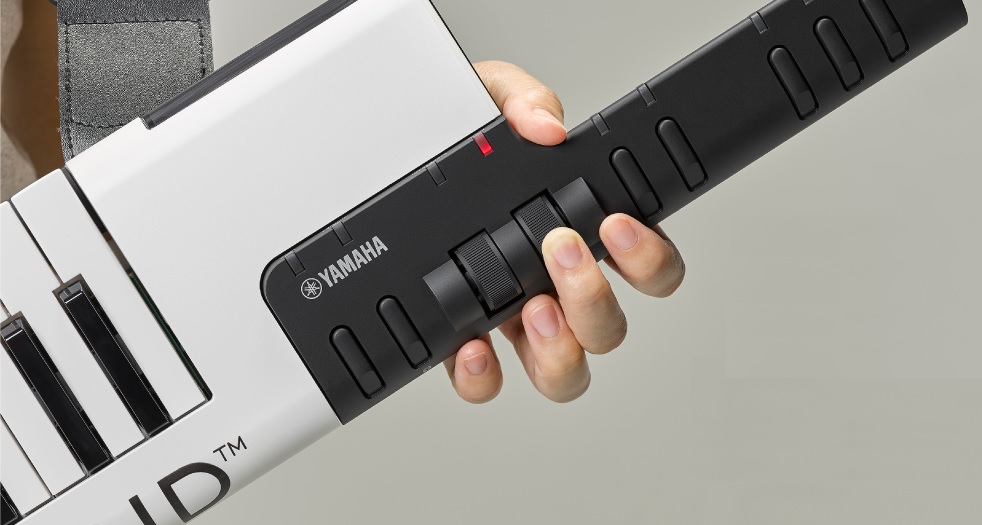
Stylus area

The lower part of the stylus area is a chromatic keyboard which plays notes. The upper part of the stylus area is a ribbon controller. Touch the stylus to either area to make music.

This is a classic resistive keyboard/ribbon controller. Stylus actions are converted to MIDI note ON, MIDI note OFF and pitch bend messages. The MIDI note is fixed: F#. MIDI pitch bend messages determine the actual final pitch which is heard.

Operating modes

Pocket Miku has two major operating modes:

  1. Normal mode
  2. NSX-1 compatibility mode

Pocket Miku boots into normal mode. In this mode, the NSX-39 recognizes and responds to stylus actions, button presses, etc.

Pocket Miku has three submodes in the normal operating mode:

  1. Do-Re-Mi mode with scales (default)
  2. A-I-U-E-O mode with vowels (SHIFT + vibrato button)
  3. Preset lyric mode with 5 lyrics (SHIFT + one of the AEIOU buttons)

The default phrases in preset lyric mode are:

    SHIFT + A    Konnichiwa Arigato (Hello, thank you)
    SHIFT + I    Butterfly song (choucho)
    SHIFT + U    Cherry blossom song (Sakura)
    SHIFT + E    Auld Lang Syne (Hotaru no hikari)
    SHIFT + O    Irohanihoheto

The magic key combination U + VOLUME UP + VOLUME DOWN switches between normal mode and NSX-1 compatibility mode. Pocket Miku plays a high hat hit when changing modes (not a “beep”). The Yamaha Web applications use NSX-1 compatibility mode. NSX-1 compatibility mode is also good for DAW-based sequencing since it decreases latency by disabling the interpretation of MIDI System Exclusive messages that are meaningful only to the NSX-39 microcontroller.

Buttons

Pocket Miku responds to single button presses and combinations:

    A-I-U-E-O    Selects on of the vowel phonemes
    VIBRATO      Adds vibrato to the sound
    SHIFT        Selects additional functions and modes
    VOLUME UP    Increase volume
    VOLUME DOWN  Decrease volume

    SHIFT + A, SHIFT+I, ...   Select A-I-U-E-O vowel mode
    SHIFT + VIBRATO           Select Do-Re-Mi mode
    SHIFT + VOLUME UP         Octave up
    SHIFT + VOLUME DOWN       Octave down
    VIBRATO + VOLUME UP       Pitch bend up (up one semi-tone)
    VIBRATO + VOLUME DOWN     Pitch bend down (down one semi-tone)

    A + VOLUME UP + VOLUME DOWN        Panic reset
    U + VOLUME UP + VOLUME DOWN        Select NSX-1 mode
    O + VOLUME UP + VOLUME DOWN        Retune Pocket Miku
    SHIFT + VOLUME UP + VOLUME DOWN    Initialize (factory reset)

Web-based applications

Gakken NSX-39 applications

Gakken provide three applications specifically for the NSX-39 (in normal mode). The applications are at http://otonanokagaku.net/nsx39/app.html.

Google Chrome version 33 or later is required because the Gakken applications use the Web MIDI API.

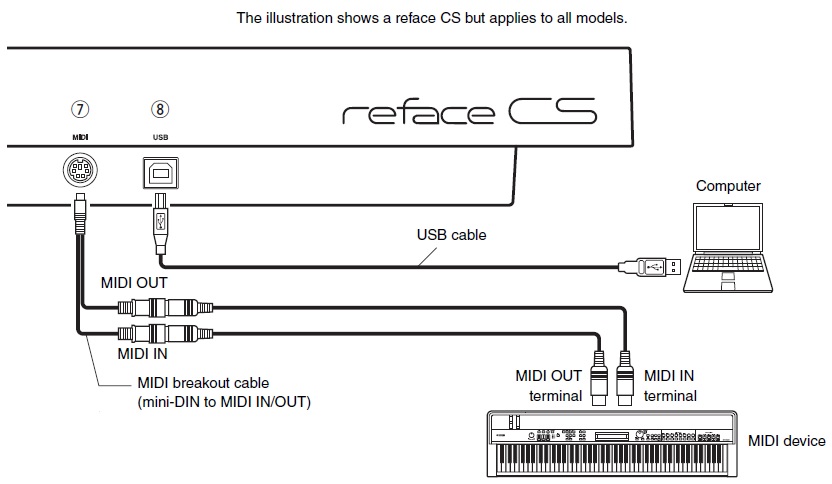
Connect NSX-39 to your computer with a USB cable and set the power switch of the NSX-39 to “USB”. If you do not connect the NSX-39 before you start Google Chrome, the NSX-39 will not be recognized by the application.

The Web MIDI API must be enabled in Google Chrome. After starting Chrome, enter:

    chrome://flags/#enable-web-midi

in the address bar as shown on the first “Browser Settings” screen. Then, enable the API in the “Enable Web MIDI API” column. Please click the appropriate button (e.g., “Use Windows Runtime MIDI API”) and restart Google Chrome.

Launch the desired application from here:

Once you agree to the End User License Agreement (EULA), you can connect to the NSX-39 (Pocket Miku’s model number).

If this procedure does not work, please restart the computer and proceed from the first step.

Application: Input lyrics

You can edit the lyrics by pressing the “E” button in the lyric input slot. Only Hiragana can be input. After inputting lyrics, pressing “Enter” on the keyboard and the app sends lyric data to Pocket Miku.

After sending lyrics data, when playing Pocket Miku, Pocket Miku sings according to the sent lyrics.

Lyrics can input 64 letters per slot. There are 15 slots and they are selected with [A] - [O], [SHIFT] + [A] - [O], [VIBRATO] + [A] - [O].

Press [SHIFT] + [VIBRATO] during editing to switch to Do-Re-Mi mode.

Application: Play in realtime

This is an application where you can input and play lyrics in realtime. If you hover over the tile where the letters are written on the screen, you can pronounce that character.

Tiles can be selected from 50, mentai (voiced, semi-voiced), small letters (1) (2), jiyuu (free arrangement) mode.

Jiyuu is a mode that allows you to place characters freely using the “frog” menu:

  • Tsukasa … You can add up to 50 letters, panels.
  • Move … Move the panel to the desired position by dragging.
  • Ken … You can delete the panel by clicking it.
  • Reading … Read the saved character panel setting file.
  • Upload … Save the character panel setting as an external file.

Google Translate didn’t do so well with these instructions! Sorry.

Change configuration

Config is an abbreviation for configuration and means “setting.” With this application, you can change the settings of Pocket Miku and add new functions. The following four operations are supported:

  • Startup sound for function addition pack
  • SHIFT button Character heading / character advance
  • Effect ON / OFF
  • Harmony

Please press the “Install” button and read the displayed message and if there is no problem press the “Send” button. When all the functions are installed, a voice saying “Owarai” appears, and writing the settings is completed.

If you want to restore the settings back, please click the “Uninstall” button, read the explanation carefully, and press the “Send” button if there is no problem.

Yamaha NSX-1 applications

Yamaha provide open source sample apps (Japanese language) at http://yamaha-webmusic.github.io/. The Yamaha applications use the Web MIDI API. See the directions above in order to set up Google Chrome.

In order to use these applications, you must change Pocket Miku to NSX-1 compatibility mode by pushing U + VOLUME UP + VOLUME DOWN simultaneously.

Aides Technology application

Aides Technology is the developer of the Switch Science NSX-1 Arduino shield.

They have one very handy Web application when MIDI sequencing. The application translates romaji (kana text) lyrics to an NSX-1 System Exclusive (SysEx) message. You can copy the HEX SysEx message from the page and paste it into your DAW. On Windows, the application will put the SysEx message on the Windows clipboard automatically.

You may also need this ASCII to Hex text converter when debugging your SysEx messages.

I’m a long time SysEx HEX warrior. Trust me, this is the way to go!

Customization and MIDI System Exclusive messages

Customization is the most difficult topic due to its complexity and the general lack of English language resources. Customization is performed through MIDI System Exclusive messages instead of simple textual commands. This approach enables use of the Web MIDI API, but makes it darned difficult to compose messages by hand.

I’m told that the Gakken Official Guide Book (Gakken Mook) contains a short section about customization via SysEx. However, one cannot cram a paper magazine through Google Translate. 🙂

The next best thing is the Pocket Miku Customization Guide (PDF) by Uda Denshi (polymoog). This guide and Google Translate will only take you so far.

The absolute best English language resource is the series of blogs written by CHH01:

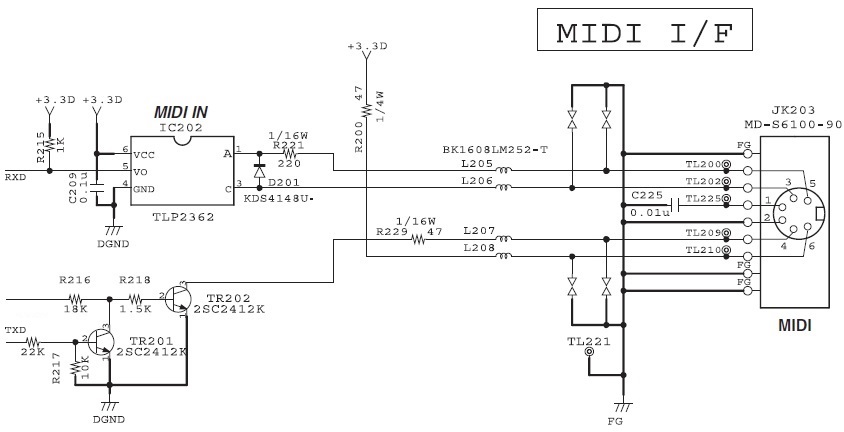
Please note that Pocket Miku has two major subsystems: a microcontroller and the Yamaha NSX-1 integrated circuit. Each subsystem has its own SysEx messages. See the Yamaha NSX-1 MIDI implementation reference manual for information about its SysEx messages. Messages interpreted by the microcontroller are described in the Pocket Miku Customization Guide. These messages are turned OFF when Pocket Miku is in NSX-1 compatibility mode.

The NSX-39 SysEx implementation is very powerful. You can change the lyrics which are stored in flash memory (15 lyric slots), change the way the NSX-39 responds to button presses (120 command slots), read switch states, and much more. Here is a list of the main customization message types (thanks to CHH01):

F0 43 79 09 11 d0 d1 d2 d3 d4 d5 ... F7

Request Version Data          d0=0x01 d1=N/A
Version Data Reply            d0=0x11 d1=NSX-39 version data
Lyrics Entry                  d0=0x0A d1=lyrics slot number   d2=character data
Request Command Slot Details  d0=0x0B d1=command slot number
Command Slot Reply            d0=0x1B d1=command
Change Command Slot           d0=0x0C d1=command slot number  d2=command
Command Direct Entry          d0=0x0D d1=command
Lyric Number Data Request     d0=0x0E d1=N/A
Lyric Number Data Reply       d0=0x1E d1=Slot number          d2=Slot data
Lyric Details Request         d0=0x0F d1=Slot number
Lyric Details Reply           d0=0x1F d1=character count      d2=character 1, etc.
Switch State                  d0=0x20 d1=000000ih             d2=0gfedcba
NSX-39 Status                 d0=0x21 d1=Status

Good luck with your investigations and experiments!

Copyright © 2017 Paul J. Drongowski

Summer NAMM 2017: Two new toys

So far, Summer NAMM 2017 is turning out to be a total sleeper for keyboard players. Here’s a couple of new toys that could be fun for musicians on the run.

Looks like the Yamaha SC-02 SessionCake is coming to North America ($99 USD). The SessionCake is a battery-powered brick which, by itself, it a kind of headphone amplifier that lets you add effects or whatever through an iOS device. But, wait, there’s more! Up to eight SessionCakes can be chained together into a Borg-like mixer for group jams.

Kraft Music are the first to list the SC-02. There are also more details on the Japanese Yamaha site. There are two models: one for keyboard and one for guitar/bass.

The other little box that is flying in under the radar is the Boss DR-01S Rhythm partner ($229 USD).

Depending upon how you want to look at it, the DR-01S is either a metronome on steroids or a classic rhythm box with a speaker and bongo-like styling. No, you don’t physically beat on the thing although it’s possible to trigger a percussion instrument via footswitch. The DR-01S sports rhythms for “acoustic musicians” and has the expected goes in and goes outtas like AUX IN and LINE OUT. It runs on 6 AA batteries.

The reference to “acoustic musicians” makes me think “no heavy metal.” I’m going to give the DR-01S a listen and see if its patterns are appropriate for contemporary liturgical music. Since it’s a small unit, I worry about sound quality (boxiness) and whether I could run a keyboard through it without a mushroom cloud. Could be fun and useful!