In the house: V3 Sound YAMMEX XXL

Thought I would post a quick note about the new unit under test — the V3 Sound YAMMEX XXL tone module. The YAMMEX is a member of the V3 Sound XXL family of tone modules. They all share the same triangular shape and are light as a feather:

V3 Sound YAMMEX XXL expansion tone module

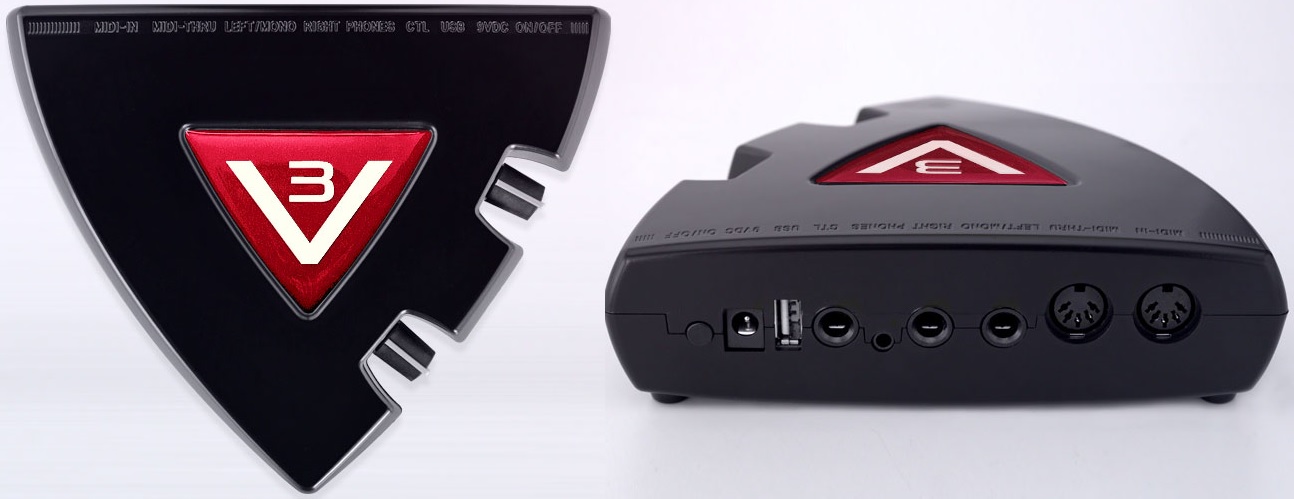
The lump-in-the-middle power supply is roughly the same weight!

You might have seen and heard Piano Man Chuck demonstrate the V3 Sound Grand Piano XXL module. [Piano Man Chuck is a V3 Sound dealer, BTW.] Well, the YAMMEX has the same sound set as the Grand Piano XXL. The main differences are:

  • The MIDI bank and program change layouts are different: Grand Piano XXL for general use as an expander, YAMMEX XXL as a Genos/PSR expander.
  • Grand Piano XXL is supported by the V3 Sound Control app; the YAMMEX XXL is not.
  • Grand Piano XXL is supported by two different MIDI Designer templates; the YAMMEX is not.
  • YAMMEX XXL voices are selected using custom Genos/PSR user voices.

YAMMEX XXL arrives from the factory with a USB flash drive containing the custom user voices (VCE files) needed to select voices through Genos/PSR. It’s all described in the YAMMEX XXL manual. [Henceforth, “Yammex” means “YAMMEX XXL”.]

I found a Yammex on ebay at a price that was impossible to refuse. It would be a shame to confine Yammex to Genos duty alone, so I studied the heck out of its MIDI implementation. I also examined the VCE files available from the V3 Sound Web site. Hmmm, looks like it’s a simple matter of uttering the appropriate Bank Select MSB, Bank Select LSB and Program Change messages. We can do that!

An inquiry to V3 Sound about compatibility was answered quickly, but implied that Yammex was only for Genos/MIDI. If you know MIDI and your controller’s capabilities, and if you don’t mind a little work, Yammex definitely can do more than Genos/PSR.

I was sorely tempted by the V3 Sound XXL series because it is based on the Dream S.A.S. SAM5716B synthesis chip. After hearing the SAM2635 and its GM/GS sound set, I wanted to hear what a high-end Dream chip could do with 3GBytes of professionally produced instrument samples. Cut to the chase, V3 Sound do not disappoint especially at the price I paid.

Jeff’s Music Gear is Sweetwater!

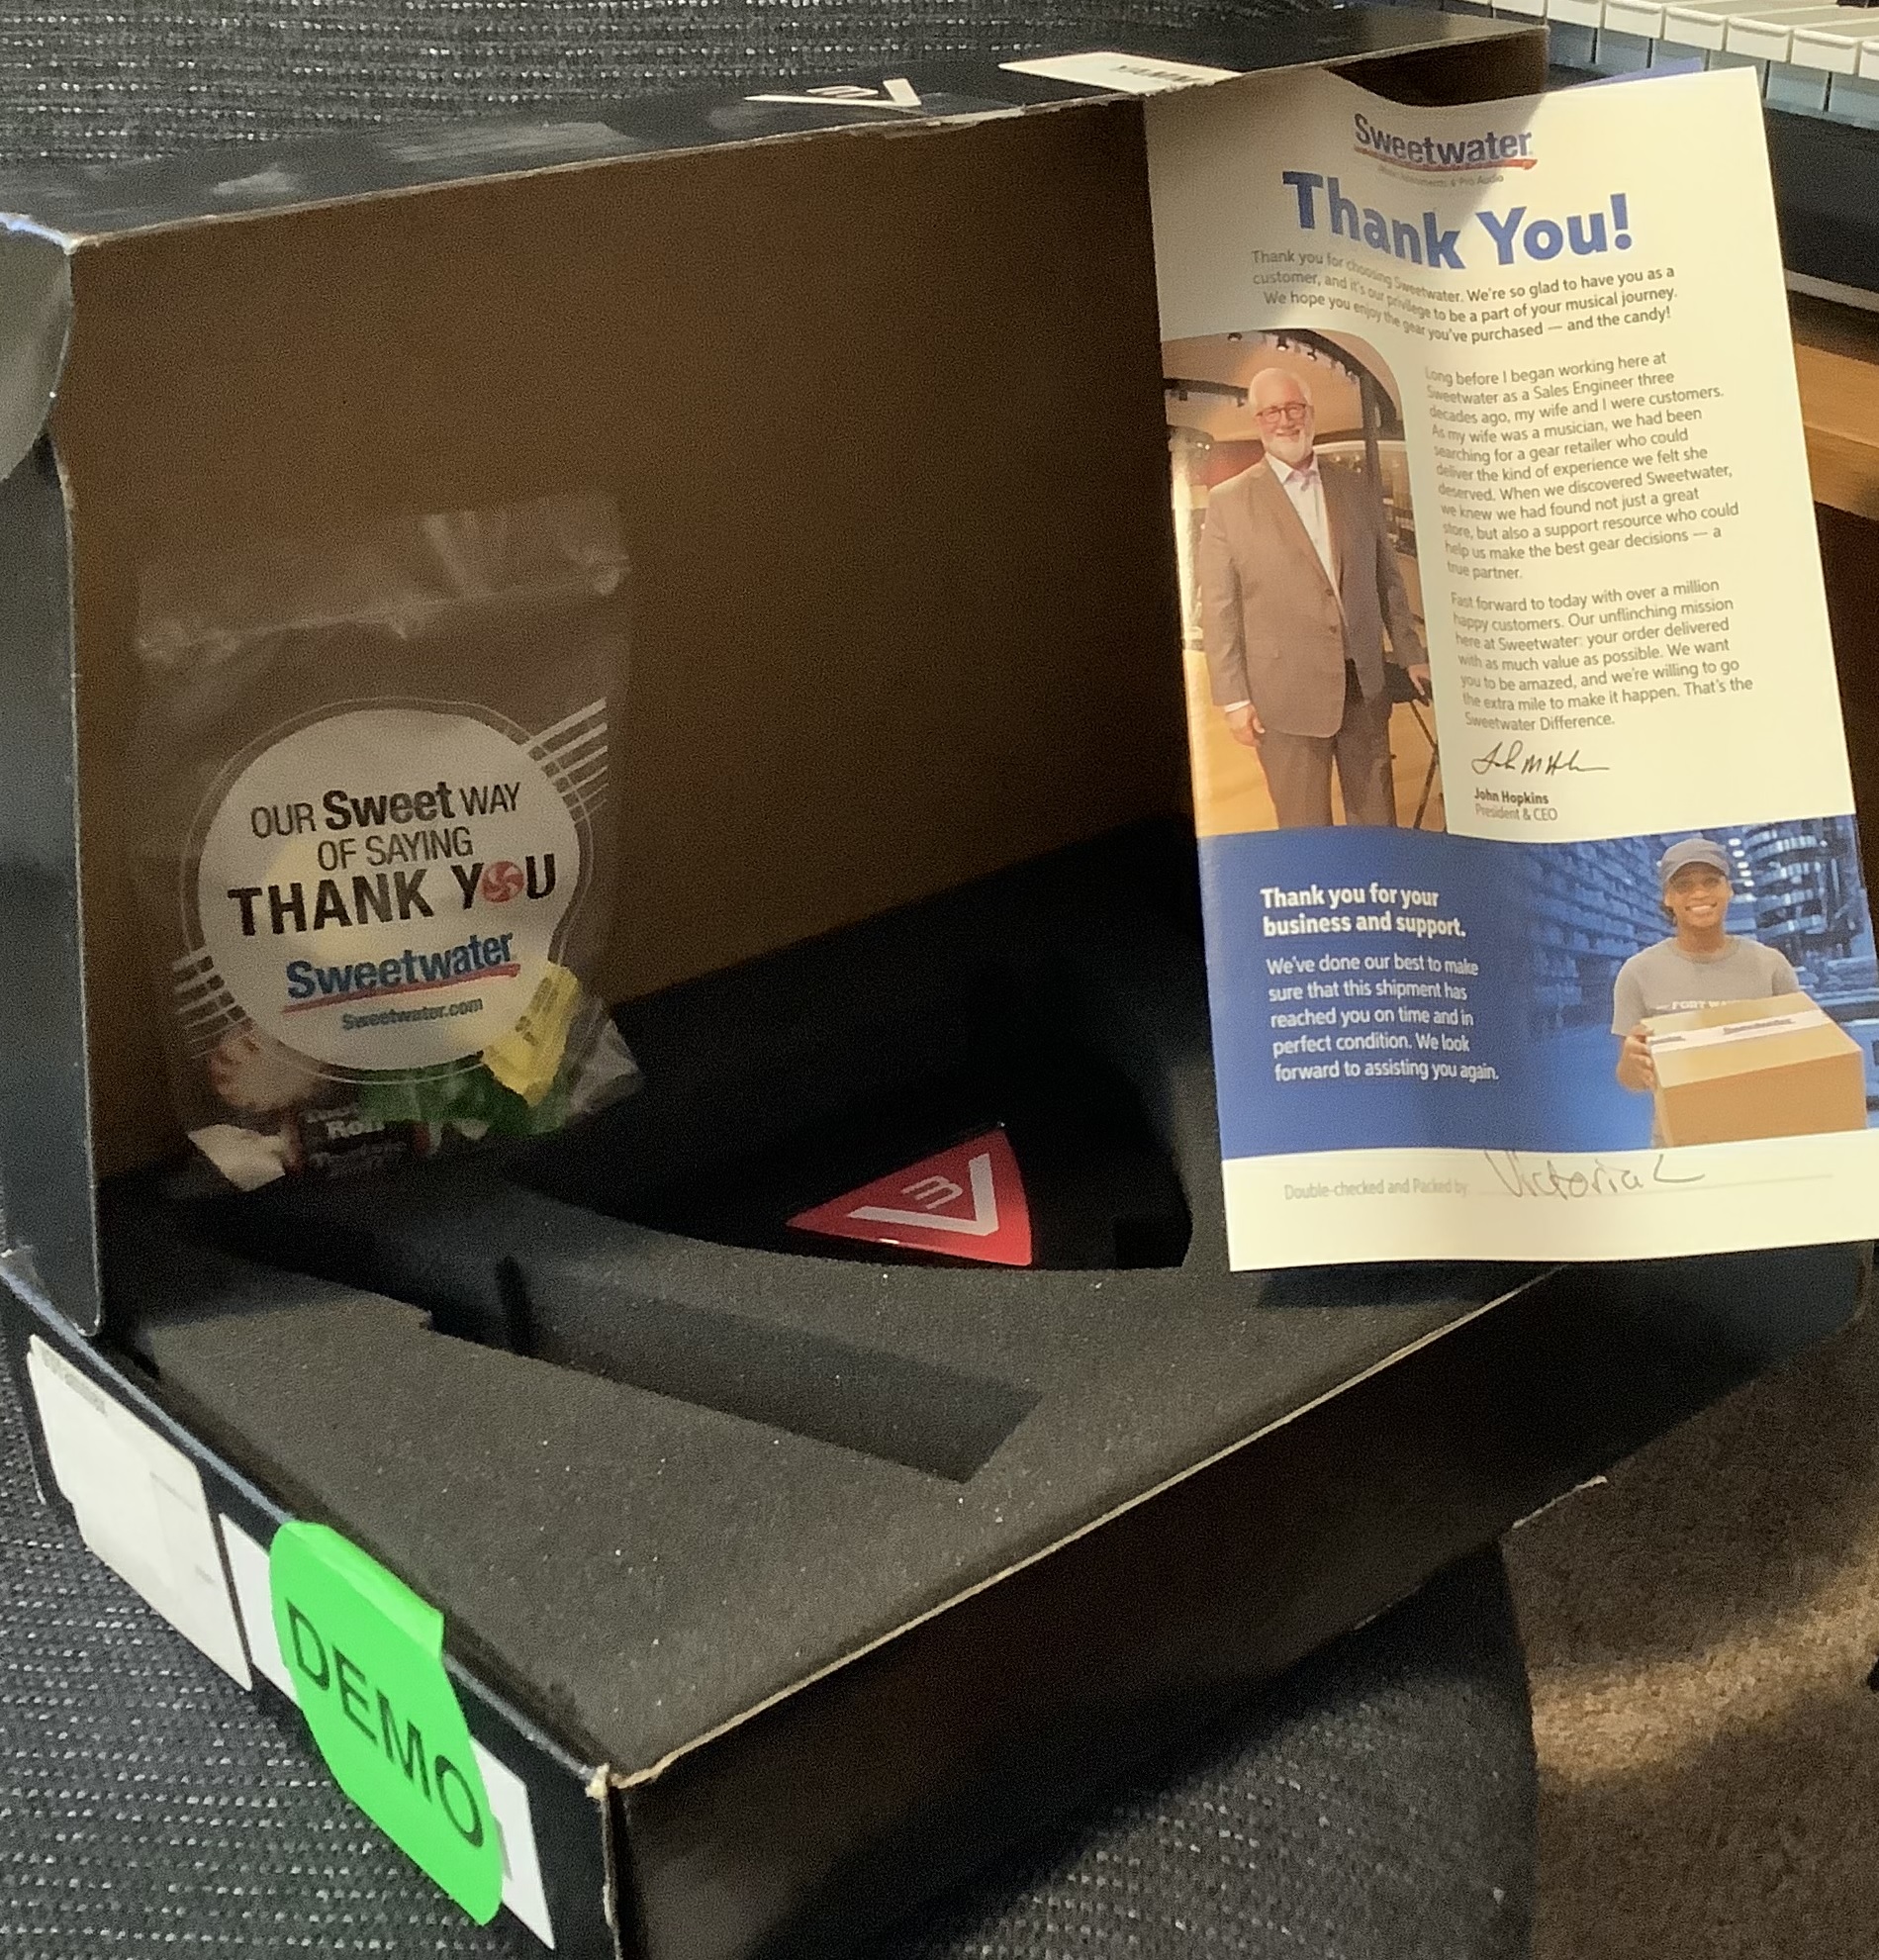
The box arrives. I open the shipping carton and what the? The Yammex box is in fine shape, but is covered in round “Demo” labels. I instantly smell “Sweetwater”. And there’s candy, and a Sweetwater “Thank You” card. The ebay seller is Jeff’s Music Gear. After a Google, I discover that Jeff’s Music Gear is Sweetwater’s ebay consignment shop! Nice to know that I was in good hands all along.

OK, then, plug everything up using Yamaha MODX as a controller. (See my article about Yamaha MODX Zone Master.) Ooops, no flashing MIDI light and no sound. I’m already composing a message to Jeff’s when I remember this note in the Yammex manual:

No sound? The YAMMEX XXL sound expander only creates a tone when you call up a sound from the V3 folder in your keyboard’s display. Just connecting it to your keyboard is not enough.

They aren’t kidding! I select a voice through the MODX Zone Master screen and suddenly the MIDI light starts flashing and Yammex starts talking. Delete the message to Jeff’s.

One other note from the manual is helpful during bring up:

Testing MIDI connections and settings. After connecting your MIDI cable and making sure your MIDI settings are correct, select a V3 User Voice. The MIDI LED on the YAMMEX XXL should now blink with every keystroke.

I find this behavior to be a dubious design decision. The purpose of a MIDI light is to indicate MIDI reception under any condition. While troubleshooting, I connected the Yammex THRU port to MIDI-OX on a PC and verified MIDI operation. Most of V3 customers will not be that savvy…

I’ve just begun auditioning sounds and already I’m pleased. I like and prefer the Bösendorfer Imperial 290 (Vienna) over the Steinway Model D (Hamburg). I fell in love with Bösendorfer when I first touched one in 1980. The electric pianos are good although too clean and polite. The organ samples are damned good. There are two flavors: No Leslie and Leslie sampled in. Sans-Leslie voices are meant to be dirtied up by an external pedal. I’ll try the Electro-Harmonix Lester K for spin and throw some overdrive on the EPs, too.

I like the Oberheim pads — another love. The classical strings are solid. That’s as far as I’ve gotten into the sound set. I’m looking forward to hearing the rest.

As to the supplied USB flash drive, the previous customer zorched the factory VCE files. I found an X6A file instead which I recognize as a Yamaha MOXF dump file. I guess the previous customer tried Yammex with MOXF and was disappointed. Fortunately, V3 Sound provide the Genos/PSR VCE files on their Web site. The supplied drive is only 64MB. [Not really a complaint.]

Experiments to come? Once I get my faves down to 8, 16 voices or so, I’ll configure the Arturia Keylab Essential. The extra knobs and sliders will come in handy. Also, I will whip up a simplified MIDI Designer template for the Yammex. The existing templates are comprehensive — yet overwhelming. I’m thinking about a UI similar to Korg Module. Those Korg folks are definitely on to something. Simplicity is king. MIDI Designer (with StreamByter) on iPad should give me splits and layers — maybe even a wireless Bluetooth interface to Yammex? Finally, Dream multi-FX.

Copyright © 2022 Paul J. Drongowski

“P” is for “piano”: Yamaha P-S500 digital piano

While we’re distracted with “CK”, “AN”, and whatnot, Yamaha sneaks out a new P-series digital piano in Europe: the Yamaha P-S500.

Natch, you can read all about the P-S500 at Yamaha’s European web site. Physically, it’s a minimalist slab that’s designed primarily for the home or small studio market segments. Cost is about 2,100 Euro and I would expect it to retail for about $2000 USD in the States.

Yamaha P-S500 digital piano

Basic features [courtesy of Yamaha] are:

  • Compatible with Smart Pianist app installed to a smart device
  • Stream Lights feature helps you perform even if you can’t read music notation
  • Enjoy playing along with the 403 preset Songs, covering a wide range of genres from pop music to classical music
  • Audio To Score function converts your favorite audio songs into piano accompaniment scores
  • Authentic Yamaha CFX & Bösendorfer Imperial concert grand piano Voices
  • Virtual Resonance Modeling (VRM)
  • 88-note weighted GHS keyboard
  • Huge variety of 660 high-quality instrument Voices, including Super Articulation Voices
  • Built-in Auto Accompaniment features with 370 Styles
  • Microphone input and automatic Vocal Harmony

Auto-accompaniment, styles, Super Articulation voices? We’ve seen these features in the DGX series, notably, the most recent DGX-670 model. The table below compares the P-S500 against the DGX-670. The DGX-670, by the way, goes for considerably less dough: $850 USD.

                DGX-670           P-S500 
----------------- ---------------------------------
Main piano: Yamaha CFX CFX, Bösendorfer Imperial
VRM: Yes Yes
Key-off sound: Yes Yes
Action: GHS GHS
Piano Room: Yes Yes
PB wheel: Yes No
Dual/layer: Yes Yes
Split: Yes Yes
USB audio: Play/record Play/record
Bluetooth: Yes Not built-in (optional)
Amplification: 2 x 6W 2 x (20W + 6W)
Speakers: 2 x (12cm + 5cm) 2 x (12cm x 6cm oval+2.5cm dome)
Display: 480x272 color 80x16 mono LCD
Weight 47.2 pounds 48.1 pounds

Here’s the decoder ring for Yamaha acronyms: Virtual Resonance Modeling (VRM), Graded Hammer Standard (GHS), Super Articulation (SA), Cool (velocity switched), Live (stereo), Organ Flute (drawbar organ).

The P-S500 looks to be the upscale, uptown sibling of the DGX-670. At 48 pounds, I don’t think you’ll want to schlep the P-S500 out of the house very often. In terms of styles and voices, the P-S500 is superior:

                          DGX-670  P-S500 
------- ------
Total voices 601 660
VRM voices 9 13
SA voices 49 111
Natural voices 11 25
Sweet voices 26 27
Cool voices 53 47
Live voices 68 58
Organ Flute voices 0 29
Total styles 263 370
Pro styles 215 328
Session styles 19 25
Free Play styles 0 3
Pianist styles 29 13
Drum Kits 29 29

The P-S500 factory voice set includes many of my favorites. If you’re looking for a more than decent, mid-level keyboard with auto-accompaniment and a graded hammer keyboard, the P-S500 is worth a look. Versus a mid-level arranger keyboard, you’re still giving up a pitch bend wheel, multi-pads, style control buttons, MIDI record/edit, etc. If you just want to play and have a good piano experience, I’d go with the P-S500 in a heartbeat. (The DGX-670 is no slouch, either.)

There are many other differences that I’ve glossed over. So, if you’re trying to decide between DGX-670, an arranger or the P-S500, be sure to dig into the manuals and data list files. Yamaha doesn’t always make it easy to compare, especially as to your specific musical goals and use cases.

One enormous difference needs to be emphasized, however. The P-S500 front panel is utterly minimalist. If you want to exploit the P-S500 to its fullest, you must use the P-S500 with the Yamaha Smart Pianist app on a tablet (Apple or Android). In this respect, the P-S500 is more like the CSP series of digital pianos for the home. It’s like a CSP without the furniture. The CSP models have enhanced GH3X or NWX keybeds which improve the piano playing experience. Given that the Smart Pianist is almost a necessity, it’s kind of weird (cheap) to omit built-in Bluetooth.

Yamaha are certainly giving us choices!

A final, electronics nerd comment. While studying the internal design of current arranger, synth and digital piano products, the designs often seem like a deconstructed tablet connected to a keybed, tone generator and MIDI/USB interface. The digital electronics are remarkably similar. With the P-S500 and the CSP series, it’s like Yamaha said “Aw, the heck with it” and moved functionality out of the piano (arranger, synth) chassis into a stock, commercial tablet like iPad or Google Pixel tablet. I don’t think we have seen the end of this approach to instrument design…

Other reviews and comments about digital pianos:

Copyright © 2022 Paul J. Drongowski

Out Of The Shadows

I’ve been working on backing and lead instruments for the classic Del Shannon song “Keep Searchin'”.

Yamaha Genos™ is made for this tune. First off, its “ShadowedPop” style is the perfect fit for that old 1950s rock’n’roll vibe. It has just the right amount of swing and attitude.

Next, Genos has very good electric guitars for lead. Want clean Tele or Strat? Genos has them. Genos also has a suite of effects to obtain a complete, authentic guitar tone.

Yamaha arranger styles have “One Touch Settings” which are mini-registrations. Hit an OTS button and Genos will both change song section and bring up an appropriate voice. The Genos “ShadowedPop” style has two OTS mini-registrations that are worth deconstructing to see how the Yamaha sound designers got their Shadows guitar tone: “60sShadowLead” and “ShadowedGuitar”.

Of course, the “shadow” in all of these voice and style names refer to Hank Marvin and The Shadows — one of, or perhaps, THE iconic 1950’s guitar band and sound. The Shadows’ treatment felt absolutely right for the Del Shannon cover. Hank Marvin was perhaps the first English artist to pick up a Fender Strat, usually putting it through a Vox amp.

The PSR “ShadowedGuitar” voice goes back four or five years and is a standard factory preset. If your Yamaha arranger does not have “ShadowedGuitar”, choose a clean, 1960’s vintage guitar preset voice. Change the insert effect to Tempo Echo and set the insert effect send level to 30. Change the effect parameters to:

 Param#  Parameter name       Value 
------ ------------------- ------
1 Delay Time 8th
2 Feedback Level +28
3 Feedback High Damp 1.0
4 L/R Diffusion +14ms
5 Lag 0ms
10 Dry/Wet D34>W
13 EQ Low Frequency 500Hz
14 EQ Low Gain 0dB
15 EQ High Frequency 4.0kHz
16 EQ High Gain 0dB

Reverb is a big part of the 50’s vibe and you’ll need gobs of it on the guitar. Select a hall reverb and set the reverb send level to at least 50. If your arranger has it, I recommend the “Real Medium Hall+” preset. It’s one of Yamaha’s best reverbs, in my opinion.

Only Genos has the “60sShadowLead” voice voice. Fortunately, it’s easy to add a close sound-alike to your instrument. Start with “ShadowedGuitar” or a clean, 1960’s vintage guitar preset. Get into the mixer (or DSP effect page) and change the insert effect to Multi FX Vintage Echo and set the insert effect send level to 127 (if necessary). Then change the effect parameters to:

 Param#  Parameter name       Value 
------ ------------------- ------
1 Comp Sustain 2.9
2 Wah Switch Off
3 Wah Pedal 0
4 Dist Switch Clean
5 Dist Drive 5.0
6 Dist EQ Mid Boost
7 Dist Tone 3.5
8 Dist Presence 4.3
9 Output 110
11 Speaker Type Twin
12 LFO Speed 2.103Hz
13 Phaser Switch Off
14 Delay Switch Delay St
15 Delay Control 60
16 Delay Time 33

We met the Multi FX algorithm once before. This algorithm is like a virtual guitar pedal board:

Compressor -->  Wah --> Distortion --> Phaser --> Delay --> Spkr Sim 

The above parameter values dial in The Shadows’ guitar tone.

You’ll need gobs of reverb, again, to complete the scene. Choose the “Real Medium Hall+” preset and set the reverb send to at least 40.

The “60sShadowLead” OTS also configures the chorus system effect. Having listened to the overall tone with and without chorus, this step is optional. (Possibly some other style part may be affected by this change or a change to any other system-level effect including reverb.) Change the chorus type to “Celeste 1” and set the chorus send level to 12. 12 is not especially high, so you can see why this last step is optional; it’s just a little sweetener.

You might consider changing the chorus effect to tremolo (e.g., “E-Piano Tremolo”). Guitarists in the 50s and 60s didn’t have guitar pedals. (Sorry, Edge.) So, folks relied on guitar amp spring reverb and tremolo (often mislabeled “vibrato”) to get space-y effects. I still have the sound of an Ampeg Gemini going through my head. 😎

Select the “E-Piano Tremolo” effect preset, increase the AM Depth to max, and set the chorus send level to 127:

 Param#  Parameter name       Value 
------ ------------------- ------
1 LFO Frequency 5.38Hz
2 AM Depth 127
3 PM Depth 0
6 EQ Low Frequency 500Hz
7 EQ Low Gain 0dB
8 EQ High Frequency 4.0kHz
9 EQ High Gain 0dB
11 EQ Mid Frequency 2.0kHz
12 EQ Mid Gain 0.0dB
13 EQ Mid Width 1.0
14 LFO Phase Difference +39deg
15 Input Mode Mono
Return Level 127

You’re looking for that deep, “Spaghetti Western”, Ennio Morricone effect. Play the lead line an octave down. Have fun!

The EQ parameters in the tremolo algorithm make this a good guitar tone mangler — swept mid EQ with Q (width)! Mid boost or cut is right at hand.

Here are short demos (MP3) on Genos with tremolo and without tremolo. Yamaha Montage and MODX have the same effect algorithms, so you should be able to apply the same techniques on those instruments, too.

Links to a few other posts about chasing tone on Yamaha gear:

Copyright © 2022 Paul J. Drongowski

STEP EDIT → Chord Looper

Yamaha Genos and PSR-SX900 arranger workstations have a feature called “Chord Looper”. Chord Looper records your left hand chords and saves them in a memory slot. (8 slots per Chord Looper bank.) Once recorded and saved, you can play back the chord progression and play over the changes. Neat.

Obviously, one way to enter a chord progression is to play it in. Let’s say, that the chord progression is long and has jazz chords like the Coltrane changes (AKA “Giant Steps”). These changes are notoriously difficult to solo over because the changes come fast, furious, and in three different scales! On top of musical difficulty, Chord Looper does not allow edits. Make a mistake and you need to record the entire sequence over again. So, folks are looking for ways to create and edit Chord Looper progressions.

Chord Looper CLD files

Fortunately, Chord Looper let’s you import and export individual chord progressions (i.e., a slot). Chord Looper exports a progression into a file with the CLD extension. Henceforth, I will call these files “CLD files”.

A CLD file is actually a Type 0 Standard MIDI File (SMF) in disguise. You can examine (or possibly edit/create) a CLD file by renaming the extension to “MID”. Once renamed, conventional software tools (Cubase, SONAR, etc.) will recognize the renamed CLD file as a Type 0 SMF and import it.

A CLD file recorded by Chord Looper is very simple inside. It contains a sequence of Yamaha XF chord events, one event for each chord change. Here are the metadata events for a simple progression (C-Am-F-G) played in by hand:

Chord Symbol   1.1.1.0     Metadata    Chord:  C/C 
Chord Symbol 1.4.4.112 Metadata Chord: Am/A
Chord Symbol 3.1.1.34 Metadata Chord: F/F
Chord Symbol 4.1.1.40 Metadata Chord: G/G

Each event specifies the chord root, chord type and alternate root bass. That’s it! A CLD file does not contain any other kind of event (notes, controller, time signature, tempo, etc.)

Each chord is a Yamaha XF Metadata chord event. The event time is the time of the chord event, i.e., when the player changed the chord and Genos recognized the chord. In the example above, the chord was changed at the beginning of each measure (sometimes a little early, sometimes a little late).

Chord STEP EDIT to CLD

Folks on the PSR Tutorial Forum have found a few ways of creating CLD files using existing software tools. Flip over to the forums and check out some of the Chord Looper threads.

Here’s a new method!

Yamaha arrangers have long supported a basic MIDI sequencer and editor. Like many software editors, the Yamaha sequencer supports step edit, letting you enter notes, control events, etc. with precise timing. One better, the Yamaha sequencer supports Chord STEP EDIT through which one can easily enter a chord sequence from a lead sheet into a separate chord track.

Thus, it’s possible to enter a chord progression easily using STEP EDIT and save the progression in a Type 0 Standard MIDI File. Initially, the progression is stored in a special part (Cds chunk) within the SMF. DAWs and so forth ignore the special proprietary data and typically delete it when writing the file back to MIDI. This kind of Chord STEP EDIT data does not contain the Yamaha XF chord events needed by Chord Looper. If you import one of these files into Chord Looper, Chord Looper comes up empty.

Once you EXPAND the step edit chord sequence, however, the expansion process creates Yamaha XF chord metadata events along with the notes and other MIDI events for the accompaniment parts. That’s the normal compositional process anyway — step edit the chord part, expand the chord part using the selected style, and save the expanded file as a Standard MIDI File.

One fly in the ointment. The Yamaha arranger software hides file extensions. This streamlines user workflow, but it inhibits interesting experiments! So, save the expanded MIDI file to a USB flash drive, take the flash drive to a personal computer, and rename the expanded SMF. Replace the “MID” extension with “CLD”. Copy the CLD file to the flash drive and reinsert the flash drive in the arranger workstation.

Import the newly renamed CLD file into Chord Looper. Voila! Chord Looper scans the file and produces a chord progression using the embedded Yamaha XF chord events. If you export the progression as a different CLD file, the exported data includes all of the other MIDI data, e.g., notes, etc. [I wouldn’t count on Chord Looper always doing this; software subject to change by Yamaha.)

Bottom line: If you pine to create and edit Chord Looper progressions with precision, use Chord STEP EDIT to create the progression, expand the backing, save as a Standard MIDI File, replace the file extension with CLD, and import into Chord Looper. Of course, you need to rename the MID file to a CLD file using a personal computer, but that’s a small hassle. Give it a try!

I tested this procedure on Genos with the Coltrane changes. Once the progression was captured in Chord Looper, I could try different tempos and different styles. Those changes do come fast and furious indeed!

Copyright © 2022 Paul J. Drongowski

Casio CT-S1000V: Master EQ

Beware, this post is going to bury you in numbers. 🙂

I’ve been investigating master equalization in the Casio CT-S1000V. The CT-S500 has the same master EQ, so everything discussed here applies to the CT-S500, too.

The CT-S1000V master EQ is a four band, semi-parameteric equalizer. The four bands are: LOW, MID1, MID2, and HIGH. It’s possible to create and store a USER setting. The edit page let’s you set the center frequency and gain for each of the four bands. You cannot set the band quality factor, Q, which determines the bandwidth spread.

The CT-S1000V provides ten master EQ presets with suggestive names. Casio, unfortunately, do not publish the center frequencies and gains for the presets. Listening to each preset, one thinks “Yeah, that’s bright,” or whatever. Details are missing in action, however.

One can assign LOW, MID1, MID2, and HIGH gain levels to a knob. Thanks to the knob edit function, it’s possible to suss out the gain level for each band within a preset. After much button pushing and knob twiddling, here are the gain levels (dB) for each preset:

                LOW  MID1  MID2  HIGH 
--- ---- ---- ----
Standard 0 0 0 0
Loudness +3 +6 +1 +7
Treble + 0 0 +4 +6
Bass + +3 +4 0 0
Mellow -3 0 0 -8
Bright -4 0 +6 +4
Rock +3 +2 -6 +6
Jazz +3 0 +6 0
Dance +3 +4 +2 +8
Classic -2 +6 +2 0

As to the band frequencies, we turn to the published table of master EQ frequencies:

    LOW frequency range      50Hz to 800Hz 
MID1 frequency range 100Hz to 8.0kHz
MID2 frequency range 100Hz to 8.0kHz
HIGH frequency range 2.0kHz to 16.0kHz

That’s enough to get into the right ballpark.

Yamaha XG Multi EQ

Never content, I worked out a table for Yamaha XG Multi EQ. Multi EQ is an optional master EQ in the Yamaha XG effects chain. Multi EQ is fully parameteric and has five bands: LOW, LOW-MID, MID, HIGH-MID, and HIGH. The LOW and HIGH bands support a peak mode, but are usually configured for shelving.

Multi EQ has five presets: Flat, Jazz, Pops, Rock and Concert (AKA “Classic”).

           Flat          Jazz            Pops          Rock          Concert 
------------- ------------- ------------- ------------- -------------
Freq Q dB Freq Q dB Freq Q dB Freq Q dB Freq Q dB
------------- ------------- ------------- ------------- -------------
Low 80Hz 0 50Hz -6 125Hz +4 125Hz +7 80Hz +3
L-mid 500Hz 0.7 0 125Hz 0.3 +2 315Hz 2.0 -4 200Hz 0.7 +4 315Hz 0.7 +4
Mid 1.0kHz 0.7 0 900Hz 0.3 +4 1.0kHz 0.7 +3 1.2kHz 0.5 -4 1.0kHz 0.5 0
H-mid 4.0kHz 0.7 0 3.2kHz 0.5 -4 2.0kHz 2.0 -4 2.2kHz 1.0 +4 6.3kHz 0.7 +2
High 8.0kHz 0 6.3kHz -6 5.0kHz +6 6.3kHz +2 8.0kHz -3

None of the Q’s are high, so the peaks/curves are rather gentle. [I wish there was an easy way to plot the curves for each preset.]

Of course, you can plug these settings into the CT-S1000V and merrily tweak away.

Yamaha Genos Master EQ

The Yamaha Genos™ Master EQ is an eight band, parametric equalizer. The Low and High bands are shelving.

Yamaha Genos provides five presets: Flat, Mellow, Bright, Loudness and Powerful:

           Flat          Mellow         Bright        Loudness       Powerful 
------------- ------------- ------------- ------------- -------------
Freq Q dB Freq Q dB Freq Q dB Freq Q dB Freq Q dB
------------- ------------- ------------- ------------- -------------
Low 80Hz 0 80Hz 0 100Hz 0 100Hz +1 140Hz +3
1 250Hz 0.7 0 250Hz 0.7 0 250Hz 0.7 -1 250Hz 1.2 +1 315Hz 0.5 +2
2 500Hz 0.7 0 500Hz 0.7 0 500Hz 0.7 -1 450Hz 1.0 -2 560Hz 1.5 +2
3 630Hz 0.7 0 800Hz 1.0 +1 800Hz 0.7 -2 630Hz 0.5 -1 800Hz 0.5 +2
4 800Hz 0.7 0 1.8kHz 0.5 -1 1.0kHz 0.7 0 1.0kHz 1.3 0 1.6kHz 1.2 +1
5 1.0kHz 0.7 0 3.6kHz 1.0 -2 1.6kHz 1.7 +2 3.6kHz 1.0 +1 3.6kHz 1.6 +1
6 4.0kHz 0.7 0 6.3kHz 1.3 -2 4.0kHz 0.7 +1 6.3kHz 0.8 +1 5.6kHz 1.4 +2
High 8.0kHz 0 9.0kHz -1 7.0kHz +3 8.0kHz +2 10.0kHz +2

The settings match the names. Mellow knocks down the highs. Bright cuts the lows and boosts the highs. Loudness is a bathtub boosting both lows and highs. Powerful kicks all bands up a notch.

If I find a way to discover the CT-S1000V band frequencies, I will update its table. In the meantime, have fun!

Copyright © 2022 Paul J. Drongowski

ChordPro auto-accompaniment: Uses

The ChordPro to Yamaha auto-accompaniment program, cp2mid, translates an extended ChordPro song file to a MIDI file containing Yamaha-compatible auto-accompaniment messages. The MIDI file is compatible with recent mid- and high-end Yamaha arranger workstations like Yamaha Genos™. Once you transfer the MIDI file to the arranger, it plays like any other Standard MIDI File (SMF). Instead of directly playing notes, however, it tells the arranger’s auto-accompaniment engine what to play: the style, the tempo, the chords and the section (intro, main, fill in, or ending). The arranger displays chords and lyrics in sync with play-back.

What can you do with ChordPro auto-accompaniment? Here’s a few ideas.

Play along with a song from the Web

ChordPro is one of the most widely used song formats on the Web. Pros and punters alike use ChordPro as shorthand lead sheets. You’ve probably seen formatted ChordPro songs like:

 G      G7          C         G 
Amazing Grace! (how sweet the sound)
D
That saved a wretch like me!
G G7 C G
I once was lost, but now am found,
Em D G
Was blind, but now I see.

Presumably, a musician is already familiar with the song’s tempo and melody, needing only to follow and change chords in time.

In extended ChordPro, the chords are embedded within the lyric text:

[G]Amazing [G7] Grace! (how [C] sweet the [G] sound) 
That [G] saved a [G]wretch like [D] me! [D]
I [G] once was [G7] lost, but [C] now am [G] found,
Was [Em] blind, but [D] now I [G] see. [G]

Chords are surrounded by square brackets. Here, we assume each chord is held for a single measure. Songs on the Web are very loose (flexible!) about time. Auto-accompaniment, however, is precise. You will probably need to tighten up timing when using a song file from the Web.

You’ll also see ChordPro directives in song files:

{title: Amazing Grace }   
{key: D}
{artist: Munsoncovers}

Directives express song meta-data and control formatting. Extended ChordPro adds a few new directives for auto-accompaniment:

{title: Amazing Grace }   
{key: D}
{artist: Munsoncovers}
{time: 3/4}
{comment: SouthernGospel is stylecode 7812 3/4}
{stylecode: 7812}
{tempo: 90}
{start_accomp}

You’ll want to add the time signature, tempo, stylecode, and start_accomp directives to the song. The stylecode directive selects one of the hundreds of built-in arranger styles. (A convenient list of codes is included in the distribution.)

You can always leave out the stylecode and select the accompaniment style on the arranger keyboard itself. You can choose one of the preset styles or user styles. Thus, you can try out different arrangements or use a style of your own design.

Finally, extended ChordPro allows annotations which select an accompaniment section like an intro, main, fill-in or ending. Here is “Amazing Grace” ready to go:

{title: Amazing Grace }  
{key: D}
{artist: Munsoncovers}
{time: 3/4}
{comment: SouthernGospel is stylecode 7812 3/4}
{stylecode: 7812}
{tempo: 90}
{start_accomp}

# Introduction
[G][*IA]

# Verse
[G][*MA] Amazing [G7] Grace! (how [C] sweet the [G] sound)
That [G] saved a [G]wretch like [D] me! [D][*FA]
I [G][*MA] once was [G7] lost, but [C] now am [G] found,
Was [Em] blind, but [D] now I [G] see. [G][*FA]

# Ending
[G][*EA]

Don’t forget to turn on the Lyric or Score display. Song chords and lyrics are displayed during play-back.

Jam

Auto-accompaniment is a tireless band! Plug in some chords and play along.

Here is a fast blues shuffle. Copy and paste the 12-bar sections as many times as you like. Change the accompaniment sections to build up energy as the tune progresses.

{title: Shuffle Blues}   
{key: C}
{time: 4/4}
# Style: BluesShuffle (3685)
{stylecode: 3685}
{tempo: 120}

{start_accomp}
[C][*IA]

{start_of_instrumental}
[C][*MA] [C] [C] [C7][*FA]
[F][*MA] [F7] [C] [C7][*FA]
[G7][*MA] [F] [C] [G7][*FC]
{end_of_instrumental}

{start_of_instrumental}
[C][*MB] [C] [C] [C7][*FB]
[F][*MB] [F7] [C] [C7][*FB]
[G7][*MB] [F] [C] [G7][*FC]
{end_of_instrumental}

[C7][*EA]

Experiment with different intros: [*IA], [*IB] or [*IC]. Try different endings: [*EA], [*EB] or [*EC]. An intro or ending will follow the preceding chord as if you played it on the keyboard itself. Generally, the A variations are one measure long. Length of the B and C variations depend on the chosen style. You will need to specify the root chord for each measure in order to keep play-back in sync.

Write a song of your own

Why not write a song of your own? Yamaha’s built-in Chord Step Edit is too detailed and clunky for songwriting. Use cp2mid instead.

{title: Minor Blues}   
{key: Cm}
{time: 4/4}
# Style: SlowBlues (7810)
{stylecode: 7810}
{tempo: 90}

{start_accomp}
[Cm7][*IA]

[Cm7][*MA] My baby left me. [Cm7] [Cm7] Now I'm all alone. [Cm7][*FA]
[Fm7][*MA] My baby left me. [Fm7] [Cm7] And I'm all alone. [Cm7][*FA]
[Ab7][*MA] I still love her, [G7] [Cm7] Won't answer the phone. [Cm7][*FC]

[Cm7][*MB] It's about money, [Cm7] [Cm7] I know it's true. [Cm7][*FB]
[Fm7][*MB] It's about money, [Fm7] [Cm7] I know it's true. [Cm7][*FB]
[Ab7b5][*MB] Can't keep a job, [G7] [Cm7] I am so blue. [Cm7][*FC]

[Cm7][*EA]

It’s easy to change the chord progressions and song structure. Plus, the lyrics are all in front of you. Once the song is loaded, you have the freedom to change the tempo and style on the keyboard. Unlike Chord Step Edit, you can manually choose a user style; you aren’t limited to the preset styles.

Turn on Lyric or Score display. You’ll be able to sing and play along with your new song!

Copyright © 2022 Paul J. Drongowski

ChordPro auto-accompaniment: Implementation notes

I’m prep’ing my ChordPro to Yamaha accompaniment program (cp2mid) for distribution. Please check out the demo. In the meantime, here are a few comments about the implementation.

Command line interface

cp2mid doesn’t have a fancy graphical user interface (GUI). A GUI is too much for a simple tool that translates an extended ChordPro file into a Standard MIDI File (Type 0).

I’m distributing both Java source code and a JAR file. The JAR file contains the compiled Java — the Java executable, if you will. “JAR” is an acronym for “Java Archive” and is produced by the Java archive program (jar), which is part of the Java development environment (JDK). JAR is a way to package up a compiled Java program, hiding all of the interior classes, etc. An end user doesn’t really need to know about JAR.

Given the JAR file, enter the following command line to run cp2mid:

    java -jar cp2mid.jar AFile.cho

“AFile.cho” is the name of an extended ChordPro file to be translated. You can hide the cp2mid.jar file within a Windows BAT file or shell file. Here is cp2mid.bat:

    java -jar cp2mid.jar %1

Nothing complicated, here.

cp2mid recognizes the “.cho” file name extension. It does not recognize any other extensions. If you snag a ChordPro file from the Web, you may need to change its extension to “.cho”. cp2mid replaces “.cho” with “.mid” in order to make the MIDI file name. Thus, “AFile.cho” is translated to “AFile.mid”.

During development and testing, you can run cp2mid starting with the compiled classes, e.g., cp2mid.class. Enter the command line:

    java cp2mid AFile.cho

to run cp2mid. The Java interpreter will look for “cp2mid.class” and the rest of the compiled classes needed by cp2mid. These compiled classes must be available in the same directory as cp2mid.class. “cp2mid”, by the way, is the main class in the application. You’ll need to specify the main class when creating a JAR file. Again, these steps are relevant only to developers.

Java classes

cp2mid has five Java classes:

  • cp2mid (cp2mid.java) Main class and driver
  • SongElement (SongElement.java) Basic element (parts) of a Song
  • Song (Song.java) Represents a ChordPro song in terms of SongElements
  • Song2mid (Song2mid.java) Translates the internal song representation to MIDI
  • MidiFile (MidiFile.java) Represents and manipulates a standard MIDI File (SMF)

The MidiFile class was used in an earlier prototype and still contains a bit of unused legacy code. This may change in future versions. The MidiFile class exploits the standard Java MIDI packages and classes. It creates a MIDI file and inserts MIDI messages (meta, SysEx and otherwise) into a MIDI file.

cp2mid is the boss. It calls on the other classes to do their jobs. Processing is broken into five phases:

  1. Check and manipulate file names.
  2. Read the ChordPro file into a String array, one line per array element.
  3. Translate each line into one or more SongElements.
  4. Translate the SongElements into MIDI.
  5. Write the internal MIDI representation to a Type 0 SMF.

The translation phases do the heavy lifting.

Song and song elements

A Song is a list of SongElements. A SongElement represents one of several ChordPro song constituents:

  • Directive
  • Chord
  • Lyric
  • Line
  • Annotation
  • Comment
  • Tab

All SongElements have the same data members. Each SongElement has a tag which identifies its type. The type determines the validity and interpretation of the other data members.

The Song class translates extended ChordPro to a list of SongElements. This is, effectively, the intermediate, internal representation of a ChordPro song.

ChordPro directives begin with ‘{‘ and end with ‘}’. Usually ChordPro directives control song formating. Extended ChordPro uses key, tempo, time signature, style code, start accompaniment and stop accompaniment directives to issue MIDI messages that will control the accompaniment engine when the MIDI file is played back.

ChordPro chords and lyrics are what it’s all about. Chords begin with ‘[‘ and end with ‘]’. Chords are extended by an optional beat count which specifies how long the chord is held. A lyric is text and may be multiple syllables long (i.e., anything up to the next chord, annotation, or end of line.)

A line element is a marker for important end-of-lines. Line elements affect lyric formating.

Normally, a ChordPro annotation is text added to a song when it is displayed. Annotations begin with ‘*[‘ and end with ‘]’. Certain predefined annotations, e.g., [*MA], [*FA], etc. change the accompaniment section during play-back.

Comments are just that. cp2mid saves the text, but doesn’t do anything with it.

A ChordPro song may contain guitar tablature (tab). Right now, cp2mid ignores tablature. This has not been tested. I’m not sure how to handle or translate tablature as yet.

Song to MIDI

The Song2mid class translates the internal intermediate song representation to MIDI messages and adds the MIDI messages to a MIDI sequence. The MidiFile class helper functions create specific types of messages. Base MIDI message and sequence classes belong to the standard Java MIDI package.

The Song2mid class walks the SongElement list from front to back. Based on element type, it dispatches to an element type-specific handler. The handler adds one or more MIDI messages to the sequence.

A separate blog post describes the MIDI messages.

I tried to encapsulate most of the “Yamaha-ness” in the Song2mid and MidiFile classes. ChordPro is very loose and forgiving when it comes to chord syntax. Song2mid recognizes only the 33 or so Yamaha chord types as defined in the Genos Data List PDF. If Song2mid doesn’t recognize a chord, it issues either a major or minor triad.

Example songs

I will distribute 15 example songs in extended ChordPro and MIDI format. Even if you don’t run cp2mid (or look at its implementation), please take a look at the extended ChordPro songs and try the MIDI files on your arranger. All sorts of fun and crazy things happen in real music (key changes, time signature changes, anticipation) and the examples demonstrate how to handle many exceptional situations. I chose certain songs as examples for testing because they are weird. 🙂

I tested the MIDI files on Genos and I’m curious about their behavior on other arranger keyboards. The MIDI files are similar to those generated by Yamaha ChordTracker. If your arranger plays ChordTracker MIDI files, it should play cp2mid MIDI files.

I don’t want to lead you on — it takes a fair bit of effort to take an Internet ChordPro file and whip it into shape. ChordPro as a formating tool is very lenient and forgiving. Accompaniment requires tighter semantics and precision like most “executable” computer stuff. It’s fun to whip a song into shape, but it requires work.

Copyright © 2022 Paul J. Drongowski

Hidden arranger smarts: file system SysEx

What to do with the ennui that sets in on New Years Day? Explore unexamined territory!

Yamaha Musicsoft Downloader is a valuable tool for Yamaha arranger keyboardists. Downloader lets you transfer MIDI song files, registrations file, text files, etc. between a Windows PC and a compatible Yamaha arranger keyboard. It even works with digital home pianos, too.

Most folks transfer their files using a USB jump drive. This isn’t a big deal when moving a few files maybe once or twice a day. When I’m developing a new style, however, I swap a drive quite frequently — dozens of times a day. All that physical swapping causes wear and tear on USB ports. I often use a short USB extender to reduce wear on the computer and/or instrument USB ports. I’d rather have a cheap cable fail than a USB port on a motherboard.

Downloader saves a lot of that wear and tear by copying data over a cable instead of a USB drive. Downloader supports both USB and good ole 5-pin MIDI transfers. Thus, folks who own older pre-USB keyboards can use Downloader, too.

Downloader has been around a while — one reason why it’s backward compatible. The user interface is a little bit dated, but it works and who cares? To move a file, you add the file to the holding area at the top of the screen, then move the file to its final destination by pressing one of the big arrow buttons. Classic.

Yamaha Musicsoft Downloader in action

The screenshot shows Downloader connected to Genos over 5-pin MIDI. The file “Downtown.mid” is in the temporary storage area. The lower left hand panel navigates instruments, drives and directories. The lower right hand panel selects files within a directory.

So, how does it do the actual transfer?

Because Downloader is old skool, it does it with MIDI. (Even over USB.) Downloader was written back in the day when MIDI was king and could do anything and everything. As another example, I give you the MIDI Sample Dump Standard (SDS) for representing and transferring samples to/from early-day samplers.

Downloader performs a dance with the target instrument. Like SDS, Downloader and the target instrument follow a set of rules — a protocol — for communication. To my knowledge, Yamaha has never published this protocol. It’s all done via MIDI System Exclusive (SysEx) messages although you won’t find these message types in the instrument’s reference manual or data list file. Nonetheless, your instrument is smarter than you think!

Of course, a lot depends upon the storage and capability of the target instrument. Entry-level instruments may be oblivious to Downloader or maybe just transfer back-up files. Mid- to higher-end arrangers are fully capable.

I decided to get a taste of this hidden protocol by monitoring the exchange of MIDI SysEx messages between Downloader and Genos. I split the MIDI stream and watched the dance as Downloader makes contact with Genos and acquires top-level directory information. After watching this process several times, I tried sending my own SysEx messages via MIDI-OX. (What a great tool!)

Here is a typical start-up sequence. It shows Genos’ response for each SysEx message that I sent.

F0 43 50 00 00 00 01 F7 
Genos responds: F0 43 50 00 00 00 02 01 01 F7
F0 43 50 00 00 02 01 F7
Genos responds: F0 43 50 00 00 02 02 33 00 01 00 00 01 00 01 00 00 1B
78 17 3F 01 00 00 00 00 00 00 01 7F 00 00 00 32 00 00
00 00 00 00 00 00 00 00 00 00 00 00 27 08 00 00 02 00
04 7F 7F 7F 7F F7
F0 43 50 00 00 01 01 F7
Genos responds: F0 43 50 00 00 01 02 00 F7
F0 7E 7F 06 01 F7 Identity request
Genos responds: F0 7E 7F 06 02 43 00 44 42 1C 0A 00 00 01 F7
F0 43 50 00 00 01 00 01 F7 Make connection (Genos is connected)
Genos responds: F0 43 50 00 00 01 02 01 F7

The first three out-bound messages test for a response. Downloader uses these messages as a connection check. The identity request message is a MIDI standard message for obtaining the identity of a musical device or instrument. Genos identifies itself as Yamaha (0x43) and model.

After getting the instrument identity, Downloader initiates the actual connection. When connected, the Genos display changes to a special background with the message: “Connected to the computer or smart device.” Genos is now listening for Downloader commands.

Thereafter, Downloader asks Genos for device, file and directory information. Here is the inquiry about top-level devices:

F0 43 50 00 05 0B 00 00 F7     Request drive 0 information 
Genos responds: F0 43 50 00 05 0B 01 42 00 00 05 00 55 53 45 52 F7
U S E R

Yamaha arranger people will recognize the USER drive where all user directories and files are kept. Genos returns the name for device 0: “USER”. If you have a USB jump drive attached, you will see:

F0 43 50 00 05 0B 00 01 F7     Request drive 1 information 
Genos responds: F0 43 50 00 05 0B 01 42 00 00 05 00 55 53 42 31 F7
U S B 1

Makes me think that Genos tells Downloader how many devices are available — maybe in response to the connection command?

Moving on, Downloader interrogates Genos about the directories and files at the next level down in the file hierarchy.

F0 43 50 00 05 04 00 3F 00 08 00 30 3A 5C 2A 2E 2A 00 F7    dir 0:\*.* 
? 0 : \ * . *
Genos responds: F0 43 50 00 05 04 01 10 31 39 38 30 20 31 20 31 20 30
1 9 8 0 1 1 0
20 30 20 30 03 01 00 00 00 03 00 2E 00 F7
0 0 .

You’ll notice that some command arguments and responses are ASCII characters, including the date and time stamps.

The number of subdirectories and files varies. So, Downloader and Genos go into a “loop” in which Downloader asks for the next entry (i.e., list item) and Genos responds with the entry’s information:

F0 43 50 00 05 05 00 F7        Request next dir list item 
Genos responds: F0 43 50 00 05 05 01 10 32 30 32 31 20 36 32 36 20 30
2 0 2 1 6 2 6 0
34 34 35 34 03 01 00 00 00 06 00 53 4F 4E 47 00 00 F7
4 4 5 4 S O N G

This loop continues until the list of available items is empty:

F0 43 50 00 05 05 00 F7        Request next dir list item 
Genos responds: F0 43 50 00 05 7F 01 01 01 42 00 00 F7 End of list

Genos responds with a unique message saying “no more” (0x7F).

Finally, it’s time to close the connection:

F0 43 50 00 00 01 00 00 F7     Disconnect command

Genos drops the connection and returns to normal operation, that is, it displays its usual main screen.

Sharp-eyed readers have noted the “ChordTracker” subdirectory in the “SONG” directory. ChordTracker created this subdirectory when I transfered an accompaniment from my iPad to Genos. How did ChordTracker create the subdirectory and perform the transfer? That’s new territory (more SysEx) to explore!

Well, that was one way to stave off the New Year’s blues. 🙂

Copyright © 2022 Paul J. Drongowski

ChordPro to MIDI accompaniment: Demo

Work continues on my Java program to translate ChordPro songs to Yamaha accompaniment (SMF). The code is fairly stable and mostly I’ve been writing example songs in ChordPro format for testing. The range and variety of musical craziness is amazing: weird chords (“Superstition”, “Michelle”), changing time signatures (“Two Of Us”), changing key signatures (“My Girl”), unusual time signature (“Everybody Wants To Rule The World”), and more.

Today, I want to give a taste of what to expect. I plan to distribute the Java executable as a “jar” file and will also make the source code available. To keep things simple, the program runs from a command line — no graphical user interface:

    java -jar cp2mid.jar ItsTooLate.cho

The program is named “cp2mid” and “cp2mid.jar” is the Java executable. We need to invoke java explicitly because it is an interpreted language and the executable consists of Java bytecodes.

The above command produces a Type 0 Standard MIDI File (SMF) named “ItsTooLate.mid”. This file must be sent to a Yamaha arranger like Genos™ by whatever means you have at your disposal, i.e., a USB flash drive or Yamaha Musicsoft Downloader.

Here is the first part of “ItsTooLate.cho”. The song begins with set-up directives including “{stylecode: }”, which selects the accompaniment style (“Cool8Beat”). You could leave out key, time, tempo, or stylecode and go with the current panel settings. This flexibility allows experiments with different tempos or different styles, including USER styles.

{t: It's Too Late }   
{key: Am}
{artist:Carole King}
{time: 4/4}
{tempo: 104}
# Style: Cool8Beat
{stylecode: 5635}

{start_accomp}
[Am7][*IA]

# Introduction (intro riff)
{start_of_instrumental}
[Am7][*MA] [D6] [Am7] [D6]
{end_of_instrumental}

{c: Verse 1}
[Am7] Stayed in bed all morning just to [D6] pass the time.
[Am7] There's something wrong here there can [D6] be no denying.
[Am7] One of us is changing
Or [Gm7] maybe we've just stopped [Fmaj7] trying. [Fmaj7][*FA]

{start_of_chorus}
And it's too [Bbmaj7][*MB] late baby now [Fmaj7] it's too late
Though we [Bbmaj7] really did try to [Fmaj7] make it.
[Bbmaj7] Something inside has [Fmaj7] died
And I can't hide [Dm7] and I just can't [Esus4:2][*FB] fake it. [E7#9:2]
{end_of_chorus}

The screenshot above shows the Genos song player with “ItsTooLate.mid” loaded and ready. Choose either the Lyrics or Score display (optional). Then hit play!

The next screenshot shows the Lyrics display. It should look familiar if you have played a Yamaha arranger. The arranger highlights the current lyric syllable or phrase in time with playback. Compare the screenshot with the ChordPro song and you’ll get an idea of what to expect for each ChordPro construct. A lyric phrase is not broken into syllables, but is associated with the chord preceding the phrase.

The following screenshot shows the Score display. It’s a different view of the same song. Lyrics appear below the staff and chords appear above. The time and key signature are displayed on the first page. Follow the bouncing ball during playback.

So, how does it sound? Listen to a quick demo (MP3) with me noodling on top.

That’s a taste of what’s ahead. I hope you will try cp2mid when it’s ready.

Copyright © 2021 Paul J. Drongowski

ChordPro auto-accompaniment: MIDI messages

I’ve made quite a bit of progress with my Java program that translates extended ChordPro songs into a Yamaha-compatible accompaniment MIDI file. This blog post describes the stuff inside the MIDI files produced by the program (cp2mid).

The MIDI file contains MIDI meta and SysEx (System Exclusive) messages which drive the Yamaha accompaniment engine. When the MIDI file is played back on a compatible Yamaha arranger keyboard (e.g., Genos), the keyboard generates an accompaniment as directed by the chord and section change messages in the MIDI file. It may sound odd to hear this, but the MIDI file doesn’t contain a single note ON or note OFF message! It’s all accomplished through control messages and the accompaniment is produced in real-time.

The MIDI file is a Type 0 Standard MIDI File. It starts with a bunch of set-up messages:

  F0 05 7E 7F 09 01 F7                           GM Reset 
F0 08 43 10 4C 00 00 7E 00 F7 XG System ON
FF 58 04 04 02 18 08 Time signature
FF 59 02 02 00 Key signature
FF 51 03 07 EF eb Tempo
F0 0D 43 73 01 51 05 00 03 04 00 00 2C 05 F7 Style code
F0 04 43 60 7A F7 Accompaniment Start

All of these message types are defined in the Yamaha Genos™ Data List PDF document. The messages beginning with “F0” are System Exclusive (SysEx) messages. Messages starting with “FF” are MIDI SMF meta messages. All messages are Yamaha proprietary (code “43”). The trick, of course, is filling in the correct values for the tempo, key, etc.

GM Reset and XG System ON initialize the tone generator. Time signature, key signature and tempo are SMF meta messages which control and arranger’s sequencing engine. The Style Code message selects one of the many built-in accompaniment styles. The Accompaniment Start message tells the accompaniment engine to get busy.

Once set-up is complete, the rest of the MIDI file consists of Chord, Lyric and Section Control messages. Again, these messages are all defined in the Genos Data List PDF document.

Here is a typical chord message:

    F0 08 43 7E 02 37 08 37 7F F7          Chord Bm/B

It tells the accompaniment engine to play a B minor chord (0x37 0x08) with a B bass note (0x37 0x7F). The neatest thing about the ChordPro conversion program? It makes it easy to play and hear difficult to finger chords like slash chords and unusual chord types like Cminmaj7-9.

Lyrics are inserted into the MIDI file using the SMF Lyric meta message:

    FF 05 len [Data]

For example, this Lyric meta message:

    FF 05 04 79 6F 75 20      0x79='y', 0x6F='o', 0x75='u', 0x20=' '

encodes the syllable text “you “.

No attempt is made to separate lyric text into syllables or to assign syllables to individual beats. When a lyric phrase is encountered in the ChordPro file, the phrase is inserted right after the preceding Chord message, i.e., it has the same MIDI timestamp as the preceding Chord message.

A Section Control message selects the current accompaniment section (pattern). The following message:

    F0 06 43 7E 00 09 7F F7               Section Control Main B: ON

selects the “MAIN B” section (0x09 0x7F). Because playback is fully automated, section changes are precise.

The penultimate message stops accompaniment:

    F0 04 43 60 7D F7                     Accompaniment Stop

The final SMF meta message ends the SMF sequencer track:

    FF 2F 00                              End Of Track (mandatory)

Overall, that’s a lot of power with just a few message types! Most of the Java code involves scanning the ChordPro input, book- and time-keeping. Java has a good MIDI library which makes coding easier.

As to time-keeping, all MIDI events (messages) have a timestamp. Messages issued from set-up directives before start_accomp occur in the first song measure. The start_accomp directive advances the MIDI clock to the first beat of the second measure. Thus, the first chord and lyric (if any) occurs at the beginning of the second measure. Thereafter, MIDI time advances in accord with each chord beat count (default: a full measure as determined by the current time signature).

Look here for more information about ChordPro format.

Copyright © 2021 Paul J. Drongowski