MODX: Select Performance from MMS

Between shopping for Halloween candy and the dentist, there’s just enough time for a few quick experiments with Yamaha MODX and Mobile Music Sequencer (MMS).

I’ve explored MMS MIDI messages in earlier blog posts. MMS transmits MIDI messages that by and large conform to the Yamaha XG voice and effects architecture. The MMS software synth engine resembles an XG tone generator albeit with a smaller and somewhat unique voice set.

MMS is capable of driving Motif XS/XF, MOX/MOXF and MX synthesizers with voice change messages. It can also drive Tyros 5, and with a few limitations, Genos and PSR arranger workstations.

The experiment de jour is sending Motif XF voice change messages MMS to MODX. On the face of it, this may seem absurd because the Montage/MODX and Motif XF have radically different patch (Performance) assignments. However, a MIDI program change message sequence,

  1. Bank Select MSB (CC#0)
  2. Bank Select LSB (CC#32)
  3. Program Change

is a program change message sequence no matter what the target is. The trick is to send meaningful program change messages which achieve an intentional result.

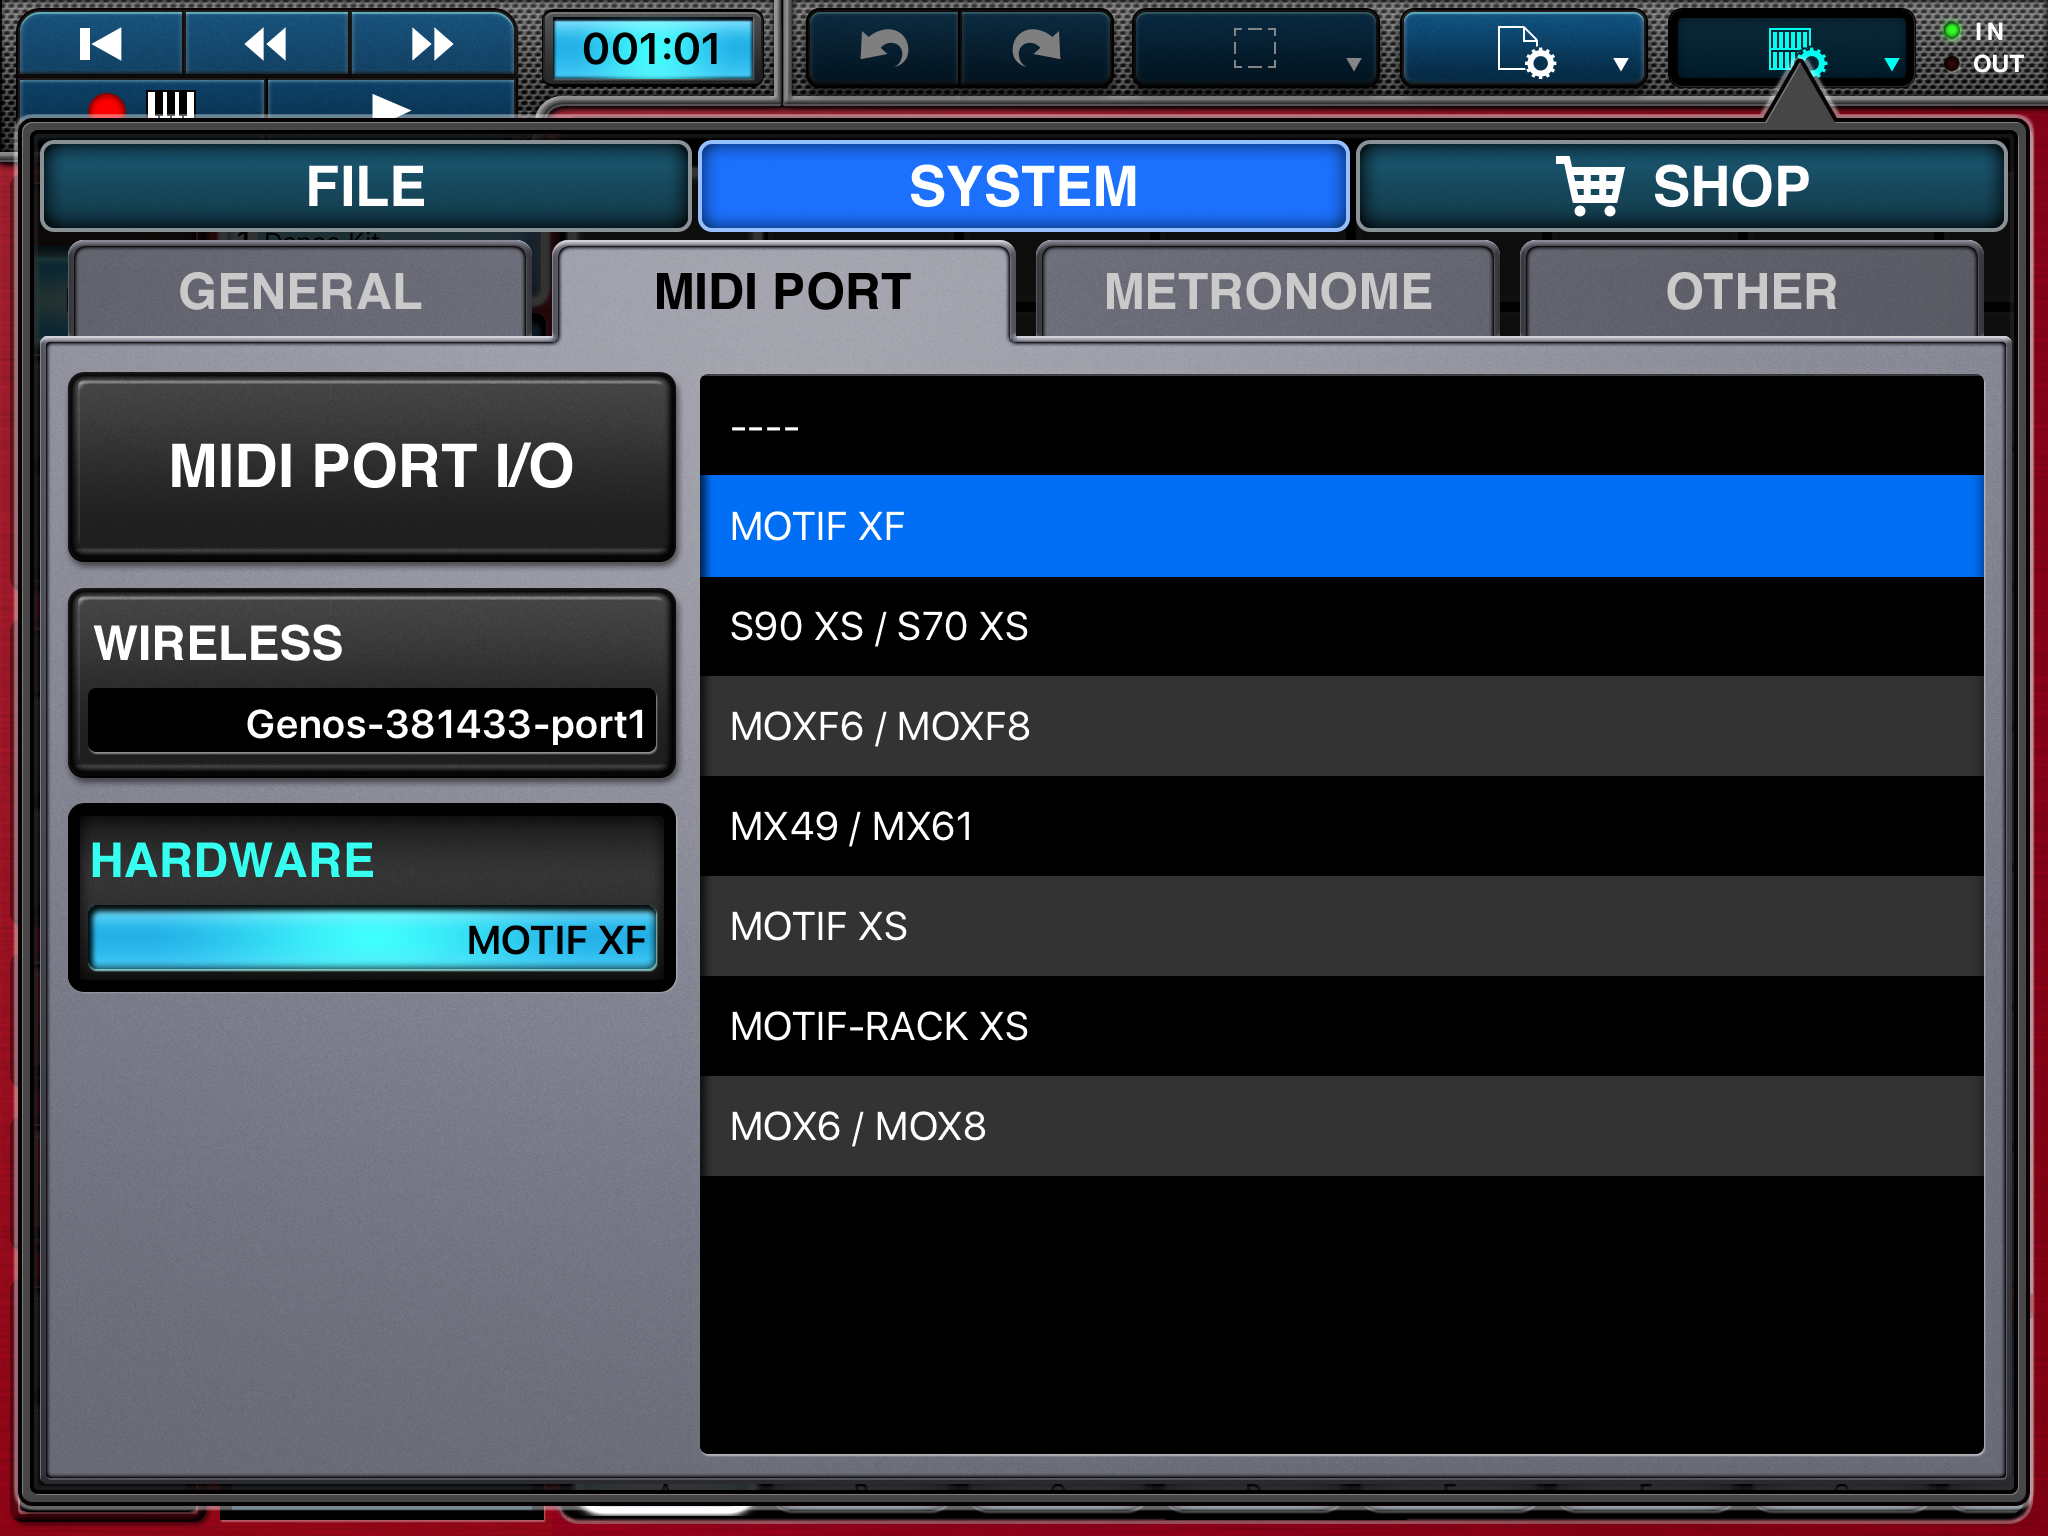
Thus, the first question is “What Motif XF patch changes can MMS send?” In order to find out, we need to tell MMS that we intend to communicate with a Motif XF. Navigate to the SYSTEM > MIDI PORT screen and touch the HARDWARE button. Select Motif XF from the list of potential targets. Then, return to the phrase view. [Click images to enlarge.]

Next, we must disable Voice Link. Create a new MMS project with Voice Link disabled. With Voice Link disabled, MMS will not set a part voice automatically when it loads a phrase.

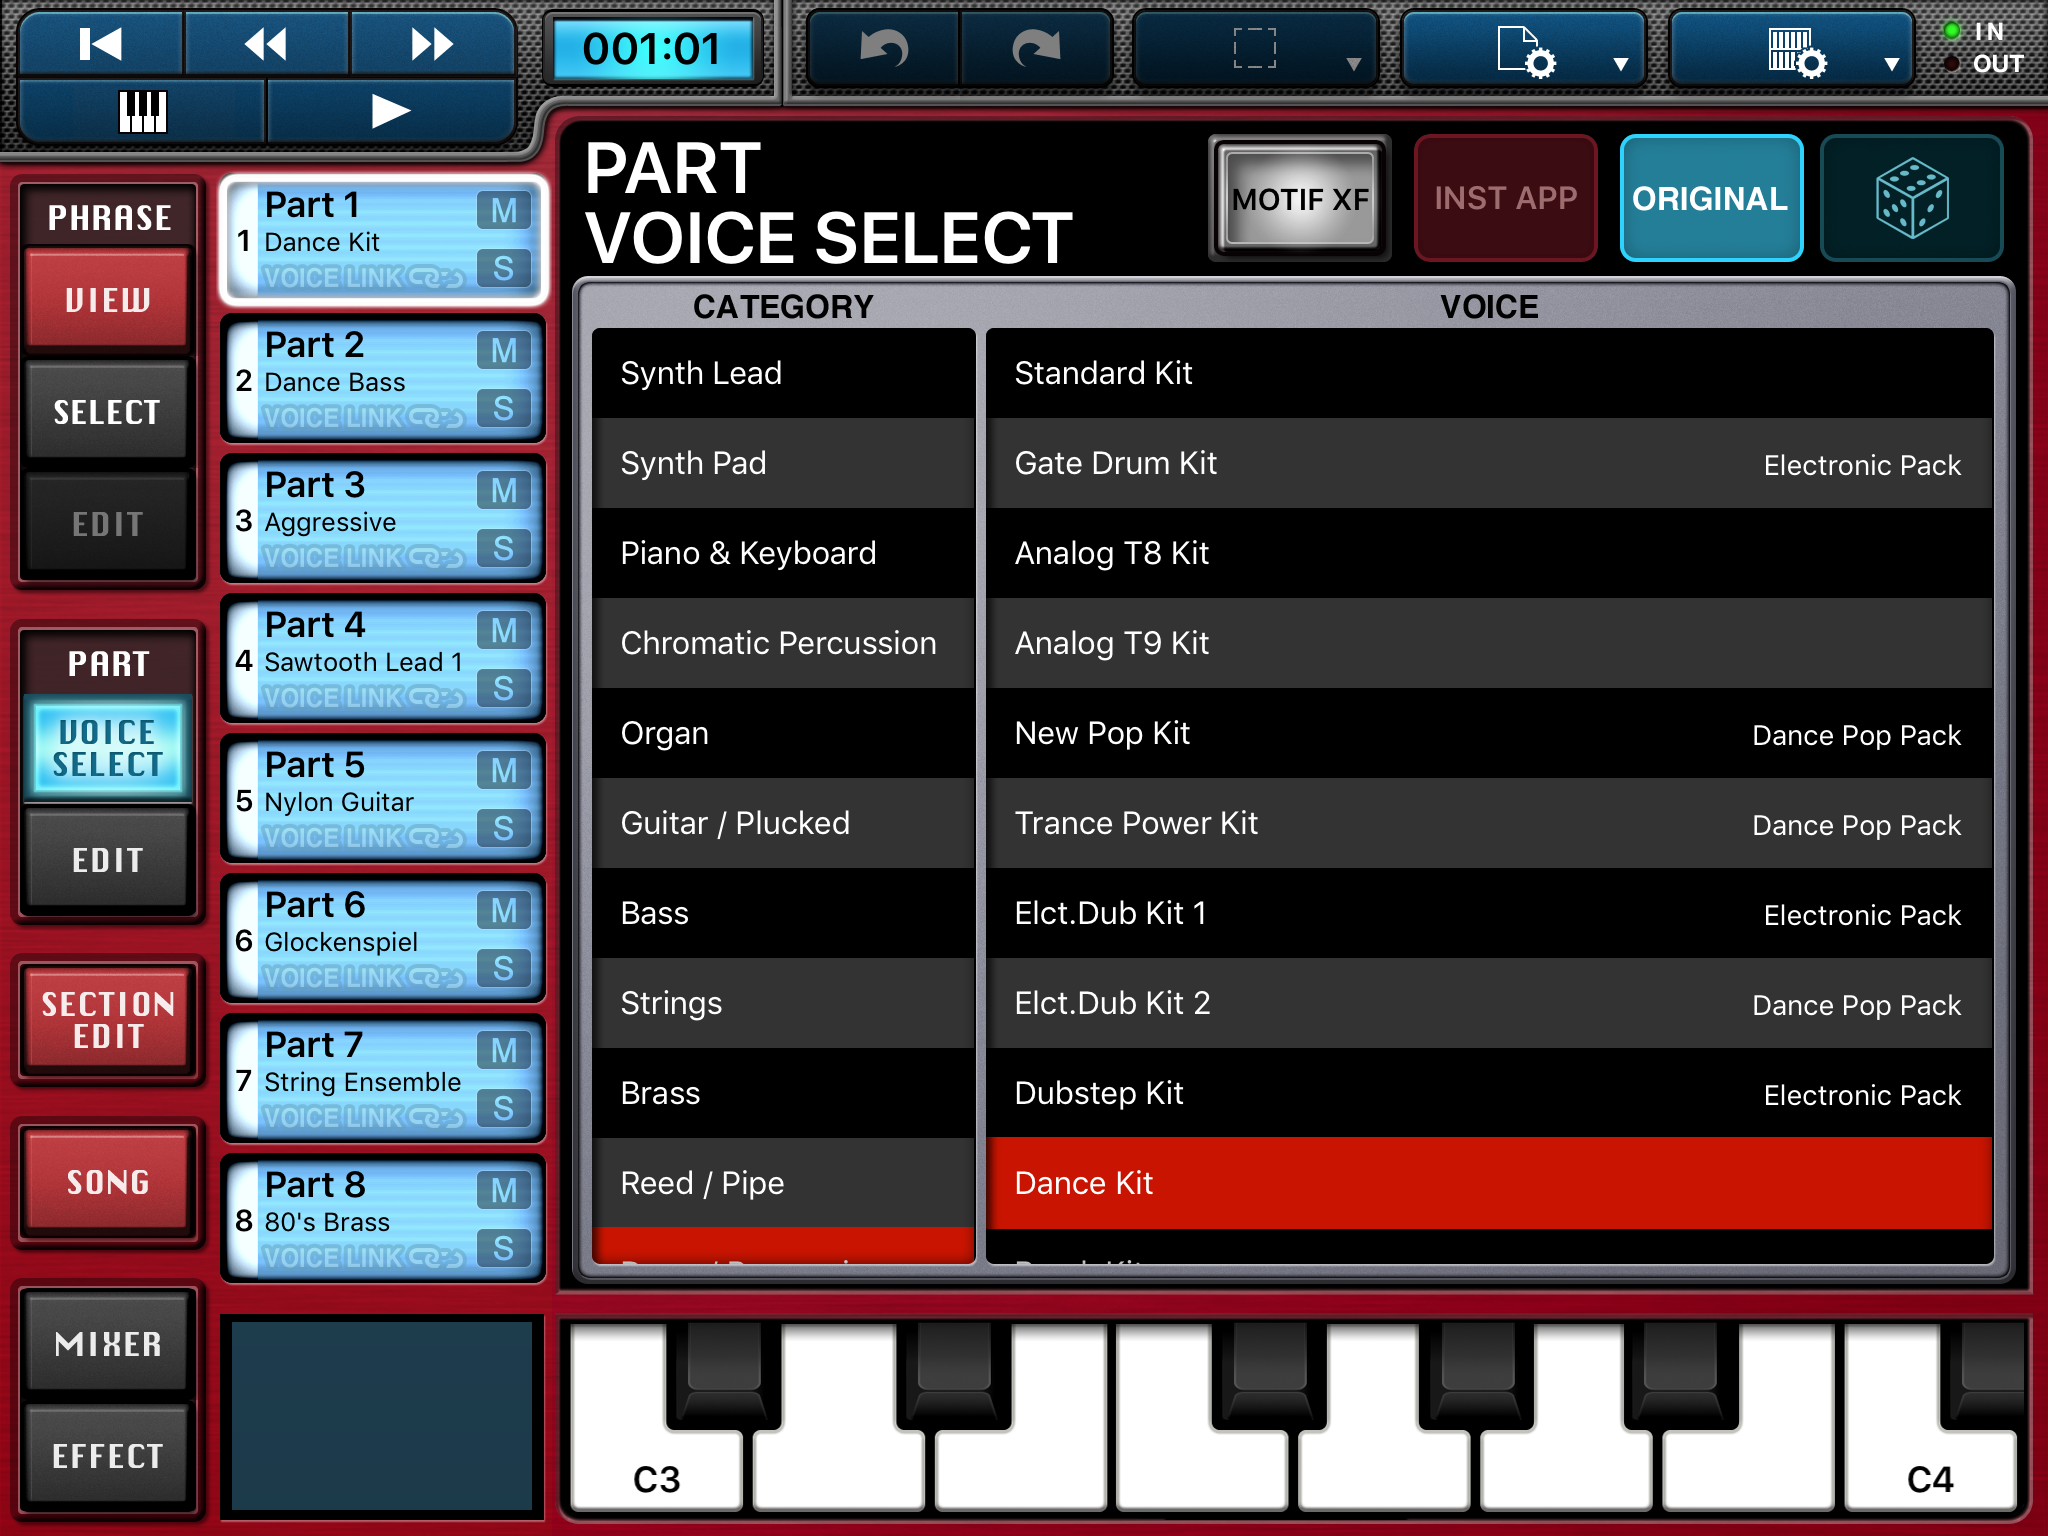
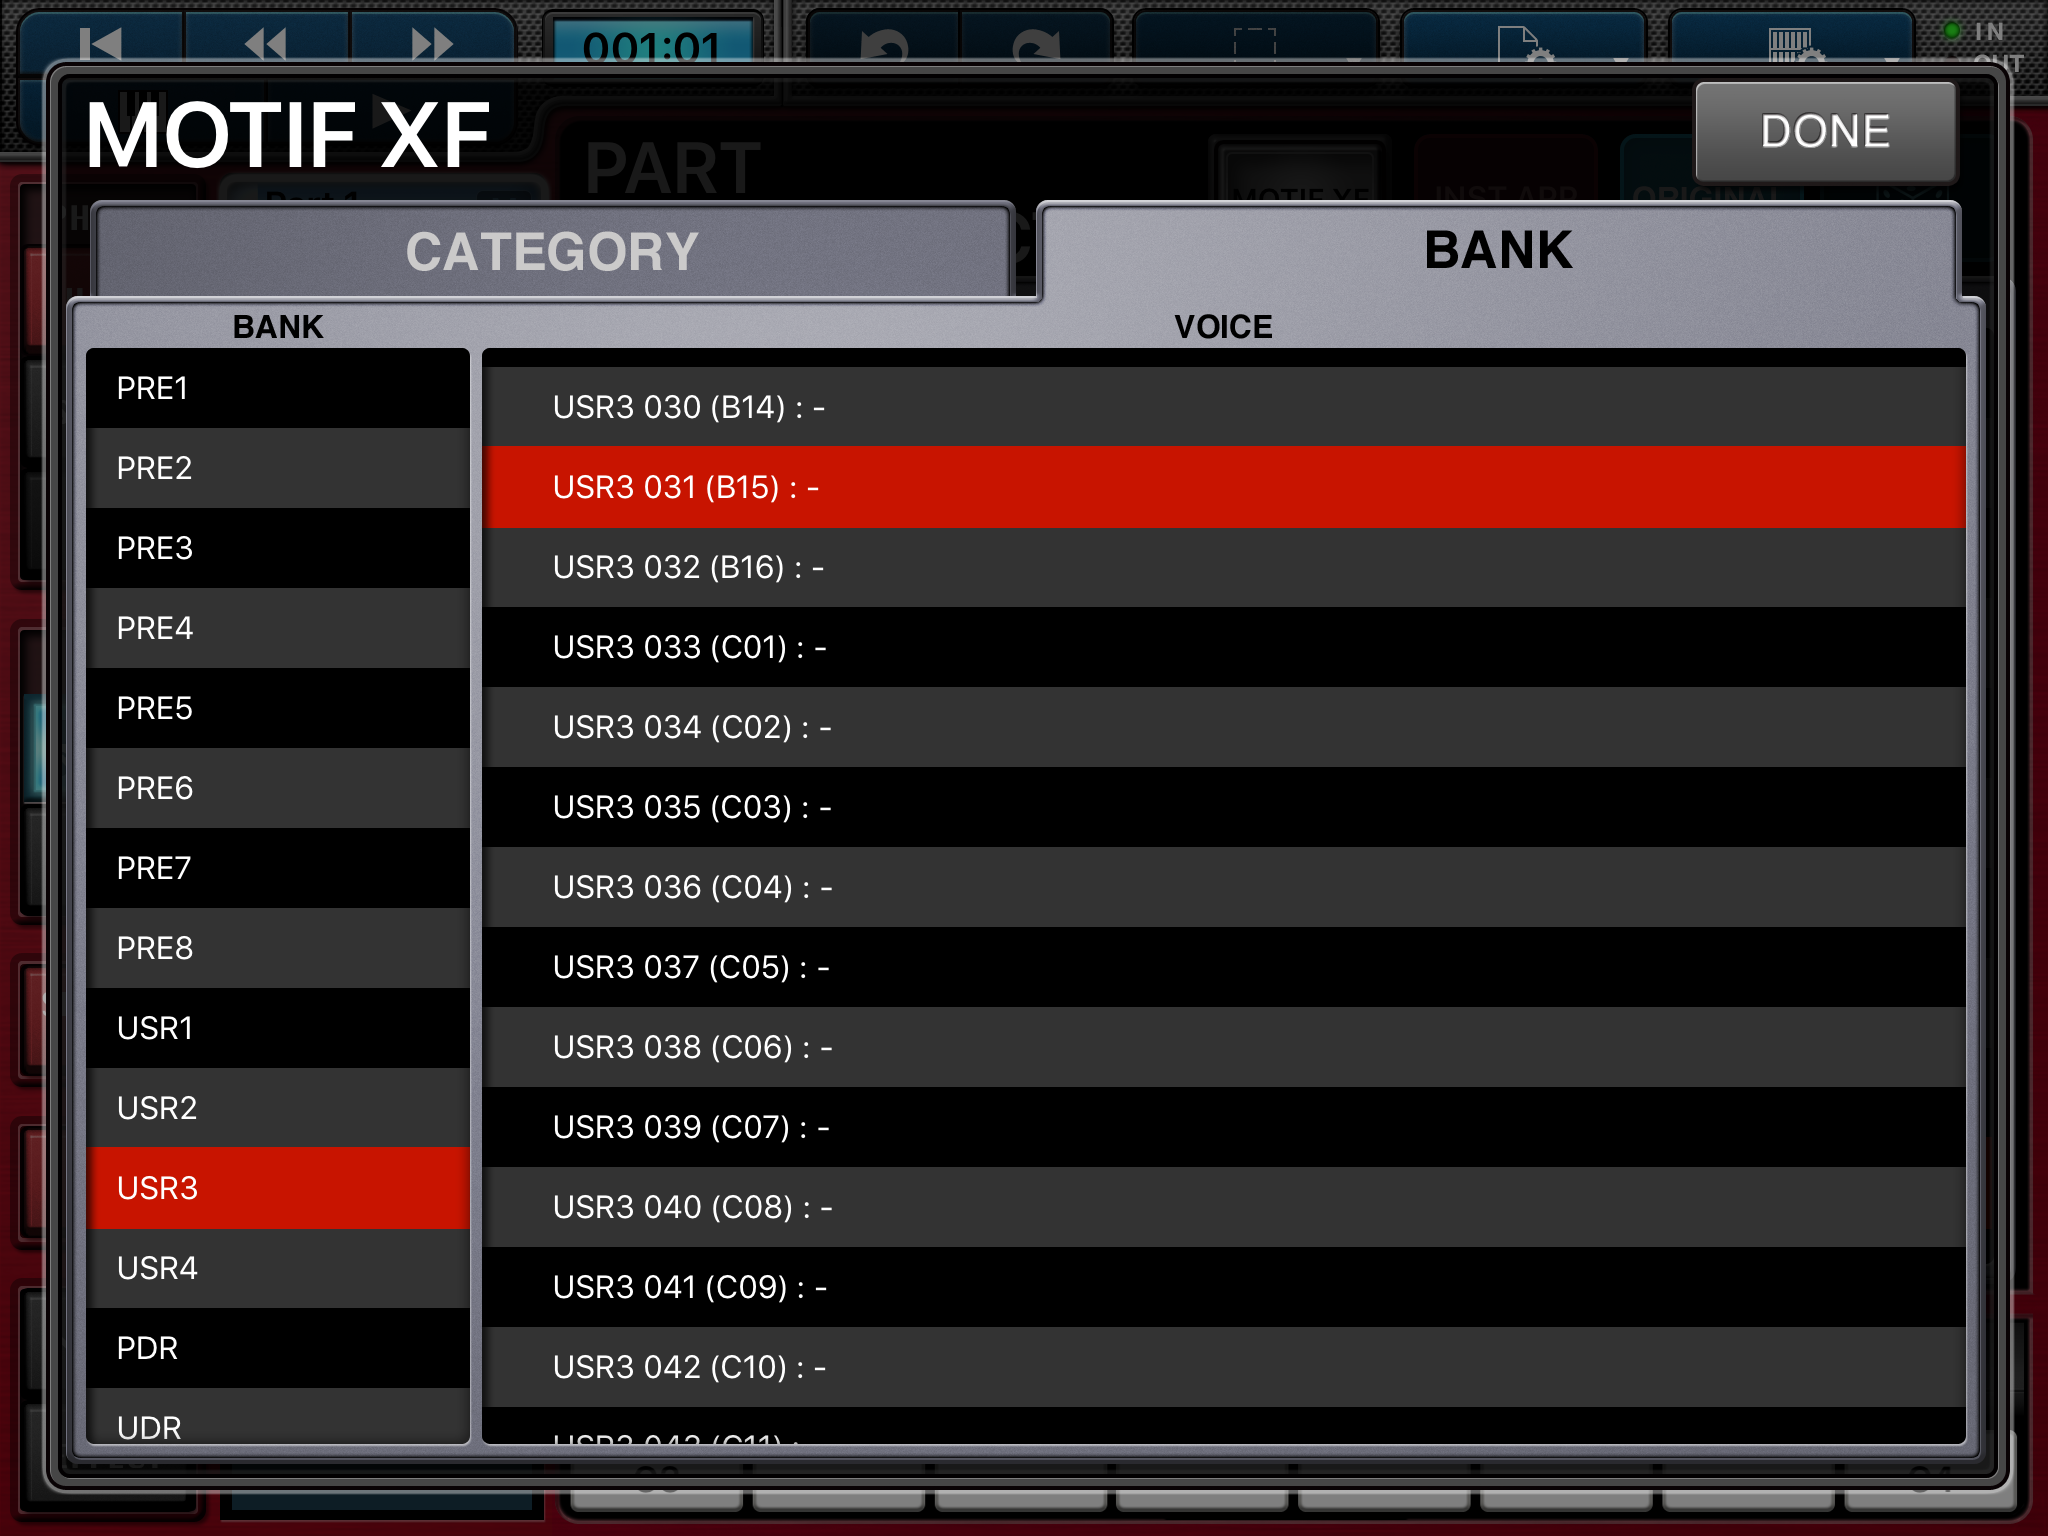
We will send patch change messages manually. Select an MMS part and touch the PART VOICE SELECT button. In the center near the top of the PART VOICE SELECT screen, you should see a button labelled “MOTIF XF”. Tap the button.

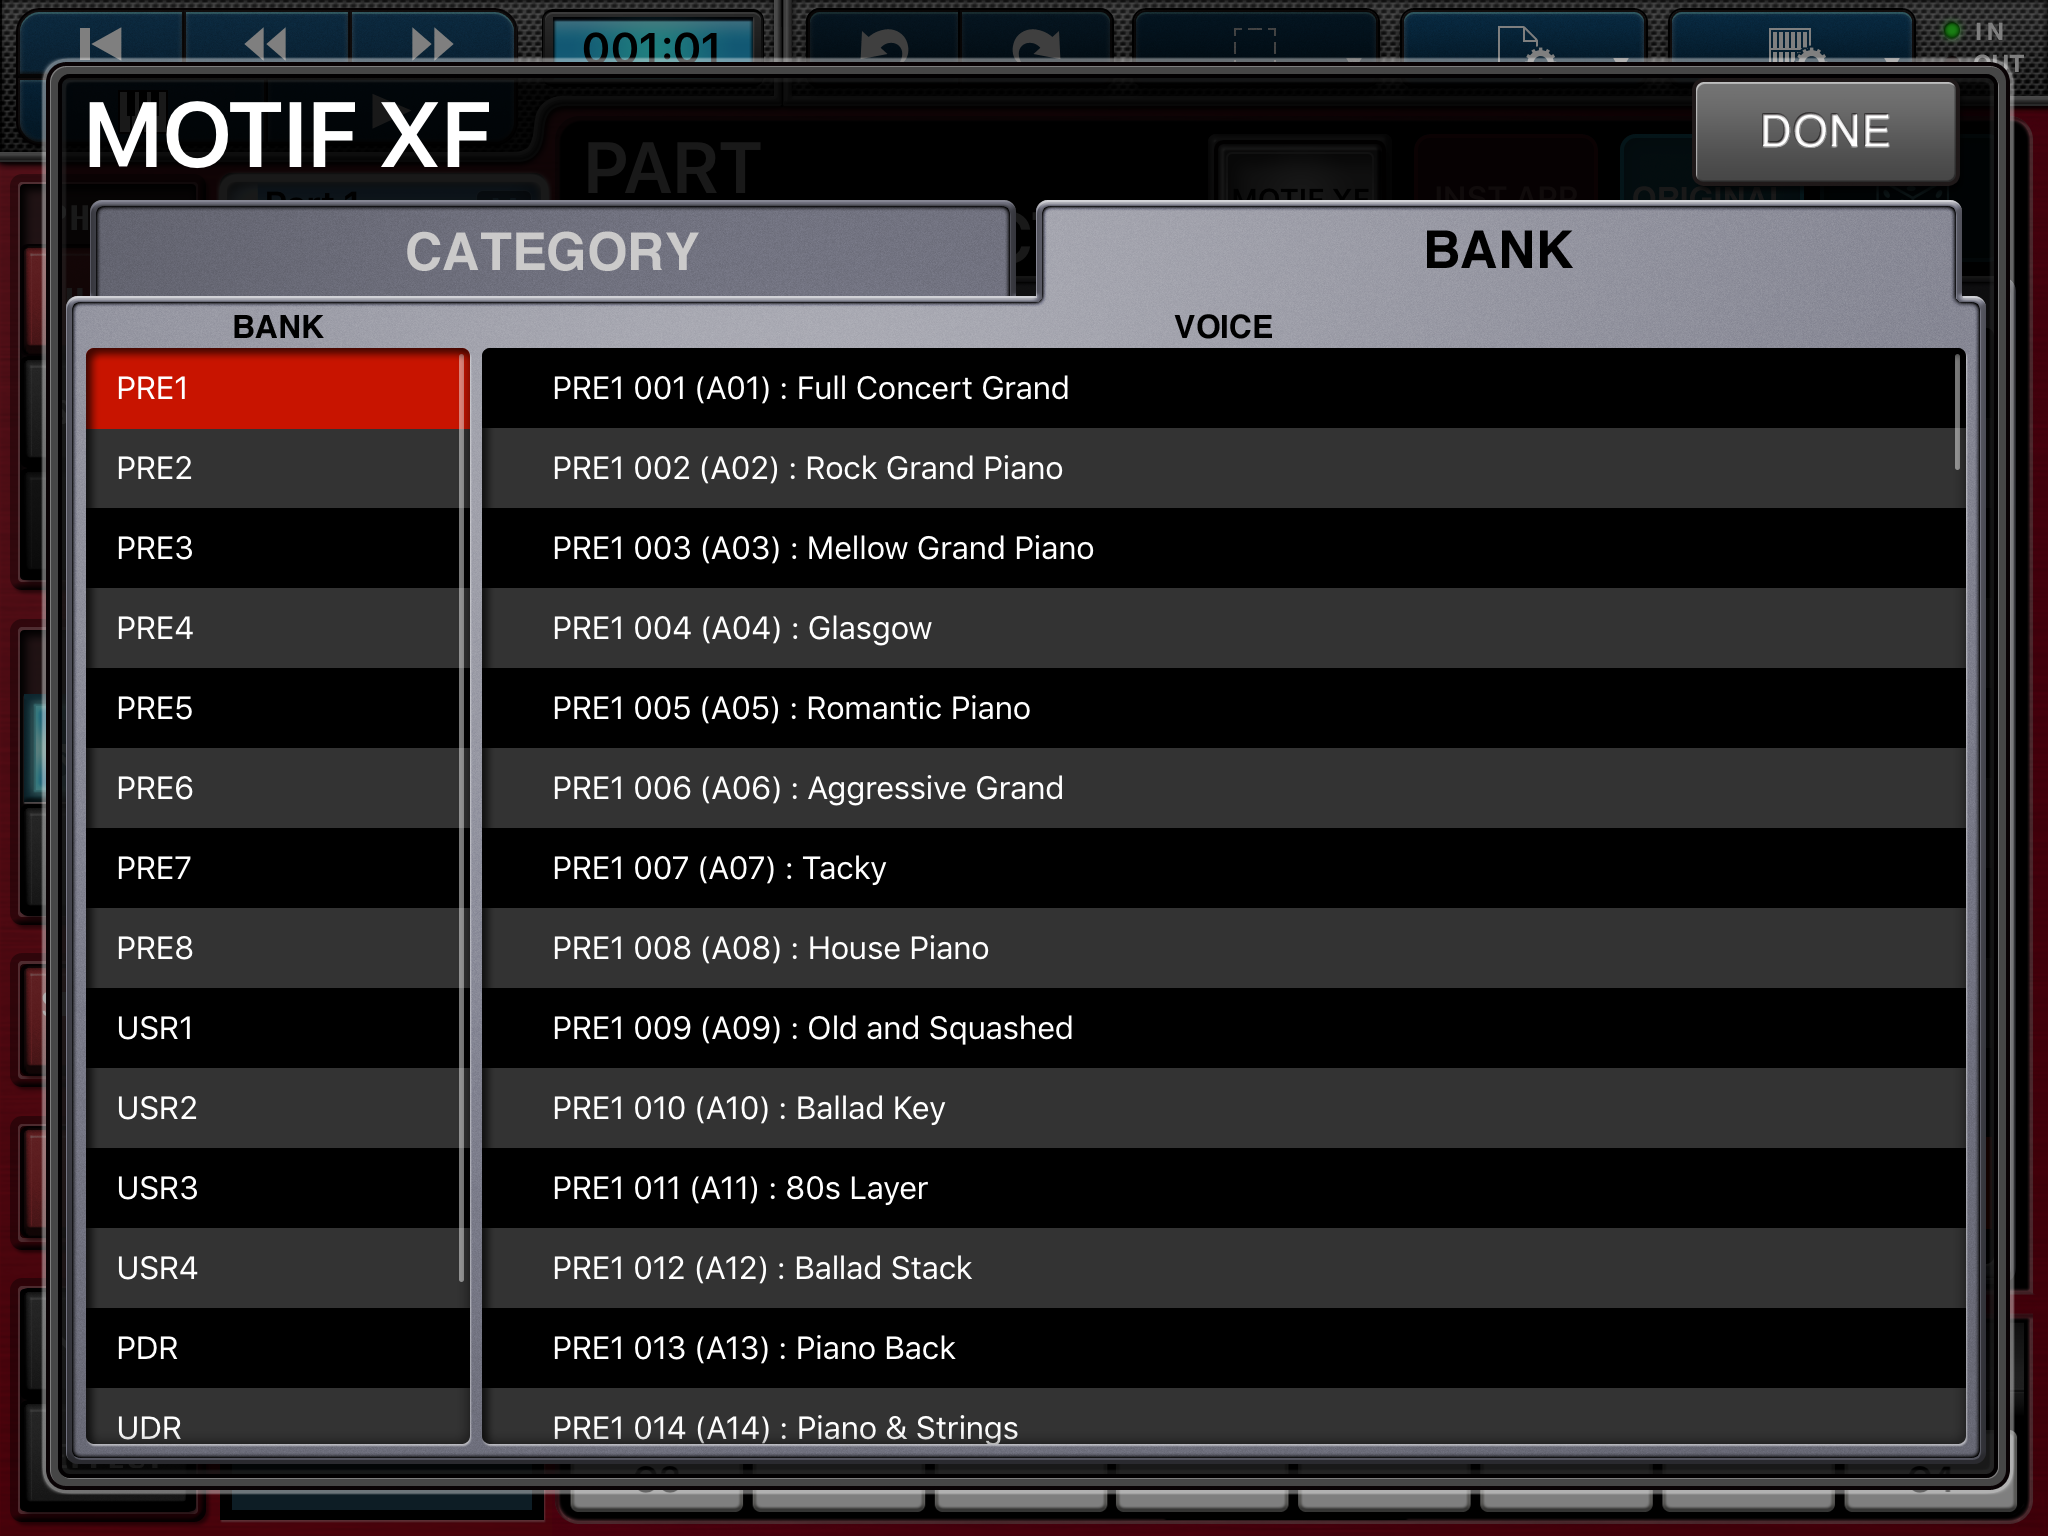
Now, you should see the hardware voice selection screen with “MOTIF XF” in the upper left hand corner. Touch the BANK tab.

We need to know and understand how the Motif XF bank and voice numbers relate to the MODX (and Montage) presets. Here is a correspondence table:

Motif XF bank MSB LSB MODX Single-Part Preset Group
PRE1 63 0 Group 1
PRE2 63 1 Group 2
PRE3 63 2 Group 3
PRE4 63 3 Group 4
PRE5 63 4 Group 5
PRE6 63 5 Group 6
PRE7 63 6 Group 7
PRE8 63 7 Group 8
USR1 63 8 Group 9
USR2 63 9 Group 10
USR3 63 10 Group 11
USR4 63 11 Group 12
PDR 63 32
UDR 63 40
GM 0 0 GM
GMDR 127 0 GMDR

The MODX information is taken from the table on page 184 of the MODX Data List PDF. These are the Motif XF banks supported by MMS. There are a few more (e.g., Mixing Voice), but those banks are not supported by MMS. If they ain’t supported by MMS, fuggedaboutit.

Please take note of these important observations and/or limitations:

  • All program change messages (except the General MIDI stuff) send bank select value 63. We only can select single-part MODX Performances.
  • MMS cannot send bank messages for all MODX presets. MODX recognizes bank LSB values for preset Performances in the range [0:31]. (We’re not considering User Performances, etc. here.)
  • We have full access to the regular General MIDI (GM) voices and drum kit.
  • We need to ignore Motif XF voice names and concentrate on the MMS bank and preset number only. Ignore voice identifiers like “A07”, too. They have no meaning in the MODX world.

Bottom line: If the MSB and LSB for a MODX Performance doesn’t fall into the range given by the table, we cannot select the MODX Performance from MMS.

Maybe, pretty please, Yamaha will update MMS for Montage, MODX and Genos?

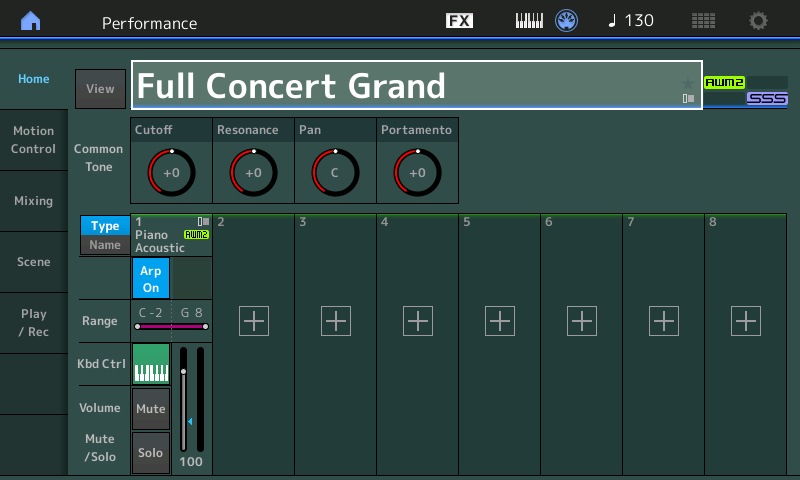
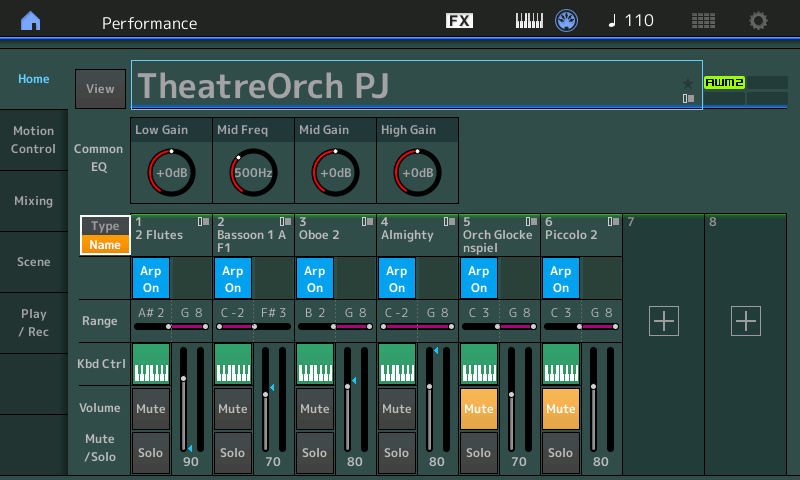
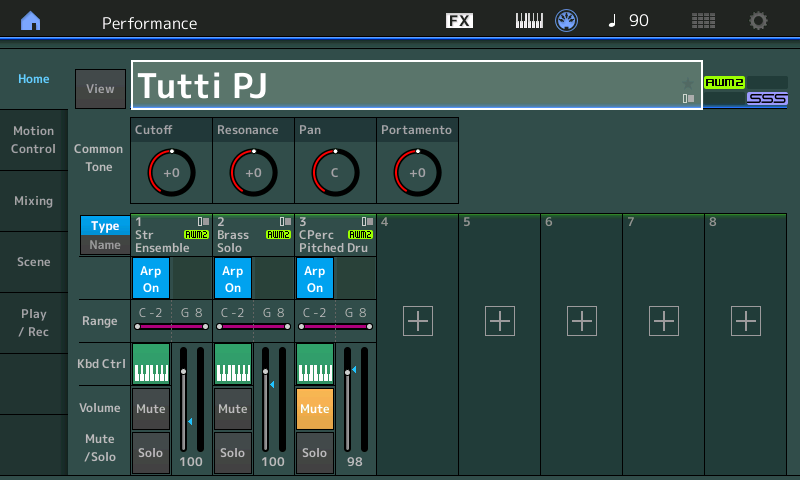
The second big question is “How do we find the Bank Select MSB, Bank Select LSB and Program Change number for a MODX Performance?” Fortunately, the answer is easy. Select a Performance by touching its name. MODX displays a contextual menu on the left hand side of the screen. Touch the Property button. MODX displays the needed Performance properties as shown in the screenshot below. This is the property information for the single-part Performance Flute Legato.

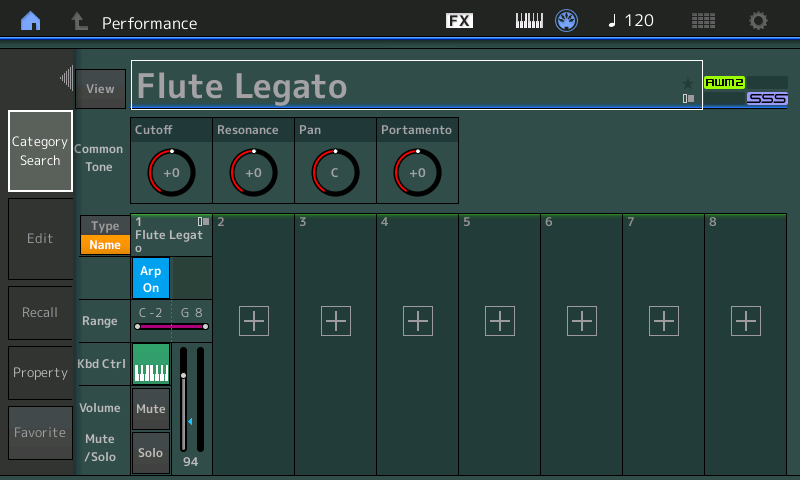
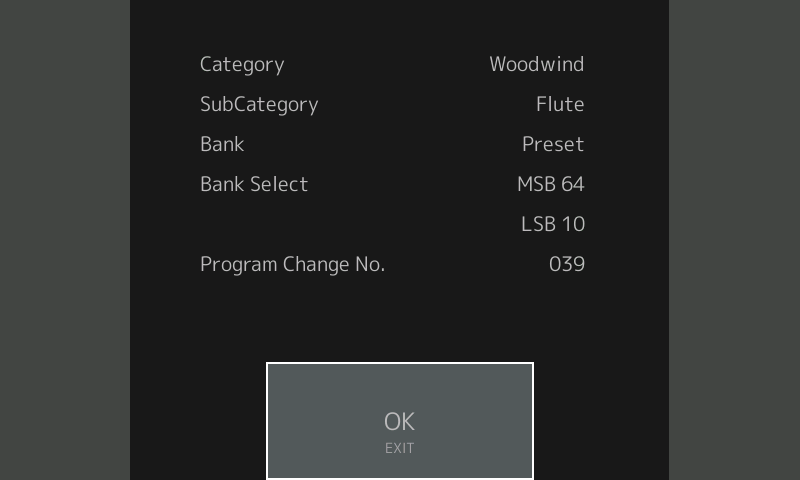
I noted a small bug (version 1.10). MODX should display “63” for preset Performances, not “64”.

Back in MMS, if we want to select Flute Legato on the MODX, we need to select the USR3 bank (MSB 63, LSB 10) and “USR3 039” (Program Change 39).

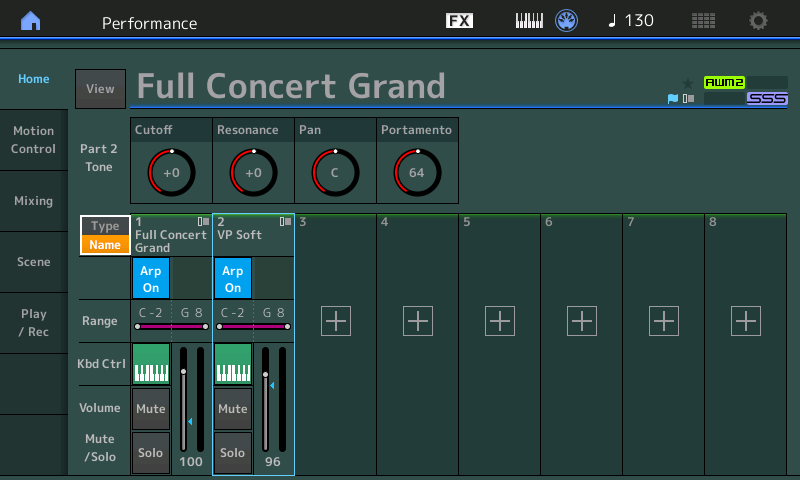
Try Tenor Soft Legato (MSB 63, LSB 10, Program Change 31). Notice that the Performance name at the top of the MODX screen does not change. Touch the Name button to display the Performance name for each Part. Aha! The Performance name for the Part is “Tenor Soft Legato”, and yep, it’s playing a saxophone.

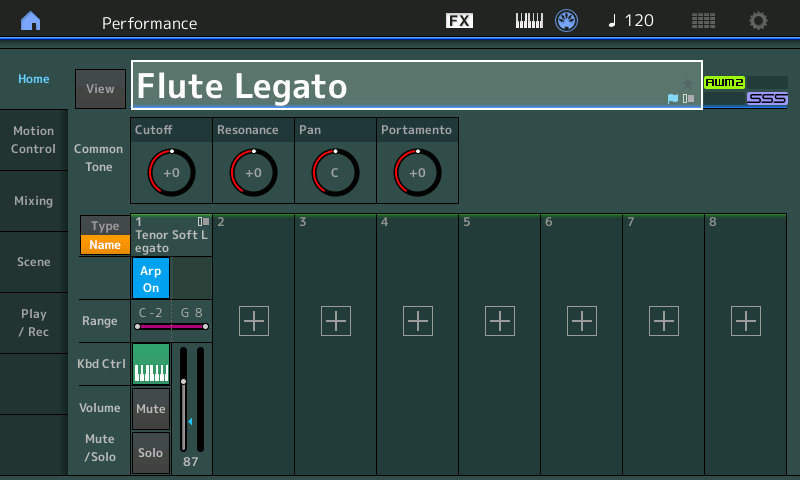
Fun, fun, fun. If you select an MMS part which does not yet have a corresponding MODX Part and change the MMS part, MODX creates a new Part in the Performance. Handy.

Drum kits

The drum kit situation is a glass half-full.

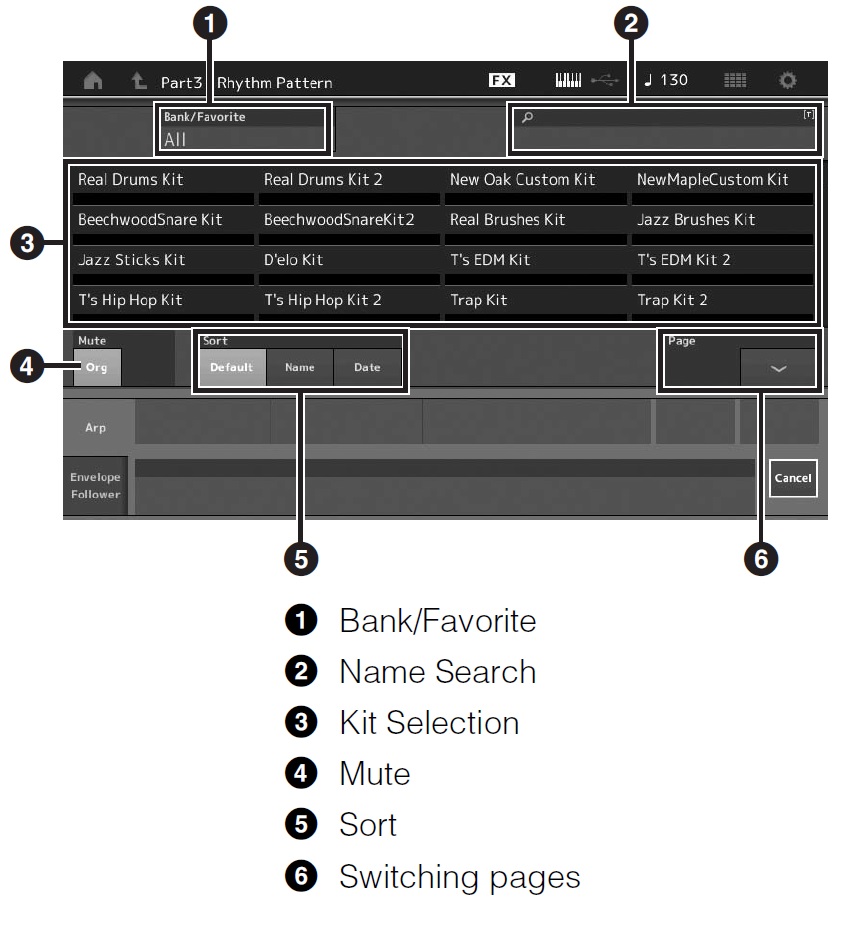
First, the good news. MMS can select 47 drum kits as listed in the table below.

MMS/Motif XF MSB LSB PC# Kit
PRE6 011 63 5 11 Real Drums Kit
PRE6 012 63 5 12 Real Drums Kit 2
PRE6 013 63 5 13 New Oak Custom Kit
PRE6 014 63 5 14 New Maple Custom Kit
PRE6 015 63 5 15 Beachwood Snare Kit
PRE6 016 63 5 16 Beachwood Snare Kit 2
PRE6 017 63 5 17 Real Brushes Kit
PRE6 018 63 5 18 Jazz Brushes Kit
PRE6 019 63 5 19 Jazz Sticks Kit
PRE6 020 63 5 20 D’elo Kit
PRE6 021 63 5 21 T’s EDM Kit
PRE6 022 63 5 22 T’s EDM Kit 2
PRE6 023 63 5 23 T’s Hip Hop Kit
PRE6 024 63 5 24 T’s Hip Hop Kit 2
PRE6 025 63 5 25 Trap Kit
PRE6 026 63 5 26 Trap Kit 2
PRE6 027 63 5 27 Downtempo Hip Hop Kit
PRE6 028 63 5 28 EDM Kit
PRE6 029 63 5 29 House Techno Kit
PRE6 030 63 5 30 House Techno Kit 2
PRE6 031 63 5 31 Electro Kit
PRE6 032 63 5 32 Electro Kit 2
PRE6 033 63 5 33 DUB Kit
PRE6 034 63 5 34 DUB Kit 2
PRE6 035 63 5 35 European EDM Kit 1
PRE6 036 63 5 36 European EDM Kit 2
PRE6 037 63 5 37 Dancefloor Kit
PRE6 038 63 5 38 Dancefloor Kit 2
PRE6 039 63 5 39 Psychodelic Dub Kit
PRE6 040 63 5 40 Brachial Kit
PRE6 041 63 5 41 Epic Kit
PRE6 042 63 5 42 Arab Mixed Kit 2
PRE6 043 63 5 43 Iranian Mix Kit
PRE6 044 63 5 44 Modern Rock Kit 2
PRE6 045 63 5 45 Brazil Kit 1
PRE6 046 63 5 46 Brazil Kit 2
PRE6 047 63 5 47 Turkish St Kit
PRE6 048 63 5 48 New Arabic Kit 1
PRE6 049 63 5 49 New Arabic Kit 2
PRE6 058 63 5 58 Highland Snares

There’s some really great stuff in there. Brachial blows me away!

Unfortunately, the eight zone (“8Z”) kits and many of the bread-and-butter kits like Power Standard Kit are out of reach. The 8Z kits need LSB 13 and the bread-and-butter kits need LSB 16. I’m bummed because I can’t get to my personal favorite, Break Kit. Its MIDI select values are MSB:63, LSB:16, PC#:54.

Hopefully, Yamaha will update Mobile Music Sequencer and we will get access to all of the MODX (Montage) Performances.

In case you’re wondering, I connected my iPad to MODX using the Apple Camera Connection Kit and a relatively ancient IK Multimedia iRig MIDI (5-pin) interface.

Copyright © 2018 Paul J. Drongowski

Yamaha MODX: Creating a split

Yesterday, we learned how to make a two voice layer and how to control one of the Parts using the Super Knob.

Today, I go over the steps to create a two Part split:

1. Press the CATEGORY button and find the Performance that will be used as the left hand voice. For this example, I chose a single-Part Performance, Small Section, from the Strings category. Press PERFORMANCE (HOME).

2. Touch the on-screen plus box button to add the second Part which will be used as the right hand voice. I chose Oboe 3 from the Woodwind category. Press ENTER to confirm your selection.

3. Now it’s time to set the split point. Touch the upper note limit in Part 1. MODX displays a contextual menu on the left-hand side of the screen. Touch the Keyboard menu item, which turns green when selected. Now, play the keyboard key which is the top-most key in the desired left hand zone. If you make a mistake, toch a different key. Press EXIT when finished.

4. Notice that the upper note limit for Part 1 has been changed. The upper note limit in the example is A#2.

By the way, instead of touch the Keyboard menu item, you can set a note limit by spinning the data dial. It’s you choice.

5. Now touch the lower note limit for Part 2. MODX, again, displays a contextual menu with one menu item, Keyboard. Touch the Keyboard item, turning it green (highlighted). Play the keyboard key which is the bottom-most key in the right hand zone (B2 in this example). Press exit when finished.

Play the finished Performance. You should hear the instrument change from Part 1 to Part 2 (or vice verse) as you play across the split point.

If you like the result, press the STORE button and save your new Performance.

While we’re here, let’s change the reverb algorithm. The system-level reverb parameters belong to the Performance as a whole. Thus, we need to make changes in Performance edit mode.

1. Touch the Performance name to select the entire Performance. MODX highlights the box around the Performance name to indicate that the Performane is selected.

2. Press the EDIT front panel button. You should see “Edit – Common/Audio” in the upper left corner of the screen. When you see this, you’re in Performance edit mode.

3. MODX displays six tabs starting with “General,” “Audio In,” etc. Touch the Effect button. MODX displays the effect routing. The diagram is an overview of the system-level effects. If you start with the same example voices, the reverb algorithm is R3 Hall.

4. Touch the Reverb tab in the second column. MODX displays the chosen effect algorithm and the effect parameters.

5. Touch the effect type box. MODX displays a menu of reverb algorithms. Touch HD Hall (or one of the other reverb types) to change the effect algorithm. Press the EXIT button to dismiss the menu.

6. MODX updates the display with the newly selected reverb type and its associated effect parameters. Try a different effect preset just for fun.

7. Press the front panel EXIT button to return to Performance play mode.

If you’re really ambitious, add a layer behind the left and right hand parts. Follow my last step-by-step tutorial and control the background layer using the Super Knob.

One or two final tips. Rename your new performances. I suggest adding one or two characters that identify the performance as one of yours versus the zillions of preset performances. (I use my initials, “PJ”.) I also recommend trying the on-screen “Type” and “Name” buttons just to the left of the Parts. These buttons choose the legend displayed at the top of each Part:

  • Type (highlighted in blue): Performance type (e.g., “Str Ensemble”)
  • Name (highlighted in yellow): Performance name (e.g., “Small Section:

Identifying information should help you keep the Part information mentally sorted. It’s easy to get confused when building a multi-Part Performance where every part is a woodwind (i.e., the same type).

With splits and layers, you’re ready to move mountains. 🙂

ICYMI: MODX screen capture

Like Montage, the MODX has a double-secret Easter egg for capturing screen shots.

  1. Insert a USB flash drive into the USB TO DEVICE port.
  2. Press and hold the A/D INPUT ON/OFF button.
  3. Press and release the AUDITION button.
  4. Release the A/D INPUT ON/OFF button.

The MODX writes screen shots to the USB flash drive with names such as “DSNAP_0.png”.

Here’s two tips. 1. To save wear and tear on the USB TO DEVICE port, I plug a short extender cable into the port and then plug the USB flash drive into the extender cable. The cable brings the port to a place where I can easily reach it and it reduces wear on the port connector. 2. The screen capture procedure doesn’t provide any visual indication that the capture was successful or complete. Use a USB flash drive with an activity LED (e.g., the Kingston Data Traveler Elite G2). You should see the drive’s LED flash when the PNG file is written. Naturally, do not remove the drive when it is active!

Copyright © 2018 Paul J. Drongowski

Easy MODX Super Knob example

I recommend watching one of the MODX tutorial videos recorded by Yamaha’s Blake Angelos. After getting through the usual preliminaries, Blake shows how to create a simple piano and synth pad layer with Super Knob control.

Back on the job, I had a saying when I or another team member got overly enthusiastic during design and implementation. “Let’s build just one of these and get it working. See how it goes. Then, scale up.”

I watched one of Blake’s tutorials (e.g., Kraft Music) and wrote down a few notes. His tutorial is ten minutes well spent; just build one of these. Here are ten steps to Super Knob nirvana.

1. Press the CATEGORY front panel button to find the old Full Concert Grand Performance. Full Concert Grand has only one part. This keeps the demo simple.

2. Press the PERFORMANCE button to go to the home screen. You should see the piano in Part 1. [Click images to enlarge.]

3. Press the on-screen plus box in Part 2 to add the synth pad. MODX displays the CATEGORY search screen where you should navigate to VP Soft in the Strings category. Or, your favorite single part pad! Press the ENTER button to make your selection. MODX displays two parts: grand piano in Part 1 and pad in Part 2.

4. Touch Part 2 to select it. (You may find it easier to navigate to Part 2 using the cursor buttons; I do.)

5. Press the EDIT front panel button to go into Part Edit. You should see “Edit – Part2 – Common” at the top of the screen.

6. Touch the Volume parameter and dial it down to zero. This silences the pad part, which we will put under Super Knob control.

7. Notice that the CONTROL ASSIGN front panel button is lit (turned on). When any controllable parameter is selected on the screen, the CONTROL ASSIGN button will light up.

8. Press the CONTROL ASSIGN button. MODX displays a screen (dialog box) asking you to assign a source controller to the selected destination parameter. In this case, the destination parameter is Part 2 Volume.

9. Turn the Super Knob. This gesture assigns the Super Knob to Part 2 Volume. MODX displays the Control Assign information for the Super Knob. Just like learn mode in a DAW or physical MIDI controller.

10. Press the EXIT front panel button. Play and turn the Super Knob. You should hear the pad volume increase or decrease as you turn the Super Knob. Watch the on-screen assignable knobs change state along with the Super Knob.

If you like the result, press the front panel STORE button to save your brand new Performance.

Easy. One thing to keep in mind is that there are two levels of MODX editing: Performance and Part. Some parameters belong to the Performance and other parameters beong to a Part. The distinction is very similar to the old Motif/MOX Performance and Voice modes although MODX is modeless. MODX stores everything in a unified Performance, but you do need to be conscious of editing at the Performance level versus editing at the Part level.

Copyright © 2018 Paul J. Drongowski

MODX Performance: Latin Flutist

To better understand voice programming, you’ll need to know a few of the abbreviations which appear in waveform names:

Abbreviation Meaning
Stac Staccato (detached)
Of Offset (start after attack)
St Stereo
L Left
R Right
Sw Velocity switched
NV No vibrato

Yamaha have never published an official key for their waveform naming convention, so this is my best educated guess. (Thanks to Phil at YamahaSynth.com for his insights.)

A MODX waveform contains one or more samples laid out in one or more keybanks. The keybanks specify basic trigger conditions for a sample: what range of notes (e.g., C-2 to G8) and what velocity range (e.g., 1 to 127). “Switched” waveforms implement two or more velocity ranges. The Flute4 family of waveforms, for example, offers four different levels: pp, mp, mf, and ff. The switched Flute4 Sw St waveform combines these individual variants into one velocity switched waveform.

Stereo waveforms are so marked (“St”); assume a mono waveform unless explicitly identified as stereo. The left (“L”) and right (“R”) waveforms are the left and right channels of a single sound. In old gear (pre-Montage and pre-Genos), tone generation (TG) channels are mono and two elements (TG channels) are needed to play back stereo. The new tone generator in Montage, MODX and Genos has stereo tone generation channels.

Acoustic instrument samples usually start with the attack portion of the sound followed by the body (and possibly, release). “Offset” means that playback is started at some offset from the beginning, usually after the attack portion. When a musician plays a legato line, the individual note attacks are de-emphasized. Offset waveforms are normally used to simulate legato.

Staccato (and pizzicato) are short samples with a strong attack. These waveforms sound like one-shots without much sustain (i.e., a long body).

Musicians playing real acoustic instruments often add vibrato in the same way that a vocalist adds vibrato. Waveforms for acoustic instruments often have the vibrato “sampled in,” i.e., the player added vibrato when the sound was digitally sampled. Non-vibrato waveforms are marked “NV.”

Finally, you’ll sometimes see “+” and “-” waveforms. These are variants which are slightly detuned sharp and flat, respectively.

Performance: Latin Flutist

All of this may seem like a lot to keep in mind, but in practice, it’s pretty simple. Let’s take a look at the voice programming for Latin Flutist. First, select Latin Flutist, tap the first Part (WW Flute) and hit the Edit button. You’ll see the Common voice parameters. Tap the “All” button in the lower right corner of the screen. MODX displays a table summarizes the active voice elements. (Don’t be a afraid to check out the “Balance” tab, too.)

The “Osc” tab provides much valuable information about the voice elements and how the voice behaves when it is played. The first four elements handle regular (non-legato) notes while the elements 5 through 7 handle the legato case. (Element 8 is not used and is turned off.)

Let’s take the regular (non-legato) case first. The first four elements depend upon the state of the assignable switches in addition to velocity and note range. Note range is not so important here because all elements respond across the full range of the keyboard (C-2 to G8). Elements 2 to 4 are potentially active when both assignable switches are off (A.SW Off). Element 3 triggers when the velocity of the incoming note is between 1 and 80, inclusively. Element 2 triggers when the velocity is between 81 and 127. Each element plays a different waveform giving the intended note a different character depending upon its velocity. Element 4 is a sweetener, triggering when a note is struck hard (velocity between 103 and 127, inclusively). Element 4 adds a stacatto “spit” to hard struck notes.

Whew, this is much harder to say than it is to actually understand or play. 🙂

Elements 5 to 7 handle legato notes. XA control is Legato. If you experiment with Latin Flutist, you’ll notice that the A.SW 1 On case (element 1) takes precedence over Element 7.

Legato notes with velocity 1 to 109 trigger element 7. Element 6 adds a staccato spit for hard struck legato notes. Element 5 is really fun because it adds a flutter tongue for hard struck legato notes. Try to trigger this case. You’ll notice that the second note in the legato sequence must be struck firmly in order to get the spit and flutter tongue. This last case is very similar to one of the Genos Jazz Flute articulations.

The Genos Jazz Flute is a Super Articulation 2 (SArt2) voice. In addition to legato and flutter, the Jazz Flute has wonderful scoop (bend up) and fall (bend down) articulations. One negative. The legato gesture needed to trigger the flutter articulation requires a firm, very deliberate strike on the second key in the legato sequence. I just about have to drill the key through the keybed when touch is set to NORMAL! On Genos, the only recourse is to set touch response to SOFT or EASY; you cannot reprogram the voice’s velocity threshold.

At this point, I hope you can see that the Osc table gives valuable clues about how the Performance can be played, i.e., how to invoke certain specific articulations. Also, if you have trouble hitting keys hard enough to trigger certain articulations, you could lower the velocity threshold for hard struck notes. (A quick fix, of course, is to use the “Soft” or “Wide” Velocity Curves — no edits required.)

Long-time readers know that I often create and post tables like:

El# Waveform          VLow VHigh  NLow NHigh  Level  XA
--- ----------------- ---- -----  ---- -----  -----  ---------
 1  Flute4 NV Sw St      1   127   C-2    G8    117  A.SW1 On
 2  Flute4 Sw St        81   127   C-2    G8    117  A.SW1 Off
 3  Flute3 Sw St         1    80   C-2    G8    127  A.SW1 Off
 4  Flute4 Stac Sw St  103   127   C-2    G8    124  A.SW1 Off
 5  Flute4 Flutter Sw  110   127   C-2    G8    120  Legato
 6  Flute4 Stac Sw St  102   127   C-2    G8    127  Legato
 7  Flute4 Sw St         1   109   C-2    G8    117  Legato

Usually I have to dig for this voice data. The MODX Osc and Balance tables put this critical information right up front. Thank you!

Performance: Concert Flute

Quickly, here is the basic programming information for the MODX Concert Flute Performance. [Click images to enlarge.]

Please note the element 5, 6 and 7 amplitude levels — zero! These element levels are under Super Knob control. Give this Performance a try and you’ll see and hear what I mean.

El# Waveform          VLow VHigh  NLow NHigh  Level Pan  XA
--- ----------------- ---- -----  ---- -----  ----- ---  ---------
 1  Flute4 NV Sw St      1   127   C-2    G8    103  C   A.SW Off
 2  Flute3 Sw St         1   127   C-2    G8      0  C   A.SW Off
 3  Flute4 Sw St         1   127   C-2    G8      0  C   A.SW Off
 4  Flute4 Stac Sw St    1   127   C-2    G8    111  C   A.SW1 On
 5  Flute4 Flutter Sw    1   127   C-2    G8    108  C   A.SW2 On
 6  Flute3 mp St         1   127   C-2    G8      0 L28  A.SW Off
 7  Flute3 mf St         1   127   C-2    G8      0 R28  A.SW Off
 8  Flute4 mp St         1   127   C-2    G8      0  C   A.SW Off

The Super Knob dials up the level for elements 6, 7, and 8 via assignable knobs 2, 3, and 4. The Super Knob also increases the reverb send level via assignable knob 1. Watch the on-screen assignable knobs while turning the Super Knob. You’ll see what it means when people call the Super Knob a “macro control knob.”

The assignable knob and Super Knob programming is a bit complicated and I’ll save further deconstruction of Concert Flute for a future blog post.

Copyright © 2018 Paul J. Drongowski

MODX Theatre Orchestra

Today’s project is reconstructing one of my favorite voices stolen from Genos/PSR: TheatreOrchestra. This voice first appeared in Tyros 3, using waveforms that are roughly contemporaneous with Motif XS (MOX).

The following table summarizes the eight voice elements in TheatreOrchestra. The voice parameters are pulled from the Genos UVF file for the voice.

Element  Low  High Low  High    Vol  Shift  Waveform
-------  ---  ---- ---  ----  -----  -----  -----------------------
   0      C3   G8    1   127   -7.9      0  Flute2 Soft St L (5623)
   1      C3   G8    1   127   -9.8     12  Flute2 Soft St L (5623)
   2      C3   G8    1   127  -12.0      0  [Flute] (4951)
   3     C-2  F#3    1   127   -3.0    -12  Bassoon Hard (5626)
   4      E3   G8    1   127   -6.0    -12  Oboe2 Med V3 (5627)
   5      C5   G8    1   127  -21.4     24  [Glocken] (5124)
   6     C-2   G8    1    68   -9.0      0  p (5248)
   7     C-2   G8   69   127   -9.0      0  f (5249)

The volume (element levels) look a little bit curious and I conjecture that element levels are set relative to 0dB. We’ll need to convert these levels to the range [0:127] with 127 corresponding to 0dB. Naturally, we’ll let our ears be the ultimate judge.

The overall sound is dominated by the woodwinds: 3 flute elements, bassoon and oboe. The bassoon and oboe are transposed down one octave. This imparts a unique reedy character to the sound. However, the lower notes (left hand) get somewhat murky, so in the final voice, I leave the bassoon and oboe in their natural ranges to either side of middle C (approximately).

The string component is not strongly stated. Any old string ensemble would do. The waveform names in the UVF files are not super informative although I suspect use of the OrchStrgs waveforms which were introduced in Tyros 3 and Motif XS.

The glockenspiel adds a nice chime to the high end. The glock always sounds in the original Genos/PSR voice, becoming rather tiresome after a while. I prefer to switch the glock in and out. Also, piccolo is a good alternative, again, being switched in and out.

The next table summarized the eight voice elements in Theatre, a similar voice that I constructed for the MOX6.

Element   Low  High Low  High  Level  Shift  Waveform
-------  ----  ---- ---  ----  -----  -----  ----------------
   1       C2   G8    1   127     90      0  Flute2 Soft St
   2       C2   G8    1   127     80     12  Flute2 Med St
   3       C3   G8    1   127     40    -12  Flute Non-Vib Of
   4      C-2   B2    1   127    100      0  Contrabass R
   5       C3   G8    1   127     50      0  Solo Combi St
   6       C3   G8    1   127     80     24  Glockenspiel  AF2
   7       B2   G8    1   127     65     24  Piccolo       AF1
   8      A#2   G8    1   127    100      0  Oboe 1

The piccolo and glockenspiel are controlled by the Assignable Function buttons AF1 and AF2, respectively. The corresponding element sounds when an AF1 and/or AF2 button is enabled (turned on).

Contrabass and the Motif XS/MOX string Solo Combi replace the string ensemble. The contrabass lends a nice bottom to hold down the bass. It should be played sparsely in the left hand (i.e., no close clusters).

Finally, here is the TheatreOrch voice for MODX. On MOX, I tended to work exclusively in voice mode. MODX is modeless and all programming is made in a Performance. Thus, on MODX, I comp’ed several Performances into a single TheatreOrch Performance, then tweaked the individual Parts. [Click images to enlarge.]

Although Performances are the first class citizens, I still dove into the Parts to make changes at the element level. The string Part is based on the Almighty Performance; I changed the waveforms to OrchStrgs Soft St and OrchStrgs Med St, splitting the patch into two velocity ranges: 1 to 68 and 69 to 127.

The new glockenspiel and piccolo waveforms are much better than Motif XS (MOX). The old glock sounded like a not very well cared for, used instrument bought in a pawn shop. The new glock rings nicely. A sweet alternative is the FM Glockenspiel. If I wasn’t such a traditionalist (!), I would have used it. Maybe in a future variation?

The flute Part (Part 1) is based on the 2 Flutes Performance. I employed older Performances for the oboe and bassoon, too. Since this voice is a blend, detailed isn’t too important and older, simpler voice programming doesn’t cut into polyphony as much as the newer detailed Performance. I prefer the new Performance for exposed solos when high quality is needed and polyphony is not likely to be an issue.

Instead of AF1 and AF2, I created four scenes. Scene 1 mutes both the glock and piccolo, Scene 2 enables the piccolo, Scene 3 enables the glock, and Scene 4 enables both the piccolo and glock. The MODX Scene buttons are close at hand and are an easy gesture away when making changes. The MODX assignable buttons, A.SW1 and A.SW2, are a longer reach.

As I work with MODX, I realize that I need to think more about building block Performances which can be combined (comp’ed) into bigger Performances. For example, it might have been better to start with 2 Oboes & Bassoon in one Part instead of separate oboe and bassoon in two Parts. Similarly, it might have been better to start with Wood Winds + Strings, which combines flutes and strings. By cutting two parts, I could have implemented the voice in four Parts, thereby making Seamless Sound Switching (SSS) possible. I may try this approach as a learning exercise.

Hope you enjoyed this brief dive into MODX Performance programming.

Copyright © 2018 Paul J. Drongowski

Bonus voice: Tutti

Let’s take a quick look at another interesting voice from arranger-land: Tutti. Tutti is a string and horn layer with Timpani in the left hand. High velocity left hand notes trigger a crash cymbal, too.

The following table summarizes the Genos voice programming.

El#  Low  High Low  High    Vol  Pan  Waveform
---  ---  ---- ---  ----  -----  ---  ------------------------
 0   C-2    G8   1   127  -25.9   -1  (4081)  Allegro Strings
 1   C-2    G8   1   127  -25.9    1  (4082)  Allegro Strings
 2   C-2    G8   1   127  -22.9    0  (4102)  French Horn
 3   C-2    F1   1   127  -14.6    0  (4222)  Timpani
 4   C-2    F1 106   127  -20.6    0  (4223)  Crash cymbal

I constructed a similar voice for MOX:

El#  Low  High Low  High    Vol  Pan  Waveform
---  ---  ---- ---  ----  -----  ---  -----------------------
 1   C-2   G8    1   127    105  L63  508  OrchStrgs Soft L
 2   C-2   G8    1   127    105  R63  511  OrchStrgs Soft R
 3   C-2   G8    1   127     90    0  621  French Horn St
 4   C-2   B1    1   127    127    0  137  Timpani Sw St        AF1 ON
 5   C-2   B1  106   127     85    0  2479 Hand Cymbal Open St  AF1 ON
 6   C-2   B2    1   127    101    0       Snare Drum           AF2 ON

     AF1 ON: Enable element 4 Timpani and element 5 Hand Cymbal
     AF2 ON: Enable element 6 Snare Drum

The timpani and hand cymbal are enabled when Assignable Function button 1 (AF1) is on. I added a snare drum hit which is enabled by AF2.

The screenshots below are a quick attempt to implement Tutti on MODX. I haven’t quite figured out the snare drum yet. First world problem: I love the Highland Snares kit and would like to use all of them!

MODX after the first gig

This weekend’s gig with MODX went reasonably well. Among the patches that I tried live, there were many hits and a few misses. Inevitably, there are misses. Some patches sound great at home, but just don’t quite cut it when playing with a painist and/or guitarist.

I’ve been editing and A/B testing my own patches, comparing MODX versions versus the MOX6 versions that are tried and tested. For example, I spent 3 hours tweaking my bread and butter B-3 patch, eventually ditching the “Multi FX” distortion and replacing it with the VCM EQ 501 multi-band equalizer. The “Multi FX” distortion has several EQ options of its own and I just couldn’t find the one to make me happy.

Plus, the “Multi FX” follows the rotary speaker effect. Who the heck puts the distortion after the rotary speaker? (Yamaha, I guess.) The distortion block makes more sense before the rotary speaker (tube overdrive), not after.

I am hooked on MODX Scenes. It was easy to switch B-3 registrations through scenes when playing live — kind of like touching a genuine Hammond registration key. (For the uninitiated, those are the reverse color keys at the left of the lower Hammond keybed.) I intend to make further use of Scenes in order to change up the color of woodwind and brass blends.

The on-screen Live Set buttons are a little thin for my big and busy fingers. Montage has that enormous bank of physical buttons for selection and so forth. Not so MODX and this is one compromise that I’m not too happy about. I’m thinking about doubling up Live Set buttons effectively creating two rows of four buttons. The following image is notional. I have tried this yet. [Click image to enlarge.]

The redundant buttons make each virtual button roughly squarish and bigger at the cost of halving the number of available presets. With the ability to select different solo voices or blends via Scene buttons, I might build eight Performances that each encapsulate several options, like a “Solo Voice” Performance with Scenes for individual solo flute, solo oboe, solo violin and solo cello.

BTW, what’s with all of the PJs in the Performance names? One of the tutorial articles at YamahaSynth.com recommends renaming when you save a Performance, making it easier to discern the original preset from a user Performance. I blew off this advice at first, and sure enough, I had trouble distinguishing between the factory presets and my own user Performances. I decided to add my initials to my user Performances even though you can filter for user Performances in Category Search.

It’s easy enough to comp presets into new Performances. I’m building woodwind and brass blends this way. If you need to delete a Part from a Performance, hold the SHIFT button and touch the Part to be removed. MODX pops up a contextual menu. You cannot delete Part 1 directly. If you need to delete Part 1, swap it with Part 2 first.

You can work quite fast this way. However, you might want to go back and edit the Insert A and Insert B effects for each part. This gotcha snuck by me at first. I found Parts with Tempo Delay and other effects that create sonic muck when playing in a large hall, e.g., the church that I play in. The hall adds its own muck, so I replaced Tempo Delay, etc. with something innocuous like VCM EQ 501 set flat or even THRU.

There’s plenty of discussion about the Montage/MODX “All 9 Bars!” performance on YamahaSynth.com, in case you didn’t get enough in my previous post.

Copyright © 2018 Paul J. Drongowski

And we’re off!

The exploration begins!

Starting in with a new keyboard is like landing on the Moon. What should I explore first?

First stop: Reverb

Effects are critical to good sound. I’ve fallen in love with the Genos™ “Real Small Hall+” effect preset. It just sounds nice to my ears and I want to incorporate it into Performances as I port my MOX voices to MODX. The “Real Small Hall+” preset has a mid-range bump around 700Hz to 800Hz which adds presence.

First off, what the heck is the equivalent effect algorithm on MODX? The Genos “Real Small Hall+” uses the Genos “REAL REVERB” algorithm. Quick comparison between the Genos Reference Manual (RM) and the MODX RM reveals that “HD Hall” is the same as “REAL REVERB”. Frankly, I don’t know why Yamaha names effects differently on different product lines. Slightly bonkers.

MODX provides three presets for “HD Hall”:

  • Large Hall
  • Medium Hall
  • Bright Hall

The “Medium Hall” preset is the closest to “Real Small Hall+”. It’s not the same, so there will be some extra editing ahead. In case you’re wondering, here are the parameter settings for “Real Small Hall+”:

Number Parameter Value
1 Reverb Time 1.3s
3 Initial Delay Time 22.1ms
4 High Damp Frequency 8.0kHz
6 High Ratio 0.8
13 EQ Low Frequency 700Hz
14 EQ Low Gain +6dB
15 EQ High Frequency 800Hz
16 EQ High Gain +4dB
Return Level 64

I would love to make a MODX user effect preset with these specific parameter values. Would sure save a lot of editing…

Of course, I tried these settings and so forth. In the course of investigation, I found it easier to navigate with the MODX cursor keys instead of poking the touch screen. As I mentioned in my last post, the small size of the MODX widgets requires care and precision when tapping the screen. I also noticed that more finger pressure is required than the Genos touch screen. Widgets along the edge of the screen are the most troublesome and maybe I’ll need to re-calibrate the touch panel.

Next step: Rotary speaker effects

One big, lingering question in arranger-land is how to make the PSR/Genos drawbar organ more realistic.

I need to port my B-3 patches, so it made sense to drop into the “All 9 Bars!” Performance. “All 9 Bars!” is a 2-part Performance which marshalls 14 voice elements into a pretty decent B-3 plus Leslie emulation. Part 1 implements the first eight drawbars and part 2 implements the 1′ bar plus some other goodies.

I’ll have more to say about the part programming in another post. In the meantime, here is a screen shot showing the insert effects routing for “All 9 Bars!”. [Click images to enlarge.]

The MODX “Rotary Speaker 1” algorithm is what we could call “the old algorithm.” “Rotary Speaker 2” is the “new algorithm” debuted in Montage. The rotary speaker effect (Insert A) drives the Multi FX (Insert B) algorithm before everything hits the 2-band EQ (flat).

The following screen shot shows the parameters for the “Rotary Speaker 1” effect.

The “Rotary Speaker 1” algorithm includes its own 2-band EQ which gives a kick at 200Hz and 4.5kHz. Thus, the 2-band EQ at the end of the Insert A to Insert B chain is flat.

The next screen shot summarizes the parameter settings for the “Multi FX” effect.

BTW, both the Multi FX and HD Hall reverb were introduced in the Motif XF version 1.50 update. Multi FX is supported in the PSR-S950 (and later) mid-range arrangers, Tyros 5 and, of course, Genos.

The effect routing diagram illustrates one immediate advantage of the Yamaha synth effect architecture over the Genos effect architecture. It is possible to chain two insert effects on Genos, but you need to stand on your head to do it. Also, it’s not easy to chain a distortion effect into the PSR/Tyros “Organ Flutes” mode. These limitations are due to legacy software and the XG voice/effect architecture — and they stick in everyone’s craw like a bad burrito. Yamaha, please?

MODX screen capture

About those screen shots!

Like Montage, the MODX has a double-secret Easter egg for capturing screen shots.

  1. Insert a USB flash drive into the USB TO DEVICE port.
  2. Press and hold the A/D INPUT ON/OFF button.
  3. Press and release the AUDITION button.
  4. Release the A/D INPUT ON/OFF button.

The MODX writes screen shots to the USB flash drive with names such as “DSNAP_0.png”. I don’t know why Yamaha hides this capability. We live in a modern, visual age, after all, and people need to share screen shots through (anti-)social media.

Here’s two tips. 1. To save wear and tear on the USB TO DEVICE port, I plug a short extender cable into the port and then plug the USB flash drive into the extender cable. The cable brings the port to a place where I can easily reach it and it reduces wear on the port connector. 2. The screen capture procedure doesn’t provide any visual indication that the capture was successful or complete. Use a USB flash drive with an activity LED (e.g., the Kingston Data Traveler Elite G2). You should see the drive’s LED flash when the PNG file is written. Naturally, do not remove the drive when it is active!

Copyright © 2018 Paul J. Drongowski

Relationship: Committed

I went in to play the 88 and walked out with the 61.

It isn’t because I don’t like the Yamaha MODX8 — it comes down to repertoire, need and gamey heart rhythm. If I could schlep the Montage 6 (33 pounds), I would have bought the Montage ages ago. 🙂

I dropped by my local GC knowing that they had a MODX6 in stock. I was hoping to try the MODX6, but found an 88-key MODX8 set up and waiting. As it was with the Montage launch, Yamaha laid out a little extra promotional money and the MODX8 was driving a pair of Yamaha HS8 monitors. Nice. Extra nice, it was raining like crazy and nobody was in the store. GC took a little bit away from the experience by hooking up a truly beat-out sustain pedal and cheap-ass cables to the HS8s. Life is never perfect.

The MODX8 is a very nice instrument. I spent 20 or so minutes jamming and generally had a blast. The hand-to-sound connection of the multi-part CFX grand piano is excellent, IMHO. This is a good keyboard for piano. Organ, not so much. The keys cut my hands when doing palm swipes. I played long enough to verify that all of the Montage sound is in the MODX. Thank heavens I had wrung out the Montage quite heavily when comparing Montage versus Genos™ and knew what to listen for.

BTW, I stick by my earlier comment. It’s a long reach to the MODX8’s pitch bend wheel, MOD wheel and assignable function (AF) buttons. This is the only genuinely negative thing that I can say about the MODX8.

Stop arguing on-line about the action. (And DACS. And touch screens.) Go play one. If you like it, buy it. The MODX8 — or any other instrument — is what it is.

I hadn’t really planned to buy the MODX6 that day, but the trade-in offer was quite decent. The dealer also allowed the usual minus 10% off given during GC trade-in, trade-up promotions. I suppose I could have bargained harder…

My first reaction while unboxing — damn, this thing is small and light. The MODX6 is a pound lighter and several inches shorter than my beloved MOX6. Hurray, I can use my current gig bag! Moving the PB and MOD wheels back let Yamaha cut inches from the overall length. I’m surprised that the front-to-back depth was not increased to accommodate the color touch screen. Good industrial design.

The plastic chassis does not feel as robust as the MOX6. This is just about the only negative. The MOX6 has stood up to guitars clunking into it and relatively light travel abuse. I hope the MODX6 will prove to be robust, too. My main gripe is the fit of the plastic end cheeks (end panels). They seem a little flimsy compared to the single molded shape of the MOX6. On the other hand, I think of the 88-key MODX8 as rather sturdy.

Certain compromises are made by all manufacturers when producing a mid-range model and the MODX is no exception. The quarter inch jacks are mounted directly on a printed circuit board (PCB) and are a little wobbly when compared to an up-scale model like the Genos. All of the controls give a nice resistance. If you’re an MOX/MOXF player, you’ll be right at home.

The touch screen is the same size as the Montage, which is smaller than the Genos screen. I’ve been spoiled by the Genos! I made a few tentative experiments at performance editing and find that I need to tap the screen with more care and precision than Genos, simply because the danged on-screen widgets are smaller.

Speaking of editing, I was able to create some layers and splits without cracking the manual. One big “However”. I know the Yamaha voice architecture and approach to voice editing quite well already. A novice will need time to get up to speed. I suggest reading the first chapter or two in the MODX Reference Manual and skim the Owner’s Manual before doing anything.

About the MODX6 keybed. Yes, it’s different than the MOX. Phil Clendeninn, on the Yamaha Synth site, mentioned that the keybed is new, even with respect to the MOXF models. The black keys have a nice texture adding a little “warmth” to the touch. The keybed is similar to the keys belonging to mid-range Yamaha arrangers. Yes, these keys are light and they are not FSX like the Montage and Genos. I don’t think this is a deal-breaker. I can perform palm swipes with ease and found the similar feeling S950 keys to be robust enough.

I’m now in the process of porting over my voices and performances from the MOX6. There is a direct migration path from MOXF to MODX, but not MOX. Yamaha usually support direct migration from the previous generation (singular), not two or three generations back. The port shouldn’t be too bad as I have only ten or so splits/layers built from scratch. All other MOX6 voices are based on factory patches which are present on the MODX, too. Those edits will be simple tweaks like dialing back reverb, extending release times here and there, etc. I eventually want to exploit the shining beacon known as the “Super-Knob” and scenes. In the meantime, I’ll be happy to start small and build Live Sets equivalent to my MOX6 set-up.

So, there you have it — my first report from the field.

Before signing off for today, I’d like to say “Goodbye” to an old friend: the PSR-S950 that I traded in. I had a lot of quality time with that ‘board and some lucky customer is going to get a gently used instrument. So long!

Update. Literally. The MODX6 had version 1.00 installed. I decided to update to 1.10 before creating too many performances and the possibility of losing data. First, the download from Yamaha was extremely slow. The first two downloads failed. Next, the read me document recommends formatting the USB flash drive on the MODX. USB drive usage information is split between the Owner’s Manual and the Reference Manual. I had to search on “format” in order to find the relevant text in the Reference Manual. The Reference Manual doesn’t have an index! Finally, the formatting directions are minimal (2 sentences?) and are not easy to understand.

Actually, I need to ding Yamaha for the overall quality of the Owner’s and Reference Manuals. The grey-scale screenshots are so small as to be unreadable and unusable. Both documents read like a direct translation from Japanese and both documents need to be edited by a native English tech writer.

Copyright © 2018 Paul J. Drongowski

MODX aftermath

After a veritable explosion of Yamaha MODX information on the Web, there isn’t too much new to say! One useful tidbit is MODX availability. Yamaha expect MODX to be available at retailers around September 27. Another tidbit is to download the MODX version 1.10 updater from the Yamaha support site, if you need it.

Folks shouldn’t forget the John Melas Montage/MODX tool set. Amidst all of the hoopla, John quietly released an updated tool set with MODX support. This is good news since it provides a MODX librarian, performance editor, Live Set editor and waveform editor — available separately or bundled. (Please see his Web site for details.)

I watched a little bit of the MODX launch live stream — enough to be duly impressed by DOMi. What a player! Her demo made a good background while I pulled together another donation to LIVING COMPUTERS: museum + labs. One take-away — it’s a long reach to the MODX8 PB/MOD wheels. The engineers needed the extra depth to accommodate the weighted keyboard action. Folks interested in the 88-key model should take this into account.

On Saturday, I spent an hour or so watching demo videos. For my purposes, the video by Blake Angelos (Yamaha) for Guitar Center is the best. He showed how to pull together an orchestral layer with Super Knob control. This is information that I can use. Thanks, Blake! Yamaha have really kept him running with the MODX launch.

Even though emphasis is on EDM and other pop — which pays the bills at Yamaha — there are very fine orchestral instruments hiding in plain sight on the Montage and MODX. In this regard, the Montage/MODX and Genos™ share sonic DNA by way of the underlying waveforms (AKA “the samples”). The separate product lines employ the waveforms in different ways (Extended Articulation versus Super Articulation), but the sound quality is amazing overall. Having worked with Genos over several months, it’s like an orchestral VST in a box, completed with scripted, articulated voices. Quite pleased.

I have such regard for the Montage acoustic instruments that I very seriously considered buying a Montage for my church gig. I passed mainly due to the weight and schlep factor. The MODX6 is a slender 14.6 pounds, a bit less than the MOX6 that I now transport and play. The MODX is a contender.

While evaluating Montage, I listed the new waveforms added to Motif XF and the new waveforms added to Montage. I was trying to decide if it made sense to upgrade to Motif XF on close-out or to go for Montage. [I decided to wait.] I’ll be using these tables, again, to compare MODX versus MOX because the MODX has the same waveforms and performances (voices) as Montage. Frankly, I don’t think there’s much question about “if”, so much as “when” to upgrade from MOX.

These are highly technical instruments. As a user, the Genos user interface (UI) is similar enough to the Tyros/PSR UI that I didn’t much too trouble making the transition from S950 to Genos. The transition from MOX to MODX is going to be a much bigger task, especially since I want to take advantage of scenes and macro control (AKA “the Super Knob”). Fortunately, the MODX UI is essentially the same as the Montage v2.5 UI and Yamaha have provided a fair number of “Mastering MODX” videos and resources on Day 1.

Copyright © 2018 Paul J. Drongowski

Yamaha MODX announcement

I’m going to update this page as information rolls out.

The Yamaha MODX Owner’s Manual is now available in the Yamaha manual library. No Data List PDF (yet). Once we have the Data List, we’ll be able to do a better comparison of effect types versus the Montage. Yamaha added a number of effect algorithms through updates and, of course, we’re hoping that the MODX will have the same arsenal.

After taking a quick side-by-side pass through the MODX Owner’s Manual, it’s clear that the MODX has much of the on-screen Montage user interface. The MODX and Montage code base is now the same and this should help Yamaha to swat bugs on both platforms and to reduce internal software development costs.

New to the MODX user interface are Rhythm Patterns. Quoting the MODX Owner’s Manual:

The [Rhythm Pattern] button provides a simple way to add a rhythm part to the current Performance. By combining rhythm patterns and the Envelope Follower, you can modify the patterns even further.

Use this button to call up the Rhythm Pattern display. You select the Rhythm Pattern you want to use, and then press [PERFORMANCE (HOME)] button or [EXIT] button to set the selection.

Seems to be a way to get a beat going quickly and is an enhancement of the existing arpeggio mechanism. [Click image to enlarge.]

Rest assured. There is a performance recorder/sequencer which is the (nearly) the same as Montage (MODX: 128 songs, Montage: 64 songs). Lack of a full sequencer (a la Motif/MOX) will disappoint some. I intend to keep my MOX6 and trusty QY-70.

The on-screen Live Set operation is identical to Montage. As noted before, the MODX drops the extensive bank of front panel buttons on the Montage. The Montage’s physical buttons mirrored the operation of the Live Set on-screen buttons, etc. I’ll have to try switching patches on-the-fly using the touch screen alone to determine if this is an acceptable compromise for me. I rely on quick changes when I play and I don’t always know in advance what voice I’ll be using. I’m an improvisational orchestrator.

Also as noted earlier, there are four sliders instead of eight. Front panel buttons select between part group 1 to 4 and group 5 to 8 in order to control part volume via the sliders. Again, some operational compromises due to cost saving as there are fewer direct access controls on the MODX. The MODX also has fewer SHIFT functions due to the elimination of the Montage’s front panel button matrix.

On-line retailers are beginning to offer the MODX on pre-order. Yamaha is going to sell a lot of these!

USA pricing table:

MODX6 MODX7 MODX8
MSRP (list) $1,649 USD $1,899 USD $2,399 USD
MAP (street) $1,299 USD $1,499 USD $1,899 USD
Weight 14.6 pounds 16.3 pounds 30.4 pounds

Yamaha MODX vs. Montage table:

Feature MODX Montage
Display 7″ WVGA color TFT 7″ WVGA color TFT
AWM2 poly 128 128
FM-X poly 64 128
SSS 4 parts 8 parts
Faders 4 8
Encoders 4 8
Buttons 4 8
Ribbon No Yes
USB audio in 4 channels (2 stereo) 6 channels (3 stereo)
USB audio out 10 channels (5 stereo) 16 channels
Sampling frequency 44.1kHz Up to 192kHz
ADC inputs 2 2
Dual insert effects 12 parts+A/D 16 parts+A/D
Waveforms 6,347 6,347
Waveform ROM 5.67GB 5.67GB
Flash ROM 1.00GB 1.75GB
User Performances 640 640
Library Performances 5,120 5,120
Scenes 8 per Perf
Arpeggios 10,239 10,000+
Simultaneous Arps 8 8
Perf Rec Songs 128 64
MIDI IN,OUT IN,OUT,THRU
Output Unbalanced Balanced
Keyboard Synth FSX
Aftertouch No Yes
Weight 61-key 14.6 pounds 33.1 pounds

Copyright © 2018 Paul J. Drongowski