Boston Music Expo 2018

After having so much fun last year, I couldn’t pass up the 2018 Boston Music Expo (Saturday, June 9). Music Expo brings people together — artists, producers, engineers, composers, tech companies — the whole panoply of folks at the intersection of musical art and technology.

Sound On Sound Magazine is the chief sponsor. This year’s gold sponsors are Yamaha and Steinberg. Of course, both Steinberg and Yamaha were showing their wares along with many other companies big and small.

Loïc Maestracci — the founder of Music Expo — was at the door with the chance for a quick “Hello!” Let’s get started and go in.

Boston Music Expo 2018 was hosted by The Record Co., located in Boston’s South Bay. The Record Co. has the ambitious mission “to build a sustainable, equitable music scene in Boston.” Although Boston already has a busy scene, it isn’t easy for all artists to grow, collaborate and record. The Record Co. provides subsidized studio space, gear and production resources, thereby lowering the financial barrier for artists looking to record.

The Record Co. has two studios, both kitted out with top-notch gear. Rates are very reasonable. The Studio A live room is quite large and was the venue for one of the two parallel seminar tracks running at Music Expo. Studio A held 40 to 50 seats with space to spare. Studio B is smaller and more intimate.

The thing that I like best about Music Expo is the surprises. While getting my bearings, I was blown away to find people soldering! I had stumbled into the Audio Builders Workshop sponsored by the Boston Chapter of the Audio Engineering Society (AES).

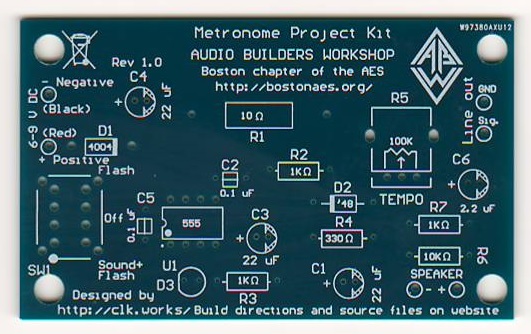
The Audio Builders Workshop offers seminars and group builds to encourage and inspire people to make their own audio electronics. I had a great chat with Brewster LaMacchia (Clockworks Signal Processing) who was leading the group build. The workshop participants were building a small metronome kit ($10 donation). The kit consists of a circuit board, 555 timer, speaker, battery connector, and a handful of discrete components. It’s all through-hole construction and looks like a great way to get started with soldering. If you’re in the Boston area and have an interest in audio electronics, then I definitely recommend getting in touch with this organization.

I bought one of the kits and will eventually build and review it. Sometimes I just like to soldering something up on a rainy day.

Another organization at Music Expo that deserves recognition and support is Beats By Girlz. BBG is a “music technology curriculum, collective, and community template designed to empower females to engage with music technology.” BBG sponsors workshops and other events (hardware and software provided!) to get women and girls into music production, composition and engineering.

That last “E” for “engineering” gets me fired up! Music technology, for me, is the gateway drug to Science, Technology, Engineering and Mathematics (STEM) education and careers. Women are so woefully underrepresented in STEM that I wholeheartedly support groups like Beats By Girlz. In addition to Boston, BBG has chapters in Minnesota, Los Angeles, New York and Chicago. I recommend Women In Music, too, BTW.

I arrived at Music Expo a little later than expected due to a traffic tie-up on the expressway. (Saturday morning? Really?) However, I did manage to catch the two sessions in which I was most interested.

Since it was first announced, I wanted to see and hear Audionamix Xtrax STEMS in action. I’ve tried to spice up my backing tracks with vocal snippets and found center extract (and center cancel) techniques lacking. My first “must-hear” session at Music Expo was an Xtrax STEMS plus Ableton Live presentation by Venomisto. Venomisto used Xtrac STEMS to pull a vocal stem from an existing song and then inserted the vocals into his own remix. Xtrax STEMS is not perfect, but it’s darned good for the money ($99 USD).

I really dug Venomisto’s latin remix, Havana. Toe tappin’, head noddin’. I love this stuff on a Saturday in the city! [I’m listening to it right now and can’t get back to work.] Cruise over to his site and you’ll hear Xtrax STEMS in action, too.

My second “don’t miss” session was “From Score To Stage” by Paul Lipscomb joined by Pieter Schlosser via Skype. Paul ran through the process of sketching and delivering the “Destiny 2” game soundtrack (Bungie Software). Wow, this session could have been a full day.

Although Paul wanted to show people that there are many ways to work and create as an artist, we’re talking “Production” here with a capital “P”. The Destiny 2 soundtrack is a AAA (big) budget production with multiple composers, orchestrators and an orchestra. All I can say, if you want to do this kind of work, be good at the hang and collaboration. Be prepared to work in a geographically dispersed team: client (Bellevue/Seattle), co-writers (Los Angeles, Seattle), orchestrator (The Berkshires in Massachusetts).

Paul classifies music (and the process of getting there) as either linear or interactive. Music for film or video is linear, having a start point, several intermediate points one after another and an end. Game music is interactive and must adapt and re-structure itself to fit the actions of the player.

He demonstrated how one can start with a simple motif (or two) and build your way to a 250 track behemoth. Thanks to the wonderful orchestral libraries available today, composers can put together a rather complete mock-up to present to a client for approval. Even on a big budget job, some of the parts in the mock-up may make it to the final mix simply because there isn’t enough money available to fund everything live (e.g., you can have the orchestra, but not the choir).

Paul uses Steinberg Nuendo and swears by it. Pieter uses Cubase. Nuendo is the bigger brother to Cubase and is geared for post-production and scoring. Paul exports MIDI tracks and provides them to the orchestrator for notation. Yep, good old MIDI.

Paul and Pieter’s presentation was thought provoking, especially about the current state/direction of orchestral music for film, video and games. A discussion about clients and aesthetics would be more appropriate for the “Notes From The Deadline” column in Sound On Sound. [My favorite SOS column, BTW.] However, I’m pondering the age-old question of how to raise our clients to a higher level of musicality. Like Paul, many of us listen to a wide range of music including traditional and modern classical music. (Paul’s advice: “Listen to everything!”) How can we move our clients beyond the limited scope of their own musical experience?

Well, shucks, that’s just two of the fifteen Boston Music Expo sessions on offer. Several sessions dealt with the business side — promotion, social media and collaboration — in addition to the artistic side.

I spent time cruising the exhibitor booths. Here’s a few short-takes and shout-outs:

  • Scott Esterson at Audionamix demonstrated Instant Dialog Cleaner (IDC) as well as XTrax STEMS. He humored a lot of my crazy questions and comments. Thanks.
  • The Yamaha folks had Montage6, MX88, MOXF8 and a clutch of Reface keyboards available for trial. Friendly as ever, it was good to touch base. I had an extended conversation with Nithin Cherian (Product Marketing Manager, Steinberg) and I quite appreciate the time that he spent talking with me.
  • The IK Multimedia iLoud Micro Monitors are excellent for the price. Not quite up to the Genelec studio monitors on show in the room next door, but much more affordable. A definite covet.
  • Speaking of IK, the iRig Keys I/O have a decent, solid feel and touch. The 25 key model is seriously small and still has full size keys. Suggestion to IK Multimedia: Please bring out a 5-pin MIDI dongle for us dinosaurs with old keyboards. I’d love to hook up an iRig Keys I/O 49 to Yamaha Reface YC.

A special shout-out to Derrick Floyd at the IK Multimedia booth. He epitomizes “good at the hang.”

I said it last year and I’ll say it again, Music Expo bridges the widening gap between customers and technically advanced products. On-line ads and videos just aren’t the same as playing with a product and experiencing it for one’s self. Brick and mortar stores cannot devote much space, inventory or expertise to the broad range of fun tools and toys that are up for sale. With on-line sales as perhaps the dominant sales channel, whoof, tactile customer experience is utterly lost. Music Expo closes the gap.

If Music Expo is coming to your corner of timespace, please don’t hesitate to attend and participate. I’m sure that you will enjoy the experience and will make valuable connections.

Copyright © 2018 Paul J. Drongowski

Which guitar is which?

I hope my recent post about single coil and double coil guitar tone and amp simulators was helpful. Today, I want to further reduce theory to practice.

A quick recap

Guitar pickups are important to overall guitar tone. There are two main types of pickup: single coil and double coil. Players generally describe the sound of a single coil pickup as bright or thin and describe the sound of a double coil pickup as warm or heavy. Double coil pickups are also called “humbuckers” because the design mitigates pickup noise and hum. Pickup tone tends to favor certain styles of music:

  • Single coil: Blues, funk, soul, pop, surf, light rock and country styles
  • Double coil (Humbucker): Hard rock, metal, punk, blues and jazz styles

Of course, there are no hard and fast rules and exceptions abound!

Fender guitars frequently use single coil pickups while Gibson favors double coil. Three guitar models are favorites and are in wide use:

  • Fender Telecaster (Usually 2 single coil pick-ups): Bright, banjo-like tone, twangy.
  • Fender Stratocaster (3 single coil pick-ups): Bright, cutting tone.
  • Gibson Les Paul (2 humbucker, dual coil pick-ups) Warm tone with sustain.

The Telecaster was originally developed in 1951 for country swing music. It was quickly adopted by early rock and rollers. The Stratocaster appeared in 1954, but is usually associated with 60s rock. It is often used in rock, blues, soul, surf and country music. The darker tone and sustain of the Les Paul make it suitable for hard rock, metal, blues and jazz styles.

These aren’t the only (in)famous guitars around. The Rickenbacker solid and semi-acoustic models are also classic. Think about the chime-y Beatles and Byrds radio hits from the 1960s. Single coil Ricks are not uncommon.

If you would like to hear the difference in raw tone between Fender Telecaster (single coil), Fender Stratocaster (single coil) and Gibson Les Paul (double coil humbucker), cruise over to this comparison video. The demonstrator compares raw tone starting at roughly 7 minutes into the video, ending at about 11 minutes. The first part of the video is the usual yacking and the last part of the video puts the guitars through an overdrive effect with the demonstrator playing over a backing track. The last part is less informative because our ears need to sort out the guitar from the backing track. Plus, once you put a guitar into a distortion effect, all bets are off. Are you hearing the true guitar tone or just an effected, synthesized tone?

Method to the madness

My ultimate goal is to identify and classify synth and arranger guitar voices, single coil vs. double coil, in order to quickly chose an appropriate guitar voice (patch) for MIDI sequencing. I work with Yamaha gear (Genos workstation, PSR-S950 arranger, and MOX6 synthesizer), so the following discussion will focus on Yamaha. However, you should be able to apply the same method (and guesswork about names!) to Korg, Nord, whoever.

Yamaha provides some major clues as to the origin of its guitar samples, but they are quite reticent to use brand names. Arranger (Genos and S950) voice names are especially opaque. Therefore, the best we can do is to use the clues when possible and to always, always use our ears.

Fortunately, the deep voice editing of the MOX6 lets me dive into the guts of a guitar patch to find the base waveform information including waveform name. In order to get the analysis started, I went into the Mega Voice patches to find the underlying waveforms. When Yamaha sample a guitar, they sample multiple articulations (open string, slap, slide, hammer on, etc.). The waveforms for a particular instrument are a family and share the same root name like “60s Clean.” Given the base waveforms, I then can identify regular synth voices which use the same waveforms. The regular voices are more easily played on the keyboard than Mega Voices, making it easier to perform A/B testing.

Mega Voices are a good entry point for analysis because the MOX, Motif and Montage family have roughly equivalent Mega Voices as the S950, Tyros and Genos product family. This allows A/B testing across and within product lines.

Development history is important, too. I took note of new Mega Voices added to each product generation. Each new Mega Voice is a new waveform family. Given a Mega Voice, I look for new Super Articulation (SArt) voices which were also added at the same time and try to find the SArt voices which are based on the Mega Voice. The chosen SArt voices become reference sounds for further A/B testing and starting points for voice selection when sequencing a song.

When A/B testing, all EQ, filter and DSP effects (including reverb and chorus) must be turned OFF. We need to reveal the sound of the underlying raw waveforms (samples). Even so, there may still be sonic differences due to VCF and VCA programming. I found that this kind of critical listening is quite tiring and it’s better to work for 30 minutes, walk away and come back later with fresh ears. Otherwise, everything starts to sound the same!

Breakdown

Enough faffing around, get to the bottom line.

First up is a correspondence table between Montage (Motif, MOX) Mega Voice guiters and Genos (Tyros, PSR S-series) Mega Voice guitars.

       Genos name            Motif/MOX name        Motif/MOX waveform
---------------------------  --------------------  ------------------
8 10 4 60sVintage                                  n/a [Strat]
8 11 4 60sVintageSlap                              n/a [Strat]
8  4 4 50sVintageFinger                            TC Cln Fing *
8  5 4 50sVintageFingerSlap                        TC Cln Fing Slap
8  6 4 50sVintagePick                              TC Cln Pick *
8  7 4 50sVintageSlap                              TC Cln Pick Slap
8  8 4 SlapAmpGuitar       
8  3 4 SingleCoilGuitar      Mega 1coil Old R&R    1Coil *
8  1 4 SolidGuitar1          Mega 60s *            60s Clean *
8  2 4 SolidGuitar2          Mega 60s *            60s Clean *
8  0 4 CleanGuitar           Mega 1coil *          Clean *
8  0 7 JazzGuitar            Mega Jazz Guitar      Jazz *
8  0 5 OverdriveGuitar       Mega Ovdr Fuzz        Overdrive *
8  0 6 DistortionGuitar      Mega Ovdr Distortion  Distortion *

A star (“*”) in the table is a placeholder for all of the voices and variants within a family. Motif/MOX have many variants of “Mega 60s” and “Mega 1coil” voices. They all use the “60s Clean” and “Clean” waveforms in different ways, including different stomp box and amplifier effects. A star in the waveform column denotes a waveform family, i.e., collectively a group of waveforms for all of the articulations sampled from the same instrument.

A few observations. Montage did not add any new guitar Mega Voices. Montage does not have a Stratocaster waveform. [A future upgrade for Montage?] Finally, I couldn’t quite work out where “SlapAmpGuitar” fit into the voice universe.

“Slap,” by the way, is a playing technique borrowed from bass players. The thumb hits a string instead of a pick or finger. Usually the lowest string is slapped because it is the most easily hit by the thumb. The slap may be combined with palm or finger muting to prevent other notes/strings from sounding with the slap.

Beyond Mega Voice

Folks know by now that Mega Voices are for styles and arpeggios. Yamaha never intended them to be played using the keyboard. It’s darn near impossible to play with the kind of precision required to trigger the appropriate articulation (waveform) when needed. They’re good for sequencing (styles, arpeggios) because a sequence can be edited in a DAW with precise control over note velocities.

None the less, musicians wanted to be able to play these great sounding voices and Yamaha responded with Expanded Articulation (Motif XS and later) and Super Articulation (Tyros 2 and later). I won’t dive into Expanded Articulation here. Super Articulation, however, effectively puts a software script in front of a Mega Voice. The script translates each player gesture to one of the several articulation waveforms which comprise a Mega Voice.

This description is notional. I doubt if the software uses an actual Mega Voice as the target. Some gestures like legato technique are handled in the AWM2 engine à la Expanded Articulation.

If you followed my suggestion to audition the Mega Voices without EQ, effects, etc., then you surely know how difficult it is to play a Mega Voice from the keyboard. Should you try this, I recommend setting the touch curve to HARD in order to hit those ultra low key velocities. Or, set RIGHT1, RIGHT2 and RIGHT3 to a fixed velocity. By changing the velocity level, you’ll be able to play a specific waveform within a Mega Voice precisely and reliably. Please refer to the Mega Voice maps in the Data List file to see the correspondence between velocity levels and waveforms.

To audition without Mega Voice and to select Genos (Tyros, S950) voices for sequencing, it’s far easier and fun to play a Super Articulation (SArt) voice. Problem is, with Yamaha’s opaque voice naming, it’s difficult to know the exact waveform family you’re triggering. So, I built a table of SArt reference voices by matching SA voices with their Mega Voice equivalent.

Genos Mega Voice      SArt reference   Waveform
--------------------  ---------------  ------------------------
60sVintage            60sVintageClean  [Strat]
60sVintageSlap        TBD              [Strat]
50sVintageFinger      CleanFingers     TC Cln Fing *
50sVintageFingerSlap  FingerSlapSlide  TC Cln Fing Slap
50sVintagePick        VintageWarm      TC Cln Pick *
50sVintageSlap        TBD              TC Cln Pick Slap
SlapAmpGuitar         TBD              TC Cln Fing Slap Amp/Lin
SingleCoilGuitar      SingleCoilClean  1Coil *
SolidGuitar1          WarmSolid        60s Clean *
SolidGuitar2          WarmSoild        60s Clean *
CleanGuitar           CleanSolid       Clean *
JazzGuitar            JazzClean        Jazz *
OverdriveGuitar       TBD              Overdrive *
DistortionGuitar      HeavyRockGuitar  Distortion *

Single coil vs. double coil? That’s easy. The only double coil guitars are SolidGuitar1, SolidGuitar2, and any SArt voice built on the 60s Clean waveform. All other guitars are single coil.

Hmmm. I’ll bet that a double coil Gibson Les Paul and/or Gibson SG are in the works. Yamaha will eventually fill the gap!

A few entries in the table are TBD, “to be determined.” Definitively identifying slap guitar has eluded me so far. I can hear a difference between non-slap and slap, but finger slap vs. picked slap, my ears aren’t there yet.

All in all, it was a useful exercise to strip away the effects and EQ. It reminds me of the scene in the documentary “It Might Get Loud” in which The Edge demonstrates his effects pedal board. First, the plain tone of the guitar, then the huge sound with all of the effects piled on. Thanks to the tech built into our keyboards, we can be a little bit like The Edge.

Copyright © 2018 Paul J. Drongowski

Single coil, double coil

Today’s exploration is practical even if it is excessively wonk-ish.

Last week, I decided to update MIDI sequences for a few classic tunes by The Alan Parsons Project. Parsons and Eric Woolfson laid down 70s progressive rock tracks with serious groove: “I Wouldn’t Want To Be Like You,” “What Goes Up”, and “Breakdown”. Classic in their own right are the guitar solos by Ian Bairnson. Bairnson contributed electric guitar (and the occasional saxophone!) to the Parsons/Woolfson wonder duo.

I’m striving for authenticity, so one of the first questions to ask is “What guitars and amplifiers did Bairnson use for the I Robot and Pyramid albums?” Fortunately, Ian has a page dedicated to his gear. Very likely, he played a Les Paul Custom through a Marshall 50 head driving a 4×12 Marshall angle-front cabinet. Thanks for posting this information, Ian!

The next hurdle is searching through the many tens (or hundreds) of synth guitar patches, amp simulators and speaker cabinet sims to find the most authentic audio waveforms and signal processing effects. Bang, we run into a practical and wonk-ish problem: Which of these many digital choices are likely candidates and which choices can we ignore? Unfortunately, manufacturers (at the very least, their attorneys) make the search difficult by avoiding any use of brand names (e.g., Gibson, Fender, Les Paul, etc.) in patch and effect names. Sometimes the patch/effect names are suggestive euphemisms, most times not.

For these kinds of sequencing jobs, I’m arranging on Yamaha gear, either PSR-S950 or Genos. Although I love their sound, it’s seems that Yamaha have deliberately gone out of their way to divorce patch/effect names from their real-world, branded counterparts. The number of candidates is small in organ-land, i.e., “Organ flutes,” as Yamaha calls them, mean Hammond B-3. The number of candidates in guitar-land is much, much larger and harder to discern.

Here’s some info that might help you out. Kind of decoder for guitar instrument and amp/cabinet sim names. Even though I looked to authoritative sources, there’s still guesswork involved. So, apologies up front if I’ve led anyone astray.

Single vs. double coil

This is a biggy. Guitarists are ever in pursuit of “tone.” Of course, a big part of tone is the electric guitar at the front-end of the signal chain. In this analysis, I’m concentrating mainly on solid body guitars and I’m ignoring acoustic, hollow-body and semi-hollow instruments.

Some might argue that player style, articulations and dynamics are the true front-end. If you want to argue that point, please go to a guitar forum. 🙂

For solid body, the choice of pick-up is important. If you’re not familiar with electric guitars, the pick-up is the set of wire coils beneath the guitar strings that sense vibrating strings and convert mechanical vibration to electrical vibration. The electrical signal is sent to a volume/tone circuit and then on to a guitar amplifier. A guitar may have more than one pick-up, say, one pick-up by the neck, one under the bridge and one in the middle between the two. The pick-ups may be switched into alternative combinations. Along with the volume/tone controls, the tonal possibilities are nearly endless.

Seems kind of pathetic to rely on only one or a few guitar waveforms (samples), doesn’t it?

There are two main kinds of pick-up: single coil and double coil (humbucker). The humbucker was invented and patented by Gibson as a means of mitigating the noise (hum) present produced by a single coil pickup. The sound of a single coil pick-up is often described with terms like “bright,” “crisp,” “bite,” “attack.” Double coil pick-ups are described as “thick,” “round,” “warm,” “dark,” “heavy.”

Due to parentage, Gibson guitars usually have double coil pick-ups. Fender guitars usually have single coil pick-ups. Naturally, the quest for tone has led to hybrids using both kinds of pick-up, regardless of manufacturer.

Reducing these observations to practice, when Ian Bairnston says he used a Gibson Les Paul Custom for his work with The Alan Parsons Project, we should be looking for samples (waveforms) of a double coil electric guitar, of which the Les Paul is an excellent example. Even if you couldn’t give two wits about synth patch names, use your ears an listen for a thick, round, warm, dark, heavy tone.

Detective work

OK, I’m a wonk and did a little detective work.

Yamaha arranger patch names are obtuse about single vs. double, etc. Worse, the voices are pre-programmed with DSP effects which mask the characteristics of the fundamental waveform. So, step zero is to be aware of the masking and turn off all EQ, DSP, chorus and reverb effects when listening and making comparisons.

Doubly worse is the lack of deep voice editing where we can deep dive a voice and discover the basic waveforms underlying a voice patch, including the waveform names. This is where my trusty Yamaha MOX6 synthesizer comes into play. I use the MOX6 to deep dive its patches and then compare patch elements against candidate voices on the PSR-S950 arranger. This always leads to interesting discoveries.

Although I refer to the MOX specifically, please remember that the MOX is a member of the Motif/MOX family. Comments can be extrapolated to the Motif XS on which the MOX is based, and the Motif XF/MOXF which are a superset of the Motif XS/MOX.

A large number of MOX programs have “Dual Coil” in their name. These programs are based on the “60s Clean” waveforms. Think of “60s Clean” as a family of waveforms with multiple articulations: open strings, slide, slap, FX, etc.

Other MOX programs are “Single Coil”. These programs are based on the “Clean” family of waveforms. If you listen and compare “60s Clean” versus “Clean,” you can hear the difference between single coil and double coil. The voice programming switches between the waveforms depending on key velocity, articulation buttons, and so forth.

The “60s Clean” and “Clean” waveform families make up the “Mega 60s Clean” and “Mega 1coil Clean” MOX megavoices, respectively. Please recall that a MegaVoice uses velocity switching, articulation switches (AF1 and AF2) and note ranges to configure a versatile voice suitable for arpeggio and style sequencing. Given the underlying waveforms, we can conclude that Mega 60s Clean is dual coil and Mega 1coil Clean is single coil.

Mid- and upper-range Yamaha arranger workstations also have MegaVoices, albeit they may have small differences in patch programming. The fundamental waveforms, however, are the same. Yamaha, like all manufacturers, recycle waveforms (samples). It’s not that older waveforms are bad; they provide backward compatibility and legacy support. Ever increasing waveform memory capacity makes it easy and inexpensive to include legacy waveforms and voices.

Given that conceptual basis, I did a little A/B testing between the MOX synth and the S950 arranger. Here is a summary of the correspondence between guitar voices:

    PSR-S950 Voice     MOX6 Voice
    -----------------  ---------------------
    MV CleanGuitar     Mega 1coil Clean

    MV SolidGuitar1    Mega 60s Clean
    MV SolidGuitar2    Mega 60s Clean

    MV SingleCoil      n/a
    MV JazzGuitar      n/a

    MV OverdriveGtr    Mega Ovdr Fuzz
    MV DistortionGtr   Mega Ovdr Distortion

    MV SteelGuitar     Mega Steel
    MV NylonGuitar     Mega Nylon

This is what my ears tell me when all of the EQ, DSP, chorus and reverb effects OFF.

MV SolidGuitar1 and MV SolidGuitar2 are based on the same waveform. The patch programming is different: different EQ, VCF and VCA parameter values. The default DSP effects are different, too.

Naturally, you’re curious about the missing S950 MV SingleCoil and MV JazzGuitar voices in the MOX6 column of the table. The MOX does not have equivalent voices. However, the Motif XF eventually added “Mega 1coil Old R&R” and “Mega Jazz Guitar”, both patches based on new single coil and jazz guitar waveform families. Indeed, the MV SingleCoil is great for that old rock’n’roll twang.

Hey, S950 owners! I’ll bet that you didn’t know that you have a piece of the Motif XF under your fingertips.

[I’m still categorizing SArt voices as single or double coil. Watch this space.]

Amplify this!

That’s it for the front-end of the signal chain. What about amp simulation?

The riddle of amp sim names is difficult to solve. Fortunately, guitarists are positively obsessive about vintage amps and the Web has many informative sites. (Too many, perhaps?) Armed with a few clues from the Yamaha Synth site, I forged out onto the Web and arrived at these educated guesses about amp simulators:

    DSP effect/sim      Real-world
    ------------------  ---------------------------------
    US Combo            Fender (Bassman?)
    Jazz Combo          Roland Jazz Chorus
    US High Gain        Boutique (Mesa Boogie Rectifier?)
    British Lead        Marshall Plexi
    British Combo       Vox (AC30)
    British Legend      Marshall (Bluesbreaker? JCM800?)
    Tweed Guy           Fender 55 Tweed Deluxe
    Boutique DC         Matchless DC30 (Boutique AC30)
    Y-Amp               Yamaha V-Amp
    DISTOMP             Yamaha stomp pedal FX
    80s Small Box       No specific make/model
    Small Stereo Dist   No specific make/model
    MultiFX             No specific make/model

The list compares quite favorably with Guitar World’s 10 most iconic guitar amplifiers:

    Vox AC30 Top Boost (1x12, 2x12)                 1958
    Fender Deluxe (1950s tweed)                     1955-1960
    Mesa/Boogie Dual Rectifier                      1989
    Marshall JCM800                                 1981
    Marshall 1959 Super Lead 100 Watt Plexi (4x12)  1965
    Roland JC-120 Jazz Chorus (2x12)                1975
    Peavey 5150 (2004: 6505)                        1992
    Fender Twin Reverb                              1965-1967
    Fender Bassman (4x10)                           1957-1960
    Hiwatt DR103 (4x12)                             1972

Several of the amp sims include cabinet simulation, too. Here are my guesses:

    DSP Sim  Real-world
    -------  --------------------------------
    BS 4x12  British stack (Marshall)
    AC 2x12  American combo (Fender?)
    AC 1x12  American combo (Fender?)
    AC 4x10  American combo (Fender?)
    BC 2x12  British combo (Vox?)
    AM 4x12  American modern (Mesa Boogie?)
    YC 4x12  Yamaha
    JC 2x12  Roland Jazz Chorus
    OC 2x12  Orange combo
    OC 1x8   Orange combo

The abbreviations “BS” and “AC” are potentially confusing. “AC” suggests the (in)famous AC series of Vox amps. “BS” suggests “Bassman”. However, I don’t recall a Vox AC 4×10, while the Fender 4×10 is iconic. A Yamaha site spelled out “BS” as “British Stack,” so I’m sticking with “A” for American and “B” for “British”.

Back to Bairnson, I’m trying the British Legend amp sim with a BS 4×12 cabinet first, then tweak.

I hope you enjoyed this somewhat wonk-ish walk through synthesizer and simulated guitar-ville. In the end, it’s tone that matters and let the ears decide.

Copyright © 2018 Paul J. Drongowski

Review: Business class air service

Ah, life has been busy. I’ve spent a fair amount of time traveling over the last few months. Soon, I’ll be posting code for a major new project that I’ve had in the works.

My post today is somewhat out of character for this site. However, I’d like to take the opportunity to review and compare recent experience on airlines.

In the last few years, my spouse and I have made several long-haul trips (5 or more hours airborne). After spending so many hours in coach on business, we decided that retired life should be easier and more pleasant. Thus, we have been fortunate to fly first- or business-class on long-haul flights.

My comments here compare JetBlue Mint, Virgin Atlantic, Delta and Alaska Airlines.

The Delta and Alaska flights offered what I would call “Mark I first class” which is typical for narrow-body (e.g., Boeing 737) ETOPS and domestic U.S. travel. Seating consists of the usual wide, partially reclining seats with which we are all so familiar. These seats are distinct from the lie-flat seats provided by Virgin Atlantic and JetBlue Mint. In comparison, the Delta and Alaska seats are suitable for daytime travel and are woefully insufficient for red-eye flights when extended sleep is desirable or required. The seat pitch (i.e., row-to-row spacing) is also critical. We have found that it’s easier to navigate in and out of a JetBlue Even More economy plus seat than the Delta first class seat.

The JetBlue Mint and Virgin Atlantic Upper Class seating is at a much higher level. Racking out in Mint or Upper Class reminds me of sleeping in a European semi-private couchette. In both cases, you have a small cubby for your stuff and the lie-flat seat. You can fully recline the Mint seat yourself while the Upper Class seat requires a little assistance from a flight attendant. VA provides a lower pad, pillow and duvet; Mint provides a pillow and duvet. The seats are comfortable enough for sleeping.

Mint seats are arranged facing forward in either pairs or a single “suite.” Upper Class seats (A330-300 and 787) are arranged in a herringbone such that you’re not absolutely facing forward. The herringbone makes it somewhat difficult to look out the window although VA keeps the windows dark during much of its flights (out of respect for those who wish to sleep, presumably).

Privacy in a Mint pair or Upper Class seat is moderate. People walking up and down the aisle(s) can easily look into your cubby. Privacy in the Mint suite is quite good; it even has a sliding door to close you off from the world. Quite frankly, flying in a Mint suite is about as close to the experience of a personal aircraft that you will get in a commercial plane. Kudos.

There are two bugaboos that I have with the lie-flat seats: where to put your stuff and what to do with your feet. All of the seats have (mesh) storage pockets, etc. I like the Mint pockets for stashing eyeglasses and the handy water bottle nook. The Mint suite adds a storage bin with sliding door and the ability to stash a day pack along side the seat although it’s underfoot when entering or leaving the suite. On VA, one can stash a day pack under the ottoman footrest. Otherwise, one is forced to dig into the overhead bin.

Feet. As mentioned in passing, the VA Upper Class seat has an ottoman for your feet (day or night). The ottoman has a safety belt and someone could join you for dining. (I haven’t see anyone do this except in jest.) VA insist on buckling this belt during take-off and landing. Undo the belt! It kept getting in the way while sleeping and is uncomfortable. On both Mint and Upper Class, foot space is kind of small (“cozy” at best). If you’re really tall and/or have big feet, good luck. Expect to wear socks and ditch your shoes for longer rest.

Virgin Atlantic offer sleep suits which are simply PJs. The fabric is a cotton/poly blend and the PJs can get quite warm in combination with the duvet. I recommend ducking into the restroom while on-the-ground boarding is in progress and changing into the sleep suit while the lav is still fresh. I changed into the upper, preferring to sleep in cargo pants with plenty of pockets to hold my stuff (especially tissues). Keep the suit and donate it after the flight.

Both JetBlue and VA give business class customers a small amenities kit which includes eye shade, socks, toothbrush, etc. I’m not ga-ga about amenity kits, so let’s just say that they do the business. The VA pouch is quite reusable for microphones and other electronic kit!

Speaking of electronic kit, if you want to play and record while you’re in the air, fly in a Mint suite. You have the usual fold-out table, but also two very useful side surfaces. The suite is positively loaded with USB and power ports and one could set up quite a large airborne studio.

The JetBlue in-flight entertainment system is pretty decent, supporting Sirius XM radio, DirectTV and a selection of movies. Unlike coach, Mint flyers have a touch screen and hand-held remote for navigation. The only niggle is there are so many DirectTV channels that scrolling from one end to the other takes a long time.

The Virgin Atlantic system looks and feels dated. It needs a major upgrade. The screen folds out into the center of the cubby. Although the screen responds to touches, I found it easier to navigate through the hand-held remote. The remote has a built-in screen which can display the flight map — handy for keeping tabs on flight progress when snoozing. The A330 for the return flight had an even older in-flight set and the remote, in particular, felt and operated like a poorly designed and worn video game controller.

Alaska Airlines have two options: an inflight tablet and GoGo Entertainment. The tablet is pre-loaded with shows and movies. I went with the tablet. Nothing super memorable other than the interface being kind of laggy.

Delta offer TV, movies and music through the touch-screen Delta Studio. Unfortunately, Delta Studio was down on the day we flew. So, I had to resort to Delta’s second option, GoGo Entertainment. GoGo Entertainment is an app that runs on your own device — in my case, an iPad. My only complaint is that the flight crew waited so long to announce the unavailability of Delta Studio that I barely had time to down the GoGo app to my iPad before take-off. Yep, once you’re in the air, you cannot download the app. The progress bar was literally racing the aircraft to the runway hold line!

Let’s get to the food. 🙂

There is nothing remarkable about the food on Delta or Alaska, with one exception. Alaska Airlines featured regional foods: salmon in the Northwest and Hawaiian on the legs to/from the Big Island. Nice. I noticed that Alaska has revamped its first class food service, so they’re trying. Stay tuned.

Wish I could say the same about Delta or any of the other large American carriers, save JetBlue. Domestic U.S. service has declined to the point where food service in South African Airways coach is better than most in the U.S. Very sad compared to the old days (late 60s and 70s) when first class service came on linen with a split of wine. Or, fond memories of the lox and bagels flight from San Francisco to the East Coast. Yes, folks, a self-serve, deli buffet in the galley of a DC-10 — in coach! U.S. coach has gone from economy to total rip-off. Revolt.

JetBlue Mint food impresses. After an opening bite, flyers have a choice of three items from a menu of five mains. Each item is a small plate. Presentation is quite good with each bite arriving in its own ceramic bowl/plate. The mains are followed by a sweet bite. Espresso and cappuccino are available and are prepared fresh (no instant!) in the galley. I tried the low-cal (call ahead) meal and found it to be OK although not as special as the regular menu.

A note to chefs: We need low-sodium meals as well as vegan, gluten-free, low cal, etc. Also, please pay attention to the dietary needs of people taking warfarin (Coumadin). There are a lot of us. Four of the five main entrées offered by JetBlue in May 2018 are high in vitamin K. I ordered the low cal meal in order to pass my monthly PRO-TIME test the day after my return. Vitamin K counters warfarin.

A note to JetBlue Mint customers: If you pre-order a special menu, your request will apply to all flights on the same itinerary. Flexibility here would be welcome.

VA’s Upper Class meal service is also good, but I put Mint above it. The food is good (for the English 🙂 ) although presentation could be improved. One chooses from a menu of options. I like an English-style breakfast and you could request an exceptionally hearty meal including a bacon sarnie. Unfortunately, the sarnie has been off the menu for me since the heart attack. How do the British eat this and survive? 🙂

Where Virgin Atlantic shines, of course, is its international Upper Class lounges. The lounge at London Heathrow is the mothership surrounded by smaller, cozy satellites (Boston and Johannesburg, in our case). The lounges are (almost) reason enough to fly VA. The food is good in all locations, consisting of small plates, salads and deli. I quite enjoyed the (South Asian) Indian food — on par or better than our local restaurants. The plates are cooked to order. The cooking staff at the Boston lounge are especially friendly and helpful. We dined early in Boston, making it possible to skip the in-flight dinner (not dessert!) and go directly to sleep on the relatively short, eastbound trans-Atlantic flight. Frankly, we couldn’t have made the trip to and from South Africa without the help and comfort of VA lounges.

As you can tell, I’m a fan of JetBlue Mint. JetBlue is trying very hard to offer a premium service for long-haul domestic flights. Their service compares quite favorably with business class service on international carriers. Further, they are providing a good experience without letting the ticket price get out of control. I hope that JetBlue puts a spur to the competition. Nice work, JetBlue!

Copyright © 2018 Paul J. Drongowski

Audio Style file format

Yamaha introduced audio styles in the PSR-S950 arranger workstation. Audio styles are both loved and hated. Loved when they sound good, but hated when people try to change or repurpose them in new styles.

The term “audio style” is a bit of an overstatement. Only the percussion track is audio. At least, that’s how audio styles have been developed and used to this day. Yamaha just released the Audio Phraser application for creating and editing the basic skeleton of an audio style, so this situation may change now that people can more freely create, edit and share their own audio styles.

Audio style file internal format

Ever since Yamaha distributed the audio styles for Genos, I’ve been meaning to take a look inside of an audio style file. Here’s a little preliminary information.

An audio style file is an IFF-like container just like a Standard MIDI File (SMF). In fact, an audio style file has the same internal organization as a regular style file which we know to be a Type 0 SMF with extra chunks.

An audio style file has the following chunks (in order):

    Type    Purpose
    ----    ------------------------------------
    MThd    SMF header chunk
    MTrk    SMF track chunk
    CASM    Yamaha CASM chunk
    AASM    Audio assembly (descriptor) chunk
    AFil    Audio file (waveform) chunk
    OTSc    Yamaha OTS chunk

The AASM and AFil chunks are new, additional chunks beyond the known MIDI, CASM and OTS chunks. All chunks have a four byte chunk identifier and a four byte chunk size. The chunk size does not include the identifier or chunk size bytes, as usual.

The AASM chunk is relatively small, about 2,500 bytes. It consists of 15 variable length ASEG subchunks. The ASEG subchunk has a four byte subchunk size. Each ASEG corresponds to a style section; that’s why there are fifteen of them.

An ASEG subchunk has three parts:

    Type    Purpose
    ----    ------------------------------------
    Adec    Identifies the style section
    Atab    Identifies the audio file; other functions unknown
    AMix    Function unknown

The Adec part is variable length, having an explicit four byte size. The Atab and AMix parts appears to be fixed length (101 and 28 bytes, respectively) and do not have an explicit size field.

The Adec part is ASCII text and is a style section name like “Main A” or “Fill In DD”. That is the only information in Adec.

I don’t know exactly what the Atab does. The Atab part contains an ASCII string which identifies the audio file associated with the style section. This string is clearly visible in a dump. (Example below.) All of the Atab and AMix parts in the test audio file have the same values except for the audio file names.

File Offset:       36965
Subchunk type:     'ASEG'
Subchunk size:     151
Section name:      Main D
Atab type:         'Atab'
   0    0    0   97    0   32   32   32 | 00 00 00 61 00 20 20 20 | ...a.
  32   32   32   32   32   41   56   48 | 20 20 20 20 20 29 38 30 |      )80
 115   67   97  110   97  100  105   97 | 73 43 61 6E 61 64 69 61 | sCanadia
 110   82  111   99  107   95   77   97 | 6E 52 6F 63 6B 5F 4D 61 | nRock_Ma
 105  110   32   68    0    0    0    0 | 69 6E 20 44 00 00 00 00 | in D....
   0    0    0    0    0    0    0    0 | 00 00 00 00 00 00 00 00 | ........
   0    0    0    0    0    0    0    0 | 00 00 00 00 00 00 00 00 | ........
   0    0    0    0    0    0    0    0 | 00 00 00 00 00 00 00 00 | ........
   1   15   -1    7   -1   -1   -1   -1 | 01 0F FF 07 FF FF FF FF | ........
   0    0    0  127    0    0    0    0 | 00 00 00 7F 00 00 00 00 | ........
 127    0    0    0    0    0  127    0 | 7F 00 00 00 00 00 7F 00 | ........
   0    0    0    0  127    0    0    0 | 00 00 00 00 7F 00 00 00 | ........
   0    0    0    0    0    0    0    0 | 00 00 00 00 00 00 00 00 | ........
AMix type:         'AMix'
   0    0    0   24    7 -128    0   -1 | 00 00 00 18 07 80 00 FF | ........
  88    4    4    2   24    8    0  -80 | 58 04 04 02 18 08 00 B0 | X.......
   7   71    0   10   64    0   91    0 | 07 47 00 0A 40 00 5B 00 | .G..@.[.
   0   -1   47    0    0    0    0    0 | 00 FF 2F 00 00 00 00 00 | ../.....

Etienne from the PSR Tutorial Forum points out that the AMix subchunk contains MIDI event codes:

AMix : header
00 00 00 18 : length of data
07 80 : 0780 hex = 1920 decimal (PPQN ?)
00 : delta time
FF 58 04 04 02 18 08 : meta event Time signature 4/4
00 : delta time
0B 07 70 : controller volume
00 : delta time
0A 40 : controller Panpot
00 : delta time
5B 00 : Controller Reverb send level
00 : delta time
FF 2F 00 : end of MTrk trunk

Nice catch, Etienne! The AMix content makes sense because something needs to set up the channel volume, pan and reverb level for the audio phrase. Yamaha love to use MIDI events for other purposes (like voice files, OTS, etc.) Why not?

The AFil chunk has substructure, too. The AFil chunk consists of ADSg chunks. As you might guess, the AFil chunk is pretty big because it contains waveform data.

The following table shows the offset and length information for the first ADSg in the example’s AFil:

    AFil     37287  15261858
    ADSg     37295   1219275      Container for an audio file
    ANdc     37303        50      File name
    AWav     37361   1219209      Container for audio waveform
    WAVE     37369       n/a      Marker (no subchunk size)
    Afmt     37373        16      Audio format information
    Sfmt     37397       217      Container for section information
    Sdec     37608         6      Section name, e.g., Main A
    Adat     37622   1218300      Waveform data
    AInf   1255930       640      Container for audio information
    BPnt   1255938       136
    OPnt   1256082       240
    APnt   1256330       232
    ATmp   1256570         0      Empty, subchunk size is 0
    ADSg   1256578                Container for the next audio file
    ....

The container relationships are important because the containers and subchunks are nested:

    AFil contains ADSg
    ADSg contains ANdc, AWav
    AWav contains WAVE, Afmt, Sfmt, Sdec, Adat, AInf
    AInf contains BPnt, OPnt, APnt, ATmp

The nesting is a bit of a pain in the patootie when writing code to parse a style file.

ADSg is the container chunk holding audio waveform (meta-)information. Like ASEG, there are fifteen ADSg chunks — one for each audio file. The ANdc subchunk inside contains the audio file name which matches up with the name in the ASEG. AWav is the container holding the audio waveform data itself.

The audio “file” format is WAV-like, but it is not exactly WAV (Microsoft RIFF). I was able to playback the audio by importing the audio style file as a raw (untyped) audio file. The audio format seems to be 44,100Hz, 16-bit stereo, big endian. No compression or encryption. It isn’t be too hard to dump the audio.

Yamaha Audio Phraser

Now that you know a little bit about what’s inside of an audio style file, here is brief overview of what the Audio Phraser program generates.

Audio Phraser generates an MThd MIDI file header chunk, a single MTrk chunk (Type 0), an ASEG chunk for each audio waveform, an AFil chunk (containing an ADSg subchunk for each audio file) and a CASM chunk.

The MIDI tempo and time signature are the same as the tempo set in Audio Phraser. The MIDI song title is set to “Audio Phraser”.

The MIDI track contains the usual markers at the beginning: SFF2 and SInt. A single SysEx message is generated after SInt: General MIDI System ON (F0 7E 7F 09 01 F7). The key signature is set to C/Am, followed by:

  • SMPTE Offset
  • Sequencer specific metadata: ff 7f 04 43 00 01 00 00

Oddly, MIDI channel 4 has four, whack-looking MIDI OFF events:

    NOTE OFF G#9
    NOTE OFF G5
    NOTE OFF C0
    NOTE OFF C0

A bug? The remaining markers indicate the start of the style sections. The section length corresponds to the length of the audio waveform for the section. Thus, if the audio waveform for “Main A” is 2 bars, then the MIDI section for “Main A” is 2 bars long.

The CASM chunk is minimal and sets NTR/NTT for MIDI channel 9 (Subrhythm). NTR is “Root Fixed” and NTT is “Bypass/Bass Off”. No NTR/NTT is given for channel 10 (rhythm/drums).

Audio Phraser does not generate an OTSc (One Touch Settings) chunk.

Audio Phraser creates an AWI file for each waveform that it imports into an audio style file. The AWI file most likely holds the results of Audio Phraser’s analysis (i.e., beat detection and so forth). It would be interesting and informative to compare the contents of an AWI file against the ASEG and AInf chunks in the resulting audio style file. I’m guessing that the AWI file is the “prototype” for the ASEG and AInf chunks.

Java source code

If you would like to explore audio style files, then download the source code for a simple audio style dump program. The code is relatively brittle and expects to encounter chunks in a certain order and/or quantity. Thus, be prepared to modify the code. This is an experimenter’s kit, after all. 😉

Copyright © 2018 Paul J. Drongowski

Back in the U.S.

If you sense a dearth of recent posts, you’re right. February and March have been insanely busy, including two long trips. The first trip took us to Seattle to see our grandson who grows by leaps and bounds every day. The second trip was to South Africa where we married off our nephew and welcomed a wonderful South African lass into our extended family.

Naturally, computer science and history always lurk in the background, occasionally coming center stage. In February, I completed a second donation to Living Computers in Seattle. I donated two working Atari computers (a 400 and an 800XL) to their collection. Everything went — peripherals, joysticks, touch pad, and software. I played a few rounds of Missile Command, etc. before sending off the entire lot. I can’t believe that I spent hours (days!) playing F-15 Strike Eagle with its cheesy graphics. 🙂 If you want to play old Atari machines and much more, please visit. You’ll have a good time!

Right on the heels of the donation, we stopped into Living Computers for a visit. We had a fun chat with Aaron Alcorn who is the Museum’s curator. He let us in about some of the Musuem’s plans as well as swapping photos of our kids (and grandkid). We saw our donated — now theirs — Apple Performa 6400 VEE in the second floor workshop/open storage. The Museum is planning a major exhibit for that space. (Restoration of an historically important mainframe. Stay tuned.)

After a few brief weeks at home, we took off for South Africa via London. Our original itinerary allowed for a day trip to Bletchley Park and the The National Museum of Computing. Unfortunately, the plan was dashed by the weather. A nor’easter hit Boston on the departure date and we had to shorten our stay in London to an over-nighter.

Nonetheless, we walked over to London’s Science Museum on Exhibition Road, bagging yet another science museum in yet another city. (We also wanted to see how many holes it took to fill the Albert Hall.) The mathematics and information age exhibits helped to make up for losing Bletchley Park.

The Science Museum has an excellent collection of mechanical computing devices including Charles Babbage’s analytical engine (trial model, 1871). It took a little digging to find any reference to Lady Ada Lovelace whose contributions, I dare say, were longer-lasting than Babbage’s. Mechanical computing engines precede electronic computing, using physical machines (or even water flow!) to model other real-world phenomena by mathematical analogy. These devices, including so-called analog computers, filled the need for high(er) speed computation before digital computing really took wing. (By the way, electronic analog computing seems underrepresented at both the Science Museum and Living Computers. Just sayin’.)

My photography skills and the iPod camera were not up to snuff. I had hoped to include many images here. However, we did see quite a number of historically significant machines: Hollerith card sorter, EDSAC-1, Pilot ACE, LEO II, Besem-6, Newton Clamshell, Xerox PARC Alto, and early PDP-8 among the finds. A number of machines/artifacts are on loan from the Computer History Museum in Mountain View, California. (Not far away from where I once lived, BTW.)

Seeing the PDP-8 in a glass case at the Science Museum, really made me “get” the concept behind Living Computers. Here was a poor old machine trapped in a glass cage. At Living Computers, you can use a PDP-8! This isn’t meant to be a slam on the Science Museum because preservation of early computing artifacts is incredibly important, especially in a society and culture which is all too willing to throw away the last generation of shiny thing. It does highlight the unique aspect and mission of Living Computers: Museum + Labs. Please join and visit.

Copyright © 2018 Paul J. Drongowski

Code: Display Genos UVF voice info

February and March have proven to be a very busy months. On top of everything, the weather in the U.S. Northeast has been atrocious and we have suffered through long power outages. One rapidly realizes how dependent we are on electricity for light, heating and even water. Our house has its own well and we lose water, too, when we lose power.

If you read my series of articles about Yamaha Genos™ voice editing with Yamaha Expansion Manager (YEM), you’re aware that Yamaha store voice information in UVF files. “UVF” (most likely) stands for “Universal Voice File” because UVF is able to represent the voice information supporting many kinds of Yamaha synthesis. YEM ships with UVF files for normal, sample-playback voices.

YEM does not display all of the voice information in a UVF file. As we saw in the tutorial series, many voice parameters cannot be seen or modified in YEM.

Since UVF is XML with predefined tags, I wrote a quick and dirty Java program to display the voice information in a UVF file. I meant to clean up and extend the code, but life has just gotten away from me. I’m posting the code here in order to encourage other folks to experiment with UVF.

//
// Display voice information in a Yamaha UVF (XML) file
//

// Author:  P.J. Drongowski
// Version: 0.1
// Date:    9 February 2018
//
// Copyright (c) 2018 Paul J. Drongowski
//               Permission explicitly granted to modify and distribute


import javax.xml.parsers.DocumentBuilderFactory;
import javax.xml.parsers.DocumentBuilder;
import org.w3c.dom.Document;
import org.w3c.dom.NodeList;
import org.w3c.dom.Node;
import org.w3c.dom.Element;
import java.io.File;

public class ShowVoice {

    public static void main(String argv[]) {

	String voiceName ;
	String veNumber ;
	String veName ;
	String veVolume ;
	String vePan ;
	String veNoteShift ;
	String veNoteLimitHi ;
	String veNoteLimitLo ;
	String veVelocityLimitHi ;
	String veVelocityLimitLo ;
	String veWaveform ;

	try {

	    File fXmlFile = new File("Clarinet&Flutes.uvf") ;
	    DocumentBuilderFactory dbFactory = 
		DocumentBuilderFactory.newInstance() ;
	    DocumentBuilder dBuilder = dbFactory.newDocumentBuilder() ;
	    Document doc = dBuilder.parse(fXmlFile) ;

	    // Normalize text nodes
	    doc.getDocumentElement().normalize() ;

	    System.out.println("Root element: " + 
			       doc.getDocumentElement().getNodeName()) ;

	    NodeList vList = doc.getElementsByTagName("information") ;
	    Node vn = vList.item(0) ;
	    Element ve = (Element) vList.item(0) ;
	    voiceName = ve.getElementsByTagName("voiceName").item(0).getTextContent() ;
	    System.out.println("Voice: " + voiceName) ;
	    System.out.println("----------------------------") ;

	    NodeList nList = doc.getElementsByTagName("voiceElement") ;

	    for (int temp = 0; temp < nList.getLength(); temp++) {
		Node n = nList.item(temp) ;

		if (n.getNodeType() == Node.ELEMENT_NODE) {
		    Element e = (Element) n ;

		    veNumber = e.getAttribute("number") ;
		    veName = e.getElementsByTagName("name").item(0).getTextContent() ;
		    veVolume = e.getElementsByTagName("volume").item(0).getTextContent() ;
		    vePan = e.getElementsByTagName("pan").item(0).getTextContent() ;
		    veNoteShift = e.getElementsByTagName("noteShift").item(0).getTextContent() ;
		    veNoteLimitHi = e.getElementsByTagName("noteLimitHi").item(0).getTextContent() ;
		    veNoteLimitLo = e.getElementsByTagName("noteLimitLo").item(0).getTextContent() ;
		    veVelocityLimitHi = e.getElementsByTagName("velocityLimitHi").item(0).getTextContent() ;
		    veVelocityLimitLo = e.getElementsByTagName("velocityLimitLo").item(0).getTextContent() ;

		    Element ew = (Element) e.getElementsByTagName("presetWaveformProduct").item(0) ;
		    veWaveform = ew.getElementsByTagName("number").item(0).getTextContent() ;

		    System.out.println(veNumber + " " +
				       veName + " " + 
				       veVolume + " " +
				       vePan + " " +
				       veNoteShift + " " +
				       veNoteLimitLo + " " + 
				       veNoteLimitHi + " " + 
				       veVelocityLimitLo + " " + 
				       veVelocityLimitHi + " " + 
				       veWaveform) ;
		}
	    }
	} catch (Exception e) {
	    e.printStackTrace() ;
	}
    }
}

Genos: Needed DSP improvements

I’ve really enjoyed playing Genos. The Super Articulation 2 (SArt2) voices take emulative synthesis to a new level of realism.

Although Yamaha have added the new rotary speaker effect to the Genos, there is still work needed to make the drawbar organ experience realistic and competitive with Hammond clones. Yamaha needs to bring the drawbar experience up to the same level as SArt2.

The current drawbar organ implementation is much the same as the previous Tyros and S-series drawbar organ mode. The drawbar signal chain consists of a tone generation stage followed by the rotary speaker effect:

                                 Rotary
    Drawbar tone generator ----> Speaker ----> Mixing Console
                                 Effect

The output is sent into the usual Genos/Tyros/PSR Mixing Control and system-level effects architecture.

The drawbar tone generator has an eight level volume control that determines the level of the pure drawbar signal. The user sets this level using a virtual drawbar in the drawbar mode graphical user interface (GUI). So, the signal that hits the input of the rotary speaker effect is constant at the level set by the user. In Genos-land, the foot pedal sets XG MIDI channel volume, i.e., changes the post-effect volume level of the organ’s channel in the Mixing Console.

Problem is, that’s not the way the real-world works. On a Hammond, for example, the foot pedal changes the signal level hitting the rotary speaker. The foot pedal does two things:

  1. It changes the overall volume level of the instrument (i.e., what the audience hears), and
  2. It changes the signal level hitting the rotary speaker pre-amp.

The second point is crucial for realism as the amount of pre-amp distortion changes with the signal level. A higher signal produces more distortion and a low-level signal is relatively clean.

The existing Genos drawbar implementation does not do this. The amount of distortion is set once and is constant. The amount of distortion does not change with the organ volume. The way the expression pedal changes channel volume sounds unnatural and is not realistic.

Many of us, including Uli and Stuart on the PSR Tutorial Forum, have tried to work around this problem. We also find the drive in the new rotary speaker effect to be, well, wimpy. So, we have tried inserting a distortion effect before the rotary speaker effect, etc. and have run into several limitations and roadblocks. These issues have to do with DSP effect chaining, access to DSP effect parameters and control of DSP effect parameters.

Here’s a short list of issues:

  • Be able to control the signal level from the drawbar tone generator into the rotary speaker drive effect. The distortion level must track the input level in order to accurately emulate real world distortion.
  • Be able to insert a distortion block between the drawbar tone generator and the rotary speaker in order to make up for the wimpy drive in the new rotary speaker effect.
  • Be able to edit parameters of a DSP effect when more than one DSP is assigned to a part. Only the last DSP in the chain is displayed in voice and can be edited. In Firmware v1.02, there was an edit button in DSP assignment dialog. Please bring this feature back. [Thanks for this one, Uli!]
  • Be able to edit more than 16 DSP effect parameters, including the missing parameters for the UNI COMP and new rotary speaker effect.
  • Be able to use the foot pedal to control all user controllable parameters for all DSP effects that have them, not just the WAH effect.
  • Provide access to the UNI COMP side-chain input, i.e., a way to connect a signal to the side-chain input.

Yamaha’s own engineers are getting ahead of the Genos developers by designing effect algorithms with more than 16 parameters, side-chain inputs and so forth. These features are currently hidden or inaccessible to Genos users. For example, we cannot change the slow-fast and fast-slow times of the rotor nor can we connect a signal into the side-chain input of the UNI COMP compressor.

The XG architecture has always provided for effect parameters which can be controlled by an assignable controller (e.g., AC1). Yet, the only two Genos effects which may practically be controlled in this way are the WAH effect and rotary speaker speed. Yamaha need to unleash the power of Genos’ assignable sliders, knobs and buttons by generalizing control. Please let us assign any MIDI controller to any parameter in any effect block. (Rotary speaker speed only affects the rotary speaker block in the drawbar signal chain.)

So, I hope Yamaha takes these suggestions into consideration and makes them part of a future update. These improvements would make Genos truly competitive against other premium-priced keyboards — clones, not just arrangers.

DSP effect signal flow

When Yamaha’s Genos developers design the graphical user interface (GUI) to manage chained DSP effects, they should call their colleagues at Line 6.

The Helix Native plug-in has a spiffy signal flow window (see image below) in which a Helix user creates and edits a virtual pedal board. The user creates effect blocks and interconnects them. Genos should have a similar visual interface for creating and managing DSP effects that are chained. Touching an effect block should open the detailed parameters for the block. The Genos touch panel would be a natural for this kind of interaction.

[Click image to enlarge.]

Slider value pick up

I have to thank Simon Sherbourne’s review of the Aturia KeyLab Essential for inspiring the following suggestion. His review appears in the February 2018 issue of Sound On Sound Magazine.

The Genos sliders are noticeably jumpy. Their behavior has prompted several complaints on the PSR Tutorial Forum.

Simon likes the value “take over” implemented in the Arturia KeyLab Essential. Quoting Simon’s review:

“Take over is always smooth. … Sliders take over using Ableton-style scaling. As soon as you move a slider the software knows where it is and draws a ‘ghost’ fader showing the hardware position. Any movement will produce relative adjustment of the mapped parameter until the physical and virtual sliders come together. Clever!”

The Arturia manual calls this “Pickup” behavior: “the faders in your DAW will gradually move to match the current position of the fader on your controller as it moves.”

Yamaha should add pickup behavior to the Genos sliders. Slider mode should be selectable by setting either a utility parameter or a controller function setting.

Genos master compressor

There is an on-going discussion at the PSR Tuturial Forum about the Yamaha Genos™ master compressor.

I did a little “effect sleuthing” and determined that the Genos master compressor is the same algorithm as the Yamaha Montage parallel compressor, PARALLEL COMP. This effect is part of the Montage v1.5 update. The same update added the universal compressor down (UNI COMP DOWN) and universal compressor up (UNI COMP UP) algorithms. All three algorithms can be used as a Montage master effect. On Genos, the parallel compressor is a master effect; the universal compressors can be used only as insertion or variation effects.

How did I run this down? I compared the parameter definitions for the Montage PARALLEL COMP effect algorithm against the parameters of the Genos master compressor. They match exactly. Yamaha often share effect algorithms across their top-of-the-line equipment.The Montage parameters are:

  • Type: Natural, Rich, Punchy, Electronic, Loud
  • Compression: 0 to 100
  • Texture: 0 to 100
  • Output level: -18dB to +18dB (0 to 120)
  • Input level: -18dB to +18dB (0 to 120)

The parameters for the universal compressor algorithms match up, too. However, the Genos user interface (UI) does not allow access to the 17th parameter, Side Chain Input Level. Yamaha need to remove the 16 effect parameter restriction imposed by Genos. (This restriction prevents access to the rotor ramp parameters in the new rotary speaker algorithm, too.)

If you’re a Montage person, you’re probably wondering, “What are ‘Natural,’ ‘Rich,’ etc.?” I’ll quote the Yamaha Genos Reference Manual here:

  • Natural: Natural Compressor settings in which the effect is moderately pronounced.
  • Rich: Rich Compressor settings in which the instrument’s characteristics are optimally brought out. This is good for enhancing acoustic instruments, jazz music, etc.
  • Punchy: Highly exaggerated Compressor settings. This is good for enhancing rock music.
  • Electronic: Compressor settings in which the electronic dance music’s characteristics are optimally brought out.
  • Loud: Powerful Compressor settings. This is good for enhancing energetic music such as rock or gospel music.

Frankly, I don’t know as much about audio compression as I should. Fortunately, Sound On Sound Magazine has an excellent article about parallel compression. The article has terrific background information about all forms of compression including DOWN and UP compression. DOWN compression is the conventional form that we are most familiar with.

Parallel compression puts a very high ratio (limiting) DOWN compression block in parallel with the original audio signal, i.e., it mixes the original signal and the compressed signal.

                ----------------------
               |                      |
     Input ----|                      + ----> Output
               |                      |
                ----> Compressor ---->

Massive gain reduction is applied to the loudest passages. According to SOS, “This means that at those points, its involvement in the mixed output signal is virtually insignificant; the output signal is completely dominated by the original input signal coming via the direct path. As a result, those loud but delicate transients are left completely intact and unchanged — which is the primary aim of this technique.”

No gain reduction is applied to quiet signals below the threshold. Thus, the parallel paths, direct and compressor, pass the same signal. When the two signals are summed (mixed), the quiet passage is +6dB louder. Again, quoting SOS, “this simple form of parallel compression leaves the loud bits unaffected and raises the quiet bits by 6dB, the total reduction in dynamic range is only 6dB.”

I hope this information helps. I recommend reading the SOS article; it has several graphs and goes deeper into this studio technique.

Copyright © 2018 Paul J. Drongowski

Suggestions and questions to Yamaha

The Genos manual should at least mention that the Genos master compressor performs parallel compression. A short explanation would help people apply and tweak the master compressor.

The Genos universal compressor algorithms support side-chain. How can we use side-chaining? How do we get a signal into the side-chain input?

Yamaha engineers are building effect algorithms with more than 16 effect parameters. The Genos user interface needs to provide access to more than 16 effect parameters and to store them.

Genos voice editing: Blending the split point

Recall that our goal is to create a Yamaha Genos™ custom voice with an overlapping split zone between upper and lower instruments. The first step started with factory preset voices to build a split voice using Yamaha Expansion Manager (YEM). The second step used XML Notepad to change the high and low note limits. These steps are demonstrated in the third article in this tutorial series.

The next and final step in our project goes way beyond “extra credit.” The split voice that I created has hard cut-off points for the lower and upper voices. I wanted to take things further and produce a smooth blend across the key range where the upper and lower voices overlap. This problem proved to be more involved than I first thought! Solving this problem turned into a learning experience. 🙂

If you want to experiment on your own, download the ZIP file with the PPF file, UVF files and Java code (SplitVoices_v1.0.zip).

Many synthesis engines implement a form of key scaling in which a parameter (e.g., amplitude, filter cut-off frequency, etc.) changes across the notes of the keyboard. Key scaling allows subtle effects like making higher notes brighter than lower notes. Amplitude key scaling changes volume level across the keyboard. My plan is to use AWM2 amplitude key scaling to make a smooth cross-blend of the upper and lower split voices.

The example voice that we are creating consists of a bassoon in the left hand and two layered oboes in the right hand. I call this voice “2 Oboes & Bassoon” because it is very similar to an MOX patch that gets a lot of play. The table below summarizes the voice design.

Element Name Note lo Note hi Vel lo Vel hi Pan
1 Oboe Hard v3 G#2 G8 101 127 0
2 Oboe Med V3 G#2 G8 1 100 0
3 Bassoon Med St R C-2 E3 1 100 0
4 Bassoon Hard St R C-2 E3 101 127 0
5 [V-645 El-1] G#2 G8 1 127 0

Sharp-eyed readers will notice that the velocity ranges are slightly different than the ranges in the third article. I found that the ranges used in the original MOX patch design made a more playable, easier to control voice.

At this point, I must caution the reader that I’m about to dive into the guts of an AWM2 voice. I assume that you’re familiar with AWM2 synthesis and its voice architecture. If not, I recommend reading the Yamaha Synthesizer Parameter Manual and the introductory sections about voice architecture in either the Montage, Motif or MOX reference manuals.

I suggest exploring a few Genos factory voices using XML Notepad or Notepad++ in order to see how the voices are structured and organized. Drill down into the XML voiceEelement entities. You will see several elementBank entities which are the individual key banks within the voice element.

You should see a blockComposition entity, too. This entity has parameters for the oscillator, pan, LFO, pitch, filter and amplitude synthesis blocks. For our purposes, we need the amplitudeBlock because the amplitude key scaling table is located within this block. The table is located within the levelScalingTable entity. See the example screenshot below. [Click screenshots to enlarge.]

An amplitudeBlock may be located in either of two places within the XML tree:

  • It may be part of the blockComposition belonging to the voiceEelement, or
  • It may be part of the blockComposition belonging to each elementBank entity.

In the first case, the parameter amplitudeBankEnable is OFF. In the second case, the the parameter amplitudeBankEnable is ON. Please remember this setting because it was a hard-won discovery. If it seems like the amplitude scaling is not taking effect, check amplitudeBankEnable and make sure it is consistent with the XML structure! The voice definition is flexible enough to allow block parameter specification at the voiceEelement level and, optionally, for each key bank at the elementBank level.

Knowledge of the XML structure is important here. I found that the bassoon voice elements defined the amplitudeBlock at the elementBank level. That meant an instance of the levelScalingTable for each of the seventeen (!) elementBank entities. Since the table contents are the same in every element bank, I did major surgery on the XML tree. I created a single amplitudeBlock at the voiceEelement level and deleted all of the amplitudeBlock entities at the element bank level. Fortunately, XML Notepad has tree cut and paste. I also set amplitudeBankEnable to OFF. (Eventually.)

Once the XML tree is in the desired form, it becomes a matter of setting each levelScalingTable to the appropriate values. A scaling table consists of 128 integer values between -127 and +127. It is stored as one long text string. Each value is the amplitude level offset associated with its corresponding MIDI note. MIDI note numbers run from 0 to 127.

At first, I used the level scaling tables from the “SeattleStrings p” voice as source material. This voice is a nice blend of the five string sections: contrabass, celli, violas, second violins and first violins. Each level scaling table emphasizes its section in the blend. Here are two screen snaps plotting the level scaling tables for the celli and first violins.

Although I abandoned this approach, in retrospect, I think it’s viable. I abandoned ship before I understood the purpose of amplitudeBankEnable. Also, I had not yet developed enough confidence to shift the table up (or down) 12 values in order to compensate for the octave position of the waveforms.

Instead, I decided to control the table contents and to make the tables myself. The MOX (Motif and Montage) define amplitude level scaling using four “break points.” Each break point consists of a MIDI note and level offset. The offset is added to the overall voice volume level and defines the desired level at the corresponding MIDI note. The offset (and resulting volume level) is interpolated between break points. (See the Yamaha Synthesizer Parameter Manual for details.) I wrote a Java program to generate a level scaling table given four break points. The program source code appears at the end of this article (bugs and all).

Here are the break points that I used. I took inspiration from the MOX break points for its “2 Oboes & Bassoon” patch.

                      BP1      BP2      BP3      BP4
                   --------  -------  -------  -------
    Bassoon Med    A#-1 -75  A#0  +0  A#2  +0  E3 -103
    Bassoom Hard   C-1  -75  A#0  +8  A#2  +0  E3 -103
    Oboe Med       A#2  -85  E3   +0  F#5  +0  C7 -103
    Oboe Hard      A#2  -63  E3  +14  C5   +4  C7 -103

I ran the program for each set of break points, generating four tables. Table plots are shown below. [Click to enlarge.]

Each table file contains one long line of 128 integer values. In order to change a level scaling table, first open a table file with a text editor (e.g., notepad, emacs, etc.), select the entire line, and copy it to the clipboard. Then, using XML Notepad, navigate to the appropriate levelScalingTable in the XML and replace the content of the #text attribute with the line in the clipboard. Save the UVF (XML) voice file. Save early, save often.

Copy the UVF file to the correct YEM pack directory as demonstrated in the third article. It’s important to be careful at every step in the process because we are making changes directly to YEM’s internal database. We don’t want to introduce any errors into YEM’s pack representation and cause a malfunction that needs to be backed out. Be sure to keep plenty of back-up copies of your work just in case.

Fire up YEM, open the “2 Oboes & Bassoon” voice for editing, and test. Enable each voice element one at a time and play the keys in the overlapping zone. You should hear the instrument fade-in or fade-out as you play through the zone.

With the offsets given above, I needed to shift each of the tables either “up” (bassoon) or “down” (oboes) to get a better blend. If you take a little off the front of a table (say, 4 values) be sure to add the same number of values to the end of the table. The table must be 128 values in length.

The blending issue is best resolved up front by defining different break points. Of course, the table files must be regenerated, but this is a little bit safer than trimming and lengthening the tables in-place within the XML. Laziness has its advantages and dangers.

If you require background information about YEM, the first article in this series discusses Yamaha Expansion Manager. The second article covers XML Notepad and how it can be used to work around limitations in YEM. The third article, mentioned earlier, demonstrates creation of the basic “2 Oboes & Bassoon” voice.

There are a few other posts related to voice editing with YEM. Check out this short article about creating a PSR/Tyros Mega Voice using YEM. Take a peek at the article about the design and implementation of my jazz scat voices. Then, download the scat expansion pack for PSR-S770/S970 and Tyros 5, import it into YEM, and take things apart.

One final note, I produced the plots shown in this article with the GNU open source GNUPLOT package. Visualization is essential to getting things right. There are other tools to visualize level scaling tables such as spreadsheet charting.

Copyright © 2018 Paul J. Drongowski

Source code: GenScalingTable.java

//
// GenScalingTable: Generate level scaling table from break points
//

import java.io.* ;

/*
 * Author:   P.J. Drongowski
 * Web site: http://sandsoftwaresound.net/
 * Version:  1.0
 * Date:     15 February 2018
 *
 * Copyright (c) 2018 Paul J. Drongowski
 *               Permission granted to modify and distribute
 *
 * The program reads a file named "breakpoints.txt" and generates 
 * a Yamaha  * amplitude level scaling table. The table is written 
 * to standard out. The table is one long string (line) containing 
 * 128 integer values ranging from -127 to +128.
 *
 * The breakpoint file contains four break points, one break point
 * per line. A breakpoint is a MIDI note name and an offset. 
 * Collectively, the break points form a curve that controls 
 * how the Genos (synth) voice level varies across the MIDI note
 * range (from 0 to 127). The curve extends to MIDI notes C-2
 * and G8.
 *
 * Exampe "breakpoints.txt" file:
 * A#2 -85
 * E3 +0
 * F#5 +0
 * C7 -103
 *
 * The file syntax is somewhat brittle: use only a single space 
 * character to separate fields and do not leave extraneous 
 * blank lines at the end of the file.
 */

public class GenScalingTable {
    static String[] bpNotes = new String[4] ;
    static int[] bpOffsets = new int[4] ;
    static int[] bpNumber = new int[4] ;
    final static boolean debug_flag = false ;

    final static String[] noteNames = {
	"C-2","C#-2","D-2","D#-2","E-2","F-2","F#-2","G-2","G#-2","A-2","A#-2","B-2",
	"C-1","C#-1","D-1","D#-1","E-1","F-1","F#-1","G-1","G#-1","A-1","A#-1","B-1",
	"C0","C#0","D0","D#0","E0","F0","F#0","G0","G#0","A0","A#0","B0",
	"C1","C#1","D1","D#1","E1","F1","F#1","G1","G#1","A1","A#1","B1",
	"C2","C#2","D2","D#2","E2","F2","F#2","G2","G#2","A2","A#2","B2",
	"C3","C#3","D3","D#3","E3","F3","F#3","G3","G#3","A3","A#3","B3",
	"C4","C#4","D4","D#4","E4","F4","F#4","G4","G#4","A4","A#4","B4",
	"C5","C#5","D5","D#5","E5","F5","F#5","G5","G#5","A5","A#5","B5",
	"C6","C#6","D6","D#6","E6","F6","F#6","G6","G#6","A6","A#6","B6",
	"C7","C#7","D7","D#7","E7","F7","F#7","G7","G#7","A7","A#7","B7",
	"C8","C#8","D8","D#8","E8","F8","F#8","G8"
    } ;

    public static int findNoteName(String note) {
	for (int i = 0 ; i < noteNames.length ; i++) {
	    if (note.equals(noteNames[i])) return( i ) ;
	}
	System.err.println("Unknown note name: '" + note + "'") ;
	return( 0 ) ;
    }

    // Put scaling values for a segment of the scaling "graph"
    public static void putTableValues(int startNote, int startOffset,
				      int endNote, int endOffset) {
	// Don't put any values if (startNote == endNote)
	if (startNote != endNote) {
	    int numberOfValues = Math.abs(endNote - startNote) ;
	    double foffset = (double) startOffset ;
	    double difference = (double)(endOffset - startOffset) ;
	    double delta = difference / (double)numberOfValues ;
	    for (int i = 0 ; i < numberOfValues ; i++) {
		System.out.print(Math.round(foffset) + " ") ;
		foffset = foffset + delta ;
	    }
	}
    }

    public static void main(String argv[]) {
	int bpIndex = 0 ;

	// Read break points (note+offset), one per line
        try {
	    FileInputStream fstream = new FileInputStream("breakpoints.txt") ;
	    DataInputStream in = new DataInputStream(fstream) ;
	    BufferedReader br = new BufferedReader(new InputStreamReader(in)) ;
	    String strLine ;
	    while ((strLine = br.readLine()) != null) {
		String[] tokens = strLine.split(" ") ;
		if (bpIndex < 4) {
		    bpNotes[bpIndex] = tokens[0] ;
		    bpOffsets[bpIndex] = Integer.parseInt(tokens[1]) ;
		    bpNumber[bpIndex] = findNoteName(tokens[0]) ;
		    bpIndex = bpIndex + 1 ;
		}
	    }
	    in.close() ;
	} catch (Exception e) {
	    System.err.println("Error: " + e.getMessage()) ;
            e.printStackTrace() ;
        }

	// Display the break point values
	if (debug_flag) {
	    for (int i = 0 ; i < 4 ; i++) {
		System.err.println(bpNotes[i] + " " + bpNumber[i]
				   + " " + bpOffsets[i]) ;
	    }
	}

	// Generate the key scaling table to the standard output
	putTableValues(0, bpOffsets[0], bpNumber[0], bpOffsets[0]) ;
	putTableValues(bpNumber[0], bpOffsets[0], bpNumber[1], bpOffsets[1]) ;
	putTableValues(bpNumber[1], bpOffsets[1], bpNumber[2], bpOffsets[2]) ;
	putTableValues(bpNumber[2], bpOffsets[2], bpNumber[3], bpOffsets[3]) ;
	putTableValues(bpNumber[3], bpOffsets[3], 128, bpOffsets[3]) ;
    }
}