Ah, we’re starting to hit the silly phase of keyboard micro-analysis and Web discussion vis a vis the not yet, not quite announced Yamaha Montage.
So, is it a floor wax or a dessert topping? Should we follow the holy sandal or the holy gourd?
Any other comedy bits I can rip off? 🙂
Frankly, I will probably never touch the bits which are touted to be for “EDM.” I’m not angry or even mildly perturbed that Yamaha would put such “useless” features on my keyboard. It’s a big world. Thank heaven for those features because more people will buy the Montage making it easier for Yamaha to offer this product at a lower street price. And gasp, I may even come to learn, use and love some of those “EDM” features. At the same time, I want to thank all those guys doing covers at the Holiday Inn…
I’ve been drawing up a shopping list of sounds and features which I would like to see in the Montage or whatever keyboard that replaces/upgrades my MOX6. What are those sounds and features? They’re personal. Not secret — personal. Even the Motif XF6 is a candidate, because heck, the discount is only going to get sweeter after the Montage drops. So, I also drew up a list comparing the MOX6 against the XF based on the desired feature set.
After a day of God (gig) and football (play-offs), I took a fresh glance at the high rez screen shots. Some these pictures are making more sense to me now. (Click on any of these images to get full resolution.)
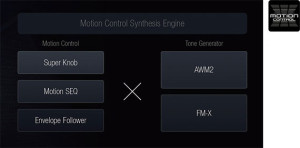
The Motion Control Synthesis Engine concept is a more concise and powerful way to think about all of those control assignments and parameters in the current Motif/MOX UI. The Super Knob, Motion SEQ and Envelope Follower sections twitch and tweeze parameters in the AWM2 and FM-X tone generators. The Motion SEQ and Envelope Follower add a dynamic aspect to the twitching and tweezing. The Motion SEQ can sync these changes to tempo — something that you don’t always get in Motif/MOX.
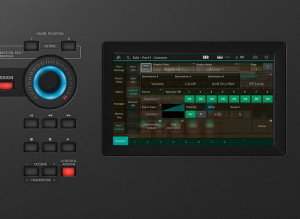
This afternoon, I was busy deconstructing the programming behind a few of the drawbar organ patches on the MOX. On the current products, you can tweak individual parameters using the mod wheel, assignable function buttons or assignable knobs. Conceivably, one could control a group of parameters from the mod wheeel, for example, but setting this up through the current UI is an exercise in tedious menu diving. If Yamaha got the Montage UI right, then it should be easier to assign multiple parameters to the Super Knob (or Motion SEQ or Envelope Follower).
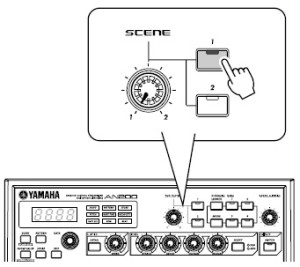
Further, the Super Knob appears to support morphing between two scenes where a scene is a particular configuration of one or more parameters, kind of like the old AN200/DX200. Let’s say you want to be able to morph from one organ drawbar setting to another. (Thanks, Bad Mister, for this idea.) If my interpetation is correct, then it should be possible to set up the first drawbar setting as scene 1, set up the second drawbar setting as scene 2, and then morph the drawbars between the two scenes. Cool. Maybe not as flexible as moving individual bars, but workable and low stress during the gig.
Ew, did I just use one of those “EDM” features? 🙂
BTW, parts of the screenshot to the right of the Super Knob should look familiar to Motif/MOX users. The Motif/MOX UI separates Voice and Performance editing into COMMON and per-PART (or per-ELEMENT) tabbed pages. This screenshot shows the COMMON page. The first vertical column of six touch buttons on the left-hand side of the screen replace the physical function buttons that selected tabs. The second vertical column of six touch buttons replace the old physical sub-function buttons. The sub-functions in the second column depend on the what’s selected in the first column. It’s all contextual. If you know how to navigate the Motif/MOX, this should be a breeze. It looks like this page edits the knob control assignment for an FM-X voice.
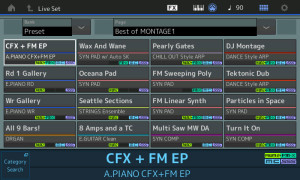
The Performance selection screenshot started to make more sense, too. The touch button in the upper left corner let’s us select the Performance bank. The touch button in the lower left does category search. No surprises. Each voice is tagged with up to four icons: AWM2, FM-X, MC, and SSS. The icons indicate the kind of Performance, that is, the tone generation method, Motion Control and SSS (Seamless Sound Switching).
On Saturday, I was trying to figure out the meaning of “All 9 Bars!” and how individual drawbars might be controlled. Given what I’ve inferred about the Motion Control Synthesis Engine, this Performance most likely morphs from one drawbar setting to another via the Super Knob. SSS comes into play when switching from one drawbar setting to the next such that the sound is not interrupted. Of course, this means that the number of parts is limited to eight maximum. Current Motif/MOX voices make use of waveforms like “Draw 1+3” and “Draw 2+4” to cover more than one tonewheel footage per tone generation element. It may be necessary to exploit such waveforms on the Montage, too. We’ll see.
The Seattle Sections Performance might be fun, too. Maybe it morphs from quiet strings to fortissimo? The crescendo could be gradual and tempo sync’ed — a musical effect that is difficult to play live through velocity (key dynamics).
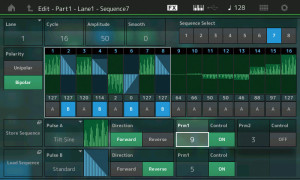
I’m rather surprised that folks are debating whether the Montage has a sequencer or not. Or whether the Montage has arpeggios or not. These features appear quite clearly in the screenshoots. There is even a physical “ARP ON/OFF” button on the front panel. Good thing it’s physical because you wouldn’t want to dig for that switch in a menu somewhere! The “lane” notion is just a way of dealing with limited vertical screen space. The UI probably uses lanes that fold up and hide rather than displaying all horizontal lanes and endlessly scrolling up and down. I’ll bet that the UI designers drew from Steinberg’s experience with Cubasis on iPad.
If one assumes that the screen captures are one-to-one, then the Montage native screen resolution is 800H by 480V pixels.
In closing, I must say that the graphic design is clean, modern and inviting. Yamaha have definitely been applying their experience with Cubasis and Mobile Music Sequencer.
Well, that’s it, folks! Like you, I’m waiting for the demo videos, manuals and a test drive. In the meantime, put on whatever moves you and chill. Maybe “Wicked Game” by Groovy Waters. Or “Lean On Me” from 20 Feet From Stardom and listen to Darlene Love testify. Peace.
Extra! Extra!
Here’s a blast from the past — quotes from the old AN200 manual about its Scene and FreeEG features.
AN200 Scene
While playing back a Pattern, turn the [SCENE] knob slowly, back and forth. Notice how the sound gradually “morphs” between 1 and 2 — in real time as you work the knob! Do this in sync with the rhythm and create your own shifting textures!
The exciting and powerful Scene feature lets you create and use two different Voices within a single Pattern. Most importantly, it lets you instantly switch between them or gradually “morph” from one to the other — all in real time. Now, it’s time for you to create a Scene or two of your own.
- Press SCENE button [1]. This is the Scene you’ll be working on first.
- Work the controls and get the sound you want for Scene 1. Any and all of the Synth knobs can be used.
- While holding down [STORE], press SCENE button [1].
- Do the same operation for Scene 2 — repeating Steps 1 – 3 above with SCENE button [2] this time.
AN200 FreeEG
The AN200 has so many real-time control features, it’s hard to get a grip on them all. Feel you need an extra pair of hands? Or maybe an extra two? No problem. Just use the amazing Free EG feature. The AN200 is packed with a lot of powerful recording functions — but none are quite as impressive as this. Free EG gives you up to four tracks for recording your knob moves — letting you incorporate real-time sound changes and knob moves as a part of the Pattern. So every time you play the Pattern, your knob changes play right along with it — just as you recorded them. We call this “Free EG” because it allows you to create unique, complex, continuous parameter changes that would be impossible to achieve with conventional EGs.
- Call up the desired Pattern, and press the red Record button.
- Select the Free EG track you want to record.
- Start the Pattern, and make your moves.
- To stop recording, press the Start/Stop button.
- To hear your Free EG recording, make sure that the appropriate track buttons are on, then press the Start/Stop button to play the Pattern.

