Yamaha VKB-100 redux

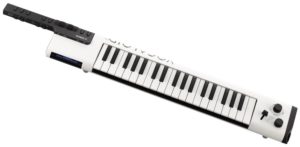
OK, sooner or later, you knew I would circle back to the Yamaha VKB-100 VOCALOID keyboard. This little gem is a vocal keytar that lets you play pre-loaded lyrics using an installed Vocaloid library sound. Up to five libraries may be installed including the VY-1 library that ships with the VKB-100.

The VKB-100 can be had for the relatively low price of roughly $400USD, depending on shipping cost from Japan. The VKB-100 is only available in Japan at the current time.

Here’s a quick summary of the specs (translated from Japanese):

Number of keys: 37
Keyboard type: HQ (High Quality) MINI keyboard
Maximum polyphony: Vocaloid (mono), Instruments (48)
Number of voices:
    Vocaloid: Up to 5 libraries, Preset: 1 library (VY-1)
    Instrument: Preset: 13
Effects: Reverb, distortion, chorus, tremolo
Equalizer: Flat, Boost, Bright, Mild
Lyric operation: Loop, phrase return/forward, head search, recover
Skill
    Vocaloid: 2 assignable skills
    Instrument: Skill 1: Sustain, Skill 2: Portamento
Memory slots: Vocaloid: 20, PCM sound source: 20
Main controls Pitch Bend Wheel, Expression Wheel, Effect Knob, 
    Select Knob, Selector Slider, Transpose button, Phrase Button, 
    Memory Button,  Skill Button, Octave Button, Loop Button, 
    Master Volume Knob
USB: USB to HOST, USB to DEVICE
Audio connections
    Headphone out
    AUX in
    Line out
Amplifier output: 0.7W
Internal speaker size: 3.6cm
Power adapter: PA-150B
Battery power: 6 x AA alkaline or rechargeable NiMH batteries
Battery life: About 7 hours when using alkaline batteries
Width x depth x height: 821 mm x 121 mm x 65 mm
Width x depth x height: 32.3 in x 4.8 in x 2.6 in
Weight: 1.5kg
Accessory soft case: SC-KB350 (5,500 Yen)

The keybed is probably the Reface keybed. (Sturdy, slightly clack-y.) What’s that? Instruments? Hmmm…

I don’t want to run through the operational particulars, again. Please see the following pages for background information:

It’s cheap, it straps on, it has a keyboard and wheels. Can it be used as a MIDI controller? As an instrument in it’s own right?

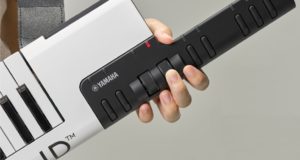
The build quality looks pretty decent and the ergonomics are nice. There are two wheels on the neck: pitch bend and expression. And here we hit the first bump in the road — no modulation. A quick look at the MIDI chart and we find that the VKB-100 sends:

  • Pitch bend
  • Portamento time (CC# 5)
  • Expression (CC# 11)
  • Portamento ON/OFF (CC# 65)
  • Release time (CC# 72)

That’s it. Now, I suppose one could remap CC# 11 to modulation, but it would be better to have modulation generated natively.

The other gotcha. The VKB-100 has two modes: normal and keyboard mode. The VKB-100 only sends MIDI controller/key messages in keyboard mode, not normal mode. The user must select keyboard mode through a menu and this setting is not retained across power off. That means changing to keyboard mode after every shutdown.

The VKB-100 doesn’t receive much of MIDI anything except some undocumented SysEx. Thus, forget about sequencing.

The final gotcha is MIDI over USB only. If you want to drive an old school 5-pin DIN MIDI module or keyboard, you will need to bridge USB to 5-pin.

So, what about those preset instruments? Here’s a list:

  1. Synth 1
  2. Synth 2
  3. Synth 3
  4. Synth 4
  5. E. Guitar
  6. Harmonica
  7. Tenor Sax
  8. Piano
  9. E. Piano
  10. Synth Bass
  11. Slap Bass
  12. Air Choir
  13. Applause

Quality is comparable to an entry-level PSR keyboard. The Tenor Sax voice, for example, sounds like the Sweet! Tenor Sax in a PSR-E443. At least you have four effect types (reverb, distortion, chorus, tremolo) with four effect depth levels each. Kinda basic.

After a few insipid J-Pop YouTube demos, you want to blow your brains out. I watched them, so you don’t have to. Here are a few demos to check out.

Hey, Blake! You got to go to Superbooth? I’m jealous!

Bottom line, I was intrigued until I dove into the (Japanese) manuals and found the VKB-100’s limitations as a controller and stand-alone instrument. Ordering from Japan is no big deal, but the VKB-100 would have to offer some real cool features and sounds to compensate for the labor of translating Japanese to English and dealing with display messages in Japanese.

If you want to get your feet wet with Vocaloid, I recommend the Gakken NSX-36 Pocket Miku module. No keytar action, but you get a multi-timbral MIDI module that does Miku Vocaloid at a very modest price (less than $50 USD).

Copyright © 2018 Paul J. Drongowski

Pocket Miku (Thanks, David!)

I usually unwind with a book or Keyboard Magazine before turning out the light for a good night’s rest. Some of you know Keyboard Magazine as Electronic Musician. πŸ™‚

Imagine my surprise when I read David Battino’s “Adventures in DIY” and it’s about Gakken’s Procket Miku. And further, David gives a shout out to your’s truly and this blog (sandsoftwaresound.net).

Thank you, David! “Adventures in DIY” is one of the main reasons that I keep subscribing to Keyboard Magazine. David has a playfulness in his projects and approach that I really like. Plus, anyone who likes Japanese monsters and toys would fit right into our family.

David continues a long tradition of DIY writing that goes back to Polyphony Magazine, where I really got the bug to create. (There’s still a few treasured issues of Polyphony in our basement.)

So, if you came looking for Gakken Pocket Miku, NSX-39 or Yamaha’s NSX-1 integrated circuit, here’s a quick list of pages related to those topics:

While you’re here, please browse around. This site is my mental storage unit and you’ll never know what you might find. Lately, I’ve been diving into the new Yamaha Genos™. Maybe you need some content like scat vocal samples, converted DJXII patterns, or Motif performances converted to PSR/Tyros styles? Maybe you’re interested in taking a tour inside Montage, PSR/Tyros, or Kronos? Use soft synths on Linux and use Raspberry Pi to bridge 5-pin MIDI and USB.

And then there are reviews of products that I’ve tried or eventually purchased: Yamaha Montage, Genos, Reface CP, Reface YC, Korg Triton Taktile, Roland GO:KEYS, Nord Stage 2ex, etc.

There are several Arduino-based projects to browse (with downloadable code). Heck, there are even notes about data structures, computer architecture and VLSI design from back in the day.

Have fun!

Book-wise, I’m currently reading David Weigel’s “The Show That Never Ends: The Rise and Fall of Prog Rock.” Fun stuff.

Vocaloid keyboard announced

At long last, Yamaha have announced their Vocaloid™ keyboard, the VKB-100. The VKB-100 is a keytar design similar to the prototype shown at the “Two Yamahas, One Passion” exhibition at Roppongi Hills, Tokyo, July 3-5, 2015.

More details will be released in December 2017. However, this much is known:

  • Lyrics are entered using a dedicated application for smart phones and tablets via Bluetooth.
  • VY1 is the built-in default singing voice.
  • Up to 4 Vocaloid singers can be added using the application.
  • Four Vocaloid voices will be available: Hatsune Miku, Megpoid (GUMI), Aria on the Planets (IA), and Yuzuki Yukari.
  • Melody is played by the right hand while the left hand adds expression and navigates through the lyrics.
  • A speaker is built-in making the VKB-100 a self-contained instrument.

The VKB-100 was demonstrated at the Yamaha exhibition booth at the “Magical Mirai” conference held at the Makuhari Messe, September 1-3, 2017. Price is TBD.

VY1 is a female Japanese voice developed by Yamaha for its own products. VY1 does not have an avatar or character like other Vocaloid singers. This makes sense for Yamaha as they can freely incorporate VY1 in products without playing royalties or other intellectual property (IP) concerns.

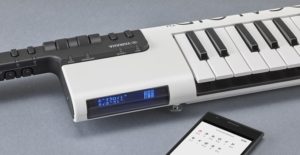
The Vocaloid keyboard has had a long evolution, going through five iterations. The first three models did not use preloaded lyrics. Instead, the musician entered katakana with the left hand while playing the melody with the right hand. This proved to be too awkward and Yamaha moved to preloaded lyrics. The left hand controls on the neck add expression using pitch and mod wheels. The left hand also navigates through the lyrics as the musician “sings” via the instrument. The current lyrics are shown in a display just to the left of the keyboard where the musician can see them.

Yamaha will release more information on the Vocaloid keyboard site.

If you want to get started with Vocaloid and don’t want to spend a lot of Yen (or dollars), check out the Gakken NSX-39 Pocket Miku. Pocket Miku is a stylophone that plays preloaded Japanese lyrics. The NSX-39 also functions as a USB MIDI module with a General MIDI sound set within a Yamaha XG voice and effects architecture.

Be sure to read my Pocket Miku review and browse the resource links available at the bottom of the review page.

Copyright © 2017 Paul J. Drongowski

Pocket Miku: Module review

So far, I’ve posted several articles with resources for the Yamaha NSX-1 eVocaloid integrated circuit and the Gakken Pocket Miku (NSX-39), which is based on the NSX-1 chip. (See the bottom of this page for links.) This post pulls the pieces together.

Pocket Miku is both a vocal stylophone and a Yamaha XG architecture General MIDI (GM) module. There are plenty of Pocket Miku stylophone demos on the Web, so I will concentrate on Pocket Miku as a module.

Pocket Miku connects to your PC, mobile device or whatever over USB. The module implements sixteen MIDI channels where channel one is always assigned to the Miku eVocaloid voice and channels 2 to 16 are regular MIDI voices. As I said, the module follows the XG architecture and you can play with virtually all of the common XG features. The NSX-1 within Pocket Miku includes a fairly decent DSP effects processor in addition to chorus and reverb. The DSP effect algorithms include chorus, reverb, distortion, modulation effects, rotary speaker and a lot more. Thus, Pocket Miku is much more than a garden variety General MIDI module.

My test set up is simple: Pocket Miku, a USB cable, a Windows 7 PC, Cakewalk SONAR and a MIDI controller. Pocket Miku’s audio out goes to a pair of Mackie MR5 Mk3 monitors. The MP3 files included with this post were recorded direct using a Roland MicroBR recorder with no added external effects.

The first demo track is a bit of a spontaneous experiment. “What happens if I take a standard XG MIDI file and sling it at Pocket Miku?” The test MIDI file is “Smooth Operator” from Yamaha Musicsoft. Channel 1 is the vocal melody, so we’re off to a fast start right out of the gate.

One needs to put Pocket Miku into NSX-1 compatibility mode. Simultaneously pressing the U + VOLUME UP + VOLUME DOWN buttons changes Pocket Miku to NSX-1 compatibility mode. (Pocket Miku responds with a high hat sound.) Compatibility mode turns off the NSX-39 SysEx implementation and passes everything to the NSX-1 without interpetation or interference. This gets the best results when using Pocket Miku as a MIDI module.

Here is the MP3 Smooth Operator demo. I made only one change to the MIDI file. Unmodified, Miku’s voice is high enough to shatter glass. Yikes! I transposed MIDI channel 1 down one octave. Much better. Pocket Miku is singing whatever the default (Japanese) lyrics are at start-up. It’s possible to send lyrics to Pocket Miku using SysEx messages embedded in the MIDI file. Too much effort for a spontaneous experiment, so what you hear is what you get.

Depending upon your expectations about General MIDI sound sets, you’ll either groan or think “not bad for $40 USD.” Miku does not challenge Sade.

One overall problem with Pocket Miku is its rather noisy audio signal. I don’t think you can fault the NSX-1 chip or the digital-to-analog converter (DAC). (The DAC, by the way, is embedded in the ARM architecture system on a chip (SOC) that controls the NSX-1.) The engineers who laid out the NSX-39 circuit board put the USB port right next to the audio jack. Bad idea! This is an example where board layout can absolutely murder audio quality. Bottom line: Pocket Miku puts out quite a hiss.

The second demo is a little more elaborate. As a starting point, I used a simple downtempo track assembled from Equinox Sounds Total Midi clips. The backing track consists of electric piano, acoustic bass, lead synth and drums — all General MIDI. Since GM doesn’t offer voice variations, there’s not a lot of flexibility here.

I created an (almost) tempo-sync’ed tremolo for the electric piano by drawing expression controller events (CC#11). My hope was to exploit the DSP unit for some kind of interesting vocal effect. However, everything I tried on the vocal was over-the-top or inappropriate. (Yes, you can apply pitch change via DSP to get vocal harmony.) Thus, Miku’s voice is heard unadulterated. I eventually wound up wasting the DSP on a few minor — and crummy — rhythm track effects.

I created four lyrical phrases:

A summer day           Natsu no hi
f0 43 79 09 00 50 10 6e 20 61 2c 74 73 20 4d 2c 6e 20 6f 2c 43 20 69 00 f7

Your face              Anata no kao
f0 43 79 09 00 50 10 61 2c 6e 20 61 2c 74 20 61 2c 6e 20 6f 2c 6b 20 61 2c 6f 00 f7

A beautiful smile      Utsukushi egao
f0 43 79 09 00 50 10 4d 2c 74 73 20 4d 2c 6b 20 4d 2c 53 20 69 2c 65 2c 67 20 61 2c 6f 00 f7

A song for you         Anata no tame no uta
f0 43 79 09 00 50 10 61 2c 6e 20 61 2c 74 20 61 2c 6e 20 6f 2c 74 20 61 2c 6d 20 65 2c 6e 20 6f 2c 4d 2c 74 20 61 00 f7

The Japanese lyrics were generated by Google Translate. I hope Miku isn’t singing anything profane or obscene. πŸ™‚

I did not create the SysEx messages by hand! I used the Aides Technology translation app. Aides Technology is the developer of the Switch Science NSX-1 Arduino shield. The application converts a katakana phrase to an NSX-1 System Exclusive (SysEx) message. Once converted, I copied each HEX SysEx message from the Aides Tech page and pasted them into SONAR.

Finally, the fun part! I improvised the Miku vocal, playing the part on a Korg Triton Taktile controller. What you hear in the MP3 Pocket Miku demo is one complete take. The first vocal section is without vibrato and the second vocal section is with vibrato added to long, held notes. I added vibrato manually by drawing modulation (CC#1) events in SONAR, but I could have ridden the modulation wheel while improving instead.

The overall process is more intuitive than the full Vocaloid editor where essentially everything is drawn. Yamaha could simplify the process still further by providing an app or plug-in to translate and load English (Japanese) lyrics directly to an embedded NSX-1 or DAW. This would eliminate a few manual steps.

Overall, pre-loaded lyrics coupled with realtime performance makes for a more engaging and immediate musical experience than working with the full Vocaloid editor. If Yamaha is thinking about an eVocaloid performance instrument, this is the way to go!

The pre-loaded lyric approach beats one early attempt at realtime Vocaloid performance as shown in this You Tube video. In the video, the musician plays the melody with the right hand and enters katakana with the left hand. I would much rather add modulation and navigate through the lyrics with the left hand. This is the approach taken for the Vocaloid keytar shown on the Yamaha web site.

Here is a list of my blog posts about Pocket Miku and the Yamaha NSX-1:

I hope that my experience will help you to explore Pocket Miku and the Yamaha NSX-1 on your own!

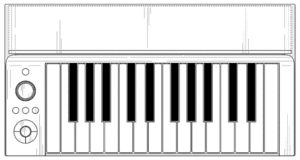
Before leaving this topic, I would like to pose a speculative question. Is the mystery keyboard design shown below a realtime eVocaloid instrument? (Yamaha U.S. Patent number D778,342)

The E-to-F keyboard just happens to coincide with the range of the human voice. Hmmmm?

Copyright © 2017 Paul J. Drongowski

Pocket Miku software resources

This page is a collection of resources for using and programming Gakken Pocket Miku, also known as the “NSX-39”. It starts out with a cheat sheet for using Pocket Miku, moves on to Web-based applications, and finishes with customization and MIDI System Exclusive (SysEx) messages.

Be sure to read the Pocket Miku user’s guide before starting. The material below is not a hand-holding tutorial!

Pocket Miku cheat sheet

Stylus area

The lower part of the stylus area is a chromatic keyboard which plays notes. The upper part of the stylus area is a ribbon controller. Touch the stylus to either area to make music.

This is a classic resistive keyboard/ribbon controller. Stylus actions are converted to MIDI note ON, MIDI note OFF and pitch bend messages. The MIDI note is fixed: F#. MIDI pitch bend messages determine the actual final pitch which is heard.

Operating modes

Pocket Miku has two major operating modes:

  1. Normal mode
  2. NSX-1 compatibility mode

Pocket Miku boots into normal mode. In this mode, the NSX-39 recognizes and responds to stylus actions, button presses, etc.

Pocket Miku has three submodes in the normal operating mode:

  1. Do-Re-Mi mode with scales (default)
  2. A-I-U-E-O mode with vowels (SHIFT + vibrato button)
  3. Preset lyric mode with 5 lyrics (SHIFT + one of the AEIOU buttons)

The default phrases in preset lyric mode are:

    SHIFT + A    Konnichiwa Arigato (Hello, thank you)
    SHIFT + I    Butterfly song (choucho)
    SHIFT + U    Cherry blossom song (Sakura)
    SHIFT + E    Auld Lang Syne (Hotaru no hikari)
    SHIFT + O    Irohanihoheto

The magic key combination U + VOLUME UP + VOLUME DOWN switches between normal mode and NSX-1 compatibility mode. Pocket Miku plays a high hat hit when changing modes (not a “beep”). The Yamaha Web applications use NSX-1 compatibility mode. NSX-1 compatibility mode is also good for DAW-based sequencing since it decreases latency by disabling the interpretation of MIDI System Exclusive messages that are meaningful only to the NSX-39 microcontroller.

Buttons

Pocket Miku responds to single button presses and combinations:

    A-I-U-E-O    Selects on of the vowel phonemes
    VIBRATO      Adds vibrato to the sound
    SHIFT        Selects additional functions and modes
    VOLUME UP    Increase volume
    VOLUME DOWN  Decrease volume

    SHIFT + A, SHIFT+I, ...   Select A-I-U-E-O vowel mode
    SHIFT + VIBRATO           Select Do-Re-Mi mode
    SHIFT + VOLUME UP         Octave up
    SHIFT + VOLUME DOWN       Octave down
    VIBRATO + VOLUME UP       Pitch bend up (up one semi-tone)
    VIBRATO + VOLUME DOWN     Pitch bend down (down one semi-tone)

    A + VOLUME UP + VOLUME DOWN        Panic reset
    U + VOLUME UP + VOLUME DOWN        Select NSX-1 mode
    O + VOLUME UP + VOLUME DOWN        Retune Pocket Miku
    SHIFT + VOLUME UP + VOLUME DOWN    Initialize (factory reset)

Web-based applications

Gakken NSX-39 applications

Gakken provide three applications specifically for the NSX-39 (in normal mode). The applications are at http://otonanokagaku.net/nsx39/app.html.

Google Chrome version 33 or later is required because the Gakken applications use the Web MIDI API.

Connect NSX-39 to your computer with a USB cable and set the power switch of the NSX-39 to “USB”. If you do not connect the NSX-39 before you start Google Chrome, the NSX-39 will not be recognized by the application.

The Web MIDI API must be enabled in Google Chrome. After starting Chrome, enter:

    chrome://flags/#enable-web-midi

in the address bar as shown on the first “Browser Settings” screen. Then, enable the API in the “Enable Web MIDI API” column. Please click the appropriate button (e.g., “Use Windows Runtime MIDI API”) and restart Google Chrome.

Launch the desired application from here:

Once you agree to the End User License Agreement (EULA), you can connect to the NSX-39 (Pocket Miku’s model number).

If this procedure does not work, please restart the computer and proceed from the first step.

Application: Input lyrics

You can edit the lyrics by pressing the “E” button in the lyric input slot. Only Hiragana can be input. After inputting lyrics, pressing “Enter” on the keyboard and the app sends lyric data to Pocket Miku.

After sending lyrics data, when playing Pocket Miku, Pocket Miku sings according to the sent lyrics.

Lyrics can input 64 letters per slot. There are 15 slots and they are selected with [A] - [O], [SHIFT] + [A] - [O], [VIBRATO] + [A] - [O].

Press [SHIFT] + [VIBRATO] during editing to switch to Do-Re-Mi mode.

Application: Play in realtime

This is an application where you can input and play lyrics in realtime. If you hover over the tile where the letters are written on the screen, you can pronounce that character.

Tiles can be selected from 50, mentai (voiced, semi-voiced), small letters (1) (2), jiyuu (free arrangement) mode.

Jiyuu is a mode that allows you to place characters freely using the “frog” menu:

  • Tsukasa … You can add up to 50 letters, panels.
  • Move … Move the panel to the desired position by dragging.
  • Ken … You can delete the panel by clicking it.
  • Reading … Read the saved character panel setting file.
  • Upload … Save the character panel setting as an external file.

Google Translate didn’t do so well with these instructions! Sorry.

Change configuration

Config is an abbreviation for configuration and means “setting.” With this application, you can change the settings of Pocket Miku and add new functions. The following four operations are supported:

  • Startup sound for function addition pack
  • SHIFT button Character heading / character advance
  • Effect ON / OFF
  • Harmony

Please press the “Install” button and read the displayed message and if there is no problem press the “Send” button. When all the functions are installed, a voice saying “Owarai” appears, and writing the settings is completed.

If you want to restore the settings back, please click the “Uninstall” button, read the explanation carefully, and press the “Send” button if there is no problem.

Yamaha NSX-1 applications

Yamaha provide open source sample apps (Japanese language) at http://yamaha-webmusic.github.io/. The Yamaha applications use the Web MIDI API. See the directions above in order to set up Google Chrome.

In order to use these applications, you must change Pocket Miku to NSX-1 compatibility mode by pushing U + VOLUME UP + VOLUME DOWN simultaneously.

Aides Technology application

Aides Technology is the developer of the Switch Science NSX-1 Arduino shield.

They have one very handy Web application when MIDI sequencing. The application translates romaji (kana text) lyrics to an NSX-1 System Exclusive (SysEx) message. You can copy the HEX SysEx message from the page and paste it into your DAW. On Windows, the application will put the SysEx message on the Windows clipboard automatically.

You may also need this ASCII to Hex text converter when debugging your SysEx messages.

I’m a long time SysEx HEX warrior. Trust me, this is the way to go!

Customization and MIDI System Exclusive messages

Customization is the most difficult topic due to its complexity and the general lack of English language resources. Customization is performed through MIDI System Exclusive messages instead of simple textual commands. This approach enables use of the Web MIDI API, but makes it darned difficult to compose messages by hand.

I’m told that the Gakken Official Guide Book (Gakken Mook) contains a short section about customization via SysEx. However, one cannot cram a paper magazine through Google Translate. πŸ™‚

The next best thing is the Pocket Miku Customization Guide (PDF) by Uda Denshi (polymoog). This guide and Google Translate will only take you so far.

The absolute best English language resource is the series of blogs written by CHH01:

Please note that Pocket Miku has two major subsystems: a microcontroller and the Yamaha NSX-1 integrated circuit. Each subsystem has its own SysEx messages. See the Yamaha NSX-1 MIDI implementation reference manual for information about its SysEx messages. Messages interpreted by the microcontroller are described in the Pocket Miku Customization Guide. These messages are turned OFF when Pocket Miku is in NSX-1 compatibility mode.

The NSX-39 SysEx implementation is very powerful. You can change the lyrics which are stored in flash memory (15 lyric slots), change the way the NSX-39 responds to button presses (120 command slots), read switch states, and much more. Here is a list of the main customization message types (thanks to CHH01):

F0 43 79 09 11 d0 d1 d2 d3 d4 d5 ... F7

Request Version Data          d0=0x01 d1=N/A
Version Data Reply            d0=0x11 d1=NSX-39 version data
Lyrics Entry                  d0=0x0A d1=lyrics slot number   d2=character data
Request Command Slot Details  d0=0x0B d1=command slot number
Command Slot Reply            d0=0x1B d1=command
Change Command Slot           d0=0x0C d1=command slot number  d2=command
Command Direct Entry          d0=0x0D d1=command
Lyric Number Data Request     d0=0x0E d1=N/A
Lyric Number Data Reply       d0=0x1E d1=Slot number          d2=Slot data
Lyric Details Request         d0=0x0F d1=Slot number
Lyric Details Reply           d0=0x1F d1=character count      d2=character 1, etc.
Switch State                  d0=0x20 d1=000000ih             d2=0gfedcba
NSX-39 Status                 d0=0x21 d1=Status

Good luck with your investigations and experiments!

Copyright © 2017 Paul J. Drongowski

Pocket Miku pictures

Thanks very much to our friends at japan24net on eBay! They did a superb job of packing and Pocket Miku arrived at our house in record time. γ©γ†γ‚‚γ‚γ‚ŠγŒγ¨γ†γ”γ–γ„γΎγ—γŸ

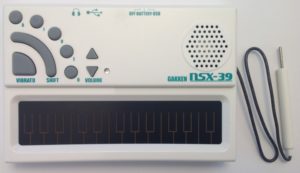
Now, the obligatory pictures! Please click on the images for higher resolution. Front:

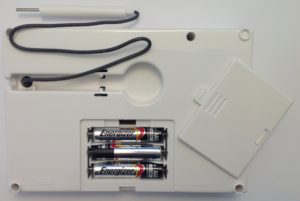
The back:

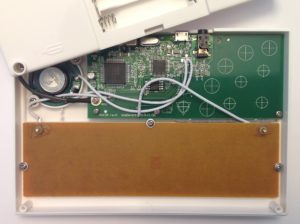
With the rear cover off:

And finally, the money shot:

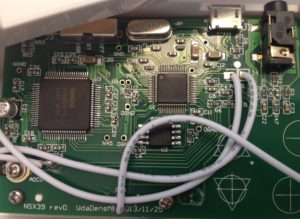
That looks like a 12.000 MHz crystal. Sorry, I didn’t have time to work through the data sheet and compute the CPU clock frequency. (96MHz maximum)

Copyright © 2017 Paul J. Drongowski

Pocket Miku hardware resources

Pocket Miku, also known as “NSX-39,” has three major integrated circuit components:

Here is the Pocket Miku NSX-39 circuit schematic.

The Generalplus GP3101A is a system on a chip (SOC) advanced multimedia processor. The GPEL3101A is an ARM7TDMI processor with integrated RAM and many peripheral interfaces including:

  • 136KByte SRAM
  • Universal Serial Bus (USB) 2.0 interface
  • 8 channel sound processing unit (SPU)
  • SPI (master/slave) interface
  • Programmable general I/O ports (GPIO)
  • 6-channel, 12-bit analog to digital converter (ADC)
  • 16-bit stereo (2-channel) audio digital to analog converter
  • 0.5W class AB mono audio amplifier

Here is the Generalplus GP31P1003A product brief. The NSX-39 schematic does not specify the clock crystal frequency, but the GP31P1003A can operate up to 96MHz.

The Yamaha NSX-1 eVocaloid processor communicates with the GPEL3101A via SPI. MIDI messages, commands, and initialization data are communicated serially. The GPEL3101A control software converts MIDI over USB to MIDI messages sent to the NSX-1 via the SPI connection.

The GPEL3101A senses the keyboard and stylus inputs through its 6-channel, 12-bit ADC.

The NSX-1 generates a digital audio stream which is sent to the GPEL3101A digital audio auxiliary input. The GPEL3101A converts the digital audio to analog audio using its DAC. (This is a neat solution — no discrete DAC component!) The GPEL3101A sends analog audio to the external PHONE OUT and amplified audio is driven into the NSX-39’s speaker.

The Macronix MX25L1635E is a 16Mbit CMOS serial flash memory. It communicates with the GPEL3101A via SPI (4xI/O mode). The memory can retain 2MBytes of data. The MX25L1635E holds the NSX-39 control program and (probably) the initial eVocaloid database. The eVocaloid database must be loaded into an internal RAM memory within the NSX-1 eVocaloid processor.

We can infer that the eVocaloid database cannot be larger than 2MBytes. The NSX-1 typically sets aside 2MBytes for the database within its large capacity internal RAM memory. Because this memory volatile RAM, it must be initialized with the eVocaloid database at start-up. It would be a sweet hack to replace the eVocaloid database with an English language database or Real Acoustic Sound (RAS) waveforms.

The NSX-39 software keeps the lyric slots and the command slots in the Macronix flash memory. This arrangement retains lyrics and commands across power-down.

Copyright (c) 2017 Paul J. Drongowski