MODX: Drawbar overdrive (part 3)

So far on our tour of MODX (Montage) drawbar organ tech, I’ve discussed drawbar control and drawbar waveforms. Convincing overdrive and distortion are essential to an authentic drawbar organ sound (B-3 plus Leslie). Technically, the overdrive (or distortion) is produced by the tube electronics in a Leslie rotary speaker. We synthesizer types must use amp and speaker simulators to produce overdrive or distortion.

Engineers are creatures of habit. After browsing a zillion MODX and Genos organ voices, I noticed that Yamaha engineers kept returning to the same effect algorithms albeit with slightly different parameter values:

    MODX Algorithm    Genos Algorithm    Characteristics 
--------------- --------------- ----------------------
BRITISH COMBO BRITISH COMBO Vox combo amp
MULTI FX MULTI FX Pedal board
AMP SIMULATOR 1 V DISTORTION Vintage amp
AMP SIMULATOR 2 STEREO AMP SIM Vintage stereo amp
SMALL STEREO SMALL STEREO DIST Stereo amp and speaker sim

The MULTI FX pedal board simulator includes the SMALL STEREO (DIST) algorithm. Check out Blake’s article about guitar effects.

Roadmap

We need a roadmap before driving into the weeds.

Usually, overdrive is configured as a MODX (Montage) insert effect. Once you navigate to the effects routing page (or one of the insert effect pages), you can change the effect type (algorithm) and/or effect parameters. Yamaha documentation refers to “effect types”; I use the word “algorithm” instead because we are selecting an algorithm (code) along with its parameters.

MODX/Montage MULTI FX insert effect

Yamaha provide several different distortion, overdrive and amp simulator algorithms. As if that isn’t enough choice, sometimes the kind of overdrive (or distortion) can be chosen by a parameter (e.g., tube, transistor, etc.) In some cases, we can choose the speaker cabinet (e.g., 2×12), too.

Why are there so many choices? If you follow the guitar pedal market, you would ask “Why are there so many distortion pedals?” Like anything else in sound and music, there are many varieties of distortion or overdrive. Some are warm (tubes), some are bright (transistor), and so forth. The trick is to use your ears and find the most appropriate kind of distortion, overdrive or amp type for the sound you want to obtain. Guitarists call this ephemeral quality “tone”.

I’ve cataloged several detailed examples in the next section. These are starting points for experimentation. If you don’t know where to start, choose something and start tweaking! If you can’t get your tone, change the kind of distortion effect if the selected algorithm allows, or move on to a different effect algorithm.

An effect algorithm is a mathematical model of a real-world device. Each algorithm simulates one or more real-world distortion, overdrive, amplifier and/or speaker cabinet effects. The models mimic an audio signal hitting a component like a tube, transistor or a mic’ed speaker cabinet. The amount of distortion usually increases when the incoming audio signal is stronger, i.e., the input level or gain (sometimes called “drive”) is turned up. The input signal drives the simulated device or component harder.

One thing to keep in mind — increasing input level (gain) also increases the output level. When you increase the gain (drive), you must decrease the output level lest you cause nasty digital distortion in the outgoing digital audio stream. Digital distortion (digital clipping) sounds unnatural and is not desirable.

Warning

Increasing drive also raises the volume of the outgoing audio, sometimes to painful levels! Keep volume low when experimenting with high drive. Protect you ears.

Most of the algorithms provide a parameter controlling the Wet/Dry mix. You’ll see settings like “D15>W”. The wet/dry value range is:

     D63>W to (D=W) to D<W63 

This determines the balance between the direct, unprocessed signal (dry) and the processed sound (wet). At dead center, “(D=W)”, the wet and dry signals are equal. Move to either side to pass more of the dry sound or wet/effected sound.

The details and examples

The BRITISH COMBO effect algorithm (Vox AC30) is a Yamaha favorite. In the table below, the first settings are taken from the MODX “All Bar None” Performance, and the second and third settings are from the Genos “ClassicJazz” and “RockOrgan JS” voices, respectively.

                            MODX         Genos        Genos 
## Parameters All Bar None ClassicJazz RockOrgan JS
-- --------------- ------------ ----------- ------------
1 Mode Bright Bright Top Boost
2 Normal 5.8 3.6 4.0
3 Brilliant 6.0 5.4 6.0
4 Bass 4.4 5.0 4.4
5
6 Treble 6.0 6.2 6.0
7 Cut 0.6 0.0 0.6
8
9 Output Level 69 126 71
10
11 Speaker Type AC 4x10 AC 1x12 AC 4x10
12 Speaker Air 2 2 0
13 Mic Position Center Center Center

The parameters “Normal” and “Brilliant” dial in the distortion.

Here’s the rotary speaker settings for two Genos drawbar organ voices. Both voices use the Genos V DISTORTION effects algorithm. The equivalent MODX algorithm is AMP SIMULATOR 1.

                           Genos           Genos 
## Parameters WhiterBars JS RotaryDriveOrg
-- --------------- ------------- --------------
1 Overdrive 28% 24%
2 Device Vintage Tube Transistor
3 Speaker Type Stack Twin
4 Presence 4 10
5 Output Level 88% 100%
10 Dry/Wet D40>W D26>W

The first voice simulates a tube preamp and the second voice simulates a transistor preamp. Tube amps have a warmer sound than transistor amps.

MODX does not have all of the Genos distortion algorithms. MODX implements the latest and greatest algorithms while Genos (Tyros and PSR) retain many legacy algorithms for backward compatibility. The table below shows the settings for the STEREO AMP SIMULATOR used by the “ClassicBars JS” voice.

                              Genos           MODX 
## Parameters ClassicBars JS The Jazz Organ
-- ----------------- -------------- --------------
1 Drive 0 15
2 Amp Type Stack Tube
3 LPF Cutoff Frequency 8.0kHz 5.0kHz
4 Output Level 114 112
10 Dry/Wet D24>W D17>W
11 Edge (Clip Curve) 0 n/a

The nearest equivalent MODX algorithm is AMP SIMULATOR 2. The parameters are the same except “Edge (Clip Curve)” is missing on MODX. Still, I would give these parameter values a try on MODX.

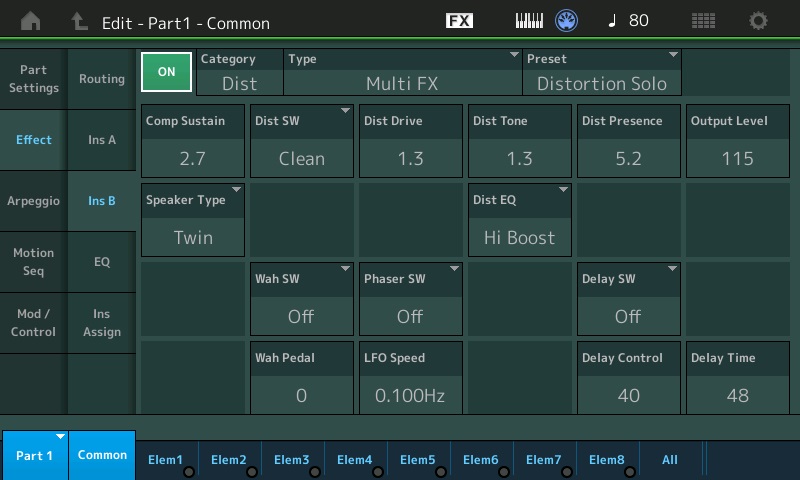
The MULTI FX algorithm simulates a guitar pedal board. The input signal hits a simple compressor (sustain) which drives a distortion block (Dist). The phaser and wah blocks are turned OFF in the examples below.

MODX Performance: More Shade 
MODX Algorithm: MULTI FX MODX Preset: Distortion Solo
MODX MODX
## Parameters More Shade 8.8.8.8.6.2.2.0.0
-- ----------------- ---------- -----------------
1 Comp. Sustain 2.3 2.7
2 Wah SW Off Off
3 Wah Pedal 0 0
4 Dist SW Clean Clean
5 Dist Drive 2.1 1.3
6 Dist EQ High Boost High Boost
7 Dist Tone 0.8 1.3
8 Dist Presence 6.0 5.2
9 Output Level 108 115
10
11 Speaker Type Twin Twin
12 LFO Speed 0.1Hz 0.1Hz
13 Phaser SW Off Off
14 Delay SW Echo1 St Off
15 Delay Ctrl 40 40
16 Delay Time 48 48

The “More Shade” Performance adds a stereo echo effect using the delay block. MULTI FX is a super handy algorithm and I’ve discussed its use with organ and electric piano before.

Yamaha CK- and YC-series

The table below summarized the YC- and CK-series rotary and distortion insert effects.

    YC61 rotary effects 
Rtr A Standard rotary speaker for organ
Rtr B Rotary speaker connected to a transistor
preamplifier with strong distortion
Lead Guitar amp (bass of high sound
pressure and sharp treble)
Crunch Guitar amp (crunch sound)
Double Guitar amp (bright sound)
Case Speaker amp for vintage electric piano
CK61 drive (rotary) effects
Rotary A Standard rotary speaker for organ
Rotary B Rotary speaker connected to a transistor
preamplifier with strong distortion
O.Drive Warm distortion (overdrive)
Dist Hard rock distortion
Comp Compressor controlled by a single knob
YC61 and CK61 insert effects
British Combo Crunch distortion (Vox AC30 Top Boost)
British Lead Hard rock type distortion (Marshall Plexi)
Small Stereo Stereo distortion

I’ll let you guess as to which Yamaha algorithms are (re)used. If you want to re-create the CK sound on MODX (Montage), have at it!

Copyright © 2023 Paul J. Drongowski

MODX: Drawbar waveforms (part 2)

Last time, we looked at the drawbar programming in MODX Performance “The Basics”. The first five voice Elements are each assigned a single drawbar waveform: 16′, 5 1/3′, 8′, 4′ and 2′.

A lot of folks (me!) frequently build on a foundation like pulling the first three or four drawbars and then pull higher bars while playing. Thus, assigning individual drawbars seems a little wasteful in these kinds of registrations, when the foundation doesn’t change. Fortunately, MODX (Montage) provide waveforms for typical drawbar foundations:

    Wave#  Waveform name            Registration? 
----- ---------------------- -------------
441 Rock Chorus Vibrato
442 Rock Percussion
443 Rock2 65 5444 644
446 Jazz w/Percussion
448 Jazz 78 6600 000
451 Full Draw 88 8888 888
454 Swish
456 Bow 87 4323 468
457 Bow Chorus Vibrato
458 Gospel 87 6000 568
459 Soul 80 0050 578
460 1st Four Draw 88 8800 000
479 Draw 1+3 80 8000 000
482 Draw 2+4 08 0800 000
485 Draw Even
488 Draw Odd

The MODX data list PDF has the complete list of waveforms, including the slightly detuned and offset variations. I tried to guess the registrations and please take my guesses with a grain of salt! [See Genos/PSR organ registrations.]

MODX Performance “Vib Chorus AF1” is as simple as you can get:

    Performance: Vib Chorus AF1 
El# Waveform Level Pan Coarse XA Control
--- ------------------ ----- --- ------ ----------
1 Bow 100 C 0 A.SW Off
2 Bow Chorus Vibrato 102 C 0 A.SW1 On

It consists of two Elements. “Bow” refers to the overall shape of the drawbars with the lowest and highest drawbars pulled out the farthest. You might hear this registration in a gospel music or soul setting.

The Elements depend on the state of the ASSIGN 1 front panel button. The Extended Articulation (XA) control parameter chooses the first Element when the A.SW switches are OFF and chooses the second Element when the A.SW1 switch is ON. This configuration conserves polyphony and Elements sparingly. You can add or disable chorus/vibrato (C/V) by pressing the ASSIGN 1 switch. The C/V is sampled into the “Bow Chorus Vibrato” waveform and you do not have the option of selecting V1, C1, etc. Unlike real world Hammond, C/V is added (or removed) only on new notes played after switching. It’s not an independent effect unit.

You could use “Vib Chorus AF1” as the basis for new Performances that switch between drawbar registrations. Why not switch between “Jazz” and “Jazz w/Percussion”, for example? Simply change Element 1 to the “Jazz” waveform and change Element 2 to the “Jazz w/Percussion” waveform.

Here are the Element assignments for another simple Performance, “Draw Control”:

    Performance: Draw Control 
El# Waveform Level Pan Coarse XA Control
--- ------------------ ----- --- ------ ----------
1 Draw 1+3 100 C 0 Normal
2 Draw 2+4 67 C 0 Normal
3 Draw Even 0 C 0 Normal
4 Draw Odd 0 C 0 Normal

You can go from quiet to shoutin’ with this one! For extra credit, learn how to add rotor grit and rotor whistle Elements in order to sweeten the pot. [Hint: Learn how to copy Elements with SHIFT+EDIT.]

New waveforms in Montage/MODX

There are several new drawbar organ waveforms in Montage (MODX) which don’t get mentioned very often. These waveforms have the Leslie speaker effect sampled in:

Wave#  Waveform Name        Performance         Registration? 
----- ------------------- -------------- -------------
495 Tonewheel1 Fast Whiter Bars 68 8600 000
496 Tonewheel1 Slow
497 Tonewheel2 Fast All Bar None 88 8888 888
498 Tonewheel2 Slow
499 Tonewheel3 Fast L The Jazz Organ, Groove Organ
500 Tonewheel3 Fast R
501 Tonewheel3 Fast St
502 Tonewheel3 Slow L
503 Tonewheel3 Slow R
504 Tonewheel3 Slow St
505 Tonewheel4 Fast 88 8888 888
506 Tonewheel5 Fast Rich Bars 63 8457 530
507 Tonewheel6 Fast

Sampled-in Leslie doesn’t get much love because the effect cannot be modified and the switch from slow speed to fast is abrupt — no acceleration ramp between the two speeds.

The first three sets of tonewheel waveforms cover the three most common registrations: 1. Whiter Shade Of Pale, 2. full drawbars, and 3. jazz organ a la Jimmy Smith and Groove Holmes. If you want to try them out, I took note of the MODX Performances built on these tonewheel sample sets.

I believe these tonewheel waveforms are used in the Genos™ “joystick (JS)” voices: “WhiterBars JS”, and “AllBarsOut JS” and “JazzRotary JS”. The ears don’t lie. Tonewheel4, 5 and 6 are probably in the Genos ROM somewhere, too. No time for an Easter egg hunt today. 🙂

Here is what you will see if you look inside of these Performances:

Performance: The Jazz Organ 
El# Waveform Level Pan Coarse
--- ------------------ ----- --- ------
1 Tonewheel 3 Slow L 115 L63 0
2 Tonewheel 3 Slow R 115 R63 0
3 Tonewheel 3 Fast L 0 L63 0
4 Tonewheel 3 Fast L 0 R63 0
5 Draw 16' Of 32 C +20
6 Rotor Whistle 0 C +17
7 Rotor Grit 1 0 C 0
8 Draw 4' Of 0 C 0

Performance: Whiter Bars
El# Waveform Level Pan Coarse XA Control
--- ---------------- ----- --- ------ ----------
1 Tonewheel 1 Slow 127 C 0
2 Tonewheel 1 Fast 0 C 0
3 Draw 16' Of 23 C +20 Key off - Rel key click
4 Rotor Whistle 0 C +17
5 Rotor Grit 1 0 C 0
6 Draw 4' Of 127 C 0 Assign SW #1 - Percussion

Performance: All Bar None
El# Waveform Level Pan Coarse XA Control
--- ---------------- ----- --- ------ ----------
1 Tonewheel 2 Slow 127 C 0
2 Tonewheel 2 Fast 0 C 0
3 Draw 16' Of 32 C +20 Key Off - Rel key click
4 Rotor Whistle 5 C +17

Example performance

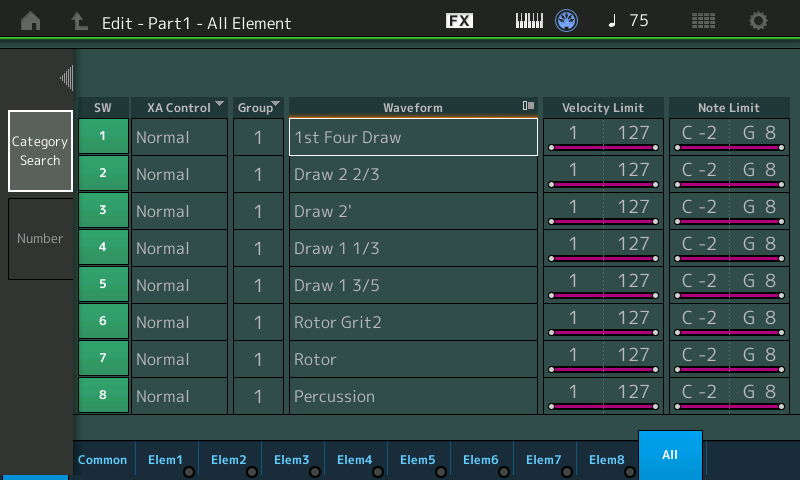
I set out to build a new Performance, “8888+”, using a few of the ideas that I outlined above. The new Performance puts the “1st Four Draw” waveform in the first Element and places four individual drawbar waveforms into Elements 2 through 5:

    Performance: 8888+ 
El# Waveform Level Pan Coarse
--- ------------------ ----- --- ------
1 1st Four Draw 127 C 0
2 Draw 2 2/3 0 C 0
3 Draw 2' 0 C 0
4 Draw 1 1/3 0 C 0
5 Draw 1 3/5 0 C 0
6 Rotor Grit 2 70 C -24
7 Rotor 127 C -17
8 Percussion 0 C -7

Elements 6 and 7 add rotor noise. Element 8 handles percussion.

I didn’t build “8888+” from scratch. I started out with the Performance “More Shade” and modified it, following the basic editing procedure which I outlined in my last post.

MODX “8888+” All Elements

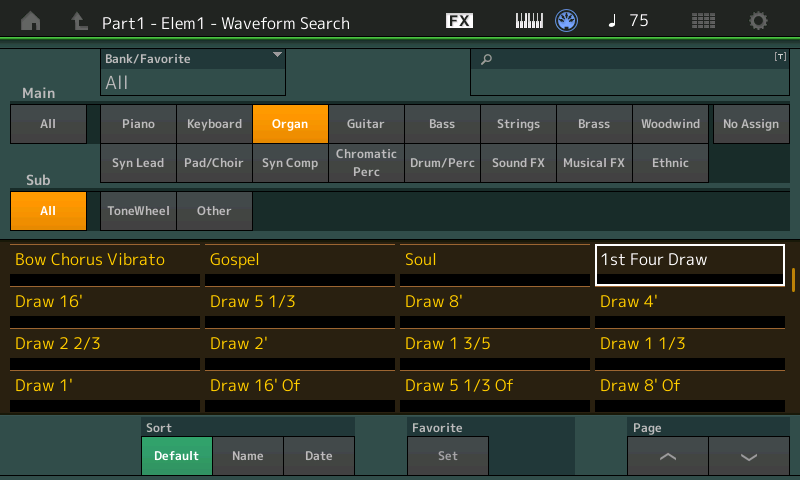
In the MODX All table, tap the name of the waveform that you want to change in order to select it. MODX (Montage) displays two buttons on the left-hand side of the display. Tap the “Category Search” button.

MODX Waveform (category) search

MODX displays waht looks like a category search page. Instead of Performances, this category search displays and searches waveforms. You can scroll through the waveform or type in the name of the waveform that you’d like to find. Select a waveform and press the ENTER button.

I followed his basic procedure for each of the first five Elements. Yeah, the 1 1/3 and 1 3/5 drawbars are not in the usual order, but I want to have 1 1/3 in the first group of sliders. I’m more likely to pull that drawbar than 1 3/5.

If you ride the sliders and noodle around, the individual drawbar sounds will be louder than the “1st Four Draw” sound. We need to rebalance the choir so that no individual drawbar will sound out-of-place with its peers.

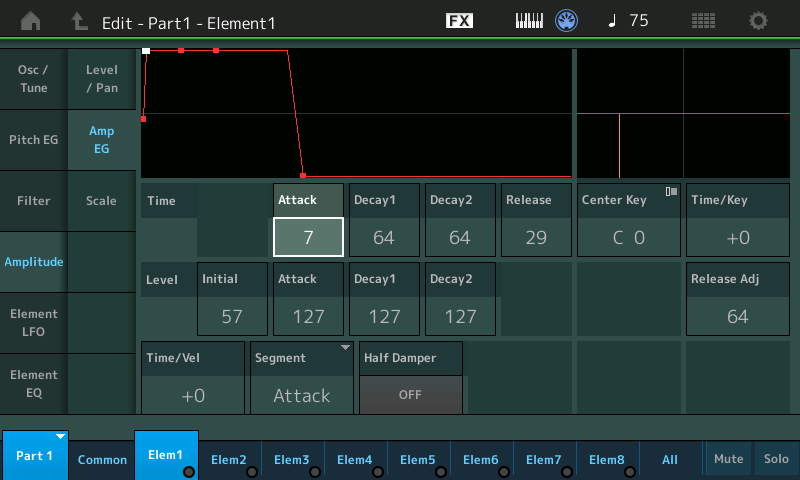
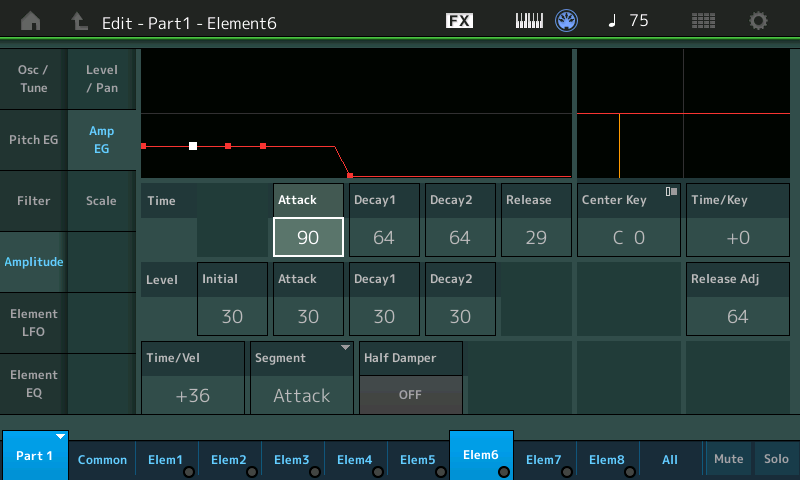
MODX Performance 8888+ first Element AEG

In order to balance the bars, I visited the Amplitude EG page for drawbars 1 through five. The picture above is the Amplitude EG page for the first Element, “1st Four Draw”. Please notice the envelope Levels: Initial, Attack. Decay1 and Decay2. Attack, Decay1 and Decay2 levels are the maximum, 127. That’s good. We want the “1st Four Draw” waveform at the maximum output level.


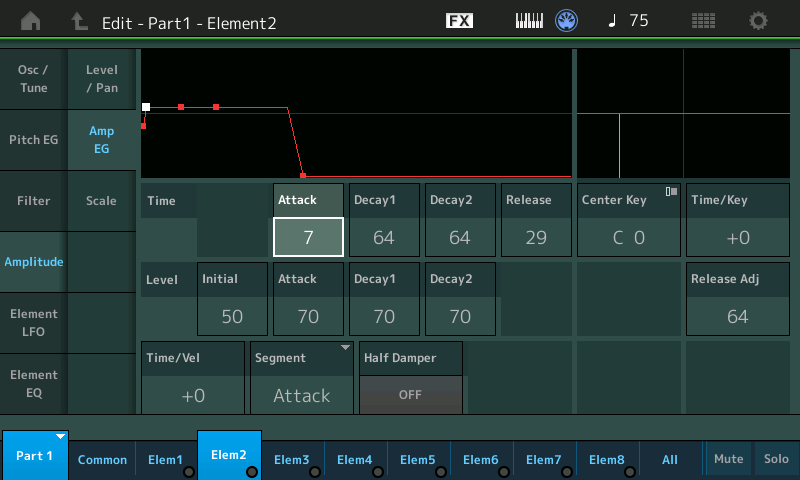
MODX Performance 8888+ second Element (2 2/3) AEG

The next screen capture shows the Amplitude EG for the “Draw 2 2/3” Element. I reduced the four envelope levels. Attack, Decay1 and Decay2 levels are 70, which will make the “Draw 2 2/3” blend into the overall drawbar choir. I programmed Elements 3, 4 and 5 in the same way. If 70 doesn’t sound/feel right to you, dial in a different level!


MODX Performance 8888+ sixth Element (rotor noise) AEG

I also adjusted the envelope levels for Elements 6, 7, and 8. In the case of 6 (above) and 7, lower envelope levels prevent outrageously loud rotor noise if I accidently push the sliders up for 6 and 7. This can happen in the heat of battle when I’m concentrating on the music and not watching my hands on the sliders. 🙂 Similarly, I set the envelope levels for Element 8, percussion, to obtain soft percussion when its slider is all the way up.

I hope this discussion encourages experiments of your own. I also hope that you are becoming more comfortable with MODX (Montage) editing.

Copyright © 2023 Paul J. Drongowski
Arturia Keylab Essential mk3

Why do I like Arturia?

First, they make great products and I use ’em. I own and play both an Arturia Keylab Essential mk2 and an Arturia Keystep — not to mention the software!

Second, Arturia really care about customers. Recently, I posted about the new Arturia Keylab Essential mk3 and how it needed to send MIDI Program Change:

I was excited when I saw Arturia’s announcement of the Keylab Essential mk3 MIDI controller. The mk3 has some nice enhancements without increasing weight and size over the mk2. The price is only slightly higher ($219 USD for the 49 mk3). The mk3 adds a larger 2.5″ LCD display, USB-C communications and power, and expression pedal support.

I downloaded the mk3’s manual and was immediately crestfallen. Keylab Essential mk3 cannot send MIDI Program Change. This is a serious step back from the mk2.

The Keylab Essential mk2 is one of the few MIDI controllers that does it right, sending Bank Select MSB, Bank Select LSB and Program Change in one go. I’m still amazed that most other MIDI controllers send Program Change without Bank Select.

Well, guess what? Arturia saw my post and replied:

We really value our users’ input, and we are very sorry to hear that you were disappointed by the fact that the new KeyLab Essential cannot send MIDI Program Change. We know that it was a much appreciated feature on the mk2, and our R&D team is currently doing their best to implement it on the mk3 as soon as possible. For your information, a new firmware should be out in about three weeks, and we’re hoping you’d be willing to give a shot to the KeyLab essential mk3 then.

By the way, I’ll be looking at the new Part feature (split point!) as this is a super, needed advancement over mk2.

Thanks, Arturia, for reading the blog and being proactive! I think it’s always important to call out manufacturers and retailers who go the extra mile (or kilometer) for customers.

MODX: Drawbar control (part 1)

Test driving Yamaha’s CK88 motivated me to get off my tail and learn how to make the experience of playing MODX more CK-like. In particular, I want to make better use of the MODX front panel sliders for drawbar control.

This requires the most basic knowledge of MODX (Montage) Performance structure. All MODX folk should read through the first section of the MODX Reference Manual, titled “Basic Structure.” In this post, I’m going to concentrate on the Tone Generator Block.

Now, honestly, I don’t expect you to recall and understand every detail! Here are the essential basics:

  • A Performance is a single set of sounds consisting of multiple Parts.
  • Each Performance has two types of parameters; parameters unique to each Part and parameters common to all Parts.
  • An Element is the basic, smallest unit for an AWM2 Normal Part.
  • A Normal Part consists of up to eight Elements.
  • Each Part is created by editing parameters unique to each Element and parameters common to all the Elements.

Yep, those are direct quotes from the manual (with a few simplifying tweaks). That’s pretty much all of the “theory” that you need to know. The rest is button pushing. 🙂

I’m going to focus on single part organ Performances in this article. That will streamline the discussion. If you understand single part Performances, you should be able to scale up to multi-part. When navigating the CATEGORY screen, single part Performances are displayed in green text; multi-part Performances are displayed in blue text. I assume you know how to select a Performance…

Deconstruction

Knowing how to deconstruct a Performance is an essential MODX skill, even if you’re a player and not a sound designer. This is the way to wring the most out of the factory presets whether you ever intend to change a single preset or not.

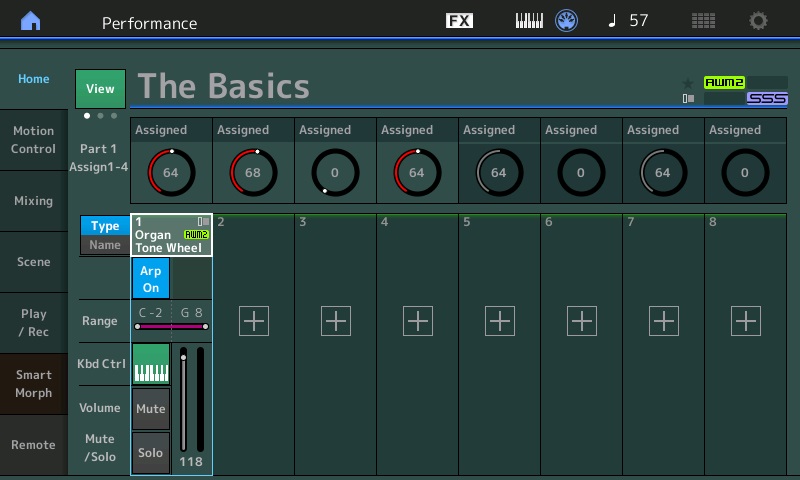
MODX Performance “The Basics”

To get started, press the CATEGORY button, then find and select the organ Performance named “The Basics”. This is a single part Performance and, yeah, it’s basic. 🙂 Press the ENTER button to go to the main screen.

When the Performance name is highlighted, pressing the EDIT button takes you to the COMMON parameters for the Performance. I’ll discuss some of those parameters in a future note about effects (i.e., system-level effects like reverb).

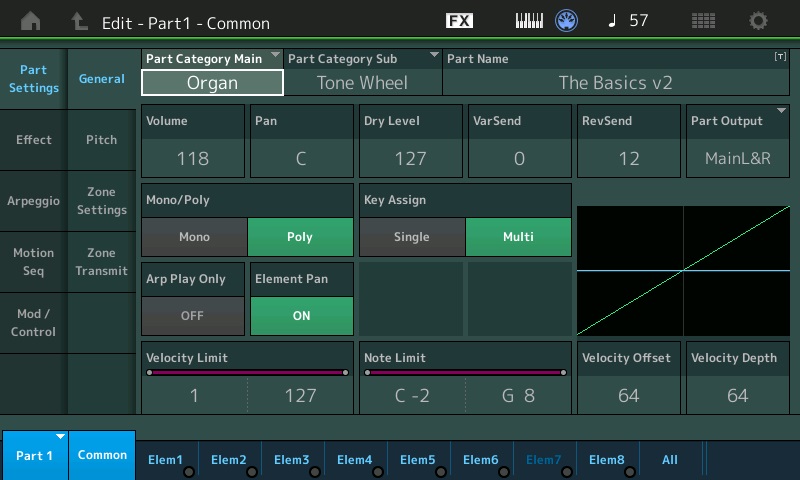
“The Basics” Part COMMON parameters

For now, use the arrow keys to navigate down to the first part. (You can touch the first part, too, to select it.) Press the EDIT button and MODX displays the COMMON parameters for the first and only part in “The Basics”. There’s tons of fun stuff here including access to the insert effects like rotary speaker. [Another day.]

What we really want is information about the Elements in “The Basics”. You’ll find a row of on-screen buttons along the bottom of the display. These buttons are especially handy when navigating through Parts, COMMON parameters and Elements. We could step through the Elements one by one by pressing the “ElemX” on-screen buttons. Let’s hit “All” instead.

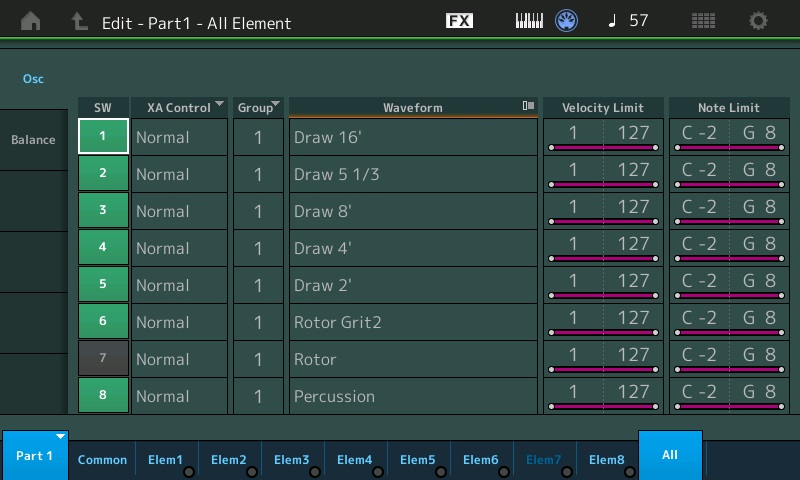
“The Basics” Osc table

MODX displays a table showing all of essential parameters (information) about the Part (the “Osc” tab). Each row in the table is an Element showing:

  • Element ON/OFF status
  • Extended Articulation (XA) control
  • Waveform
  • Velocity limit
  • Note limit
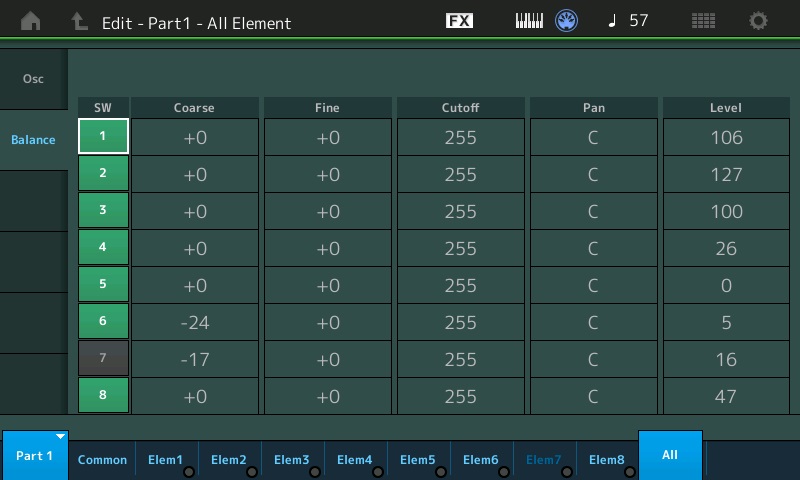
“The Basics” Balance table

Press the “Balance” tab. MODX displays another table showing:

  • Element ON/OFF status
  • Coarse tuning (semitones)
  • Fine tuning (cents)
  • Filter cutoff
  • Pan
  • Level

Wow, this is a terrific overview! Now you know how I populate and compose all of these kinds of tables on my site.

Drawbars and settings

Let’s stop here and reflect on what we’re seeing.

    MODX/Montage Performance: The Basics 

El# Waveform Level Coarse
--- ------------ ----- ------
1 Draw 16' 106 0
2 Draw 5 1/3 127 0
3 Draw 8' 100 0
4 Draw 4' 26 0
5 Draw 2' 9 0
6 Rotor Grit 2 5 -24
7 Rotor 16 -17
8 Percussion 47 0

“The Basics” consists of five individual drawbars: 16′, 5 1/3′, 8′, 4′ and 2′. In Hammond language, the registration is (roughly) 68 6210 000. There is also percussion, provided by Element 8. Element 6 adds a little bit of rotor grit. Element 7, rotor whine, is turned off initially. Press the on-screen ON/OFF button for Element 7 if you want to add rotor whine to the mix.

Extra credit. Press the on-screen “Elem7” button. This takes you to the main page of parameters for Element 7. You can turn Element 7 ON/OFF there and do a whole lot more damage to it! Press “All” to return to the table(s).

You can change the drawbar registration by adjusting one or more of the Element levels. For example, touch the Level parameter for Element 1 in order to select it. Then, hold a key, spin the data wheel and listen to the sound change. More dramatically, change the Element 5 level and listen to the 2′ drawbar come in.

Play the drawbars

Of course, this isn’t a practical way to change a registration while playing. That’s where the MODX front panel sliders come in.

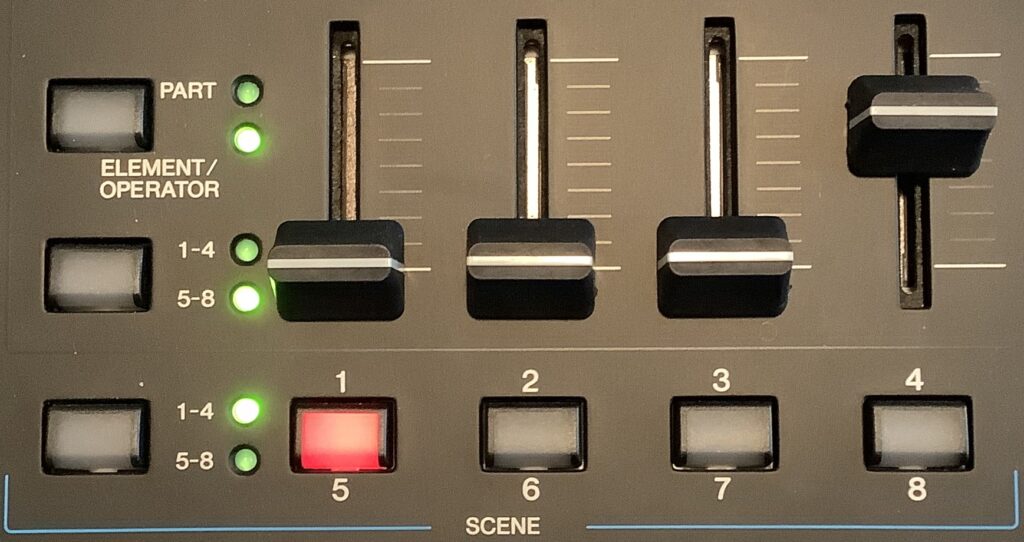
MODX sliders controlling Elements 5 through 8

As shown in the picture above, use the top button to select ELEMENT/OPERATOR. Use the middle button to select Elements 5 through 8. Now move the first slider and watch Element 5 level change. Hold a key and hear the change.

Congratulations! You can now play the drawbars and you understand the relationship between the sliders and Element levels.

But, wait, there’s more. Move the fourth slider to change Element 8 level. This adds and removes percussion. Move the second slider (Element 6 level) and listen to the rotor grit. Now you know how to make your Leslie sound busted. 🙂

If you grok all of this, try deconstructing the “More Shade” Performance. Judging from its name, this Performance tries to emulate “Whiter Shade Of Pale.”

    MODX/Montage Performance: More Shade 

El# Waveform Level Coarse
--- ------------ ----- ------
1 Draw 16' 127 0
2 Draw 5 1/3 41 0
3 Draw 8' 127 0
4 Draw 4' 107 0
5 Draw 1 3/5 18 0
6 Rotor Grit 2 18 -24
7 Rotor 23 -17
8 Percussion 0 -7

Copyright © 2023 Paul J. Drongowski
Yamaha CK88: Yes, I played one

I always hesitate calling one of these posts a “review,” especially when the actual trial is serendipitous. Had to stop at Whole Foods and decided to drop into Guitar Center just to see what they had on the floor. Lo and behold, a Yamaha CK88!

It was a nice surprise, but I didn’t have the usual lead sheets that I use when testing. So, it came down to random plunking and noodling.

First, I’m going to lay out most of the good news. For instruments in the $1,000USD (61 key) to $1,500 (88 key) range, the CK sounds damned good. The user interface (UI) is intuitively direct and had only one “What the?” moment.

Yamaha CK88 stage keyboard

I played and listened to the CK88 through its built-in speakers. The built-in speakers are a bit unusual for Yamaha stage/synth instruments, but not so for its digital pianos and arranger keyboards. The CK88 has sufficient volume for practice and maybe enough for an acoustic-level rehearsal. Thus, I put the CK’s speakers in the “courtesy speaker” category. Being 2x6W, 12cm by 6cm ovals, they are not unlike the courtesy speakers on the Case CT-S1000V (or S500) — just OK. They are not boxy, something I don’t tolerate under any circumstance.

I started out with acoustic piano because, err, it was the 88 GHS keybed in front of me. I found both the main acoustic piano (CFX) and Rhodes (78Rd) to be satisfying. I would prefer to play the Rhodes on the GHS rather than the CFX. I don’t know if it’s because I’ve been playing the Petrof grand occasionally, but the GHS just did provide the same enjoyment. On again, off again, I’ve been thinking about a digital piano for home and the GHS action ain’t it. The GHS seems to bottom out, for lack of a better description. Forget organ swipes on the 88, too, unless your hands are made of leather.

Practical tips department. The piano sounded muffled when I first started playing. The last customer pulled all of the EQ sliders to -12dB, thank you. Reset, always reset.

Next, I jumped into the acoustic, non-keyboard sounds. The CKs are like a “greatest AWM2 hits” from MODX/Montage. The brass voices are pleasant enough and would be useable in a band setting. The voices range from Jerry Bruckheimer to mellow, more musical horns. The only voice that threw me is “Sweet Trumpet” which is suitable only for mariachi covers.

The saxes are typical AWM2 saxes — emergency use only. I’m spoiled by Super Articulation sax. The oboe is a bit too bright for my taste. The clarinet and bassoon are not bad. The flutes are cool. Strings are varied and useable. I can’t be too harsh because the CK beats the up-scale, expensive YC61 for orchestral voices and, notably, pipe organ.

Venturing into synth brass, pads and leads, we’re back to greatest hits territory. You’ll probably find something close enough for rock’n’roll among the lot. There’s no point in getting too OCD on a machine with limited editing and few real-time parameters to tweeze. CK has what I would call “Yamaha Quick Edit” which apply offsets to the actual voice parameters. Want deep editing? Look to MODX/Montage.

Now to the organs. The CK cops the pipe organs from Genos™ — excellent choice. Maybe it was the EQ or sumptin’, but the VOX (V) didn’t pierce my ears and the Farfisa (F) didn’t have that Sam The Sham rasp. Oddly, I give Reface YC the edge as far as combo organs are concerned.

As to the main event — Hammond B-3 — the CK is much more than Reface YC in a tuxedo. The drawbars are nice and smooth, offering the right amount of resistance. The drawbar throw is a little short (a la Reface) when compared to Yamaha’s clonewheels. The CK drawbars slide and don’t have the Reface drawbar detents.

To my ears, the CK and Reface YC basic drawbar sound is the same — pretty clean and artifact (e.g., leakage) free. The rotary speaker sim and effects chain are what make the difference. Obviously, the CK is richer in that regard. You get so much more for the money with CK (full-size keyboard, better effects chain, acoustic piano, EP, decent acoustic/electronic instruments, A/D input, audio playback, etc.), why would anyone bother with Reface anymore, unless they absolutely must have the portability?

I like the CK vibrato/chorus implementation and UI more than Reface, too. All of the organ controls are more Hammond-like even if they are a bit small.

I developed a preference for the CK Rotary 2 sim over Rotary 1. I wish I knew which rotary speaker algorithms Yamaha chose for CK as I would like to recreate the CK sound on MODX. The CK horn/rotor turn a bit too fast and, unfortunately, the speeds cannot be changed.

The only “What the?” moment had to do with the DRIVE buttons and what they apply to the internal signal. If I were giving the CK a serious spin, I would study the effects chain and controls before sitting down in the driver’s seat.

So, there it is. The CKs offer great value for the money, no doubt about it. I personally would go with the 61-key model (CK61) since I play mainly organ/synth. The GHS isn’t for me and suggests that I should “go large” if I ever follow through and buy a digital piano for home. Having MODX, I don’t feel like I’m missing out although I need to make better use of MODX sliders for real-time drawbar control.

Other reviews and comments about digital pianos:

Copyright © 2023 Paul J. Drongowski
Just because…

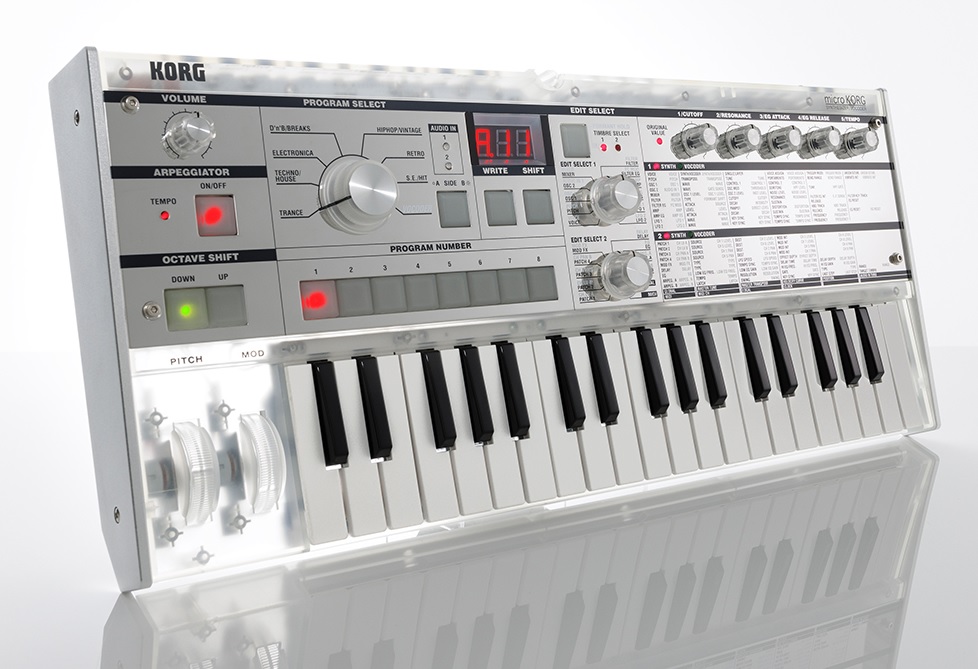
It looks cool — the limited edition Korg microKORG Crystal synthesizer and vocder. Videos: Ooh and Aah.

The picture to ship a thousand synths (or whatever the cliché is)

No word of new content. €539 transparent bag included. Available July 2023.

Yeah, Superbooth 23 has commenced. I don’t intend to make a big deal out of it. After NAMM 2023, I need a break from chasing shiny objects (Korg Crystal excepted).

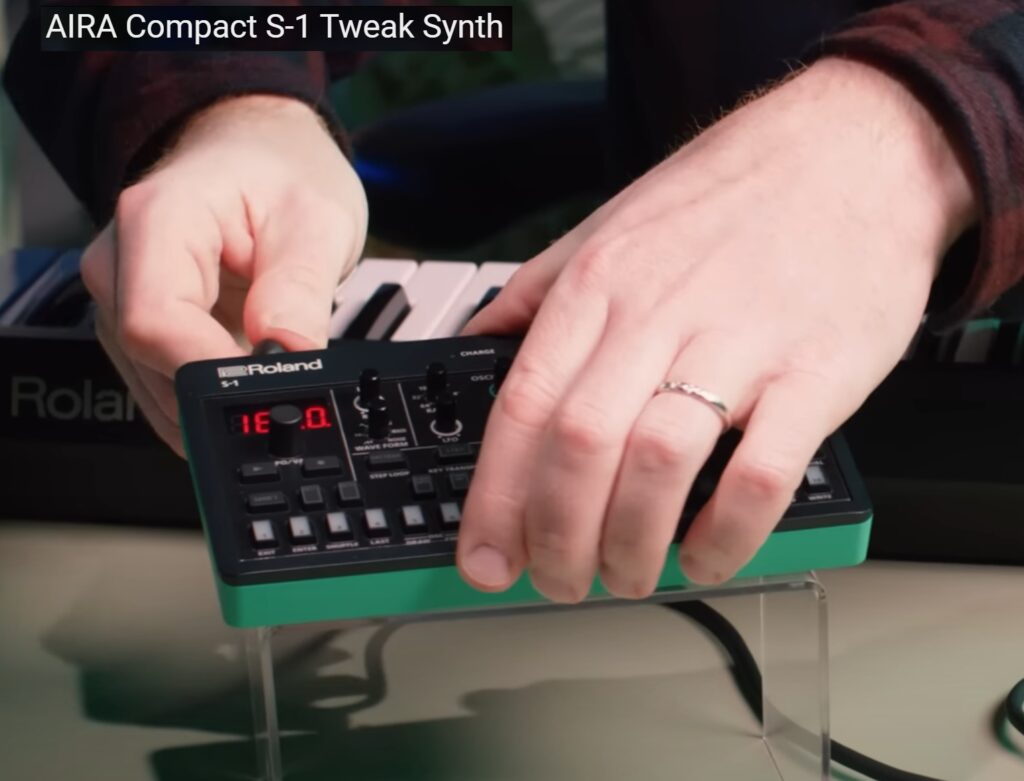
I like the form. I like the size. I like the price ($199 USD). Roland AIRA S-1.

The Roland AIRA Compact S-1 Tweak Synth

I hope Roland grow the AIRA product line. Most punters — me — are more likely to buy a 200 buck expansion box than a $5,000 Oberheim OB-X8. Please, please, please add an AIRA like the D-05 boutique. Roland, you would sell zillions of ’em.

Copyright © 2023 Paul J. Drongowski
Korg NTS-2: Initial review

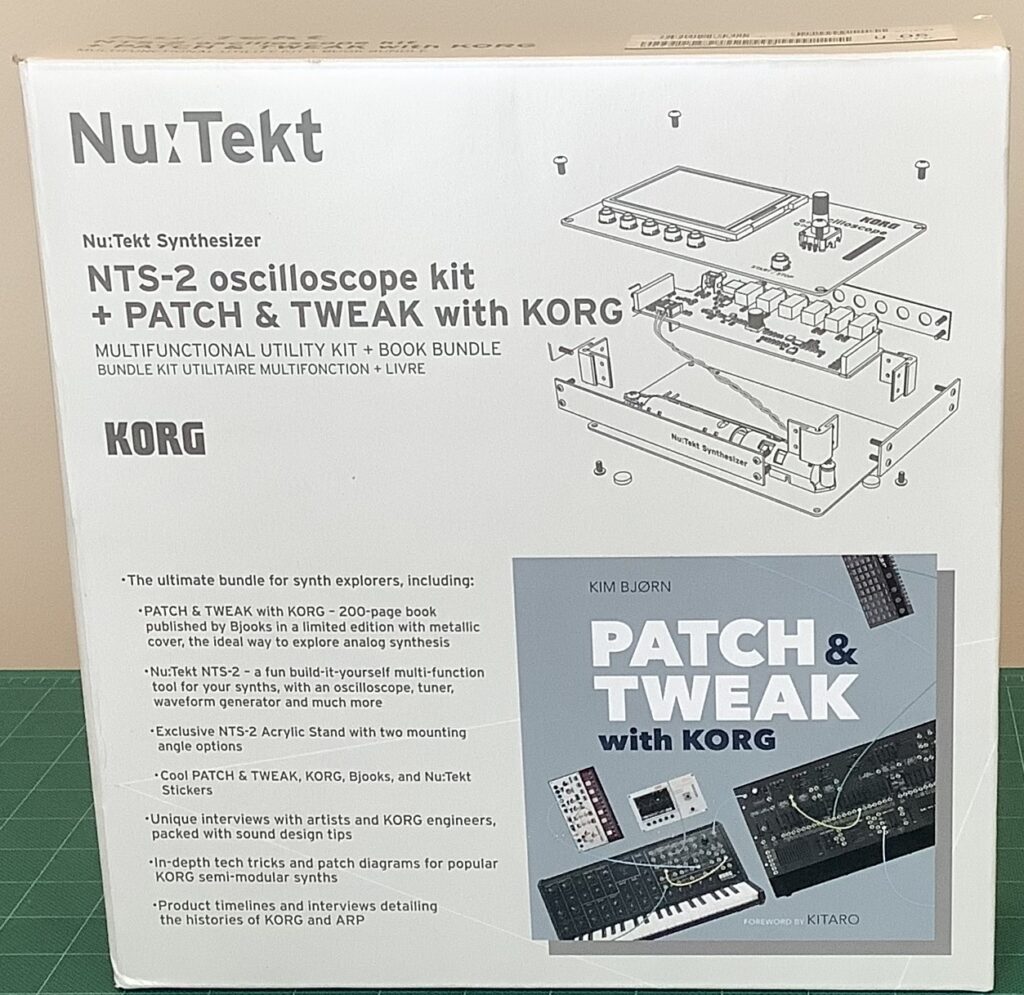
I’m happy to make a first report about the Korg NTS-2 Oscilloscope kit. The NTS-2 is bundled with the book “PATCH & TWEAK with KORG”, by Kim Bjorn. Whatever the reason for the delay, it took Korg several months to deliver after the NTS-2 was first announced. Fortunately, the bundle finally hit my doorstep. 🙂

Korg NTS-2: The box bundle

The NTS-2 kit and book are a fairly hefty package, mainly due to the weight of the enclosed book. The book looks, feels and weighs like a “coffee table” book. Tain’t light.

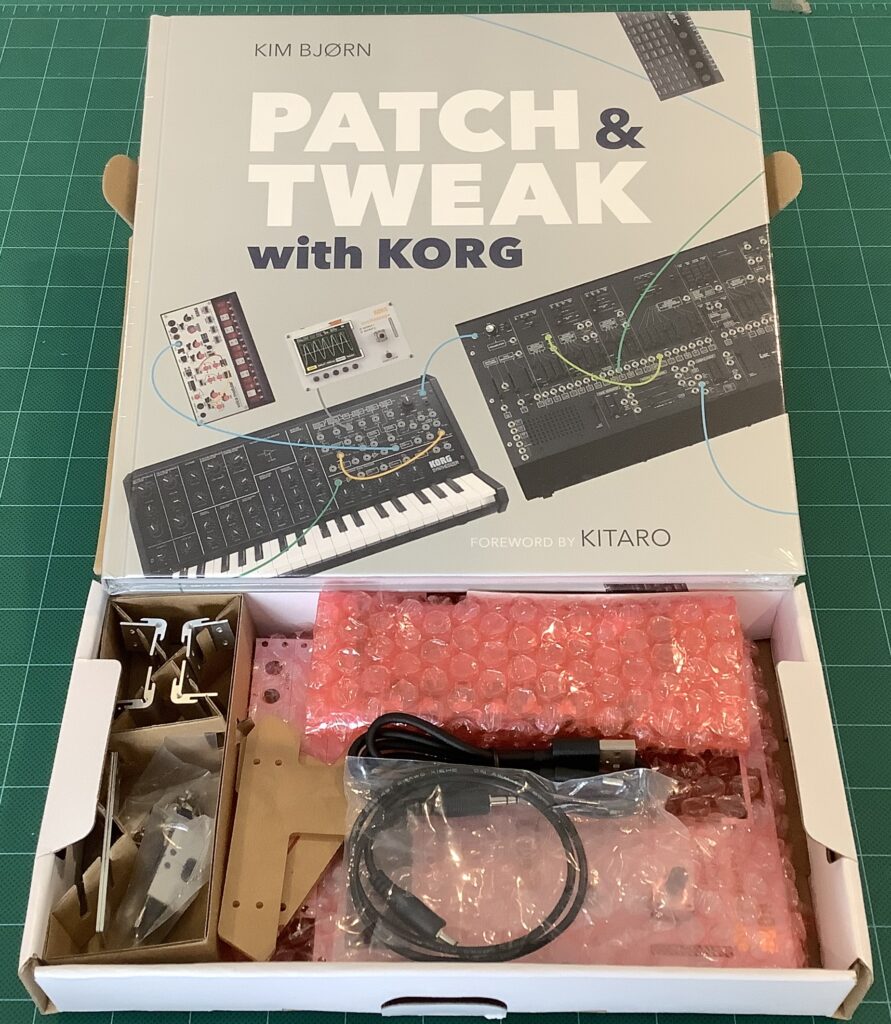
Korg NTS-2 Book and kit

The NTS-2 kit itself is packed in an unmarked white box. All the components are lovingly protected by bubble wrap. In addition to the printed circuit boards (PCB), you get the now-familiar corner and side pieces, hardware, USB Type-C cable, a way-too-short 3.5mm stereo cable and two acrylic stand pieces.

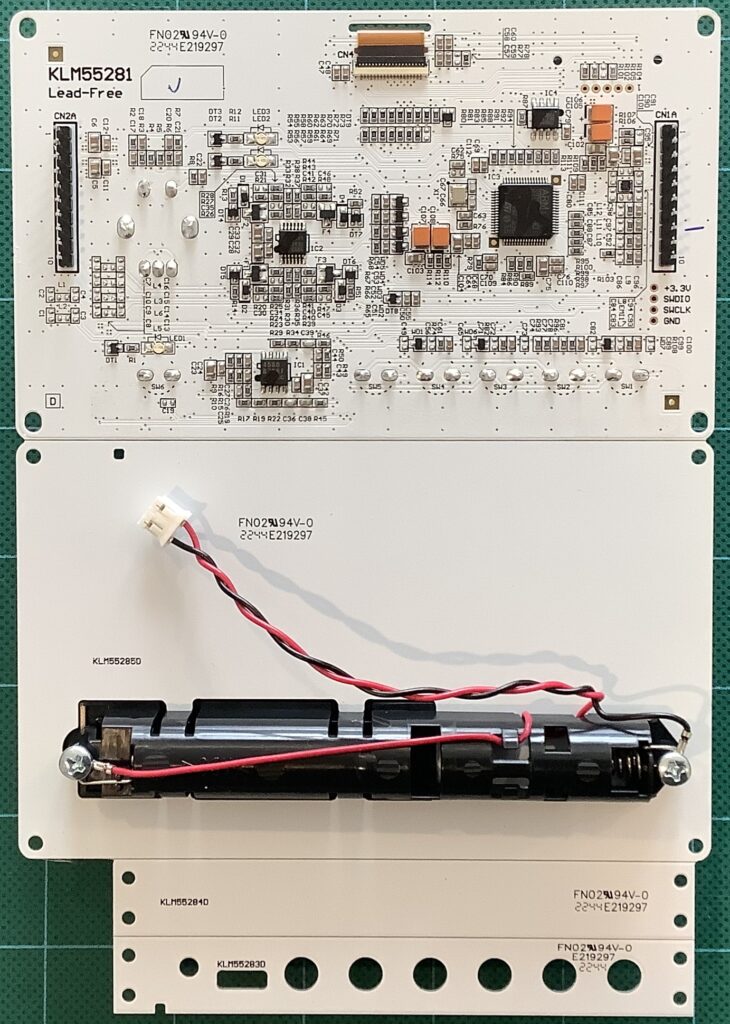
Printed circuit boards

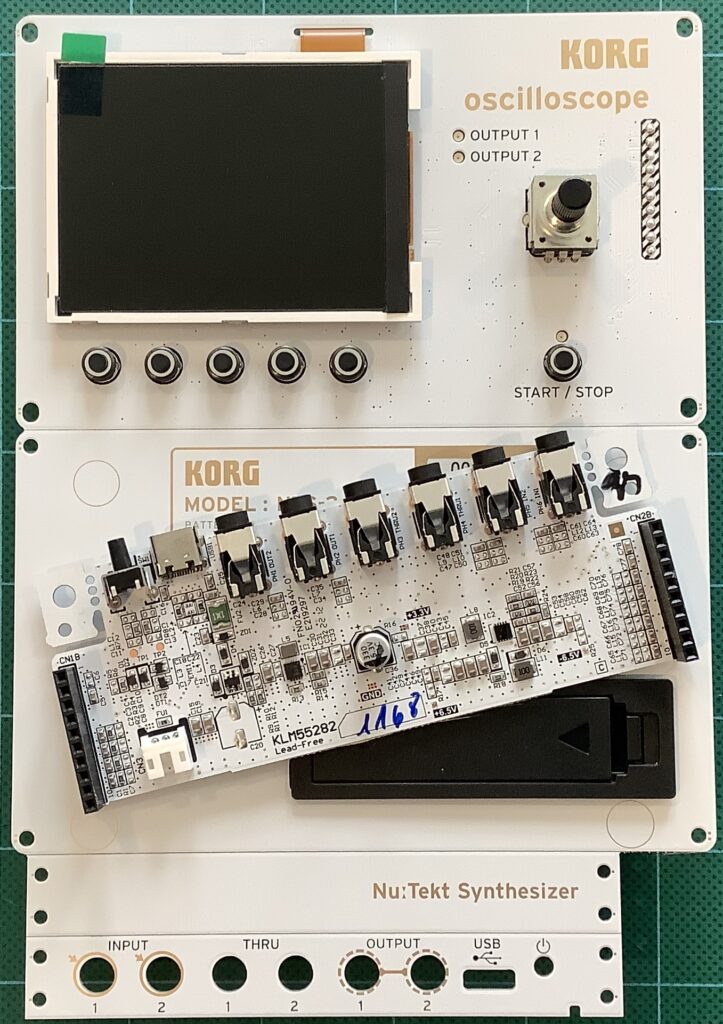
The Nu:tekt manufacturing concept is rather clever. Korg design and manufacture one (or more) large-ish, break-apart PCBs for each kit. The PCBs are loaded with surface mount (SMT) components and other random stuff like the display and battery holder. No soldering is required. Thus, one gets all of the benefit of SMT without the grief of soldering components made for mice. [My old hands and developing cataracts can barely handle work at this fine level.]

Korg NTS-2 main electronics board

The main board consists of four subboards to be broken apart.

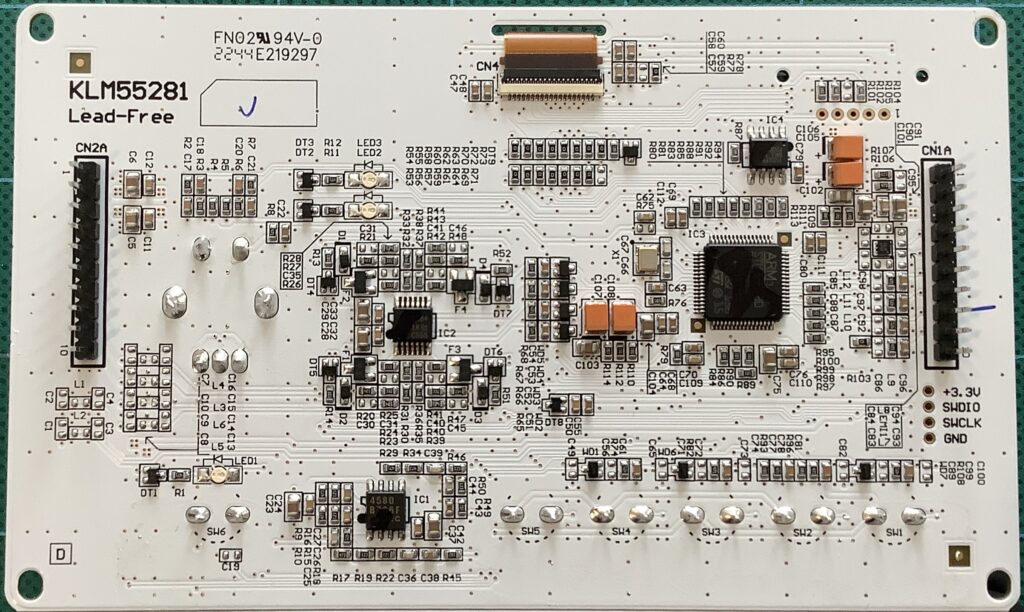
Korg NTS-2 screen and interface board

The color display (240×320 pixel 2.8″ LCD) is mounted on the flip-side of the main board. A second fully-assembled PCB has the jacks, ON/OFF switch and other gizmos needed for interfacing. The interface board plugs into the main board.

Korg NTS-2 main board detail (the money shot)

The image above is a close-up picture of the main electronics, including the ARM processor. Thank you, Korg, for wave-soldering this!

Assembly

The NTS-2 follows the pattern established by the rest of the Nu:tekt product line. The NTS-2 arrives disassembled and you do the work of putting the major components together. The kit includes assembly instructions, and “1, 2, you know what to do.” [Apologies to Junior Wells.]

The kit includes the cutest little screwdriver I’ve ever seen. Keep the screwdriver and use it to repair your eyeglasses. Yep, the kit screws are freaking small.

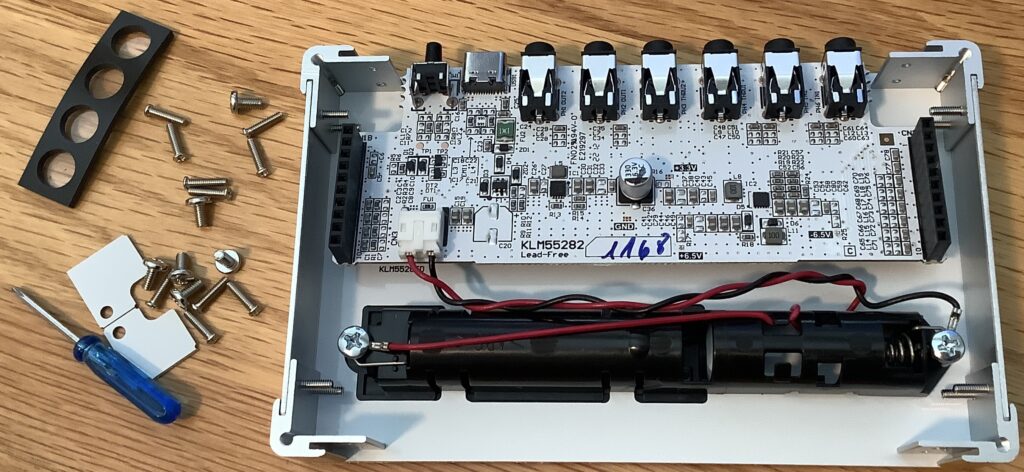
Korg NTS-2 bottom assembly

The image above shows the bottom assembly. You can see how the metal corner and side pieces tie everything together. Note the orientation of the interface board. Getting the orientation right is the only step that requires any real thought. Don’t forget to connect the battery lead to the interface board.

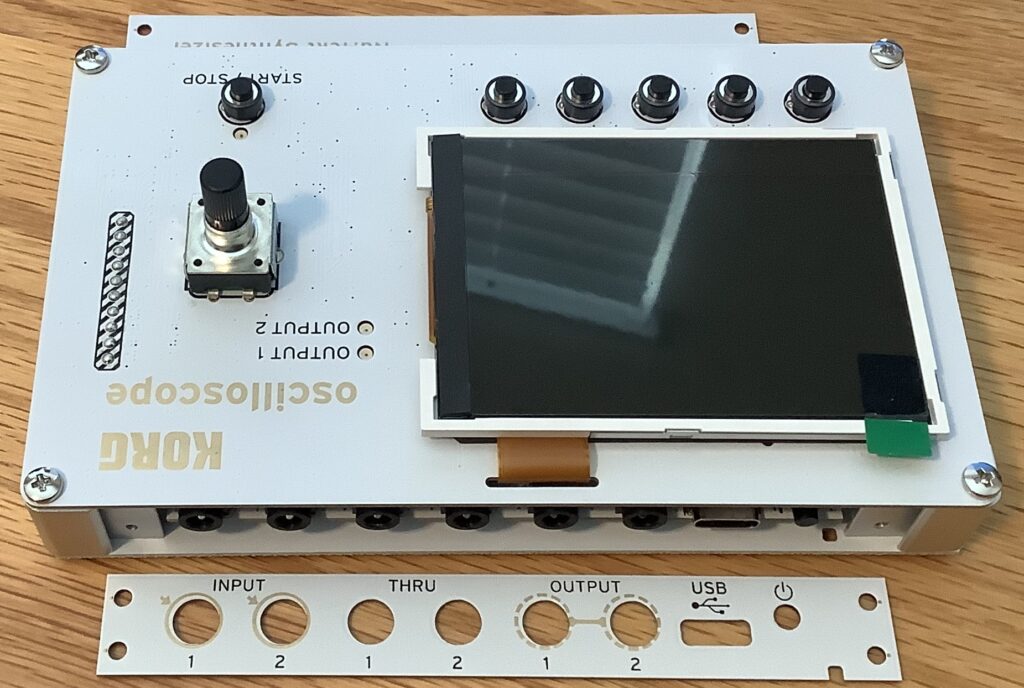
Korg NTS-2 top assembly

Screws secure the main board, AKA “the top”, onto the metal corners — after you’ve plugged the interface and main boards together, of course.

Assembly time is roughly the length of the Skye & Ross album (one hour). Overall, it was a fairly pleasant way to spend the morning, including coffee.

PATCH & TWEAK

The PATCH & TWEAK with KORG book fits the cliche, “richly illustrated.” If you want to know about synths — KORG synths, in particular — this is a fantastic book.

If you want to learn how to operate the NTS-2, not so much. The book has a few basics, however you must download the NTS-2 Owner’s Manual from the Korg web site to get the real dope. The Owner’s Manual (4 pages) isn’t much to look at although it does list the basic control parameters for each of the four operating modes:

  • Oscilloscope mode (SCOPE)
  • Function generator mode (WAVE)
  • Spectrum analyzer mode (FFT)
  • Global mode / settings

The book suggests how the NTS-2 may be used — not how to actually do any of that stuff. I recommend a little background reading about oscilloscopes (the Wikipedia page at the very least).

The NTS-2 operates on either USB power or two AAA batteries. I put in two AAA batteries, hit the switch, and no smoke. 🙂 No idea about real-world battery life at this point.

The user interface is menu-driven and is a lot easier to understand than my old Gabotronics oscilloscope. The front panel buttons line up with the on-screen menus. Simply press the appropriate button to rotate (navigate) through the menu items.

I wanted to see what happens if I just put a (mono) audio signal into the NTS-2 without any set-up or prep. This seems like the most typical first use scenario. I’ll bet the NTS-2 was inspired by the Korg Minilogue scope; people love to watch signals dance around.

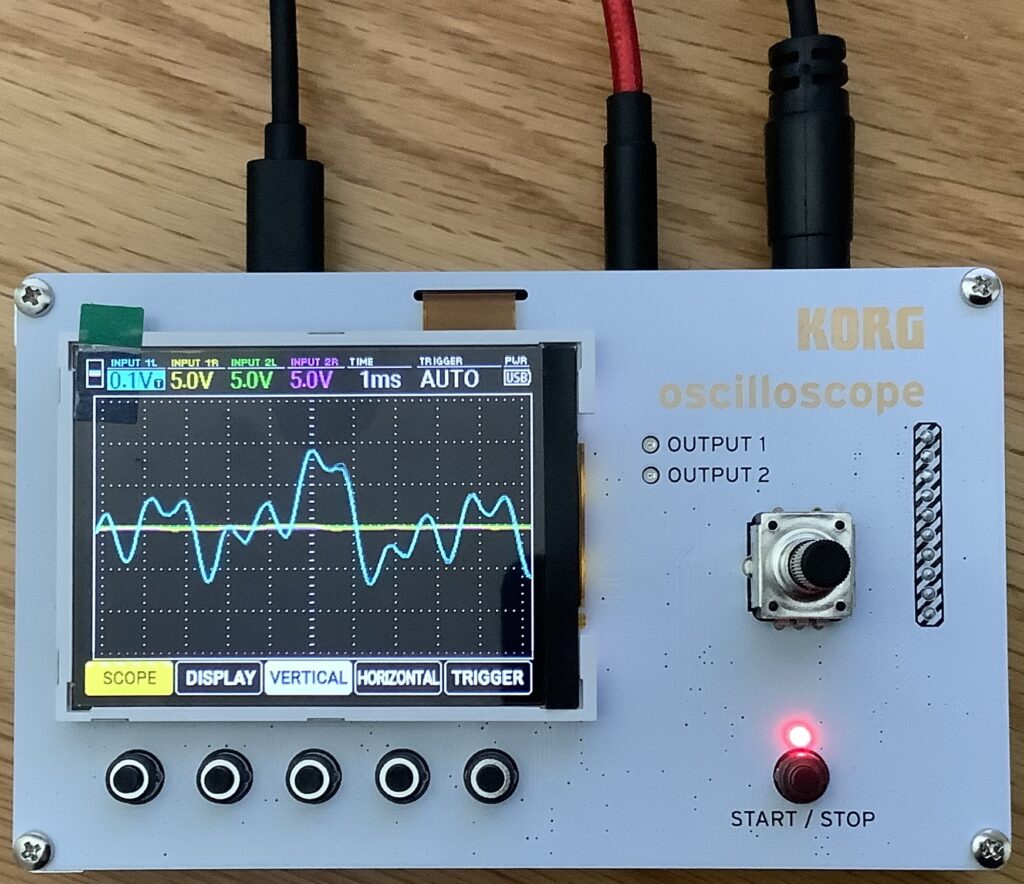
First, you need to know that the INPUT and signal THRU jacks are stereo and the OUTPUT jacks are mono. I connected the NTS-2 INPUT to the MONO out from Yamaha MODX, selected an organ patch and taped down a key to form a simple tone generator. 🙂 Select SCOPE mode and press VERTICAL to select Input 1L.

And, flat line. What the? Well, out of the box, the vertical voltage range is set too high, 10 volts. The MODX is line out (approximately 1V max). Turn the parameter knob and change the vertical range to 0.1V. (The current range is shown in the status bar at the top of the display.) Now, we got picture!

Korg NTS-2 first signal and no smoke!

Thanks to the simple NTS-2 menu system, I had fun playing with the function generator, too. I did have trouble grokking the FFT spectrum analyzer and need to revisit FFT mode after reading up.

I’m quite pleased with the NTS-2 and it should handle audio and control voltage analysis, no prob. I don’t know what to expect when analyzing high speed digital signals. The old Gabotronics does OK with digital and it has a logic analyzer capability which the NTS-2 does not. I use the Gabotronics with its Windows app because the Gab is absolutely horrible as a stand-alone scope. The NTS-2, on the other hand, does not have a personal computer-based app (at least not yet).

Thus, if you intend to do a lot of digital troubleshooting, you may want to consider one of the many inexpensive bench oscilloscopes that have popped up in recent years. If you want to do audio only and want easy fun, try the NTS-2.

Copyright © 2023 Paul J. Drongowski