
Last time, we looked at the drawbar programming in MODX Performance “The Basics”. The first five voice Elements are each assigned a single drawbar waveform: 16′, 5 1/3′, 8′, 4′ and 2′.
A lot of folks (me!) frequently build on a foundation like pulling the first three or four drawbars and then pull higher bars while playing. Thus, assigning individual drawbars seems a little wasteful in these kinds of registrations, when the foundation doesn’t change. Fortunately, MODX (Montage) provide waveforms for typical drawbar foundations:
    Wave#  Waveform name            Registration?
    -----  ----------------------   -------------
     441   Rock Chorus Vibrato
     442   Rock Percussion
     443   Rock2                    65 5444 644
     446   Jazz w/Percussion
     448   Jazz                     78 6600 000
     451   Full Draw                88 8888 888
     454   Swish
     456   Bow                      87 4323 468
     457   Bow Chorus Vibrato
     458   Gospel                   87 6000 568
     459   Soul                     80 0050 578
     460   1st Four Draw            88 8800 000
     479   Draw 1+3                 80 8000 000
     482   Draw 2+4                 08 0800 000
     485   Draw Even
     488   Draw Odd
The MODX data list PDF has the complete list of waveforms, including the slightly detuned and offset variations. I tried to guess the registrations and please take my guesses with a grain of salt! [See Genos/PSR organ registrations.]
MODX Performance “Vib Chorus AF1” is as simple as you can get:
    Performance: Vib Chorus AF1
    El# Waveform            Level  Pan  Coarse  XA Control
    --- ------------------  -----  ---  ------  ----------
     1  Bow                   100   C      0    A.SW Off
     2  Bow Chorus Vibrato    102   C      0    A.SW1 On
It consists of two Elements. “Bow” refers to the overall shape of the drawbars with the lowest and highest drawbars pulled out the farthest. You might hear this registration in a gospel music or soul setting.
The Elements depend on the state of the ASSIGN 1 front panel button. The Extended Articulation (XA) control parameter chooses the first Element when the A.SW switches are OFF and chooses the second Element when the A.SW1 switch is ON. This configuration conserves polyphony and Elements sparingly. You can add or disable chorus/vibrato (C/V) by pressing the ASSIGN 1 switch. The C/V is sampled into the “Bow Chorus Vibrato” waveform and you do not have the option of selecting V1, C1, etc. Unlike real world Hammond, C/V is added (or removed) only on new notes played after switching. It’s not an independent effect unit.
You could use “Vib Chorus AF1” as the basis for new Performances that switch between drawbar registrations. Why not switch between “Jazz” and “Jazz w/Percussion”, for example? Simply change Element 1 to the “Jazz” waveform and change Element 2 to the “Jazz w/Percussion” waveform.
Here are the Element assignments for another simple Performance, “Draw Control”:
    Performance: Draw Control
    El# Waveform            Level  Pan  Coarse  XA Control
    --- ------------------  -----  ---  ------  ----------
     1  Draw 1+3              100   C      0    Normal
     2  Draw 2+4               67   C      0    Normal
     3  Draw Even               0   C      0    Normal
     4  Draw Odd                0   C      0    Normal
You can go from quiet to shoutin’ with this one! For extra credit, learn how to add rotor grit and rotor whistle Elements in order to sweeten the pot. [Hint: Learn how to copy Elements with SHIFT+EDIT.]
New waveforms in Montage/MODX
There are several new drawbar organ waveforms in Montage (MODX) which don’t get mentioned very often. These waveforms have the Leslie speaker effect sampled in:
Wave#  Waveform Name        Performance         Registration?
-----  -------------------  --------------      -------------
  495  Tonewheel1 Fast      Whiter Bars         68 8600 000
  496  Tonewheel1 Slow
  497  Tonewheel2 Fast      All Bar None        88 8888 888
  498  Tonewheel2 Slow
  499  Tonewheel3 Fast L    The Jazz Organ, Groove Organ
  500  Tonewheel3 Fast R
  501  Tonewheel3 Fast St
  502  Tonewheel3 Slow L
  503  Tonewheel3 Slow R
  504  Tonewheel3 Slow St
  505  Tonewheel4 Fast                          88 8888 888
  506  Tonewheel5 Fast      Rich Bars           63 8457 530
  507  Tonewheel6 Fast
Sampled-in Leslie doesn’t get much love because the effect cannot be modified and the switch from slow speed to fast is abrupt — no acceleration ramp between the two speeds.
The first three sets of tonewheel waveforms cover the three most common registrations: 1. Whiter Shade Of Pale, 2. full drawbars, and 3. jazz organ a la Jimmy Smith and Groove Holmes. If you want to try them out, I took note of the MODX Performances built on these tonewheel sample sets.
I believe these tonewheel waveforms are used in the Genos™ “joystick (JS)” voices: “WhiterBars JS”, and “AllBarsOut JS” and “JazzRotary JS”. The ears don’t lie. Tonewheel4, 5 and 6 are probably in the Genos ROM somewhere, too. No time for an Easter egg hunt today. 🙂
Here is what you will see if you look inside of these Performances:
Performance: The Jazz Organ
El# Waveform            Level  Pan  Coarse
--- ------------------  -----  ---  ------
 1  Tonewheel 3 Slow L    115  L63     0
 2  Tonewheel 3 Slow R    115  R63     0
 3  Tonewheel 3 Fast L      0  L63     0
 4  Tonewheel 3 Fast L      0  R63     0
 5  Draw 16' Of            32   C    +20
 6  Rotor Whistle           0   C    +17
 7  Rotor Grit 1            0   C      0
 8  Draw 4' Of              0   C      0

Performance: Whiter Bars
El# Waveform          Level  Pan  Coarse  XA Control
--- ----------------  -----  ---  ------  ----------
 1  Tonewheel 1 Slow    127   C      0
 2  Tonewheel 1 Fast      0   C      0
 3  Draw 16' Of          23   C    +20    Key off - Rel key click
 4  Rotor Whistle         0   C    +17
 5  Rotor Grit 1          0   C      0
 6  Draw 4' Of          127   C      0    Assign SW #1 - Percussion

Performance: All Bar None
El# Waveform          Level  Pan  Coarse  XA Control
--- ----------------  -----  ---  ------  ----------
 1  Tonewheel 2 Slow    127   C      0
 2  Tonewheel 2 Fast      0   C      0
 3  Draw 16' Of          32   C    +20    Key Off - Rel key click
 4  Rotor Whistle         5   C    +17
Example performance
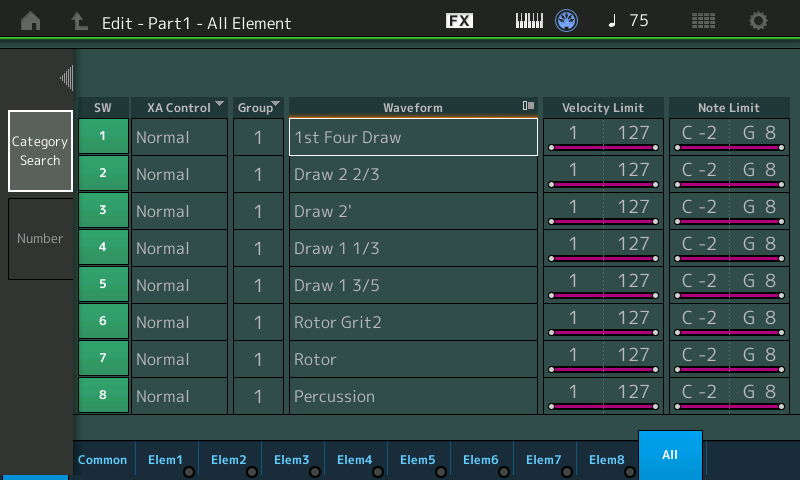
I set out to build a new Performance, “8888+”, using a few of the ideas that I outlined above. The new Performance puts the “1st Four Draw” waveform in the first Element and places four individual drawbar waveforms into Elements 2 through 5:
    Performance: 8888+
    El# Waveform            Level  Pan  Coarse
    --- ------------------  -----  ---  ------
     1  1st Four Draw         127   C      0
     2  Draw 2 2/3              0   C      0
     3  Draw 2'                 0   C      0
     4  Draw 1 1/3              0   C      0
     5  Draw 1 3/5              0   C      0
     6  Rotor Grit 2           70   C    -24
     7  Rotor                 127   C    -17
     8  Percussion              0   C     -7
Elements 6 and 7 add rotor noise. Element 8 handles percussion.
I didn’t build “8888+” from scratch. I started out with the Performance “More Shade” and modified it, following the basic editing procedure which I outlined in my last post.
In the MODX All table, tap the name of the waveform that you want to change in order to select it. MODX (Montage) displays two buttons on the left-hand side of the display. Tap the “Category Search” button.
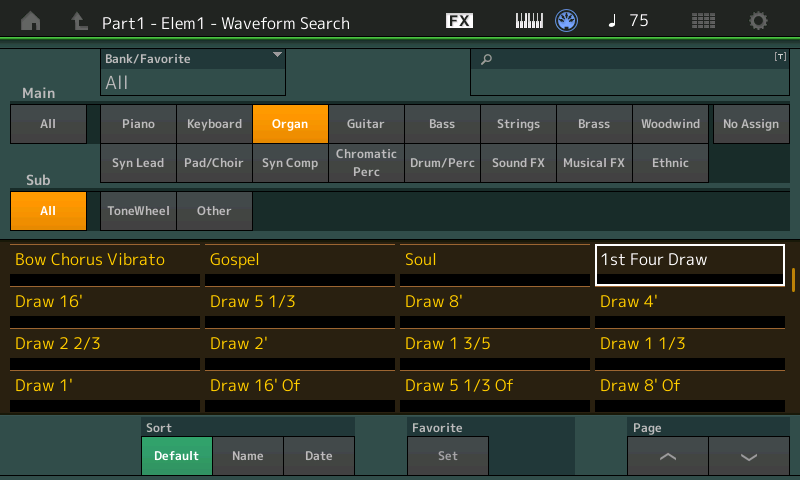
MODX displays waht looks like a category search page. Instead of Performances, this category search displays and searches waveforms. You can scroll through the waveform or type in the name of the waveform that you’d like to find. Select a waveform and press the ENTER button.
I followed his basic procedure for each of the first five Elements. Yeah, the 1 1/3 and 1 3/5 drawbars are not in the usual order, but I want to have 1 1/3 in the first group of sliders. I’m more likely to pull that drawbar than 1 3/5.
If you ride the sliders and noodle around, the individual drawbar sounds will be louder than the “1st Four Draw” sound. We need to rebalance the choir so that no individual drawbar will sound out-of-place with its peers.
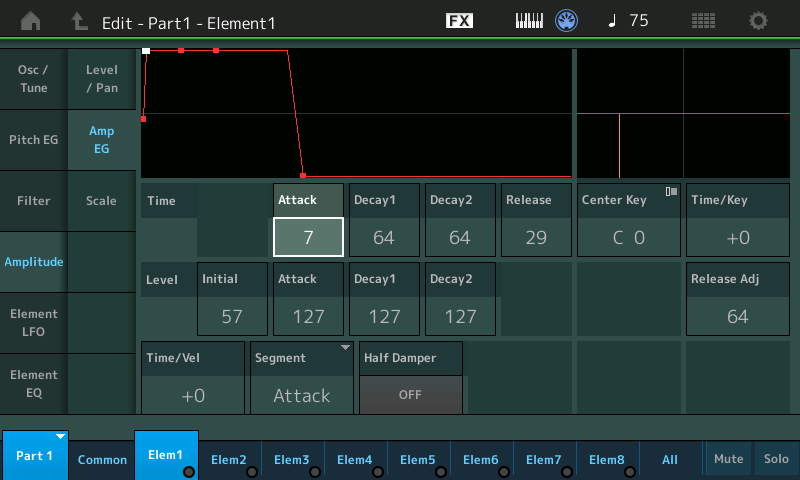
In order to balance the bars, I visited the Amplitude EG page for drawbars 1 through five. The picture above is the Amplitude EG page for the first Element, “1st Four Draw”. Please notice the envelope Levels: Initial, Attack. Decay1 and Decay2. Attack, Decay1 and Decay2 levels are the maximum, 127. That’s good. We want the “1st Four Draw” waveform at the maximum output level.

MODX Performance 8888+ second Element (2 2/3) AEG
The next screen capture shows the Amplitude EG for the “Draw 2 2/3” Element. I reduced the four envelope levels. Attack, Decay1 and Decay2 levels are 70, which will make the “Draw 2 2/3” blend into the overall drawbar choir. I programmed Elements 3, 4 and 5 in the same way. If 70 doesn’t sound/feel right to you, dial in a different level!
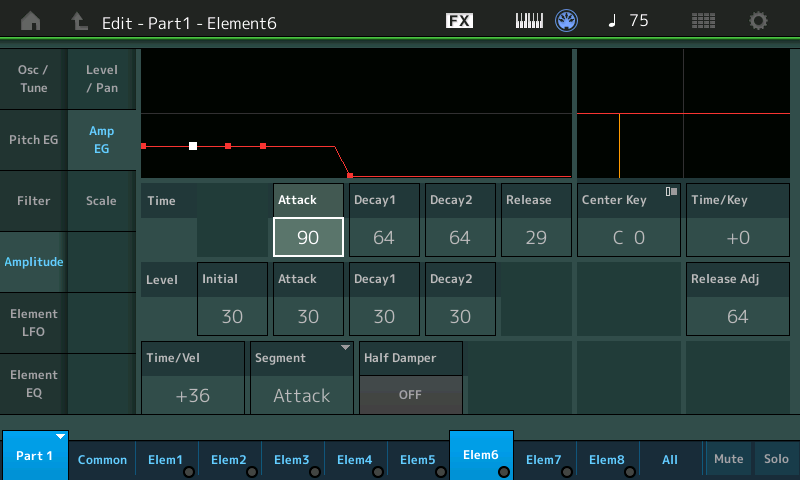
MODX Performance 8888+ sixth Element (rotor noise) AEG
I also adjusted the envelope levels for Elements 6, 7, and 8. In the case of 6 (above) and 7, lower envelope levels prevent outrageously loud rotor noise if I accidently push the sliders up for 6 and 7. This can happen in the heat of battle when I’m concentrating on the music and not watching my hands on the sliders. 🙂 Similarly, I set the envelope levels for Element 8, percussion, to obtain soft percussion when its slider is all the way up.
I hope this discussion encourages experiments of your own. I also hope that you are becoming more comfortable with MODX (Montage) editing.
Copyright © 2023 Paul J. Drongowski