Today’s exploration is practical even if it is excessively wonk-ish.
Last week, I decided to update MIDI sequences for a few classic tunes by The Alan Parsons Project. Parsons and Eric Woolfson laid down 70s progressive rock tracks with serious groove: “I Wouldn’t Want To Be Like You,” “What Goes Up”, and “Breakdown”. Classic in their own right are the guitar solos by Ian Bairnson. Bairnson contributed electric guitar (and the occasional saxophone!) to the Parsons/Woolfson wonder duo.
I’m striving for authenticity, so one of the first questions to ask is “What guitars and amplifiers did Bairnson use for the I Robot and Pyramid albums?” Fortunately, Ian has a page dedicated to his gear. Very likely, he played a Les Paul Custom through a Marshall 50 head driving a 4×12 Marshall angle-front cabinet. Thanks for posting this information, Ian!
The next hurdle is searching through the many tens (or hundreds) of synth guitar patches, amp simulators and speaker cabinet sims to find the most authentic audio waveforms and signal processing effects. Bang, we run into a practical and wonk-ish problem: Which of these many digital choices are likely candidates and which choices can we ignore? Unfortunately, manufacturers (at the very least, their attorneys) make the search difficult by avoiding any use of brand names (e.g., Gibson, Fender, Les Paul, etc.) in patch and effect names. Sometimes the patch/effect names are suggestive euphemisms, most times not.
For these kinds of sequencing jobs, I’m arranging on Yamaha gear, either PSR-S950 or Genos. Although I love their sound, it’s seems that Yamaha have deliberately gone out of their way to divorce patch/effect names from their real-world, branded counterparts. The number of candidates is small in organ-land, i.e., “Organ flutes,” as Yamaha calls them, mean Hammond B-3. The number of candidates in guitar-land is much, much larger and harder to discern.
Here’s some info that might help you out. Kind of decoder for guitar instrument and amp/cabinet sim names. Even though I looked to authoritative sources, there’s still guesswork involved. So, apologies up front if I’ve led anyone astray.
Single vs. double coil
This is a biggy. Guitarists are ever in pursuit of “tone.” Of course, a big part of tone is the electric guitar at the front-end of the signal chain. In this analysis, I’m concentrating mainly on solid body guitars and I’m ignoring acoustic, hollow-body and semi-hollow instruments.
Some might argue that player style, articulations and dynamics are the true front-end. If you want to argue that point, please go to a guitar forum. 🙂
For solid body, the choice of pick-up is important. If you’re not familiar with electric guitars, the pick-up is the set of wire coils beneath the guitar strings that sense vibrating strings and convert mechanical vibration to electrical vibration. The electrical signal is sent to a volume/tone circuit and then on to a guitar amplifier. A guitar may have more than one pick-up, say, one pick-up by the neck, one under the bridge and one in the middle between the two. The pick-ups may be switched into alternative combinations. Along with the volume/tone controls, the tonal possibilities are nearly endless.
Seems kind of pathetic to rely on only one or a few guitar waveforms (samples), doesn’t it?
There are two main kinds of pick-up: single coil and double coil (humbucker). The humbucker was invented and patented by Gibson as a means of mitigating the noise (hum) present produced by a single coil pickup. The sound of a single coil pick-up is often described with terms like “bright,” “crisp,” “bite,” “attack.” Double coil pick-ups are described as “thick,” “round,” “warm,” “dark,” “heavy.”
Due to parentage, Gibson guitars usually have double coil pick-ups. Fender guitars usually have single coil pick-ups. Naturally, the quest for tone has led to hybrids using both kinds of pick-up, regardless of manufacturer.
Reducing these observations to practice, when Ian Bairnston says he used a Gibson Les Paul Custom for his work with The Alan Parsons Project, we should be looking for samples (waveforms) of a double coil electric guitar, of which the Les Paul is an excellent example. Even if you couldn’t give two wits about synth patch names, use your ears an listen for a thick, round, warm, dark, heavy tone.
Detective work
OK, I’m a wonk and did a little detective work.
Yamaha arranger patch names are obtuse about single vs. double, etc. Worse, the voices are pre-programmed with DSP effects which mask the characteristics of the fundamental waveform. So, step zero is to be aware of the masking and turn off all EQ, DSP, chorus and reverb effects when listening and making comparisons.
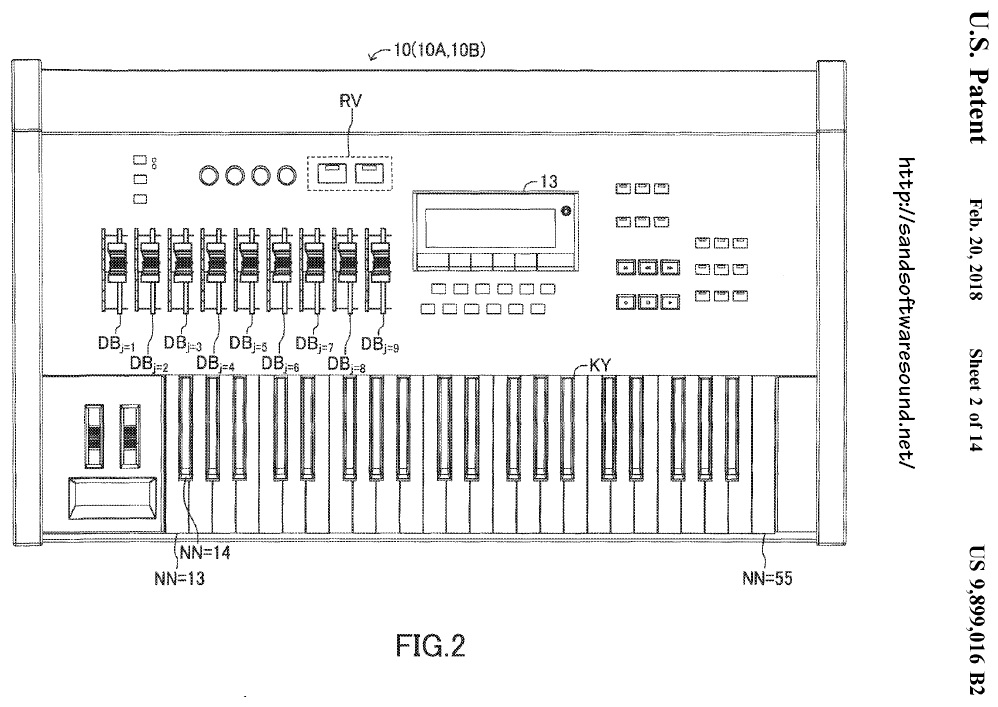
Doubly worse is the lack of deep voice editing where we can deep dive a voice and discover the basic waveforms underlying a voice patch, including the waveform names. This is where my trusty Yamaha MOX6 synthesizer comes into play. I use the MOX6 to deep dive its patches and then compare patch elements against candidate voices on the PSR-S950 arranger. This always leads to interesting discoveries.
Although I refer to the MOX specifically, please remember that the MOX is a member of the Motif/MOX family. Comments can be extrapolated to the Motif XS on which the MOX is based, and the Motif XF/MOXF which are a superset of the Motif XS/MOX.
A large number of MOX programs have “Dual Coil” in their name. These programs are based on the “60s Clean” waveforms. Think of “60s Clean” as a family of waveforms with multiple articulations: open strings, slide, slap, FX, etc.
Other MOX programs are “Single Coil”. These programs are based on the “Clean” family of waveforms. If you listen and compare “60s Clean” versus “Clean,” you can hear the difference between single coil and double coil. The voice programming switches between the waveforms depending on key velocity, articulation buttons, and so forth.
The “60s Clean” and “Clean” waveform families make up the “Mega 60s Clean” and “Mega 1coil Clean” MOX megavoices, respectively. Please recall that a MegaVoice uses velocity switching, articulation switches (AF1 and AF2) and note ranges to configure a versatile voice suitable for arpeggio and style sequencing. Given the underlying waveforms, we can conclude that Mega 60s Clean is dual coil and Mega 1coil Clean is single coil.
Mid- and upper-range Yamaha arranger workstations also have MegaVoices, albeit they may have small differences in patch programming. The fundamental waveforms, however, are the same. Yamaha, like all manufacturers, recycle waveforms (samples). It’s not that older waveforms are bad; they provide backward compatibility and legacy support. Ever increasing waveform memory capacity makes it easy and inexpensive to include legacy waveforms and voices.
Given that conceptual basis, I did a little A/B testing between the MOX synth and the S950 arranger. Here is a summary of the correspondence between guitar voices:
    PSR-S950 Voice     MOX6 Voice
    -----------------  ---------------------
    MV CleanGuitar     Mega 1coil Clean

    MV SolidGuitar1    Mega 60s Clean
    MV SolidGuitar2    Mega 60s Clean

    MV SingleCoil      n/a
    MV JazzGuitar      n/a

    MV OverdriveGtr    Mega Ovdr Fuzz
    MV DistortionGtr   Mega Ovdr Distortion

    MV SteelGuitar     Mega Steel
    MV NylonGuitar     Mega Nylon
This is what my ears tell me when all of the EQ, DSP, chorus and reverb effects OFF.
MV SolidGuitar1 and MV SolidGuitar2 are based on the same waveform. The patch programming is different: different EQ, VCF and VCA parameter values. The default DSP effects are different, too.
Naturally, you’re curious about the missing S950 MV SingleCoil and MV JazzGuitar voices in the MOX6 column of the table. The MOX does not have equivalent voices. However, the Motif XF eventually added “Mega 1coil Old R&R” and “Mega Jazz Guitar”, both patches based on new single coil and jazz guitar waveform families. Indeed, the MV SingleCoil is great for that old rock’n’roll twang.
Hey, S950 owners! I’ll bet that you didn’t know that you have a piece of the Motif XF under your fingertips.
[I’m still categorizing SArt voices as single or double coil. Watch this space.]
Amplify this!
That’s it for the front-end of the signal chain. What about amp simulation?
The riddle of amp sim names is difficult to solve. Fortunately, guitarists are positively obsessive about vintage amps and the Web has many informative sites. (Too many, perhaps?) Armed with a few clues from the Yamaha Synth site, I forged out onto the Web and arrived at these educated guesses about amp simulators:
DSP effect/sim Real-world
------------------ ---------------------------------
US Combo Fender (Bassman?)
Jazz Combo Roland Jazz Chorus
US High Gain Boutique (Mesa Boogie Rectifier?)
British Lead Marshall Plexi
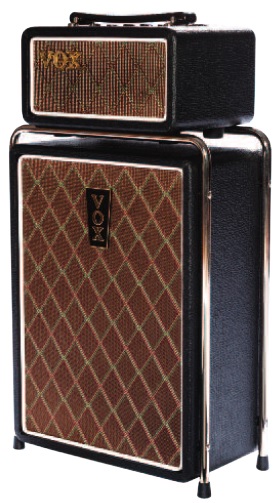
British Combo Vox (AC30)
British Legend Marshall (Bluesbreaker? JCM800?)
Tweed Guy Fender 55 Tweed Deluxe
Boutique DC Matchless DC30 (Boutique AC30)
Y-Amp Yamaha V-Amp
DISTOMP Yamaha stomp pedal FX
80s Small Box No specific make/model
Small Stereo Dist No specific make/model
MultiFX No specific make/model
The list compares quite favorably with Guitar World’s 10 most iconic guitar amplifiers:
    Vox AC30 Top Boost (1x12, 2x12)                 1958
    Fender Deluxe (1950s tweed)                     1955-1960
    Mesa/Boogie Dual Rectifier                      1989
    Marshall JCM800                                 1981
    Marshall 1959 Super Lead 100 Watt Plexi (4x12)  1965
    Roland JC-120 Jazz Chorus (2x12)                1975
    Peavey 5150 (2004: 6505)                        1992
    Fender Twin Reverb                              1965-1967
    Fender Bassman (4x10)                           1957-1960
    Hiwatt DR103 (4x12)                             1972
Several of the amp sims include cabinet simulation, too. Here are my guesses:
    DSP Sim  Real-world
    -------  --------------------------------
    BS 4x12  British stack (Marshall)
    AC 2x12  American combo (Fender?)
    AC 1x12  American combo (Fender?)
    AC 4x10  American combo (Fender?)
    BC 2x12  British combo (Vox?)
    AM 4x12  American modern (Mesa Boogie?)
    YC 4x12  Yamaha
    JC 2x12  Roland Jazz Chorus
    OC 2x12  Orange combo
    OC 1x8   Orange combo
The abbreviations “BS” and “AC” are potentially confusing. “AC” suggests the (in)famous AC series of Vox amps. “BS” suggests “Bassman”. However, I don’t recall a Vox AC 4×10, while the Fender 4×10 is iconic. A Yamaha site spelled out “BS” as “British Stack,” so I’m sticking with “A” for American and “B” for “British”.
Back to Bairnson, I’m trying the British Legend amp sim with a BS 4×12 cabinet first, then tweak.
I hope you enjoyed this somewhat wonk-ish walk through synthesizer and simulated guitar-ville. In the end, it’s tone that matters and let the ears decide.
Copyright © 2018 Paul J. Drongowski