The AG08 is an extension of the successful AG06MK2 and AG03MK2 streaming console mixers. I use a MK1 AG06 every day and appreciate the number of I/O and control options that it offers.
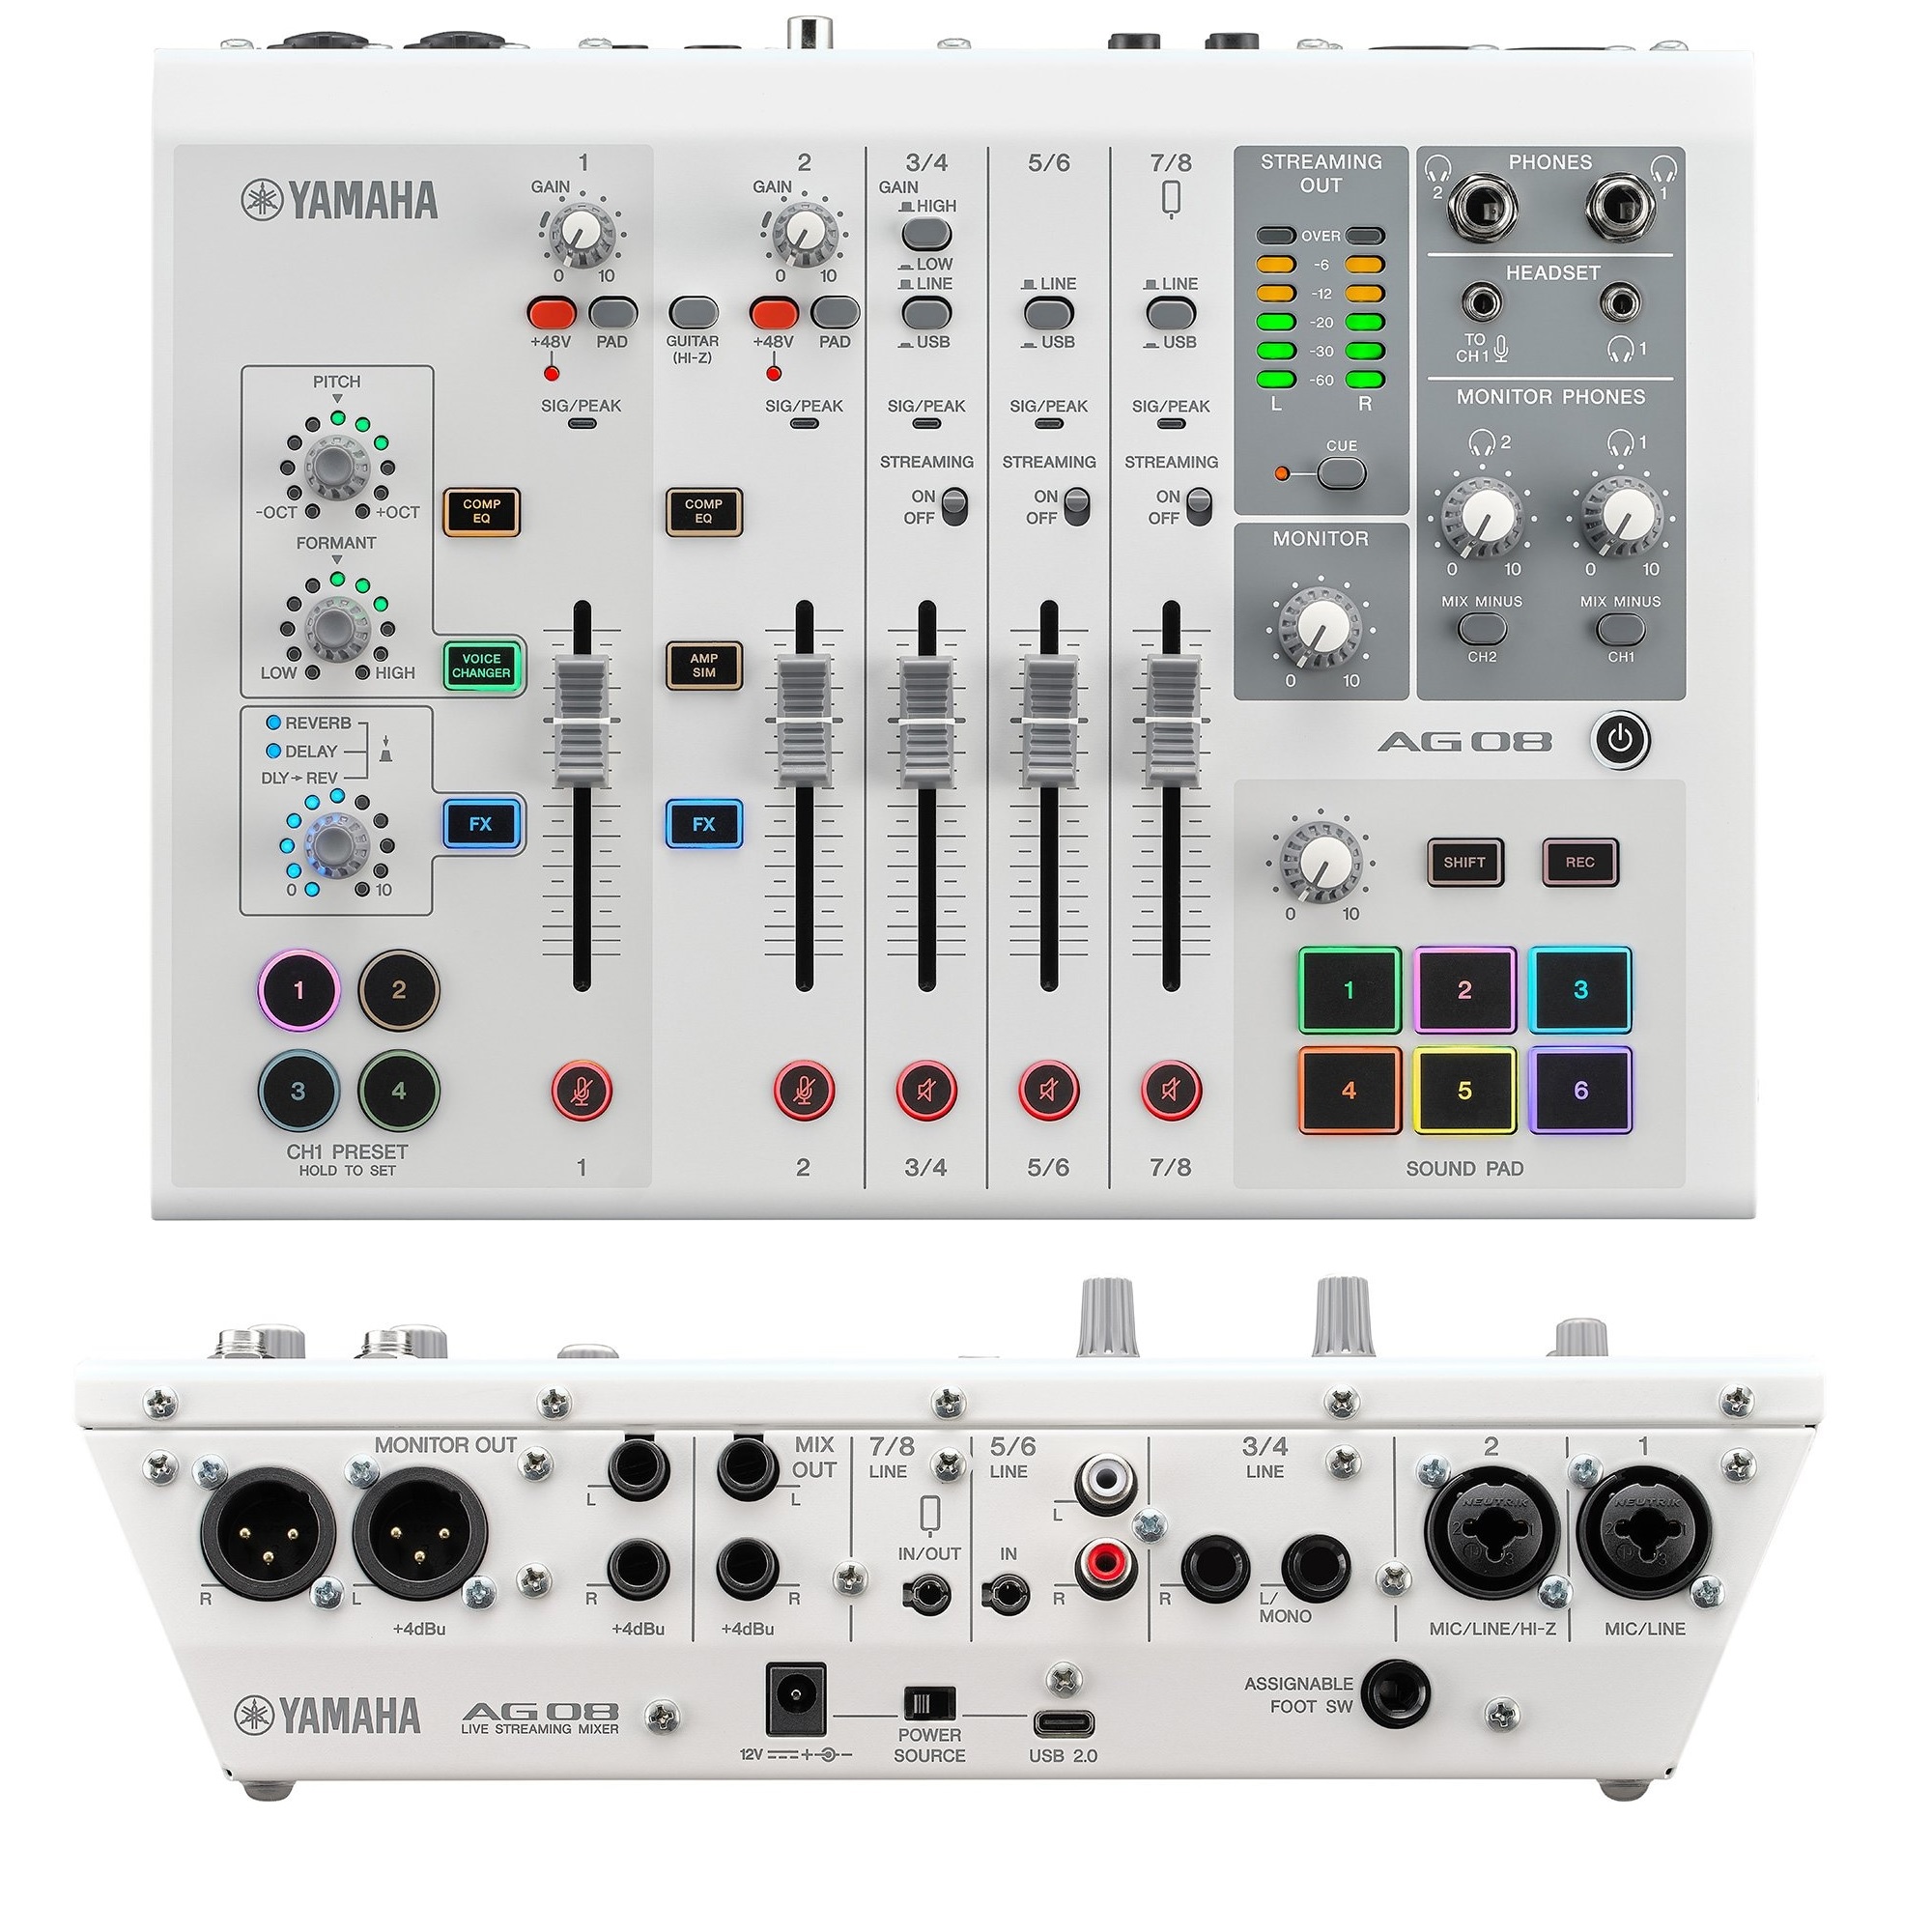
Yamaha AG08 Live Streaming Mixer
Yamaha are definitely chasing the live streaming and pod-casting hot trend. The AG08 has:
24-bit, 48 kHz Multi-channel audio recording and playback
External 12V power or USB C bus power (switchable)
Phantom power on channels 1 and 2
Dimensions: 11.5″W x 8.8″D x 3.5″H
Weight: 4.9 pounds (2.2kg)
It’s all controlled by the Yamaha AG08 Controller app for IOS. (Same is true for AG06 and AG03.) You can find all the specs and manuals on-line now.
The industrial design is quite clean and colorfully pretty. Don’t like white? Yamaha offer the AG08 in black, too. It’s a tad big for my desktop and a little too much functionality for me. However, it appears to be built like a tank. Hope it can survive the occasional coffee spill. 🙂
The AG08 comes with the usual Yamaha software bundle including Steinberg WaveLab Case. WaveLab Cast may be aimed at the pod-casting community, but I find that it does a lot of everyday audio chores without the expense of full WaveLab.
Clearly, digital piano is the main focus. The FP-E50 is targeted for the home market, but I can see where (semi-)pros might consider this keyboard for casual gigs. Power comes from an external adapter, however. There isn’t 5-pin MIDI either — another feature that pros might miss.
Roland FP-E50 digital piano (arranger, synth)
Flipping through the FP-E50 tone list, it has a slew of classic Roland sounds from XV/JV days. Additional sounds (EXZ Wave Expansions and SDZ Sound Packs) can be downloaded from the Roland Cloud. Roland plan to release new accompaniment styles as “Z-Style Packs”.
The asking price is a reasonable $999USD (MAP). A furniture-style stand is available for $100USD. Roland are going up against Yamaha DGX-670. Just on the basis of visual appearance and styling, I’d rather have the FP-E50 in my living room.
The $1,000 keyboard space is definitely interesting these days!
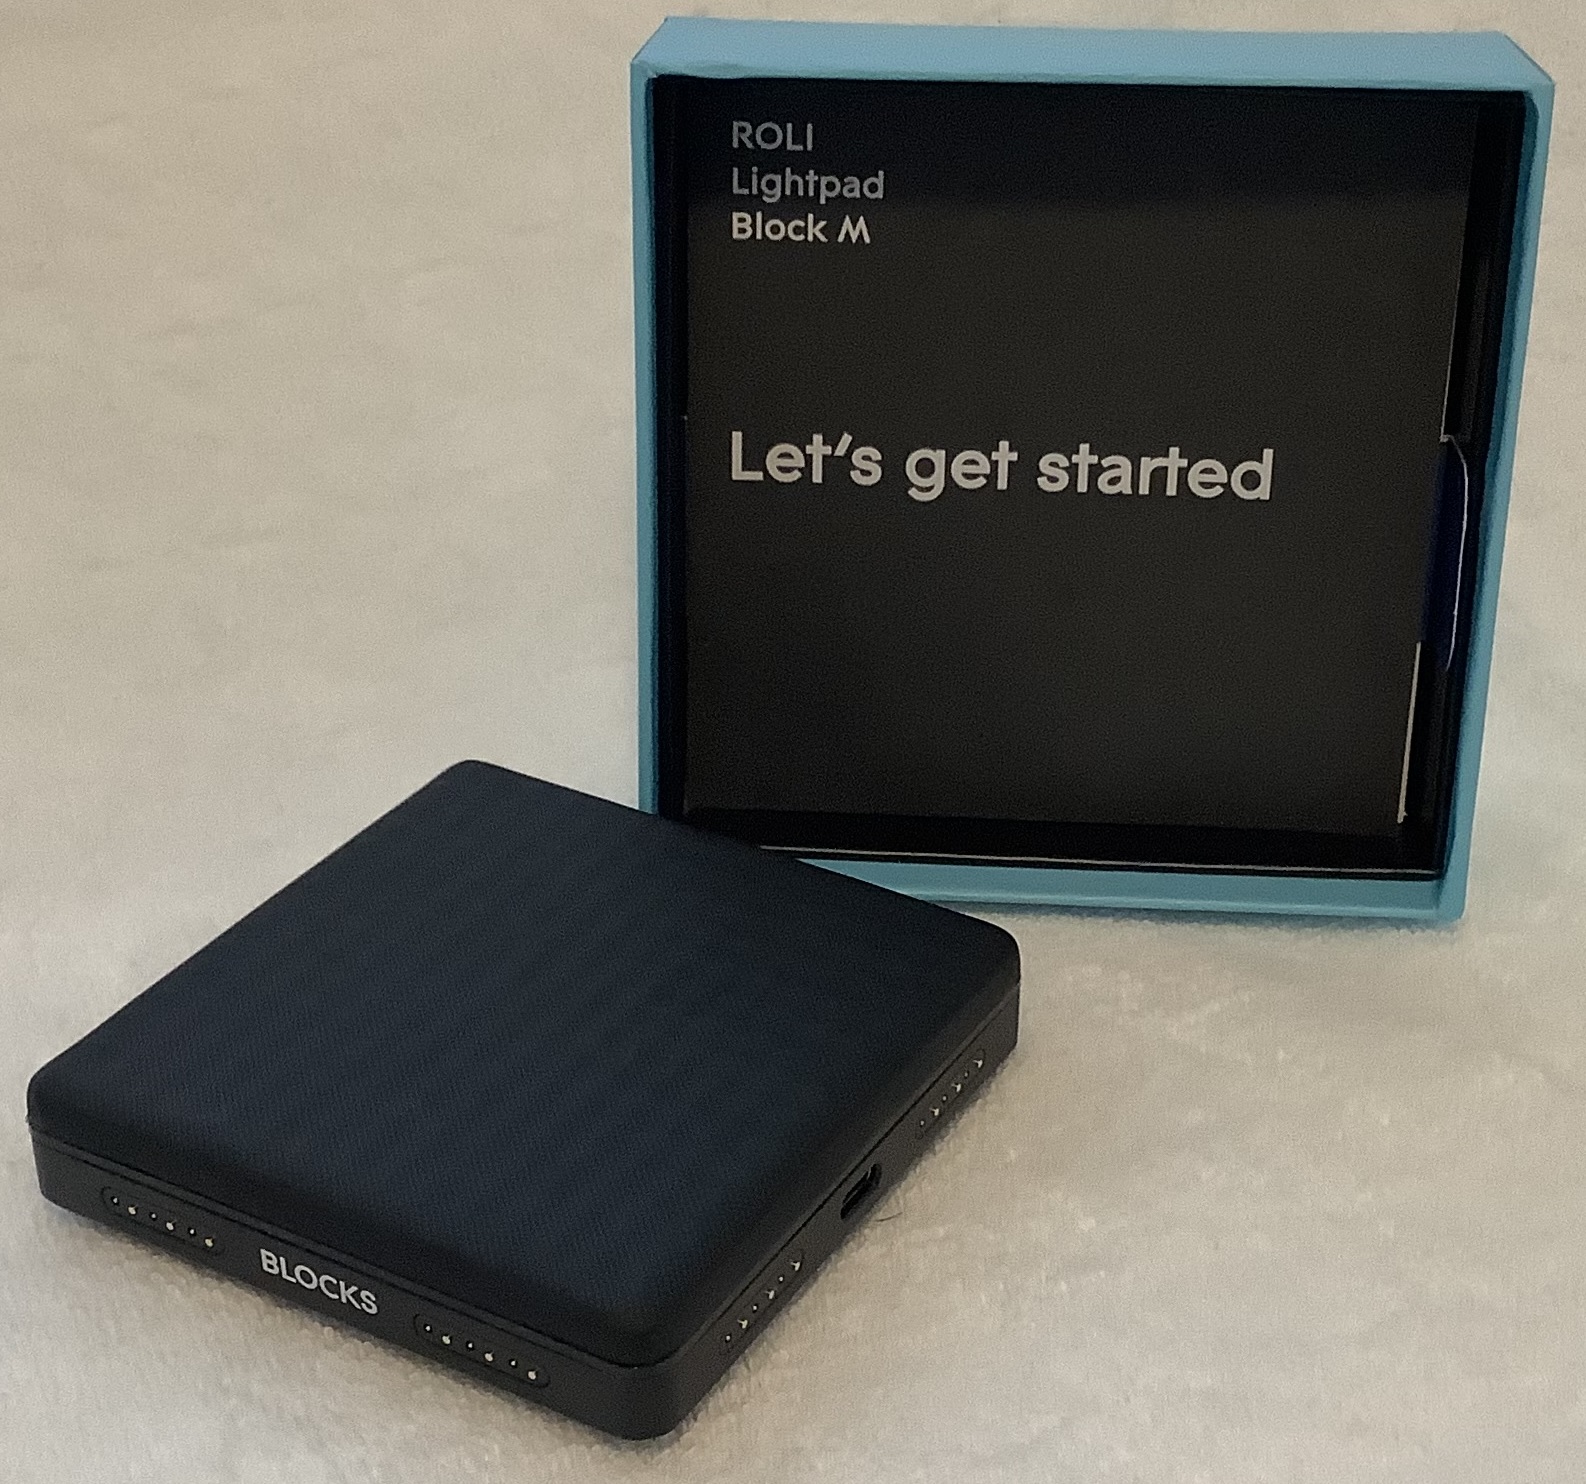
Having worked with and played ROLI Lightpad M, I’m ready to write this review!
Starting out
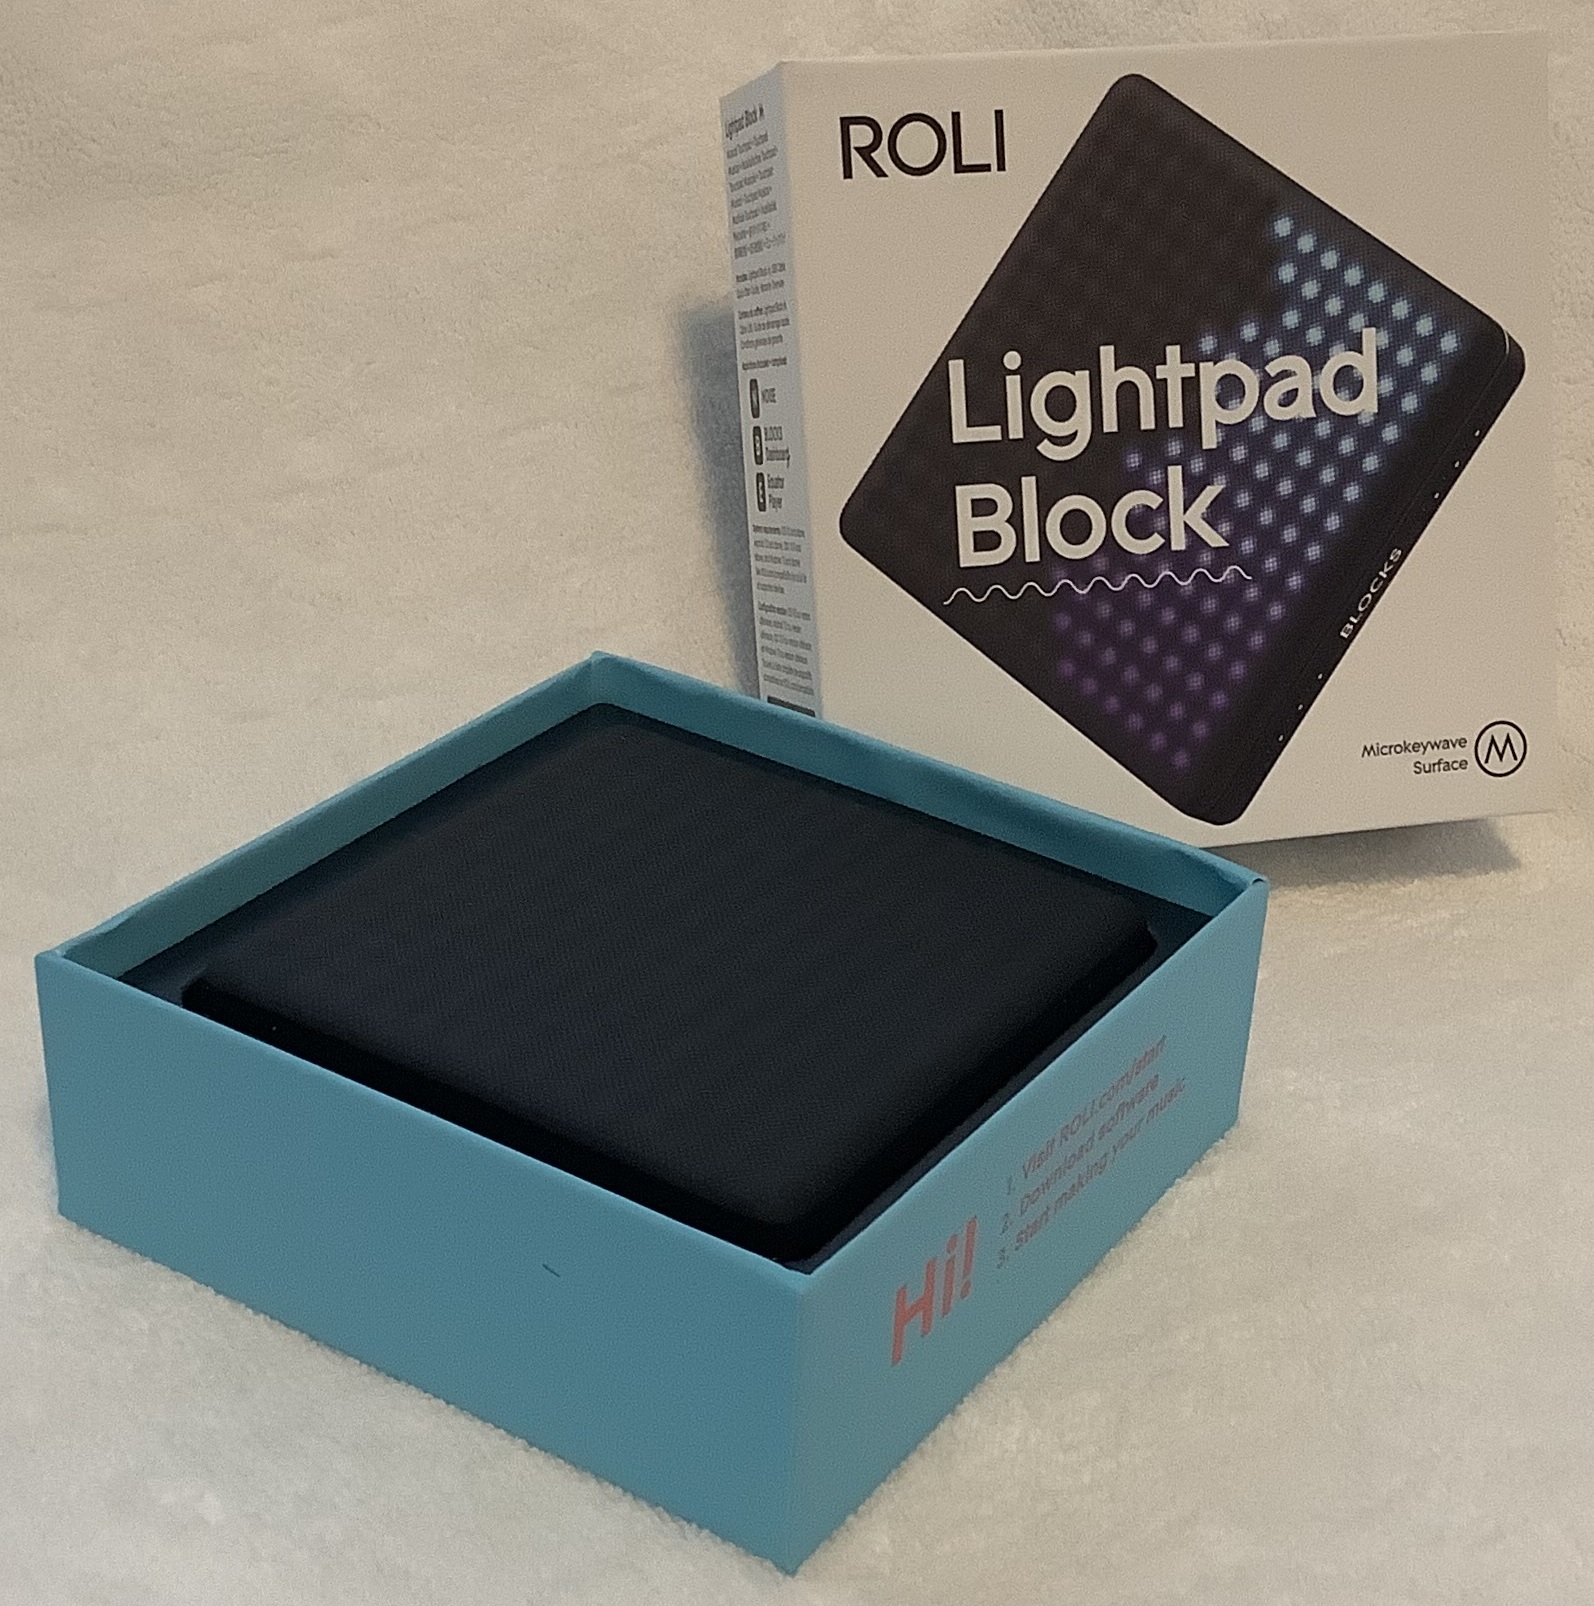
The first thing you notice out of the box — ROLI Lightpad M has some heft. If Stanley Kubrick had invented a palm-sized talisman to take humankind to the next level in evolution, Lightpad would be it. It’s dark grey (light black?) with the DNA connector studs on four sides. Lightpad’s heft is due to its 2000mAh Li-po rechargeable battery. The extra weight has two advantages:
Lightpad feels substantial like a “real instrument”.
Lightpad does not skitter across the table when played, thanks to both the weight and rubber pad on the bottom.
Overall, it gives the impression of quality, not a cheapo plastic knock-off.
ROLI Lightpad M (unboxed)
My Lightpad had been sitting idle on a shelf somewhere and the battery was fully discharged on arrival. Lightpad shows battery status when the mode button is pressed (when Lightpad is OFF). I charged Lightpad using the ROLI USB C cable and an Apple iPAD charge adapter. Lightpad needed four hours to come up to full charge.
Tip: Flip Lightpad over and look at the rubber pad. The pad is inscribed with icons indicating button operations and the USB C port.
ROLI Connect (under Windows 10) readily recognized and registered Lightpad. I downloaded a mess o’software including ROLI Player, ROLI Drums, and ROLI Dashboard via ROLI Connect (ROLI’s content manager). Separately, I installed the ROLI Noise app on iPAD (3rd generation Air, IOS 15.6.1).
I wanted to play Lightpad M and the ROLI Noise app seemed to be the fastest way to start playing. There are plenty of on-line videos and I won’t go over the same basic territory here.
Noise is a decent way to learn about Lightpad’s basic capabilities as a drum pad and melodic controller. Enable Bluetooth and turn Lightpad ON. Lightpad sweeps a blue arc across the surface signifying connect mode. Launch Noise, tap the power switch icon in the lower right, and follow the dialog boxes to complete connection.
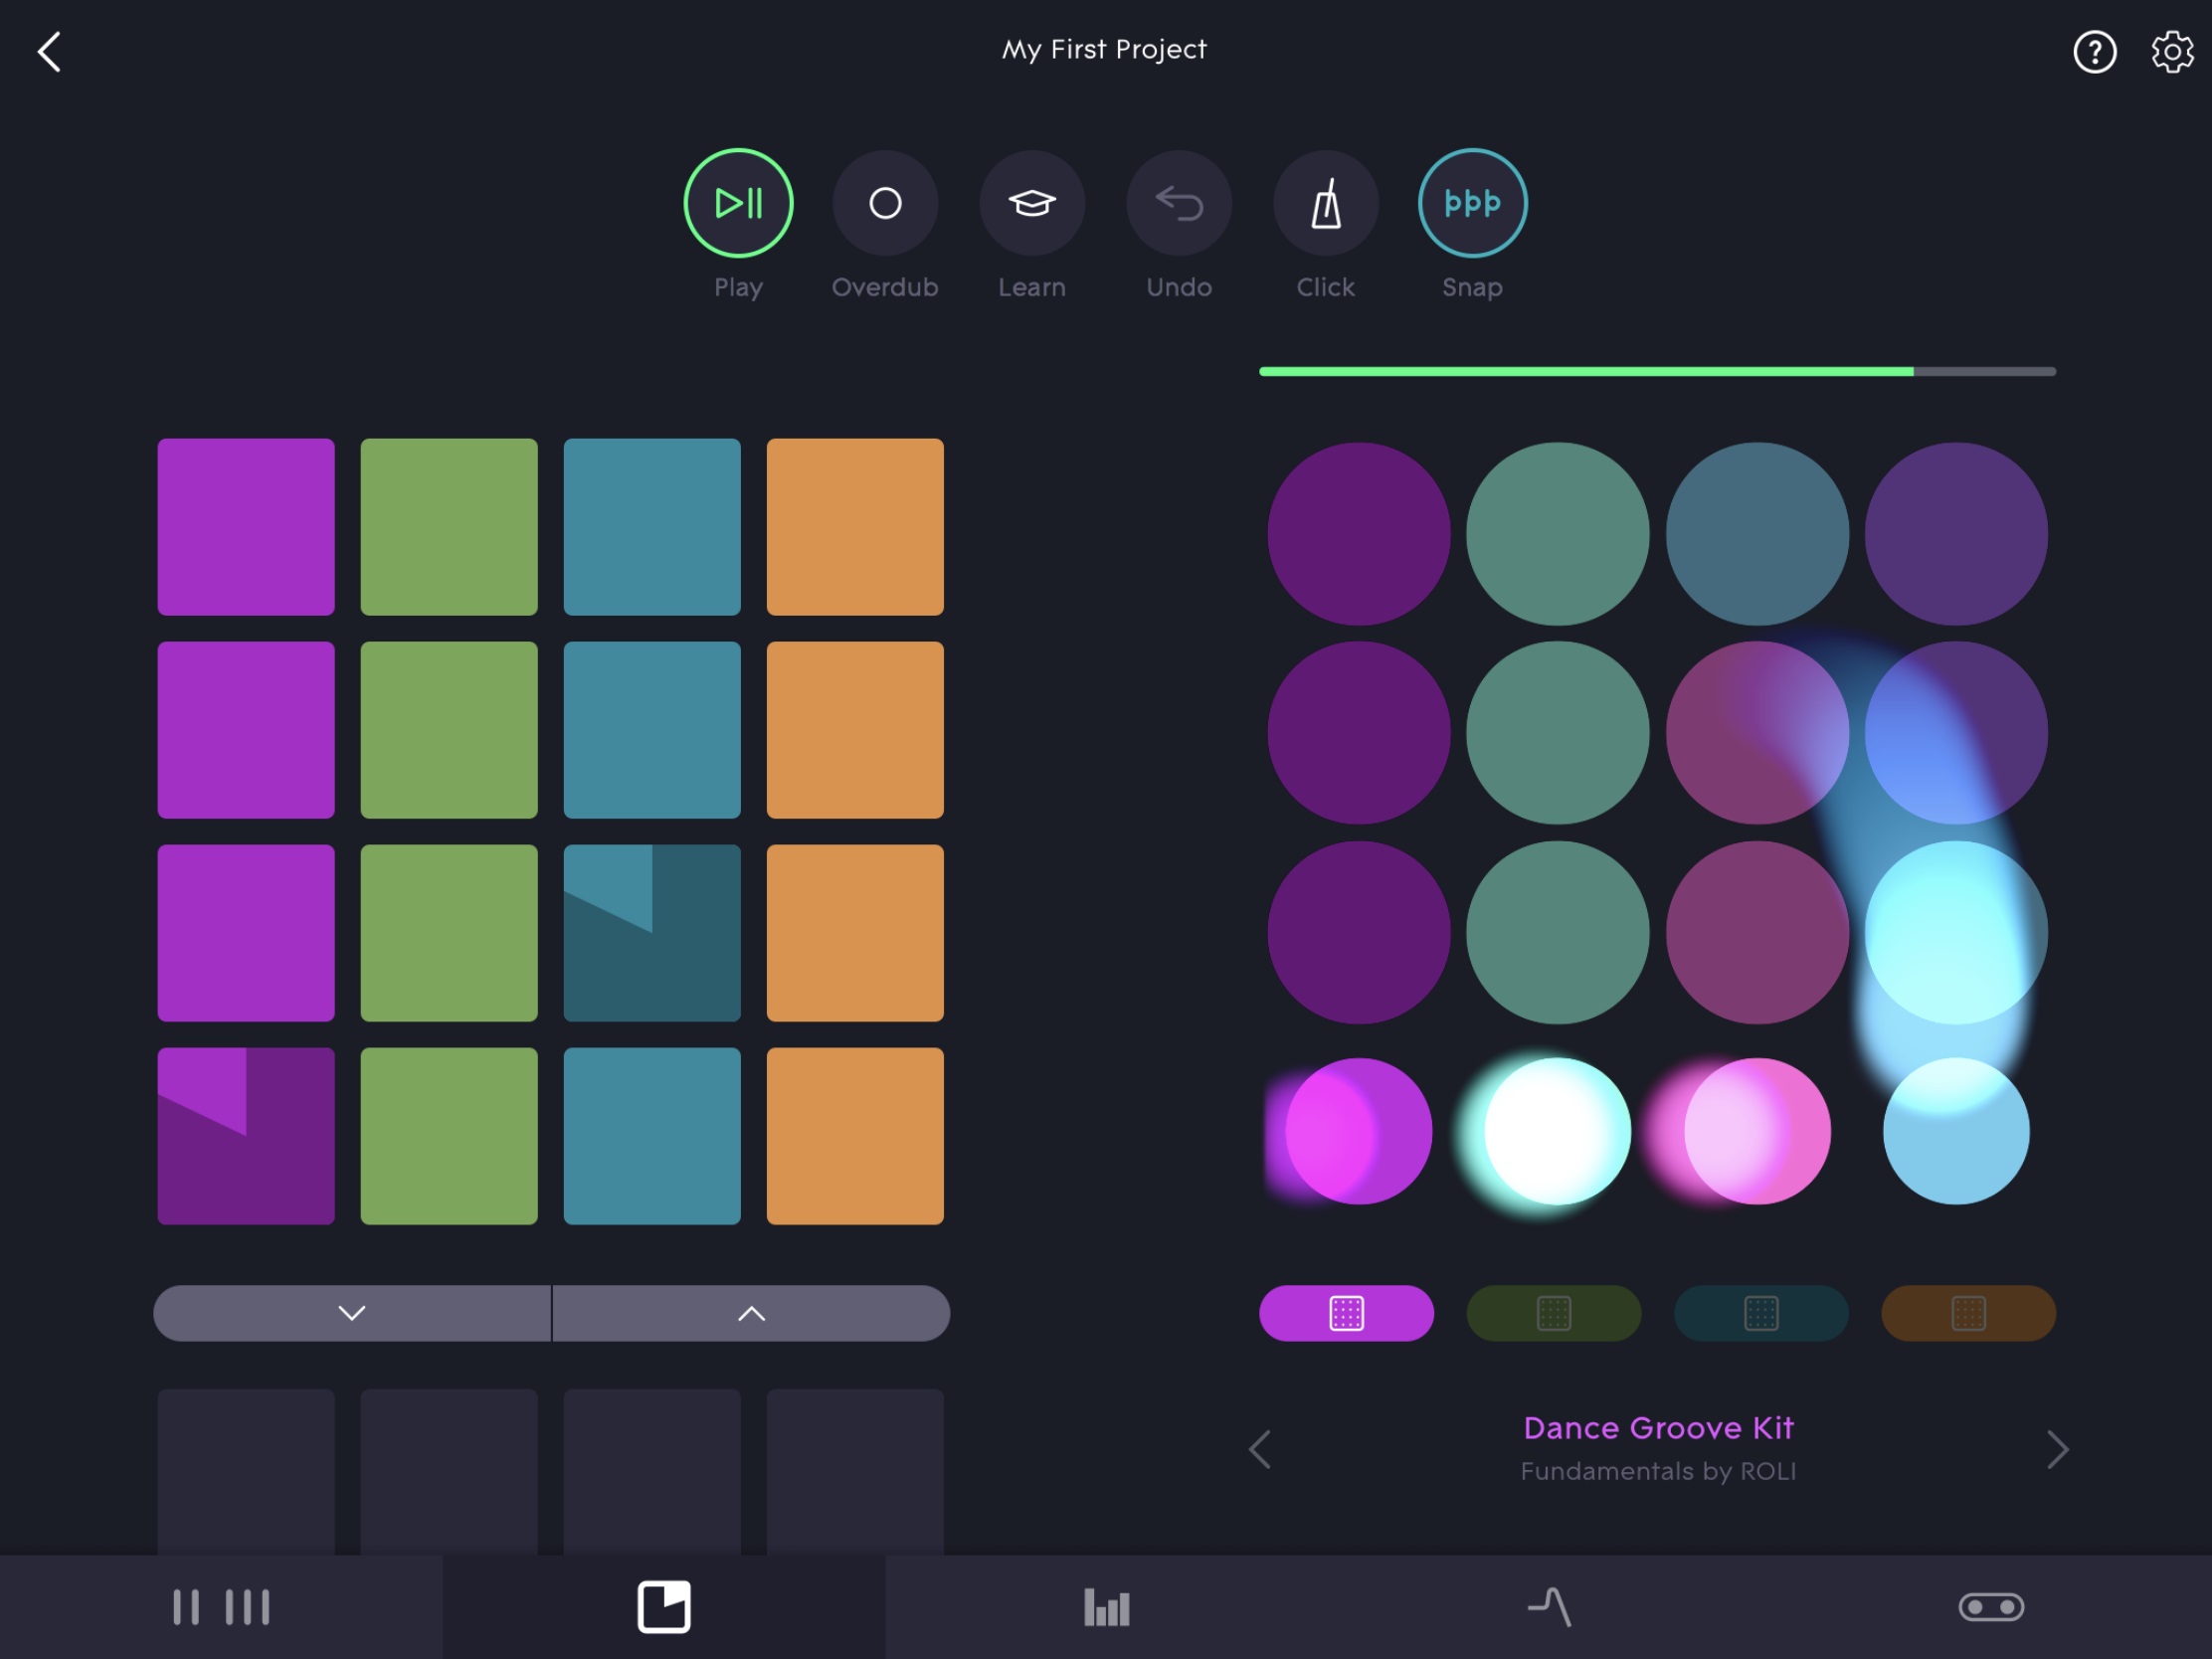
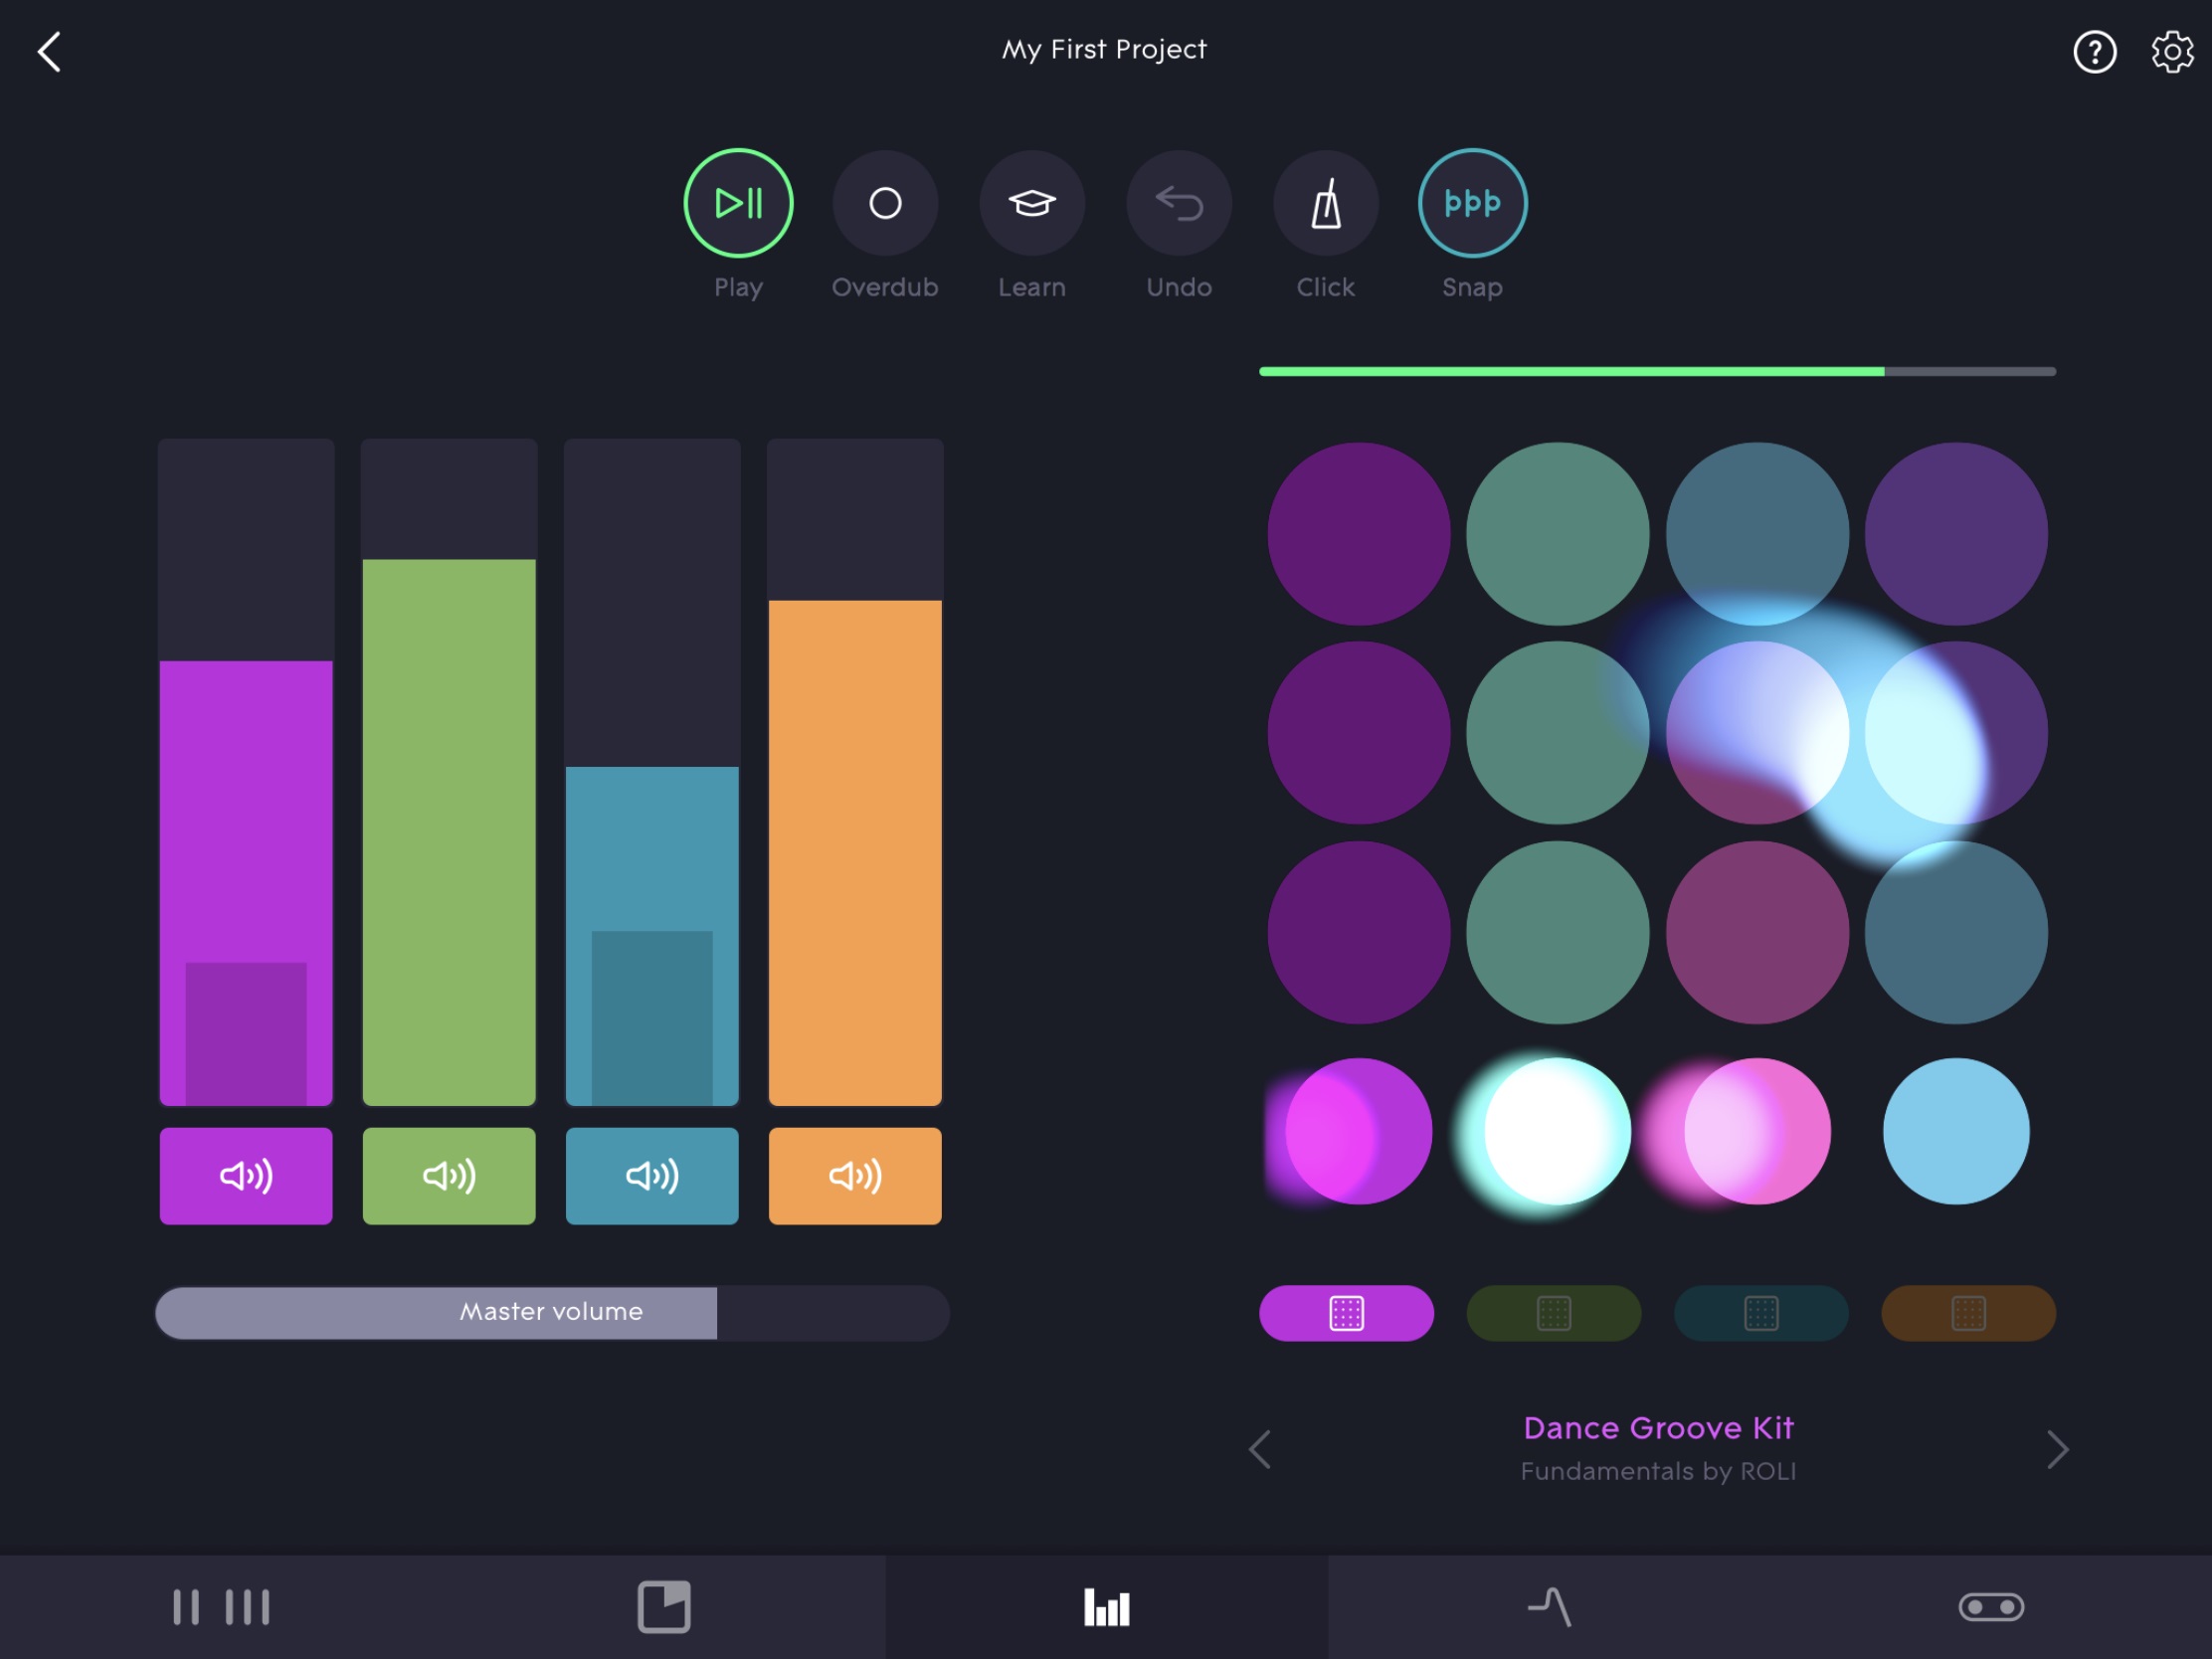
I had watched enough videos to know how to use the two matrices on the main screen: “clip” launcher on the left and key pad on the right. The four small buttons under each column in the key pad select the column (drum and three melodic instruments). Use the voice picker at the bottom to choose an instrument for the selected column.
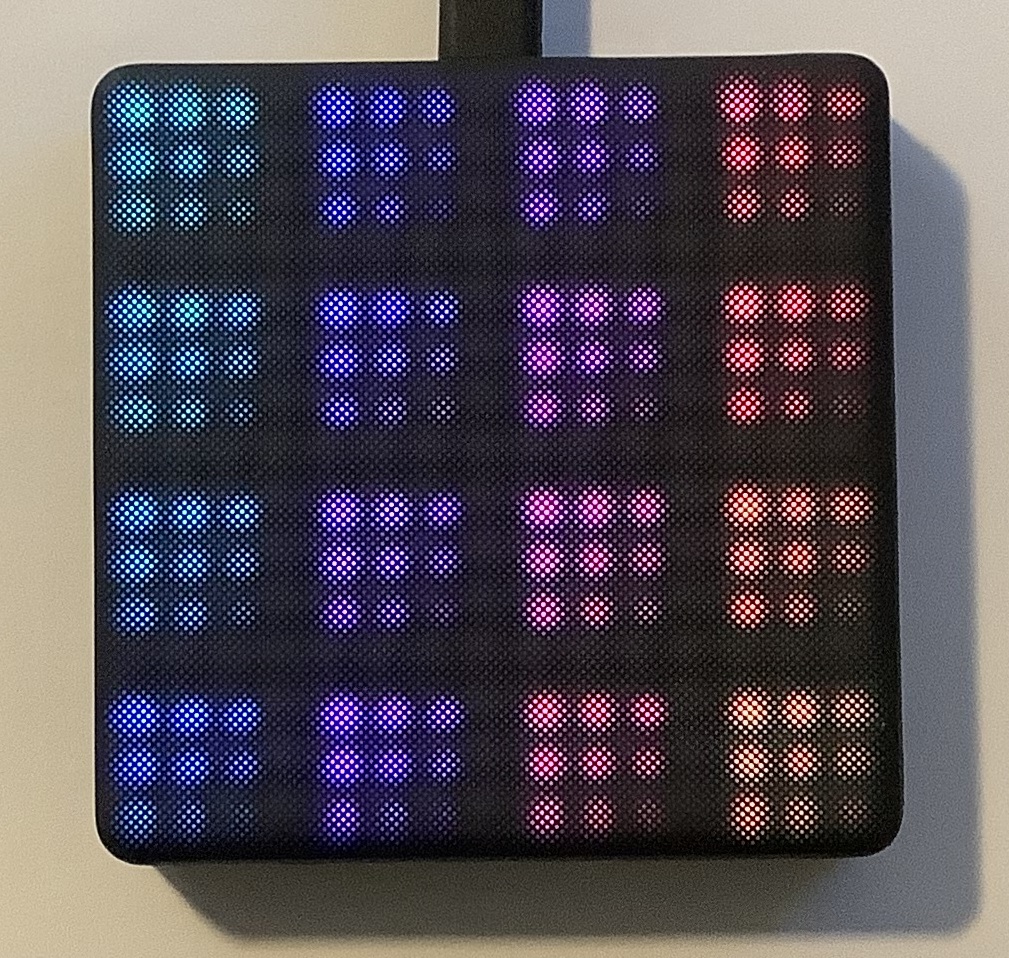
ROLI Lightpad M 4×4 grid
It’s all intuitive, simple and enough to start horsing around. Noise changes Lightpad’s configuration to reflect on-screen choices.
Tip: Drums come in two forms: drum kits and groove kits. Drum kits assign a voice to each pad and you tap out a pattern in the usual way. Groove kits assign a clip to each pad and should be struck and held. Not knowing this distinction, I thought groove kits were broken, i.e., I didn’t always get an immediate response when briefly striking a pad.
Tip: Pads in the 4×4 and 5×5 configurations are too small for accurate finger drumming. If you can, select and use a 2×2 grid in order to get MPC-sized virtual pads.
I recommend downloading and trying the Pharell “Happy” sound pack. It’s free and is the fastest way to instant gratification. I want to play darn it, not build a drum pattern from scratch. If ROLI revive Noise, they should provide more content of the instant fun variety. I can see why some users might lose interest quickly when they have to microcode everything from scratch using a not always intuitive user interface (UI).
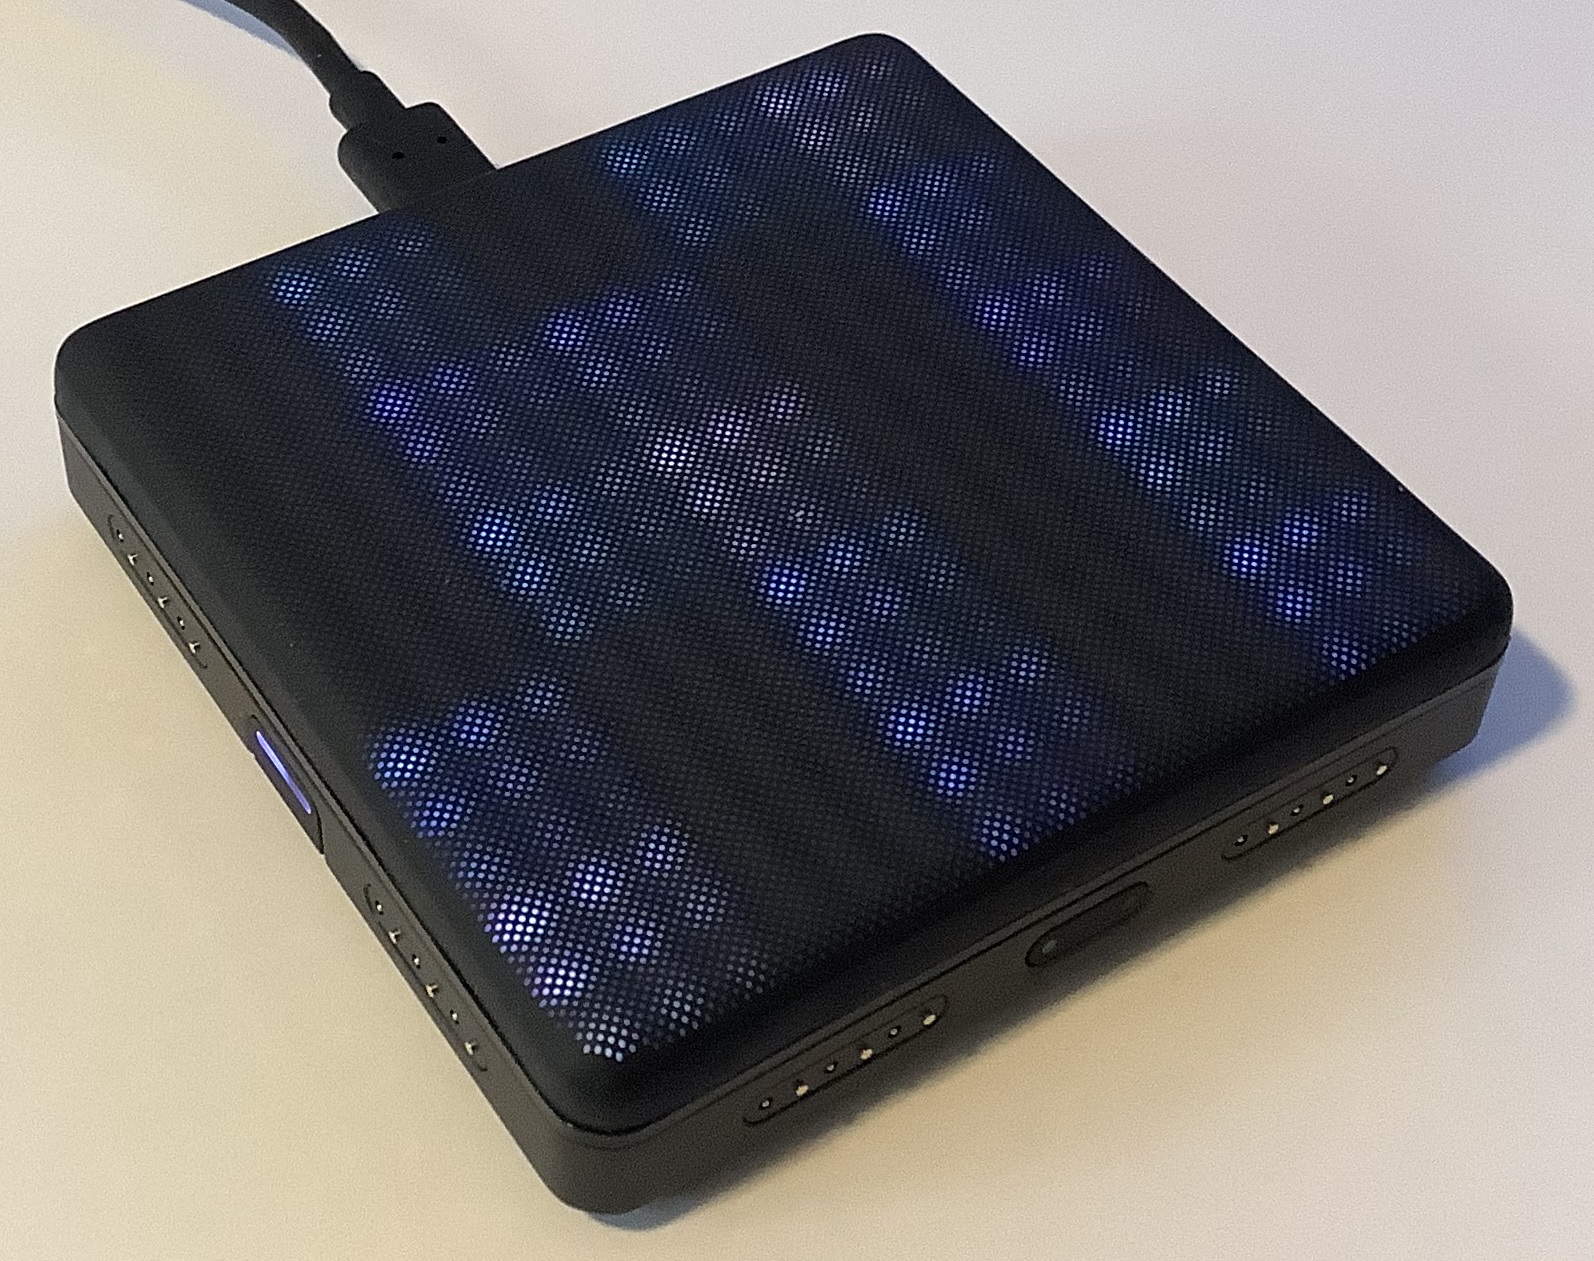
ROLI melodic key pad (C major scale)
I had the most fun jamming to and messing with the Happy sound pack. I especially liked playing a lead over slowed-down Happy. I messed with scales, chords, arpeggiation. The touch surface is balanced between soft enough and pleasant resistance. It’s just totally cool to play a line and then add extra pizzazz through pressure, glide, slide or whatever gesture you feel.
Tip: The playing surface ripples with so-called “waves”. The waves give a nice textured feel. Lightpad M has both the waves and an improved playing surface; the original Lightpad does not — something to keep in mind when shopping the used instrument market.
Tip: Use ROLI Dashboard and/or Noise to adjust pressure sensitivity. Out of the box, Lightpad is not as responsive to pressure as one would like.
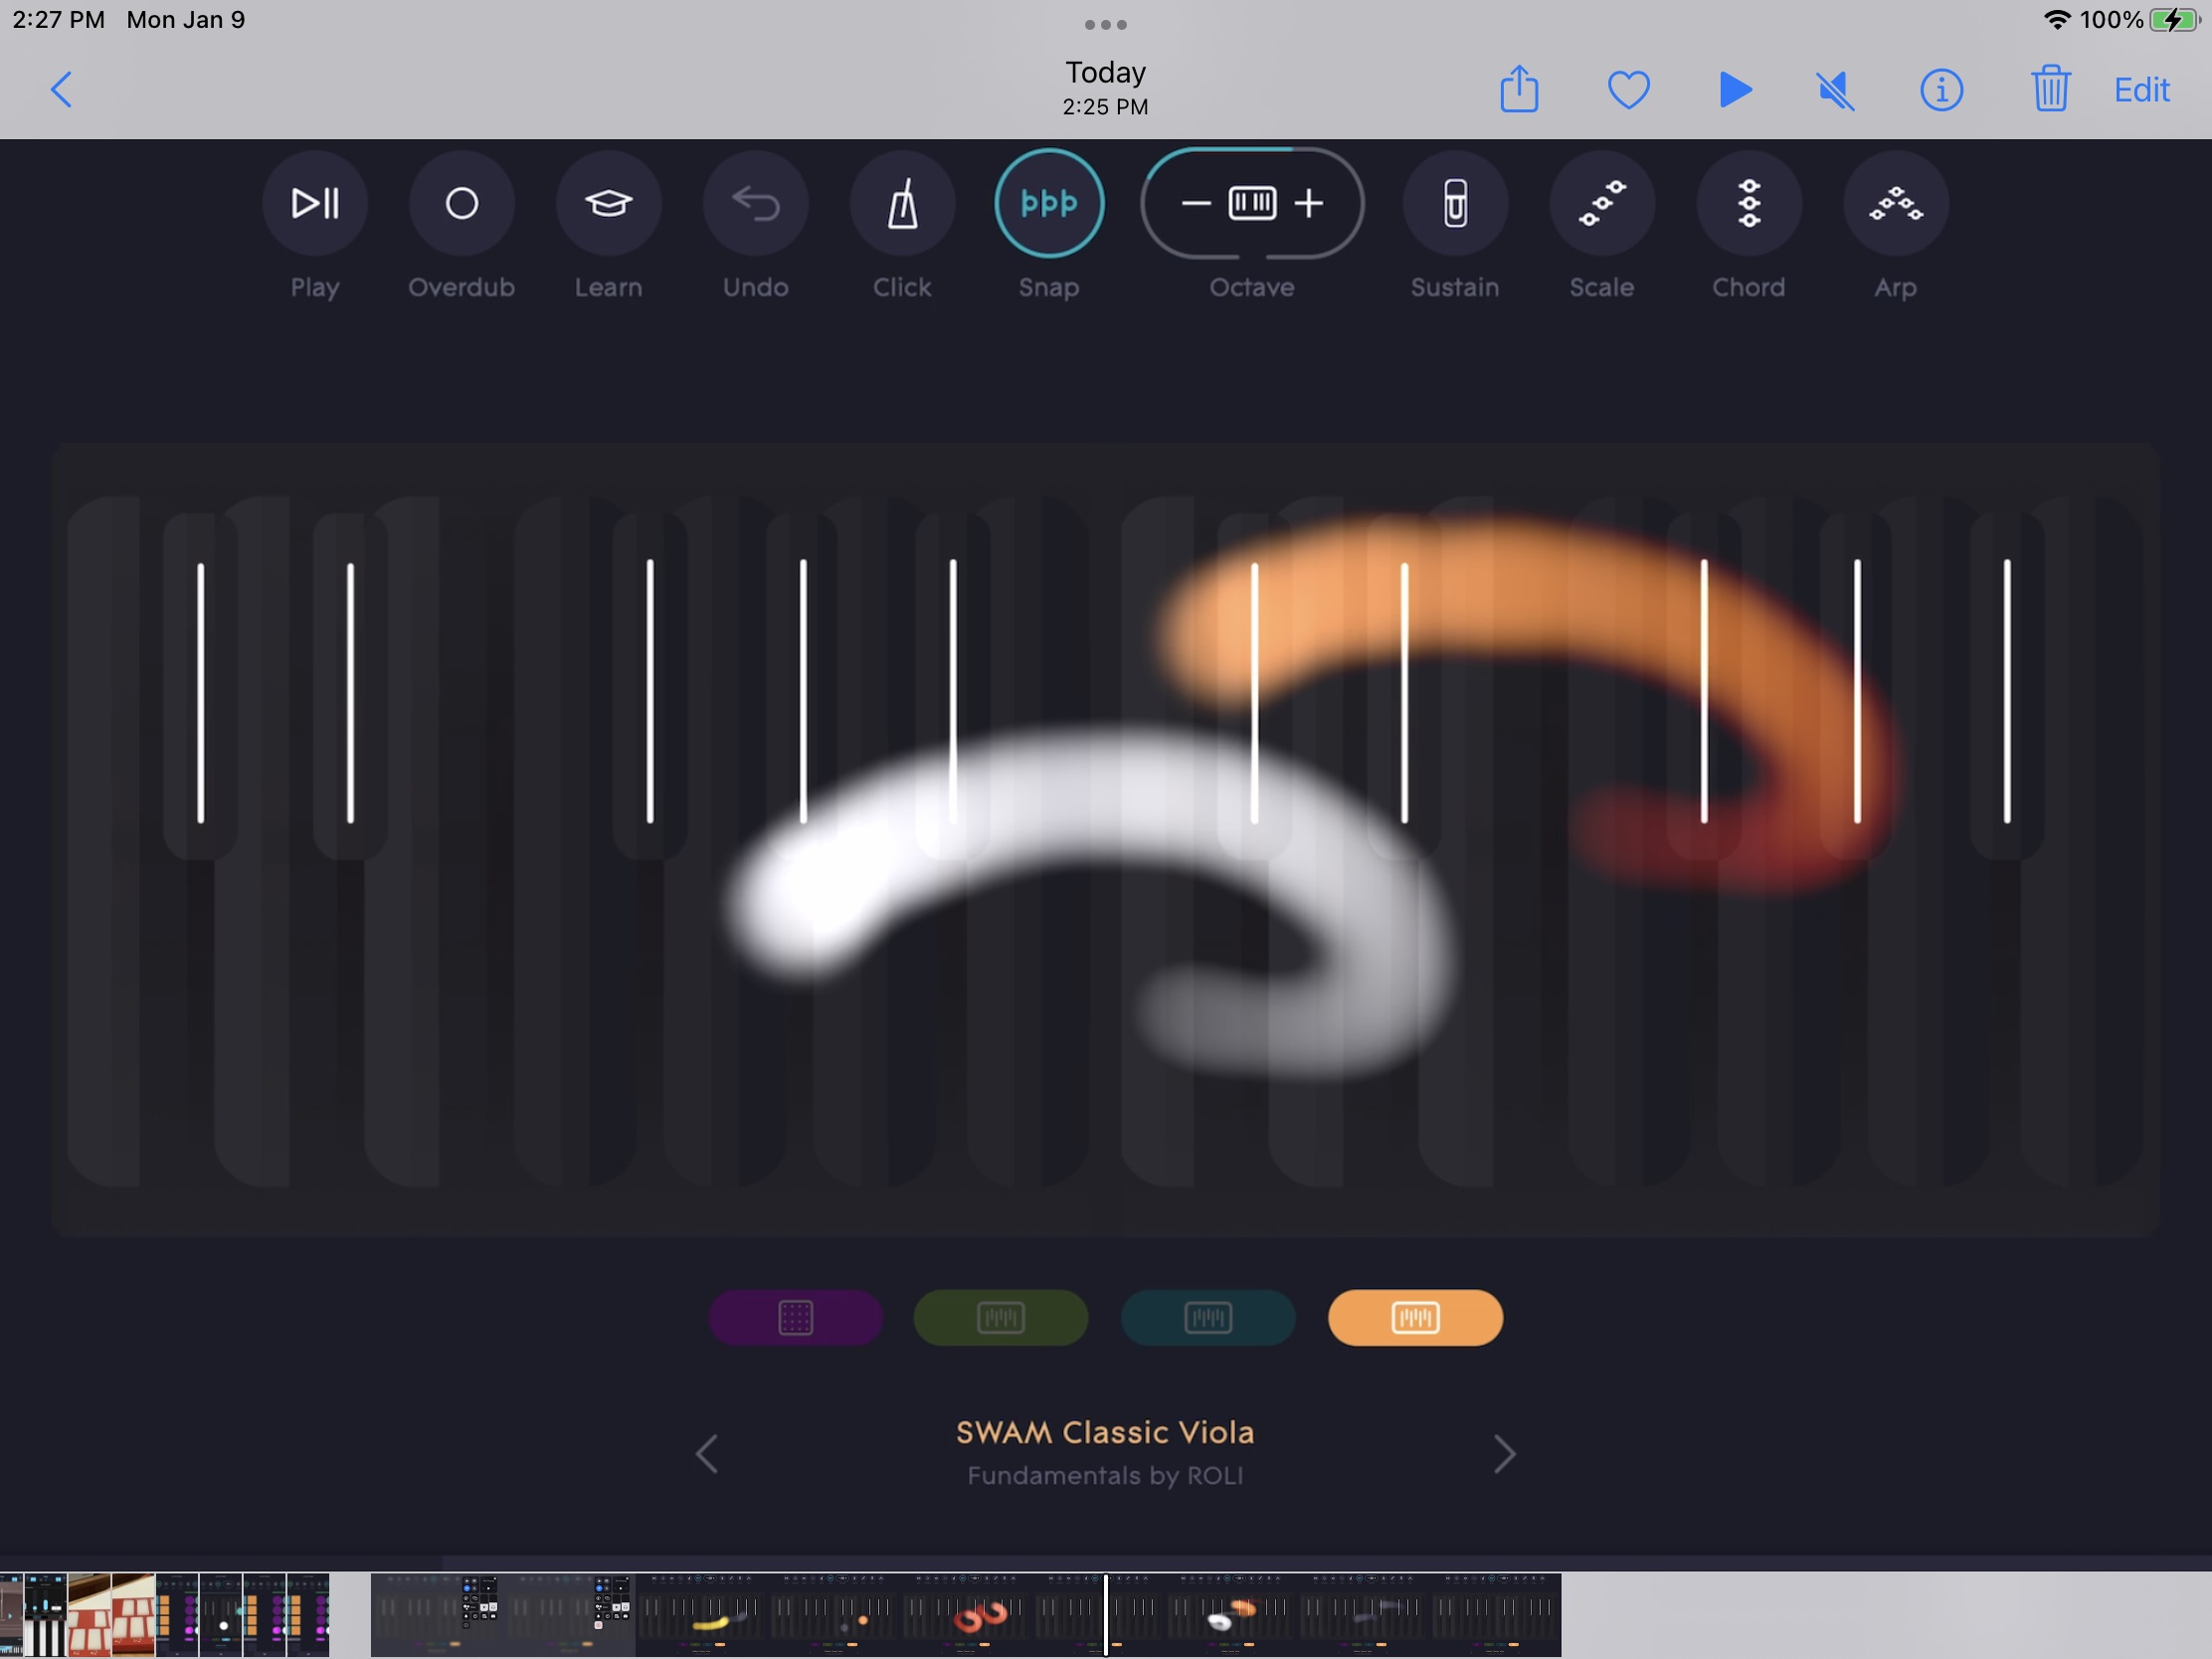
For melodic instruments, notes are laid down on a 5×5 grid. Notes in the chosen scale are lit and non-scale tones are dark. Strangely, I began to recognize major vs. minor, etc. by sight and I could pick out melodies. I honestly didn’t expect that! Select Noise’s Seaboard simulator and Lightpad will follow notes played on-screen.
Noise is fun as far as it goes. In the end, Noise smells like a Web site that’s gotten a bit stale. Not surprising, because ROLI have neglected upkeep in recent years. There are a few UI widgets that don’t seem to operate anymore, e.g., “Hide Note” in the scale picker. Sadly, the SWAM sound packs cannot be installed — something to do with “not available in the AUv3.” Not my problem, ROLI.
ROLI Equator 2 and ROLI Dashboard
The tone gets decidedly “serious” on the personal computer side. ROLI Player and ROLI Drums run standalone and as plug-ins within a DAW or other VST compatible software tool. ROLI Player encapsulates the melodic software instruments Equator 2, Strobe 2 and Cypher 2. ROLI Drums holds up the rhythmic end.
In standalone mode, you can browse the presets while trying out different Lightpad configurations (scales, smart chords, etc.) OK, but not a lot of instant gratification a la the ROLI Noise app.
So, launch Ableton Live and try inserting ROLI Player on a MIDI track. Whoops, Live can’t find the ROLI Player plug-in! Drop into Ableton Live preferences and check the VST plug-in path. ROLI Player and Drums install into:
Darned Ableton Live supports only one custom path which I have already used. I copied the Player and Drums DLL files to the directory at the end of the custom path — a fast and sleazy work-around.
Ableton Live eventually found and created the ROLI Player plug-in. Choose a few funky loops, get the clips started, and now the fun begins, again. ROLI need to make the personal computer side as engaging as ROLI Noise on iPAD. None the less, if you have Ableton Live, you can groove away playing leads, bass lines, whatever in ROLI Player or Drums. The ROLI software bundle includes a download code for Ableton Live Lite, so you should be able to set yourself up.
Overall, in terms of playing experience, ROLI Lightpad M is best suited for leads. Finger drumming and bass require too much good timing and precision on my part. With all five touch dimensions going, however, you can positively shred.
In conclusion
I hope my comments convey the feeling of ROLI Lightpad M as a primary physical controller for synthesis. The experience is a similar to working in Akai’s MPC environment — triggering notes, chords and arpeggios with pads. Unlike MPC pads, Lightpad lets you mangle sound with gestures after the initial strike. It’s a worthy addition to a studio for no other reason than breaking out of muscle memory and mental ruts.
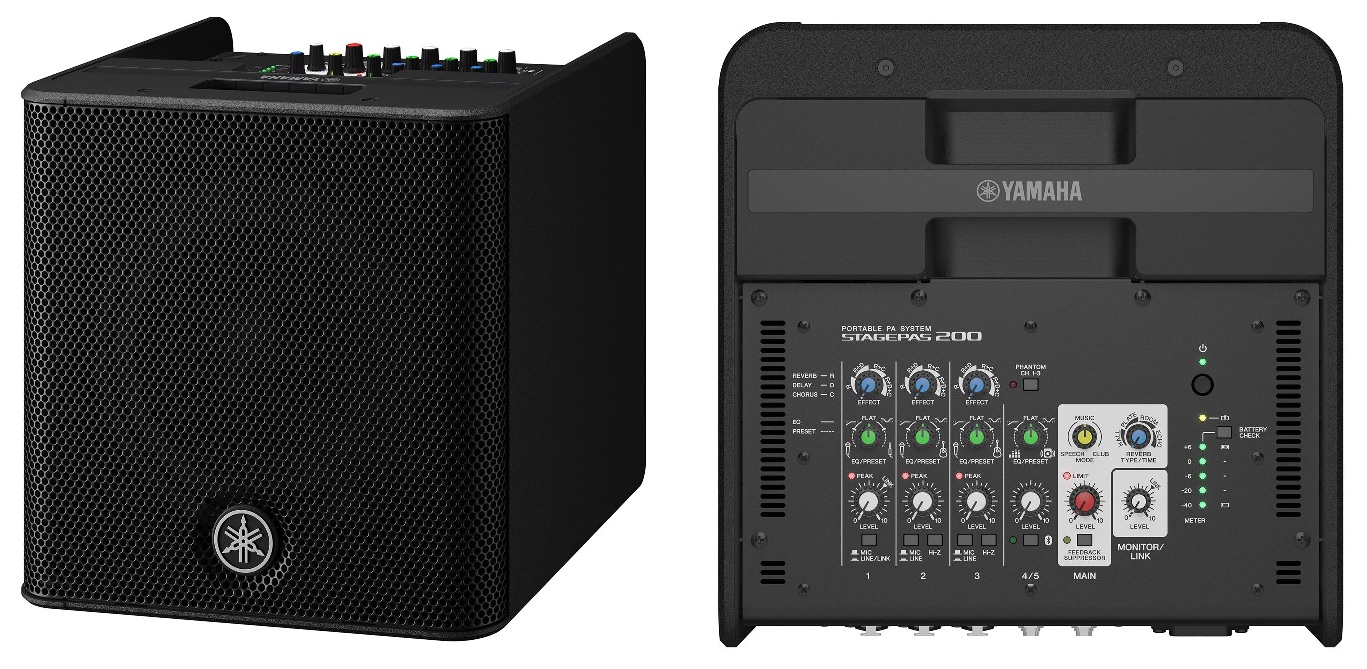
Buskers and coffee house players should take note of the new Yamaha STAGEPAS 200 portable PA system. The STAGEPAS 200 is a compact unit packing 2-way bi-amplification, 5 mixing channels (3 mono + 1 stereo), SPX digital reverb, a low frequency driver (8″ cone, 150W) and a 1″ high frequency driver. Dial in parameters with the STAGEPAS Controller iOS/Android app.
Yamaha STAGEPAS 200 portable PA
Yamaha have two models on offer: with battery (200BTR) and without (200). They weigh 27.6 pounds (12.5kg) and 26.5 pounds (12kg), respectively. Both models are essentially a cube measuring 12″ (310mm) per side.
Battery operating time is 8 hours (estimated) at 6% continuous use. I suspect that real-world will be less as 6% seems rather conservative sound-wise. I don’t think Yamaha are being disingenuous; it’s hard to rate operating time as expected use may vary from quiet background music to thundering blare. Accessorize with a spare battery pack, if you need a security blanket.
The STAGEPAS 200BTR should street around $650USD and the battery-less model at $550USD. Yamaha are going head-to-head with Bose S1 Pro ($700USD) and JBL ONE Compact ($630USD).
Yamaha have finally announced the P-S500 portable digital Smart Piano in North America. It’s being pitched more for home and studio than stage. The whole concept is to simplify the front panel while moving access to auto-accompaniment and such to the Smart Pianist tablet-based application.
These two announcements appear in the run-up to NAMM 2023 to be held April 13-15 in Anaheim. NAMM has along runway this year as the April show combines the former winter and summer trade-shows. Expect to see more product announcements in the next several weeks.
Alright. I bought a cut-rate ROLI Lightpad M. 🙂 I spent the day charging, registering, downloading, installing, and updating. Over 3 gigabytes later…
ROLI Lightpad M
I will eventually blog about the ROLI Lightpad M itself. For the moment, I’m going to ramble about the ROLI gestalt.
And you may ask yourself, "Where is that large automobile?"
 And you may tell yourself, "This is not my beautiful house"
 And you may tell yourself, "This is not my beautiful wife"
 And you may ask yourself, "Well, how did I get here?"
-- Talking Heads, "Once In A Lifetime"
Starting out with Lightpad M feels like my first day with Akai MPK Mini. Lots of downloading and plenty of gifts to unwrap. Unboxing Lightpad is more “Apple chic” than “rack ’em and stack ’em.”
You first need to download ROLI Connect — ROLI’s content manager. Yes, yet another content manager. Plug in and ROLI Connect recognizes the Lightpad and guides you through registration. For some reason, ROLI Connect refused to show the Lightpad on its “Devices” tab. A minor quibble as the Lightpad magically appears after a reboot, etc.
You get a pretty decent bundle of stuff (Mac/Windows) just like Akai:
ROLI Studio Player
ROLI Studio Drums
ROLI Dashboard
Ableton Live Lite (redemption)
Cycling MAX ’74 (3 month redemption)
Melodics (3 month redemption)
Tracktion Waveform (redemption)
I downloaded and installed Studio Player, Studio Drums and Dashboard, leaving the rest for another time.
Sound-wise, you get quite a few packs:
5D EDM
Chillwave Drifting
Cinematic
Colours of India
Elementak EDM
Elements *
Equater 2 Fundamentals *
Experiments
Giant Dubstep
Modern Electronic
Session Keys *
Structure
Synthetic Resistance
Video Games
Vintage Electronic
World Colours
I wish ROLI Connect displayed the download sizes before starting the actual downloads. Equator 2 Fundamentals alone weighs 2.5GB. Begin sliding into the deep…
Hmmm, no free SWAM on Mac/PC. Somewhat understandable, as the full Mac/PC titles are tres cher. Still, I was hoping to try a few more SWAM instruments.
Fire up Studio Player and it recognizes the Lightpad M. All good.
And you may ask yourself, "How do I work this?"
That’s when you know you are in the deep. So, I tapped, swiped and pushed at random. Then spent the evening watching videos. 🙂 Although tedious at times, videos show me how other people use Lightpad and the ROLI software.
When you buy ROLI, you buy into the ROLI ecosystem. That may be a good thing; it may be a bad thing. This situation isn’t too different than buying into Akai’s MPC universe, Arturia’s Analog Lab, or Native Instrument’s Komplete, just to mention a few similar ecosystems.
An MPE ecosystem is not necessarily evil. Controller and synthesis need to be carefully matched as I discovered using Keith McMillen QuNexus with SWAM Flute. ROLI Studio Player incorporates Equator, FXpansion Strobe and FXpansion Cypher (all version 2). Studio Player has the patch browser and real-time performance tools (smart chords and multi-layer arpeggiator) which can be assigned to the Lightpad M.
Some punters have diss’ed the presets as all sounding alike or some such. Well, upgrade to full and make your own sounds. It’s a synthesizer. Buying a Lightpad may be a way to get full Equator for less. Do the maths and then go to work.
What you might not know (I didn’t) is that you can suck Studio Player or Studio Drums into Cubase as a VST, not just Live or Tracktion. You get a VST with superpowers like smart chords, arpeggiation, etc. Neat. A tool that embeds in a bog standard DAW? Now you have my attention!
The ROLI ecosystem is all well and good, but I want to use Lightpad as a controller to add the touch missing from Arturia Keylab Essential. [I will surely try this and blog about it.] Lightpad has an XYZ touch pad mode which is configured through the ROLI Dashboard. The Lightpad is small enough to fit into the upper left corner of the Keylab Essential 49 (above the pitch and mod wheel). I expect to do a lot of tweaking to SWAM Flute (Cello, etc.) to adjust parameter sensitivities, ranges and so forth.
I think ROLI/Luminary have focused wisely during their re-birth from bankruptcy. Keeping Lightpad was a good business decision as well as letting Studio Player make friends through the existing VST mechanism. Ditching the control BLOCKS (Live, Loop and Touch) was sensible, too. The control blocks were rather expensive key pads that sent control messages to Studio (or Noise). Not super necessary given the capabilities in Noise and Studio Player.
In the long run, I wonder how Lightpad M and Lumi Keys will relate. Lightpad M seems to be technically reliable, but I see negative comments about Lumi Keys on Reddit that give me pause (e.g., not charging, Bluetooth connection issues, etc.) Luminary still have a way to go in their recovery.
Luminary want to make money through Lumi subscriptions (lessons and songs). This is a dubious business decision. People are wise to the subscription scam. A subscription makes sense only if it delivers genuine value to the end user and keeps delivering value over the long run. I would rather see Luminary (any company, really) focus on reliable products sold and bought once — not promises.
Next up, I’ll try Lightpad M with Noise on Apple iPad — a good way to fill in the commercial gaps while watching football.
Like the undulating Seaboard surface, ROLI (the company) has had its ups and downs.
ROLI made waves with its innovative alternative controllers like the Seaboard and Lightpad. Hardware is a tough, unforgiving business and, no doubt, the COVID recession hit ROLI like SARS-CoV-2 itself. ROLI reorganized in September 2021 becoming “Luminary.” ROLI sifted through the ashes of its IP and are now focused on three hardware products: Lightpad Block Studio Edition, LUMI, and the Seaboard RISE 2.
No matter what one may think about the ROLI hardware, they have produced some excellent software tools and ROLI-focused sound libraries: Equator, Cypher and Strobe. The Equator (now Equator 2) synth is widely respected. ROLI’s software has been the teaser driving its MPE hardware sales.
ROLI Noise app clip buttons and pads
So it goes with the free ROLI Noise app. Noise quite effectively simulates a ROLI BLOCKS set-up consisting of a Lightpad, LIVE BLOCK and 2 octave Seaboard BLOCK. ROLI has five short “getting started” videos:
Noise gives you MPE thrills on the cheap. You can tap and swipe to your heart’s content without owning a Lightpad or Seaboard BLOCK. I especially like the virtual Seaboard — all of the fun without the Bluetooth connection issues which seemed to plague the Seaboard BLOCKS. [ROLI need to get on top of this issue with LUMI, too.]
ROLI Noise app virtual mixer (left)
Noise was clearly intended as a loss leader (AKA “driver”) for hardware sales. As Lou once sang, “gives you sweet taste.” You need a Lightpad or Seaboard BLOCK to unlock its extra sound bundles. Noise works with only Roli hardware; It didn’t recognize or receive MIDI sent by my Akai MPK Mini. Noise does not have MIDI settings, so it’s Roli’s way or the highway.
The free sounds are not bad and include Audio Modeling’s SWAM Viola. Naturally, you don’t get SWAM parameters to play with. That would definitely tick-off folks who pay good money for SWAM. Still, I’m grateful for the freebie and I’m happy to see partners working together to expand the MPE market and ecosystem.
That’s the good news. Unfortunately, ROLI haven’t updated Noise in recent years. Given Apple’s relentless disrespect for stable APIs, one doesn’t know how much longer ROLI Noise will run on IOS. [Grrr.] I would love to see a renewed Noise app in support of Luminary’s current product line.
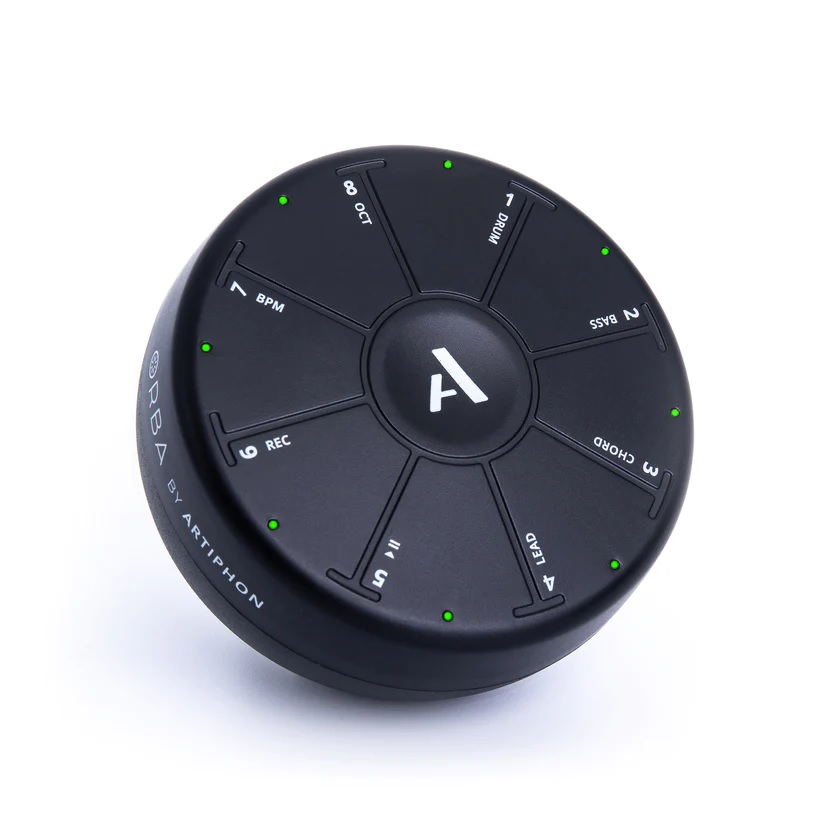
I bought an Artiphon Orba (version 1) when the Orba first hit mainstream retailers. Orba implements MIDI Polyphonic Expression (MPE) and transmits MIDI over USB-C or Bluetooth BLE. Might the Orba be an interim MPE controller?
The Orba is pitched as a musical tech toy to while away the hours making beats and songs. If you’ve never held and play one, Orba is the size of a small grapefruit (a large orange?) cut in half. It fits rather neatly in the hand. The top surface is subdivided into eight wedges with a button in the middle of the wedges. [Dang, this does look like a grapefruit prep’ed for breakfast. 🙂 ] The wedges play sounds unless the center button is pressed first, requesting a change in mode (i.e., drum, bass, chord, lead, record, octave change, etc.)
Artiphon Orba (version 1)
The wedges respond to pressure, up/down swipes and right/left swipes. Orba’s internal sensors respond to tilt and shake. Depending upon the preset voice, all of these gestures warp the current sound — and send MIDI MPE messages. Orba provides haptic feedback through vibration, something I turn off in order to save power.
Orba’s MPE abilities aren’t promoted aggressively although the Orba manual does a decent job of describing its MPE implementation. The Orba app (personal computer or tablet based) has a few parameters to control Orba’s behavior as a MIDI controller:
MIDI Mode: MPE, Single Channel, Channel-per-part
Mobile MIDI Mode: Consolidates MIDI into a single port
Pitch Bend Scaling: 0%, 25%, 50%, 100%
Orba Sounds: Local OFF
Local OFF is a bit quirky. It doesn’t always turn off the internal synth! I compensate by turning the Orba’s volume all the way down.
Orba’s size and gestural response are the neatest things about Orba as a MIDI controller. Everything is small and self-contained. Under battery power and Bluetooth, you can pretty much fling the Orba around without wires. This assumes, of course, that the destination synth can receive Bluetooth MIDI directly from Orba. This isn’t a problem when using software instruments on iPad, but would be an issue for a non-Bluetooth synth like Modal Skulpt SE.
In typical use as a tech toy, Orba is a four track sequencer. Each track has a preset voice and role: drum, bass, chord, and lead. Drum, bass and lead record (play) individual notes. Chord plays multiple notes. Everything follows a particular musical scale which is set through the Orba app.
This is where use as a MIDI controller is limited. When you hit a wedge in bass, lead or chord modes, you’ll get notes belonging to a pre-defined scale. If you go off-piste in the melody, there isn’t a way to play non-scale tones. Forgot a lot of Beatles tunes or many, many Christmas carols!
Let’s say you want to augment a keyboard controller using only Orba’s gestural control i.e., play notes on the keyboard and bend them with Orba. Forget MPE in that case. The MPE channel and messaging model won’t allow that. An MPE source needs to keep track of the note-to-channel assignment and send certain control messages to the channel associated with the note to be modified. The keyboard and Orba have their own ideas about channel assignment and you can’t “cross the streams.” [Sometimes you need to cross the streams, Egon. 🙂 ]
All is not lost, however. I had fun in single channel mode with Audio Modeling SWAM Flute and SWAM Cello. Cello is a real kick; playing vibrato with finger gestures is totally cool.
Whatever MIDI mode, Orba sends MIDI note ON (note OFF) when a wedge is touched (released). There needs to be a way to tell Orba, “Don’t send MIDI note ON and OFF”. You can kinda, sorta work around this issue by touching a wedge and leaving it there. Sure, you get the initial note ON, but then the keyboard controller overrides the initial note value. I can’t see doing this in front of a live audience (congregation). In the studio, yeah, especially if you can delete unwanted notes from a recorded MIDI track.
At a meta-level, I wonder if companies have actual musicians try their prototypes during advanced development? All MIDI controllers have these little frustrations and limitations. Argh! Once again, please add scripting and let us make fixes. Developers simply cannot anticipate all usage models and modes!
Ever since I started playing SWAM software instruments on iPad, I wanted to begin experimenting with MIDI Polyphonic Expression (MPE). Like most folks on a budget, I established a price threshold — $200 or less — and cast around for likely candidate controllers. $200 is a bit more than “impulse purchase.” $300 is definitely too much for a trial. (Sorry Lumi.)
A note on budget, toys and reviews. I don’t get free products for review. Like you, I spend my hard-earned cash. No B.S., here.
I considered using an iPad app like GeoShred, but screen-based controllers don’t have the tactile feel of a physical instrument. I tried the Roli 5D app, too, and found the virtual keyboard to be too small for my fat fingers, although I get why people dig Seaboard.
There are several “alternative” controllers implementing MPE and I decided against them. Give me keys or at least a keypad. Budget and key considerations narrow the field of candidates considerably.
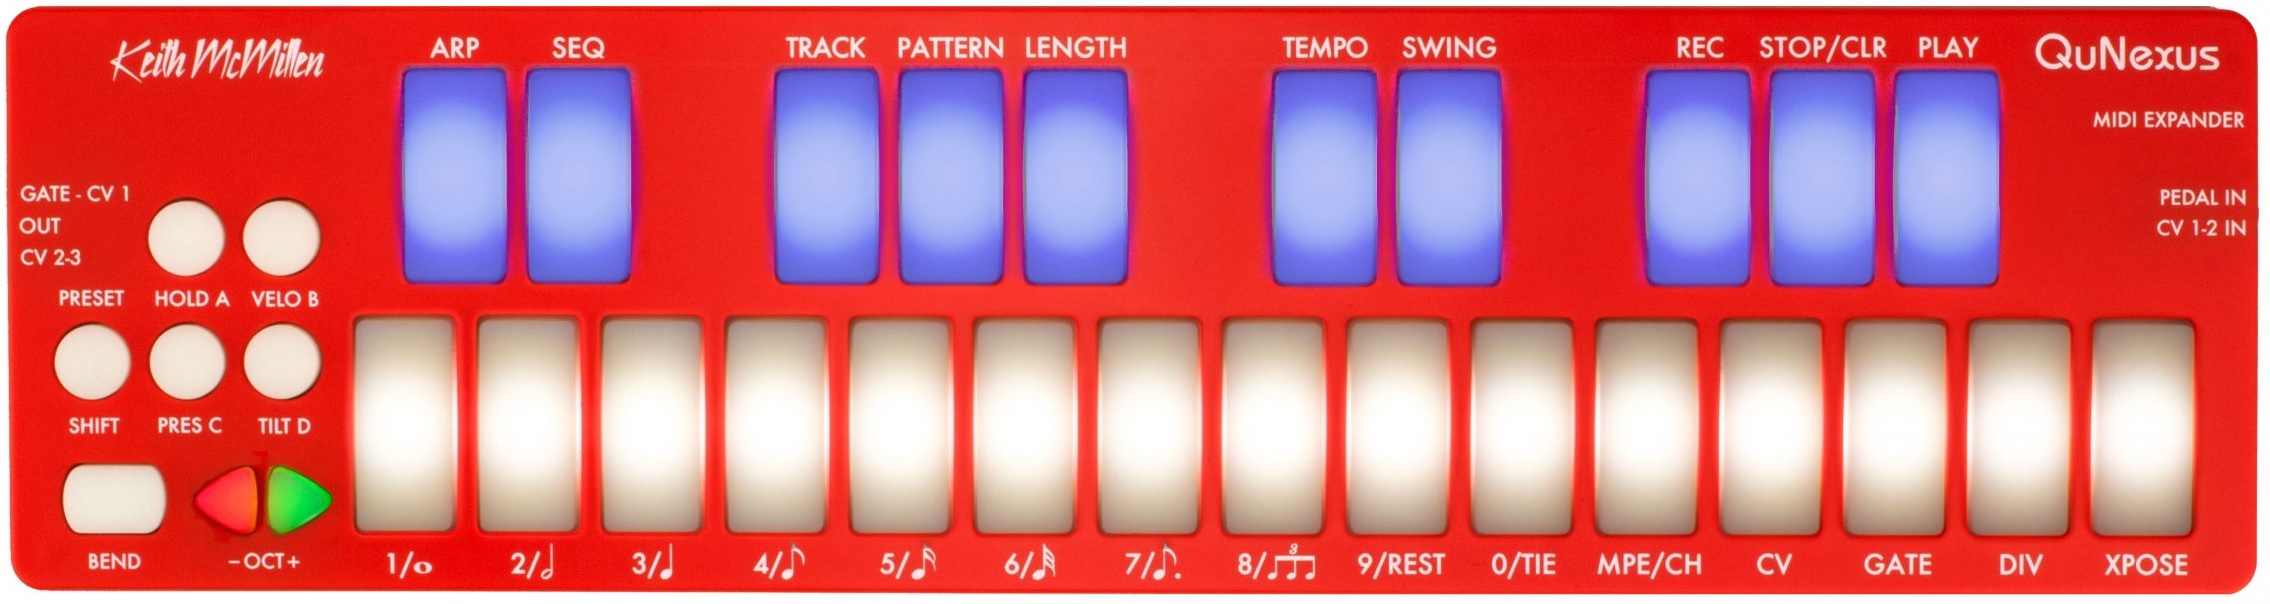
Keith McMillen and Keith McMillen Instruments have been designing and making electronic instruments for 35+ years. They offer two products for $200 or less: QuNexus RED ($199USD MAP) and K-Board-C ($119USD MAP). The two models are physically similar: a small form factor (12.8″ by 3.3″), a two octave keypad, a group of control buttons to the left of the keypad and USB-C connectivity.
Keith McMillen QuNexus RED
The QuNexus is the older and more capable brother to the K-Board-C. QuNexus sports additional connectivity options including control voltage (CV) IN/OUT and a MIDI expansion port. KMI supply a compatible 5-pin MIDI expansion dongle with the QuNexus. The extra connectivity swayed me in favor of the QuNexus over the K-Board-C. The QuNexus is smarter, too, and has a multi-track sequencer, arpeggiator, etc.
A word about styling. I love the K-Board-C colors. I may need to buy one just because they are so cute. A number of on-line reviews complain about the QuNexus RED. In person, the RED is more “grapefruit orange” than “fire truck.” It’s rather attractive and I wouldn’t let the color put you off.
The keys and buttons resemble fat chicklets. They have a pleasant, solid feel. They are not squishy in the way Roli Seaboard is squishy. There’s a fair bit of resistance. I have several concerns with the keypad:
Its short width precludes two-fisted playing.
The sharp/flat keys are not raised, i.e., higher than the “white” keys.
The key layout and size conspires against certain chord fingerings, e.g., playing F# and A together with my 3rd and 5th fingers didn’t work for my hand.
Of course, one shouldn’t be surprised by these concerns; just look at a picture or two.
If you’ve read some of my other posts, you’ll know that two octaves is not enough. I played Christmas music while testing and found myself out of keys at the bottom and at the top. If a manufacturer must make a two octave keyboard, I strongly recommend an F-to-F layout which better covers the range of the human voice (most melodies).
Knowing all that, I was fully prepared to shed with QuNexus. Being no stranger to mini-keys, I quickly learned to play melody lines without looking down at my hands. Although the QuNexus fits neatly on one’s lap (angled for comfort), it is more at home on a desktop.
QuNexus has four preset configurations. The first two configurations (non-MPE) worked quite well in Korg Module and SWAM Flute. The third configuration implements MPE. I tested the first three configurations in SWAM Flute. I did not test the fourth configuration, drums.
Again, the first two non-MPE configurations played well with SWAM Flute. MPE (the third configuration) was a bit alarming. SWAM Flute responded to all gestures, but the response to tilt (mapped to flute flutter) was too much right out of the box. As to tilt, the key pads seemed to be rooted at the bottom. Striking and holding keys near the bottom tamed tilt and the flutter. Playing and pressing near the top of the keys brought in much more tilt. Clearly, this is going to take some practice!
So. KMI QuNexus RED. What happened?
My QuNexus suffered from a few sensor defects that made it unusable. Three keys (Eb, A and middle C) spontaneously triggered ON or would trigger with the slightest touch. The notes did not turn OFF by themselves. (All verified using MIDI OX.) The end result was random stuck notes. Unacceptable.
I contacted KMI support and they very quickly analyzed the problem as a “hot sensor.” Well, I’d say there are three hot sensors. To their credit, KMI offered a replacement should I not get a quick turn-around response from Patchwerks. Patchwerks came through. Both companies deserve props for customer service.
In the end, I returned the QuNexus for a refund. I agonized over this decision. My policy (philosophy?) in regard to key-related issues is to pass on a replacement unit which possibly comes from the same production run.
Will I give KMI another try in the future? Yes. The K-Board-C is closer to “impulse purchase” and the colors are gorgeous. I will go in wiser knowing that I will need to woodshed in order to play melodies with confidence on a K-Board-C . Also, I will need to tweeze and tweak MPE parameter sensitivity to match controller with synthesizer (and vice versa). When we play an ax like MODX, KRONOS, etc., professional sound designers have done the tweaking for us. When starting with MPE, expect to do some work.
I need to mention another reason to choose KMI. KMI and GeoShred are offering discounts on GeoShred and GeoSWAM for K-Board Pro 4, QuNexus and K-Board-C users. Discount codes are provided by KMI. The offer is good Nov 20, 2022 to Nov 20, 2023. See this video for details.
I have seen synthesizer heaven and its name is “Patchwerks”.
Patchwerks was my go-to source for synthesizer gear during the pandemic. I have placed several on-line orders with them and each time their customer service was spot on.
I finally had an opportunity to visit their Seattle showroom at 4129 Stone Way North in Seattle’s Wallingford neighborhood. If you live in Seattle or visit Seattle, I strongly recommend a trip to the Patchwerks showroom. You won’t be disappointed!
The showroom seems to have one of everything. In addition to synths and beat boxes, you’ll also find patch cables galore, DIY kits, and of course, friendly staff. No one comes screaming “Don’t touch that!” and there aren’t any wannabe guitar gods. (You know which other brick and mortar retailer I have in mind…)
Don’t bring your Ford F-250 or RAM 2500 truck because you may need to park on a side street. Wallingford is old Seattle. Side streets are three cars wide and two of the “lanes” on either side of the street are filled with parked cars. It was a challenge parking my dinky Scion iM. 🙂
I’d like to say that the “opportunity” was to buy something new. Instead, I needed to return a troubled Keith McMillen QuNexus. Good on Patchwerks because they readily offered an exchange or return after seeing a video of the malfunction. These guys are on the level. (Regular returns are subject to a 10% restocking fee.)
I must give a shout-out to Keith McMillen Instruments (KMI), too. After getting the trouble report, they immediately stood behind their product and offered an exchange if Patchwerks was unable to resolve the issue/situation. Both Patchwerks and KMI responded to my initial trouble report within 24 hours. Very quick and to the point. It’s a pleasure to call out a positive customer service story.
I will continue to order from Patchwerks and I will likely give Keith McMillen Instruments another go, too. Even though the QuNexus didn’t work out, those colorful K-Board-C are quite appealing.
When you’re in Seattle, be sure to visit Patchwerks.
“God Rest Ye, Merry Gentlemen” by Jon Batiste, Judith Hill, and Stay Human really grooves and I wanted to get in on the fun(k). So, I started with Yamaha Chord Tracker and worked out a similar chord progression.
Wanting to hear the progression and jam on it, I wrote the progression and lyrics in Extended ChordPro:
{title: God Rest Ye, Merry Gentlemen} {Artist: Jon Batiste} {Key: Cm} {Time: 4/4} # Style: JazzGuitarClub {stylecode: 3878} {Tempo: 120}
{start_accomp}
# Intro [Cm][*IA]
# Verse 1 God [Cm:2][*MA] rest ye [Bb/D:2] merry, [Eb5:2] gentle [Fm:2] men, Let [Gm:2] nothing [Ab:2] you dis- [Gm:2] may. [G7:2][*FA] Re- [Cm:2][*MA] member, [Bb/D:2] Christ our [Eb5:2] Sa- [Fm:2] vior was [Gm:2] Born on [Ab:2] Christmas [Gm:2][*FA] day. [C7:2] To [Fm:2][*MA] save us [Bb:2] all from [Eb5:2] Satan's [AbMaj7:2] pow'r when
[Eb5:2] We were [Dm:2] gone a- [Bb/D:2] stray. [Bb:2] O [Eb5:2] Ti- [Ab:2] dings of [Dm:2] com- [Gaug:2] fort and [Cm:2] Joy, [Fm7:2] Comfort and [Bb7][*FA] joy. O [Eb5:2][*MA] Ti- [Ab:2] dings of [Dm:2] com- [Gaug:2][*FA] fort and
Extended ChordPro adds auto-accompaniment features to the well-known and widely used ChordPro song format. I translated the ChordPro to a Yamaha-compatible auto-accompaniment file and played it on Genos™.
In “God Rest Ye,” you’ll notice the new extensions right away. There are a few more directives like: {stylecode: 3878} and {start_accomp}. Chord symbols are enhanced with a beat count, e.g., “[Cm:2]“, placing chord changes on beats within a measure. Annotations indicate auto-accompaniment section changes. For example, “[*MA]” and “[*FA]” mean “Main section A” and “Fill in A”, respectively.
Getting to hear the progression — not just play it by hand — was a huge help. I found a few places where a minor chord was required instead of a major. Play-back encouraged me to listen critically and to find a few hipper voicings.