Cortex-A72 tuning: Data access

In my discussion about instructions per cycle as a performance metric, I compared the textbook implementation of matrix multiplication against the loop next interchange version. The textbook program ran slower (28.6 seconds) than the interchange version (19.6 seconds). The interchange program executes 2.053 instructions per cycle (IPC) while the textbook version has a less than stunning 0.909 IPC.

Let’s see why this is the case.

Like many other array-oriented scientific computations, matrix multiplication is memory bandwidth limited. Matrix multiplication has two incoming data streams — one stream from each of the two operand matrices. There is one outgoing data stream for the matrix product. Thanks to data dependency, the incoming streams are more important than the outgoing matrix product stream. Thus, anything that we can do to speed up the flow of the incoming data streams will improve program performance.

Matrix multiplication is one of the most studied examples due to its simplicity, wide-applicability and familiar mathematics. So, nothing in this note should be much of a surprise! Let’s pretend, for a moment, that we don’t know the final outcome to our analysis.

I measured retired instructions, CPU cycles and level 1 data (L1D) cache and level 2 (L2) cache read events:

    Event                          Textbook     Interchange 
----------------------- -------------- --------------
Retired instructions 38,227,831,497 60,210,830,509
CPU cycles 42,068,324,320 29,279,037,884
Instructions per cycle 0.909 2.056
L1 D-cache reads 15,070,922,957 19,094,920,483
L1 D-cache misses 1,096,278,643 9,576,935
L2 cache reads 1,896,007,792 264,923,412
L2 cache read misses 124,888,097 125,524,763

There is one big take-away here. The textbook program misses in the data cache far more often than interchange. The textbook L1D cache miss ratio is 0.073 (7.3%) while the interchange cache miss ratio is 0.001 (0.1%). As a consequence, the textbook program reads the slower level 2 (L2) cache more often to find necessary data.

If you noticed slightly different counts for the same event, good eye! The counts are from different runs. It’s normal to have small variations from run to run due to measurement error, unintended interference from system interrupts, etc. Results are largely consistent across runs.

The behavioral differences come down to the memory access pattern in each program. In C language, two dimensional arrays are arranged in row-major order. The textbook program touches one operand matrix in row-major order and touches the other operand matrix in column-major order. The interchange program touches both operand arrays in row-major order. Thanks to row-major order’s sequential memory access, the interchange program finds its data in level 1 data (L1D) cache more often than the textbook implementation.

There is another micro-architecture aspect to this situation, too. Here are the performance event counts for translation look-aside buffer (TLB) behavior:

    Event                          Textbook     Interchange 
----------------------- -------------- --------------
Retired instructions 38,227,830,517 60,210,830,503
L1 D-cache reads 15,070,845,178 19,094,937,273
L1 DTLB miss 1,001,149,440 17,556
L1 DTLB miss LD 1,000,143,621 10,854
L1 DTLB miss ST 1,005,819 6,702

Due to the chosen matrix dimensions, the textbook program makes long strides through one of the operand matrices, again, due to the column-major order data access pattern. The stride is big enough to touch different memory pages, thereby causing level 1 data TLB (DTLB) misses. The textbook program has a 0.066 (6.6%) DTLB miss ratio. The miss ratio is near zero for the interchange version.

I hope this discussion motivates the importance of cache- and TLB-friendly algorithms and code. Please see the following articles if you need to brush up on ARM Cortex-A72 micro-architecture and performance events:

Check out my Performance Events for Linux tutorial and learn to make your own Raspberry Pi 4 (Broadcom BCM2711) performance measurements.

Here is a list of the ARM Cortex-A72 performance events that are most useful for measuring memory access (load, store and fetch) behavior. Please see the ARM Cortex-A72 MPCore Processor Technical Reference Manual (TRM) for the complete list of performance events.

Number  Mnemonic            Name 
------ ------------------ ------------------------------------
0x01 L1I_CACHE_REFILL Level 1 instruction cache refill
0x02 L1I_TLB_REFILL Level 1 instruction TLB refill
0x03 L1D_CACHE_REFILL Level 1 data cache refill
0x04 L1D_CACHE Level 1 data cache access
0x05 L1D_TLB_REFILL Level 1 data TLB refill
0x08 INST_RETIRED Instruction architecturally executed
0x11 CPU_CYCLES Processor cycles
0x13 MEM_ACCESS Data memory access
0x14 L1I_CACHE Level 1 instruction cache access
0x15 L1D_CACHE_WB Level 1 data cache Write-Back
0x16 L2D_CACHE Level 2 data cache access
0x17 L2D_CACHE_REFILL Level 2 data cache refill
0x18 L2D_CACHE_WB Level 2 data cache Write-Back
0x19 BUS_ACCESS Bus access
0x40 L1D_CACHE_LD Level 1 data cache access - Read
0x41 L1D_CACHE_ST Level 1 data cache access - Write
0x42 L1D_CACHE_REFILL_LD L1D cache refill - Read
0x43 L1D_CACHE_REFILL_ST L1D cache refill - Write
0x46 L1D_CACHE_WB_VICTIM L1D cache Write-back - Victim
0x47 L1D_CACHE_WB_CLEAN L1D cache Write-back - Cleaning
0x48 L1D_CACHE_INVAL L1D cache invalidate
0x4C L1D_TLB_REFILL_LD L1D TLB refill - Read
0x4D L1D_TLB_REFILL_ST L1D TLB refill - Write
0x50 L2D_CACHE_LD Level 2 data cache access - Read
0x51 L2D_CACHE_ST Level 2 data cache access - Write
0x52 L2D_CACHE_REFILL_LD L2 data cache refill - Read
0x53 L2D_CACHE_REFILL_ST L2 data cache refill - Write
0x56 L2D_CACHE_WB_VICTIM L2 data cache Write-back - Victim
0x57 L2D_CACHE_WB_CLEAN L2 data cache Write-back - Cleaning
0x58 L2D_CACHE_INVAL L2 data cache invalidate
0x66 MEM_ACCESS_LD Data memory access - Read
0x67 MEM_ACCESS_ST Data memory access - Write
0x68 UNALIGNED_LD_SPEC Unaligned access - Read
0x69 UNALIGNED_ST_SPEC Unaligned access - Write
0x6A UNALIGNED_LDST_SPEC Unaligned access
0x70 LD_SPEC Speculatively executed - Load
0x71 ST_SPEC Speculatively executed - Store
0x72 LDST_SPEC Speculatively executed - Load or store

Copyright © 2021 Paul J. Drongowski

Raspberry Pi 4 mini-review

Success with the RTL-SDR Blog V3 software defined radio (SDR) inspired me to try SDR on Raspberry Pi. I pulled out the old Raspberry Pi 2, updated to the latest Raspberry Pi OS (Buster), and installed CubicSDR and GQRX.

Both CubicSDR and GQRX ran, but performance was unacceptably slow. Audio kept breaking up, possibly due to a small audio buffer and/or insufficient CPU cycles. The poor old Raspberry Pi 2 Model B (v1.1) is a 900MHz Broadcom BCM2836 SoC, a quad-core 32-bit ARM Cortex-A7 processor. The RPi 2 has 1GB of RAM. If you would like to know more about its internals, please read about the BCM2835 micro-architecture and performance analysis with PERF (Performance Events for Linux).

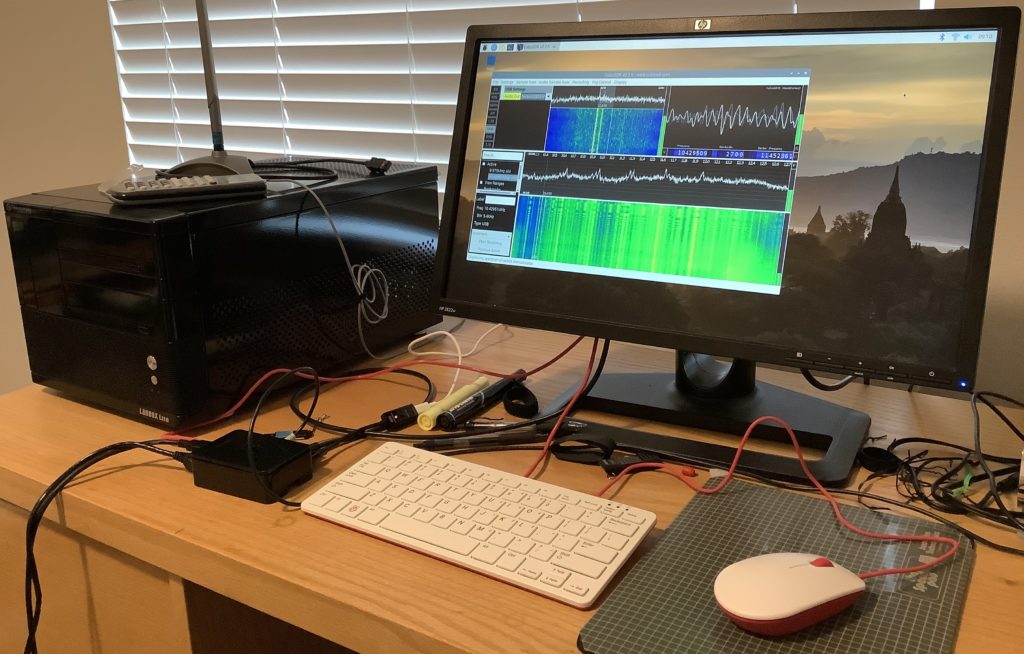
Time to upgrade! I had been meaning to retire the Black Hulk — a 2011 vintage power-sucking LANbox with a Greyhound-era dual-core AMD processor. Upgrading gives me the opportunity to try the latest Raspberry Pi 4 and gain a lot of desktop space. The image below shows my office work space including the Black Hulk and the intsy RPi 4.

Raspberry Pi 4 running CubicSDR software defined radio

I decided to accessorize a little and purchased a Raspberry Pi branded keyboard and mouse. The Raspberry Pi keyboard is a small chiclet keyboard with an internal hub. The internal hub is a welcome addition and postpones the need for an external USB hub. The keyboard has a decent enough feel. It is smaller than the Logitech which it replaces, giving me more desktop space albeit with a slightly cramped hand feel. The Raspberry Pi mouse is just OK. I like the splash of color, too, a nice break from boring black and grey.

Raspberry Pi 4 is faster without question. The desktop and web browser are snappier. RPi 4 boosts the Ethernet port to 1000 BaseT (Gigabit) and you can see it.

The Raspberry Pi 4 is a 1.5GHz Broadcom BCM2711, a quad-core 64-bit ARM Cortex-A72 processor. I ran an old naive matrix multiplication program and it finished in 0.6 second versus 2.6 seconds on the Raspberry Pi 2. Naturally, I’m curious about the speed-up. I hope to dig into the BCM2711 micro-architecture.

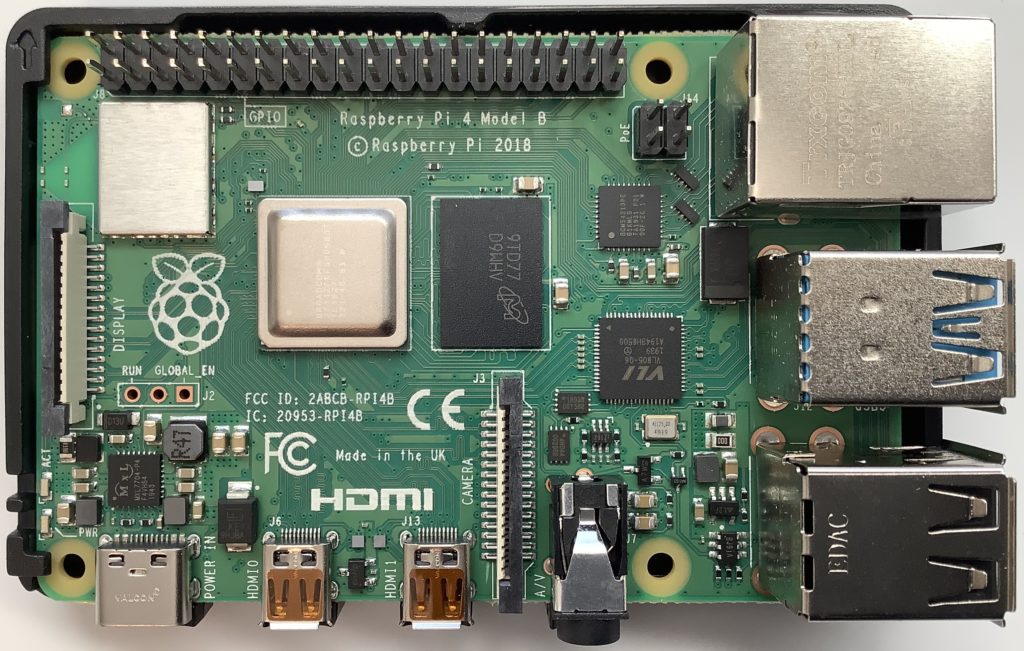
Raspberry Pi 4 PCB (Broadcom BCM2711 and 4GB RAM)

I recommend upgrading to Raspberry Pi 4 without hesitation or reservations. I bought the Canakit PI4 Starter PRO Kit at Best Buy, not wanting to wait for delivery. The kit includes an RPi 4 with 4GB RAM, black plastic case, Canakit power supply, heat sinks, cooling fan, micro HDMI cable, USB card reader, NOOBS on a 32GB MicroSD card, and a Canakit power switch (PiSwitch). It seemed like the right combination of accessories.

By the way, you might want to consider the newly announced Raspberry Pi 400. It integrates a Raspberry Pi 4 and keyboard into one very compact unit. Its price ($70USD) is hard to beat, too.

The PiSwitch sits between the USB-C power supply and the RPi4, and is a convenient desktop power ON/OFF switch. Canakit could be a little more forthcoming about proper power up and power down sequencing. When powering down, I let the monitor go to sleep before turning power off. This should give the Raspberry Pi OS time to sync and properly shut-off.

I recommend checking the connecters on your monitor before placing any kind of web order. My HP monitor does not support HDMI, doing DisplayPort, DVI-D and VGA. The Canakit cable is micro-HDMI to HDMI. I bought a mini-HDMI to DVI-D cable on-line and wound up waiting after all! No way I’m paying Best Buy prices for a cable. 🙂

Assembly is a piece of cake. The processor and case fit together without screws or other hardware. The case fit and finish is good and holds together well just by fit alone. I installed the heat sinks, but not the fan. If I run into thermal issues, I will add the fan.

I didn’t bother with the NOOBS MicroSD card as I already had Buster installed. I see the value in NOOBS for beginners who don’t want to deal with disk images and such. I will probably repurpose the NOOBS card.

The only annoyance is due to the Raspberry Pi OS package manager. The add/remove software interface shows waaaaay too much detail. I want to install CubicSDR and GQRX, but where the heck are they? Why do I have to sort through a zillion libraries, etc. when searching on “SDR”? I installed via command line apt-get — a far more convenient and direct method.

The higher processor speed and bigger RAM pay off — no more glitchy audio. After trying both CubicSDR and GQRX, I prefer CubicSDR. I didn’t have any issues configuring for HF reception in either case. You should read the documentation (!) ahead of time, however.

I hope this quick Raspberry Pi 4 rundown is helpful.

Copyright © 2020 Paul J. Drongowski

Qsynth and FluidSynth on Raspberry Pi: The basics

The first four articles in this series are a quick guide to getting started with audio and MIDI on Raspberry Pi 2:

  1. Get started with Raspbian Jessie and Raspberry Pi 2
  2. Get started: Linux ALSA and JACK
  3. Raspberry Pi soft synthesizer: Get started
  4. USB audio for Raspberry Pi

Although the articles address Raspbian JESSIE, the HOW-TOs should be able to get you started with pretty much any version of Linux.

I showed how to use a simple monophonic soft synthesizer (amsynth) in part 3. Now, it’s time to move on to a multi-timbral synth: FluidSynth. FluidSynth has a graphical front-end, Qsynth, and I’ll demonstrate Qsynth, too. This tutorial assumes that JACK (and/or ALSA) is properly configured. The second and third articles will help you with configuration.

The Web sites for FluidSynth and Qsynth are:

Please visit these sites to learn about the advanced capacilities that are offered by these programs. You can always consult manual pages while you are working:

    man fluidsynth
    man qsynth
    man qjackctl
    man aplay

or you can request help directly, e.g., fluidsynth --help.

Installation

Installation is a breeze:

    sudo apt-get install fluidsynth
    sudo apt-get install qsynth

These commands should automatically download and install the General MIDI SoundFont. The path name for the GM SoundFont is:

    /usr/share/sounds/sf2/FluidR3_GM.sf2

If you did not get the GM SoundFont by installing Qsynth or FluidSynth, then enter the command:

    sudo apt-get install fluid-soundfont-gm

to install it. If you want a Roland GS-compatible SoundFont, install it with the command:

    sudo apt-get install fluid-soundfont-gs

The General MIDI SoundFont file is about 140MBytes and the GS-compatible SoundFont file is about 32MBytes in size.

FluidSynth

Although you’re most likely to use FluidSynth via Qsynth, it’s worth discussing FluidSynth’s unique capabilities first. Some things can be done quite handily from the command line. The number of FluidSynth’s command line options can be overwhelming, so if you skip to Qsynth, that’s understandable.

FluidSynth is a multi-timbral software synthesizer based on SoundFont 2 specifications. It is a command line application program that accepts MIDI input from either a MIDI controller keyboard or a software MIDI sequencer. FluidSynth needs a SoundFont file containing instrument definitions and samples. It plays the incoming notes using the selected SoundFont instruments. FluidSynth supports sixteen MIDI channels (default). It provides chorus and reverb effects.

There are many SoundFonts available for download from the Web. Two of the best known and widely used SoundFonts are:

  • FluidR3_GM.sf2: A General MIDI sound set
  • FluidR3_GS.sf2: A Roland GS-compatible sound set

The General MIDI sound set is pretty good; don’t let the “General MIDI” label drive you away!

FluidSynth has three main usage modes:

  1. Interactive command mode.
  2. One-liner mode. “One-liner” is my name for this mode of operation.
  3. Server mode.

If you just type fluidsynth on the command line, FluidSynth launches into its interactive mode, i.e., FluidSynth accepts and interpets commands of its own. I won’t go into interactive mode here, but suffice it to say, that you can set parameters, load SoundFont files, etc. using FluidSynth commands. Enter help when you are in interactive mode in order to get information about commands and parameters. Interactive mode is a good way to explore FluidSynth configuration such that you can write out complicated combinations of FluidSynth command line options.

“One-liner mode” (option -i) launches FluidSynth without dropping into its interactive mode. You’re mostly likely to use this mode when launching FluidSynth from a shell script or if you just have a simple job to do from the command line.

One-liner mode means that you need to dive into FluidSynth’s command line options. There are many command line options including:

  • -C, --chorus: Turn chorus ON or OFF
  • -R, --reverb: Turn reverb ON or OFF
  • -K, --midi-channels: Set the number of MIDI channels
  • -j, --connect-jack-outputs: Connect JACK outputs
  • -F, --fast-render: Render MIDI to an audio file
  • -O, --audio-file-format: Audio file format for fast rendering
  • -r, --sample-rate: Set the sample rate
  • -T, --audio-file-type: Audio file type for fast rendering
  • -i, --no-shell: Don’t run in interative mode
  • -S, --server: Start FluidSynth as a server process

A full list of command line parameters is given in the FluidSynth User Manual.

One-liner mode handles two everyday tasks without a lot of GUI hoopla:

  1. Play back MIDI given a list of MIDI files on the command line.
  2. Render a MIDI file to an audio file (fast render).

FluidSynth looks for command line options, followed by a SoundFont file, followed by a list of MIDI files. Enter the following command to play back a MIDI file (“EvilWays.mid” in these examples) through the ALSA audio port such as the 3.5mm stereo jack on the Raspberry Pi 2:

fluidsynth -a alsa -n -i /usr/share/sounds/sf2/FluidR3_GM.sf2 EvilWays.mid

The -a option selects the ALSA audio device, -n suppresses MIDI input, and -i suppresses interactive mode. ALSA should be configured to use the 3.5mm audio jack. (See the second article in this series about ALSA and JACK.)

If you prefer to use JACK instead of vanilla ALSA, start the JACK server running via qjackctl. (See the third article in this series about using JACK with a soft synth.) Then, enter the following command:

fluidsynth -a jack -j -n -i /usr/share/sounds/sf2/FluidR3_GM.sf2 EvilWays.mid

The -a option selects JACK and the -j option tells JACK to connect the audio output of FluidSynth to the system audio output. If you leave out the -j option, JACK will not make the audio connection and you will be left wondering why there isn’t any sound coming from your speakers! You can also make this connection in the qjackctl Connections or Patchbay windows. In practice, if you aren’t getting audio output or MIDI, check your connections in JACK — audio or MIDI connections may be missing.

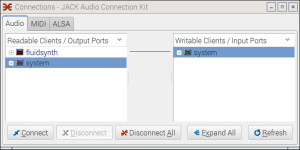
The image below shows the audio connection from FluidSynth to JACK. (Click on the image to enlarge it to full resolution.) This is a snapshot of the qjackctl Connections window while FluidSynth is playing a MIDI file. The audio connection is broken when FluidSynth is done with playback (i.e., when FluidSynth exits).

qjackctl_fluidsynth

Fluidsynth provides a way to fast render a MIDI file to a digital audio file. “Fast” is a relatively term. Perhaps “non-realtime render” may be a more accurate description. The following command:

fluidsynth -T wav -F EvilWays.wav /usr/share/sounds/sf2/FluidR3_GM.sf2 EvilWays.mid

converts a MIDI file (“EvilWays.mid”) to a WAV format audio file (“EvilWays.wav”). The -T option specifies the file format and the -F option specifies the name of the output file. The rendering process grinds on for a little while, so please be patient. Once you have the audio file, play it back using the ALSA aplay program:

    aplay -D hw:CODEC,0 EvilWays.wav

This example command sends digital audio to the CODEC audio device. Of course, you may use the built-in audio port or some other device. (See part 2 of this series for more examples. These tutorial articles build on each other!)

The way to get a list of audio types (-T) and audio file formats (-O) is confusing. You need to pass “help” to the appropriate command line option. (Grrrrrr.) The command:

    fluidsynth -O help

produces the following output on Raspbian JESSIE:

-O options (audio file format):
   'double','float','s16','s24','s32','s8','u8'

s8, s16, s24, s32: Signed PCM audio of the given number of bits
float, double: 32 bit and 64 bit floating point audio

The command:

    fluidsynth -T help

produces the output:

-T options (audio file type):
  'aiff','au','auto','avr','caf','flac','htk','iff','mat','mpc','oga',
  'paf','pvf','raw','rf64','sd2','sds','sf','voc','w64','wav','wve','xi'

auto: Determine type from file name extension, defaults to "wav"

Finally, server mode is needed when you want to run FluidSynth as a stand-alone server process. Qsynth is more convenient, so I won’t discuss server mode here just to keep things short.

I have to warn you, working with FluidSynth in either interactive mode or one-liner mode is not always smooth. Feedback is limited and you often have to work through rather cryptic error messages. Qsynth makes life much easier and interesting.

Qsynth

Qsynth is a graphical user interface (GUI) for FluidSynth. Qsynth is based on the Qt framework and toolset for user interface design and implementation.

Qsynth is the way to go if you want to use it as a soft synth with a MIDI controller or sequencer. It pairs up rather nicely with QJackControl, too.

We intend to demonstrate Qsynth using an M-Audio Keystation Mini 32 controller. If you’re working along with me, plug a MIDI keyboard controller into an available Raspberry Pi 2 USB port. Launch qjackctl:

    qjackctl &

and start the JACK server by clicking the Start button in the QJackCtl control panel. JACK routes the audio to the selected audio output port. Then, launch qsynth:

    qsynth

Qsynth automatically searches for the JACK server and connects audio to it. Qsynth displays a control panel which resembles an old school MIDI module. The panel knobs control master gain and the reverb and chorus effects. There are also buttons to Restart FluidSynth, to stop stuck notes (Panic), to Reset settings and to view/edit MIDI channel settings (Channels).

qsynth_panel

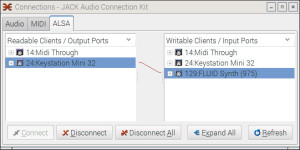
At this point, you need a MIDI connection from the Keystation (or other MIDI controller) to Qsynth. In the demo, I clicked the Connect button on the QJackCtl panel and made the MIDI connection using the Connections window. (See the image below. Click on the image for full resolution.)

qjackctl_qsynth

Select the Keystation entry on the left and select the FluidSynth entry on the right. Click the Connect button to make the MIDI connection. “FluidSynth” appears as a destination in the right hand column instead of “Qsynth.” Remember, Qsynth is a graphical front-end for a FluidSynth running in the background. The MIDI controller needs to communicate with the soft synth.

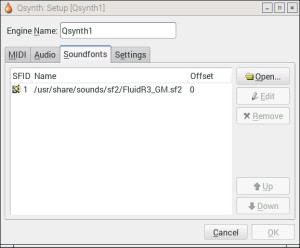
Play a few notes on the MIDI controller to make sure that audio and MIDI are working. Then, click the Setup button on the Qsynth front panel. Qsynth displays its Setup window which has four tabs: MIDI, Audio, Soundfonts and Settings. Click SoundFonts to go to the Soundfonts tab.

qsynth_setup

The SoundFonts tab displays the SoundFont files that are currently loaded into Qsynth (FluidSynth). Click on the Open button to load a SoundFont file like:

    /usr/share/sounds/sf2/FluidR3_GS.sf2

Use the Remove button to unload a SoundFont. Click the OK button when you are finished making changes.

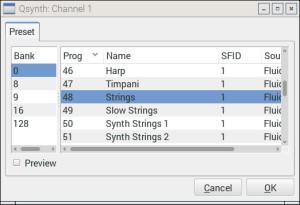
If you start Qsynth with the General MIDI SoundFont and play notes on MIDI channel 1, you hear a grand piano voice. Click the Channels button on the front panel in order to change voices. With the Channels window open, double click on a row in the MIDI channel table. Should you prefer contextual menus instead, right click on a row and select Edit in the pop-up menu. This action gets you to the same place: the channel edit window (below).

qsynth_edit_channel

The channel edit window displays a list of available SoundFont voices. Voices are organized and selected in the conventional way, namely, banks and individual programs (voices). Choose a different voice like Strings (General MIDI bank 0, program 48). Qsynth does not change the voice until you click the OK button to confirm the change. If you would like to browse and try voices, check the Preview box. When Preview is enabled, Qsynth temporarily changes the voice, letting you plink away on the controller and hear the voice before changing it (or perhaps just leaving things alone by cancelling).

Click the Quit button on the Qsynth front panel when you’re finished. Then, stop the JACK server using the QJackCtl control panel.

That’s all there is to it!

Copyright © 2016 Paul J. Drongowski

USB audio for Raspberry Pi

In the first few articles of this series:

Get started with Raspbian Jessie and RPi2
Get started: Linux ALSA and JACK
Raspberry Pi soft synthesizer: Get started

we used the built-in, 3.5mm audio output from the Raspberry Pi 2 (RPi2) to produce sound through powered monitors. If you tried this with your own RPi2, you realize that the sound quality is good enough for initial experiments, but not good enough for production — unless you’re into lo-fi.

This article starts with background information about the built-in audio circuit and why it is lo-fi. Then, I briefly mention a few alternative approaches for high quality audio output and audio input. Finally, I describe my experience bringing up the Behringer UCA-202 USB audio interface on RPi2 and Raspbian JESSIE.

Built-in audio

The Raspberry Pi Foundation has not yet published a schematic for the Raspberry Pi 2. However, Adafruit (and others) claim that the audio circuit is the same as the earlier, first generation Raspberry Pi. Let’s take a look at that.

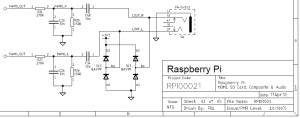
The Raspberry Pi drives a pulse width modulated (PWM) signal into a passive low pass audio filter. (See the schematic below. Click on images to enlarge and get full resolution.)

rpi_audio_schematic

The PWM technique produces OK audio, but not good, clean audio. The software performs RPDF dithering and noise shaping to improve quality. Later RPi models (like the B+ and generation 2) have better power regulation and produce less digital noise at the audio output. There is much on-line debate about further improvements, but the PWM technique seems is limited by the 11-bit quantization. (This latter point alone is subject to debate!)

JACK seems to modify the audio sample stream as well. I can hear a loud hiss from my speakers when JACK is running and sending audio through the built-in DAC circuit. Ideally, the speaker should be completely silent.

Raspberry Pi 2 does not have an audio input. Thud!

Alternatives to built-in audio

If you want better audio quality or need to record an external audio signal, there are two approaches:

  1. Buy and install an audio board.
  2. Buy and install a USB audio interface.

With respect to the first approach, I briefly explored two of the available Raspberry Pi add-on audio boards:

  1. Cirrus Logic Audio Card
  2. HiFiBerry DAC Pro+

The Cirrus Logic board is well-specified with a WM5102 audio hub, WM8804 S/PDIF transceiver, and two WM7220 digital microphone integrated circuits. Those in the know will recognize these parts as Wolfson designs. The HiFiBerry DAC+ Pro is output only and uses an equally well-respected Burr Brown digital-to-audio converter (DAC).

Potential users are advised to be careful and to check compatibility with their particular model of Raspberry Pi. Adafruit cautions that the Cirrus Logic board may not be compatible with Raspberry Pi 2.

Both boards have drivers. However, both vendors eshew device configuration and prefer to distribute full OS images that include the requisite drivers. This approach puts existing users at a disadvantage. Now that I have Raspbian JESSIE installed and running, I would like to build and install the driver by itself, not write another micro SD card and go through the bring up process again.

With these issues in mind, I decided to go the USB audio interface route. It’s also the lowest cost option for me because I already have a Behringer USB audio interface in hand.

Behringer UCA-202 audio interface

The Behringer UCA-202 is an inexpensive ($30 USD) USB audio input/output interface. Analog signals are transfered on RCA connectors (left/right IN and left/right OUT). The UCA-202 also has a headphone output and an S/PDIF optical output. The UCA-202 is bus-powered and class-compliant. Conversion is 16-bit at 32kHz, 44.1kHz or 48kHz. The UCA-202 has a sister, the UCA-222, with the same spec.

I have used the UCA-202 as a plug-and-play audio interface with both Windows and Mac OS X. Now, I can claim success with Raspbian JESSIE Linux, too. This thing is the “pocket knife” of low-cost USB audio interfaces.

Even though I’m using a Behringer UCA-202, the directions below should also apply to other class-compliant USB audio interfaces. It never hurts to search the Web for directions, problems and tips for your particular audio interface. Just sayin’.

Before plugging in the UCA-202, run aplay -l and aplay -L to see a list of the sound cards (-l) and PCMs (-L) that are installed on your machine.

Next, plug the UCA-202 into one of the USB ports. Run the aplay commands, again, and look for a new audio device. On my machine, a new sound card appears in the aplay -l output:

    card 1: CODEC [USB Audio CODEC], device 0: USB Audio [USB Audio]
      Subdevices: 1/1
      Subdevice #0: subdevice #0

The new sound card is named “CODEC”, it is ALSA card number 1, and it has one subdevice (number 0). The aplay -L output lists a whole slew of new PCMs:

    sysdefault:CARD=CODEC
        USB Audio CODEC, USB Audio
        Default Audio Device
    front:CARD=CODEC,DEV=0
        USB Audio CODEC, USB Audio
        Front speakers
    surround21:CARD=CODEC,DEV=0
        USB Audio CODEC, USB Audio
        2.1 Surround output to Front and Subwoofer speakers
    surround40:CARD=CODEC,DEV=0
        USB Audio CODEC, USB Audio
        4.0 Surround output to Front and Rear speakers
    surround41:CARD=CODEC,DEV=0
        USB Audio CODEC, USB Audio
        4.1 Surround output to Front, Rear and Subwoofer speakers
    surround50:CARD=CODEC,DEV=0
        USB Audio CODEC, USB Audio
        5.0 Surround output to Front, Center and Rear speakers
    surround51:CARD=CODEC,DEV=0
        USB Audio CODEC, USB Audio
        5.1 Surround output to Front, Center, Rear and Subwoofer speakers
    surround71:CARD=CODEC,DEV=0
        USB Audio CODEC, USB Audio
        7.1 Surround output to Front, Center, Side, Rear and Woofer speakers
    iec958:CARD=CODEC,DEV=0
        USB Audio CODEC, USB Audio
        IEC958 (S/PDIF) Digital Audio Output
    dmix:CARD=CODEC,DEV=0
        USB Audio CODEC, USB Audio
        Direct sample mixing device
    dsnoop:CARD=CODEC,DEV=0
        USB Audio CODEC, USB Audio
        Direct sample snooping device
    hw:CARD=CODEC,DEV=0
        USB Audio CODEC, USB Audio
        Direct hardware device without any conversions
    plughw:CARD=CODEC,DEV=0
        USB Audio CODEC, USB Audio
        Hardware device with all software conversions

Not all of these PCMs are defined and configured by the way. Take note of the PCM named “hw:CARD=CODEC,DEV=0”. This is essentially the raw interface to the UCA-202. This PCM, at the very least, is defined.

Connect the audio outputs of the UCA-202 to powered monitors. Test the audio output interface by playing an audio (WAV) file:

    aplay -D hw:1,0 HoldingBackTheYearsDb.wav

or:

    aplay -D hw:CARD=ALSA,DEV=0 HoldingBackTheYearsDb.wav

Please note that you need to pass in the entire PCM name “hw:CARD=CODEC,DEV=0“.

Connect an audio source to the inputs of the UCA-202. Test the audio input interface by recording to an audio (WAV) file:

    arecord -D hw:CARD=ALSA,DEV=0 -f cd test.wav

I had trouble with the duration (-d) option. YMMV. Type Control-C to stop recording. Then, play back the test audio file through the UCA-202.

That’s all there is to it! The UCA-202 is truly plug and play.

Configure JACK and other applications

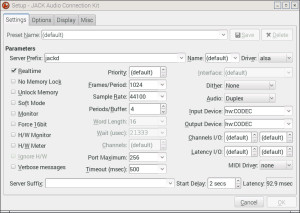
You need to tell the JACK audio server to use the UCA-202 instead of the RPi’s built-in audio device. Run qjackctl and click the Settings button. Select “hw:CODEC” as the Input Device and Output Device. (See the image below.) Click OK to return to the main control panel and start the JACK server. The server routes digital audio to and from the UCA-202 and JACK clients. Launch amsynth and click its Audition button. You should hear sound from the powered monitors that are connected to the UCA-202.

qjackctl_codec

ALSA’s aplay and arecord commands are OK for testing, but are clunky for practical use. Let’s install Audacity:

    sudo apt-get install audacity

Audacity is the well-known cross-platform, open source, audio editing tool.

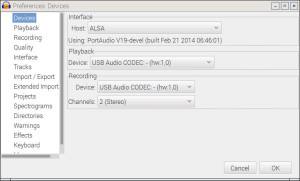
Edit Audacity’s preferences to set the audio interface. (See the following image.) If you want to use ALSA directly, set the interface Host to ALSA. Then set the Playback and Recording Devices to “USB Audio CODEC”. Audacity should now be able to play and record through the UCA-202.

audacity_alsa

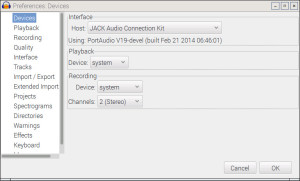
If you prefer to use JACK instead, once again edit Audacity’s preferences. (See the following image.) Set the interface Host to “JACK Audio Connection Kit”. Set the Playback and Recording Device to “system”. Make sure the JACK audio server is running. You may need to restart Audacity at this point. Play back an audio file or try recording a new file. JACK should serve the UCA-202 audio to/from Audacity.

audacity_jack

Raspberry Pi soft synthesizer: Get started

Now let’s make some noise!

This article shows how to install, configure and play a simple software synthesizer (amsynth) on Raspberry Pi 2. The first part in this series is a quick installation and configuration guide for Raspbian Jessie Linux. The second part is an introduction to the Linux audio infrastructure (ALSA and JACK). Please consult these articles for background information. I assume that you know a little about JACK and ALSA aconnect in this article.

amsynth

amsynth is a basic virtual analog (i.e., analog modeling) synthesizer for Linux. It is polyphonic (16 voices max). Each voice has two oscillators, a 12 or 24dB per octave resonant filter and dual ADSR envelope generators. All can be modulated using a low frequency oscillator (LFO). The synth also has distortion and reverb effects. Read more about amsynth at the amsynth web site.

amsynth is a good starting point for exploration since it is easy to set up and use. It can operate standalone (JACK, ALSA or OSS) or as a plug-in (DSSI, LV2, VST). When amsynth launches, it automatically searches for a JACK audio server. If it cannot find a JACK server, it switches to ALSA audio.

Run the following command to install amsynth:

    sudo apt-get install amsynth

The package manager fetches amsynth and the libraries, etc. that amsynth needs.

I’m going to show amsynth running on ALSA and JACK in this tutorial. I had the most success running on JACK and I recommend that approach for practical work. My goal is to play amsynth from an external MIDI keyboard — an M-Audio Keystation Mini 32 in this demonstration.

amsynth running on ALSA

ALSA seemed like the fastest way to test amsynth. Indeed, it came right up and I was able to play amsynth using the Keystation once I connected the ALSA MIDI ports for amsynth and the Keystation.

To repeat my initial experiment, start two terminal windows on the desktop. In the first window, run amsynth:

    amsynth

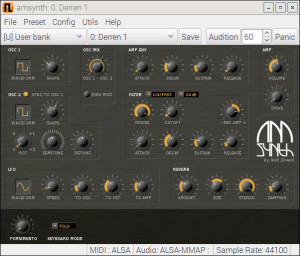
Simple, huh? No command line arguments to mess with. You should see the amsynth front panel as shown in the image below. Notice the status at the bottom of the amsynth front panel. The synth expects to use ALSA for both MIDI and audio.

amsynth_alsa

With the Keystation plugged in, run aconnect in the second window to identify the available ALSA MIDI ports:

    > aconnect -o
    client 0: 'System' [type=kernel]
        0 'Timer           '
        1 'Announce        '
    client 14: 'Midi Through' [type=kernel]
        0 'Midi Through Port-0'
    client 20: 'Keystation Mini 32' [type=kernel]
        0 'Keystation Mini 32 MIDI 1'
    client 128: 'amsynth' [type=user]
        1 'MIDI OUT        '
    > aconnect -o
    client 14: 'Midi Through' [type=kernel]
        0 'Midi Through Port-0'
    client 20: 'Keystation Mini 32' [type=kernel]
        0 'Keystation Mini 32 MIDI 1'
    client 128: 'amsynth' [type=user]
        0 'MIDI IN         '

The aconnect -i command displays ALSA MIDI sender ports including the MIDI coming in from the Keystation. The aconnect -o command displays the ALSA MIDI receiver ports that accept MIDI data including the MIDI IN port belonging to amsynth.

Use aconnect, again, to patch the Keystation to amsynth:

    aconnect 20:0 128:0

ALSA ports are identified by client and client-specific port number. The first port in the command line above is the sender port and the second port is the receiver port.

Enter aconnect -l to display port and connection status. Here is what I saw after connecting the Keystation to amsynth:

    client 0: 'System' [type=kernel]
        0 'Timer           '
        1 'Announce        '
    client 14: 'Midi Through' [type=kernel]
        0 'Midi Through Port-0'
    client 20: 'Keystation Mini 32' [type=kernel]
        0 'Keystation Mini 32 MIDI 1'
            Connecting To: 128:0
    client 128: 'amsynth' [type=user]
        0 'MIDI IN         '
            Connected From: 20:0
        1 'MIDI OUT        '

Click the Audition button on the front panel. amsynth plays a sound. Hit the keys on the Keystation and amsynth plays the notes.

Now that you’re in business, here are a few things to do:

  • Try different presets.
  • Turn the virtual knobs while holding a note.
  • Twist MIDI controller knobs and watch amsynth track the changes.
  • Explore amsynth’s menus.

You probably noticed a few greyed out items in the Utils menu:

  • MIDI (ALSA) connections
  • Audio (JACK) connections

These items refer to utility programs that make MIDI and audio connections (kaconnect, alsa-patch-bay, qjackconnect). I couldn’t locate pre-built versions of these programs for Raspbian. This isn’t a big deal, since we’re going with JACK anyway.

If you followed these directions and played amsynth with a MIDI keyboard of your own, you probably noticed the latency (lag) between striking a key and hearing a sound. The lag under ALSA alone is unacceptable — another reason to go with JACK.

Should you need a virtual keyboard, here are two Linux applications for ya:

    vkeybd         Virtual MIDI Keyboard
    vmpk           Virtual MIDI Piano Keyboard

Install these with the sudo apt-get install command.

amsynth running on JACK

Let’s run amsynth along-side JACK for audio.

JACK is a server that runs as a separate Linux process. A process running a system service like JACK is called a “daemon” in Linux terminology. (Just in case you see this term when reading supplementary articles on the Web.) We need to start JACK running before amsynth so that amsynth can discover the JACK server and connect to it.

Here is the general flow of things when getting down to work:

  1. Plug in your MIDI controller.
  2. Launch qjackctl.
  3. Change JACK settings, if necessary.
  4. Start the JACK server.
  5. Launch amsynth or other JACK-aware application.
  6. Make connections in qjackctl or ALSA.

Full disclosure, I first started JACK from the command line using a variety of suggested options and had only limited success. I got a few runtime errors along the way and the latency was unacceptably long.

These first experiments produced one useful tip: Add yourself to the Linux audio group. The notion of a group in Linux is similar to the different classes of users that you find on a different operating system, e.g., the group of Administrator users on Windows. Users belonging to the audio group have special rights which improve the performance of realtime applications like a soft synthesizer. These rights include the ability to reserve and lock down memory and to run time-critical operations at a higher priority.

The Raspbian Jessie image comes equipped with the audio group. The following command checks to see if the audio group is already defined (just in case you’re working on a different version of Linux):

    grep audio /etc/group

If this command doesn’t display anything, then you need to create the audio group yourself. The command:

    sudo groupadd audio

adds the audio group. You will need to define the rights and privileges for the audio group — an expert task that I will not explain here. See the references at the bottom of this page for more details.

Run the following command to display your group membership:

    groups

If “audio” is not listed in the output, then you need to add yourself to the audio group:

    sudo usermod -a -G audio XXX

where XXX is your user name. The next step is vital to your sanity. Log out. Log all the way out. If you logged in from the text shell and started the X Windows system, then leave X Windows and log out from the text shell. Then, log back in. Run groups and the system should now show you as a member of the audio group. Group membership is established and inherited when you log in.

Finally, it’s time to start JACK. Fortunately, JACK has a graphical control panel called qjackctl. The control panel uses the cross-platform Qt graphical user interface (GUI) package which supplies all of the buttons, drop-down lists and so forth. Start the control panel with the following command:

    qjackctl &

The ampersand at the end of the command line is not accidental. It tells the Linux shell to run qjackctl and detach the control panel from the terminal window. This leave the terminal window live and ready to accept new commands.

The qjackctl control panel is shown in the following image.

qjackctl

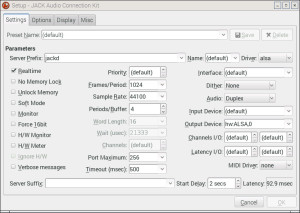
Click the Setup button in order to make a few small changes. Change the Sample Rate parameter to 44100Hz, which is the rate prefered by amsynth. Set the Periods/Buffer parameter to 4. If the number of periods is less than 4, you will probably hear noisy, glitchy audio. JACK and amsynth work just fine when the Output Device is set to “(default)”. I decided to set the Output Device parameter by hand to “hw:ALSA,0” as a way of testing the ALSA settings. Please see the settings that I used in the following image. (Click images to get full resolution.)

qjackctl_setup

Now launch amsynth:

    amsynth

The soft synth will search for the JACK audio server and should connect to it.

You could follow the procedure in the ALSA section (above) to connect the Keystation to the MIDI IN belonging to amsynth. However, qjackctl has two convenient ways to make MIDI connections:

  1. Connections
  2. Patchbay

These features reside behind the Connect and Patchbay buttons. They each have similar capabilities and allow you to make connections between MIDI and audio ports. The main difference is persistence or lack thereof. Connections are temporary and are broken when a client is terminated. Connections are forgotten when the JACK server is terminated, too. The Patchbay lets you define, save and load port-to-port connections in a file. JACK is also pretty good about restoring the active patchbay even if you haven’t started applications, soft synths, etc. in an orderly way. (JACK needs to be running first, of course.)

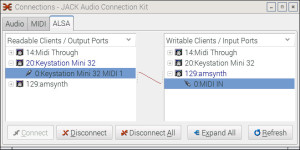
I made connections using both techniques just for fun. The image below is a snapshot of the Connections dialog box. There are three tabs — one for each type of connection (port). I made MIDI connections using the ALSA tab because the Keystation MIDI ports were not registered with JACK. (They did not appear on the MIDI tab even though the MIDI tab did show amsynth‘s MIDI ports.) To make a connection, just select a sender in the left column and a receiver in the right column. Then click the “Connect” button. If you terminate amsynth or JACK, the connection is lost and forgotten.

qjackctl_alsa_midi

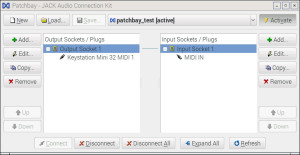
The Connections dialog is a good place to experiment while you’re getting your virtual, in-the-box studio together. When you have a set-up that you like, it’s time to capture the set-up in the Patchbay. First, click the “Patchbay” button on the qjackctl control panel. Click the New button. Use the appropriate Add button to add output sockets to the left column or to add input sockets to the right column. Then, choose two ports and click the Connect button. After making connections, save the set-up to a file. The interface is intuitive. You can save and load as many different set-ups as you would like (as long as there is free drive space!)

qjackctl_patchbay

When you quit JACK, it remembers the last active Patchbay set-up. JACK recalls this set-up when you launch JACK, again. In case you’re wondering, qjackctl saves its configuration (settings) in:

    /home/XXX/.config/rncbc.org/QjackCtl.conf

where “XXX” is your Linux user name. The “.” character at the beginning of “.config” hides the “.config” file. Use ls -a to show all files in a directory including the hidden ones. The JACK daemon saves its configuration in:

    /home/XXX/.jackdrc

where “XXX” is your linux user name. This, by the way, is your home directory. Linux applications typically store configurations in hidden files within your home directory. The “.jackdrc” file contains the command that was last used to launch JACK, e.g.,

    /usr/bin/jackd -dalsa -dhw:0 -r44100 -p1024 -n4 -D -Phw:ALSA,0

This is good to know when you want to find out the initial launch conditions for the JACK daemon.

The one aspect that qjackctl does not handle well is the deletion of Patchbay set-up files. qjackctl stores a Patchbay set-up in an XML file. If you delete or move the XML file, then you will get a warning message like:

    Could not load active patchbay definition. Disabled.

You will need to delete the reference to the missing file from the “QjackCtl.conf” file.

At this point, you should be able to play amsynth from an external MIDI controller with acceptable latency. Have fun!

Finally, I found three well-written guides to JACK, qjackctl, and the JACK patchbay. Here are the links. If you read my introduction to ALSA and JACK and this articles, then you have sufficient background to dive into the finer points.

Demystifying JACK – A Beginner’s Guide to Getting Started with JACK
HOW-TO QjackCtl Connections
QjackCtl and the Patchbay

If you enjoyed this article, then be sure to check out:

Qsynth and FluidSynth on Raspberry Pi: The basics

Copyright © 2016 Paul J. Drongowski

Get started: Linux ALSA and JACK

Before we dive into specific music applications, I need to provide a little background information about audio and MIDI support on Linux.

If you’re coming from Mac OS X or Windows, you may not have heard very much about the Linux way of doing audio and MIDI. Seems like the “mainstream media” don’t want to have much to do with Linux. Linux has a very well-developed infrastructure for audio and MIDI. Linux audio is a “stack” (a layer cake) with audio/MIDI applications on top:

  • Audio applications
  • JACK (Jack Audio Connection Kit)
  • ALSA (Advanced Linux Sound Architecture)
  • Linux kernel

You probably haven’t heard about JACK and ALSA before, so a little explaining is in order.

The Advanced Linux Sound Architecture (ALSA) uses the kernel to implement low-level — but extremely powerful — audio and MIDI features. ALSA provides several useful applications, but I like to think of ALSA as a tool to build higher level tools. ALSA is the layer that supports “soundcards,” which is the Linux catch-all term for hardware audio interfaces, MIDI interfaces, and more. Go to the ALSA project homepage to get more information from the developer’s perspective.

You are far more likely to interact with the Jack Audio Connection Kit (JACK) than ALSA. JACK is an audio/MIDI server that provides audio and MIDI services to JACK-based applications (i.e., applications using the JACK API). The list of JACK-enabled applications is impressive. In fact, this list is a rather good summary of the audio and MIDI applications that are available on Linux! Check out the JACK project page to get more information from the developer’s point of view. End-users (us normal people) should read the JACK FAQ which covers some of the finer points about JACK.

ALSA utils

The ALSA utility applications are collectively known as “ALSA utils.” Use the apt-get command to download and install the ALSA utils:

    sudo apt-get install alsa-utils

Here is a list of the ALSA utility applications:

    alsactl    Change and save settings for an audio device
    amixer     Adjust volume and sound controls (ncurses version)
    alsamixer  Adjust volume and sound controls (ncurses version)
    aconnect   Make MIDI connections
    aseqview   Display ALSA sequencer events (e.g., note ON, note OFF)
    aplay      Play back an audio file from the command line
    arecord    Record an audio file from the command line

Let’s take a look at a few of these applications in action.

Test speaker output

Although not strictly part of ALSA utils, speaker-test is a quick way to make sure that the built-in Raspberry Pi audio output is properly connected and configured.

First, connect the RPi2 audio output to your powered monitors using a 3.5mm to whatever patch cable. The Raspberry Pi built-in audio can be routed to either the 3.5mm audio jack (“analog”) or to the the HDMI port. Enter the command:

    amixer cset numid=3 N

to route the built-in audio. Replace “N” with one of the following choices:

    0: auto   1:analog   2:HDMI

In this case, use N=1 to route the audio to the 3.5mm audio jack. Then, run the command:

    speaker-test -t sine -f 440 -c 2

to send a 440Hz tone to the audio output. You should hear a test tone from your speakers.

If you don’t hear a test tone, double check your connections. You may need to add the current user to the audio group: sudo adduser XXX audio, where “XXX” is the user’s name. (I don’t believe this is strictly necessary.)

Play an audio file

Once speaker output is working, why not play an audio file? The aplay program plays an audio file. It supports just a handful of audio formats: voc, wav, raw or au. The default format is WAV.

    aplay -c 2 HoldingBackTheYearsDb.wav

The -c option specifies two channels. (The default is one channel of audio.)

If you listen carefully, you’ll notice that the built-in audio is a little bit noisy. I’ll get into the issue of audio quality in a future blog entry.

The command aplay -l displays a list of all sound cards and digital audio devices.

ALSA mixing

There are two ALSA utility mixer applications: amixer and alsamixer. amixer is a command line tool that controls one or more soundcards. The command (which does not have any command line arguments):

    amixer

displays the current mixer settings for the default soundcard and device as shown below:

    Simple mixer control 'PCM',0
      Capabilities: pvolume pvolume-joined pswitch pswitch-joined
      Playback channels: Mono
      Limits: Playback -10239 - 400
      Mono: Playback -2000 [77%] [-20.00dB] [on]

The output shows a list of the simple mixer controls at your disposal.

The alsamixer application is a bit more visual. alsamixer turns the terminal window into a visual mixer. Try:

    alsamixer

and see. Start alsamixer in one window and play an audio file in different window. Use the UP and DOWN arrows to control the playback gain (volume). Use the escape key (ESC) to exit alsamixer.

MIDI patch-bay

ALSA provides a virtual MIDI patch-bay that lets you interconnect MIDI senders and receivers. MIDI data is communicated from sender ports to receiver ports. A port may belong to either a MIDI hardware interface or a software application. The virtual patch-bay allows for very flexible, powerful MIDI data routing.

The aconnect utility application both displays the status of the virtual patch-bay and makes connections. First off, we need to know the available sender and receiver ports. The command:

    aconnect -i

displays a list of the sender ports including external MIDI input ports. External MIDI input ports (-i) are ALSA sender ports because they send MIDI data to ALSA receiver ports. I connected a Roland UM-2ex MIDI interface to one of the RPi’s USB ports and got the following output with aconnect -i:

client 0: 'System' [type=kernel]
    0 'Timer           '
    1 'Announce        '
client 14: 'Midi Through' [type=kernel]
    0 'Midi Through Port-0'
client 20: 'UM-2' [type=kernel]
    0 'UM-2 MIDI 1     '

The UM-2ex has one 5-pin MIDI IN (client 20, port 0).

Likewise, the command:

    aconnect -o

displays a list of the receiver ports including external MIDI output ports. External MIDI output ports (-o) are ALSA receiver ports because they receive MIDI data from ALSA sender ports. Here is the output when the UM-2ex is connected:

client 14: 'Midi Through' [type=kernel]
    0 'Midi Through Port-0'
client 20: 'UM-2' [type=kernel]
    0 'UM-2 MIDI 1     '
    1 'UM-2 MIDI 2     '

The UM-2ex has two 5-pin MIDI OUTs (client 20, port 0 and port 1).

The notions of sender and receiver may seem a little confusing especially in the context of external MIDI INs and OUTs. Please keep in mind that “send” and “receive” are defined with respect to ALSA itself (and ALSA objects).

Now, I want to really blow your mind. Let’s connect both the Roland UM-2ex and an M-Audio Keystation Mini 32 to the RPi2. Here is the output generated by aconnect -i:

client 0: 'System' [type=kernel]
    0 'Timer           '
    1 'Announce        '
client 14: 'Midi Through' [type=kernel]
    0 'Midi Through Port-0'
client 20: 'UM-2' [type=kernel]
    0 'UM-2 MIDI 1     '
client 24: 'Keystation Mini 32' [type=kernel]
    0 'Keystation Mini 32 MIDI 1'

We can see the MIDI IN for the UM-2 and the Keystation.

Here is the output generated by aconnect -o:

client 14: 'Midi Through' [type=kernel]
    0 'Midi Through Port-0'
client 20: 'UM-2' [type=kernel]
    0 'UM-2 MIDI 1     '
    1 'UM-2 MIDI 2     '
client 24: 'Keystation Mini 32' [type=kernel]
    0 'Keystation Mini 32 MIDI 1'

We see the MIDI OUTs for the UM-2 and the Keystation.

Let’s patch the Keystation (client 24, port 0) to the MIDI OUT of the UM-2ex (client 20, port 0):

    aconnect 24:0 20:0

The sender port is (24:0) and the receiver port is (20:0). MIDI messages are sent from the Keystation to the MIDI OUT of the UM-2ex. If you physically connect the MIDI IN of a tone module or synthesizer to the UM-2’s MIDI OUT, you can now play the tone module or synth using the Keystation. Guess what we just built? A USB MIDI to 5-pin MIDI bridge. Ever need to control an old school 5-pin MIDI synth using a new school USB-only MIDI controller? Now you can with Raspberry Pi and ALSA!

Run aconnect -l to display the connection status. Here is the output for the virtual patch bay:

client 0: 'System' [type=kernel]
    0 'Timer           '
    1 'Announce        '
client 14: 'Midi Through' [type=kernel]
    0 'Midi Through Port-0'
client 20: 'UM-2' [type=kernel]
    0 'UM-2 MIDI 1     '
	Connected From: 24:0
    1 'UM-2 MIDI 2     '
client 24: 'Keystation Mini 32' [type=kernel]
    0 'Keystation Mini 32 MIDI 1'
	Connecting To: 20:0

The output shows the connection from the Keystation to the UM-2ex.

To break the connection, run the command:

    aconnect -d 24:0 20:0

Run aconnect -l, again, and you’ll see that the connection has been removed.

More resources

If you’re a long-time reader of my site, you know that I blogged about the USB to 5-pin MIDI bridge technique before. If you have a Raspberry Pi and know how to run aconnect, you have a bridge!

The Ardour folks have two good articles about JACK on Linux (here and here).

New to Linux (Raspbian Jessie) on Rapsberry Pi? Then be sure to check out my article about getting started with Raspbian Jessie and Raspberry Pi.

PERF tutorial part 3 is now on-line

Just wrapped up Part 3 of the Linux-tools PERF tutorial.

The tutorial now consists of three parts. Part 1 covers the most basic PERF commands and shows how to find program hot-spots using software performance events. Part 2 discusses hardware performance events and performance counters, and demonstrates how to measure hardware performance events using PERF counting mode. Part 2 introduces several derived performance metrics like instructions per second (IPC) and applies these metrics to the sample application programs.

Part 3 is the newest addition to the tutorial series. It builds on parts 1 and 2, showing how to use hardware performance events and counter sampling to profile an application program. Part 3 discusses sampling period and frequency, the sampling process, overhead, statistical accuracy/confidence and other practical concerns.

I hope you find the PERF tutorial to be useful in your work! Although I produced the example data on the ARM-based Raspberry Pi, the commands and techniques will also work on x86.

Performance counter kernel module

As promised, I’ve described the design of a Linux loadable kernel module that allows user-space access to the Raspberry Pi (ARM 1176) performance counters. By the way, the design of the module is not specific to Raspbian Wheezy or even the Raspberry Pi for that matter. I believe that the kernel module could be used on the new Beagleboard Black (BBB) to enable user-space counter access on its ARM Cortex-A8 processor under Linux. I just ordered a BBB and will try out the code when possible. (Assuming quick delivery!)

The kernel module alone isn’t enough to measure performance events. In fact, the kernel module doesn’t even touch the counters. It merely flips a privileged hardware bit which lets user-space programs read and write the performance counters and control register. So, I have also written a few user-space C functions to configure, clear, start and stop the performance counters. An application program just needs to call a few functions to choose the events to be measured and start counting, to stop counting, to get the raw counts, and to print the event counts.

I have uploaded the source for both the kernel module (aprof.c) and the user-space functions (rpi_pmu.h and rpi_pmu.c). In addition, there is source for some utility functions that I like to use in benchmark programs (test_common.h and test_common.c). All of this is a work in progress and I will update the source when major enhancements or changes are made.

Speaking of source, I have found a way of organizing and storing source code through WordPress. WordPress is kind of security paranoid and doesn’t allow you to upload source code or even gzip’ed TAR files. I ran into this issue when I attempted to upload a make file and WordPress wouldn’t let me do it (with complaints about potentially malicious code and so forth). WordPress does let you post source for viewing, however.

So, I’ve added a Source menu item to the main menu. I want the menu structure below the Source item to operate like a browsable code repository. The first level of items below Source are projects, like the kernel module. The next level of menu items navigate into the source belonging to a project. Each make file and source file is a separate page. The source code is displayed using the SyntaxHighligher plug-in in order to keep indentation. No other formatting or highlighting is done just to keep things simple. I could cut and paste code from these pages, so I hope you can, too!

An introduction to performance tuning (and counters)

My latest page is an overview of performance tuning on ARM11. The Raspberry Pi is a nifty little Linux box, but it’s kind of slow at 700MHz. Therefore, I suspect that programmers will have an interest in tuning up application programs and making them run faster. Performance tuning is also a good opportunity to learn more about computer architecture and machine organization, especially the ARM1176 core at the heart of the Raspberry Pi and its memory subsystem.

The ARM1176 has three performance counters which can measure over 20 different microarchitectural events. One of these counters is dedicated to core clock cycles while the other two are configurable. The new performance tuning page has a brief overview of the counters and it has a table with the supported events.

The new page also describes two different use cases for the counters: caliper mode and sampling mode. Caliper mode counts the number of microarchitectural hardware events that occur between two different points in program execution. Caliper mode is good for measuring the number of data cache accesses and misses for a hot code region like a loop. The programmer inserts code to start counting at the beginning of the hot region and inserts code to stop counting at the end of the hot region. This is the easiest use case to visualize and to implement. It’s the approach that I’m taking with my first performance measurement software and experiments (a custom kernel module plus some user-space code). These experiments are almost finished and ready for write up.

Sampling is a statistical technique that produces an event profile. A profile shows the distribution of events across program instructions, routines, source lines, or modules. This is a good way to find hot-spots in a program where tuning is most beneficial. Sampling does not require modification to source.

Performance Events for Linux (informally called “PERF”) is the standard tool for program profiling on Linux. At the moment, PERF has a bug which prevents it from sampling hardware events. I’ve been looking into this problem, too, and hope to post some results. In the long-run, I want to post examples using PERF in order to help people tune up their programs on Raspberry Pi.