Genos voice editing: YEM

To date, my experience with Yamaha Genos™ has been generally positive. I’ve got a basic set of registrations set up for church tunes and I just converted the PSR-S950 registrations for rock, pop, jazz, funk tunes. Everything — customized styles, WAV files, and registrations — reside in the Genos’ internal memory.

Although some Genos players are reporting divots and a few serious bugs, my use has been quite reliable and error free. The shortcomings which affect me the most are related to drawbar organ (AKA “Organ Flutes”) functionality. I’ll cover that subject in a separate post.

The church registrations make use of left/right voice splits and layers. The Genos, like Tyros 5, breaks the keyboard into four zones/layers: LEFT, RIGHT1, RIGHT2, and RIGHT3. The RIGHTx parts allow two or three voice layers. If the LEFT part is turned off, the RIGHTx voices extend across the full keyboard. If the LEFT part is turned on, the keyboard is divided into LEFT and RIGHTx zones. The LEFT part plays only one voice (no layering).

The Genos allows considerable flexibility within this model. Please see the Owner’s Manual for details and configuration.

By and large, the LEFT/RIGHTx paradigm is sufficient to cover 90% of my needs. However, sometimes the hard split between LEFT and RIGHTx sounds unnatural. Consider a split with strings in the LEFT and oboe in the RIGHT. If the melody line crosses the split point, uh-oh, the melody shifts to the strings.

Now, it may be possible to avoid this issue through Genos ensemble voices, which are a big unexplored territory for me. I will look into ensemble voices eventually. As a synth guy, I’m used to addressing this issue through voice programming. In the synth world, one can have overlapping zones where both left and right voices are heard — usually good enough to fool the ear. Even better, features such as:

  • Level Key Follow Sensitivity
  • Amplitude Scaling

perform a blend across the split point. Think of this as a “horizontal cross-fade” similar to the “vertical cross-fade” which smooths the switch point between velocity levels.

None of these deep techniques is immediately available through the Genos user interface (UI). Genos voice editing reminds me of the TG-500 Quick Edit mode — a way to make fast voice-level changes (via “offsets”) which affect all of the underlying voice elements at once. Quick edit is not unique to Yamaha having seen and used a similar capability on Roland JV/XP gear.

Enter Yamaha Expansion Manager (YEM).

Having a PSR-S950, I nearly and dearly missed Yamaha Expansion Manager. YEM first supported the PSR-S970, S770 and Tyros 5 keyboards, now Genos. YEM is the means to make and install expansion packs. It also allows creation of new voices based on user waveforms (samples). On Tyros 5 and Genos, one can create new voices from preset voices of the “Regular,” “Sweet” or “Live” variety. Super Articulation voices cannot be edited or created via YEM.

My one brush with YEM was the implementation of the Scat Voice expansion pack for the PSR-S970, S770 and Tyros 5. YEM’s voice editing was sufficient to get the job done.

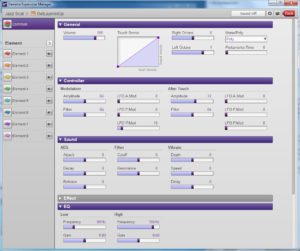
The screenshot below (click to enlarge) shows YEM’s Common voice parameters. YEM has all of the usual sliders and UI gizmos found in a typical computer-based synth voice editor. The Common parameters correspond to the Quick Edit parameters that are accessible through the Genos UI. These tweaks are also the high-level voice parameters found in Yamaha’s XG voice architecture.

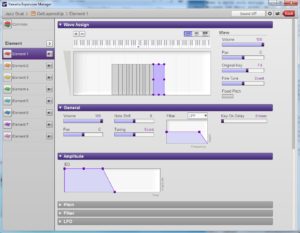
The next deeper level of editing adheres to Yamaha’s AWM2 voice architecture. I recommend studying the Motif documentation to learn more about the AWM2 voice architecture, including the Yamaha Synthesizer Parameter Manual. (All manuals are available directly from the Yamaha Web site.) Concisely, a voice consists of one to eight elements. Each element is a mini sample-playback synthesizer with its own waveform, amplitude, pitch, filter and LFO blocks. Through YEM, you can tweak parameters within these blocks as shown in the screenshot below.

When working with user samples, YEM provides access to the key banks which make up an element waveform. In the screenshot above, you can see twelve key banks laid out across the middle of the MIDI keyboard. Velocity for each key bank ranges from 1 to 89. This is a velocity-switched voice, so other elements handle the rest of the full MIDI velocity range of 1 to 127.

I want to mention two major shortcomings of YEM at this point:

  1. YEM does not provide vertical cross-fade to smooth the transition between velocity levels.
  2. YEM does not provide control over velocity sensitivity at the element level.

Lack of vertical cross-fade means a hard sonic change across velocity split points. Inability to control element-level velocity sensitivity prohibits construction of well-behaved Megavoice voices. Yamaha need to add these capabilities to YEM.

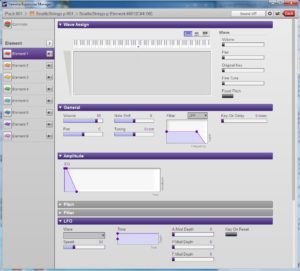
As I mentioned earlier, YEM allows Tyros 5 and Genos users to edit preset voices. The screenshot below shows the YEM screen for element 1 in the “SeattleStrings p” voice.

Wow, a big blank where we expect to see the key banks. YEM does not provide access to the individual key banks for the factory waveform assigned to an element. To some extent, this is understandable as they would need to extract and distribute a lot more detail about the factory waveforms with YEM.

However, Yamaha omit vital information:

  • What is the waveform name? A string section? A car horn? What?
  • What range of the keyboard does the waveform cover?
  • How is key amplitude scaling applied to the waveform?
  • How is key velocity scaling applied to the waveform?

These omissions significantly reduce the effectiveness of YEM. Yamaha need to add these capababilities to YEM.

The missing information is available in the Genos voice definition files (UVF) that are distributed with YEM. In my next post on the topic of Genos voice editing, I will describe how to find, access and change the missing parameters.

Copyright © 2018 Paul J. Drongowski

NAMM 2018: And now Yamaha

Yamaha have revamped nearly every model in its previous digital and arranger keyboard line:

  • PSR-S975 Arranger Workstation (MSRP: $2,599 USD)
  • PSR-S775 (MSRP: $1,699) Arranger Workstation
  • PSR-EW410 (MSRP: $599) adds Quick Sampling function – 5 samples (1 Key Follow type + 4 One shot/Loop type) 9.6 sec/sample (maximum) – and Groove Creator
  • PSR-E463 (MSRP: $479) adds Quick Sampling and Groove Creator.
  • KS-SW100 Compact Subwoofer (MSRP: $199) targeted for home keyboard players.

The PSR-S775 and PSR-S975 were announced a few weeks before the NAMM show. The all important Owner’s Manual, Reference Manual and Data List are now available for each model. These documents are very helpful when making purchase or upgrade decisions.

Yamaha are featuring the entire digital and arranger workstation line at Winter NAMM 2018, including the rather wonderful Genos flagship and the lower mid-range PSR-S670. Musicians looking for a MOXF successor will just have to wait a little bit longer.

Copyright © 2018 Paul J. Drongowski

100 percent Genos

Now that I’ve gotten past the busy Christmas season, it’s time for a quick Genos demo. And I do mean quick!

I was anxious to try the new Yamaha Genos™ FunkAltoSax and FunkBaritoneSax voices as well as the JazzFlute. All three are Super Articulation 2 voices designed for solo lines.

For alto sax, what could be a better test than Junior Walker’s “What Does It Take (To Win Your Love)” although Junior knocked this one out on tenor. It’s a fun tune to play although I still have difficulty with them triplets. That’s why he’s Junior Walker and I’m me.

So, about the backing track. It started life as a MIDI file purchased from Yamaha Musicsoft. Previously, working in SONAR, I selected new voices, etc. for the PSR-S950 and produced a mix without the (usually) awful melody part. The melody part is for me. Music minus one, great for practice.

Now, instead of SONAR, I copied the S950 MIDI file to the Genos and revoiced/remixed it on the Genos alone. Overall, mixing on the Genos went well. The only two hang ups were:

  1. Figuring out where the S950 “Song Creator” went, and
  2. Getting the Genos to apply and save the new voices, effects, levels, etc.

Song Creator is subsumed into MIDI Multi Recording (Reference Manual, Chapter 5). Even if you have the MIDI song in the Genos Song Player, you must explicitly import the MIDI song into MIDI Multi Recording. Maybe I did something wrong, but MIDI Multi Recording clears the song data when you first enter MIDI Multi Recording, as Genos assumes you’re creating a new song.

The other usage snafu is remembering to tap the multi recording Setup icon and to “execute” the set-up (Chapter 5, page 73). If you don’t execute, Genos does not change the existing Mixer settings (including new voices) when you save. I totally forgot about this aspect of the Yamaha UI because I usually prepare MIDI files in SONAR and do not mix on the arranger itself.

Yamaha, why-oh-why did you keep this skunky workflow? So many people get frustrated by this unnecessary execute step. Just commit the set-up as it is when you tap Save.

I found it very easy to fly around the Mixer making changes. Here is a table summarizing the S950 setup and the Genos setup:

    S950 voice/effect    Genos voice/effect
    -------------------  --------------------
    Strings              SeattleWarm
    Brass p              PopHornsSwell JS
    FretlessBass         ActiveFingerBass
    RockPiano            C7 WarmGrand
    AcousticKit          VintageOpenKit (Revo)
    Room reverb          Real Room (REAL REVERB)

I tried not to over-think the remix, choosing voices fast without a lot of A/B comparison. PopHornsSwell is OK; maybe I could have done better. The active finger bass, C7 and vintage open drum kit are all new to Genos.

The VintageOpenKit is a Revo drum kit with wave cycling. I didn’t need to remap any of the low MIDI notes due to a sound compatibility issue. (See Genos hi-hat happiness for more info about differences and potential issues.) This demo shows what Revo can do for a plain vanilla MIDI drum track. Like the rest of the mix, I didn’t do any tweaking and tweezing with the drum kit.

The Real Room reverb sounds better than the legacy Room reverb algorithm. I A/B tested the mix with the compressor ON and OFF. I left the master compressor ON (Natural preset) since it gave the mix more body. Overall, the track sounds more finished (studio-like) with the master compressor ON. The master EQ is flat. Maybe the mix would sound better with a mid-range scoop and a slight high/low boost?

Recording-wise, I jumped into Audio Quick Record, enabled recording, set a level, and tapped the play button. After a few false starts, I played the tune through — for better or for worse.

Here’s the finished Genos demo: “What Does It Take” (MP4/AAC). Enjoy!

Production talk aside, what’s it like to play? I can’t express the absolute joy it is to play the FunkAltoSax voice. Frankly, I don’t really care whether I sound like Junior (doubtful) or not, so much as engaging with the music and having fun within the moment. I’ve only had a few practice sessions with the ART1, ART2 and ART3 buttons; it helps to know a priori the instrument-specific articulation associated with each button. But, nothing — nothing — replaces the visceral thrill of scooping those sax wails and blasting the growl.

Man, it’s a good time. 🙂

Copyright © 2017 Paul J. Drongowski

Java note mapper (v0.1)

Here’s a little bit of Java code to brighten your day.

Two weeks ago, I described the additional hi-hat notes in the Yamaha Genos™ Revo drum kits. The hi-hat sounds replace noises like sequence click, etc. in the lowest numbered notes of the MIDI scale. Thus, a Genos factory style wheezes, zings and clicks when it is played on a legacy PSR or Tyros arranger workstation.

Quite a few people would like to try the new Genos styles, but the hi-hat notes pose a major barrier to conversion (i.e., porting a Genos style to legacy PSR/Tyros). Jørgen Sørensen’s Revo Drum Cleaner suppresses these sounds, but does not remap the Genos hi-hat notes to General MIDI (GM) standard notes.

That’s where note remapper comes in. Note remapper is an experimenter’s kit, not a finished tool. Jørgen (and Michael Bedesem) have written many rather nice tools for the PSR/Tyros arranger workstations. Note remapper gets the job done from the command line, so don’t expect a graphical user interface (GUI) or even a nice installer! It’s an experimenter’s kit.

However, what you do get is source code. Here is the ZIP file containing source, precompiled Java classses (executables), map files and examples.

What else can you do with note mapper? Well, note mapper operates on any Standard MIDI File (SMF). Thus, it’s not just a PSR/Tyros utility. Maybe you want to write a Java program of your own. The source code will give you a good starting point. Copy and modify to your heart’s content.

If you are into converting PSR/Tyros styles, take notice (pun) that note mapper changes both the MIDI note number and velocity according to maps in the files keymap.txt and velmap.txt, respectively. Therefore, you can also map to and from Mega Voices.

Interested? Then please read on. The following text is taken from the README files.

Description

This Java program maps the notes in a standard MIDI file according to a key (note number) map and a velocity map. Use it to map the Yamaha Revo hi-hat/drum sounds. Or, use it to map to and from Mega Voice. It’s all up to you and how you design your key and velocity maps.

The note mapper is launched from the command line (no GUI). There are two command line options:

   -v  Verbose flag
   -w  Write default keymap.txt, velmap.txt and hhmap.txt files

The -w option gives the user a quick start by writing a few default map files. Both -v and -w are optional.

The rest of the command line consists of an (optional) MIDI channel number and the name of the MIDI file to be mapped. The channel number must be an integer in the range [1:16]. Only notes in the specified channel are mapped. The default channel is 10 (the GM/XG drum channel).

The note mapper writes a new file named mapped.mid. It’s up to the user to rename or save this file. If the file in not renamed or saved, it will be overwritten when note mapper is run again.

The note mapper assumes there are two files, keymap.txt and velmap.txt, in the working directory where the note mapper is launched. The note mapper reports an error if it cannot read these two files. The default key and velocity maps preserve the input; the input notes are sent to the output without change.

A map file consists of 128 positive integers in the range [0:127]. Each integer defines how its corresponding note or velocity value is mapped to a new value. Essentially, each integer in the file is loaded into a 128 byte map array indexed by either the incoming MIDI note number or the incoming MIDI velocity value.

The hhmap.txt maps the Revo hi-hat note numbers to General MIDI hi-hat note numbers.

    Revo notes        GM notes
    -------------     ----------------
    13 14 15 16   --> 42 Hi-Hat Closed
    21            --> 44 Hi-Hat Pedal
    17 18 19 20   --> 46 Hi-Hat Open
    22            --> 55 Splash Cymbal

The Examples directory contains two example Genos styles. Be sure to read the READ_THIS.TXT file in that directory, too!

Example command lines

Map the notes for channel 10 in the MIDI file named “Mr.Soul_factory.T552.mid”.

    java MapNotes 10 Mr.Soul_factory.T552.mid

Write the default keymap.txt, velmap.txt and hhmap.txt files before mapping:

    java MapNotes -w 10 Mr.Soul_factory.T552.mid

The default keymap.txt and velmap.txt files do not change/map notes, i.e.,
they are the “identity mapping.”

How to use note mapper to change a style

To use the note mapper on a style, you must split the style into its MIDI and non-MIDI parts using Jørgen Sørensen’s Split/Splice tool. Note mapper, like most commercial MIDI tools, does not recognize or retain non-MIDI data. Thus, you need to run the style through Split/Splice to save the non-MIDI information.

After splitting the style, run the style through the note mapper. The note mapper writes a file named “mapped.txt”. Splice mapped.txt with the non-MIDI data produced in the preceding step. Splicing the mapped MIDI data with the non-MIDI data produces a complete style file (MIDI+CASM+OTS).

Transfer the style file to your PSR/Tyros and revoice the style parts, test the style, edit the OTS, and so forth.

If you don’t like how the mapped file sounds, then you can reuse the non-MIDI data and do another map/splice, assuming that you didn’t modify the OTS.

Compiling

The distribution comes with source code (*.java files) and precompiled class files (*.class files).

You can, of course, modify the source code and recompile. You need the Java development kit which includes the Java compiler, package definitions, and so forth. To recompile, just enter:

    javac MapNotes.java
    javac NoteMapper.java

I have included source for a quick and dirty MIDI file dumper:

    javac QuickDumper.java
    javac QuickDump.java

You may prefer to dump MIDI files using one of the much better tools written by Jørgen Sørensen or Michael Bedesem. See:

The Examples directory

The Examples directory contains two example styles: Mr.Soul and SoulSupreme. Each style has several files, so here’s a little guide.

    Mr.Soul_factory.T552.prs    Original Genos factory style
    Mr.Soul_factory.T552.mid    Original Genos MIDI part
    Mr.Soul_factory.T552.nmi    Original Genos non-MIDI part
    Mr.Soul_mapped.T552.mid     MIDI with mapped hi-hats
    Mr.Soul_mapped.T552.sty     New style file with mapped hi-hats

The *.class files are the Java executable files. Example command line:

    java MapNotes 10 Mr.Soul_factory.T552.mid

The note mapper produces a file named “mapped.mid” which you may rename to something else, e.g., Mr.Soul_mapped.T552.mid.

keymap.txt and velmap.txt are the key (note number) and velocity map files needed by note mapper. hhmap.txt is my initial hi-hat note map.

Workflow

The overall workflow is:

               Mr.Soul_factory.T552.prs
                          |
                          |
                          V
              Jørgen's Split/Slice (split)
              |                          |
              |                          |
              V                          V
  Mr.Soul_factory.T552.mid   Mr.Soul_factory.T552.nmi
              |                          |
              |                          |
              V                          |
         Note mapper                     |
              |                          |
              V                          |
      Rename mapped.mid                  |
              |                          |
              V                          |
  Mr.Soul_mapped.T552.mid                |
              |                          |
              |                          |
              V                          V
             Jørgen's Split/Slice  (splice)
                          |
                          |
                          V
               Mr.Soul_mapped.T552.sty

Copyright (c) 2017 Paul J. Drongowski

Genos: Hi-hat happiness

If you’re following all of the Genos™ hoopla, you know that Revo! drums are one of the major features extensively advertised by Yamaha. You probably know that Revo (I’m dropping that darned exclamation point 🙂 ) drums use wave-cycling to to help remove the mechanical, robotic sound of MIDI drum and percussion parts.

All true.

Revo drums also offer one additional major feature which, in skilled hands, can fend off the MIDI robots: hi-hat drum instruments that help you mimic all of the crazy stuff that drummers do.

Some of us first noticed the new hi-hat sounds while converting Genos styles to other Yamaha arranger keyboards like the Tyros 5, PSR-S970, PSR-S950, etc. Yamaha styles are actually Type 0 Standard MIDI Files (SMF), consisting of a normal MIDI part (regular old SMF MIDI data) and non-MIDI parts (CASM to handle note transposition and OTS to select RIGHT1, RIGHT2, … voice sets on the fly). Whenever a new Yamaha arranger keyboard like the Genos comes along, there is a cottage industry backporting new styles to old axes.

If one installs and plays a Genos style on, say, the PSR-S950, and the style uses a Revo drum kit, you’re entertained by a percussion track that sounds like a Spike Jones novelty tune or a Benny Hill episode. Bells, scratches and other mayhem. What’s up?

For answers, check out the Genos Data List file, a downloadable PDF published and distributed by Yamaha. The Data List file contains the drum kit layout (i.e., how the MIDI note numbers are assigned to individual drum instruments/samples) for all of the drum kits. Many Yamaha drum kits to date approximately follow the note-to-drum instrument layout of the so-called “Standard Kit.” The lowest notes (C#-1 to E0, MIDI note numbers 13 to 28) are sounds like scratch, sequence click, click noise, etc. The highest notes (C#5 to G6, MIDI note numbers 85 to 91) are silent, i.e., no instrument is assigned.

Jump to the new modern age and the Revo “Rock Drum Kit,” for example, assigns ten hi-hat instruments to the notes C#-1 to A#-1. The Rock Drum Kit also assigns four snare drum variations to notes C#0 to E0. The rest of the Revo Rock Drum Kit follows (roughly) the Standard Kit layout.

The Genos styles make use of the new hi-hat and snare instruments assigned to the lowest MIDI note numbers. When a Genos style is played on an old non-Revo keyboard like the S950, the notes bark, ring and wheeze.

Before moving on, I should mention that assigning drum instruments to the highest note numbers is not a new practice for Yamaha or any other vendor, for that matter. Contemporary electronic and dance styles are percussion-rich and the corresponding Yamaha kits often have instrument variations and other fun sounds in the “north country.” Revo drums continue this practice for electronic- and dance-oriented kits.

Back in the day

Even keyboard players are remotely familiar with the real-world hi-hat instrument. The hi-hat is that pedal thing with two opposing cymbals, one platter above the other platter. The pedal controls the top platter, closing the gap between the platters or leaving them apart in the open position.

To appreciate the new Revo world, let’s look back to the MIDI Standard Kit. Drum kits which follow the Standard Kit form have conventionally offered three hi-hat (HH) sounds:

  • Hi-Hat closed
  • Hi-Hat pedal
  • Hi-Hat open

That’s just enough to cover basic hi-hat territory. HH closed is a bright chick or tick. HH open is shimmering and sustained like a ride cymbal. HH pedal is the sound of the pedal closing after being struck.

What drummers do

The top cymbal area is divided (roughly) into three parts: the bell near the center, the edge, and the region between the bell and the edge.

Regular hi-hat sounds are played using the tip of the drum stick hitting the top cymbal somewhere between the bell and the edge. The area closer to the bell has a brighter sound (high frequency tone). Drummers strike the cymbal edge for accents, striking with the thick part of the stick shank (the “shoulder”). Hard rock and metal tend to whack the edge no matter what in order to get an open slushy sound.

Open hi-hat is usually played with the tip on the top of the upper cymbal. For most genres, drummers want a crisp, clean sound. A drummer might hit the edge of an open hi-hat when they want the hi-hat part to stand out in the mix or they want an accent.

As I mentioned, the pedal closes the hi-hat cymbals. Drummers snap the cymbals together as part of their timekeeping (maybe to emphasize quarter notes, for example). It’s not just a binary choice (open/closed), however. Drummers apply more or less foot pressure in order to change the sound, even when the hi-hat cymbals are closed!

Then there are special techniques like choking the hi-hat. The drummer holds the cymbals tight with the pedal, opens the cymbals just before striking the top cymbal, and then quickly clamping the cymbals closed again.

Drummers sometimes look for extra sizzle in the open position and hang a light chain (or other random object) on the top cymbal. Want a completely different tone? Play the hi-hat with brushes or mallets.

Well, combine all of these techniques and the hi-hat is one expressive instrument! The three MIDI Standard Kit sounds don’t even begin to capture the full range of the hi-hat. With all of these playing techniques, the hi-hat has a dynamic sound; it’s no mystery why MIDI hi-hats sound robotic.

This is where Revo comes in.

If you want to learn more about hi-hat playing technique, search the Web. There’s a lot of free info out there. Knowing about real-world instruments is essential knowledge for arranging and orchestration.

What Revo offers

Wave cycling is important, but it only takes you half-way to hi-hat Nirvana.

Here is a table of the new hi-hat instrument sounds in the Genos Revo Rock Drum Kit:

                                     Alternate
Note# Note  RockDrumKit                Group
----- ----  -----------------------  ---------
   13 C#-1  Hi-Hat Tip 00 RD            64
   14 D-1   Hi-Hat Edge 00 RD           64
   15 D#-1  Hi-Hat Tip 10 RD            64
   16 E-1   Hi-Hat Edge 10 RD           64
   17 F-1   Hi-Hat Edge 25 RD           96
   18 F#-1  Hi-Hat Edge 50 RD           96
   19 G-1   Hi-Hat Edge 75 RD           96
   20 G#-1  Hi-Hat Edge 99 RD           96
   21 A-1   Hi-Hat Pedal Closed RD      64
   22 A#-1  Hi-Hat Pedal Splash         96

Even better, the hi-hat instruments (except the splash) use wave-cycling, i.e., there are multiple samples per instrument. The old school hi-hat MIDI note numbers are assigned to Revo sounds in the following way:

                                                Alternate
Note# Note  StdKit     RockDrumKit                Group
----- ----  ---------  -----------------------  ---------
   42 F#1   HH Closed  Hi-Hat Edge 00 RD            1
   44 G#1   HH Pedal   Hi-Hat Pedal Closed RD       1
   46 A#1   HH Open    Hi-Hat Edge 75 RD            1

Given the new-to-old school assignment, I interpret the number in the instrument (sample) name to mean “how open the cymbals are.” This value is the distance between the cymbals where “00” is closed and “99” is open. Warning! I may be totally wrong as Yamaha have not explicitly defined the meaning of the number in the Data List.

Here’s a few more new-to-old school hi-hat MIDI note assignments:

 # Note StdKit PopDrumKit             VintageOpenKit         JazzStickKit
-- ---- ------ ---------------------- ---------------------- ---------------
42 F#1  Closed Hi-Hat Edge 00 PD      Hi-Hat Tip 00 VO       Hi-Hat Edge 00 JS
44 G#1  Pedal  Hi-Hat Pedal Closed PD Hi-Hat Pedal Closed VO Hi-Hat Pedal Closed JS
46 A#1  Open   Hi-Hat Edge 75 PD      Hi-Hat Edge 75 VO      Hi-Hat Edge 99 JS

The closed position is “00” whether the hi-hat is played on the edge or tip. The open position is either “75” or “99”.

These assignment tables suggest a starting point when converting Revo drum parts in Genos styles or songs to legacy, non-Revo kits, e.g., PSR-S950 kits. (More below.)

The Alternate Group controls how an incoming hi-hat note affects an on-going hi-hat sound. Here’s the description from the Yamaha Genos Data List:

  • 1 to 95: Playing any instrument within a numbered group will immediately stop the sound of any other instrument in the same group of the same number.
  • 96 to 127: For these numbers, playing within a specific numbered group will NOT stop other instrument sounds in the same group number. However, the sound of instruments within these numbers are stopped when playing any instrument of a group whose number is that minus “32.” For example, the sound of an instrument numbered “96” will be stopped by playing any instrument numbered “64.”

Revo in action

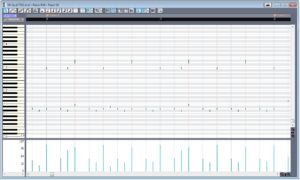
The image below is a snapshot of the MAIN B section in the Genos “Mr. Soul” style (MP3). [Click image to enlarge.] The DAW is SONAR, which names notes from zero instead of Yamaha’s -2. Subtract 2 from the SONAR note name to get the Yamaha note name.

Section MAIN B plays the following notes and hi-hat instruments in the Revo Rock Drum Kit:

Note# Note  RockDrumKit                 Standard Kit
----- ----  -----------------------     ------------
   13 C#-1  Hi-Hat Tip 00 RD        --> HH Closed
   14 D-1   Hi-Hat Edge 00 RD       --> HH Closed
   15 D#-1  Hi-Hat Tip 10 RD        --> HH Closed
   16 E-1   Hi-Hat Edge 10 RD       --> HH Closed
   17 F-1   Hi-Hat Edge 25 RD       --> HH Open

Section MAIN C starts off with F#-1 Hi-Hat Edge 50 RD. The other drums instruments are:

Note# Note  RockDrumKit                 Standard Kit
----- ----  -----------------------     ------------
   35 B0    Kick 2 RD               --> Kick Tight
   38 D1    Snare 1 RD              --> Snare
   39 D#1   Clap Power              --> Hand clap

These notes carry the kick, snare and clap pattern.

When converting this style to a legacy kit, the kick, snare and clap pattern map to corresponding instruments in the Standard Kit. For the hi-hat, I would first try the mapping shown above for the Revo hi-hat notes. Conversion, though, pretty much sucks the Anton Fig right out of the pattern.

I hope you enjoyed this mini-tour through the Revo drum hi-hats and I encourage you to explore the other extensions in the new Genos drum kits. Yamaha have added variations for snare, brushes, and other drumming techniques. Like the SArt2 acoustic instruments, Genos is a ready-to-play, sample library. The Revo additions greatly enhance the realism of Genos styles. Revo — it’s more than wave-cycling.

Once I get a Genos, or even access to a Genos, I will add audio examples of the individual Genos hi-hat sounds. Meanwhile, give the “Mr. Soul” MP3 a listen

Copyright © 2017 Paul J. Drongowski

A few after action thoughts

A few more thoughts after writing my Genos snap review

Articulations are gonna take practice

The Yamaha Genos™ is a mini, ready-to-play, orchestral library. The player has a large number of physical controllers including joystick, articulation buttons and aftertouch. This is what draws me to Genos.

One big take away: exploiting all of this capability is going to take practice, practice, practice.

Fortunately, the Genos has a few features to ease the process.

The DEMO touch button is your friend. Each voice has a DEMO button that plays a musical phrase. The phrase typically triggers one or more articulations. The appropriate front panel button (ART1, ART2, ART3) lights up when the associated articulation is triggered.

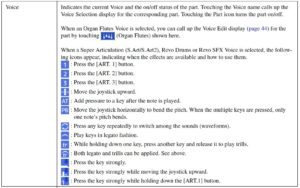
Another helpful feature appears in the Voice Part Setup display. (Hit the front panel VOICE button to go there.) Genos displays a small icon next to the voice name for each available articulation. [See image below. Click to enlarge.] It’s a way to learn quickly what to try or do.

The Genos Data List PDF is another helpful resource. The Data List has a table of all Super Articulation 2 (SArt2) voices, including the articulations supported by each voice.

Reflections on my technique

It really is humbling to record yourself and listen to the playback.

I recorded my noodling and doodling while evaluating the Yamaha Genos. There were a few decent moments in the two hour recording and a number of musical divots:

  • Lost the beat when my left hand ran out of keys in the lower split.
  • Playing certain instruments (e.g., oboe) beyond the comfortable, natural range of the acoustic instument.
  • Pointless, wandering improvised solo lines.

The first two divots are partially due to unfamiliarity with the split point and positioning of the left and right hand voices. In retrospect, I didn’t drop the left hand voice an octave (via the Genos MIXER panel) and wound up playing the bass line quite close to the lowest keys. This problem is easily fixed technically when programming splits and layers for actual use. (Once I get a Genos. 🙂 )

Without setting the left hand range properly, I’m playing away and, suddenly, my little finger is hitting the end cheek (or whatever that inert block of plastic or metal is called). That moment of frustration just enough to throw me off tempo. (The huge reason why I hate 37-key keyboards.)

Playing outside the natural range of the acoustic instrument is mostly on me. I wanted to test the full range of the oboe (for example) and that was a deliberate choice. I usually assess a musical score ahead of time to determine if and when I can play a higher oboe line. However, a big “however,” I know there are times when I botch this — live in front of a congregation. My face flushes and I desperately think about how I am going to gracefully get myself out of the situation.

The third divot is all on me. Alot of my improvisations were down right embarrassing — solo lines that made noise and went nowhere. Some of the meandering was due to the Genos evaluation — pushing buttons to change a voice or randomly flogging the articulation buttons to see what they would do. However, some of the meandering is due to distraction and lack of engagement in what I was playing.

Self-reflection led me to a few rules that I need to follow when improvising:

  • Be full engaged with the music.
  • Don’t become distracted by the technology while playing.
  • Be deliberate. Play with authority. Don’t be tentative.
  • Play with intention.
  • Have a musical guide.

The best moments in the recording are when I was fully engaged with either the score or the backing track. I can sense this while listening. Without engagement, I’m a dead duck and I should just kick back and comp in sync with the beat. (Of course, comping requires a level of engagement, too!)

Being deliberate goes along with engagement. When you’re deliberate, you’re involved. It raises the energy level and mental concentration. All good.

The notions of intention and having a musical guide are very important. Intention means having a message and a direction. Know where you’re going and what you want to say. Otherwise, it really is random noise, even if it’s played in the pocket.

By “musical guide,” I mean a lead sheet or other kind of score. The lead sheet may be mental rather than paper. It’s a structure. With the structure in place, you can make the changes and play around the melody. It’s no wonder that many jazz improvisations start and finish with a head.

I hope these reflections help you out while I hope that I live up to them myself.

Let’s talk money

It always comes back to the money. 🙂

The Genos is not a cheap instrument. A large part of its cost is the research and development that went into the instrument. Yamaha outdid themselves with new SArt and SArt voices. (Yamaha finally broke the waveform memory barrier imposed by their previous generation hardware.)

However, let’s be rational about the price and strategize. Nobody pays MSRP (list price) for a car and you’re not going to pay list. Everyone advertises the Minimum Advertised Price (MAP), $5,499.99 in the United States. If you put in modest effort, you’re not going to pay MAP either.

Don’t just click “Add to cart.” Call. Don’t just call big on-line retailers. Support small dealers. That’s “deal-er.” Aside from good customer service, this is one of the main reasons why I call Audioworks CT.

You may choose to buy Genos somewhere else, but a little bit of phone shopping can save you rent money.

Copyright © 2017 Paul J. Drongowski

Genos: First contact (snap review)

Before I dive into Yamaha Genos™, I need to send a big shoutout to Frank Ventresca of Audioworks CT. I tested and bought my PSR-S950 from Audioworks CT. I’m ba-ack, having had a good experience the first time — largely due to Frank’s customer service. If you’re interested in trying and buying an arranger keyboard, I recommend visiting Audioworks CT and/or giving Frank a call.

For me, it’s about 140 miles one way from home to Audioworks CT. Preparations are similar to getting ready for a long day hike — only with sheet music instead of boots. The long car trip means that testing time is limited. I try to hit the driving sweet spot between morning rush on I-495/I-290 near Boston and the afternoon rush from New Haven and Hartford, leaving me about two hours to play.

After arriving at Audioworks CT, I found a three tiered stack: Yamaha Montage, Korg Pa4x and Yamaha Genos, from top to bottom. Thanks to a tip from Stephen on the PSR Tutorial Forum, I expected to see the Pa4x. With that foreknowledge, do I A/B the Genos and the Pa4x? I chose to focus solely on the Genos given the two hour window for testing. Frank, BTW, invited me to stay longer, but I knew that I needed to avoid traffic Hell later in the day.

I warmed up while Frank finished a business meeting. No music stand, so I used the Pa4x as a very expensive music rest. Once Frank was available, he quickly installed the Genos music stand.

I decided to listen through headphones rather than use Audioworks’ house system. It’s a good system, but I decided to go with my usual, lightweight headphones (Roland RH-7A). Headphones also freed up the LINE OUT which I connected to a Roland MicroBR digital recorder. This setup let me hit record, play and forget.

At the time of this writing, I pulled a few snippets among the noodling and posted them here. I’m trying to get my first impressions down fast and don’t want audio production to get in the way of my initial thoughts.

Before recording, I set the Genos EQ to flat and turned off the master compression. Audio is recorded direct to MP3 (192 kbit/sec). Not the best quality, but I was afraid of overrunning the rather small SD card in the MicroBR. After setting initial levels, I tried to forget that the MicroBR was there and that the red light was ON.

It’s humbling to listen to my noodling. Hats off to everyone’s main man Katsunori UJIIE, who seems to rip this stuff effortlessly!

Genos is an instrument

One shouldn’t have to say this, but the Genos is an instrument in the same league as Montage or Kronos. With the limited time available, I concentrated on Genos as a performance instrument first and as an arranger keyboard second. This approach is consistent with my musical priorities: church gig first, fun and possibly one man band (OMB) second.

As a liturgical musician, I play with a pianist on acoustic piano and a 12-string guitar. That’s a lot of rhythmic content right there. Much of what I play complements piano and 12-string guitar. Subconsciously, I fill in and hear these missing parts when practicing. Hopefully, you will fill in this context, too. If and when you hear the audio snippets, I’m playing fuller than I would with the group. There is always a tendency to “be the whole band” when playing alone. Apologies in advance.

The focus is on emulation of acoustic instruments, orchestra and pop. You won’t hear any synth and given the short trial time, you won’t hear many styles (unfortunately).

The FSX keyboard is a more robust keybed than the PSR-S950. The FSX action is heavier. You do get what you pay for. The FSX affords aftertouch; the S950 does not.

The Genos has three front panel articulation buttons to trigger voice articulations. The voice display shows the available articulations for each selected voice. (Nice.) The voice display also shows a drawbar icon for organ flute voices. Touching the drawbar icon brings up the drawbar display. (Extra nice.) I made extensive use of the voice DEMO touch button in order to play and sort through voices quickly.

The user interface is responsive. I didn’t get a sense of lag as reported by other players. I discovered that the MENU front panel button is your special friend. It brings up two pages filled with touch buttons leading to all internal settings. It’s kind of a “site map” for the Genos.

Strings

The Genos is like having a compact orchestral sample library in a portable, immediately playable keyboard. Think Garritan Personal Orchestra.

There are two major options for strings in addition to legacy voices: Kino strings and Seattle strings. The Seattle strings first appeared in the Tyros 5 before they were explicitly identified and advertised in the Montage. The Kino strings have a different character and the violin sections are panned separately left and right. Both options have multiple bowing and playing techniques (legato, spiccato, pizzicato) plus articulations. The options are also broken out into sections as well as the standard ensemble voices.

The Kino strings have more power and are more in your face than the Seattle strings. Dare I say, more bow? Where is Dave Stewart when you need him? (This review would be wittier if written by Dave Stewart, too.)

The voice DEMO feature is really handy when approaching a deep keyboard like Genos for the first time. I quickly settled on the “warm” variation of the Kino strings and Seattle strings. Either choice (Kino Seattle) would work as a bread and butter ensemble patch. I give the edge to Seattle because, well, they would sit better with piano and acoustic guitar, given our repertoire. Tyros 5 people, hold up your heads with pride.

With the loss of our group’s flutist, I’m play a lot of exposed solo lines using violin, oboe and flute. The Genos offers four Super Articulation 2 solo voices: Celtic Violin, Jazz Violin, Classical Cello and Pop Cello. The Celtic Violin is a good fit with our liturgical repertoire. The Genos cellos are quite good, definitely a big cut above the MOX6 that I currently play. I wish that I had more time to check out the cellos.

Meta-comment: Exploiting the Genos, especially its articulations and ensembles — will require practice, practice, practice.

Woodwinds

In the case of woodwinds, I need both ensemble voices (or layers) and solo voices (mainly oboe and flute). The Genos does not disappoint in either category.

I quite easily built and tried a few layers. It wasn’t difficult to create a workable reed plus horn layer — another bread and butter, every Sunday patch. Less is often more. It isn’t necessary to layer up a preset woodwind ensemble with French horn; sometimes a mellow oboe or clarinet will do.

The Genos has two SArt2 oboes (classical and pop) and an SArt “MOR Oboe.” The Classic Oboe is bright and thin, able to cut through strings. For exposed lines, I would prefer the Pop Oboe or MOR Oboe voices that have a warmer, fuller sound.

The SArt2 Classical Bassoon and Pop Bassoon are quite pleasant without moving into comedic territory. (Peter and the Wolf.)

Brass

The Genos has a mess’o’horns and classical brass. Symphony horns are quite useful in liturgy as pads and mid-range filler. Fanfare brass is too much except for the obvious holidays when all sorts of sonic mayhem can be let loose. The Genos has a wide range of horns from mellow to a brighter more open tone.

The brasher instruments (trumpet and trombone) are available solo and in sections. All quite good. Trombones are especially useful due to their wider range and deeper timbre.

The demo phrases for certain brass voices are way hotter level-wise than the strings or woodwinds. I had to adjust the audio record level way down to prevent clipping. Unfortunately, this affected the level for everything else that I recorded during the day. Sorry, I just spaced out and didn’t reset the level. (Argh!) So, you may need to adjust the audio volume at your end.

Drawbar organ

Huh? That’s not classical. Our church means gospel and a little Hispanic music, too.

I enjoyed getting into the Genos drawbar organ. There’s no undiscovered clone killer here, but Yamaha’s drawbar emulation will work in a lot of churches (and stages, too). I’m already quite familiar with Yamaha’s emulation having played both the MOX and PSR-S950.

The physical drawbars are a treat. The knobs are shaped like, er, classic drawbar knobs. The bars can be changed and played in real time, something that I miss on the MOX and to a large extent, the S950. If you select a preset, the physical position of the sliders does not directly relate to the sound, of course. The sliders are not motorized. When a slider is moved, it won’t change the sound until the slider “catches” the current internal bar value. That’s why Martin Harris “warms up” the sliders before playing the bars in his demo videos.

The new rotary speaker simulation is an improvement, but won’t knock the Neo Ventilator from its perch. Here, Yamaha have some work to do immediately:

  • The Drive parameter doesn’t seem to have any effect on the sound. (Thanks to Uli from the PSR Tutorial Forum for pointing this out.) Pushing the Drive to 10 doesn’t add any overdrive.
  • As mentioned in an earlier post, the rotor slow/fast and fast/slow times cannot be adjusted; only the horn (de)acceleration times can be adjusted.

Yamaha needs to fix these divots.

The rotary speaker sim is set too fast out of the box. This gave me a chance to dive into the DSP effect editing menus. I made the changes without too much difficulty and without a manual. Good job. I just wish that I could change the rotor (de)acceleration times, too.

This seems to be a good place to mention that sound programmers universally tend to set the times too fast, especially the ramp times. Players love it when it takes a while for those old, vintage belts and pulleys to spin the rotor/horn up and down. A lot of real B-players habitually hit the half-moon switch to keep the Leslie in its intermediate, changing state. Watching Gregg Allman do this in 1971 was a revelation that stuck with me for a lifetime!

Wot? No pipe organ? Genos carries over the quite excellent handful of pipe organ voices from Tyros 5. They’re good. Move along.

Pop instruments

Now that the main job is done, it’s time for the funk and blues.

You probably noticed by now that I haven’t said anything about the CFX and C7 acoustic pianos. You’re right and you won’t hear another word about them from me. They’re covered elsewhere, everywhere.

I did try the Suitcase Rhodes (oh, why this charade about names?), the Wurlitzer and the Clav. All will do the business. The Suitcase is still waaaay too polite for my taste in fusion. Think the fuzzed out bliss of “Mahavishnu.” That’s a 70’s Rhodes.

The SArt2 Funk Alto Sax and Funk Baritone Sax are welcome additions. I look forward to exploring those. The Jazz Flute sounds good to my ears and has interesting articulations. The Classical Flute can jam, too.

I took a listen to the new Active Bass (Music Man Stingray?) Sweet. Should provide new options when sequencing.

Then there’s the mess’o’guitars. I presume that 50’s is Telecaster and 60’s is Stratocaster? With all the DSP at hand, the electric guitars are instant “tone” with all of the right pedal-board effects dialed in. The jazz guitar sounds good. I often reach for jazz guitar when playing pop. (Need more technique, though. Practice, practice, practice.)

The sax and brass demos start out with the new funk saxes. The rhythm section demo includes Suitcase Rhodes, Wurli, Clav, CP80, Active Bass, electric guitars and jazz guitar.

Styles

At this point in the day, my ears and hands were getting trashed. I was hoping to try the styles that have been getting short shrift in on-line videos. Given the time that was left, all I could hit was “Mr. Soul” and “Soul Supreme” with the old chestnut “Acoustic Jazz” thrown in. All good for a fun-time jam.

Neither style was harmed by playing over them. I did jam quite a bit and got a decent Fishbelly Black organ tone out of the drawbar organ and rotary sim. Oh, happy day!

Workflow

You should be able to sense my time urgency at this point because my comments are getting shorter and shorter.

I played along with a few MIDI and WAV audio songs in order to assess the workflow for OMB. Even without playlists and registrations, the Genos has a much smoother workflow than the Montage in this regard. Montage designers should take note because many Montage players incorporate audio and MIDI tracks into their performances, too.

I botched a chance to try Revo drums with a MIDI file. I brought the USB drive that contains my WAV audio and MIDI backing tracks. I played along with “Just My Imagination,” a track that suffers from extreme “machine gun” drum rolls. Darn, with time pressing, I forgot to re-voice the file with a Revo drums kit! Bummer.

Summary

Genos is waaaaaay too much for two hours. Two weeks, two months, maybe.

There you have it. Genos? Yes, I played one. As you can tell from this quick review, I’m more enthusiastic than ever about Genos.

Need more information about Super Articulation voices? Please look here.

Copyright © 2017 Paul J. Drongowski

Genos: Position and promotion

The first public European demos started over the weekend. I’ve been watching Peter Baartmans and Sander Tournier put the Genos through its paces.

The whole experience has me thinking about how the Genos is being positioned in regional markets, mainly, western Europe versus North America.

First off, the arranger keyboard culture is completely different in Europe than the United States. Arranger demonstrations are big public events. One recent demo had over 500 attendees in the audience. In some venues, audience members buy tickets! This is unimaginable in the United States (except iPhone).

The European demos show off a broader range of styles. In this aspect, I’m comparing the European demos with videos made for American retailers (Guitar Center, Sweetwater, and Kraft Music). The European demos cover everything from jazz to rock to EDM to classical to traditional European pop. For the latter, think outdoor cafes and biergartens where you can spend hours with a few hundred like-minded souls. Not to mention that acquired taste, Schlager. (And that’s not a beer!)

The American demos concentrate on contemporary musical genres and styles. The Genos has new acoustic and pedal steel guitars, so Nashville and country get special emphasis. Martin Harris highlights the Kino strings coming more from a cinematic or singer-songwriter perspective. These are customers that Yamaha hopes to hook in North America. With all of its articulated sounds, the Genos is a mini-library of sampled instruments both pop and orchestral.

The American videos avoid any whiff of cheese. Unfortunately, many American listeners regard (too) many musical styles as “cheese” and the typical Guitar Center clientele are the worst offenders. Thus, you won’t hear traditional European pop in a video targeted for American retailers. In the U.S., arranger keyboards are regarded as the evil spawn of the cha-cha home organ. After playing Montage and hearing the Genos demos, a lot of folks need to adjust their thinking.

Yamaha run a risk, here, because on-line media is world-wide. I’m thinking about the videos for the Dexibell drawbar organ. A few people saw one video which didn’t fit their musical taste and bad-mouthed the Dexibell to high Heaven. They never moved on to the other videos which had some very tasty jazz.

At this point in the Genos launch, it’s a little difficult to dig out the deeper jazz, soul, R&B, and funk possibilities of the Genos. You need to wade through a lot of video to even get a sniff.

The customer base for high-end arranger keyboards is aging. Even the European audiences have a lot of “gray heads.” (I’m getting grayer by the day, too. 🙂 ) Yamaha and its dealers want to entice a younger crowd with arranger keyboards. But, they have a dilemma. A young person today does not have the disposable income for a $5,500 (USD street) keyboard, especially when they can make music with their smart phone, tablet or laptop. The entry price to EDM, for example, is much lower than the price of a Genos.


[Source: Yamaha Easy Product Guide, 2017; Click to enlarge.]

Yamaha led the Genos campaign with EDM. This gave the Genos a youthful cachet, but alienated many people in the historical customer base for high-end arranger product. Folks wondered, “Did they drop the big band styles?” However, let’s say that Yamaha did put a schmaltzy big band tune into the Guitar Center video. Instant turn off. Personally, I wouldn’t mind a big band tune. I grew up listening to Glenn Miller and Benny Goodman, but that was my father’s music. (BTW, I respect that music; I just don’t play it.) Most people can’t look beyond the end of their own musical nose.

So, where do Yamaha find customers with sufficient disposable income and maybe the time and interest? Back to the 80s! The Genos has some excellent styles that allow note-for-note covers of famous 1980s pop and rock, including synth-heavy 80s pop. We all tend to relate emotionally to the music of our teen years and early 20s. Let’s take 1985 as the midpoint, subtract 20 years and look to people born around 1965 or so. They were teens when 80s music was happening. Thus, Yamaha are targeting people in their late 40s and early 50s — old enough to have the disposable income for a high-end arranger while young enough to rebuild the aging customer base.

Well, I hope this ramble has given you a different perspective on Genos and arranger keyboard marketing. The Yamaha demos are carefully designed and scripted to appeal to target market segments. Where do you fit?

Copyright © 2017 Paul J. Drongowski
First look at new Genos effects

New Genos effect algorithms

To my way of thinking, Genos/Tyros/PSR DSP effects consist of two parts: an effect algorithm and sets of preset parameters for the algorithm. That’s my mental model. Genos adds a number of new effect algorithms and effect presets versus Tyros 5. Here is a terse summary of the additions:

  • Reverb block
    • New presets with enhanced mid-range
  • Chorus block
    • Tempo delay, tempo echo and tempo cross delay added
  • Insertion/variation blocks
    • New distortion effects (not included in Montage)
      • Tweed Guy: Vintage bass amp simulator
      • Boutique DC: Boutique made overdrive amp simulator
      • Y-Amp: Preamp & amp simulator for Guitar
      • Distomp: Preamp & parametric EQ simulator for Guitar
      • 80s Small Box: 80s distortion pedal simulator
    • New EQ & compressor effects
      • Uni Comp: Compressor using “downward” algorithm for making loud sounds quieter
    • New modulation effects
      • Real Rotary (Same as Montage minus horn acceleration parameters)
    • New miscellaneous effects
      • Damper Resonance:Simulates a damper resonance effect for grand piano (same as Montage)
      • Presence: Brings out the hidden presence of the input signal
      • Tyros 5 Loop Fx and Lo-Fi Drum effects moved to “Misc” category

BTW, it’s not clear if the Genos does half-pedal like the Montage. I’m thinking, “No.” Yamaha have reserved Virtual Resonance Modeling (VRM) for the Clavinova series. Genos and Montage get the DAMPER RESONANCE DSP algorithm instead.

I’ve been trying to decode the names of the guitar effect algorithms. Yamaha seem incredibly paranoid about stepping on someone’s trademark or copyright. Here’s my current guesses:

  • Tweed guy: Fender Bassman (’59 vintage)
  • Boutique DC: Cornell by DC Developments
  • Y-Amp: Yamaha Y-Amp
  • Distcomp: Yamaha stomp pedal
  • 80s Small Box: MXR fuzz pedal simulator

I wonder if we’ll see these algorithms ported to the Montage in an update? Just after the Tyros 5 was released, the T5’s “Real Distortion” effect algorithms were added to the Motif XF (version 1.5).

Yamaha needs to fix this divot

I did a quick compare of Montage effects vs. Genos effects. As mentioned above, Genos adds the new rotary speaker effect algorithm first released in Montage. Here is a correspondence table:

Montage           Genos             MSB LSB Genos preset name
----------------  ----------------  --- --- --------------------------
ROTARY SPEAKER 1  ROTARY SPEAKER 1  99  16  Dual Rotary Speaker Bright
                                    99  17  Dual Rotary Speaker Warm
ROTARY SPEAKER 2  REAL ROTARY       69  32

“ROTARY SPEAKER 1” is the former, go-to rotary speaker effect algorithm (WARM and BRIGHT).

At this level, all looks great. Except, the Genos Data List PDF shows 16 parameters for the REAL ROTARY algorithm while the Montage Data List shows 18 parameters. The Genos leaves out:

No. Parameter               Range                 Value      Tbl No.
--- ----------------------- --------------------- ---------- -------
17  Slow-Fast Time of Rotor x0.21 - x1.00 - x2.00 (14 - 127) 49
18  Fast-Slow Time of Rotor x0.21 - x1.00 - x2.00 (14 - 127) 49

Either the Genos cannot store more than 16 DSP parameters or it cannot display/edit more than 16 DSP parameters.

Whatever the reason, this stinks and Yamaha need to fix this divot. People need to set the (de)acceleration times for both the horn and rotor. They have sinned in the eyes of B-3 purists and must atone.

Genos Firmware V1.10

All is not bleak, however. Genos Firmware version 1.10 has been announced. Yamaha’s quick summary:

  • What’s new?
    • Audio Multi Recording function is available
    • Search function while adding the Playlist
    • Supports use with the Yamaha Expansion Manager (V2.5.0 or later)
    • Supports Expansion Audio Style
    • Wireless LAN status can be checked on the Time display
    • Improved the performance of the instrument
    • Fixed other minor problems
  • Registration Memory can additionally save following parameters
    • Arpeggio Velocity
    • Arpeggio Gate Time
    • Arpeggio Unit Multiply
    • Style Retrigger Rate
    • Style Retrigger On/Off
    • Style Retrigger On/Off & Rate

The update adds support for Yamaha Expansion Manager (YEM) voice editing and pack installation.

The update is scheduled for release on 1 November 2017. The Genos Reference Manual and Data List were pulled pending the release of the update. The fact that a quick update was in the works might explain why the V1.0 Reference Manual and Data List were delayed. Big corporations move with leviathan speed. [No real news, there.]

Copyright © 2017 Paul J. Drongowski