About pj

Now (mostly) retired, I'm pursing electronics and computing just for the fun of it! I'm a computer scientist and engineer who has worked for AMD, Hewlett Packard and Siemens. I also taught hardware and software development at Case Western Reserve University, Tufts University and Princeton. Hopefully, you will find the information on this site to be helpful. Educators and students are particularly welcome!

Yamaha PSS-A50 stereo mod

I want to give a shout out to Lionel on the PSR Tutorial Forum. He posted a very nice PSS-A50 mod — stereo!

Yep, the PSS-A50 is stereo and, as Lionel discovered, the in-built samples are also stereo. Check out Lionel’s PSS-A50 stereo mod video. His video begins with a great close-up of his changes to the PSS-A50 digital main board (DM).

As noted in my PSS-A50 look inside, the central computer and tone generator is Yamaha’s SWLL processor (YMW830-V). The SWLL is a system-on-a-chip (SOC) which integrates the host CPU, working memory, key/display scanner, and tone generator. Just add a 37-key keyboard, display driver, 2MByte serial flash program/waveform ROM, USB controller, audio electronics and power electronics, and you have a complete ultra-low cost synthesizer.

The digital-to-audio converters (DAC) are integrated into the SWLL. The SWLL has six DAC-related pins:

  • DACLPP (pin 1)
  • DACLMM (pin 2)
  • DAC_VDD (pin 3)
  • DAC_VSS (pin 4)
  • DACRMM (pin 5)
  • DACRPP (pin 6)

DAC_VDD and DAC_VSS are conversion reference voltages. DAC_VDD is derived from DAC_VCC produced by a low drop-out voltage regulator (Texas Instruments TLV74333PDBVR). DAC_VSS is ground.
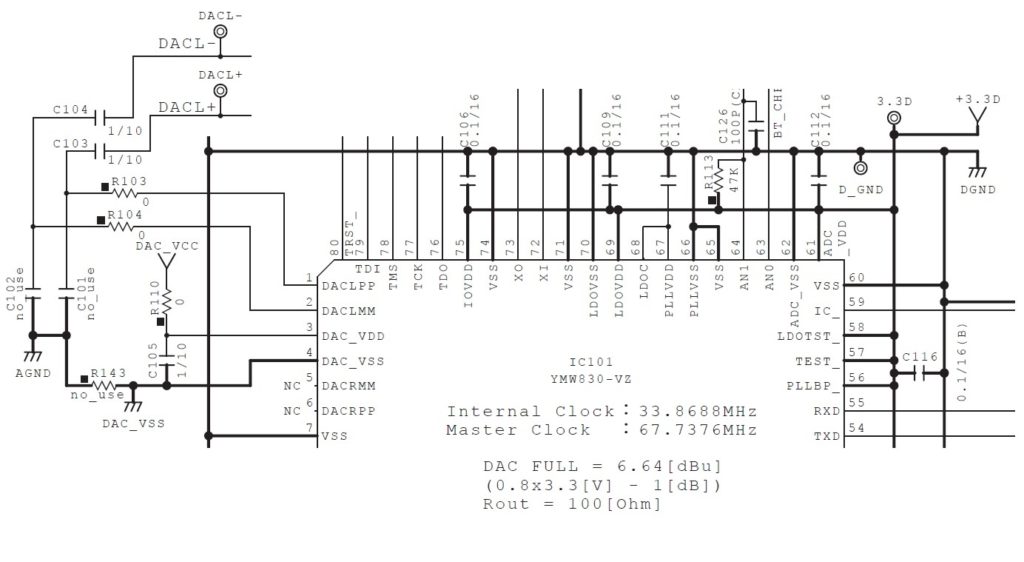
Yamaha SWLL (YMW830) DAC signals

DACLPP and DACLMM are differential audio signals for the left channel. DACRPP and DACRMM are differential audio signals for the right channel. DACRPP and DACRMM are left unconnected in the PSS-A50. There are two test points, DACL- and DACL+, on the printed circuit board (PCB), in case you would like to probe these signals.
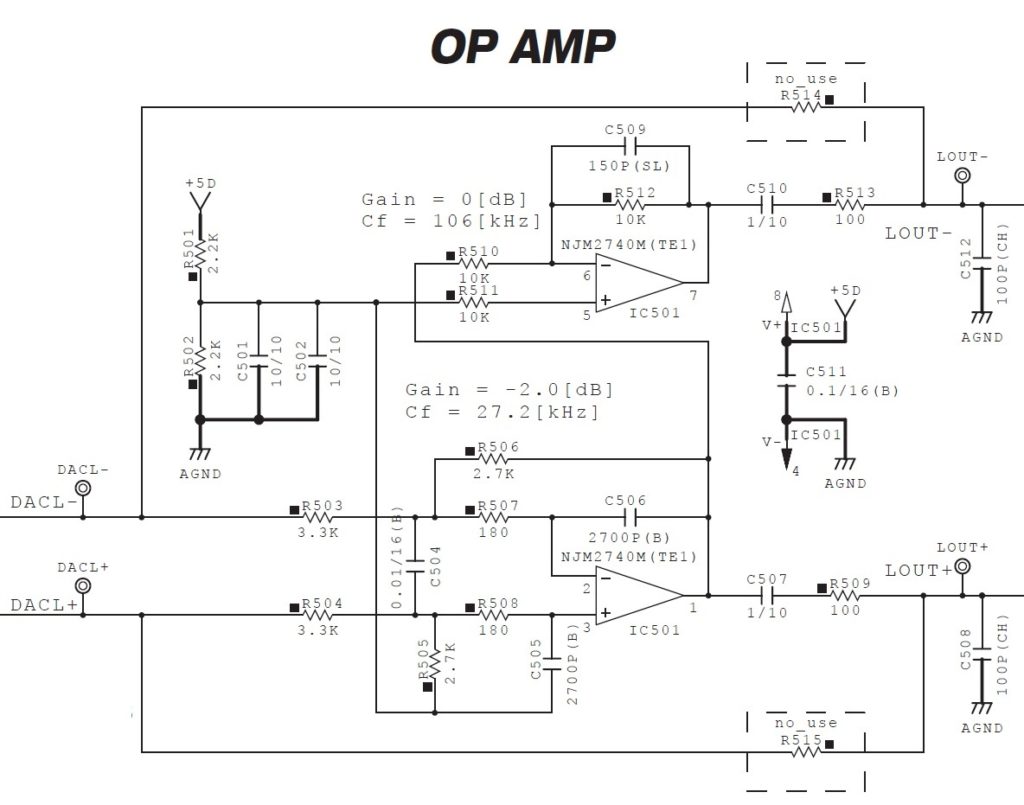
PSS-A50 post-DAC low pass filters

DACL+ and DACL- feed two operational amplifiers which are low pass filters. The low pass filters produce signals LOUT+ and LOUT-, which are sent to the plus and minus inputs of the headphone amplifier (TPA6132A2RTER) and speaker power amplifier (Rohm BD27400GUL). It’s differential audio signals all the way, presumably, to keep noise low.

The Texas Instruments TPA6132A2RTER is a 25 mW stereo headphone amplifier. The Rohm BD27400GUL is a low voltage class-D monaural speaker amplifier.

I have to admire Lionel’s construction skills as it is quite difficult to solder wires to a surface mount IC. Nice work replicating the stereo low pass filters, too.

Keep the Yamaha PSS-A50 hacks coming! Please don’t forget the PSS-A50 MIDI mod.

Here are some additional Yamaha PSS-related stories:

Copyright © 2022 Paul J. Drongowski
NAMM 2022: Your guess is as good as mine

Update: If you’re looking for information about the new Yamaha CK61 and CK88, see my specification and snap review articles.

With NAMM 2022 coming up (June 3-5), it’s time for rumors. 🙂

Yamaha filed for two new trademarks in June 2021. The trademarks are words in stylized form. The scope is “Musical instruments, namely, electronic musical keyboards, electronic organs, electronic music synthesizers, cases for musical instruments”.

Trademarks applied for and published soliciting opposition

The main marks are CK61™ and CK88™. The marks:

  • CK SIXTY ONE; CK SIX ONE; CK 61
  • CK EIGHTY EIGHT; CK EIGHT EIGHT; CK 88

are alternative forms.

The marks have been published, soliciting opposition as of 29 March 2022. Seems reasonable that a manufacturer would want the product identifier approved before making a zillion units with the name stamped on.

Let the speculation begin! Clearly, 61-key and 88-key keyboards are involved. Duh! “C” for “control”? Somewhat reminiscent of the old control synth product range? No 76 model?

The font is similar to the Yamaha Reface series marks. I’d love to see a merged all-in-one Reface-like keyboard with full-size keys. The MX series is getting a little long-in-the-tooth, so its replacement might be another possibility? Hope the price is reasonable…

When Reface YC and CP grew up, Yamaha kept the stylized names and font in the names of the YC and CP stage keyboards. Maybe a new stage keyboard in the Yamaha synth product group? A combined FM and virtual analog keyboard that doesn’t overlap the YC and CP models?

Copyright © 2022 Paul J. Drongowski

SDR flight tracking with ADS-B

Watching ADS-B “flight radar” has been cheap entertainment and a window into the larger world.

ADS-B, in case you didn’t know, is an alternative means for tracking aircraft. (“ADS-B” stands for “Automatic Dependent Surveillance-Broadcast”. Who came up with that acronym?) Aircraft carry an ADS-B transmitter which broadcasts identification and positional information. Aircraft are identified by a 24-bit ICAO address and (optional) call sign. In the case of commercial aircraft, the call sign is typically the airline and flight number. Position is determined by on-board GPS and altimeter data. So, the aircraft is telling ADS-B receivers where it is.

ADS-B is bi-directional, too. In some regions, aircraft may receive temporary flight restrictions (TFRs) and notices to airmen (NOTAMs), for example.

ADS-B data links operate at 1090MHz or 978MHz. 978MHz frequency reduces message congestion on 1090MHz. ADS-B on 1090 is essentially a modified Mode S transponder.

Since ADS-B operates on such high (UHF) frequencies, it is a line-of-sight system. If you have an ADS-B receiver, it will receive only aircraft in sight of the antenna (assuming sufficient signal strength). Because all ADS-B reception is local, web sites like Flight Radar 24 and ADS-B Exchange aggregate ADS-B data from receivers around the world and display current data on a map. That’s how they create the illusion of being global.

The airspace in eastern Europe has been especially interesting. The Ukraine war zone is dark as one might expect for contested — and dangerous — airspace. Occasionally you will see an aircraft fly into Ukraine and immediately kill it’s ADS-B transmission. Conversely, a pilot forgets to turn off ADS-B and you might spot a fighter near the border! Other popular aircraft for trackers include NATO AWACS, drones, tankers and cargo planes.

Let’s say you want to track aircraft in your own nearby airspace. If you have a software-defined radio (SDR) receiver, you’re most of the way there. I have successfully tracked flights in the northern Seattle area using both an RTL SDR Blog V3 radio and a nooelec Nano 2+ SDR. Comparing the two, the RTL SDR blog radio seems to have a wider range and is more responsive than the nooelec Nano 2+.

ADS-B at-home antennas

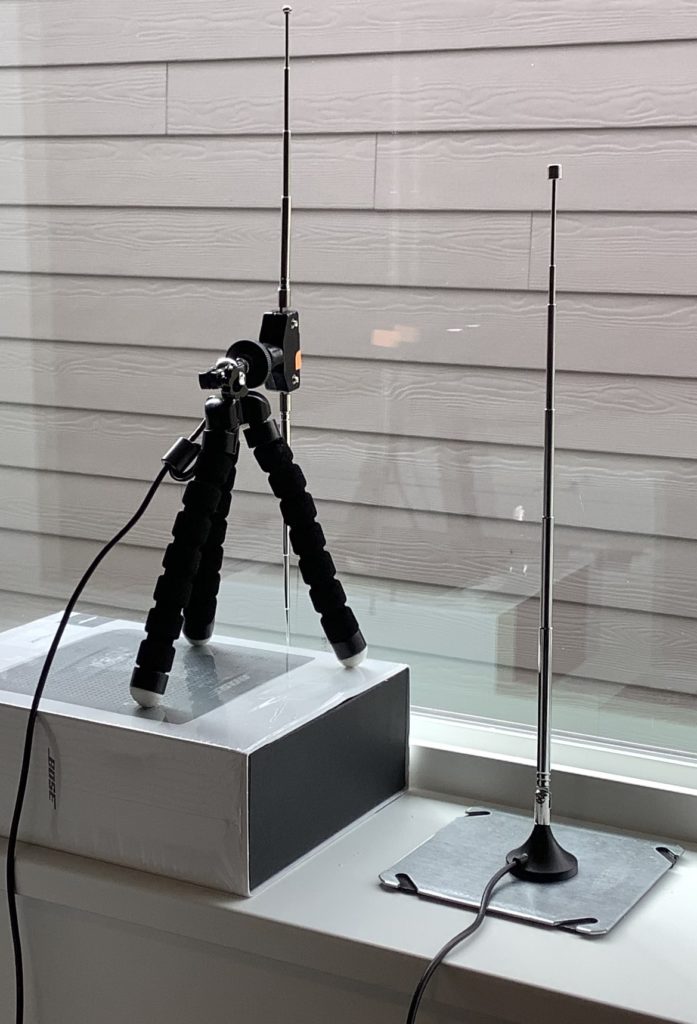
In addition to a receiver, you need an antenna. I used the bundled antennas which came with the receivers. The nooelec is a vertical whip antenna set to a 1090MHz full wave, 27.5cm. The RTL SDR antenna is a vertical dipole where each element is set to a half-wave. The difference in range may be due to the different antennas. Unfortunately, I don’t have the right coax adapters to mix and match. (Maybe after the next Amazon order.)

ADS-B radio signals are vertically polarized so get those antennas straight up and down!

Finally, the keyword in software-defined radio is “software.” You’ll need a program to tune the receiver, demodulate the ADS-B signal and display the ADS-B data (in either a table or on a map).

After seeing a positive review on the RTL SDR blog, I decided to try SDRangel on Windows 10. SDRangel has come a long way since I first took a look. SDRangel is set up differently than programs like AirSpy SDR# (SDR-sharp). To my point of view, SDR# and other programs like it are intended mainly for voice (audio) signal modes. They make great receivers for wide band FM, narrow band FM and AM. You’re on your own when it comes to digital modes like ADS-B. The SDR# signal processing chain is already set up like a radio and is pretty much ready to go after installation and launch.

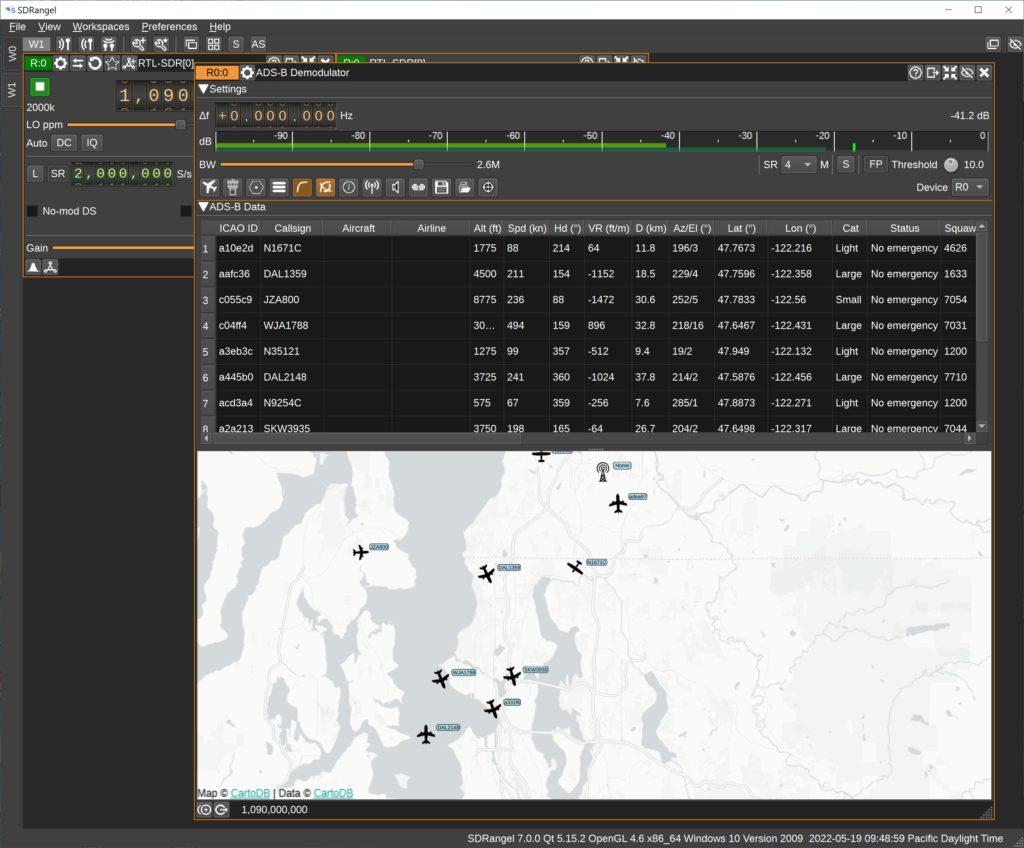
ADS-B via SDRangel (north Puget Sound/Seattle area)

SDRangel, on the other hand, requires a little bit of knowledge about the processing signal chain. First you create a workspace to hold the signal chain. Then you create a receiver to tune in a signal. Finally, you create one or more “channels” where each channel is a demodulator. SDRangel provides a wide range of demodulators (plug-ins), one of which is ADS-B.

I recommend trying an audio mode first, just to learn your way around SDRangel. I tuned in a local National Weather Service (NWS) station on 162.55MHz narrow band FM (NBFM) using the NBFM demodulator (plug-in). The NWS station is 24/7 and is fairly strong. None the less, I needed to raise the RF gain and turn off the squelch in order to hear anything. Not the same “out of the box” experience as SDR#.

Once set up, though, turning to ADS-B was a snap. I created a new workspace and put a receiver (tuned to 1090MHz) and ADS-B demodulator into it. I needed to increase the SDR sampling rate to 2,000,000 (hint: set the decimation factor to 1). If you don’t up the sampling rate, you’ll get a red warning message and no ADS-B data.

With this set-up, I can track flights in the north Puget Sound area. The antenna is indoors (house rules), but it will still see quite a few flights between the Sound to the west and the Cascade mountains to the east. I compared the SDRangel output with Flight Radar 24 and was satisfied. Because I was receiving on 1090MHz only, I am missing flights on 978MHz. More experiments to do one day. 🙂

Copyright © 2022 Paul J. Drongowski N2OQT
NAMM 2020: Casio sneak peek

Casio get arty!

Casio’s pre-NAMM 2022 press release mentions a few art projects to be released and shown during NAMM 2022, June 3-5.

Music Tapestry creates pictures from musical performances — a modern day color organ, for you old-timers like me. Music Tapestry is triggered by musical pitches and keyboard touch. Casio Sound Developer Hiroko Okuda — who helped developed Music Tapestry — will demonstrate it at the Casio booth.

Black and white example from U.S. Patent 10,803,844

Casio’s U.S. Patent 10,803,844 (October 2020) discloses a process to visualize musical performance. Hiroko Okuda is one of the inventors.

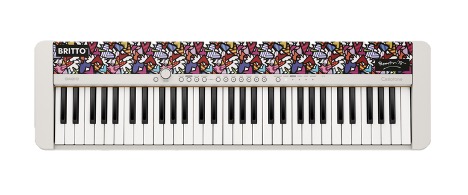
Casio CT-S1 FH limited edition — Britto Flowers & Hearts

If you think the Casio CT-S1 is too plain, try the “Flowers & Hearts” fabric by Brazilian pop artist Romero Britto. Casio will be selling a Limited Edition CT-S1 FH model (limited to 200 units at $500 USD).

Check out more of Britto’s work on-line!

Of course, Casio will be demonstrating their latest products including the Casio CT-S1000V with vocal synthesis. I’ll bet that the CT-S500 will be there, too. 🙂

Copyright © 2022 Paul J. Drongowski
Roland and Korg make candy

Superbooth 2022 is underway — candy for everyone!

Roland

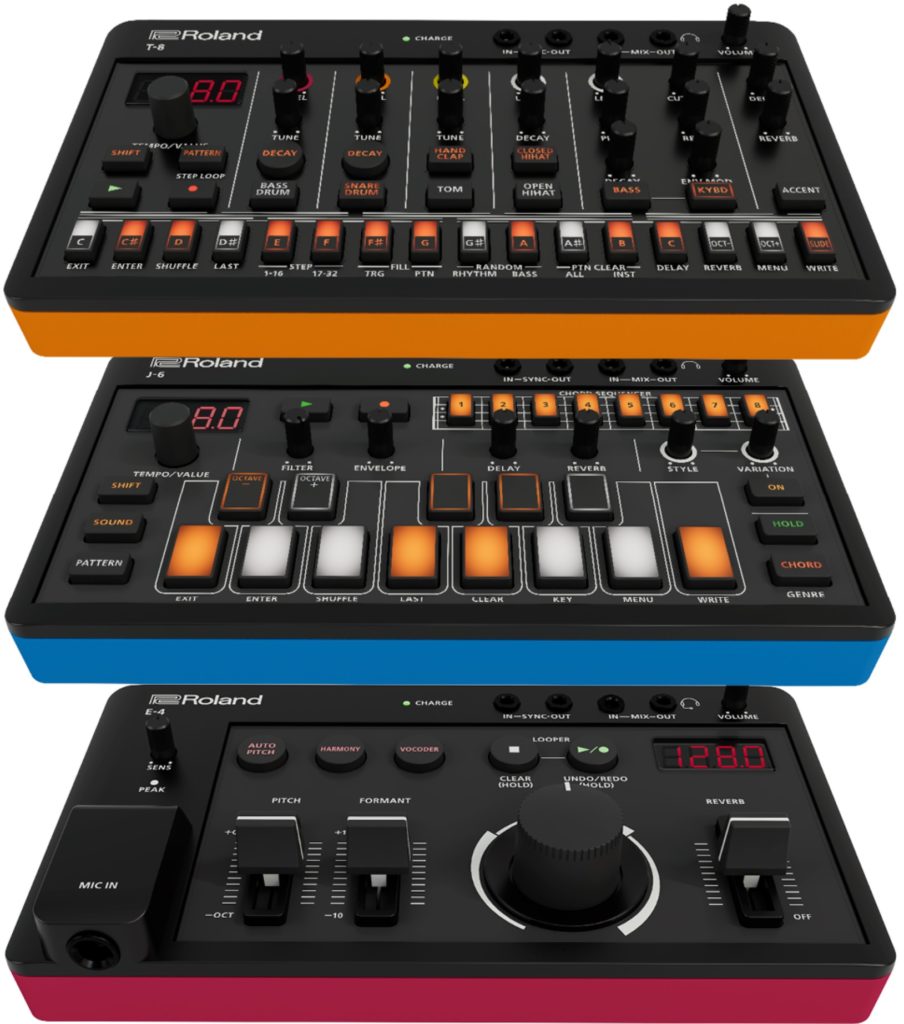
Roland’s new Aira Compact modules are a license to print money. Korg have successfully mined the low-cost, small module field with its Volca series. Now Roland have joined the fun. (“Aira” is pronounced “eye-ra”. OK.) These suckers are tiny!

Roland Aira Compact: T-8, J-6, E-4

There are three initial modules in the range:

  • T-8 Beat Machine
  • J-6 Chord Synthesizer
  • E-4 Voice Tweaker

I recommend Roland’s overview video. All of the modules have a built-in Li-ion battery (4.5 hour estimated operational time) charged via the micro-USB port. Throw in MIDI and SYNC, too, through mini-jacks.

Roland are smart to capitalize on their reputation in drum machines. The T-8 is a seven track machine: six rhythm tracks plus a TB-303 bass track.

The J-6 has a host of in-built chords and chord patterns organized into “Genres.” The interface seems to be well-thought out, especially for those less interested in theory and actually jamming black and whites. The J-6 has a 4-voice Analog Circuit Behavior (ACB) Juno-60 synth engine. The J-6 can be played from an external controller.

The E-4 Voice Tweaker is designed for voice mangling, but one should be able to run either signals into it, too.

The modules are hitting the street at $200 each. Somehow these kinds of modules find a way onto the studio. Almost by themselves…

Korg

As cute and colorful as the Rolands may be, The new Korg NTS-2 is at the top of my short-list.

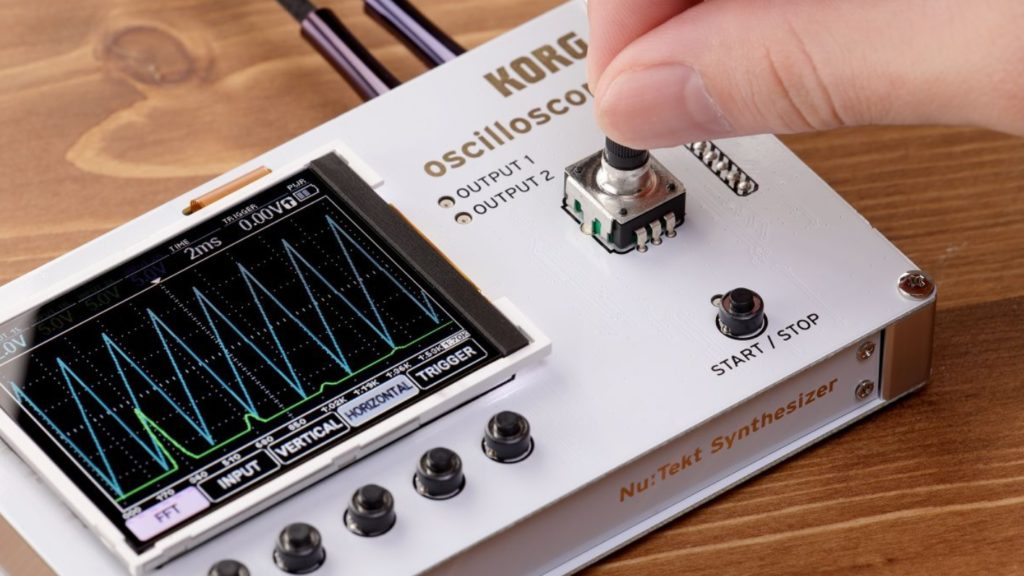
The Korg NTS-2 joins the NTS-1 mono synth in the Nu:Tekt product line. The NTS-2 is an attractive looking four channel oscilloscope. Punters are complaining about the price — $230 USD — but the this is a nicely featured oscilloscope plus tuner, plus FFT, plus spectrum analyzer. The NTS-2 has dual waveform generators which can act as add-on synth oscillators or LFOs. There’s some real development cost behind this thang.

Korg NTS-2 Oscilloscope

In terms of function, screen size and build quality, it beats my Gabotronics Xminilab Portable. The NTS-2 has a larger color screen and five soft function buttons. I’ve never been very successful with the Gabotronics as a stand-alone test instrument, so I’m hoping for better out of the NTS-2.

Unlike the NTS-1, the NTS-2 OSC can run on two AAA batteries (estimated two hours of operational time).

The NTS-2 will be bundled with a book: “Patch & Tweak With Korg” by Kim Bjørn (BJOOKS). The bundle is stamped “Limited Edition,” so Korg may eventually release NTS-2 on its own. Other books in the Patch & Tweak series cost about $45 USD. Maybe the NTS-2 alone will run $180?

Another consideration is test leads and probes. Korg assume the NTS-2 will be connected into your rig with patch cables. Korg do not mention probes, so if you need in-circuit measurements, you’re on your own. (Minor bummer.)

Copyright © 2022 Paul J. Drongowski
CT-S1000V: Tremolo EP

I spent a little time with the Casio CT-S1000V this morning, trying to dial in a mellow Rhodes EP with tremolo. The Stage E.Piano tone is nice, but has auto pan instead of tremolo. I like tremolo since I usually go MONO into the live sound system.

Studying presets is always informative. The DSP tones, by default, have an Active DSP chain pre-configured. The Active DSP chain for Stage E.Piano is:

Amp Cab          -> Auto Pan         -> Auto Pan 
---------------- ---------------- ----------------
Type: RD-MK2-PRE Rate: 68 Rate: 62
Vari: 1 Depth: 80 Depth: 80
Wet Level: 127 Waveform: Sine Waveform: Sine
Dry Level: 0 Manual: 0 Manual: 0
Bypass: OFF Wet Level: 70 Wet Level: 70
Dry Level: 100 Dry Level: 118
Bypass: OFF Bypass: OFF

Two Auto Pan stages? Well, let’s find this chain in the list of DSP combinations. What the? The default “Tone” DSP chain doesn’t appear in the DSP List!

The Trem 60’s EP has tremolo, so let’s take a look at its default Active DSP chain:

Amp Cab          -> Tremolo          -> Tremolo 
---------------- ---------------- ----------------
Type: WR-200-PRE Rate: 92 Rate: 92
Vari: 3 Depth: 64 Depth: 64
Wet Level: 112 Waveform: Sine Waveform: Sine
Dry Level: 0 Wet Level: 100 Wet Level: 100
Bypass: OFF Dry Level: 100 Dry Level: 100
Bypass: OFF Bypass: OFF

Two Tremolo stages and once again, such a DSP combination is not listed User Guide DSP List!

Well, DSP combi number 33, Drive Amp 2, is close to what we need. Starting with the Stage E.Piano tone, I changed it’s Active DSP programming to:

Drive          -> Tone Control   -> Amp Cab          -> Tremolo 
-------------- -------------- ---------------- ----------------
Type: Crunch3 Low Freq: 400 Type: RD-MK2-PRE Rate: 82
Gain: 70 Low Gain: +3 Vari: 1 Depth: 120
Out Level: 70 Mid Freq: 2.5k Wet Level: 100 Waveform: Sine
Wet Level: 127 Mid Gain: +5 Dry Level: 0 Wet Level: 70
Dry Level: 0 High Freq : 5k Bypass: OFF Dry Level: 60
Bypass: ON High Gain: 0 Bypass: OFF
In Level: 127
Wet Level: 68
Dry Level: 0
Bypass: OFF

The Bypass parameter comes to the rescue. I didn’t like any of the Clean drive types, so I disabled (bypassed) the drive stage.

The Tone Control boosts the MIDs adding warmth. The Amp Cab model is a Rhodes Mk2 preamp — the same model in the stock Stage E.Piano tone. These Tremolo settings just sound right to me. Of course, you’re welcome to play with any of these settings.

I uploaded updated registration banks, including the Stage E.Piano tremolo. Please see the CT-S free registrations page for a link to the ZIP file.

Have fun!

Copyright © 2022 Paul J. Drongowski
RTL-SDR: Earth ground are easy

If you’re into software defined radio and you’re looking for better HF reception, invest time in your antenna system and grounding.

I don’t have the space to string a dipole, so I’m working with a simple (random) long wire antenna. The long wire antenna is connected to an RTL-SDR receiver through a Nooelec Balun Nine One and a short length of coaxial cable. The long wire is connected to the antenna input on the balun.

Unfortunately, my early experiments with grounding did not work out very well. I tried connecting the balun ground port to various cold water pipes in the house. I do not recommend using house ground. House ground merely adds a mess o’noise to the original signal — bad, bad, bad. Thus, I left the balun ground unconnected and pressed on.

With the start of the war against Ukraine, I began monitoring HF, again, just to hear what I can hear on the left coast of North America. If you are interested in Europe and Ukraine specifically, I recommend the Wide-band Web SDR at the University of Twente in the Netherlands. Aside from radio access, there is an active chat area. Twente gets you much closer to the action.

Counterpoise

Counterpoise is a fancy name for wires or cables that substitute for an earth ground.

If you cannot connect to an earth ground, you should consider adding a counterpoise to your long wire antenna. Sounds like work, but it’s simple! Just connect another long wire to the ground side of the balun. String the counterpoise in the opposite physical direction of the long wire antenna. Done.

Consistent with my usual sleazy methods, I grabbed a 25 foot length of bell wire, twisted the pair at both ends, and connected one end to the balun ground. This quick and dirty counterpoise was good enough for +3dB or so in signal-to-noise ratio (SNR) as measured by Airspy SDR-Sharp.

A weeder?

My studio window is about 15 feet above ground, so it made sense to drop the bell wire out of the window and connect it to earth.

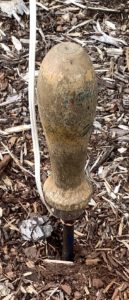
Really? A garden weeder for an earth ground rod!

A good earth ground typically consists of 4 to 8 feet of grounding rod buried in the earth. I know there are drain pipes located in the ground beneath my window and frankly, planting 4 feet (8 feet!) of rod sounds like too much work. So, I grabbed a garden weeder — yes, a garden tool — and stuck it in the ground. Then I wrapped the end of the bell wire around the weeder.

This quick and literally dirty solution was good for about +12dB (or more) improvement in the SNR.

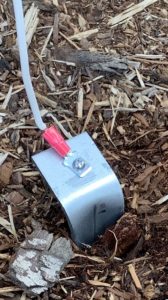
Metal edging stake

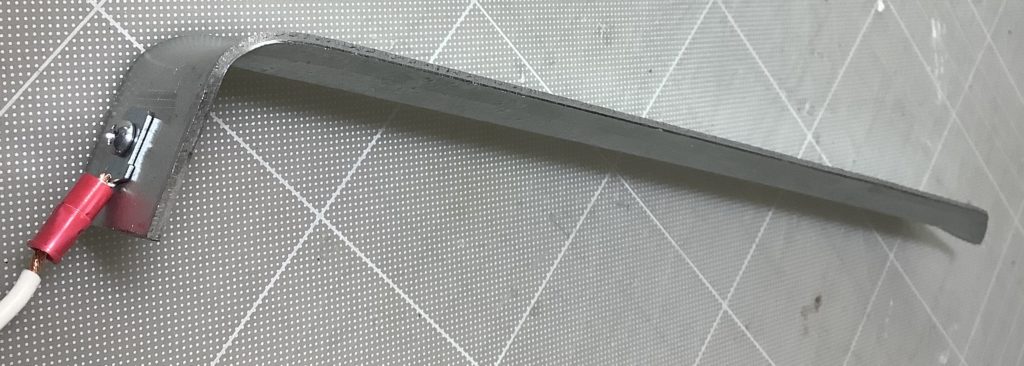
I didn’t want to expose the weeder to good old Pacific Northwest wet weather and found a cheap, simple substitute — a galvanized metal edging stake. Normally, one uses edging stakes in the garden. However, they are inexpensive and expose more surface area to the earth than a weeder. 🙂

Edging stake

I upgraded the bell wire to 16 gauge primary wire. Unfortunately, the primary wire makes it more difficult to close the sliding window into my studio. The bell wire is flatter and mushable.

Inexpensive edging stake earth ground

As to SNR, I’m getting similar results. Unless I get the gumption to drive a grounding rod, this is close enough for rock and roll. (73)

If you would like more help with software-defined radio (SDR), here are links to my earlier posts:

Copyright © 2022 Paul J. Drongowski, N2OQT

Casio CT-S1000V: Free registration banks

I hope today’s post will help liturgical musicians who want to play the Casio CT-S1000V and CT-S500 at church services. I invested a fair amount of effort building patches and registrations which fit contemporary and traditional church music. The sounds would also be compatible with soft pop and gospel-tinged genres, too.

I’ve gig-tested there sounds, having played them at services. So, if you would like to try them yourself, please download the ZIP file. The ZIP contains six CT-S registration files:

  1. RegBank01.RBK: Woodwinds
  2. RegBank02.RBK: Strings
  3. RegBank03.RBK: Horns / Brass
  4. RegBank04.RBK: Drawbar organs
  5. RegBank05.RBK: Pipe organs
  6. RegBank06.RBK: Miscellaneous

The sixth bank is a work in progress. The first five banks cover most of my needs, but there are always a few miscellaneous sounds that pop up.

Each CT-S1000V and CT-S500 registration has four slots (patches). The following table summarizes the registration and patch layout.

       1              2              3              4 
-------------- -------------- -------------- --------------
Bank 1 Horn+Wood Flute+Cla Wood Sect ChamberWinds
Bank 2 MellowStrings StereoStrings SoloViolin ChamberStrings
Bank 3 FrenchHorns NobleHorns HighSchool Tp + Tb
Bank 4 MellowGospel SoftGospel BrightChurch Simmering
Bank 5 Pipe Organ 3 Chapel Organ Organ Flute Bandoneon
Bank 6 SoftPad VoiceEnsemble StageE.Piano StageE.Piano Trem

I usually pre-select a bank and patch before each musical piece. Then I switch to a different patch within the same bank in order to add a different color. I wish it was a little easier to change registration bank on the fly. Maybe I’ll get better with practice.

Patch details

The CT-S patches are based on combinations which I used on old Roland JV- and XV- series gear. The following tables show the CT-S tones in each patch and the level for each tone. You’re welcome to tweak the levels using the BALANCE menu.

Woodwinds      Upper1            Upper2             Lower           
---------------- ----------------- ----------------
Horn+Wood English Horn 100 Fr.Horn Sect 110 Mellow Str.2 127
Flute+Cla Flute 1 100 VeloClarinet 100 Mellow Str.2 127
Wood Sect Flute & Oboe 100 VeloClarinet 100 Mellow Str.2 127
ChamberWinds Flute & Oboe 95 VeloSopranoSax 85 Mellow Str.2 127

Strings Upper1 Upper2 Lower
---------------- ----------------- ----------------
MellowStrings SlowStreoStr 100 Warm Pad 120
StereoStrings SlowStreoStr 120
SoloViolin Slow Violin 75 Mellow Str.2 90
ChamberStrings Chamber 100

Brass Upper1 Upper2 Lower
---------------- ----------------- ----------------
FrenchHorns French Horn 100 Fr.Horn Sect 80
NobleHorns Fr.Horn Sect 100 Flugelhorn 80
HighSchool Clarinet 100 Glockenspiel 80 French Horn 80
Tp + Tb Flugelhorn 100 Trombone 80 Tuba 80

B-3 Organ Upper1 Upper2 Lower
---------------- ----------------- ----------------
MellowGospel GospelOrgan2 127 Organ Bass 100
SoftGospel Rock Organ 2 127 Organ Bass 110
BrightChurch Elec.Organ 1 100 Organ Bass 127
Simmering Elec.Organ 6 110 Organ Bass 127

Pipe Organ Upper1 Upper2 Lower
---------------- ----------------- ----------------
Pipe Organ 3 Pipe Organ 3 100
Chapel Organ Chapel Organ 100
Organ Flute Organ Flute 120
Bandoneon Bandoneon 120

Pads Upper1 Upper2 Lower
---------------- ----------------- ----------------
SoftPad Soft Pad 127
VoiceEnsemble VoiceEnsembl 120

I dialed down the reverb in all cases and settled on the ROOM2 reverb type. These patches are intended for live playing in a reverberant church hall, so additional reverb is unnecessary. You might find the pipe organ patches to be waaay dry when compared with the factory tones. I removed the initial reflections and delay which create the impression of a large space — totally unwanted in a live church.

I added 3-band EQ (ACTIVE DSP) to the woodwind patches to add warmth and to reduce harshness. Feel free to tweak away!

For string patches, Knob 1 and 2 are assigned to attack time and release time, respectively. I had to decrease the release time to reduce a simulated reverb tail. Knob 3 is usually modulation.

For drawbar organ patches, Knob 1 is rotary speaker speed, Knob 2 is scanner vibrato/chorus and Knob 3 is rotary speaker brake. Drive Rotary (ACTIVE DSP) is enabled with ACTIVE DSP HOLD. Here are the Drive Rotary DSP parameters:

                                       BrightChurch 
Param MellowGospel SoftGospel Simmering
------- ------------ ---------- ------------
Type 2 2 2
OD Gain 30 42 42
OD Level 30 42 42
Speed SLOW SLOW SLOW
Brake ROTATE ROTATE ROTATE
FallAcel 35 35 20
RiseAcel 40 40 35
SlowRate 45 45 65
FastRate 95 95 100
Vib/Cho OFF OFF OFF
WetLevel 100 110 110
DryLevel 0 0 0
Bypass OFF OFF OFF

I programmed Organ Bass in the left hand because I didn’t care for the sound of the rotary speaker on notes below middle C (or so). Drive Rotary does not have a parameter for the horn/rotor balance — maybe that would help.

I hope these patches help you to get started with your own registrations!

Copyright © 2022 Paul J. Drongowski
Casio CT-S1000V: Master EQ

Beware, this post is going to bury you in numbers. 🙂

I’ve been investigating master equalization in the Casio CT-S1000V. The CT-S500 has the same master EQ, so everything discussed here applies to the CT-S500, too.

The CT-S1000V master EQ is a four band, semi-parameteric equalizer. The four bands are: LOW, MID1, MID2, and HIGH. It’s possible to create and store a USER setting. The edit page let’s you set the center frequency and gain for each of the four bands. You cannot set the band quality factor, Q, which determines the bandwidth spread.

The CT-S1000V provides ten master EQ presets with suggestive names. Casio, unfortunately, do not publish the center frequencies and gains for the presets. Listening to each preset, one thinks “Yeah, that’s bright,” or whatever. Details are missing in action, however.

One can assign LOW, MID1, MID2, and HIGH gain levels to a knob. Thanks to the knob edit function, it’s possible to suss out the gain level for each band within a preset. After much button pushing and knob twiddling, here are the gain levels (dB) for each preset:

                LOW  MID1  MID2  HIGH 
--- ---- ---- ----
Standard 0 0 0 0
Loudness +3 +6 +1 +7
Treble + 0 0 +4 +6
Bass + +3 +4 0 0
Mellow -3 0 0 -8
Bright -4 0 +6 +4
Rock +3 +2 -6 +6
Jazz +3 0 +6 0
Dance +3 +4 +2 +8
Classic -2 +6 +2 0

As to the band frequencies, we turn to the published table of master EQ frequencies:

    LOW frequency range      50Hz to 800Hz 
MID1 frequency range 100Hz to 8.0kHz
MID2 frequency range 100Hz to 8.0kHz
HIGH frequency range 2.0kHz to 16.0kHz

That’s enough to get into the right ballpark.

Yamaha XG Multi EQ

Never content, I worked out a table for Yamaha XG Multi EQ. Multi EQ is an optional master EQ in the Yamaha XG effects chain. Multi EQ is fully parameteric and has five bands: LOW, LOW-MID, MID, HIGH-MID, and HIGH. The LOW and HIGH bands support a peak mode, but are usually configured for shelving.

Multi EQ has five presets: Flat, Jazz, Pops, Rock and Concert (AKA “Classic”).

           Flat          Jazz            Pops          Rock          Concert 
------------- ------------- ------------- ------------- -------------
Freq Q dB Freq Q dB Freq Q dB Freq Q dB Freq Q dB
------------- ------------- ------------- ------------- -------------
Low 80Hz 0 50Hz -6 125Hz +4 125Hz +7 80Hz +3
L-mid 500Hz 0.7 0 125Hz 0.3 +2 315Hz 2.0 -4 200Hz 0.7 +4 315Hz 0.7 +4
Mid 1.0kHz 0.7 0 900Hz 0.3 +4 1.0kHz 0.7 +3 1.2kHz 0.5 -4 1.0kHz 0.5 0
H-mid 4.0kHz 0.7 0 3.2kHz 0.5 -4 2.0kHz 2.0 -4 2.2kHz 1.0 +4 6.3kHz 0.7 +2
High 8.0kHz 0 6.3kHz -6 5.0kHz +6 6.3kHz +2 8.0kHz -3

None of the Q’s are high, so the peaks/curves are rather gentle. [I wish there was an easy way to plot the curves for each preset.]

Of course, you can plug these settings into the CT-S1000V and merrily tweak away.

Yamaha Genos Master EQ

The Yamaha Genos™ Master EQ is an eight band, parametric equalizer. The Low and High bands are shelving.

Yamaha Genos provides five presets: Flat, Mellow, Bright, Loudness and Powerful:

           Flat          Mellow         Bright        Loudness       Powerful 
------------- ------------- ------------- ------------- -------------
Freq Q dB Freq Q dB Freq Q dB Freq Q dB Freq Q dB
------------- ------------- ------------- ------------- -------------
Low 80Hz 0 80Hz 0 100Hz 0 100Hz +1 140Hz +3
1 250Hz 0.7 0 250Hz 0.7 0 250Hz 0.7 -1 250Hz 1.2 +1 315Hz 0.5 +2
2 500Hz 0.7 0 500Hz 0.7 0 500Hz 0.7 -1 450Hz 1.0 -2 560Hz 1.5 +2
3 630Hz 0.7 0 800Hz 1.0 +1 800Hz 0.7 -2 630Hz 0.5 -1 800Hz 0.5 +2
4 800Hz 0.7 0 1.8kHz 0.5 -1 1.0kHz 0.7 0 1.0kHz 1.3 0 1.6kHz 1.2 +1
5 1.0kHz 0.7 0 3.6kHz 1.0 -2 1.6kHz 1.7 +2 3.6kHz 1.0 +1 3.6kHz 1.6 +1
6 4.0kHz 0.7 0 6.3kHz 1.3 -2 4.0kHz 0.7 +1 6.3kHz 0.8 +1 5.6kHz 1.4 +2
High 8.0kHz 0 9.0kHz -1 7.0kHz +3 8.0kHz +2 10.0kHz +2

The settings match the names. Mellow knocks down the highs. Bright cuts the lows and boosts the highs. Loudness is a bathtub boosting both lows and highs. Powerful kicks all bands up a notch.

If I find a way to discover the CT-S1000V band frequencies, I will update its table. In the meantime, have fun!

Copyright © 2022 Paul J. Drongowski
Casio CT-S1000V: More tips

A few new Casio CT-1000V tips and observations. Hope they’re helpful.

Portamento

The CT-S1000V (CT-S500) has portamento. Control over portamento is quite flexible. Be prepared to experiment, however, as the interaction between portamento settings is not immediately obvious. Unfortunately, the User Guide is not super helpful as it refers to several terms with “portamento” in the name, e.g., “Upper Portamento,” “Part Portamento”, etc.

All of these tips apply to the CT-S500, too.

There are two different ways to access portameto-related settings: through the MENU button and through the Settings sub-menu.

The MENU parameters allow the following adjustments:

  • UPPER PORT: Turn on Upper Portamento.
  • PART PORT: Turn on Part Portmento for each part (Upper1, Upper2, Lower).
  • TIME: Change portamento time for Upper1, Upper2 and Lower, individually. Each part has its own time.

When Upper Portamento is enabled, you can enable/disable portamento on the Upper part using a front panel button.

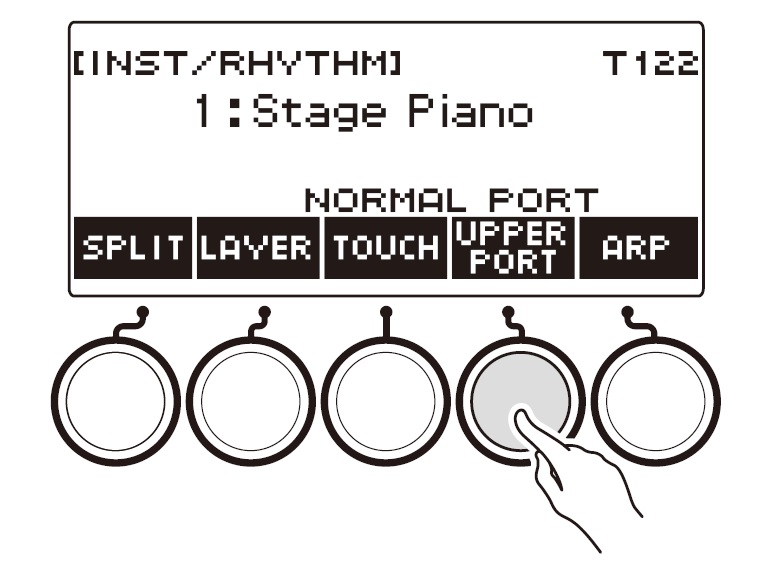
Casio CT-S1000V/CT-S500 UPPER PORT soft button [Casio]

Ah, so which panel button is that? If you press the INSTRUMENT button, the CT-S1000V displays five soft buttons: SPLIT, LAYER, TOUCH, SUS and ARP. The SUS button controls sustain. If you want to control Upper Portamento instead, dive into the Settings sub-menu and scross to “SUS/UPPER PORT button”. Change the value from “SUS” to “UPPER PORT”. Now the INSTRUMENT button shows “UPPER PORT” instead of “SUS”. Pressing the “UPPER PORT” soft button applies portamento to the Upper part. This feature allows you to apply portamento selectively during a solo line.

I hope this brief overview helps when reading the User Guide. I recommend reading the fine print about Upper Portamento because Upper Portamento can override Part Portamento. (Surprise!)

Expression pedal

For some crazy reason, I didn’t hook up and configure an expression pedal on Day 1. In retrospect, one should probably tangle with pedal set-up early just in case pedal settings are saved in user memory locations like CT-S1000V registrations.

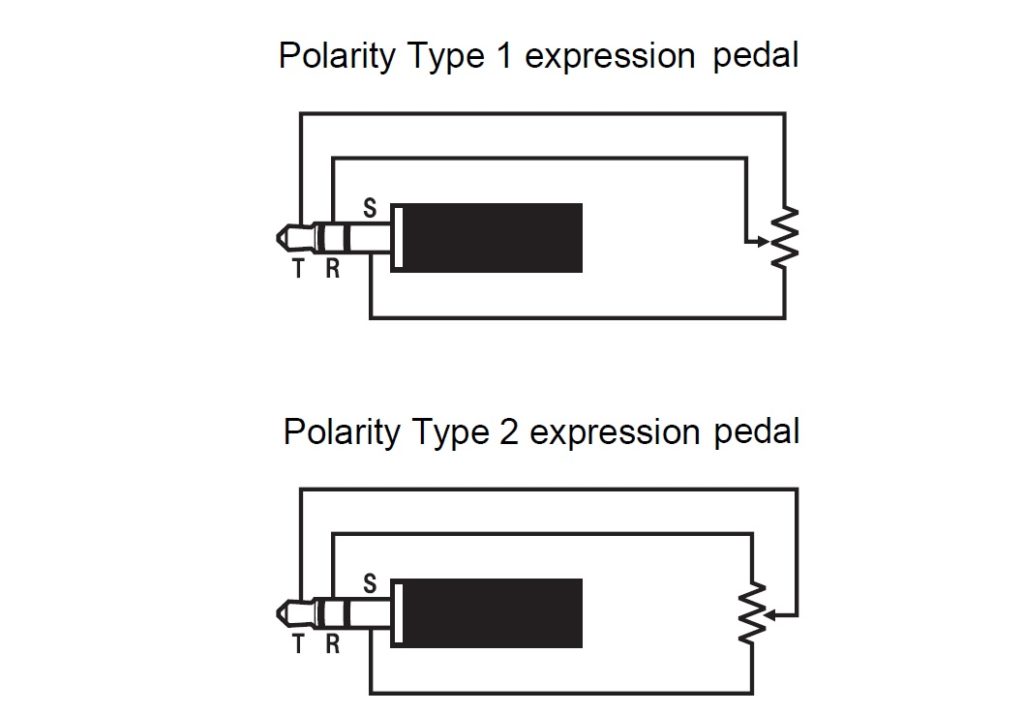
The User Guide gives good step-by-step directions concerning pedal set-up. The CT-S1000V is vendor agnostic, thankfully. I have three (!) Yamaha FC-7 pedals and didn’t want to buy another pedal. The CT-S1000V supports two TRS wiring schemes as shown in the diagrams below:

Casio CT-S1000V/CT-S500 pedal polarity types [Casio]

To make a long story short, the Yamaha FC-7 is polarity type 1. The FC-7 resistance is 50K ohms and be sure to go through the simple calibration steps in the User Guide. For reference, the FC-7 TRS signals are:

  • Tip: Reference voltage
  • Ring: Wiper
  • Sleeve: Ground

You wouldn’t believe how many forum posts get this wrong!

Roland, Kurzweil and Fata are polarity type 2. The User Guide confirms operation for the Roland EV-5, Kurzweill CC-1, Fatar VP-25 and Fatar VP-26. Type 2 TRS signals are:

  • Tip: Wiper
  • Ring: Reference voltage
  • Sleeve: Ground

The Roland FV-500L should work, too. Be aware that the EV-5 and FV-500L have a “minimum volume” potentiometer (variable resistor) in series with the main control potentiometer. Turn the minimum volume control to 0 before calibrating. The main control potentiometer resistance is 10K ohms; the minimum volume potentiometer resistance is 50K ohms.

Rant of the day: I have a nice, light-weight Boss EV-1-WL expression pedal. Wish I could use it with the CT-S1000V (and others). No device to device BLE, no 5-pin MIDI, no host compatibility. Arg.

Are pedal settings really stored?

I posted this question on the Casio Music Forums site. Even though the User Guide claims the pedal settings are stored in MY SETUP and registrations, I haven’t seen evidence. If you change the pedal settings and load a registration (or MY SETUP), the changed settings remain.

I hope that Casio will clarify.

Drawbar organ tones

As mentioned earlier, I pulled together a bank of drawbar organ registrations. I settled on the following tones:

    Gospel Organ 2    Mellow 
Rock Organ 2 Mellow
Elec.Organ 1 Bright church-y for hymns
Elec.Organ 6 Simmerin' for grease

In all four cases, I split the keyboard putting the “Organ Bass” tone in the left hand. I like the way Organ Bass holds down the low-end and doesn’t sound swirly. Split point is E4.

Movin’ on to pipe organs…

Copyright © 2022 Paul J. Drongowski