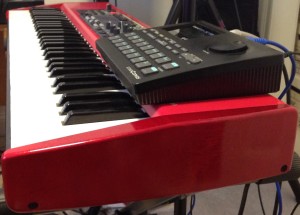
Reface CP: Yes, I played one!

Finally got a chance to try a Yamaha Reface CP and a Reface DX. Given the genres of music that I play, I’m the most interested in the Reface CP and YC models. The CP and DX were on the floor at Guitar Center, so I decided to try the DX, too. I’ll catch the YC another day when it’s in stock.

As we all know, Guitar Center on Saturday afternoon is not the ideal environment for a trial. I demo’d through headphones mainly to cut out the din from the rug-rats randomly pounding on keyboards and the sonic self-stimulation from the guitar department.

Even under these degraded conditions, the CP sounds excellent. The sound is the stuff, if you know what I mean. (This is a family web site.) Quick impressions of the main sounds:

  • Rhodes I: Nice, mellow, laid back, smooth.
  • Rhodes II: Bright, snarky, barks like a dog (in the good way).
  • Wurli: Solid performer, not too polite, more Ray than Supertramp.
  • Clav: Solid performer, good body.
  • CP: Bright knife, brings make the old days without the back ache.

The effects are excellent. Dial in the drive and/or the appropriate effect and you’re good to cover:

  • Smooth Operator
  • Do It Again
  • What’d I Say
  • Higher Ground

and a whole lot more! Max out the drive and it doesn’t get that annoying digital fizziness. The wah needs to be tuned into the appropriate frequency range, but that’s SOP. The wah can be made so bright that it cuts glass and pokes holes in the eardrums. (Not a recommended practice.)

One part of Yamaha’s marketing pitch truly rings right. The CP is a “live panel” instrument. Be ready to dial everything in with no presets. Very old school and a nice change from menu diving. This kind of interactivity bodes well for the YC organ, when I finally find one.

Mini keys. Sigh. If you’re a player, then expect to MIDI the CP to a real keyboard. That said, Yamaha are right to be proud of these mini-keys. They are very responsive. I didn’t have too much trouble laying down block chords or noodling a solo line. However, three octaves is at least one octave too short for stretching out or laying down full right hand jazz chords while holding down any kind of bass. My chief adjustment problem with the mini-keys is playing left hand stride or arpeggios. You probably saw this coming, too.

Build quality is reasonably good for a small, light-weight instrument. The knobs have a solid feel. I’m somewhat less enamored of the volume slider and octave switch. They feel a little bit cheap. The toggle switches are retro in a Home Depot kind of way. Yamaha had better mind their Chinese suppliers because this board could easily degrade to trash if someone sneaks cut-rate components into it.

The built-in speakers are just OK. You’re probably going to connect the CP to a decent amp and speakers anyway.

Bottom line, the CP sound is nicely crafted. I hope to hear these sounds with this kind of interactivity in a new full-size ax soon.

I had to give the DX a try especially since I had a DX-21 back in the day. Turn on the DX and soon you’re back in 4 OP FM yesteryear. Folks in electronic genres (EDM, etc.) dig FM, but for the kind of music that I play today, I’m not ready to return to FM. If you are into FM, then you really should give the DX a try. It, too, is the real stuff.

Extra credit

It is a long drive to GC, so I tried a few other instruments, too.

I had a discussion with one of the salepeople about the CP, mentioning electric piano, jazz chords, etc. This guy was so desperate to make a sale that he insisted on trying the Roland JD-Xi. Only a Carpathian would recommend a JD-Xi to a retro-jazzer. Well, it turns out, the guys was a Carpathian — a guitar player trying to make sales in the keyboard department. Cheesh.

I did try the JD-Xi. Definitely not my cup of tea. Plus, the Yamaha HQ mini-keys really are much better than the JD-Xi.

The keyboard department had a used Tyros for sale. Yes, the original Mark I. I tried it just for grins and to see how much Tyros and mid-range PSRs have progressed over the years. Needless to say, the PSR-S950 — and definitely the newer S970/S770 — are light-years beyond the Tyros Mark I.

Finally, I gave the DigiTech Trio a try. The Trio is a stomp box accompanist. You put it in learn mode, play a rhythm pattern on guitar, and the Trio identifies the tempo and key. Then, in play mode, the Trio adds a bass and drum backing track selected from one of several genres. The Trio is based on musIQ® technology licensed from 3dB Research Ltd. Some of the backing tracks are provided by PG Music, developers of Band-In-A-Box (BIAB). (There’s quite a music technology mafia in Victoria, BC.) Harman, who own DigiTech, liked MusIQ so much that they bought 3dB Research, too.

I couldn’t teach the Trio a thing. I am a lousy guitarist, I was hungry and I definitely was tired of the sonic assault in the guitar department. The backing tracks that I heard were OK although I think BIAB itself sounds better. If you intend to try one in a store, be sure to read the manual ahead of time…

Scat voices the newest Yamaha arrangers

The original Jazz Scat voices expansion pack for the Yamaha PSR-S950 arranger workstation remains a popular part of the site. With the Tyros5, Yamaha took a different direction and format for expansion packs. The new approach to expansion pack development and use is embodied in the Yamaha Expansion Manager, or “YEM” for short. Up to now, Tyros5 users have not been able to load and use the original Jazz Scat voices expansion pack.

That’s all changed! I’m pleased to announce the alpha test version of the Jazz Scat voices expansion pack for YEM-compatible Yamaha arranger workstations. The list of YEM-compatible arrangers include the Tyros5, PSR-S670, PSR-S770 and PSR-S970 workstations.

Why “alpha test?” At this time, I do not have access to a YEM-compatible workstation in order to do my own testing. (I’m happy with the S950, thanks.) In response to requests, however, I have produced a new YEM-compatible expansion pack. I’ve done as much testing as I can in YEM. Now, it’s your turn!

The expansion pack is in YEM project file format, sometimes called a “PPF file” because of its file extension. The PPF file must first be loaded into YEM. Once it is in YEM, you can send it to your keyboard, generate an install file (PPI format), copy voices to your own custom pack and even edit the voices themselves. That’s a lot of flexibility!

If you encounter problems, please post your issues to the PSR Tutorial Forum . If you are a PSR/Tyros user, you really should participate at the forum anyway. It’s a great place to meet other PSR/Tyros users and to learn new techniques.

Here is a link to the expansion pack. You need to download and UNZIP this file, read the README_PACK_YEM.TXT file, and then load the pack into the Yamaha Expansion Manager.

Both the scat voice expansion pack and the scat voice samples are released under a Creative Commons Attribution 4.0 International License.

Creative Commons License
ScatVoices and ScatVoice samples by Paul J. Drongowski are licensed under a Creative Commons Attribution 4.0 International License.

You are free to use the expansion pack voice or samples (even for commercial purposes) as long as you provide a link to http://sandsoftwaresound.net from your own web site AND/OR explicitly credit me in your creative work, e.g., “Scat samples/voice by Paul J. Drongowski”.

If you would like to know more about the sampling and voice design process, please read this post. The original S750/S950 compatible pack is here. Or, feel free to listen to the MP3 demo.

XG effects: SYSTEM mode

The last time that I took a look at Yamaha XG effects, I discussed using the VARIATION effect as a channel insertion effect. I’m now working on a PSR/Tyros style where I would like to apply an amp simulation effect to two channels. So, it’s time to learn about the configuration of VARIATION effects in SYSTEM mode. Even though I’m working on a style, you can apply these techniques to any Standard MIDI File (SMF) for play-back on an XG sound engine.

XG insertion effects are relatively easy to configure as the VARIATION effect is added to the signal chain of a single MIDI channel (XG part). Configuration of the VARIATION block as a SYSTEM effect takes more effort (i.e., more System Exclusive messages), but is well worth it. Now that I understand SYSTEM mode better, I may set up a DAW template for SYSTEM mode and use that template as my default effect configuration.

The diagram below shows the signal flow for the VARIATION, CHORUS and REVERB effect blocks when VARIATION is configured for SYSTEM mode. I show only one channel (Part NN) entering from the left in order to keep the diagram simple. Control “knobs” are drawn as ovals; these are XG/MIDI parameters under your control. The first four knobs — CC91, CC93, CC94 and DRY — are per-part parameters and need to be set for each of the sixteen channels (parts). The MIDI Continuous Controller (CC) knobs set the reverb, chorus and variation send levels for the part, respectively. In my project, I set the variation send (CC94) for two parts to non-zero levels and set CC94 for the remaining parts to zero. The non-zero levels pass the signal to the VARIATION block.

XG_System_Mode

The reverb, chorus and variation send levels are configured using MIDI Continuous Controller messages, but the DRY level is set using an XG System Exclusive (SysEx) message. Although this looks inconsistent, it follows Yamaha’s XG recommendations, i.e., use CC messages in preference to SysEx where possible. DRY level must be controlled using SysEx as no corresponding MIDI CC message is defined.

Please see the table at the end of this post for further message programming details.

The rest of the effect blocks and knobs are global (system-wide). The REVERB, CHORUS and VARIATION return levels (REV RET, CHO RET, and VAR RET) along with the DRY levels determine the amount and balance of effected and un-effected (dry) sound. All of the return levels default to 0dB (decimal 64 or 0x40 in hexadecimal notation). The default for each per-part DRY level is the maximum (decimal 127 or 0x7F). These default values enable signal flow right from the beginning and are a good starting point for experimentation and tuning. At least you are guaranteed to get some sound out of the effect section!

The VARIATION, CHORUS and REVERB blocks need to be configured through the usual XG SysEx voodoo. You need to select at least the effect type and be sure to configure the VARIATION effect for SYSTEM mode. In actual practice, you should do this before setting any send levels as the change to SYSTEM mode changes the level parameters to new default values.

Now the fun begins! The default configuration puts the three effect blocks in parallel. The inter-block send levels:

  • Send VARIATION to CHORUS (VAR to CHO)
  • Send VARIATION to REVERB (VAR to REV)
  • Send CHORUS to REVERB (CHO to REV)

establish serial effect routings between blocks. The level values determine the degree to which a series connection is made (i.e., how much signal is passed). Initially, all of these knobs are set to zero and the effects are full parallel. You can change these values to add reverb and/or chorus to the effected variation signal, for example, in the same way that you add reverb and/or chorus to a part.

The higher end arranger workstations offer a rich choice of CHORUS block effects — everything from chorus, phaser and flange to rotary speaker. Thus, you can create a long effect chain from VARIATION to CHORUS to REVERB, if you so desire. Want to phase a distorted guitar sound? You can!

The following tables summarize the low level details of effect programming. The addressable XG parameters must be set with the usual SysEx magic, e.g., F0 43 10 4C 02 01 40 4B 01 F7 to set the effect type.

Continuous Controller (Per part/channel)                    "Knob"

  CC91  Part/Channel REVERB SEND                            (CC91)
  CC92  
  CC93  Part/Channel CHORUS SEND                            (CC93)
  CC94  Part/Channel VARIATION SEND                         (CC94)

MULTI PART (per part/channel NN)

  Address   Parameter             Default
  --------  --------------------- -------
  08 NN 11  DRY LEVEL             0x7F                      (DRY)
  08 NN 12  CHORUS SEND           0x00
  08 NN 13  REVERB SEND           0x28 (decimal 40)
  08 NN 14  VARIATION SEND        0x00

REVERB effect block (global)

  Address   Parameter             Default
  --------  --------------------- -------
  02 01 00  REVERB TYPE           0x01, 0x00 (HALL1)
  02 01 0C  REVERB RETURN         0x40 (off:0x00, 0dB:0x40) (REV RET)
  02 01 0D  REVERB PAN            0x40 (center)

CHORUS effect block (global)

  Address   Parameter             Default
  --------  --------------------- -------
  02 01 20  CHORUS TYPE           0x41, 0x00 (CHORUS6)
  02 01 2C  CHORUS RETURN         0x40 (off:0x00, 0dB:0x40) (CHO RET)
  02 01 2D  CHORUS PAN            0x40 (center)
  02 01 2E  Send CHORUS to REVERB 0x00 (off, 0dB:0x40)      (CHO to REV)

VARIATION effect block (global)

  Address   Parameter             Default
  --------  --------------------- -------
  02 01 40  VARIATION TYPE        0x05, 0x00 (DELAY LCR2)
  02 01 56  VARIATION RETURN      0x40 (off:0x00, 0dB:0x40) (VAR RET)
  02 01 57  VARIATION PAN         0x40 (center)
  02 01 58  Send VAR to REVERB    0x00 (off, 0dB:0x40)      (VAR to REV)
  02 01 59  Send VAR to CHORUS    0x00 (off, 0dB:0x40)      (VAR to CHO)
  02 01 5A  VARIATION CONNECTION  0x00 (insert:0, system: 1)
  02 01 5B  VARIATION PART #      0x7F (off: 0x7F)

Crunchin’ da drums

In my last post, I discussed Motif/MOX eight zone (8Z) drum kits. The eight zone concept lets you assemble eight different percussion sounds into a custom kit. The waveforms are assigned to voice elements and are stretched/limited to eight different keyboard (MIDI note) zones. The Motif/MOX have matching arpeggios that work with the 8Z kits.

By the way, the 8Z drum kits were first introduced with the Motif XS. My notes on the 8Z kits and this note on effects apply to all later models including the Motif XF and MOXF.

If you have ever tried the percussion sounds alone without effects, the drum sounds are kind of “plain Jane” without a lot of impact. This post deconstructs a couple of effects which can be applied to break beats and other styles that require crunch and animation.

The first effect chain is taken from the Voice PRE8:060 “8Z Romps.” The voice has two insert effects connected in series. INSERT A is a Lo-Fi algorithm with the following parameters (effect preset “Max Lo-Fi”):

    #  Parameter              Value    Numeric
   --  ---------------------  -------  -------
    1  Sampling Freq Control  4.01KHz  (10)
    2  Word Length            93       (93)
    3  Output Gain            +7 dB    (14)
    4  LPF Cutoff             20.0KHz  (60)
    5  Filter Type            Radio    (2) 
    6  LPF Resonance          10.0     (100)
    7  Bit Assign             2        (2)
    8  Emphasis               On       (1)
   10  Dry/Wet                D<W63    (127)
   15  Input Mode             Stereo   (1)

The parameter number, name, values, etc. are taken from the MOX Data List. (See the section titled “Effect Parameter List” in the PDF file). The numeric values — given here in decimal — are what you need to program the effect through System Exclusive MIDI messages. More about this in a minute.

The Lo-Fi effect adds a lot of crunch and crush. But, wait! There’s more. The INSERT B effect is the AmpSim 1 amp simulator. Its parameters are:

    #  Parameter              Value    Numeric
   --  ---------------------  -------  -------
    1  Over Drive             54%      (54)
    2  Device                 dst1     (2)
    3  Speaker                Combo    (2)
    4  Presence               +10      (10)
    5  Output Level           34%      (34)
   10  Dry/Wet                D<W63    (127)

This is the “Beat Crunch” effect preset.

Please remember that my goal is to use the 8Z break beats in a PSR/Tyros style. In order to do accomplish this, I found the equivalent effects algorithms for the Yamaha PSR-S950 arranger workstation. Here are the equivalent algorithms:

    MOX            PSR-S950
    --------       -----------------------------
    Lo-Fi    --->  Lo-Fi DRUM1 (MSB:94 LSB:18)
    AmpSim 1 --->  V_DIST CRUNC (MSB:98 LSB:18 )

Unfortunately, the XG effects architecture supports at most one system-wide variation effect or one per-part insert effect. So, I decided to use the Lo-Fi algorithm because it seemed to provide most of the grit and nastiness that I was seeking.

It took a little detective work to find and match up the corresponding effect algorithms between the Motif/MOX and the PSR/Tyros. The effect type is enough to get into the same neighborhood. The rest of the sleuthing involves comparing the parameter lists in order to find the exact (or best) match. The MOX has Virtual Circuit Modeling (VCM) effects and the S950 does not. Therefore, you may not always be able to find an exact match.

With the S950 Data List in hand, I translated the effect parameters into the hexadecimal System Exclusive (SysEx) messages to configure the Lo-Fi effect on the PSR:

    F0 43 10 4C 02 01 40 5E 12 F7   Variation Type
    F0 43 10 4C 02 01 5A 01 F7      Variation Connection (SYSTEM)
    F0 43 10 4C 02 01 42 00 0A F7   PARAMETER 1 Sampling Freq Control (10)
    F0 43 10 4C 02 01 44 00 5D F7   PARAMETER 2 Word Length (93)
    F0 43 10 4C 02 01 46 00 0E F7   PARAMETER 3 Output Gain (14)
    F0 43 10 4C 02 01 48 00 3C F7   PARAMETER 4 LPF Cutoff (60)
    F0 43 10 4C 02 01 4A 00 02 F7   PARAMETER 5 Filter Type (2)
    F0 43 10 4C 02 01 4C 00 64 F7   PARAMETER 6 LPF Resonance (100)
    F0 43 10 4C 02 01 4E 00 02 F7   PARAMETER 7 Bit Assign (2)
    F0 43 10 4C 02 01 50 00 01 F7   PARAMETER 8 Emphasis (1)
    F0 43 10 4C 02 01 54 00 7F F7   PARAMETER 10 Dry/Wet (127)
    F0 43 10 4C 02 01 74 01 F7      PARAMETER 15 Stereo  (1)

I configured the effect as a system-wide variation effect such that multiple percussion parts may be sent to the effect. I inserted the SysEx messages into the set-up measure of the PSR style file using SONAR (my usual DAW/sequencer). Yow, the difference between the percussion sounds without and with this effect is like night and day!

The MOX insert effects are followed by a system-wide Tempo Cross Delay effect (effect preset “4beat Echo”). This effect adds a nice bit of animation to the overall sound. The MOX effect parameters are:

    #  Parameter              Value    Numeric
   --  ---------------------  -------  -------
    1  Delay Time L>R         4th      (11)
    2  Delay Time R>L         8th.     (10)
    3  Feedback Level         16       (80)
    4  Input Select           L        (0)
    5  Feedback High Dump     0.5      (5)
    6  Lag                    0ms      (64)
   10  Dry/Wet                D<W63    (127)
   13  EQ Low Frequency       250Hz    (22)
   14  EQ Low Gain            0dB      (64)
   15  EQ High Frequency      4.0KHz   (46)
   16  EQ High Gain           0dB      (64)

The equivalent S950 effect is TEMPO CROSS1 (MSB:22 LSB:0). I assigned this effect to the system-wide CHORUS block.

Here are the S950 (XG) SysEx messages to configure the delay effect in the CHORUS block:

    F0 43 10 4C 02 01 20 16 00 F7  Chorus Type TEMPO CROSS1
    F0 43 10 4C 02 01 22 0B F7     PARAMETER 1 Delay Time L<R     (11)
    F0 43 10 4C 02 01 23 0A F7     PARAMETER 2 Delay Time R<L     (10)
    F0 43 10 4C 02 01 24 50 F7     PARAMETER 3 Feedback Level     (80)
    F0 43 10 4C 02 01 25 00 F7     PARAMETER 4 Input Selection    (0)
    F0 43 10 4C 02 01 26 05 F7     PARAMETER 5 Feedback High Dump (5)
    F0 43 10 4C 02 01 27 40 F7     PARAMETER 6 Lag                (64)
    F0 43 10 4C 02 01 2B 7F F7     PARAMETER 10 Dry/Wet           (127)
    F0 43 10 4C 02 01 32 16 F7     PARAMETER 13 EQ Low Frequency  (22)
    F0 43 10 4C 02 01 33 40 F7     PARAMETER 14 EQ Low Gain       (64)
    F0 43 10 4C 02 01 34 2E F7     PARAMETER 15 EQ High Frequency (46)
    F0 43 10 4C 02 01 35 40 F7     PARAMETER 16 EQ High Gain      (64)

A little bit of delay on a busy drum part goes a long way. The send level (not shown here) is relatively low — just enough to add a little animation to the sound without creating a lot of clutter. It sounds OK, but I might adjust the send level dynamically and add more delay to exposed parts like the break while keeping the MAIN sections clean.

I hope this short effects clinic helps you out!

Groovin’ in eight zones

I heard a great interpretation of Chris Isaak’s “Wicked Game” by Groovy Waters. Their work inspired me to create a down-tempo PSR/Tyros style with break beats that would let me jam over the changes (Bm-A-E-E).

And that led me into a whole new exploration in Motif/MOX and PSR/Tyros styles!

While goofing around with the Yamaha MOX6 workstation, I stumbled into some break beats with “8Z” in the name. I noticed that the “8Z” arpeggios are targeted for voices with “8Z” in their names. So, what is this “8Z” business?

The Motif XS (and MOX) added 8-zone drum kits and arpeggios, hence, the “8Z” in the names. A conventional drum kit has dozens of individual percussion sounds laid out across the MIDI note range (AKA “the keyboard”). An 8-zone kit is an extension of a regular synth voice where each voice element is assigned a percussion sound. The usual upper and lower note limits determine the key range for each sound. Here is the element information for the PRE8:060 “8Z Romps” voice:

                            Name        Note#
                         ----------   ---------
    Waveform             Low   High   Low  High
    ----------------     ----  ----   ---- ----
    BD T9-4               C0    C1     24   36  
    SD Elec7              C#1   F1     37   41  
    China St              F#1   C2     42   48  
    SD Rim SE             C#2   C3     49   60  
    Bd Jungle 2           C#3   F#3    61   66  
    Bd Distortion4        G3    C4     67   72  
    Bd Distortion RM      C#4   C5     73   84  
    Bd D&B2               C#5   C6     85   96  

Each waveform is stretched across a multi-key zone. Thus, each of the notes within a zone have a slightly pitch-shifted tone, allowing for tonal variation in patterns where repeated notes are played in sequence. Since these are basically regular synth voices, you are also free to mess about with the filter, amplitude envelope and all the usual sound design goodies.

The arpeggios designed for the “8Z Romps” voice do just that. (See “MA_8Z Romps” and so forth.) The pitch shift, etc. breaks up the monotony of repeated notes.

The “8 zone” idea makes it easy to cobble new drum kits together from the diaspora of waveforms in the regular drum kits. You probably don’t need more than eight different percussion sounds for a set of basic beats. A quick survey of other “8Z” kits shows this to be true:

    8Z HeavyHearts      8Z Chilly Breakz    8Z Gated Beatz
    --------------      ----------------    --------------
    Bd T9-1             Bd HipHop6          Bd Gate
    Bd Hard Long        Sd HipHop9          Bd HipHop9
    SD Elec12           Sd T8-1             Sd HipHop6
    Sd HipHop6          HH Closed T8-2      Sd Hip Gate
    HH Closed D&B       HH Open T8-2        HH Closed T8-1
    HH Open T9          Electric Perc1      HH Open T8-1
    Clap AnSm           Sleigh Bell         Noise Burst
    Shaker Hip 2        Shaker Hip 1        Shaker Hip 1

These kits have a different key layout than “8Z Romps”. In fact, these 8Z kits have a few zones that resemble the conventional kit layout — the bass drums (Bd) cover the notes where bass drum is usually found, the snare drums (Sd) cover the usual notes for snare drum, etc. Thus, you can play “regular” drum arpeggios through these 8Z voices and they sound just fine. The upper range elements cover a wide range of notes and are the “catch all” for the usual percussion spice such as conga, shakers, guiro, triangle and the like. With the pitch shifting, the “catch all” approach can produce some hip patterns.

There is far more fun to be had. I came across the “8Z” kits and arpeggios while playing the Performance USR2:102(G06) Ibiza Growl Sax. This Performance had the feel that I was looking for, although I wasn’t too pleased with the sax voice. (A problem that is easily fixed.) The Performance assigns “8Z Romps” to the first voice, but, wait! It plays break beats through “8Z Romps” that were not designed for “8Z Romps”, having different zones, etc. Cool. Yamaha sound designers are not only good at following the rules, they are equally adept at breaking the rules, too.

I decided to go ahead with the break beats from Ibiza Growl Sax even though the PSR/Tyros do not have “8Z” drum kits. I had to unwind all of the 8Z-ness and map the percussion voices to standard PSR-S950 drum kits. Unfortunately, the repetitive patterns are a little bit plain even though the musical feel is still good.

Next up, crushing the drums and bouncing them around.

Performance styles for PSR-E443

The PSR-E443 folks don’t get enough love, so here is a collection of performance styles for the E443 and the E433.

So, what is a “performance style?”

The Yamaha Motif/MOX series of synthesizer workstations have hundreds of factory “Performances” to to help a composer get started with a new song. A Performance has up to four independent voices (drum, bass, guitar, etc.) and up to six sets of related musical phrases — “arpeggios” in Motif-speak. The arpeggios are drawn from a built-in library of several thousand musical phrases in a slew of contemporary genres. Each set of phrases has a role (main section, fill, break) and the composer switches between sets while playing in order to lay down a basic arrangement or backing track. Even if you’re not a songwriter, the Motif Performances are just plain fun for jamming or practice.

I recorded and translated 22 of my favorite Motif/MOX Performances to PSR/Tyros styles — Performance styles. They play just like regular styles (follow chords in the left hand, play fill-ins when changing main sections, etc.) The styles are stripped down and are meant to be played. A few of the styles have only bass and drum, so there isn’t a lot of elaborate orchestration to get in the way. The introductions and endings are very simple.

This first collection targets the PSR-E443 and E433. The styles are SFF1 and should work on other arrangers supporting SFF1 although you may need to substitute different drum kits. The styles in this collection do not use Mega Voices. A more advanced collection with SFF GE and Mega Voices is being developed.

Since these are my favorite performances, the styles come from a funky, jazzy, fusion kind of place.

For more information, check out the README page. Then, download the ZIP file and have fun!

MOX interview: Follow up

Here’s a quick follow up after my interview with Yamaha marketing.

First, the word “conversation” is a better description than “interview.” I had a really enjoyable, high-bandwidth conversation with fellow gear-heads. What could be better than that? The Yamaha team members are friendly, extremely knowledgeable and open. They are also good listeners and had read my pre-interview MOX retrospective.

So, thanks to Yamaha for listening!

I also learned some things that I intend to put into practice going forward. We discussed how I created the voices that I use on my church gig and the issue of sound dropping across voice changes in MOX Voice Mode. One way to avoid sound cut-off is to use Song Mode instead of Voice Mode. Assign a voice to each part in Song Mode and then select parts on the fly. I’ll have to give this a try. I also want to experiment with the assignable knobs for drawbar control and Song Mode may be part of this solution, too.

Since the conversation was relatively short — about 25 minutes with my MacBook Air crashing due to a thermal overload part way through (Yikes!) — I went blank on some of the reasons and history for my work style. For example, I created the voices for the church gig through the front panel and didn’t use either the PC- or iPad-based editors. I since reconstructed my mind-set from way-back-when. I’m sure that I was sooooo anxious to use the MOX at the gig that I just dove into the front panel. I had programmed a TG-500 back in the day and the Yamaha voice architecture was still familiar to me. (The Motif/MOX effects structure is way easier to understand than the old TG, thankfully.) The last thing I needed was a software editor to get between me and the gig!

I didn’t have an iPad when I bought the MOX6 and wasn’t aware of the Yamaha apps for Motif/MOX. The apps — once I learned about them — motivated me to budget for and to buy the iPad. Aside from Web-browsing and e-mail, my iPad is almost entirely devoted to music-making tools (no cat videos). I have both Cubasis and Mobile Music Sequencer (MMS) installed. MMS gets used; Cubasis not so much. Cubase is one of those tools that I want to learn — kind of like my current explorations in Ableton Live.

Starting today, I would use the iPad apps. Heck, I should (would) check out the Yamaha PC-based editor and the fine Motif/MOX tools by John Melas.

Well, there you have it. A positive experience all the way around!

If you’re curious about how I use the MOX for content creation, please check out the following posts and pages:

Yamaha Reface (No, I haven’t played it)

It’s Internet de rigueur to comment on the new Yamaha Reface keyboards — whether you’ve played them or not! So, here goes…

I’m in fat city with an original AN-200 (Prophet-5 plus beat machine in a box), a P-50m (pianos in a box), a CS-01 (monophonic analog synthesizer) and a Nord Electro 2. Although a few of these pieces are gathering dust, they pretty much cover the sonic territory of Reface. DX-wise, I had more than enough FM in the 80’s, thank you, and could always get my old CE-20 repaired, if the urge to frequency modulate should ever overcome me again. Overall, I’m unlikely to take the plunge and buy a Reface keyboard just out of necessity.

First off, I genuinely wish Yamaha all the success in the world with these products. This is the first time that Yamaha have strayed from the AWM2 mainstream in some years. I would hate to see this innovative product line tank and make Yamaha risk-averse. The Reface product line started out as an after-hours skunk works engineering project. The fact that Yamaha committed to manufacturing and marketing Reface is significant and shows real effort to shift their corporate culture. Further, if Reface makes scads of money for Yamaha, then its profits will lift other boats within Yamaha.

Sonically, Reface sounds pretty darned good. The CP and YC are my favorites because they fit with the musical genres that I work in. I hope that some of this technology will migrate into future synthesizer and arranger workstation products. Spectral Component Modeling (which includes Virtual Circuit Modeling) grew from VL technology. The VCM effects in the MOX/Motif are quite good, so please give me more of that! I am pleased to see Yamaha work on organ emulation and would like to see the drawbar control, vibrato/chorus and rotary speaker effects in a new workstation. Both the Motif/MOX and higher-end arrangers are missing the Hammond “vibrato scanner” effect — a significant omission.

So, why am I not buying? Apparently, “mini” keyboard sales are making money for Novation and others, and Yamaha wants a piece of this market. The decision to use mini-keys strongly bifurcates the marketplace — you either like (accept, tolerate) mini-keys or you don’t. I’m a “don’t.” I have tried mini-keys in the past and, well, no thanks. This is not an “anti-Yamaha” position — I lost all interest in the Korg Odyssey, for example, when I learned that it had mini-keys.

The Reface is touted as a portable, take-it-anywhere keyboard. If you’ve been reading this blog, then you know that I’ve put together a portable rig based on the Korg Triton Taktile (TT.) The TT has 49 full-size keys and is not much bigger or heavier than a Reface. The TT key bed is excellent and four octaves is enough room to roam. Although the TT is missing the up-to-date tone generation and effects technology in Reface, it’s a very playable alternative to Reface.

Finally, there is the issue of the $500 street price. I suspect that Yamaha is looking to make a few extra bucks from the early adopters. Korg may have pursued the same strategy with the TT. They brought the TT out at a higher street price and then eventually reduced the price to the current $350 USD. The TT comes with a superb bundle of software plug-ins and offers, making it a terrific bargain. Unfortunately, for Yamaha, this is the competition facing Reface (pun intended) and a $500 street price looks mighty steep for an ax with mini-keys and no free software incentives.

Internet reaction from Reface detractors has been vehement — far over the top, in my opinion. It seems like some people have taken Reface as a personal affront! Please, settle down. Yamaha is a big company and they will surely roll out new products for the rest of us. The Motif refresh is overdue, for example, and must be in the works. It’s good to see Yamaha releasing new products that are out of its mainstream offerings. All the best!

Footloose and fancy free

Maybe you would like to play your music in the great outdoors at a family picnic. Or, like me, you would like an extremely light, battery-powered rig for quick set-up at rehearsals.

Modern battery technology to the rescue! More musical instruments and portable speakers than ever run on battery power. Many of these devices sport an integrated rechargeable battery and a USB-based charge or power outlet. You can have that light battery-powered portable rig by combining a battery- or USB-powered keyboard with one of the many available portable speakers.

Here’s how I designed my portable rig.

I started with the KORG TRITON Taktile 49 USB-powered MIDI controller and synthesizer. The TRITON Taktile (TT) has 49 keys and is very light-weight (less than 8.5 pounds). The TT incorporates the Triton Classic sound engine and programs which are under the control of eight front panel knobs and sliders. I reviewed the TT here and here , so I won’t go into more detail about its sonic capabilities.

The TT does not have built-in battery power. However, it runs quite well on a rechargeable USB battery pack. USB battery packs are readily available and are usually intended to power or recharge personal electronic devices such as MP3 music players, phones, tablets and so forth. Fortunately, electricity is electricity and the TT is happy to operate on power supplied by a USB battery pack. As long as a battery pack can supply the necessary current (usually stated in milli-amperes or “mA”), the pack should be able to power any compatible musical instrument keyboard.

Let’s explore power requirements a little bit more, using the TT as the example. KORG claim that the TT draws 550mA of power through the 5 Volt DC USB-B port. I purchased an Incase Portable Power 5400 recharging “brick.” The Incase brick can supply up to 2.1 Amps (2100 mA) of current, more than enough to power the TT. The “5400” in the product name refers to the battery capacity: 5,400 mAH. In theory, the Incase 5400 brick should be able to power the TT for nearly 10 hours. (God helps us if we ever rehearse that long!) I have been using the TT/Incase combination during practice for the last few days under light use and haven’t burned off 20% of total capacity yet.

So far, so good. But, what about a portable speaker? Unfortunately, you can’t expect to drag your keyboard into Target or Best Buy and audition portable speakers. Most of the speakers on display in box stores are wired into a point-of-sale demonstration system which plays back canned demo tracks. You won’t be able to disconnect from the demo system and connect a synth to the back of the portable speakers on display. Thus, you should audition as many speakers as possible with the canned tracks and try to find the one with the best overall reproduction without “boxiness” and weak low end.

I tried out portable speakers in-store rather obsessively and exhaustively. I eventually settled on the JBL Charge 2 Bluetooth speaker. The JBL Charge 2 has reasonably flat response and good low end without the boxiness of many small speakers (such as the higher priced Jambox Mini). The Charge 2 is a little bit chunky weighing about 0.5 pounds. It specs out pretty well: 2×7.5 Watts and 75Hz – 20kHz frequency response. Two passive radiators provide solid bottom end; bass notes are distinct with recognizable pitch.

Sonically, I’m quite happy with the TRITON Taktile and JBL Charge 2 combination. The JBL handles high energy sounds like organ and French horn without distortion and flappy speakers. The headphone output from the TT is a little too low, however, and I must turn the volume all the way up on the JBL in order to get to rehearsal-level volume. Our church group rehearsals are “unplugged” (except for me, of course), so I don’t anticipate any problems on the job. However, I’m considering the addition of a battery-powered gain stage between the TT and the JBL. The following candidates for gain stage look viable:

  • Boostaroo R234 Revolution Headphone Amplifier
  • Rolls MX56C Minimix A/V Battery Powered Mixer
  • MCM Custom Audio Compact Headphone Amplifier

The Rolls MX56C is attractive because, hey, who couldn’t use a battery powered utility mixer for other production applications? The MCM headphone amplifier has a Micro USB-B power input in addition to a 9V barrel connector. The MCM can be powered from a USB-A port just like the one on the Incase power brick.

Potentially, a fourth alternative is a guitar boost pedal. The pedal solution is viable as long as the pedal is flat and does not color the sound of the acoustic voices. I tried a Danelectro D-2 FAB Overdrive pedal with the jazz/pop voices and the overdrive does a great job of dirtying up the voices while adding gain. The TT voices are exceptionally clean and the added grit on electric pianos and guitars is especially welcome. As Moe the Bartender would say, “He ain’t pretty no more.”

There are two other aspects of the JBL Charge 2 that are worth mentioning. First, the JBL is such a chunk because it incorporates a 6000 mAh Lithium-ion Polymer battery and a 2.0 Amp USB-A charging/power port. Originally, I intended to power the TT using the JBL Charge 2. Unfortunately, there is too much digital noise on the USB power line when the TT is connected and is drawing power. One can clearly hear undesirable synthesis artifacts and noise at a completely unacceptable level when the JBL both powers and amplifies the TT. Now, I run the TT on the Incase power brick separately. I am thinking that the JBL could power the MCM headphone amplifier, hopefully without the digital noise.

Second off, the JBL is a Bluetooth speaker. (It works quite well in this capacity having tried the JBL with an iPad.) It seems like a no-brainer to send audio from the TT to the JBL over Bluetooth assuming that a Bluetooth audio transmitter is attached to the 3.5mm stereo output of the TT. This is a loser for live play, however. The transmitter must encode and compress the audio which imposes an unacceptable delay between playing a note and actually hearing the note through the JBL. I’ll stick to good ole latency-free audio cable.

The picture below shows the whole rig: the gray Incase power brick, the TRITON Taktile, and the JBL speaker resting on top of the TT. The TT does not have much clear room on top. Most of the top is taken by buttons, switches, sliders, pads, etc. The JBL’s perch is rather precarious. I would feel better having the JBL on the floor or a stable resting place nearby.

TT_and_Charge2

The entire rig fits into a Kaces 49-key gig bag and weighs 12 pounds. Finally, a self-powered rig that is as easy to handle and move as an acoustic guitar!

Triton Taktile: A few more thoughts

A quick follow-up to my earlier snap review about the Korg Triton Taktile.

I’ve spent more time playing the Triton Taktile and generally remain pleased with many of the on-board preset sounds and the keyboard feel. The only major disappointment is a way to toggle the rotary speaker speed for B-3 organ sounds. Speed changes are an important part of B-3 playing style and I sorely miss this capability. I hope that Korg can find a way to add speed change in a future update. Unfortunately, the Leslie effect seems to be sampled into many of the sounds, so an update of this kind may not be possible technically.

I wanted to register my favorite patches, so I decided to download and install the Korg Kontrol Editor. The front panel procedure for registering favorites is not particularly fiddly, but the Kontrol Editor allows entry in one go and presents a WYSIWYG view on the contents of favorites Set A and Set B. I like to see how the patches are laid out across the buttons and to juggle their order. The Kontrol Editor does the business as you can see in the screen below. The Kontrol Editor leaves tool/keyboard synchronization up to you. When you have something worth writing then you click a button to transfer the edits to the keyboard. When you want to read something back from the keyboard into the editor, then click the appropriate button.

KontrolEditor

The screenshot shows my favorite sixteen patches. Set A is my “church” group consisting of voices that I am most likely to use at rehearsals with the music ministry. Set B is my “jazz/pop” group of voices that are fun for jamming with MP3 backing tracks or even PSR-S950 styles.

If you ever go to use Korg Kontrol Editor on Windows, please note that you must install the Korg USB-MIDI driver first. The install documentation has a small hiccup and doesn’t mention the need for the driver right up front. No biggee, but you will need the driver.

The Korg part of the installation is smooth. The Windows part, however, became a learning experience. A-hem. I had plugged the Triton Taktile (TT) into a USB port before installing the Korg driver. Windows installed some default driver of its own. This is not surprising. However, the Kontrol Editor did not recognize the TT after installing the Korg USB-MIDI driver. The editor has a means of manually selecting MIDI ports and the TT did not appear in the editor’s list of available (connected) ports.

Time for the usual Windows driver-Hell troubleshooting. Before doing anything else, I uninstalled the Korg driver and rebooted.

While searching the Web for a solution, I found several references to the notorious Windows XP MIDI limit. Windows installs a separate driver for not only each different MIDI device (keyboard), but each unique combination of device and physical USB port. Yep, this means that you get two instances of the same driver if you plug your TT (or whatever) into physical USB port A today and into physical USB port B tomorrow! Windows XP remembers up to ten MIDI drivers and if you tend to move your MIDI devices around USB ports, the ten slots get filled up. Then, no more.

There is some debate as to whether this limitation is present in Windows 7 or not. (I’m using Windows 7.) One solution to the problem is to manually remove registry entries for unused (inactive) MIDI devices. Tromping around inside the Windows registry, however, is not a particularly safe or fun activity.

There are two better and safer methods for removing inactive MIDI drivers:

  1. A method suggested by Craig Anderton on Harmony Central. (Search on “windows midi limit”.
  2. The Korg USB driver uninstall utility.

Craig’s method is clear, but requires a little Device Manager knowledge. Basically, you need to execute these two commands as Administrator:

    set devmgr\_show\_nonpresent\_devices=1
    start Devmgmt.msc

Windows launches the Device Manager where you can navigate to the “Sound, video and game controllers” part of the device tree. There, inactive drivers are shown with a greyed out speaker. Right click on each unwanted inactive driver and select “Uninstall” from the contextual menu. Once slots are freed up, you should be good to go.

Or, better yet, try the Korg USB driver utility. This utility program is installed along with the Korg USB driver itself. The uninstall utility displays the unconnected (inactive) MIDI devices and lets you uninstall the associated driver. I installed the Korg USB driver (leaving the TT unattached) and ran this utility on my machine. I selected and removed all of the inactive devices/drivers. Then, I plugged in the TT and voila, the KORG driver and editor recognized the Triton Taktile. All was then good with the world.

Even if you don’t own or use a Korg keyboard, I recommend this utility as a way to work around the Windows MIDI driver divot. Korg really should be commended for writing this utility and making it freely available. As to Windows, I really don’t need any more learning experiences of this type…

Another minor issue is dealing with the 3.5mm (1/8″) stereo output. This output is fine when connecting in stereo to either a 3.5mm or 1/4″ stereo phone input or connecting to two 3.5mm or 1/4″ phone mono inputs — just use the appropriate cable (i.e., TRS to TRS or an insert cable). Connecting from 3.5mm stereo to 1/4″ mono is more troublesome as the right and left channels need to mix down to mono. I received the following reply from Korg USA product support:

You should be ok to connect the Triton Taktile to a mono input by using an 1/8” stereo to a (1/4” or 1/8”) mono cable. I don’t think there are any programs that have sounds panned hard right so all the programs should sound fine.

The HOSA (Livewire) CMP-105 is such a cable. Properly, one should mix down the right and left signals, passing each side through a 1K ohm resistor into a common electrical node (the mono output). You might also want to check out the advice and circuits at Why not wye?

I’m happy to use the CMP-105 as long as there aren’t any long term reliability issues on the Triton Taktile side. The stereo to mono cable does work as suggested by Korg. I will mainly use this solution when driving a mono-only effect like a guitar pedal. Otherwise, there are usually enough available inputs to do a more proper mix down.

Finally, I was curious about the MIDI bank select and program change messages that are needed to select Triton Taktile programs. The TT follows the typical Korg convention: Bank Select MSB is 121 (decimal) for regular voices and Bank select MSB is 120 for drum kits.

The program layout is somewhat schizoid. Korg did not collect all of the drum kits at the end of program list (as Mr. Spock would expect). The drum kits are interspersed with regular voices in the final quartile. Normal voices are assigned banks and program change numbers in the expected fashion up to program number 399, which is the first drum kit. Program number 1 has bank select MSB 121, bank select LSB 0 and program change 0. The program change numbers increase to 127 when the bank select LSB increases to 1 and the program change number rolls over to 0. This continues in an orderly fashion until program number 299 and the first drum kit. After that, the assignment is difficult to enumerate. (Please see the table below.)

I determined the bank select and program change values by monitoring the TT’s MIDI OUT while changing programs through the front panel. If you want to fill out the rest of the table, grab a copy of MIDI OX and monitor the MIDI OUT. Yeah, I’m lazy. 🙂

Program# MSB LSB PC# Program name
1 121 000 000 A. Piano
127 121 000 126 F.Horn Ens
128 121 000 127 Flute
129 121 001 000 Sax Ens
255 121 001 126 Hybrid Brass
256 121 001 127 Blind Brass
257 121 002 000 Reso Brass
383 121 002 126 Brass/Lead
384 121 002 127 PWM Lead
385 121 003 000 Glide Lead
415 121 003 030 Monster
399 120 000 007 Std Kit 1
400 120 000 011 House Kit
401 120 000 015 Psycho Kit
402 120 000 017 Orch&Ethno
403 121 003 018 Velo Hit
404 121 003 019 Gtr Hit
416 120 000 120 Std Kit 2
417 120 000 010 Brush Kit
418 120 000 009 Power Kit