Tuning up a littleBits oscillator

I’m starting to experiment with the littleBits oscillator and synth bits. I’d like to control the oscillators using an Arturia Keystep either through MIDI or through the Keystep’s control voltage (CV) and gate outputs.

Perusing the littleBits forum, I noticed several complaints about how difficult the oscillators are to tune. Setting the basic pitch is not a problem — just turn the PITCH knob. The issue is really intonation. Guitarists are very familiar with intonation, that is, being in tune along the fretboard. The keyboard equivalent is being in tune across the entire keyboard or a given range of keys.

For my initial testing, I assembled a simple littleBits circuit:

Power -> MIDI module -> Oscillator -> Dimmer -> Synth Speaker

The littleBits MIDI module was connected to an Arturia Keystep and for comparison’s sake, a Korg MicroKORG. The MIDI module translates incoming MIDI note on and note off messages into littleBits-compatible CV. The Dimmer is the volume control. I find it much easier to set volume levels, etc. with a full-size pot instead of a trimmer. Also, I strongly recommend putting knobs on the oscillator PITCH pot. It is much easier to set the oscillator pitch accurately when a knob is installed. (Funny how the little things make a big difference.)

My first concern was the actual control voltage being sent to the oscillator. I pulled out my trusty multimeter and measured the Keystep’s pitch (CV) over a wide range of keys (notes). I also measured the CV generated by the littleBits w5 MIDI module. The voltages all look reasonable for 1 volt per octave CV, modulo the limited 3 digit precision of the multimeter. Two notes separated by an octave produced a one Volt difference as expected.

The Keystep generates CV from 0 Volts to 10 Volts. littleBits signals are limited to the range from 0 Volts to 5 Volts. Rather than tempt fate and drive the littleBits oscillator from the Keystep CV output, I decided to put a littleBits CV interface module on order. The CV interface scales CV to the littleBits range — whatever that means. Stay tuned.

The voltage for each note as produced by each CV source (Keystep CV vs. MIDI module) is not the same. For example, the Keystep generates 4.03 Volts for MIDI note C2 while the MIDI module generates 1.20 Volts. Relax. This isn’t a big deal as the basic pitch is easily set by the oscillator’s PITCH control. It’s all relative, man.

I used a Snark guitar tuner to set the pitch and to test intonation. The Snark is an inexpensive small tuner with a microphone input. I like the Snark because it shows the detected note (C, C#, D, etc.) and whether the note is flat or sharp. I don’t like the Snark because the clip-on thingy breaks off almost immediately! The clip-on thingy isn’t necessary for desktop testing, however.

I first tried setting the pitch and intonation by ear. This is where the MicroKORG was really handy. I sent the MicroKORG’s MIDI out to the MIDI-to-CV module and routed the MicroKORG’s audio output to the mixer feeding the studio monitors. I also patched the littleBits audio into the mixer, so I could easily dial up the MicroKorg audio as a pitch reference. Hit a single key on the MicroKORG and both the oscillator and MicroKORG attempt to play the same note. Adjust the PITCH and TUNE knobs appropriately.

The Snark tuner method is much better. The Snark’s display shows when things are sharp or flat. I recommend using a tuner like the Snark instead of matching pitch by ear.

At first I couldn’t get satisfactory intonation beyond a one octave range. This is disappointing and appears to be the place where most forum members gave up. I read the Korg littleBits Synth booklet paying particular attention to the tuning procedure on page 21. One of my biggest complaints about the littleBits system is the lack of detailed documentation and the Synth book was kind of sketchy about tuning and intonation. However, a light did turn on in my head.

I decided to turn the TUNE trimmer fully clockwise (thinking “OFF”). Then, I set the base pitch, i.e., the lowest pitch in the desired range. Next, I checked the highest note in the desired range — about two octaves. Natch, the intonation was bad, so I slowly turned the TUNE trimmer clockwise until the pitch of the highest note was correct. This disturbed the pitch of the lowest note and I had to find a balance between pitchiness at the low and high ends.

The result is fairly playable. I played the chromatic scale from lowest to highest and checked the Snark at each step. The intonation was acceptable.

To make sure this procedure wasn’t a fluke, I tuned the second oscillator using the same method and got the same result. Finally, I wired up the MIDI module driving both oscillators and mixed the audio:

                             |-> Osc ->|
Power -> MIDI -> Split ->|         |-> Mix -> Dimmer -> Speaker
                             |-> Osc ->|

The pitches were danged close and the intonation of the individual oscillators matched quite well. I just needed to adjust the relative tuning to get a good phat sound.

Not bad for “cheap” $16 USD oscillators! It’s rather unfair to blame the oscillator design at this price. Plus, you did say that you want analog synthesis, right? We’ve gotten spoiled by decades of pitch-perfect digital synths. Making the tuning and intonation right is all part of the analog game.

One final thought. The littleBits CV signal driving the oscillators is somewhat under-documented. Voltage Control Lab have a nice analysis. They explain the littleBits OUT signal from the Korg SQ-1. They say that the CV signal plays two roles as a combined gate and pitch control. When the CV is asserted, i.e., the gate is high, the voltage level sets the pitch.

Here’s a more MIDI-centric interpretation. When a MIDI note is off, the CV signal is 0 Volts. The oscillator is silent at 0 Volts. When a MIDI note is on and held, the CV signal sets the pitch. When the MIDI note goes off, the CV signal returns to 0 Volts and silences the oscillator. This appears to be the behavior of the MIDI module (when it is in MIDI IN mode).

The Arduino combo organ is back

If you have a taste for cheesy 1960s combo organ sounds, I just posted the littleBits MIDI organ project. This project is an updated littleBits take on my old Combo Organ project. It uses the same “bottom octave generator” technique to squeeze five sample playback voices out of an Arduino.

Here’s an MP3 demo of the Farfisa voice and a demo of the Vox voice. I drove the MIDI organ from SONAR on a PC.

Here’s why you should prefer the littleBits version. The original project uses the MidiVox shield which is out of production. The littleBits version replaces the MidiVox with two breadboard-based circuits: a MIDI input interface and a Small Peripheral Interface (SPI) digital-to-analog converter (DAC). Easy to build and functionally equivalent. The new sketch incorporates improvements made to the Arduino SPI library and PROGMEM. The current SPI library uses a different convention for sending data to the DAC. PROGMEM is way different now; the old code won’t compile. The newer version of PROGMEM is stricter about typing and const.

The littleBits MIDI organ could form the basis of a sample playback synthesizer. Just replace the Farfisa and Vox waveforms with single cycle samples of your favorite synth or retro keyboard. Waveform space in PROGMEM is still tight, but hey, this is science. It’s supposed to be fun!

You’ll need to add a few headers to the littleBits Arduino module in order to use SPI. Here are some simple directions and tips:

Add SPI to littleBits Arduino Part 1
Add SPI to littleBits Arduino Part 2
Add SPI to littleBits Arduino Part 3

You’ll also find the SPI DAC and MIDI interface designs in parts 2 and 3, respectively.

While you’re at the littleBits site, check out f.j2’s Solina string synthesizer. Retro is bustin’ out all over!

I need to switch gears for a little while and be a musician again. So, I’ll be taking a short break from Arduino projects. More to come on the music side of things…

Add SPI to littleBits Arduino 3

At some point, you’ll want to go beyond the few inputs and outputs provided by the littleBits Arduino bitSnaps.

The stock littleBits Arduino module has twelve unpopulated signal pads:

  • Three analog inputs: A2, A3 and A4.
  • Three digital inputs/outputs: D10, D11 and D13.
  • Six ICSP signals: GND, MOSI/D16, VCC, RESET, SCK/D15, and MISO/D14.

Three of the ICSP pads can be used as ordinary digital inputs/outputs: D14, D15, D16. The same three ICSP pads also implement the Small Peripheral Interface (SPI): MOSI, MISO and SCK.

         GND ---O  O--- RESET
    MOSI/D16 ---O  O--- SCK/D15
         VCC ---O  O--- MISO/D14

The first article in this short series discusses the ICSP pads and how to solder a 2×3 header to the pads. The second article describes a circuit and code for a SPI-based digital-to-analog (DAC) converter using the Microchips MCP4921 integrated circuit.

The MCP4921 requires an active-low chip select (also known as “Slave Select”) signal to activate data communication with the SPI master (the Arduino). As described in part 2, I generated chip select through one of the bitSnap digital pins: D1, D5 or D9. D5 and D9 are buffered by a relatively slow-acting op amp. The op amp effectively imposes a delay on the chip select signal necessitating a long busy wait in the DAC’s interrupt routine. Pin D1 is not buffered, doesn’t require the busy wait and is faster.

Pin D1 itself does double duty. Depending upon its configuration, pin D1 functions as either an ordinary digital output or as the serial data output (TX). My latest project incorporates MIDI input and uses the Arduino MIDI library to parse and dispatch MIDI messages. After much experimentation and frustration, I determined that the MIDI library just doesn’t know how to keep its paws off pin D1 (TX). Even with MIDI THRU turned off (i.e., calling MIDI.turnThruOff()), the library seems to interfere with D1/TX. The interference disrupts communication with the MCP4921 DAC. Sending chip select by D5 or D9 is too slow, so it became time to populate the rest of the Arduino’s input and output pads.

We need two 1×3 pin headers to finish the job. I bought 1×3 pin headers from Jameco. In order to save time and money, you could just cut two 1×3 headers from a long header strip instead. Once again, I used a solderless breadboard as a jig to hold the headers in place while soldering. Here’s a tip (pun intended). Apply pressure to the side of each pin with the soldering tip; do not push down on the pin. If you push down, the pin may sneak down into the through-hole!

The 1×3 pin headers and the finished Arduino module are shown in the picture below. (As always, click on images for higher resolution.) With the 1×3 header pins soldered in place, I connected the MCP4921 chip select to Arduino pin D10 using a male-to-female jumper wire and changed the sketch to toggle D10.

When I was searching for the headers, I came across “breadboard friendly” 5-pin DIN sockets sold by Adafruit. Adafruit charges a pretty penny for these sockets, but they are well worth it. With the success of the SPI DAC implementation, I decided to build the MIDI input interface on a small solderless breadboard (picture below). These small 170 point breadboards are so inexpensive, there isn’t much need to build on a prototyping board.

Here are the schematic and broadboard layout for the MIDI input interface. Have fun!

A tale of three keyboards

First, another customer service success story!

I was watching and waiting for a controller keyboard to complement the littleBits Synth modules. I especially wanted a keyboard that generates gate, control voltage (CV) and standard 5-pin MIDI all-in-one. The Arturia Keystep fit the bill and it’s been getting rave reviews. So, when I saw a “mint” Keystep at Musician’s Friend for a few dollars off, I put one on order.

Musician’s Friend (MF) does a good job of assessing the condition of customer returns. Once again, they didn’t disappoint. Physically and electronically, everything is ship-shape. It’s a good way to save a few bucks, although a brand new Keystep is not a budget-buster at $119 USD street.

The only issue — and it’s not exactly MF’s fault — is that someone registered the Keystep and copped the Ableton Live Lite activation code. Cheeky and damned annoying. The Arturia site would not let me register the product (my main goal).

Fortunately, Arturia has excellent customer service. (A shout-out to Amine and Guillaume!) Within 24 hours, the Keystep was registered and I had the code for Ableton Live Lite. Great job!

I’m trying to spin out another littleBits project and haven’t been able to dive into the Keystep as yet. However, my first impression while unboxing is highly favorable. For a product that streets at $119, this beast is solid — perhaps the best build quality that I’ve seen in an inexpensive controller. Arturia have a “slim key” design of their own. The slim keys are quite playable and they feel positively robust.

The unboxing led me to a quick comparison between the three short controller keyboards that I have on-hand. The picture below shows, from top to bottom, the Roland SK88Pro (37 keys), the Arturia Keystep (32 keys), and the Korg MicroKORG XL+ (37 keys). I shot all three keyboards together in the same image, then edited the image to compare the relative key and keyboard sizes. The SK88Pro is a “full” size synth keyboard and is comparable to the old Roland JV, XP, XV keybeds. The Arturia Keystep keys are a little wider and a little longer than the MicroKorg XL+. It always takes me a few minutes to adjust to the XL+. Adjustment to the Keystep is even easier.

I hope this short post helps you out!

Sing “Do Re Mi” using an Arduino SPI DAC

After a few months away from electronics, I dusted off the littleBits Arduino project that I completed way back in September. Just as I completed the project, we took a short vacation trip — just enough time away to break the creative flow and to procrastinate about a write-up.

The old-new project uses the Arduino SPI digital-to-analog converter which I sketched out in two earlier posts: How to add SPI to a littleBits Arduino and the Arduino SPI DAC design. The SPI DAC greatly improves audio quality over the el-cheapo PWM+filter approach. It adds a little extra hardware, but it’s worth it.

The SPI DAC project adds a 12-bit digital-to-analog converter (DAC) to the littleBits Arduino. The DAC is a Microchips Technology MCP4921. The design is fairly simple and could be whipped together by a novice. I built the circuit on a solderless breadboard in order to avoid soldering. You still need to solder a 2×3 header to the littleBits Arduino. Can’t avoid it unless littleBits decides to sell Arduino modules with pre-installed headers.

I wanted to make the project “kid friendly.” So, rather than geeking out with MIDI, synthesis, etc., the sketch sings a song in Solege (i.e., “Do, re, mi). The Arduino’s program memory (PROGMEM) holds the waveforms (samples) for the eight syllables of the C major scale. The song is represented in an array where each row of the array contains the pitch and duration of a note. The sketch steps through the song array and sings each note (a Solfege syllable). Check out the MP3 demo.

As you might guess, it took a fair bit of effort to fit the waveforms into 28K bytes of PROGMEM! For more information, read about the waveform development process.

I posted the full design and code on the littleBits web site. I want to move ahead to new projects and frontiers and I won’t be posting the detailed design here. I do want to use the SPI DAC in future projects.

While you’re at the littleBits site, please check out the Mini Pops Drumcomputer. This is a very nice update on the Lo-fi Beat Box project. The developer, f.j2, fabricated the low pass filter as a littleBits module using the littleBits Hardware Development Kit (HDK). He also added new waveforms. Great job!

NAMM 2017: Yudo Kami-OTO

You won’t be seeing this from Yamaha, Korg or Roland.

It’s the Yudo Kami-OTO. The Kami-OTO is a DIY musical instrument keyboard made from cardboard. The cardboard construct sits over a computer (“ASCII”) keyboard. The cardboard keys hit the computer keyboard keys. An app interprets the key taps and makes the noise.

Yudo also make a very interesting synth/piano keyboard: the NEUMAN. They have announced version two (NEUMAN-2) at NAMM 2017. Take the link and check it out. It’s control surface is one lone touch panel. Cool.

Speaking of Yamaha, here’s a quick hit. The Japanese Yamaha site is advertising the version 1.5 update for the Montage. The update includes a new rotary speaker effect. Yaaaaaaaaaaaaay!

Preparing audio waveforms for Arduino PROGMEM

The Arduino lo-fi Beat Box is kicking up some activity and comments on the littleBits site. (Follow this link to the Beat Box project page at littleBits.)

Two littleBits inventors have made considerable progress in suppressing the noisy buzz which seems to plague the el-cheapo lo-fi DAC design. I eventually gave up fighting the buzz and built a proper Small Peripheral Interface (SPI) DAC for the littleBits Arduino. See this page and this page for more information about the SPI DAC design. The main component is the Microchips MCP4921 12-bit SPI-compatible DAC. The audio output is much quieter.

I built a littleBits song player that sings a song in Do-Re-Mi Solfege. It uses the SPI DAC for conversion. Although I completed the project at the beginning of September 2016, I’m just now getting to a write-up for the littleBits site!

If you’re still hacking the Beat Box project, you should check out the ongoing discussion in the littleBits forum. Inventor alexpikkert built a rather spiffy passive low pass filter module using littleBits bitSnaps. I’m waaay too ham-handed for that kind of work, so I’m quite impressed by his implementation.

Another inventor, Frankje, would like to contribute some new drum waveforms. He needs more information about the drum waveforms and the process that I used to make them. So, here goes.

The drum waveforms (AKA “the samples”) are stored in the Arduino’s program memory (PROGMEM). PROGMEM is the non-volatile flash memory where the uploaded sketch resides. PROGMEM is quite big by Arduino standards. The Leonardo (ATmega32u4) has 1K byte EEPROM, 2.5K bytes SRAM (read/write RAM for variables) and 32K bytes of flash memory (PROGMEM). The bootloader uses 4KBytes of PROGMEM leaving 28K bytes for user code and data.

Notice that I said “and data.” The Arduino developers wisely give a sketch direct access to data stored in PROGMEM. A sketch reads data from PROGMEM using an access functions such as pgm_read_byte_near(). Thanks to PROGMEM, Arduino programmers can store a reasonably large amount of non-volatile data along with their code.

By now, if you are using a modern day musical instrument library (i.e., 10+ GBytes of sampled instruments), you’re shreiking in horror. I wanted to keep the Beat Box design small, simple and self-contained — no SD card or bulk flash memory. That means cramming all of the percussion samples into less than 28KBytes. Please remember, our sketch needs to fit into that 28K bytes, too.

Immediately, I chose a sampling rate and size that minimized space without sacrificing too much quality. The Beat Box sample format is 22,050Hz, signed 8-bit, mono. I tried a 10,025Hz sampling rate, but too much of the top end (high frequency brightness) was lost. The Arduino PWM conversion technique provides, at best, 8 or 9 bits of resolution, so its was easy to settle on 8-bit signed. Going mono cut waveform size in half. Stereo would require a second lo-fi DAC as well as upping memory consumption by a factor of two.

I started out sampling a TR-808 kit here and a TR-808 kit there. Nothing sounded as good as the TR-808 samples produced by Michael Fischer. Michael sampled a TR-808 back in September 1994 (!) and his sample set is excellent. He sampled each of the TR-808 voices over a range of knob (parameter) values. I went through the sample set, found the sounds which (to me) represent the 808, and chose sounds with the smallest WAV files from that representative subset.

Then, the torture began.

Michael’s samples are 44,100Hz, 16-bit, mono. So, I first down converted the chosen few waveforms to 22,050Hz, 8-bit, mono and I trimmed the samples as short as I could dare. My main audio editing tool is Sony Sound Forge Audio Studio, but any good audio editor could do the job. I’m most familiar with Sound Forge and can fly with it.

The next step is getting each waveform into a compilable, C-language source file. I converted each 22,050Hz, 8-bit mono WAV file to a RAW audio file. A RAW audio file does not have a header and contains only waveform samples. I wrote a program, raw2c.c, to convert a raw file to a C-language include file containing a formatted, C-language array that is initialized with the waveform samples. The program counts the number of samples and generates a #define for the array length.

Here is the source code for raw2c.c.

I also wrote a simple command script to batch convert all sixteen RAW files and to concatenate the individual include files into a single include file, waveforms.h.

Once I had the waveform.h file, I compiled the entire sketch to see if everything would fit into 28K bytes.

Then I repeated the trim, convert and compile process, again. And, again. And, again. You get the picture. I eventually had to mangle the waveforms. Truly a shame. The final cymbal sounds have only a brief shimmer of their true glory.

There you have it! I applied the same development process to the Do-Re-Mi waveforms although I started out with samples of my vocoded voice. Memory space requirements were even tighter (!) and I had to reduce the sampling rate to 11,025Hz.

Good luck, squeeze away and convert!

Copyright © 2017 Paul J. Drongowski

Tip-toe through the tech

Last year ’bout this time, we were all holding our collective breath awaiting the new Yamaha Montage. There are two products which I expect to see from Yamaha sometime in the next one to two years:

  1. The successor to the mid-range MOXF synthesizer, and
  2. The successor to the top-of-the-line (TOTL) Tyros arranger workstation.

NAMM 2017 seems a little too soon for both products. In the case of the MOXF successor, Yamaha conducted marketing interviews during the summer of 2015. I would guess that MOXF sales are still pretty good and no new products from the usual suspects (Korg, Roland) are visible on the horizon. The Krome and FA could both use an update themselves. Not much market pressure here at the moment. (Korg’s NAMM 2017 announcements are, so far, a little underwhelming.)

Read my MOX retrospective and interview follow-up.

I suspect that the Tyros successor is somewhat closer to launch. Speculation has been heated ever since Yamaha filed for a US trademark on the word mark “GENOS”. The word mark was published for opposition on November 15, 2016. “Published for opposition” means that anyone who believes that they will be damaged by registration of the mark must file for opposition within 30 days of publication. If “GENOS” is indeed the name for the Tyros successor, then the 30 day period ending December 15, 2016 is cutting it very close to NAMM 2017. Even more ludicruous if Yamaha were to begin manufacturing products printed with that name for a NAMM 2017 launch. Imagine the scrap if opposition was successful!

For quite some time, I have been meaning to summarize the key U.S. patents that I believe to be GENOS-related. (Assuming that “GENOS” is the name!) I’ve procrastinated because the launch date is most likely fall 2017 at the earliest as previous Yamaha mid- and high-end arranger models are typically launched in the fall in anticipation of the holiday selling season.

A much larger barrier is the task of reading and gisting the patents. Patents are written in legalese and are much more difficult to read than the worst written scientific papers! One of the folks on the PSR Tutorial forum suggested making a list of the top five technologies for the new TOTL arranger. I generally hate the superficial nature of “list-icles,” but the suggestion is a good one. Nothing will get done as long as the barrier is big because I would much rather jam and play! I’m supposed to be retired.

The 2016 Yamaha annual report states that Yamaha want to make innovative products which are not easily copied by competitors. Patents — legally protected intellectual property — are essential to achieving this goal. Generally, a company only applies for a patent on technology in which they have a serious business interest due to the significant cost of obtaining and maintaining patent protection.

So, here are a few of Yamaha patented technologies which could appear in future products — perhaps GENOS, perhaps others.

SWP70 tone generator

This may seems like old news…

The next generation SWP70 tone generator first appeared in the mid-range Yamaha PSR-S970 arranger workstation. The SWP70 made its second appearance in the Yamaha Montage synthesizer. The S970 incorporates only one SWP70 and does not make full use of the chip. (At least three major interfaces are left unconnected.) In keeping with Yamaha’s TOTL design practice, the Montage employs two SWP70 integrated circuits: one each for AWM2 sample-playback and FM. A second sample cache interface on the AWM2 side is unconnected.

The Tyros successor likely will use two SWP70 tone generators, too. The number of available tone generation channels with two SWP70s will be massive (512 channels). Yamaha could opt for a single SWP70 and still outmatch the current generation Tyros 5. Like the Montage, there will be enough insert effect DSP processors to cover each style and user part, as many as two for every part.

It will be interesting to see (and hear) if the GENOS will make use of the second sample cache interface. A second cache would not only support more tone generation channels, but might be necessary for long, multi-measure musical phrases that are needed for full audio styles (discussed below).

The SWP70 flash memory interface follows the Open NAND FLASH interface (ONFI) standard, the same as solid state drives (SSD). ONFI memory devices can be stacked on a bi-directional tri-state bus, so potentially, the GENOS could support a large amount of internal waveform storage. This flash memory will contain the “expansion memory,” that is, physical memory reserved in flash memory for user waveforms. The expansion flash memory expansion modules (FL512M, FL1024M) are dead, Jim.

If you’re interested in Yamaha AWM2 tone generation, here’s a few patents to get you started:

  • Patent 9,040,800 Musical tone signal generating apparatus, May 26, 2015
  • Patent 8,383,924 Musical tone signal generating apparatus, February 26, 2013
  • Patent 8,389,844 Tone generation apparatus, March 5, 2013
  • Patent 8,957,295 Sound generation apparatus, February 17, 2015
  • Patent 8,035,021 Tone generation apparatus, October 2011
  • Patent 7,692,087 Compressed data structure and apparatus and method related thereto, April 6, 2010

U.S. Patent 8,957,295 is the patent issued for the SWP70 memory interface. U.S. Patent 9,040,800 describes a tone generator with 256 channels — very likely the SWP70.

Pure Analog Circuit

This may seem like old news, too, since Pure Analog Circuit (PAC) debuted in the Yamaha Montage.

Pure Analog Circuit is probably the least understood and least appreciated feature of the Montage. It’s not just better DACs, people. The high speed digital world is very noisy as far as analog audio is concerned. Yamaha separated the analog and digital worlds by putting the DACs and analog electronics on their own printed circuit board away from noisy digital circuits. Yamaha then applied old school engineering to the post-DAC analog circuitry, paying careful attention to old school concerns like board layout for noise minimization and clean power with separate voltage regulation for analog audio. Yamaha’s mid- to high-end products have always been quiet — PAC is pristine.

Since the PAC board is a separate, reusable entity, I could see Yamaha adopting the same board for GENOS.

Styles combining audio and MIDI

Yamaha are constantly in search of greater sonic realism. Existing technologies like Megavoices and Super Articulation 2 (Advanced Element Modeling) reproduce certain musical articulations. However, nothing can really match the real thing, that is, a live instrument played by an experienced professional musician. PG Music Band-in-a-Box (BIAB), for example, uses audio tracks recorded by studio musicians to produce realistic sounding backing tracks. The Digitech TRIO pedal draws on the PG Music technology for its tracks. (“Hello” to the Vancouver BC music technology syndicate.)

Yamaha have applied for and been granted several patents on generating accompaniment using synchronized audio and MIDI tracks. Here is a short list of U.S. patents:

  • Patent 9,147,388 Automatic performance technique using audio waveform data, September 29, 2015
  • Patent 9,040,802 Accompaniment data generating apparatus, May 26, 2015
  • Patent 8,791,350 Accompaniment data generating apparatus, July 29, 2014
  • Application 13/982,476 Accompaniment data generating apparatus, March 12, 2012

There are additional patents and applications. Each patent covers a different aspect of the same basic approach, making different claims (not unusal in patent-land). Yamaha have clearly invested in this area and are staking a claim.

The patents cite four main motivations, quoting:

  1. The ability to produce “actual musical instrument performance, human voices, natural sounds”
  2. To play “automatic accompaniment in which musical tones of an ethnic musical instrument or a musical instrument using a peculiar scale”
  3. To exhibit the “realism of human live performance”
  4. To advance beyond known techniques that “provide automatic performance only of accompaniment phrases of monophony”

Your average guy or gal might say, “Give me something that sounds as natural as Band-in-a-Box.” Yamaha sell into all major world markets, so the ability to play ethnic instruments with proper articulation is an important capability. Human voice, to this point, is limited to looped and one-shot syllables, e.g., jazz scat. The new approach would allow long phrases with natural intonation. [Click on images in this article for higher resolution.]

audio_accompaniment_tracks

Currently, mid- and high-end Yamaha arrangers have “audio styles” where only the rhythm track is audio. The patents cover accompaniment using melodic instruments in addition to rhythm instruments. The melodic audio tracks follow chord and tempo changes just like the current MIDI-based styles. Much of the technical complexity is due to synchronization between audio and MIDI events. Synchronization is troublesome when the audio tracks contain a live performance with rubato. Without good synchronization, the resulting accompaniment doesn’t feel right and sounds sloppy.

Accompaniment from chord chart

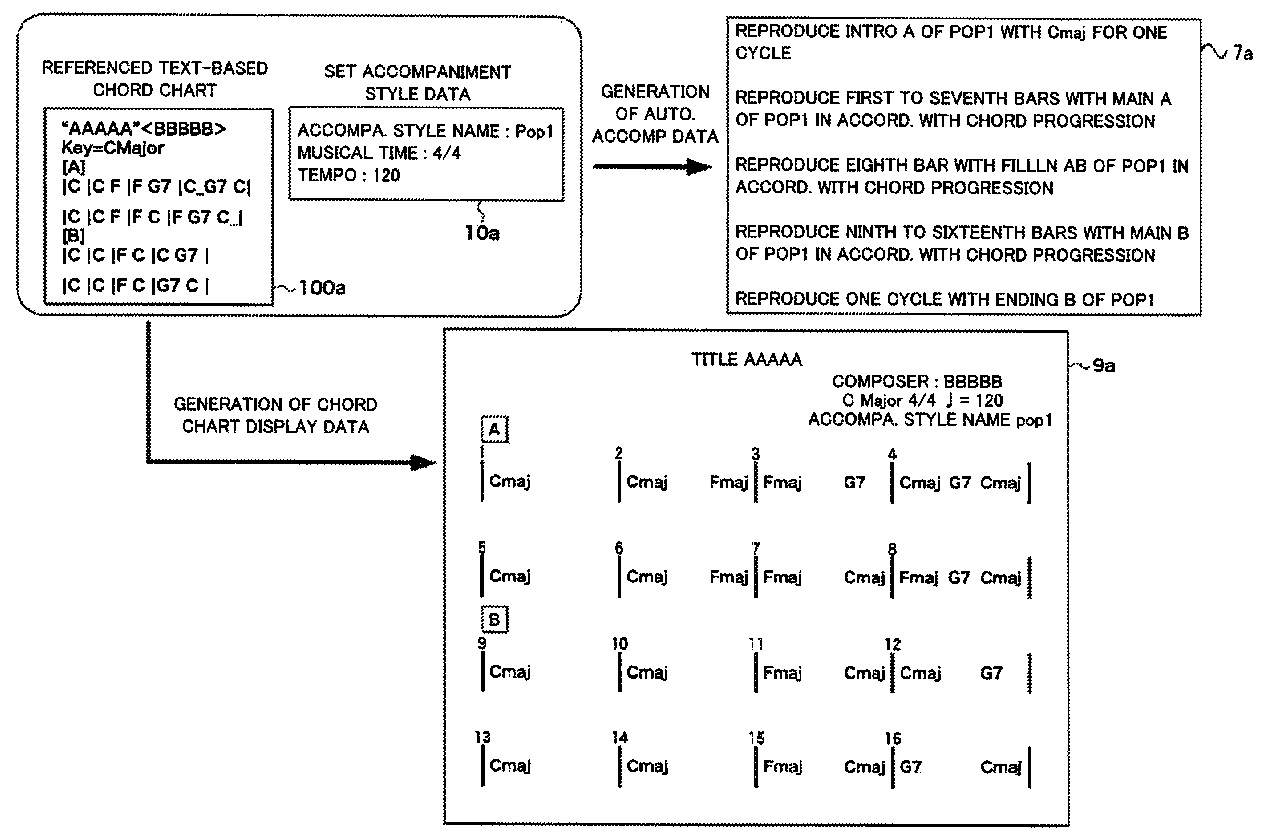
This next feature will be very handy. U.S. Patent 9,142,203 is titled “Music data generation based on text-format chord chart,” September 22, 2015. If you use textual chord charts (lyrics plus embedded chord symbols), you will want this!

chord_chart_example

Simply put, the technique described in this patent translates a textual chord chord to an accompaniment. The accompaniment is played back by the arranger. The user can select tempo, style, sections (MAIN, FILL IN) and so forth.

The translator/generator could be embedded in an arranger or it could be implemented by a PC- or tablet-based application. Stay tuned!

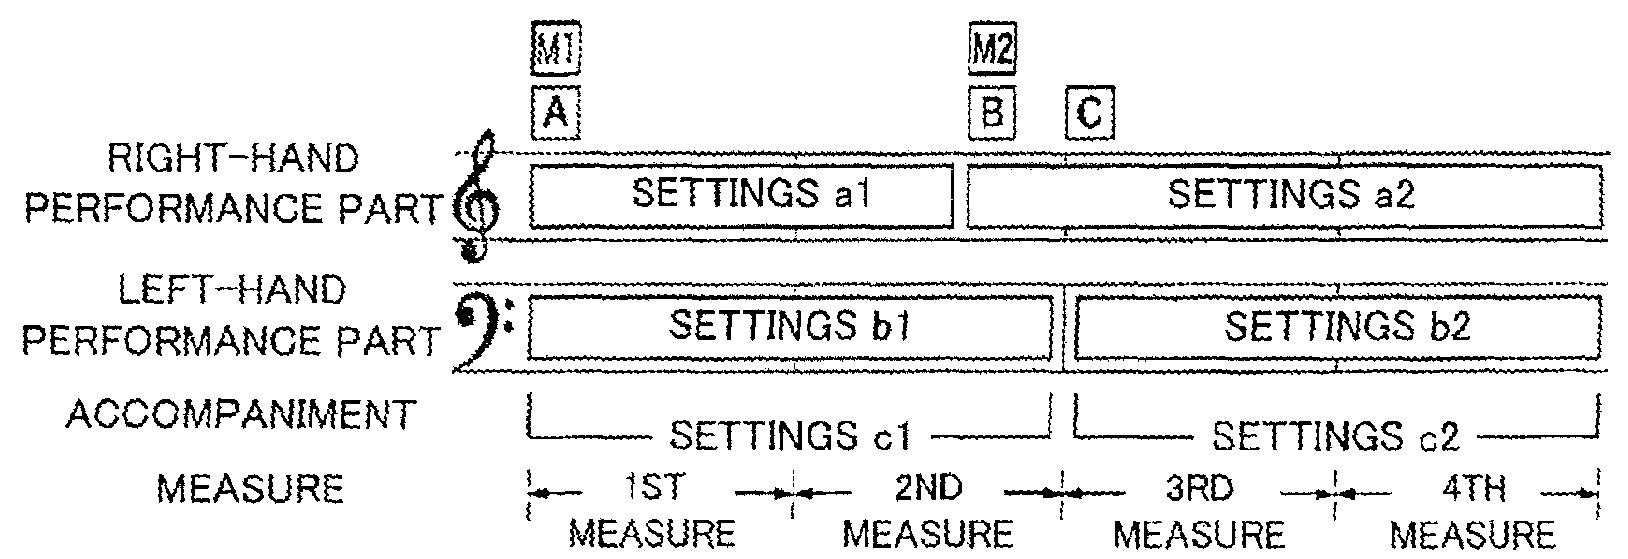
Selectively delayed registration changes

A registration is a group of performance parameters such as the right hand voice settings, left hand voice settings, accompaniment settings, and so forth. Mid- and high-end arrangers have eight front panel buttons where each button establishes a set of parameter values (“readout”) when the button is pushed. It’s the player’s job to hit the appropriate button at the appropriate time during a live performance to make voice settings, etc. A player may need a large number of buttons, if a musical performance is complicated.

Usually only a few parameters are different from one registration to the next. Recognizing this, the technique described by U.S. Patent 9,111,514 (“Delayed registration data readout in electronic music apparatus,” August 18, 2015) delays one or more parameter changes when a button is pushed. The user specifies the parameters to be delayed and the delay (such as the passage of some number of beats or measures, etc.) Thus, a single registration can cover the work of multiple individual registrations.

delayed_registration

I’ll have to wait to see the final product to assess the usefulness of this feature. Personally, I’d be happy with a configuration bit to keep OTS buttons from automatically turning on the accompaniment (ACCOMP). Sure would make it easier to use the OTS buttons for voice changes.

Ensembles / divisi

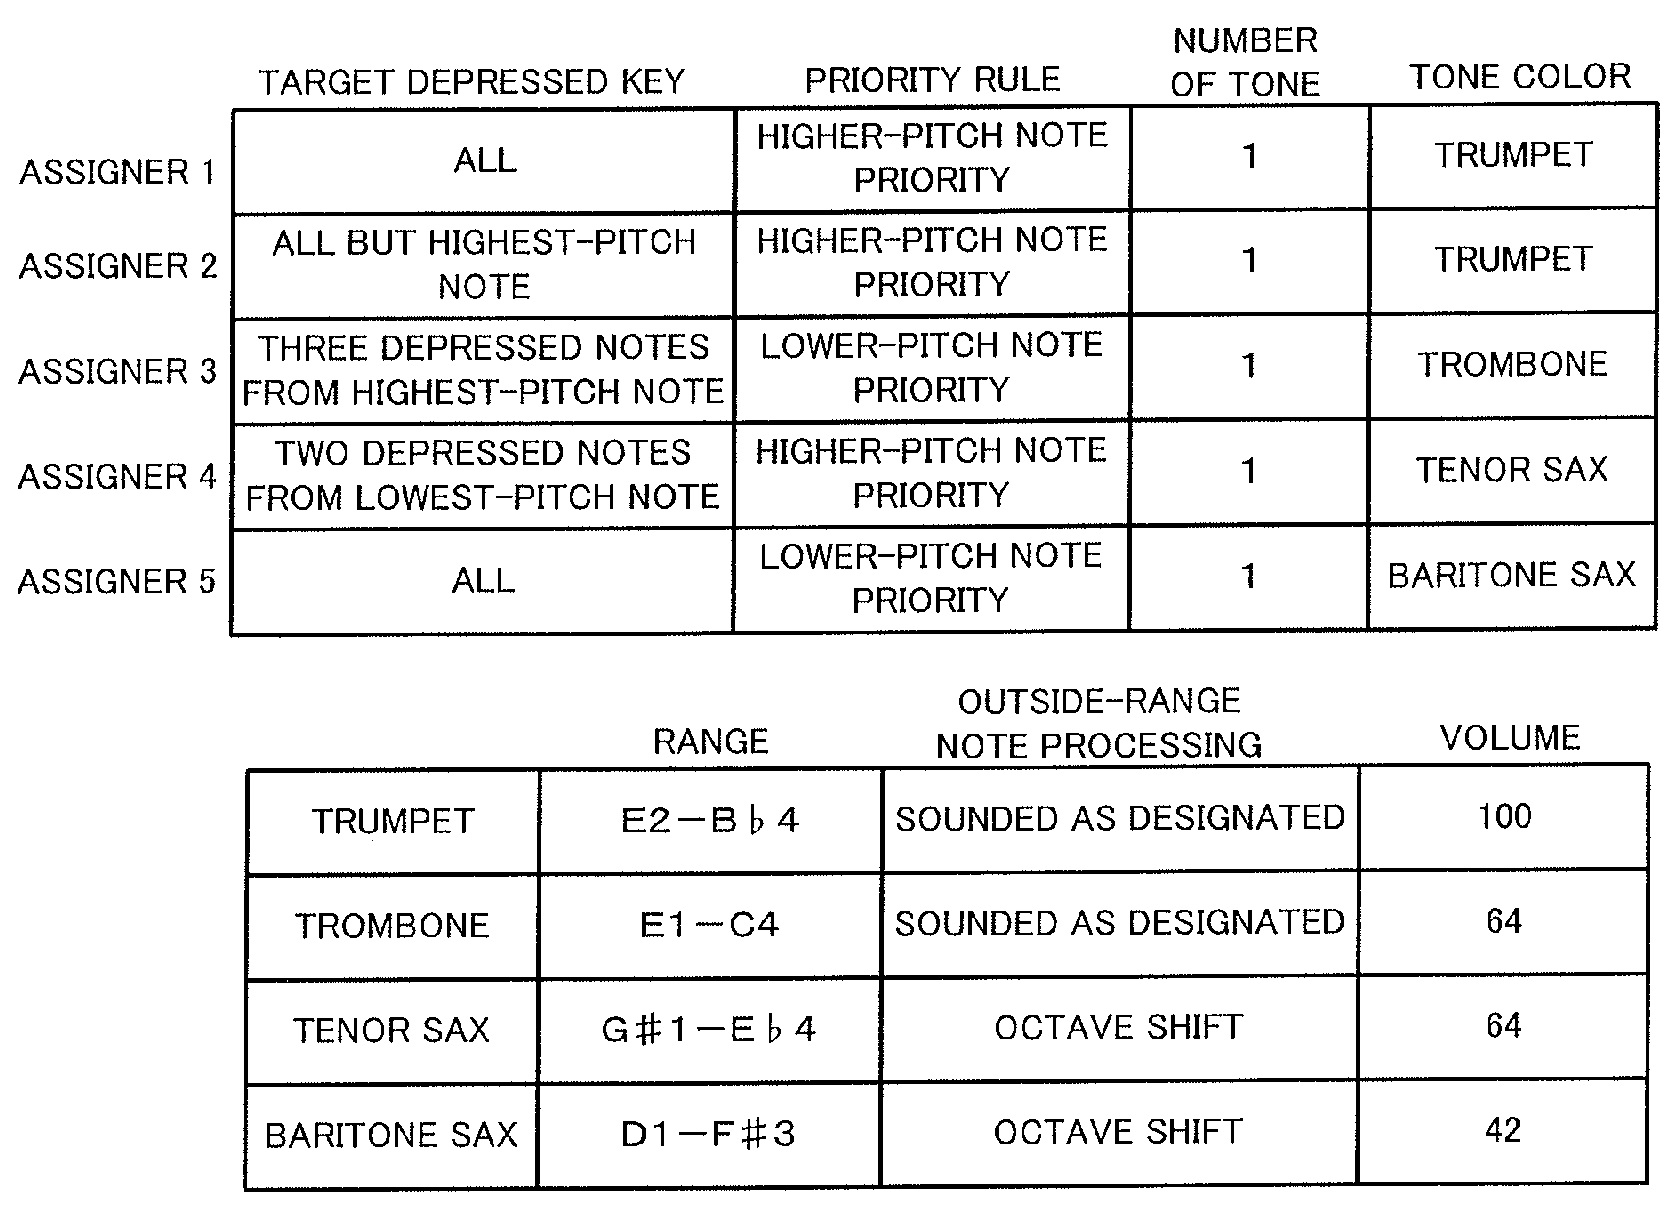
Tyros 5 ensemble voices assign played notes to individual instrument voices in real time, allowing a musician to perform divisi (divided) parts. Tyros 5 ensembles can be tweaked using its “Ensemble Voice Key Assign Type List.” Types include open, closed, and incremental voice assignment. U.S. Patent 9,384,717, titled “Tone generation assigning apparatus and method” and published July 5, 2016, extends Tyros 5 ensemble voice assignment.

The technique described in 9,384,717 gives the musician more control over part assignment through rules: target depressed key, priority rule, number of tones to generated, note range, etc. The rules handle common cases like splitting a single note to two or more voices.

ensemble_rules

These extensions could lead to some serious fun! I didn’t feel like the Tyros 5 ensemble feature was sufficiently smart and placed too many demands on the average player, i.e., less-than-talented me. The rules offer the opportunity to shift the mental finger work to software and perhaps could lead to more intuitive ensemble play. Neat.

Voice synthesis

As I alluded to earlier, arrangers make relatively primitive use of the human voice. Waveforms are usually limited to sustained (looped) or short (one-shot) syllables.

Yamaha have invested a substantial amount of money into the VOCALOID technology. VOCALOID draws on a singer database of syllable waveforms and performs some very heavy computation to “stitch” the individual waveforms together. The stitching is like a higher quality, non-real time version of Articulated Element Modeling (AEM).

VOCALOID was developed through a joint research project (led by Kenmochi Hideki) between Yamaha and the Music Technology Group (MTG) of the Universitat Pompeu Fabra in Barcelona, Spain. VOCALOID grew from early work by J. Bonada and X. Serra. (See “Synthesis of the Singing Voice by Performance Sampling and Spectral Models.”) More recent research has stretched synthesis from the human voice to musical instruments. Yamaha hold many, many patents on the VOCALOID technology.

Patent 9,355,634, titled “Voice synthesis device, voice synthesis method,” is a recent patent concerning voice synthesis (May 31, 2016). It, too, draws from a database of prerecorded syllables. The human interface is based on the notion of a “retake,” such as a producer might ask a singer to make in a recording studio using directives like “put more emphasis on the first syllable.” The retake concept eliminates a lot of the “wonky-ness” of the VOCALOID human interface. (If you’ve tried VOCALOID, you know what I mean!) The synthesis system sings lyrics based on directions from you — the producer.

An interface like this would make voice synthesis easier to use, possibly by novices or non-technically oriented musicians. The big question in my mind is whether voice synthesis and editing can be sped up and made real time. Still, wouldn’t it be cool if you could teach your arranger workstation to sing?

Music minus one

This work was conducted jointly with the MTG at the Universitat Pompeu Fabra. A few of the investigators were also involved in VOCALOID. Quoting, “The goal of the project was to develop practical methods to produce minus-one mixes of commercially available western popular music signals. Minus-one mixes are versions of music signals where all instruments except the targeted one are present.”

This is not good old center cancellation. The goal is to remove any individual instrument from a mix regardless of placement in the stereo field. You can hear a demo at http://d-kitamura.sakura.ne.jp/en/demo_deformation_en.htm.

I doubt if this technique will appear on an arranger; the computational requirements are too high and the method is not real time. However, “music minus-one” is very appealing to your average player (that is, me). My practice regimen includes playing with backing tracks. I would love to be able to play with any commercial tune on whim.

There are patents:

  • US Patent 9,002,035 Graphical audio signal control
  • US Patent 9,224,406 Technique for estimating particular audio component
  • US Patent 9,070,370 Technique for suppressing particular audio component

and there are scientific papers:

  • “Audio Source Separation for Music in Low-latency and High-latency Scenarios”, Ricard Marxer Pinon, Doctoral dissertation, Universitat Pompeu Fabra, Barcelona, 2013.
  • D. Kitamura, et al., “Music signal separation by supervised nonnegative
    matrix factorization with basis deformation,” Proc. DSP 2013, T3P(C)-1, 2013.
  • D. Kitamura, et al., “Robust Music Signal Separation Based on Supervised Nonnegative Matrix Factorization with Prevention of Basis Sharing”, ISSPIT, December 2013.

Music analysis

Yamaha have put considerable resources into what I would call “music analysis.” These technologies may not (probably will not) make it into an arranger keyboard. They are better suited for PC- or tablet-based applications.

I think we have seen the fruits of some of this labor in the Yamaha Chord Tracker iPad/iPhone application. Chord Tracker identifies tempo, beats, musical sections and chords within an audio song from your music library. It displays the extracted info in a simple chord chart and can even send the extracted “lead sheet” to your arranger. The arranger plays back the “lead sheet” as an accompaniment using the selected style.

We’re probably both wondering if Chord Tracker will integrate with the chord chart tool described above. Stay tuned.

Yamaha Patent 9,378,719 (June 28, 2016) is a “Technique for analyzing rhythm structure of music audio data.” Patent 9,117,432 (August 25, 2015) is an “Apparatus and method for detecting chords.” I wouldn’t be surprised if Chord Tracker draws from these two patents.

Yamaha has also investigated similarity measures and synchronized score display:

  • Patent 9,053,696 Searching for a tone data set based on a degree of similarity to a rhythm pattern, June 9, 2015
  • Patent 9,006,551 Musical performance-related information output device, April 14, 2015
  • Patent 9,275,616 Associating musical score image data and logical musical score data, March 1, 2016

I’m not sure where Yamaha is going with similarity measures and searching. Will they use similarity measures to selected accompaniment phrases? Who knows?

The work on score display synchronizes the display of the appropriate part of a musical score with its live or recorded performance. These techniques may be more appropriate to musical education and training, particularly for traditional brass, string and woodwind players. Yamaha derives considerable revenue from traditional instruments and this is perhaps a way to enhance their “ecosystem” for traditional acoustic instruments.

Score display is one possible application of Yamaha’s patented technique to transmit performance data via near-ultrasonic sound. The technique borrows one or more tone generation channels to generate the near-ultrasonic data signal. See my earlier post about U.S. Patent 8,779,267 for more details.

So long for now!

That’s it! I hope you enjoyed this brief tour through a few of Yamaha’s recent patent grants and filings.

If you want more information about a particular patent, then cruise on over the the U.S. Patent and Trademark Office (USPTO) web site. Navigate to patent search and plug in the patent number.

Copyright © 2017 Paul J. Drongowski

Round and round they go

Here’s a couple of new products to be announced at NAMM 2017.

The first product is a rotary speaker system that doesn’t use any rotating elements. It’s the Moon Amplification Skamp®.

moon_amp_skamp

The Skamp® has nine transducers in total: six speakers and four horns. There are two speakers and one horn per side. The DSP models a the physical movement of sound around a room by shooting the audio out each side in a round-robin fashion.

moon_amp_sound_paths

This design is a real head-slapper. Why didn’t someone think of it before? Kudos. I haven’t seen a retail price as yet.

If you want more info, you can check out the U.S. Patent:

Apparatus and Method for a Celeste in an Electronically-Orbited Speaker
US patent number: 9,286,863
Publication date: March 15, 2016
Inventor: Nancy Diane Moon

BTW, if you live in the USA, patent law does not allow “personal use.” So, forget about building this one in your backyard!

In the Something Red category, check out the Rock’N’Rolla junior briefcase turntable. You can get these guys in black, white, and teal, too. All set to spin your 33s, 45s and 78s.

rock_n_rolla_red

The Rock’N’Rolla drew out a moment of nostalgia — the first time I ever heard Jimi Hendrix’ Purple Haze. In 1967, I was playing in a Motown, Soul, Top 40s garage band. The guy who was our erstwhile manager came rushing in and, breathing hard, said, “You’ve got to hear this!”

Being dirt poor teens, nobody had a working record player. The only player that could spin a record had a busted amplifier. So, we put the 45 on the player, turned it on, put our ears next to the tone arm, and listened to the needle scratch out “Purple Haze” unamplified.

I didn’t get a chance to cover “Purple Haze” until I moved on to the psychedelic band — which still covered a few Motown tunes lest we got our butts kicked. Cleveland, 1967.

Won’t be long, yeah!

Winter NAMM 2017 starts in two weeks (January 19). As usual, we gear freaks can’t wait to get our annual new product fix!

Roland jumped the field and announced a few new products at the 2017 Consumer Electronics Show (CES). They appear to be rolling out a new consumer-oriented product line, “GO:”, for amateur musicians and music makers.

Roland announced two new keyboards for beginning players: the GO:KEYS (G-61K and G-61KL) and the GO:PIANO. Both products target the entry-level market currently dominated by Yamaha and Casio. This is a smart business move as the entry-level segment moves a lot of units and offerings in this segment have been getting stale. Here are estimated USA sales statistics for 2014 in the “portable keyboard” segments:

    Category                       Units            Retail value
    -----------------------------  ---------------  -------------
    Portable keyboards under $199    656,000 units  $ 64,000,000
    Portable keyboards over $199     350,000 units  $123,000,000
    Total portable keyboards       1,006,000 units  $187,000,000

    (Source: NAMM)

Unit volume is high, but price and margins are razor thin. Keyboards in the “under $199” category are sold mainly in big box stores, not musical instrument retailers. So, it will be interesting to see where the new Roland keyboards are sold.

The GO:KEYS is most similar to an entry-level arranger keyboard. Estimated street price is $299. Roland is selling two models: a model with Bluetooth support and a model without. Probably depends on their ability to get RF type acceptance in a country or region. The GO:KEYS claims General MIDI 2 (GM2) support among 500 “pro-quality” sounds. The GM2 tone set consists of 256 melodic instruments and nine drum kits. I produced quite a few decent backing tracks using the Roland GM2 sound set on its RD-300GX stage piano. If Roland adopted this set, then the GO:KEYS should sound pretty decent (at least through external monitors rather than its internal speakers). No manual yet so it’s hard to say specifically what other sounds are included. Even if they recycled some chestnuts from the old JV/XP/XV, there is hope.

roland-go_keys

The Roland GO:PIANO is, ta-da, a portable piano. This product has the Yamaha Piaggero line in its cross-hairs. The estimated street price is $329. Again, no manual, so it’s hard to assess the feature set. Pricing on both products places them at the higher end of the entry-level market. The inclusion of Bluetooth support at this price point is a significant differentiator.

roland_go_piano

Both the GO:KEYS and GO:PIANO are battery powered (six AA batteries) in addition to an AC adapter. Both products use one-off fixed field LCD text and graphics like the lower cost Yamaha and Casio models. The key beds look decent, but we will have to play them in order to assess feel and quality. At least the keys are full size — not mini-keys, thank you.

If the Roland sounds are indeed up to snuff, Roland may be able to take sales away from Yamaha and Casio. Yamaha has been coasting with its entry-level sound set for over a decade and the recent PSR-E453 refresh did little to rejuvenate the entry-level segment. It will be interesting to see if Roland can win sales and spur innovation at the low end.

The GO:MIXER is positioned as an audio mixer for your mobile phone. It is USB powered, however, with no battery option. The GO:MIXER has guitar, microphone, instrument and media player inputs with associated mixing level control. There is a stereo monitor output as well as a “center cancel” feature. The estimated street price is $99USD.

roland_gomixer

Although Roland promote it for video production, I could see musicians using the GO:MIXER for a quick mix in the field. It certainly has enough inputs that a small group of pals could plug in and jam away.