Add SPI to littleBits Arduino 3

At some point, you’ll want to go beyond the few inputs and outputs provided by the littleBits Arduino bitSnaps.

The stock littleBits Arduino module has twelve unpopulated signal pads:

  • Three analog inputs: A2, A3 and A4.
  • Three digital inputs/outputs: D10, D11 and D13.
  • Six ICSP signals: GND, MOSI/D16, VCC, RESET, SCK/D15, and MISO/D14.

Three of the ICSP pads can be used as ordinary digital inputs/outputs: D14, D15, D16. The same three ICSP pads also implement the Small Peripheral Interface (SPI): MOSI, MISO and SCK.

         GND ---O  O--- RESET
    MOSI/D16 ---O  O--- SCK/D15
         VCC ---O  O--- MISO/D14

The first article in this short series discusses the ICSP pads and how to solder a 2×3 header to the pads. The second article describes a circuit and code for a SPI-based digital-to-analog (DAC) converter using the Microchips MCP4921 integrated circuit.

The MCP4921 requires an active-low chip select (also known as “Slave Select”) signal to activate data communication with the SPI master (the Arduino). As described in part 2, I generated chip select through one of the bitSnap digital pins: D1, D5 or D9. D5 and D9 are buffered by a relatively slow-acting op amp. The op amp effectively imposes a delay on the chip select signal necessitating a long busy wait in the DAC’s interrupt routine. Pin D1 is not buffered, doesn’t require the busy wait and is faster.

Pin D1 itself does double duty. Depending upon its configuration, pin D1 functions as either an ordinary digital output or as the serial data output (TX). My latest project incorporates MIDI input and uses the Arduino MIDI library to parse and dispatch MIDI messages. After much experimentation and frustration, I determined that the MIDI library just doesn’t know how to keep its paws off pin D1 (TX). Even with MIDI THRU turned off (i.e., calling MIDI.turnThruOff()), the library seems to interfere with D1/TX. The interference disrupts communication with the MCP4921 DAC. Sending chip select by D5 or D9 is too slow, so it became time to populate the rest of the Arduino’s input and output pads.

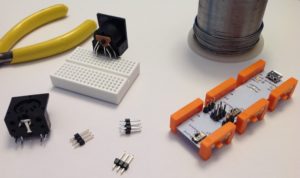
We need two 1×3 pin headers to finish the job. I bought 1×3 pin headers from Jameco. In order to save time and money, you could just cut two 1×3 headers from a long header strip instead. Once again, I used a solderless breadboard as a jig to hold the headers in place while soldering. Here’s a tip (pun intended). Apply pressure to the side of each pin with the soldering tip; do not push down on the pin. If you push down, the pin may sneak down into the through-hole!

The 1×3 pin headers and the finished Arduino module are shown in the picture below. (As always, click on images for higher resolution.) With the 1×3 header pins soldered in place, I connected the MCP4921 chip select to Arduino pin D10 using a male-to-female jumper wire and changed the sketch to toggle D10.

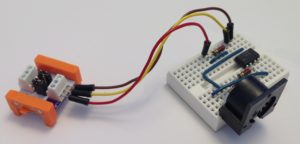
When I was searching for the headers, I came across “breadboard friendly” 5-pin DIN sockets sold by Adafruit. Adafruit charges a pretty penny for these sockets, but they are well worth it. With the success of the SPI DAC implementation, I decided to build the MIDI input interface on a small solderless breadboard (picture below). These small 170 point breadboards are so inexpensive, there isn’t much need to build on a prototyping board.

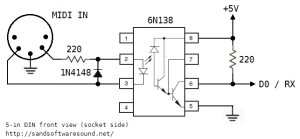
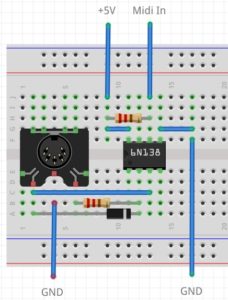
Here are the schematic and broadboard layout for the MIDI input interface. Have fun!

Add SPI to littleBits Arduino 2

Music makers working with littleBits Arduino will almost certainly want to add a high(er) resolution digital-to-analog converter (DAC) to their Arduino. Part 1 shows how to add an ICSP header to your littleBits Arduino module. The ICSP header is where you find the SPI signals — MISO, MOSI, and SCK — along with Vcc (+5 Volts) and ground. The ICSP header pin layout is:

         GND ---O  O--- RESET
    MOSI/D16 ---O  O--- SCK/D15
         VCC ---O  O--- MISO/D14

This is the layout when viewing the top of the Arduino module with the USB connector at the top (i.e., away from you, “north” on a map).

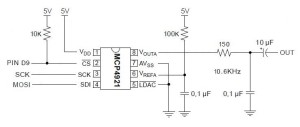
Now let’s take a look at a simple circuit using the Microchips MCP4921 12-bit DAC. (Click on images to get higher resolution.)

spi_dac_schematic

Three signals control the DAC: Slave Select (SS/Pin D9), Master Out Slave In (MOSI) and Serial Clock (SCK). Data is sent to the DAC through SPI’s bit serial protocol. First, SS is driven LOW, then 16 bits are sent one at a time to the DAC. SCK synchronizes the data bits sent via MOSI. The first byte consists of a 4-bit “command” and the top 4 bits of the 12-bit value to be converted. The second byte is the lower 8 bits of the value to be converted. After sending 16 bits, the SPI master drives SS HIGH. If you’re curious about all of the signaling details, please see the MCP4921 data sheet.

The rest of the DAC circuit consists of a voltage reference for the converter and a post-conversion (reconstruction) filter. The filter is a simple, one stage passive low pass filter with a 10,600Hz corner frequency.

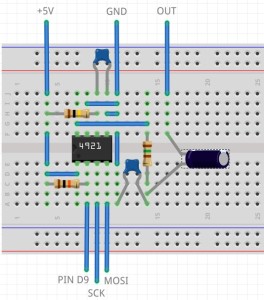
I built the DAC circuit on a small solderless breadboard. Here’s the layout.

spi_dac_breadboard

I connected MOSI, SCK, +5V and ground to the appropriate ICSP pins on the Arduino module. Slave Select is sourced by Arduino pin D9. I connected a littleBits Proto module to D9 and routed the input signal to the breadboard. If you want to postprocess the DAC’s audio output with littleBits modules, then route the DAC output to the Proto module’s output snap. Be sure to remove the shorting block (jumper) between the middle two pins on the Proto module. This approach provides power and ground to the audio postprocessing modules connected to the output snap of the Proto module — an important side-benefit.

The choice of pin D9 for Slave Select was the beginning of a long, hard journey in debugging. To make a long story short, pins D5 and D9 are buffered and the output buffer introduces additional delay on the Slave Select signal. The delay is long enough such that the DAC does not see a low Slave Select signal before data bits start arriving.

Here’s the code that writes the DAC:

#define NOP asm volatile ("nop\n\t")
void busyWait(uint8_t count) { 
  for(uint8_t i = count; i > 0 ; i--) { NOP ; } 
}

void writeDac(int16_t dacValue) {
  byte data ;
  SPI.beginTransaction(SPISettings(20000000,MSBFIRST,SPI_MODE0)); 
  digitalWrite(SlaveSelect, LOW) ;
  busyWait(25) ;
  data = highByte(dacValue) ;
  data = 0x0F & data ;
  data = 0x30 | data ;
  SPI.transfer(data) ;
  data = lowByte(dacValue) ;
  SPI.transfer(data) ;
  digitalWrite(SlaveSelect, HIGH) ;
  SPI.endTransaction() ;
}

The busy wait effectively stops the sketch for a little while after driving Slave Select LOW. This gives the Slave Select more time to reach the DAC before the sketch transfers the first data byte to the DAC. If you use an unbuffered pin like D1, you don’t need the busy wait.

It took a long time to eliminate all of the other possible issues that could have caused a failure: bad solder joints, wiring mistakes, etc. Fortunately, I have a similar DAC — the MidiVox — which works correctly. I also tested the hardware with Arduino UNO where all digital pins are unbuffered. It was frustrating to get everything working with the UNO, but not the littleBits Arduino module! Persistence wins the day.

In closing, I want to warn developers who interface high speed logic to littleBits Arduino. Beware of the delay through those buffered outputs! The delay may be long enough to throw off critical timing.

Add SPI to the littleBits Arduino

As Moe Szyslak might say, “He ain’t pretty no more!”

Last time through, I mentioned that I wanted to add a SPI digital-to-analog converter (DAC) to the littleBits Arduino module. The Microchips MCP4921 is a good candidate. It is a 12-bit DAC which communicates via the Small Peripheral Interface (SPI) bus or “SPI.”

The littleBits Arduino module is essentially an Arduino Leonardo. As such, its SPI port is available through the module’s ICSP pads. (“ICSP” stands for “in-circuit serial programming,” by the way.) The ICSP pads are the group of pads (two rows of three pads) between the D5 and D9 bitSnaps.

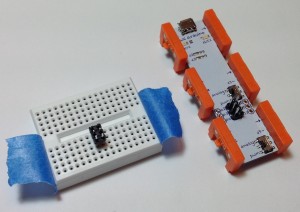
I soldered a 2×3 vertical pin header to the ICSP pads using a very simple jig. The image below is a “before and after” picture. (Click images for higher resolution.) The jig is a solderless breadboard that holds the header in place. I pushed the header into the breadboard just enough to hold the header and then placed the Arduino module over the header and pressed down. The idea is to get the black base of the header in contact and properly aligned with the module printed circuit board (PCB). The blue strips of masking (painter’s) tape keep the assembly together. The “after” part of the image shows the module with the header soldered in place.

icsp_solder_after

The jig really makes the soldering job easy. I have used other methods like trying to tape the header pins in place, but this approach was a piece of cake and frustration free.

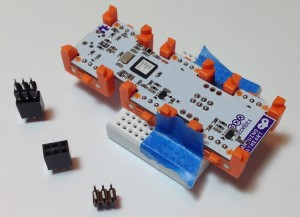
The image below shows the header, module and jig just before soldering. The picture also shows the 2×3 vertical pin header and a compatible 2×3 female header block. You could install the female header block instead. I went with the male header because most ICSP cables expect a male header on the PCB to be programmed.

icsp_solder_jig

I ordered the parts from Mouser Electronics. Mouser and Jameco are my usual “go to” sources for components and tools. Here are the part numbers:

  • Harwin M20-9980346 03+03 DIL VERTICAL male header 2.54mm
  • Harwin M20-7830342 03+03 DIL VERTICAL female header 2.54mm
  • BPS BB170-WH White 170 point solderless breadboard
  • BPS ZW-MF-20 ZIPWIRE Female-Male 20cm
  • BPS ZW-MM-20 ZIPWIRE Male-Male 20cm

The “2.54mm” refers to the pin spacing (AKA “0.1 inch”). The female header is $1.19 and the male header is $.24. Buy at least ten of each and the price goes down a little. The contacts are tin; gold is a little more expensive.

I plan to make (eventually) little PCB “hats” using the female header blocks. The idea is to build a small, single-purpose circuit that plug onto the ICSP header or littleBits Proto module header like a hat. This approach would eliminate point-to-point connections using jumper wires. I may experiment with this approach once I get the basic DAC circuit ironed out and tested.

I really like Busboard Prototype System (BPS) products. BPS has the most useful prototyping board patterns. They also have these nifty ZIPWIRE ribbon cables. The wires terminate with individual male pins or female receptacles. Let’s say you need to make six connections from the ICSP header to a solderless breadboard. Then tear off a group of six wires and associated terminations. Push the receptacles onto the male header and push the pins into the solderless breadboard. The individual wires are color-coded in order to make the correct point-to-point connections at both ends. I’ll use ZIPWIRE to connect the Arduino SPI port (ICSP) to a solderless breadboard with the SPI DAC circuit.

If you have a littleBits Arduino module and want to make the most of it, it’s time to break out the soldering iron. Best of luck!

Add a filter and envelope to the tone sequencer

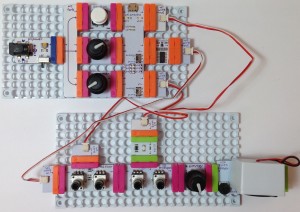
The tones produced by my littleBits tone sequencer are too basic. So, I decided to add a littleBits filter module and envelope module to spice things up. I built the Arduino part of the project on one mounting board and built the synthy part of the project on a separate board. Three wire modules connect the two subsystems together as shown in the picture below.

gatemodseq

Of course, since the whole thing is Arduino-based, it makes sense to drive filter modulation and envelope trigger (gate) from the Arduino. The trigger signal is turned on at the beginning of a note and is turned off at the end of a note. Nothing could be simpler.

The filter modulation signal is more fun. The dimmers connected to the Arduino control the attack and release time and the sustain level. Here is a simple diagram showing the shape of the filter modulation signal.

filter_mod_signal

One dimmer controls both the attack time and the release time. Close enough for rock and roll. I suppose that I could have added a third dimmer and controlled these times separately. A project for you perhaps?

Per standard operating procedure, I posted the design and code. The code is explained in detail. I also posted this project to the littleBits project site. The littleBits page has the source code, too, and has simple directions for building the project.

Have fun and keep on experimenting!

littleBits Arduino MIDI interface

I thought, “When it comes time to test the 5-pin MIDI interface with the littleBits Arduino, just hook it up. Download the sketches. Take a victory lap.”

Instead, I got an “opportunity” to discover and learn. Not so fast, but not so bad, either.

Please recall that a few posts ago I described the design of a 5-pin MIDI interface for Arduino. The MIDI IN part of the interface attaches to the Arduino RX pin (pin D0) and the MIDI OUT part connects to the TX pin (pin D1). I tested the 5-pin MIDI interface with an Arduino UNO board using the simple MIDI sequencer sketch and a sketch to echo MIDI IN to MIDI OUT. My original plan was to connect the 5-pin MIDI interface to the littleBits Arduino via two protoboards, then run the sketches, again, for testing.

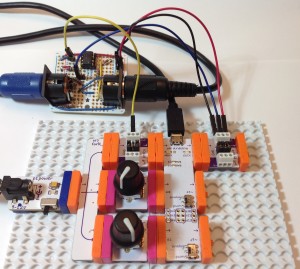
First, the hook up. The image below shows the littleBits hardware. (Click the image for full resolution.) The Arduino is “at the heart” and communicates with a PC through the USB port. The littleBits proto module directly to the left of the USB port brings the logic-level MIDI IN signal to the Arduino RX pin. The proto module directly to the right of the USB port sends the Arduino TX signal to the MIDI OUT circuit. The signals to and from the 5-pin MIDI interface board are:

  • Yellow wire: Logic-level MIDI IN
  • Blue wire: Logic-level MIDI OUT
  • Red wire: +5 Volts (Vcc)
  • Black wire: Ground

MIDI is a serial communication standard operating at a rate of 31,250 bits per second. RX and TX are the Arduino’s digital serial receive and transmit pins, respectively.
littlebits_arduino_midi_interface

So far, so good. There are a few extra details to consider. The positive supply voltage (+5 Volts) and ground are distributed throughout the whole interface board. Only one set of power supply connections are needed to power the interface board. I attached the power supply connections to the proto module handing the MIDI OUT. Next, the proto module jumpers are configured a little bit differently on the MIDI IN and MIDI OUT sides. Having all three jumpers in place, the MIDI OUT proto module passes all signals: Vcc, ground and the data signal arriving from TX. The MIDI IN proto module only passes Vcc and ground. It does not pass the signal from its input bitSnap. The output from the proto module is generated by the signal coming from the 5-pin MIDI interface board (i.e., the yellow wire). This signal is send to the RX pin.

Adhering to my original test plan, I downloaded the simple MIDI sequencer sketch. This sketch tests the MIDI OUT circuit by sending MIDI note on and note off messages. I attached the MIDI OUT connector to a MIDI tone module, flipped the power switch, and no sound. MIDI data was not being sent to the MIDI tone module. After much wailing, gnashing of teeth and browsing, I remembered that the Arduino Leonardo board has two serial ports, not one port like the UNO. One serial interface handles RX/TX and another serial interface handles USB communications.

The littleBits Arduino is a Leonardo board. Was the MIDI data being sent to the USB port? I turned on the Serial Monitor in the IDE. Yep, the Serial Monitor was showing jibberish arriving from the Arduino. I expected jibberish because the bit rate was all wrong, but nonetheless, observations confirmed that MIDI data was going to the wrong port (USB instead of TX).

The Arduino IDE exposes two serial ports for a Leonardo board:

  • Serial” refers to the virtual serial port over USB.
  • Serial1” refers to the serial port through RX/TX.

Originally, I wrote and compiled the MIDI sequencer sketch for an Arduino UNO board. The calls to write() refered to Serial. That’s fine on the UNO because the UNO uses the same serial port for RX/TX and USB communication and everything works. On Leonardo (littleBits), however, the sketch refers to the USB serial port, not RX/TX as I had intended.

I solved the problem with conditional compilation. Here is the new code for the function MidiSend() in the MIDI sequencer sketch:

//
// Send a short, 3-byte MIDI message
//
void MidiSend(byte cmd, byte data1, byte data2)
{
#ifdef LEONARDO
  Serial1.write(cmd | CHANNEL) ;
  Serial1.write(data1) ; 
  Serial1.write(data2) ; 
#else
  Serial.write(cmd | CHANNEL) ;
  Serial.write(data1) ; 
  Serial.write(data2) ; 
#endif
}

The symbol “LEONARDO” determines the code to be compiled into the sketch. If LEONARDO is defined then the sketch sends MIDI bytes to Serial1. If LEONARDO is not defined, then the sketch sends MIDI bytes to Serial. I also needed to fix up the code in setup():

#ifdef LEONARDO
  Serial1.begin(31250) ;
#else
  Serial.begin(31250) ;
#endif

After making these changes and defining LEONARDO at the beginning of the sketch:

#define LEONARDO 1

I compiled and uploaded the sketch. Voila! I heard music from the tone module! MIDI data was now being sent to the appropriate Arduino serial port (TX).

Along the way, I also learned some useful information about the RX and TX LEDs. The RX and TX LEDs flash when data is transfered through the USB port. They do not flash when data is sent through the RX/TX pins. If you want to flash the LEDs yourself, then use the following macros:

    RXLED0;
    RXLED1;
    TXLED0;
    TXLED1;

These macros are a feature of the Leonard board and are not recognized on UNO.

Two separate, independent serial ports has its advantages. First, it isn’t necessary to disconnect the 5-pin MIDI interface board when uploading a sketch. With only one serial port on UNO, TX/RX and USB communication cannot peacefully co-exist. On Leonardo (littleBits), they do peacefully co-exist and you can use the virtual serial port over USB (i.e., Serial Monitor) to trace program execution and print debug messages while using RX/TX for MIDI communication. Finally, if we don’t ever touch Serial1, we should be able to configure D0 and D1 as regular Arduino digital input and output pins (respectively).

By now, you realize that I had to modify the sketch that echoes MIDI IN to MIDI OUT, too. Instead of conditional compilation, this sketches defines a symbolic constant, “SERIALPORT,” which expands to the name of the serial port to be read and written. Full disclosure: I did not test the MIDI library version on littleBits (Leonardo).

//
// Send MIDI IN to MIDI OUT (THRU)
//

// Author:  P.J. Drongowski
// Date:    6 June 2016
// Version: 1.1
//
// Copyright (c) 2016 Paul J. Drongowski
// Permission granted to use, copy and distribute

// Uncomment the following line to use the Arduino 
// MIDI library instead of serial read() and Write().
// #define USE_MIDI_LIBRARY 1
// This has not been tested/debugged on LEONARDO!

// Define the symbol SERIALPORT to select the appropriate
// serial port:
//    Serial    UNO
//    Serial1   LEONARDO/littleBits
#define SERIALPORT Serial1


#ifdef USE_MIDI_LIBRARY

#include <MIDI.h>
MIDI_CREATE_DEFAULT_INSTANCE() ;

void setup() {
  MIDI.begin(MIDI_CHANNEL_OMNI) ;
}

void loop() {
  if (MIDI.read())
  {
    MIDI.send(MIDI.getType(),
              MIDI.getData1(),
              MIDI.getData2(),
              MIDI.getChannel());
  }
}

#else

int midiByte = 0 ;

void setup() {
  // Initialize the serial port for MIDI
  SERIALPORT.begin(31250) ;
}

void loop() {
  if (SERIALPORT.available() > 0) {
    midiByte = SERIALPORT.read() ;
    SERIALPORT.write(midiByte) ;
  }
}
#endif

MIDI sequencer: Testing your MIDI interface

Now that you’ve assembled the MIDI interface for your Arduino, it’s time to try it out. That means you need a few basic sketches to test and debug the interface.

First, a philosophical word or two. Testing is one of the most neglected and least emphasized topics in engineering. Other than careful design, assembly and coding, nothing else is as important to the success of a project as testing. In practice, you should be thinking about testing while you design, code, layout and solder. Without getting too computer science-y, it all comes down to controllability and observability — the ability to apply a stimulus (test input) and the ability to measure and assess a response (expected vs. actual test output).

Take the case of our MIDI interface. There are two major subsystems: the MIDI IN circuit and the MIDI OUT circuit. We must drive the MIDI IN circuit with a keyboard (or some other device) that sends MIDI to the 5-pin MIDI IN connector. The Arduino reads the logic level bit-stream through its RX pin (pin D0). The messages in the bit-stream need to conform to the MIDI message standard. On the MIDI OUT side, the Arduino sends a logic level bit-stream into the MIDI OUT circuit via the TX pin (pin D1). Again, the bit-stream carries standard MIDI messages. We must observe the outgoing MIDI messages, perhaps by playing the MIDI stream into a MIDI-compatible keyboard or tone module.

In addition to controllability and observability, you also need a test plan that identifies the features to be tested and the order in which you intend to test those features. A carefully constructed plan can make your work more efficient and systematic. Again, taking the case of the MIDI interface, I intend to test the MIDI OUT side first because I can easily write a sketch to generate MIDI messages and that sketch does not require a working MIDI IN circuit. Once I know that the MIDI OUT is correct, I can use the MIDI OUT as part of MIDI IN testing. By testing MIDI OUT first, I can work around the limited controlability and observability of our system.

I hope this plan makes sense to you. Here’s a few additional points. We don’t need to test all MIDI standard messages and can restrict testing to simple 3-byte messages like NOTE ON and NOTE OFF. We need to have a reliable, known-good MIDI sender (like a keyboard or other controller) and MIDI receiver (like a tone module). I have two MIDI-compatible devices — a Roland SK-88 Pro Sound Canvas keyboard and a Boss DS-330 Dr. Synth module — that I like to use for testing. Both devices now have emeritus status, meaning that I won’t cry too much if I blow them up! I send the MIDI OUT from the Arduino to both devices and play the audio through self-powered speakers. I play the SK-88 keyboard and send MIDI NOTE ON and NOTE OFF messages to the MIDI IN circuit under test and read those messages on the Arduino.

With these preliminaries out of the way, let’s dive into the details.

MIDI OUT: Simple MIDI Sequencer

In order to test MIDI OUT, we need a sketch that sends MIDI NOTE ON and NOTE OFF messages via the TX pin into the MIDI OUT circuit. With a MIDI tone generator connected to the 5-pin MIDI OUT connector, we just need to listen to the audio from the tone generator to determine if the outgoing notes are correct.

I took the simple Arduino tone sequencer sketch and modified it to send MIDI NOTE ON and NOTE OFF messages. I replaced calls to the Arduino tone() function with code to send MIDI NOTE ON and NOTE OFF as appropriate. (Reusing code this way is known as “copy and modify.”) The new sketch is a simple MIDI sequencer that repeatedly plays back a musical sequence of notes through the MIDI OUT port. The sketch is a useful little program in itself — not just a specialized test.

Here are direct links to the source code for the sketch:

MidiNoteNum.h: Defines symbolic constants for the note names
ToneNote.h: Defines symbolic constands for note/rest durations
MidiSeq.ino: The simple MIDI sequencer Arduino sketch

The sketch does not use the Arduino MIDI library. It sends messages by making calls to the Arduino Serial library. I will use the Arduino MIDI library in future projects, especially when we need to parse complicated incoming messages.

The sketch sends messages on MIDI channel 1. So, be sure to have the destination tone generator configured to receive on channel 1 (or OMNI).

Here’s a possible gotcha that could drive you insane. The Arduino’s serial port is used for both uploading sketches and for MIDI communications. MIDI operates at a rather “unusual” data rate of 31,250 bits per second and most likely does not match the default rate established by the Arduino IDE. Even worse, the MIDI devices used for testing (i.e., keyboard controller) may be sending real time status messages that collide with commands from the IDE. Soooo, you may see messages about “sync” failure when uploading a sketch. If that is the case, then temporarily disconnect the MIDI IN circuit while uploading a sketch. Also, you will not be able to print to the serial port, etc. and see text serial messages in the IDE’s Serial Monitor window. Unfortunately, this limits the use of serial communication for tracing and debugging purposes when MIDI is connected and active.

MIDI IN: Echo MIDI IN to MIDI OUT

Once we know that the MIDI OUT port is working, it’s time to check the MIDI IN port. An easy way to test is to simply echo the incoming MIDI messages to the MIDI OUT port. If we have a MIDI keyboard connected to MIDI IN and a tone generator connected to MIDI OUT, then anything that we play on the keyboard should be heard through the tone generator. If the keyboard and tone generator are part of the same instrument (e.g., a synthesizer workstation, arranger or digital piano), be sure to turn LOCAL off. You want to hear the MIDI messages coming in through the instrument’s MIDI IN port.

Here is the code for the MIDI IN to MIDI OUT sketch.

//
// Send MIDI IN to MIDI OUT (THRU)
//

// Author:  P.J. Drongowski
// Date:    30 May 2016
// Version: 1.0
//
// Copyright (c) 2016 Paul J. Drongowski
// Permission granted to use, copy and distribute

// Uncomment the following line to use the Arduino 
// MIDI library instead of serial read() and Write().
// #define USE_MIDI_LIBRARY 1

#ifdef USE_MIDI_LIBRARY

#include <MIDI.h>
MIDI_CREATE_DEFAULT_INSTANCE() ;

void setup() {
  MIDI.begin(MIDI_CHANNEL_OMNI) ;
}

void loop() {
  if (MIDI.read())
  {
    MIDI.send(MIDI.getType(),
              MIDI.getData1(),
              MIDI.getData2(),
              MIDI.getChannel());
  }
}

#else

int midiByte = 0 ;

void setup() {
  // Initialize the serial port for MIDI
  Serial.begin(32500) ;
}

void loop() {
  if (Serial.available() > 0) {
    midiByte = Serial.read() ;
    Serial.write(midiByte) ;
  }
}
#endif
There are two ways to echo the incoming MIDI message stream. One way is to echo the bytes arriving on the serial input to the serial output. This is the most straightforward method. The other way is to use the Arduino MIDI library to read incoming MIDI messages and send the messages to the MIDI OUT port. The code (above) implements both methods and uses conditional compilation (#ifdef) to select and compile one of the methods. If you want to get your feet wet with the Arduino MIDI library, then define the symbol USE_MIDI_LIBRARY before the #ifdef.

Here are a few links for the Arduino MIDI library to help you get started.

Arduino MIDI Library site
Arduino MIDI Library Documentation
Deprecated site

The current version is 4.2. The Arduino IDE has a nice library management system: Sketch > Include Libraries > Manage Libraries.