The wind-up
First, let me explain… Our church was designed and built long before architects anticipated the switch from (pipe) organ to acoustic piano for liturgy. Nor did they ever expect guitars, drums, brass, woodwinds or electronic instruments. To add insult to injury, the original “church organ” — rarely used — consumes a huge amount of real estate. Oh, and forget about storage space for music stands, mic stands, etc. It’s non-existent.
Thus, I play in an insanely small space on a choir riser. No two- or three-tier rig; MODX6 barely fits.
There are two aging electrical outlets (mains) to one side of the choir area. We musicians must fumble over choir members — mere singers! — to access the wall outlets. Set-up is like playing a game of Twister.
The pitch
I’ve tried a number of battery-powered rigs and none have been fully satisfactory — until now. Thanks to two Youtube videos, I sprang for a TalentCell rechargeable 12V 6000mAh lithium ion battery pack. $32 USD and it’s going to the gig with MODX6 and a Yamaha Stagepas 100BTR.
The littlest Stagepas deserves a review of its own someday. Briefly, the Stagepas 100BTR is 100W (Class-D), 120dB SPL, 70Hz-20kHz, and weighs 12.1 pounds. It contains its own rechargeable battery.
The TalentCell has two output ports: +12V (nominal) and +5V USB-A. The +12V connector takes a 5.5mm x 2.1mm jack just like MODX. The 12V port doubles as the charge port. The TalentCell has its own power switch, thank you.
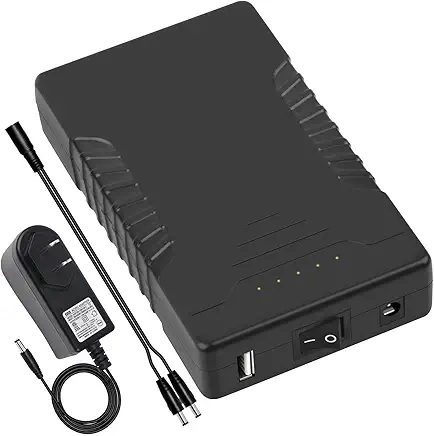
TalentCell 12V 6000mAh battery pack
MODX6 power consumption is 16 Watts at 12V. That puts typical current draw at (16W / 12V) ~ 1.33 Amps. With a 1.33 Amp draw, the TalentCell should be good for (6000mAh / 1333mA) = 4.5 hours. You may or may not get 4.5 hours of power. I would never run a battery to its ragged edge! However, you can, should and will get 2 hours and that is good enough to cover a Sunday service plus rehearsal. I think if I played a four hour gig, I’d buy a second TalentCell and bring it along.
I am definitely not the trusting type, so I’ve been running on battery power while practicing this week. I feel pretty good about achieving a two hour run-time. I have not experienced any power glitches or drop outs. I would not deploy this rig if there was even the hint of unreliability.
If you watch the videos or read reviews, you will hear and see comments about the TalentCell’s nominal 12V output. Fully charged, my digital meter reads 12.1 Volts (unloaded). After two hours use (3 of 5 power LEDs lit), the meter reads 11.3 Volts. Yes, that is a tad less than 12 Volts, but it is also typical behavior for a battery pack.
With a few minor exceptions, the MODX digital (+5V, +3.3V) and analog (+9V) electronics operate on power which is internally regulated. The internal regulators require minimums of 10 Volts (regulated down to 9V) and 8 Volts (regulated down to 5V and 3.3V).
Thus, the slightly lower nominal voltage has not been an issue for the sensitive stuff.
The TalentCell comes with its own 12.6V power adapter and Y-cable in the box. The Y-cable supports charge while in use. The Y-cable is rather short, so I bought a 3 foot 5.5mm x 2.1mm extension cable. With the TalentCell on the floor, the 3 foot extension cable is long enough to reach the MODX6 power input while the MODX6 is resting on its stand. I play sitting, BTW, so you will need a longer extension cable if you play standing and want to leave the TalentCell on the floor.
I feel pretty good about this solution and I hope that my reasoning and analysis are helpful. As always when it comes to power, think thrice. Check voltages, current, operating time and polarity. Don’t leave anything to chance.
The final score
The gig went according to plan with no issues. I played through my trusty Bose SoundLink® Color II speaker — just enough to blend with the voices on this outing.
I ran the MODX6 on the Talentcell battery pack for roughly 90 minutes, start to finish. The pack registered four out of five LEDs capacity-wise. I measured the output voltage at home: 11.3 Volts DC.
I intend to make this my standard set-up. I simply unpacked everything, set the MODX6 on its stand, hook up the cables and play. I don’t have to crawl around looking for outlets and I don’t trip over choir members. I’m taking the win. 🙂
Copyright © 2025 Paul J. Drongowski