
In my last post, I created a new Yamaha MODX Performance from a handful of WAV files. The new Performance had shortcomings, mainly due to short loops in the samples themselves. I tossed the first one away. What the heck — it’s only bits. 🙂
Last time, I did all of the work on the MODX itself through its user interface (UI). My experience was generally good, but I had to enter a lot of detail directly into the UI. Today, I’m moving on to Sample Robot for Montage with hopes of making the job easier.
Sample Robot by SKYLIFE is a spiffy tool for copping sounds from old keyboards or any other sound source. Yamaha formed a parnership with SKYLIFE resulting in Sample Robot for Montage, a version of Sample Robot that is tailor-made for Montage (and MODX).
Even though Sample Robot for Montage — which I will refer to as “SRM” — has the ability to capture multisamples automatically from MIDI keyboards, it has two other capabilities of immediate interest and purpose:
- SRM can import WAV/AIFF files into a multisample.
- SRM exports the finished result as a Montage User file (X7U) or a Montage Library file (X7L). MODX loads both of these file types.
Thus, SRM looks to be and is a promising path for creating new MODX Performances from existing WAV/AIFF files.
At this point, I must admit that I’m still getting my head around the Montage/MODX library concept. [This subject receives scant space in the documentation, unfortunately.] Thanks to Phil’s tutorials on YamahaSynth.com, I grok their basic purpose — to bundle related Performances, waveforms, arpeggios, etc. into an easily distributed and imported package. I have much to learn about this subject especially how to exploit Montage/MODX libraries for data management during sound development. More about this some day.
Sample Robot for Montage: Set-up
I downloaded SRM from the Yamaha Musicsoft site. SRM is free to Montage (and, apparently, MODX owners) until March 2019. I can’t argue with the price!
The download is a ZIP file containing both the Windows and Macintosh versions of SRM. The Musicsoft site provides a Yamaha code number and a serial number, both of which are required for activation. Rikki don’t lose that number. 🙂
Install is easy — just click through the installation wizard. The Windows installer is about 200MBytes, the bulk of which are example projects.
You will be asked to activate after launching SRM for the first time. Enter all of the magic numbers. SRM starts up with a preloaded example. I peeked and poked at the example for a little while and quickly discovered that an audio device wasn’t assigned. I eventually settled on “Microsoft Sound Mapper – Output”. Unfortunately, Windows 7 ran that damnable audiodg (Audio Device Graph Isolation) process, taking a long time to complete. Further, I had to restart SRM before getting audio through the monitors. I can’t fault SRM for this. Microsoft? Hello, it’s 2018?
Upon start-up, SRM displays a wizard leading you through the task of setting essential project characteristics like sample rate and such. In a moment of hubris, I cancelled the wizard the first time through and found the app to be somewhat inert. Me-thinks SRM needs to initialize its environment and clicking through the start-up wizard at least once does the trick.
SRM: The warm-up
I strongly recommend a quick read through the SRM manual for no other reason than to become familiar with its concepts and terminology. The terminology is fairly standard, but it differs a bit from Montage/MODX terminology. For example, it appears that your SRM “multisamples” will become Yamaha waveforms and inherit multisample names. This is where familiarity will breed expertise, I expect.
I also suggest taking a tour around the SRM user interface. The “Info and Settings” pane is a property inspector that shows important properties for the selected project, multisample or sample. Then, check out the virtual keyboard. With a two button mouse, left clicking/holding a key plays the sample associated with the note. (Notes with a blue box marker have a sample assigned.) Right clicking a key selects the sample associated with the key.
The Osc, Wav, MIDI and Panic radio buttons seem to choose what the virtual keyboard sends and does. Try Osc and you’ll hear a pure reference tone at the selected pitch — a good feature when working with pitched multisamples. I don’t know about you, but my sense of pitch goes all whack after 30 minutes or so of intense work.
Today’s protein on the plate
I dug another old chestnut out of my hoard of pipe organ samples. Apple’s Symphony Orchestra Jam Pack (a blast from the past, eh?) has several mighty fine church organ patches. Even though it’s Garageband, the church organ is an EXS24 virtual instrument. If you know where to look, you can find the samples and you can play/inspect the virtual instrument in Logic via EXS24.
Apple licensed pretty decent samples. I once tried to determine their original source and vaguely remember Sonic Reality. Others thought VSL lite (circa 2003). Association with Garageband unfairly cheapened their reputation.
The samples are taken from three principal ranks (8′, 4′ and 2′) in unison. Without deep diving organ registration, a voice consisting of principals is good for hymn accompaniment. [Principals, BTW, are the metal pipes that give a pipe organ its distinctive timbre.] Thanks to the even footages, there aren’t a lot of weird harmonics to clutter up the sound.
A Dave Stewart moment. Many synthesizer pipe organ patches are reedy. They want to impress the buyer with bombast (i.e., “Phantom of the Opera” AKA Bach’s Toccata and Fugue in D minor). Reeds and strings are inappropriate for hymn accompaniment. Flutes, sometimes. Pure tones, pure tones.
Here is a table summarizing the sample files:
KB#  Low  High  Center  File
---  ---  ----  ------  -----------------------
 1   C-2   C#1      C1  Prin_842_kb1_c1.aif
 2    D1    E1     D#1  Prin_842_kb2_d#1.aif
 3    F1    G1     F#1  Prin_842_kb3_f#1.aif
 4   G#1   A#1      A1  Prin_842_kb4_a1.aif
 5    B1   C#2      C2  Prin_842_kb5_c2.aif
 6    D2    E2     D#2  Prin_842_kb6_d#2.aif
 7    F2    G2     F#2  Prin_842_kb7_f#2.aif
 8   G#2   A#2      A2  Prin_842_kb8_a2.aif
 9    B2   C#3      C3  Prin_842_kb9_c3.aif
10    D3    E3     D#3  Prin_842_kb10_d#3.aif
11    F3    G3     F#3  Prin_842_kb11_f#3.aif
12   G#3   A#3      A3  Prin_842_kb12_a3.aif
13    B3   C#4      C4  Prin_842_kb13_c4.aif
14    D4    E4     D#4  Prin_842_kb14_d#4.aif
15    F4    G4     F#4  Prin_842_kb15_f#4.aif
16   G#4   A#4      A4  Prin_842_kb16_a4.aif
17    B4   C#5      C5  Prin_842_kb17_c5.aif
18    D5    E5     D#5  Prin_842_kb18_d#5.aif
19    F5    G8     F#5  Prin_842_kb19_f#5.aif
The note names (numbers) follow the Yamaha convention. This information was taken from Logic EXS24.
I did a little bit of prep work. I renamed the AIF files, putting the center note into standard form. I checked the samples in Yamaha Tiny Wave Editor (TWE) to see if they were looped. (They were.) I normalized the samples using TWE. Turns out, SRM can normalize and I could have accomplished this task in SRM instead.
The Apple samples are decent:
- Stereo, 44100Hz, 16-bit
- Nice long samples (12 to 19 seconds each)
- Long loops, no audible bumps
This one has the potential to be a keeper.
SRM: Doing the business
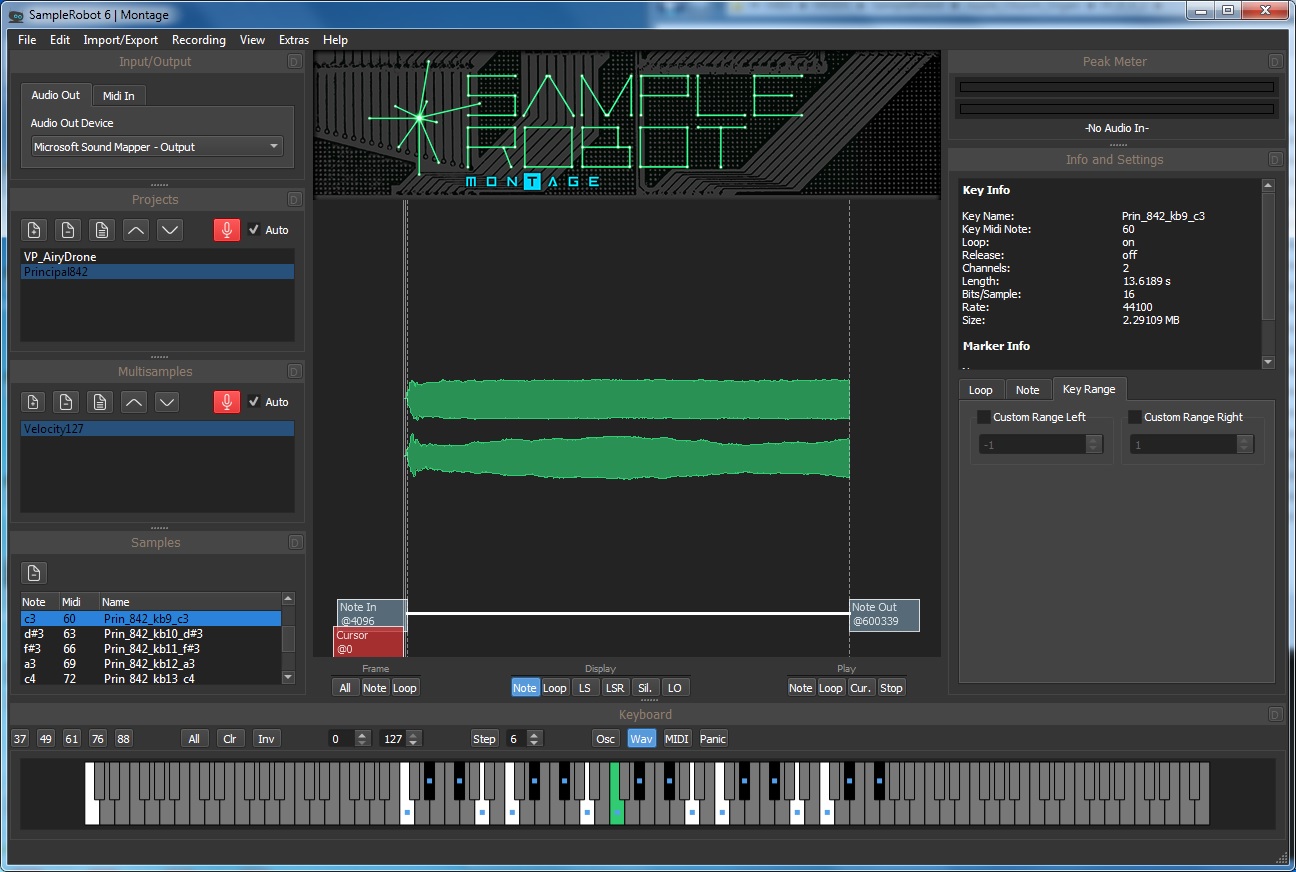
Time to get down to business. I created a new project named “Principal842”. Please see the screenshot below. [Click images to enlarge.] I like SRM’s “Battle Zone” visual theme; it’s one of the few games that I still relate to.
Drop into the “Import/Export” menu, select the AIF files, click the Import button, and what the?
Admittedly, what came next were my most frustrating moments. I either imported one individual sample file or just the last sample file in the selected list. Arg! Long story short, it came down to finding the right combination of import settings.
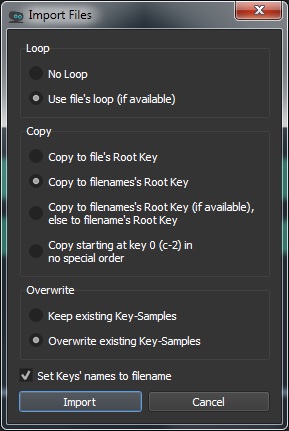
The default Copy setting is “Copy to filenames’s Root Key (if available), else to filename’s Root Key”. Grammar issue aside (“filenames'” is grammatically correct), I tried “Copy to filenames’s Root Key” with success.
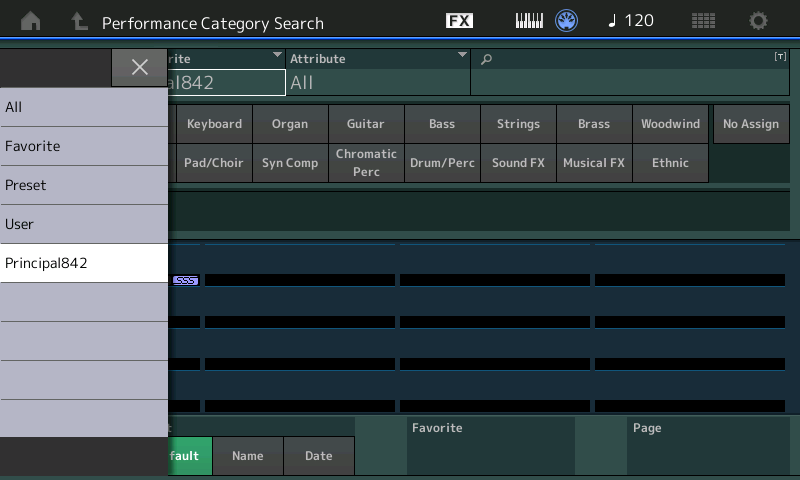
The first screenshot shows the state of the project after a successful import. The samples are laid out correctly across the keyboard as derived from the sample file names. Further, SRM did a smashing job with the keybank ranges.
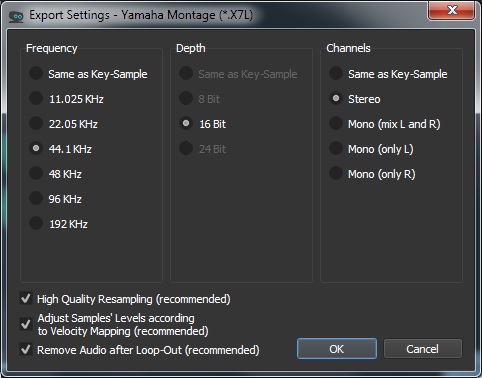
With everything in order, dive into import/export and select Montage Library (X7L) format for export. I went with X7L instead of X7U (User format) because I didn’t want to overwrite my User area. Yes, I’m thoroughly backed up, but why take a chance. I also wanted to get my feet wet with libraries.
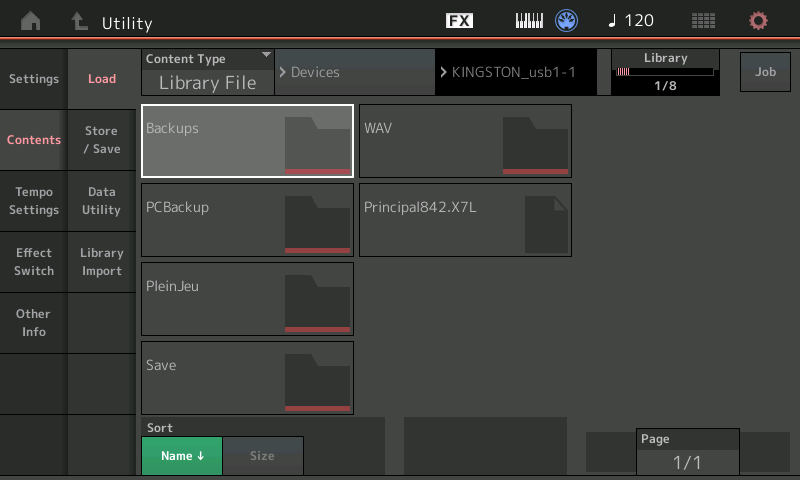
I copied the X7L file to a USB flash drive, inserted the flash drive into MODX and loaded the library file. The X7L Library file is sizeable due to the waveform inside. The library file has the name “Principal842”, same as the SRM project. The Library appears in Category Search under that name. SRM generated a basic Performance, too.
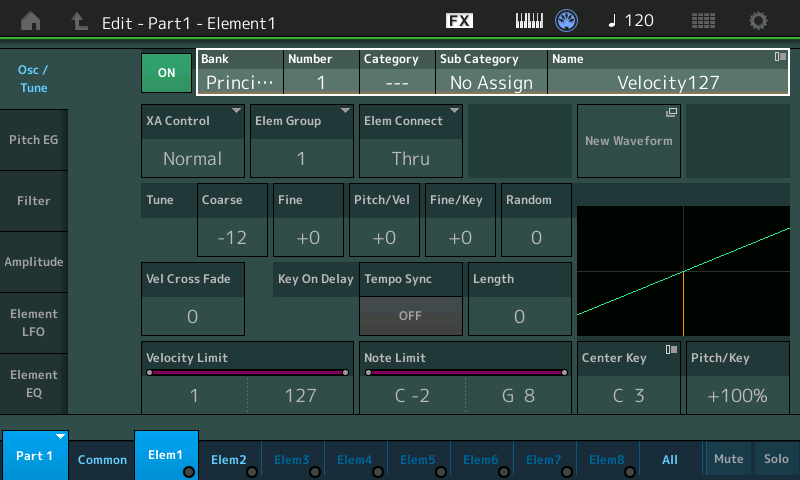
I tried the basic Performance and was satisfied with the raw material. I then dove into the left-over husk of yesterday’s abandoned experiment. The husk (Performance) began life as the “Church Organ” preset voice. I changed its waveform to the new one and made a few tweaks here and there. Voila! A decent pipe organ voice suitable for hymn accompaniment.
Sometimes a new waveform requires polish. The sample levels may be uneven across the keyboard or a sample may be out of tune. The MODX UI is well up to the job allowing tweaks for level and fine pitch.
I wanted to post the finished project. However, given the commercial origin of the samples (Apple), I don’t want to violate intellectual property (IP) rights. Instead, here’s a quick MPEG-4 demo (m4a).
Copyright © 2018 Paul J. Drongowski
Pingback: First take: the 1010Music tangerine compact streaming sampler « Adafruit Industries – Makers, hackers, artists, designers and engineers!
Pingback: 1010Music tangerine: Sampling electric piano - Sand, software and sound