MODX: Sampling Genos pipe organ

Sample Robot for Montage (SRM) is a very useful addition to the Yamaha MODX (Montage) product ecosystem. After my initial start-up experience:

I went on to produce two sampled pipe organ voices: Organ Prinzipal and Organ Pleno.

Prinzipal and Pleno

Anyone who sees a pipe organ — especially a cathedral-sized instrument — is immediately impressed by its large array of pipes. The open metal pipes are the principal pipes which give a pipe organ its distinctive sound. Pipes are arranged in ranks, kind of like the individual drawbars on a Hammond B3 organ (vice versa, really!) Hammond-ites know that the length of a pipe determines its pitch and that each rank has a reference pitch (measured in feet) that specifies the rank’s harmonic character when blended with other ranks.

I generally use pipe organ to lead congregational singing. Conventional wisdom for hymn accompaniment is simple: Use principal pipes with simple, foundational pitch: 8′, 4′ and 2′. Although this sounds plain vanilla, the sound is not cluttered by harmonics that may confuse the congregational ear. This kind of organ registration is often called a “principal chorus.” Due to the deep history of pipe organ in Western Europe, a French, German or Italian name may be used instead, e.g., “Prinzipal.”

Old school players understood the need to built energy and drama during a tune, too. Thus, an organist might add non-fundamental harmonics during the final verse and chorus. Think, Hammand organ “whistle”, 1 3/5′, 1 2/3′, etc. Often, a group of such ranks is brought in, a “mixture.” If the mixture consist of principal pipes, then the resulting registration is called a “full principal chorus.” This registration has many names, too, such as “Organo Pleno” or “Plein Jeu.”

In case you’re wondering, reed stops are rarely used for hymn accompaniment, if ever. Flute pipes are occasionally added for quiet meditative hymns. Principals are the real work horses.

Yamaha Musicsoft offers a terrific PSR expansion pack: Church Organ. Someone put a lot of love and care into this pack! I bought a PSR-S950 based upon the strength of the Church Organ pack. Fortunately, the PSR-S970 version of the pack also loads on Yamaha Genos™ and I’ve been able to take advantage of its sounds for practice and live play.

My goal here is to sample the Organ Prinzipal and Organ Pleno voices on Genos and to use those voices on MODX.

Sample, test, repeat

Sampling with SRM is reasonably straightforward. If you read my previous blog posts, then you already have the general drift. I recommend reading the SRM manual, too.

I liked the sampling strategy and key layout used in the Apple Symphony Orchestra pipe organs and arrived at a planned layout of keybanks:

KB#  Low  High  Center
---  ---  ----  ------
 1    C-2  C#0      C0
 2    D0    E0     D#0
 3    F0    G0     F#0
 4   G#0   A#0      A0
 5    B0   C#1      C1
 6    D1    E1     D#1
 7    F1    G1     F#1
 8   G#1   A#1      A1
 9    B1   C#2      C2
10    D2    E2     D#2
11    F2    G2     F#2
12   G#2   A#2      A2
13    B2   C#3      C3
14    D3    E3     D#3
15    F3    G3     F#3
16   G#3   A#3      A3
17    B3   C#4      C4
18    D4    E4     D#4
19    F4    G4     F#4
20   G#4   A#4      A4
21    B4   C#5      C5
22    D5    E5     D#5
23    F5    G8     F#5

In Sample Robot concepts, this means starting at C0 (MIDI note number 24) and sampling every three semi-tone steps up to C5 (MIDI note number 84). With the exception of the lowest and highest note, a sample is never transposed (pitch shifted) more than a single semi-tone. I also liked the long sample time in the Apple approach and settled on a 12 second capture time plus 0.5 seconds release (12.5 seconds total of capture). I didn’t use the release samples, but I wanted to see and hear them as a learning experience.

If you change the MIDI note range or step number in SRM, be sure to click the Step button! I got hung up and couldn’t figure out why SRM didn’t “see” new note range limits. This really should be mentioned prominently in the SRM manual. I assumed that SRM would simply take what it was given…

These basic sampling parameters can be set using the SRM project wizard. Or, you can set them individually on the various property tabs. I went through the wizard first, then fine tuned individual parameters later.

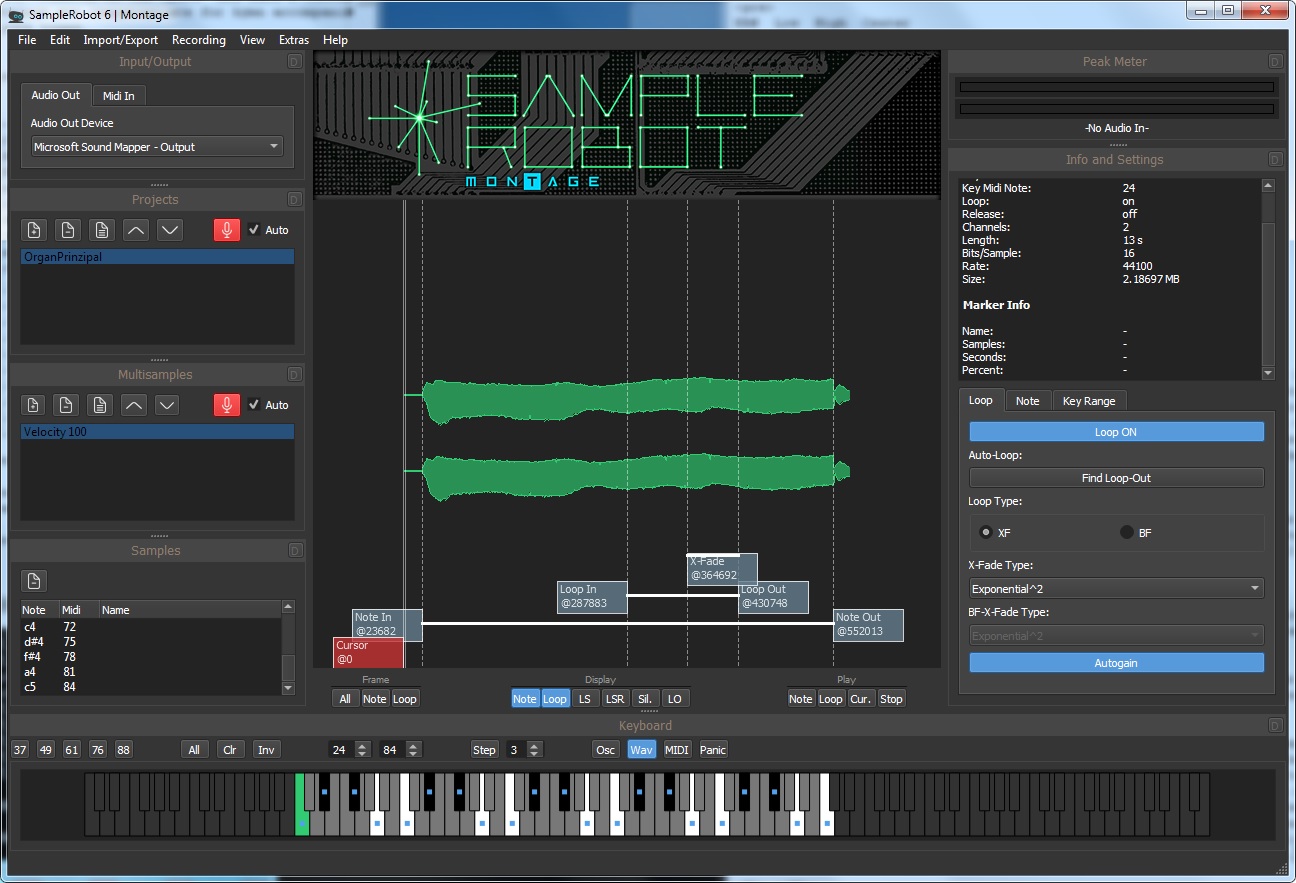
The virtual keyboard at the bottom of the screen shows the notes to be sampled (black and white) and the notes for which samples have been taken (notes with a blue square). The dark grey notes are not sampled. [Click on images to enlarge.]

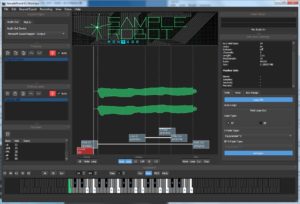
Before going further, I must state that I made several attempts at sampling each voice. I decided to retain the volume differences (level nuances) across the multisample. I turned Auto-gain OFF and set the audio input level manually. Thanks to the waveform display, I could find any obviously clipped sample. I also did a spot check of questionable samples in Sound Forge Studio. I eventually arrived at a set of samples for each voice in which one (or a few samples) were max’ed and the rest of the samples in the set fell in line as synthesized by Genos. I believe this strategy preserved the natural levels across the pipe organ key range.

Loop quality

I let SRM do the looping. I know from experience that looping pipe organ samples is not easy and is very time consuming. Plus, I wanted to see how well SRM would do.

The Display buttons below the waveform pane control waveform annotations. Enable the Loop button and SRM shows the loop in (start) and loop out (end) points for a sample. I used the default cross-fade loop settings as shown in the screenshot.

SRM’s loops sound decent. There are a few samples where a bit of a surge could be heard, but no obvious bumps or clicks. SRM’s loops are shorter than the Apple loops and that is a little disappointing. However, there aren’t any short cycle loops that lose the dynamic timbral quality of a pipe organ. I think they are all useable as they are without any manual tweaking. My opinion is based upon what I auditioned in SRM and what I heard at the MODX keyboard itself.

Normalization and gain change

Really good thinking went into this part of SRM. SRM gives you several options for normalizing or applying a gain factor across one or all of the samples in a project. (Please see the manual for details.)

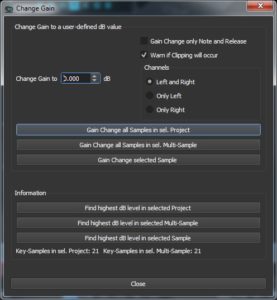
Normalization works as expected. It applies a gain factor that brings up the an entire sample such that the peak is 0dB or a custom peak level which you set.

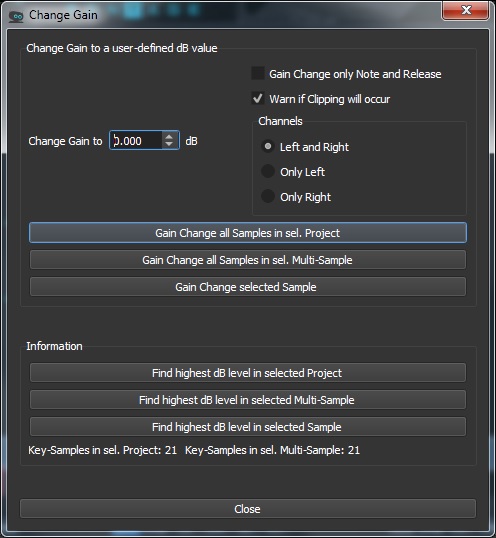
Gain change is just what I needed for this project. I wanted to maintain the relative difference in level between samples — just make everything uniformly louder without introducing clipping distortion. In order to do this, I needed to know the highest dB level for a group of samples then apply a gain factor everywhere to pull all samples up. SRM provides a few different options for finding the overall peak level, e.g., “Find highest dB Level in selected Project”. Suggested improvement to SRM: After analyzing the samples, SRM should display the peak level for each sample in the property pane along with the sample’s other properties.

I like the option “Warn if clipping will occur.” Features like normalization and gain change would make SRM quite useful and necessary even when starting out with old samples borrowed from a VST software instrument. 🙂
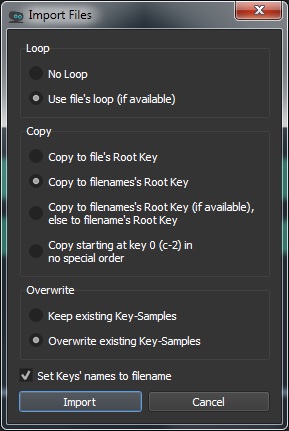
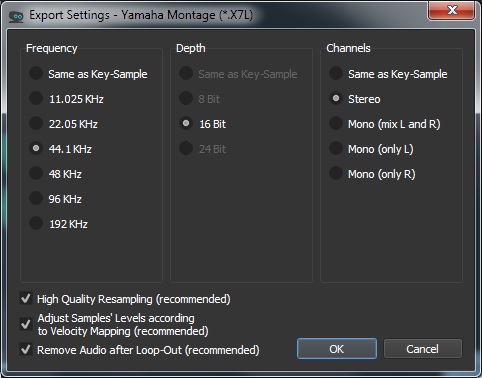
Export and import

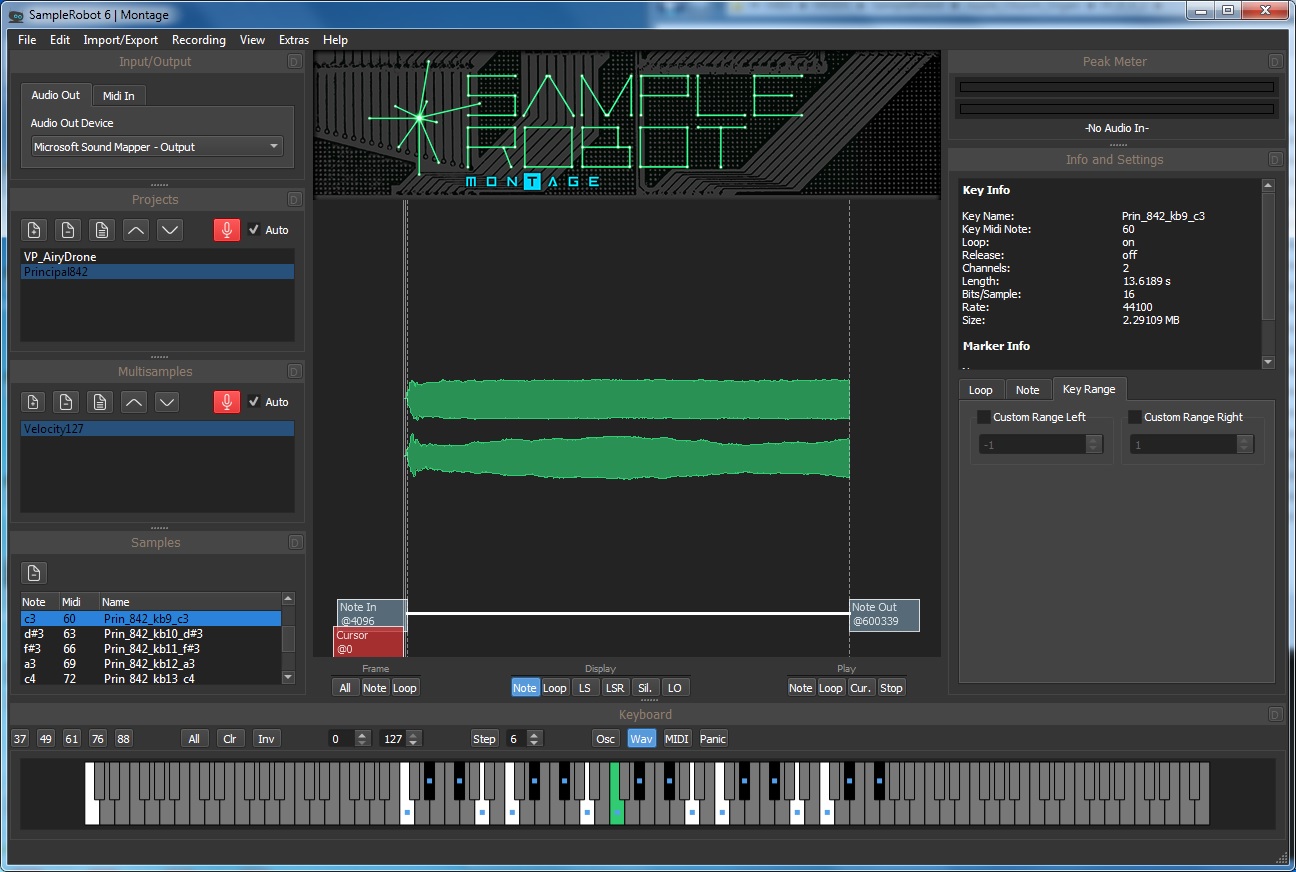
I exported each voice as a Montage LIBRARY file (X7L) and loaded each LIBRARY file into MODX. One nice MODX feature is the ability to audition Performances in a Library. This is a quick way to sanity check new waveforms (and underlying samples) on MODX.

There were several iterations at this stage, too. It took a few iterations to get the desired key range for sampling. The initial key range was one octave too high. I like to have three octaves in the left hand and two octaves in the right hand for hymn accompaniment as I’m faking organ pedals in the left hand. I used MIDI OX to check the high and low MIDI note numbers, then I reset the lower and upper note sampling limits in SRM.

Thankfully, any and all iterations are fast. SRM can sample the entire key range in about 5 to 6 minutes with the chosen capture time for each sample (12.5 seconds). This is welcome and needed time to get a cup and give my ears a rest!

Finishing and sanding

The new waveform needs to be incorporated into a finished MODX Performance because the SRM-generated Performance in the Library file is very, very basic. (Actually basic is a good thing for quality assurance and auditioning.)

In one of my earlier experiments, I had fashioned a pipe organ Performance (Plein Jeu). I repurposed the Performance even though I had long since blown away the Plein Jeu waveform.

My process has (roughly) the following steps:

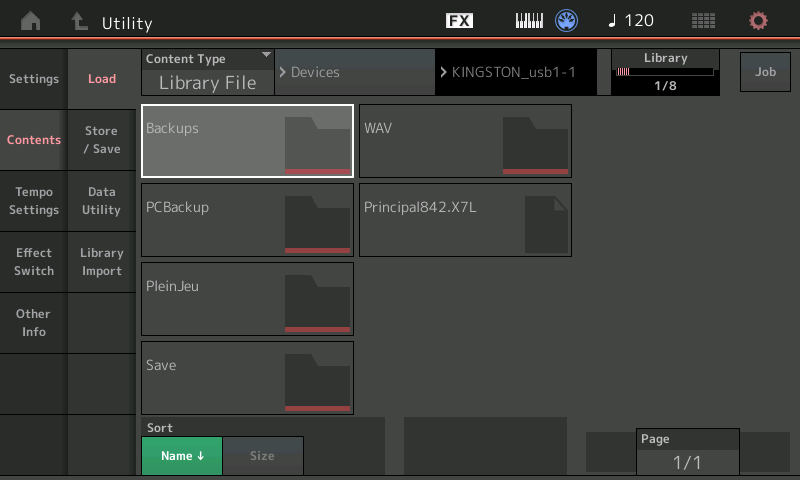
  1. Load the LIBRARY file generated by SRM.
  2. Audition the generated Performance in the Library.
  3. Import the generated Performance and its waveform into USER memory.
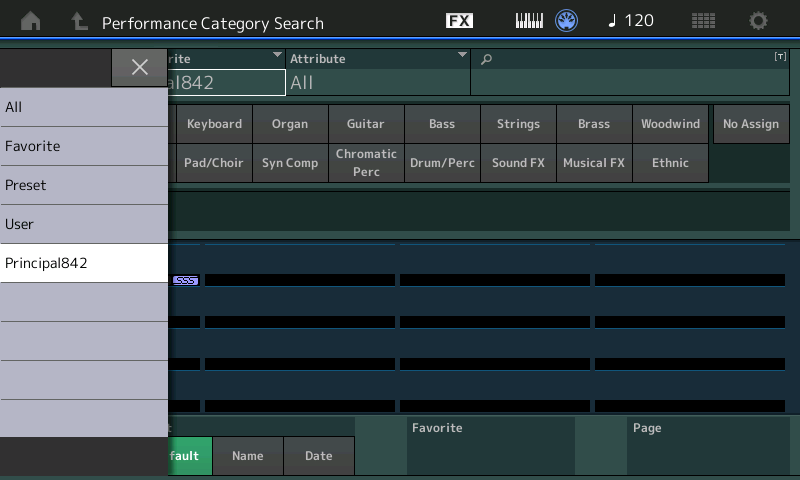
  4. Select and edit an existing Performance, hopefully one which is close to the desired result.
  5. Save the new Performance under a new name.
  6. Edit the effects or any other Performance Common parameters.
  7. Edit the Part information within the Performance.
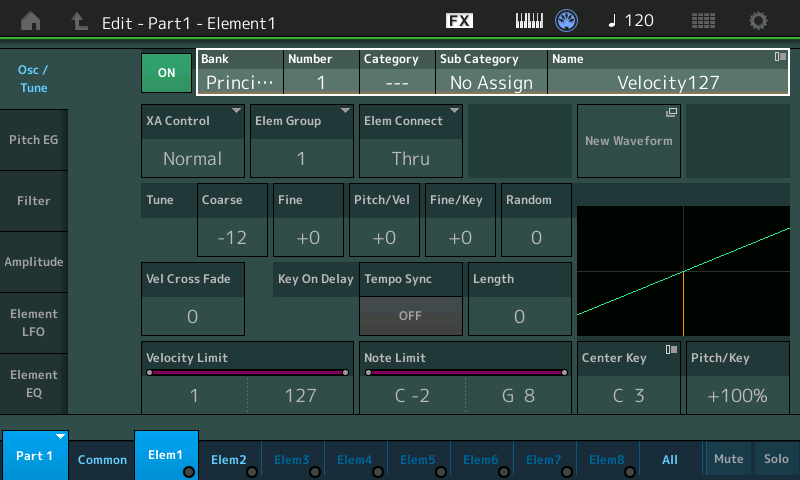
  8. Edit the elements in the new Performance to use the new waveform.
  9. Edit the new waveform to change its name (category and subcategory), to extend the lower note limit of the lowest key bank, and to extend the upper note limit of the highest key bank.
  10. Make any other necessary tweaks to the new waveform.
  11. Make tweaks to the Element programming or effects.
  12. Save the new Performance.

Clearly, prior experience with Performance and Part editing is a real plus at this stage. Ramp up slowly! Gain experience. Rome wasn’t built in a day.

OK, get ready for TMI. When you load a library, MODX seems to load incoming waveforms into wave memory on a contingency basis. This is why you can audition new Performance waveforms in a library. You can even make a contingent waveform part of a USER Performance. If you haven’t explicitly imported the Library Performance and its (contingent) waveform from the Library and you delete the Library, kiss the waveform good-bye; it’s deleted, too.

When you’re ready to commit to a new waveform, you must explicitly import the parent Performance and the new waveform within to USER Memory via the Data Utility.

A few comments for the developers

Nice work! Here are a few refinements.

Please add the ability to directly monitor the incoming sample stream. It would greatly aid set up and we can listen for audible clipping distortion when setting levels.

Display the peak level in sample properties. This will make it easy to find samples which are (potentially) clipped.

The Project Datapath in the Preferences dialog does not seem to apply everywhere and it isn’t persistent i.e., it is reset to the path “C\Users\xxx\Documents\SKYLIFE\SampleRobot6\Data.” This file path should be used consistently.

A native English speaker should take a quick pass through the manual, which is already pretty darned good. There are occasional spelling and simple grammatical errors (e.g., possessive versus plural). The same reviewer should check the application for spelling errors; there are misspelled words.

The manual should inform the user to press the Step button after changing the MIDI note limits for sampling.

What’s next?

When I A/B’ed the expansion pack organs against the Apple Symphony Orchestra pipe organ, I had to give the quality edge to Apple. I’ve already snagged another voice from the Symphony Orchestra Jam Pack. At the very least, I’ll use Sample Robot for Montage to change gain, to layout the key banks and to generate a Montage LIBRARY file. It shines at these operations and really speeds up the work.

Copyright © 2018 Paul J. Drongowski

Sample Robot: Quick feedback

I’m deep into the next phase of my experiments with SKYLIFE Sample Robot — automatically sampling a pipe organ voice from Yamaha Genos™

Two mundane, yet important observations:

  • The license allows up to 3 simultaneous installs — quite generous.
  • Sample Robot is 64-bit only. (?)

I intended to install Sample Robot on my “upstairs” PC. The upstairs PC is equipped with a basic analog-to-digital converter (ADC) and digital-to-analog converter (DAC), a Behringer UCA202. Yes, I know, it’s kind of low-brow, but I don’t do enough sampling, etc. to splash out for an expensive converter. The upstairs rig is always ready to go, including its E-MU MIDI2x2 interface. It all sits right next to Genos. A quick cable up and we should be ready.

Or not. The upstairs PC runs Windows 7 32-bit. The copy of Sample Robot which Yamaha Musicsoft dealt to me insists on 64-bit Windows 7. BTW, I couldn’t find this requirement (or any detailed platform requirements) on the Sample Robot web site or in the Sample Robot manual. I think it’s 64-bits or the highway…

“If the mountain will not come to Muhammad, then Muhammad must go to the mountain.” Drag Genos, UCA202, and a handful of cables downstairs to Windows 7 64-bit and Sample Robot.

With everything moved and cabled, it’s finally time to fire up Sample Robot. Thank goodness for its start-up wizard because it definitely takes you through every essential setting which must be made. The wizard leads up to its final screen which has a button to start sampling. Great. except what about setting levels?

Here the road gets a bit rough. First, I noticed that Sample Robots meter is twitching as though it’s getting schmutz on the audio input or at least a dirty sample stream from the UCA202 ADC. I’ll be darned if I can find a way to monitor the incoming sample stream through the box, i.e., route the incoming stream to Sample Robot’s audio output in order to hear incoming audio on the monitors.

Worse, I didn’t even know that Genos was playing the wrong voice! Genos has two 5-pin MIDI ports: Port A IN/OUT and Port B IN/OUT. By default, Port A is associated with the SONG channels and Port B is associated with the keyboard (tone generator) itself. I needed port B, and of course, was plugged into Port A.

How did I work through these issues? First, I turned off Sample Robot’s Auto-gain feature. “Use the Force, Luke.” I feel much better hitting the ADC with a known sensible level for starters. I can always enable Auto-gain later on.

Next, I had to get some aural feedback. I reduced the amount of time each sample is taken to two seconds. With such a short time, I could quickly capture half-a-dozen samples, stop capture, and playback each individual sample for quality assurance. This is how I finally discovered the Port A/Port B wrong voice problem.

With Genos properly configured, I started to hear pipe organ instead of cheesy GM piano. This afternoon, I intend to capture a full set of short samples and QA them before acquiring full length (12 second) samples and looping them. Better to wait 60 seconds instead of six minutes; shorten that feedback loop!

Now, I think I can move ahead. But, please, oh please, where is the Monitor function in Sample Robot? To its credit, Sample Robot does what it says on the tin (modulo 64-bitness). More to come.

MODX: Get started with Sample Robot

In my last post, I created a new Yamaha MODX Performance from a handful of WAV files. The new Performance had shortcomings, mainly due to short loops in the samples themselves. I tossed the first one away. What the heck — it’s only bits. 🙂

Last time, I did all of the work on the MODX itself through its user interface (UI). My experience was generally good, but I had to enter a lot of detail directly into the UI. Today, I’m moving on to Sample Robot for Montage with hopes of making the job easier.

Sample Robot by SKYLIFE is a spiffy tool for copping sounds from old keyboards or any other sound source. Yamaha formed a parnership with SKYLIFE resulting in Sample Robot for Montage, a version of Sample Robot that is tailor-made for Montage (and MODX).

Even though Sample Robot for Montage — which I will refer to as “SRM” — has the ability to capture multisamples automatically from MIDI keyboards, it has two other capabilities of immediate interest and purpose:

  1. SRM can import WAV/AIFF files into a multisample.
  2. SRM exports the finished result as a Montage User file (X7U) or a Montage Library file (X7L). MODX loads both of these file types.

Thus, SRM looks to be and is a promising path for creating new MODX Performances from existing WAV/AIFF files.

At this point, I must admit that I’m still getting my head around the Montage/MODX library concept. [This subject receives scant space in the documentation, unfortunately.] Thanks to Phil’s tutorials on YamahaSynth.com, I grok their basic purpose — to bundle related Performances, waveforms, arpeggios, etc. into an easily distributed and imported package. I have much to learn about this subject especially how to exploit Montage/MODX libraries for data management during sound development. More about this some day.

Sample Robot for Montage: Set-up

I downloaded SRM from the Yamaha Musicsoft site. SRM is free to Montage (and, apparently, MODX owners) until March 2019. I can’t argue with the price!

The download is a ZIP file containing both the Windows and Macintosh versions of SRM. The Musicsoft site provides a Yamaha code number and a serial number, both of which are required for activation. Rikki don’t lose that number. 🙂

Install is easy — just click through the installation wizard. The Windows installer is about 200MBytes, the bulk of which are example projects.

You will be asked to activate after launching SRM for the first time. Enter all of the magic numbers. SRM starts up with a preloaded example. I peeked and poked at the example for a little while and quickly discovered that an audio device wasn’t assigned. I eventually settled on “Microsoft Sound Mapper – Output”. Unfortunately, Windows 7 ran that damnable audiodg (Audio Device Graph Isolation) process, taking a long time to complete. Further, I had to restart SRM before getting audio through the monitors. I can’t fault SRM for this. Microsoft? Hello, it’s 2018?

Upon start-up, SRM displays a wizard leading you through the task of setting essential project characteristics like sample rate and such. In a moment of hubris, I cancelled the wizard the first time through and found the app to be somewhat inert. Me-thinks SRM needs to initialize its environment and clicking through the start-up wizard at least once does the trick.

SRM: The warm-up

I strongly recommend a quick read through the SRM manual for no other reason than to become familiar with its concepts and terminology. The terminology is fairly standard, but it differs a bit from Montage/MODX terminology. For example, it appears that your SRM “multisamples” will become Yamaha waveforms and inherit multisample names. This is where familiarity will breed expertise, I expect.

I also suggest taking a tour around the SRM user interface. The “Info and Settings” pane is a property inspector that shows important properties for the selected project, multisample or sample. Then, check out the virtual keyboard. With a two button mouse, left clicking/holding a key plays the sample associated with the note. (Notes with a blue box marker have a sample assigned.) Right clicking a key selects the sample associated with the key.

The Osc, Wav, MIDI and Panic radio buttons seem to choose what the virtual keyboard sends and does. Try Osc and you’ll hear a pure reference tone at the selected pitch — a good feature when working with pitched multisamples. I don’t know about you, but my sense of pitch goes all whack after 30 minutes or so of intense work.

Today’s protein on the plate

I dug another old chestnut out of my hoard of pipe organ samples. Apple’s Symphony Orchestra Jam Pack (a blast from the past, eh?) has several mighty fine church organ patches. Even though it’s Garageband, the church organ is an EXS24 virtual instrument. If you know where to look, you can find the samples and you can play/inspect the virtual instrument in Logic via EXS24.

Apple licensed pretty decent samples. I once tried to determine their original source and vaguely remember Sonic Reality. Others thought VSL lite (circa 2003). Association with Garageband unfairly cheapened their reputation.

The samples are taken from three principal ranks (8′, 4′ and 2′) in unison. Without deep diving organ registration, a voice consisting of principals is good for hymn accompaniment. [Principals, BTW, are the metal pipes that give a pipe organ its distinctive timbre.] Thanks to the even footages, there aren’t a lot of weird harmonics to clutter up the sound.

A Dave Stewart moment. Many synthesizer pipe organ patches are reedy. They want to impress the buyer with bombast (i.e., “Phantom of the Opera” AKA Bach’s Toccata and Fugue in D minor). Reeds and strings are inappropriate for hymn accompaniment. Flutes, sometimes. Pure tones, pure tones.

Here is a table summarizing the sample files:

KB#  Low  High  Center  File
---  ---  ----  ------  -----------------------
 1   C-2   C#1      C1  Prin_842_kb1_c1.aif
 2    D1    E1     D#1  Prin_842_kb2_d#1.aif
 3    F1    G1     F#1  Prin_842_kb3_f#1.aif
 4   G#1   A#1      A1  Prin_842_kb4_a1.aif
 5    B1   C#2      C2  Prin_842_kb5_c2.aif
 6    D2    E2     D#2  Prin_842_kb6_d#2.aif
 7    F2    G2     F#2  Prin_842_kb7_f#2.aif
 8   G#2   A#2      A2  Prin_842_kb8_a2.aif
 9    B2   C#3      C3  Prin_842_kb9_c3.aif
10    D3    E3     D#3  Prin_842_kb10_d#3.aif
11    F3    G3     F#3  Prin_842_kb11_f#3.aif
12   G#3   A#3      A3  Prin_842_kb12_a3.aif
13    B3   C#4      C4  Prin_842_kb13_c4.aif
14    D4    E4     D#4  Prin_842_kb14_d#4.aif
15    F4    G4     F#4  Prin_842_kb15_f#4.aif
16   G#4   A#4      A4  Prin_842_kb16_a4.aif
17    B4   C#5      C5  Prin_842_kb17_c5.aif
18    D5    E5     D#5  Prin_842_kb18_d#5.aif
19    F5    G8     F#5  Prin_842_kb19_f#5.aif

The note names (numbers) follow the Yamaha convention. This information was taken from Logic EXS24.

I did a little bit of prep work. I renamed the AIF files, putting the center note into standard form. I checked the samples in Yamaha Tiny Wave Editor (TWE) to see if they were looped. (They were.) I normalized the samples using TWE. Turns out, SRM can normalize and I could have accomplished this task in SRM instead.

The Apple samples are decent:

  • Stereo, 44100Hz, 16-bit
  • Nice long samples (12 to 19 seconds each)
  • Long loops, no audible bumps

This one has the potential to be a keeper.

SRM: Doing the business

Time to get down to business. I created a new project named “Principal842”. Please see the screenshot below. [Click images to enlarge.] I like SRM’s “Battle Zone” visual theme; it’s one of the few games that I still relate to.

Drop into the “Import/Export” menu, select the AIF files, click the Import button, and what the?

Admittedly, what came next were my most frustrating moments. I either imported one individual sample file or just the last sample file in the selected list. Arg! Long story short, it came down to finding the right combination of import settings.

The default Copy setting is “Copy to filenames’s Root Key (if available), else to filename’s Root Key”. Grammar issue aside (“filenames'” is grammatically correct), I tried “Copy to filenames’s Root Key” with success.

The first screenshot shows the state of the project after a successful import. The samples are laid out correctly across the keyboard as derived from the sample file names. Further, SRM did a smashing job with the keybank ranges.

With everything in order, dive into import/export and select Montage Library (X7L) format for export. I went with X7L instead of X7U (User format) because I didn’t want to overwrite my User area. Yes, I’m thoroughly backed up, but why take a chance. I also wanted to get my feet wet with libraries.

I copied the X7L file to a USB flash drive, inserted the flash drive into MODX and loaded the library file. The X7L Library file is sizeable due to the waveform inside. The library file has the name “Principal842”, same as the SRM project. The Library appears in Category Search under that name. SRM generated a basic Performance, too.

I tried the basic Performance and was satisfied with the raw material. I then dove into the left-over husk of yesterday’s abandoned experiment. The husk (Performance) began life as the “Church Organ” preset voice. I changed its waveform to the new one and made a few tweaks here and there. Voila! A decent pipe organ voice suitable for hymn accompaniment.

Sometimes a new waveform requires polish. The sample levels may be uneven across the keyboard or a sample may be out of tune. The MODX UI is well up to the job allowing tweaks for level and fine pitch.

I wanted to post the finished project. However, given the commercial origin of the samples (Apple), I don’t want to violate intellectual property (IP) rights. Instead, here’s a quick MPEG-4 demo (m4a).

Copyright © 2018 Paul J. Drongowski