
Here’s a quick update on my progress with the V3 Sound YAMMEX XXL sound module.
The V3 Sound XXL series are very compact, light-weight MIDI sound modules based on the Dream S.A.S. SAM5716B synthesis engine. The YAMMEX and its sister, the V3 Sound Grand Piano XXL, have hundreds of high quality voices — 3GBytes of factory samples in a 4GByte waveform memory. The modules also provide two multi-effect (MFX) pipelines which enrich the sound.

The XXL modules do not have a built-in user interface (UI) having no display or buttons for selecting voices. All sounds and effects are selected through the MIDI and USB-A ports. V3 Sound provide the tablet-based V3 Sound Control app and two comprehensive MIDI Designer UI templates. The V3 Sound Control app, unfortunately, does not support the YAMMEX. V3 Sound considers the YAMMEX as a Genos/PSR expansion only and expect users to control YAMMEX through a set of predefined voice (VCE) files and the normal Genos/PSR voice selection process.
Well, those VCE files do send MIDI Bank Select MSB, Bank Select LSB and Program Change messages. I can now assure you that these messages are enough to select YAMMEX voices even if you are not using a Genos or PSR.
Yamaha MODX Zone Master works quite well. You need to build MODX Performances consisting of external MIDI zones. Thanks to Zone Master you can select, split and layer YAMMEX voices. The trick is to assign a separate YAMMEX voice to each MIDI channel and use Zone Master channel and note ranges to affect splits and layers.
I have also successfully used the Arturia Keylab Essential with YAMMEX. It took only 15 minutes work to make a control template using Arturia’s MIDI Control Center application. I assigned eight of my favorite YAMMEX voices to the eight Keylab pads and assigned the most common MIDI continuous controllers to the knobs and sliders.
Both of these scenarios are dirt-simple involving a direct 5-pin MIDI connection. Unfortunately, Keylab Essential by itself cannot do splits and layers over 5-pin MIDI. Keylab Essential does not provide the functional equivalent of Zone Master. Keylab Essential can send on only one MIDI channel at a time and doesn’t implement the concept of key ranges (zones). Keylab Essential also restricts the number of selectable voices to what you can programmed into its key pads.
All is not lost, however, as MIDI Designer once again comes to the rescue. First, you need to make connections:
                                 iPad
                                   |
    Keyboard controller  -->  iRig MIDI -->  YAMMEX
The keyboard controller sends MIDI over a 5-pin cable to the iPad which, in turn, sends MIDI to the YAMMEX over a second 5-pin cable. Bonus: I successfully tested Bluetooth MIDI input from Korg Microkey Air. The iPad acts as a Bluetooth wireless interface to YAMMEX.
The iPad runs two applications: StreamByter and MIDI Designer:
MIDI IN --> StreamByter --> MIDI Designer --> MIDI OUT
Incoming note messages are passed THRU StreamByter and MIDI Designer. StreamByter remaps (rechannelizes) the MIDI notes to three zones/streams:
    Channel 1: UPPER1
    Channel 2: UPPER2
    Channel 4: LOWER
UPPER1 and UPPER2 form a two-voice layer above the split point. LOWER is a solo left-hand voice below the split point. I borrowed this simple zone structure from the Casio CT-S1000V. It’s intuitive and is quite powerful even in its simplicity.
StreamByter maps and mangles MIDI data according to user-defined rules. The rules are rather cryptic, so I refer you to the StreamByter documentation. Currently, I am using the following rules to split/layer:
    NX 00-3A = X3
    NX 3A-7F = X0
    NX 3A-7F = X1 +C
Yes, the UPPER and LOWER zones have a one note overlap. I’m still experimenting and may make the overlap larger, if a bigger overlap is useful. I don’t like abrupt breaks between upper and lower zones.
Well, the rest of the work is done by MIDI Designer and my YAMMEX control template. The V3 Sound templates struck me as too complicated — the main reason why I went with “the Casio voice structure” and my own template. Here is the first prototype, work-in-progress template:
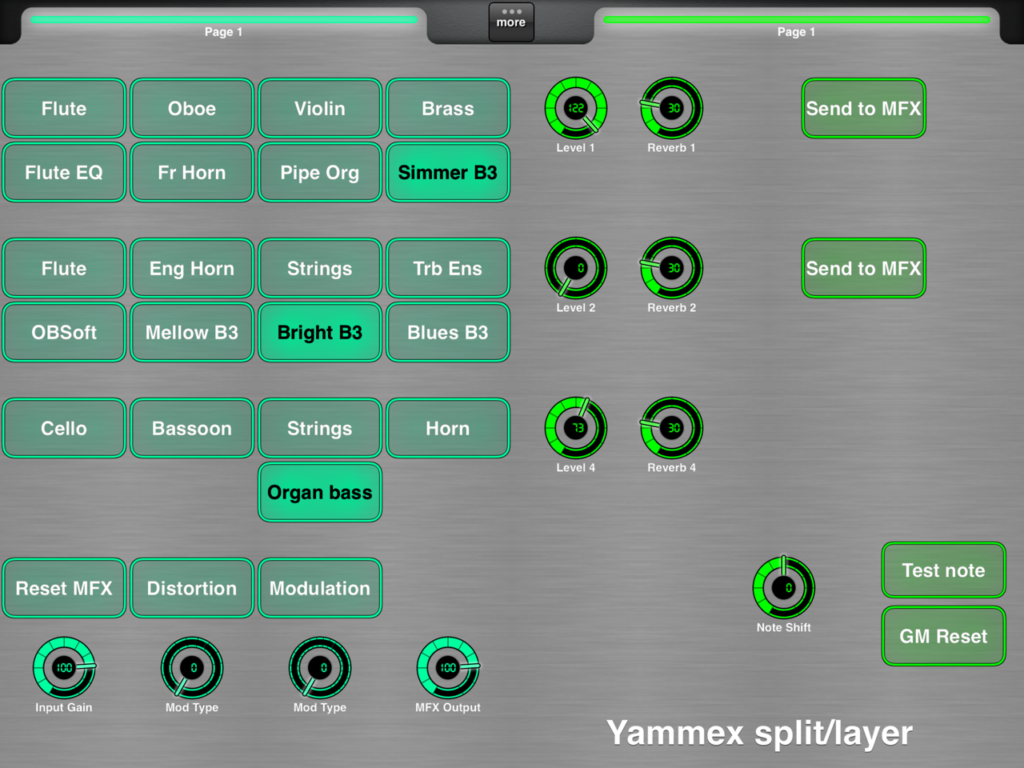
There are eight radio buttons to select the UPPER1, UPPER2, and LOWER voices. [Well, I need to add three more voices to LOWER, as you can see.] These are my favorite YAMMEX voices and they will let me build my most frequently used combinations. Knobs set the voice and reverb level for each zone.
The MFX controls do not function correctly at this time. I seem to be missing some magic; YAMMEX is not responding to the MIDI messages sent by the template even though the V3 Sound “factory” template sends the same darned messages! At this point, I need to ask V3 Sound for advice.
All in all, things are coming along — many successes, a few failures. That’s to be expected at this stage!
Copyright © 2022 Paul J. Drongowski