SAM2695, A50 and NSX-39 thoughts

I’m still kicking around ideas for small, ultra-low cost MIDI tone modules. Random thoughts to follow…

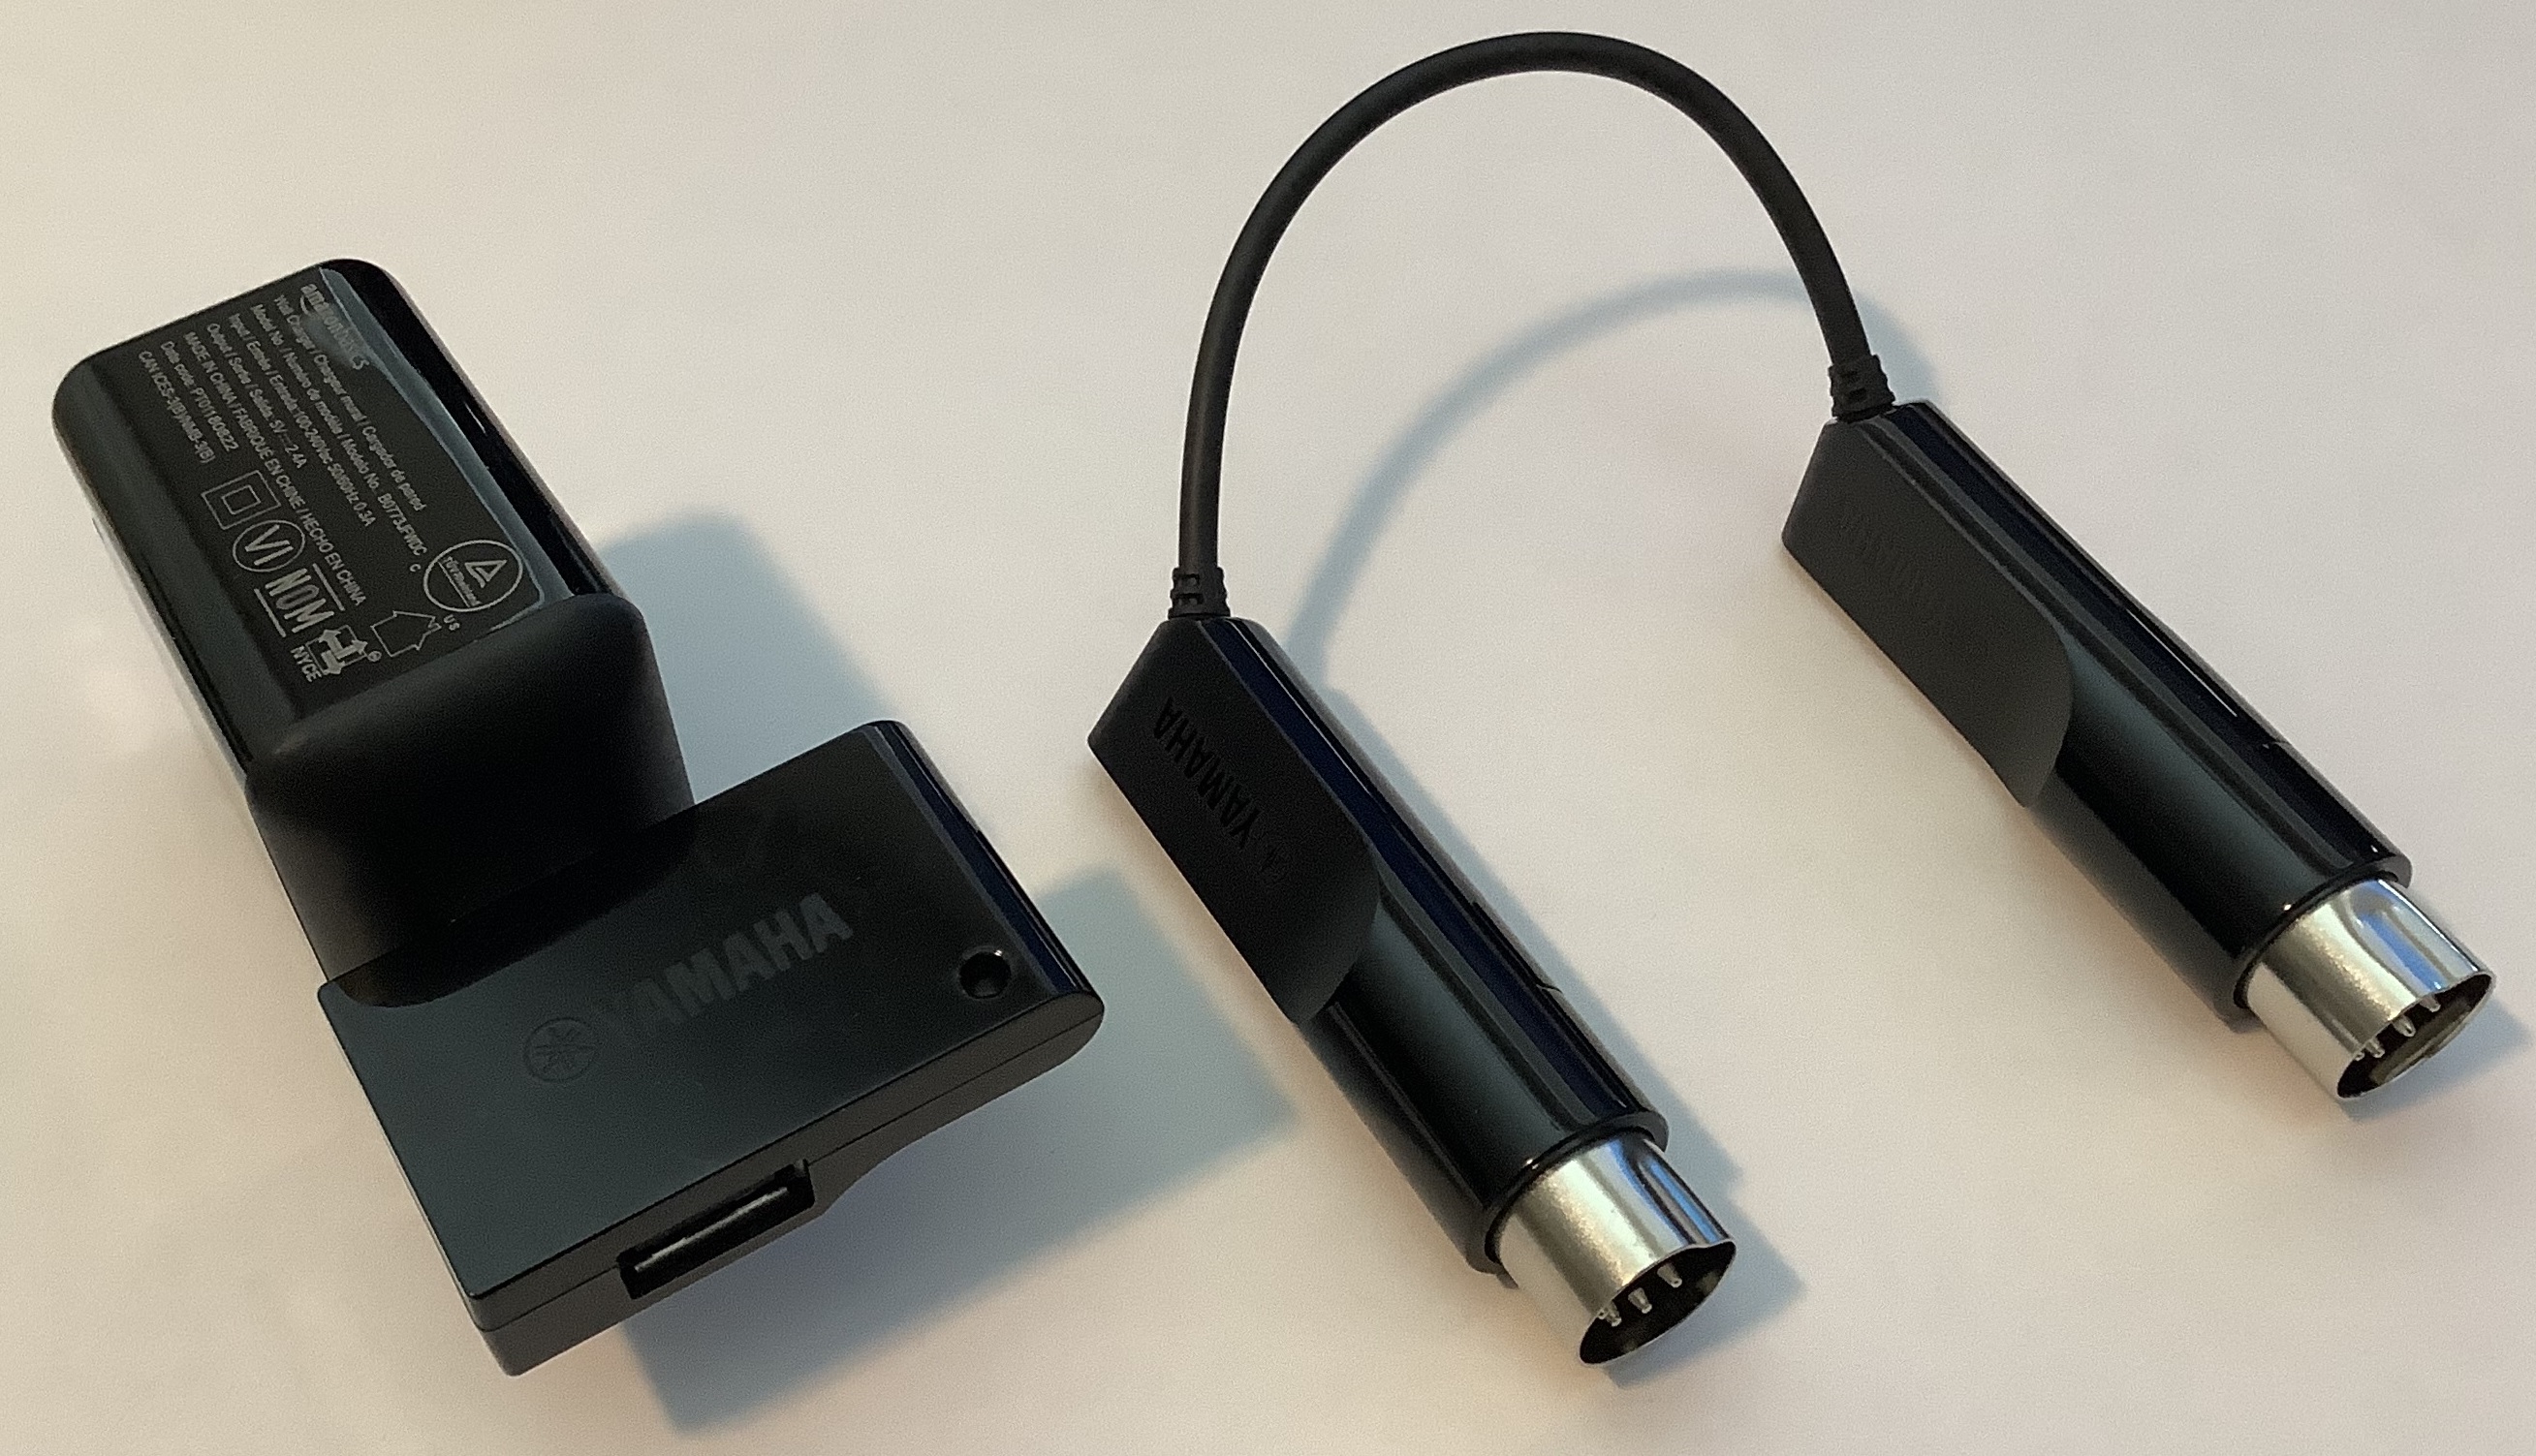
I completed the SAM2695 project using the M5Stack U187 MIDI module. Using a nibbling tool and utility knife, I cut a few holes along the edge of a Hammond 1591CSBK plastic project box. I packed the MIDI module and cabling into the Hammond box and strung cables through the holes. There are three cables:

  • An in-line barrel connector switch cable
  • A 3.5mm stereo cable (6 feet)
  • A CME MIDI cable (3 feet)

The audio and MIDI cables are thin and flexible. Overall, this proved to be a better construction method than drilling holes for external connectors and so forth. I’m not the best fabricator…

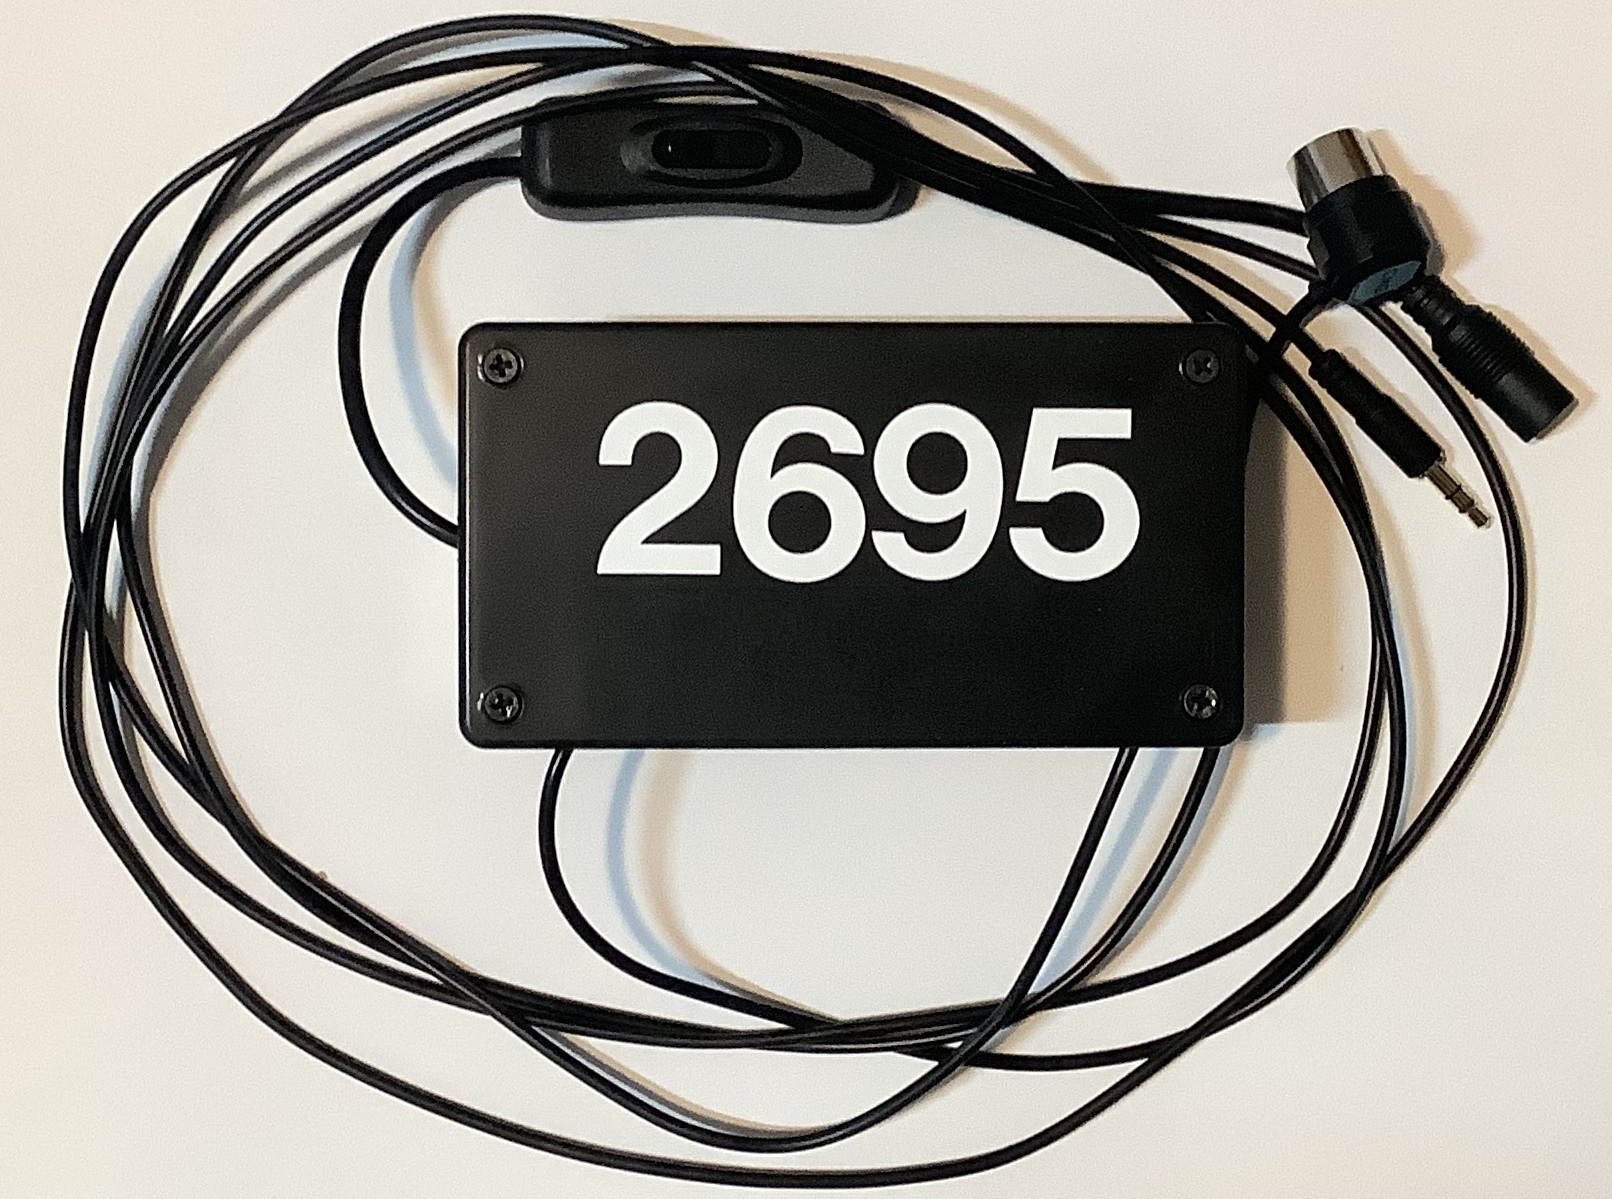
SAM2695 General MIDI tone module

The end result is a GS-compatible General MIDI module which is the size of a guitar pedal. I configured a Novation Launchkey 49 (Mk4) to select 16 GM voices through the pads and to tweak/tweeze a basic set of GM parameters. The Mk4 supports two zones (Part A and Part B), is flexible, and deserves a blog post of its own.

I put the SAM2695 through its paces and confirmed my impressions. (See my post comparing the SAM2695 against the Yamaha PSS-A50.) Not a bad GM module for $50 (total). Still, it won’t have people selling their Nords, Montages, Kronos, whatever. 🙂 There are some decent playable voices and then there are some crap voices.

The SAM2695 effects, in particular, leave me wanting. The 2695 exposes reverb and chorus parameters, but most tweaking requires System Exclusive (SysEx) messages. More ranting about SysEx in a minute.

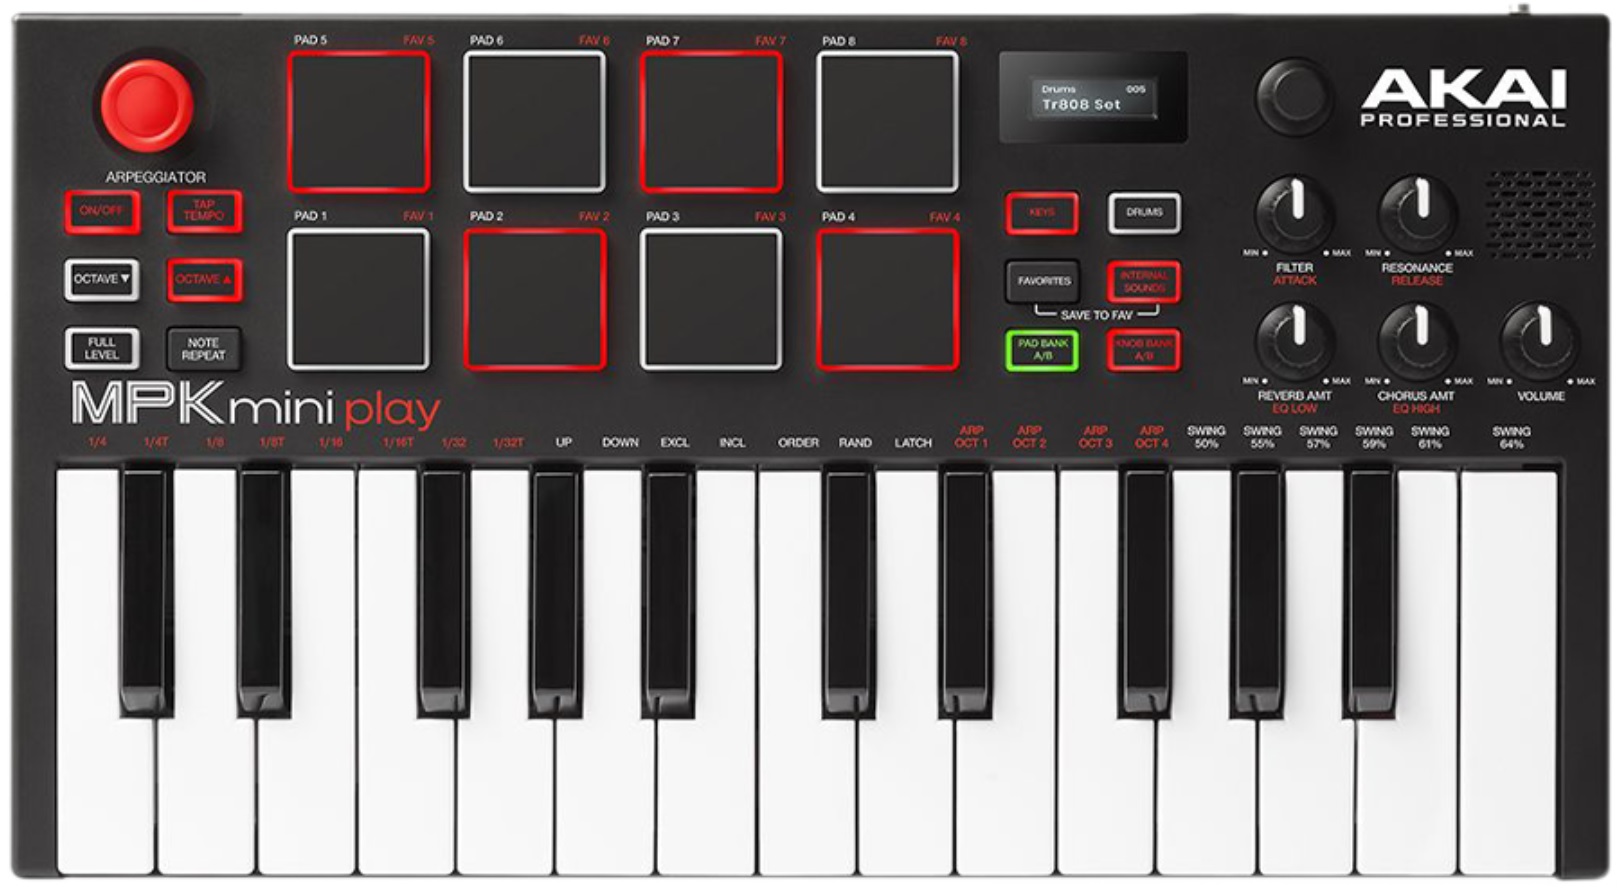
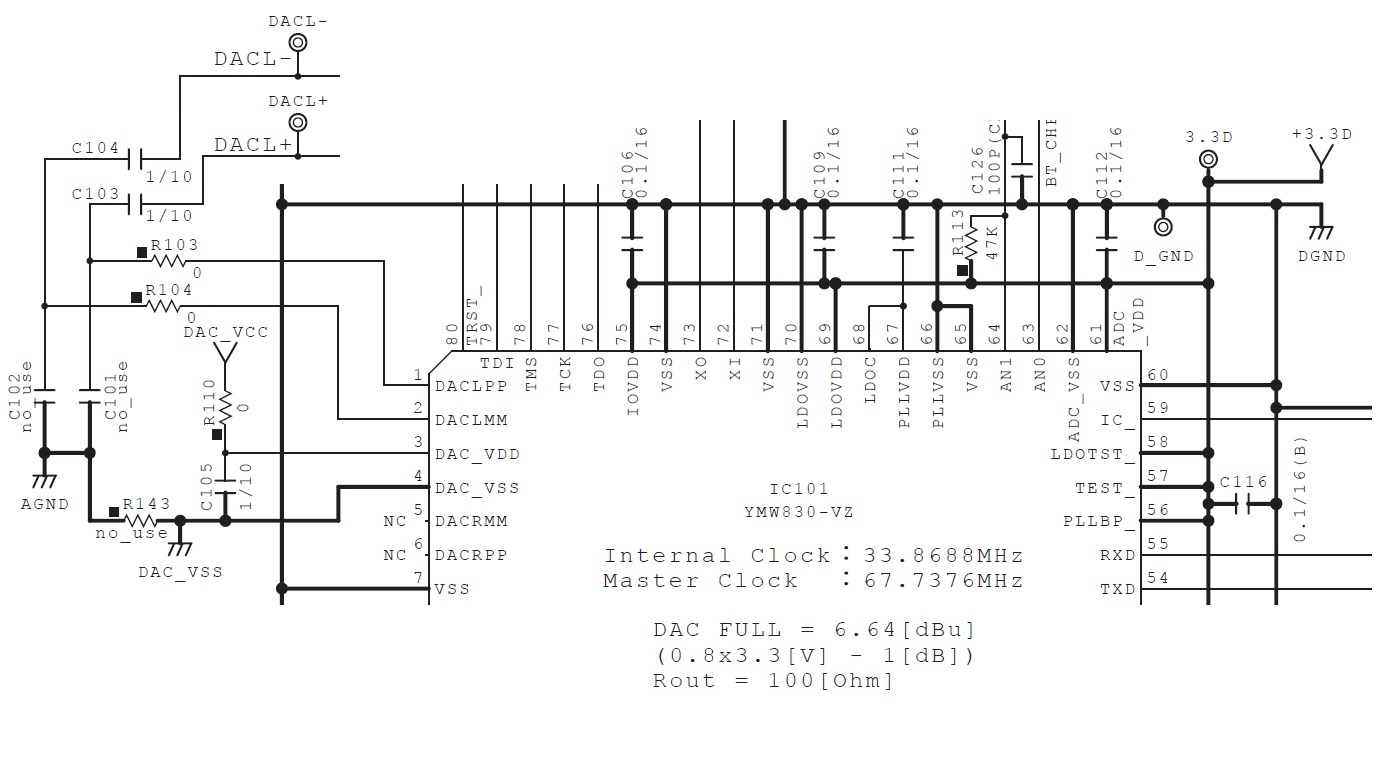
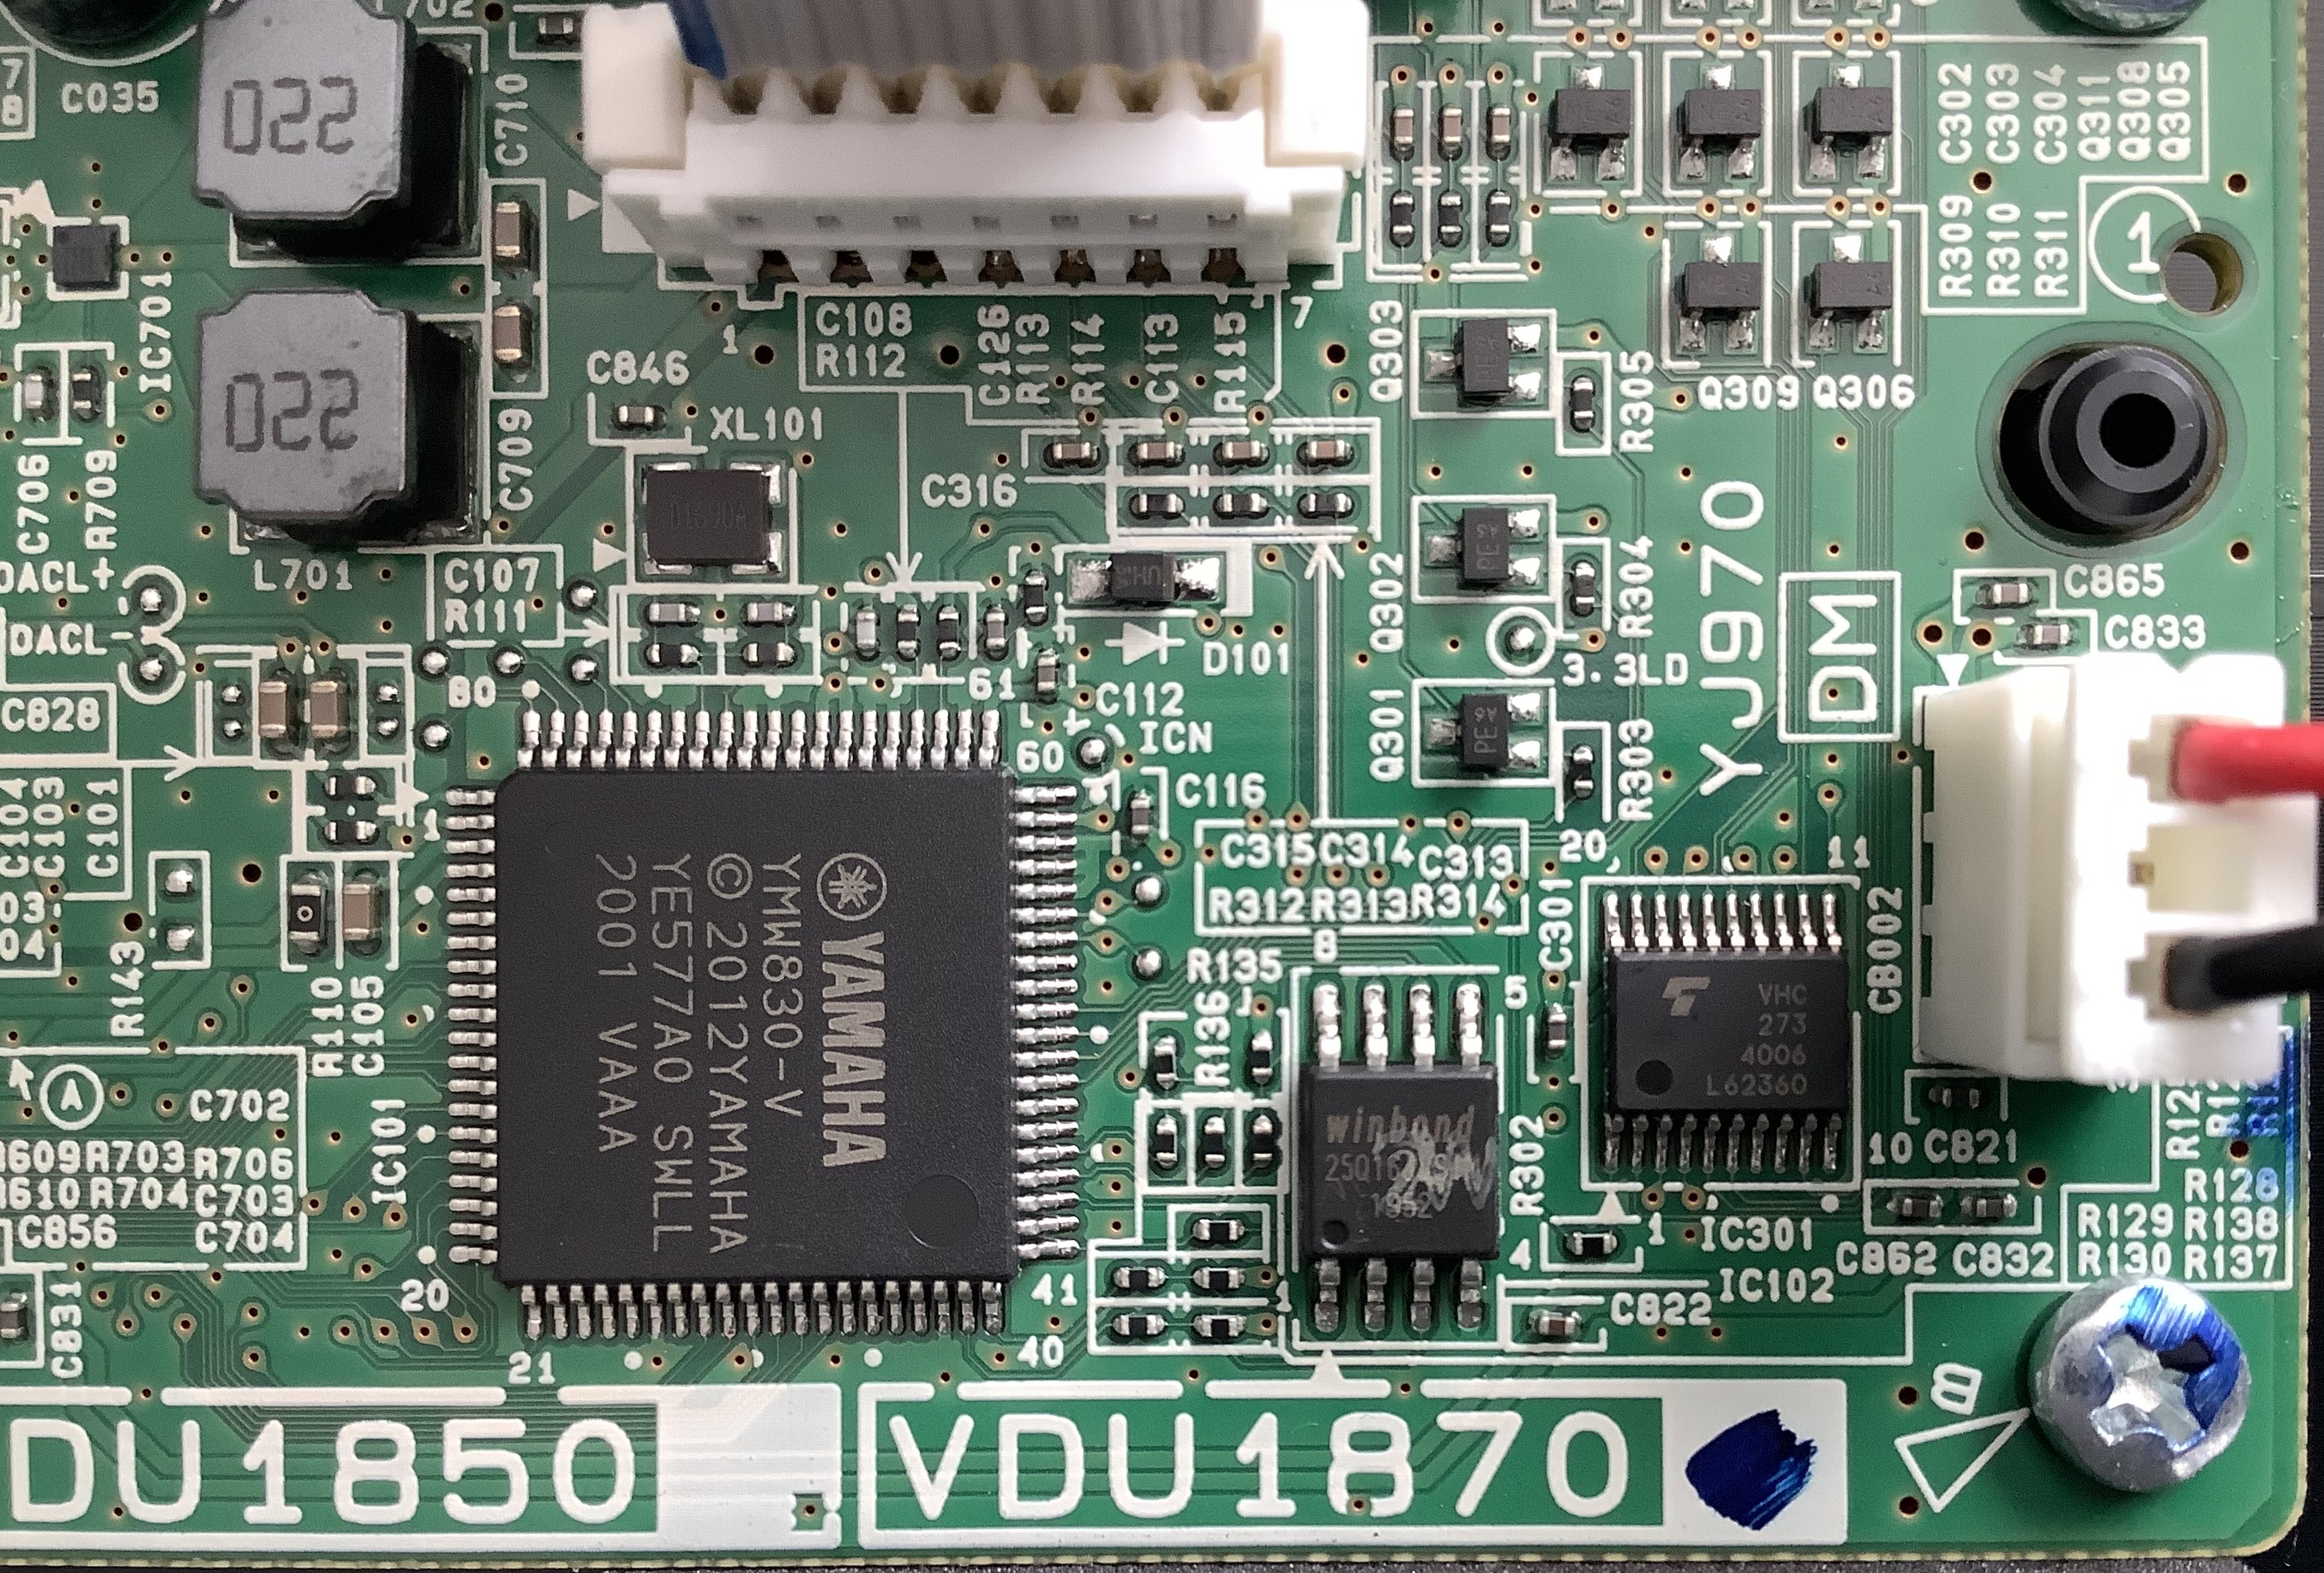
Relatively speaking, the Yamaha PSS-A50 is not harsh and its effects are better. The PSS-A50 also uses a one-chip solution, the Yamaha YMW830. On the other hand, the A50 MIDI implementation is truly spartan. For example, one cannot change either the reverb or chorus type. The stock A50 is mono (not stereo), so the Yamaha engineers decided not to implement MIDI CC#10 Pan.

Thus, I have really cooled to the idea of hacking the A50 into a module. Why begin a project when you know that the end result will be deficient in a major way?

Which brings me to the third option — chopping up Gakken NSX-39, better known as “Pocket Miku.” The NSX-39 is based upon a different one-chip Yamaha solution, the YMW820 (NSX-1). The YMW820 is a more than decent XG MIDI implementation. It supports the full GM sound set (A50 has 40 selected GM voices) and it has a fair to middling variation effect unit, including rotary speaker!

With all that going for it, the NSX-39 should be a no brainer. Nope. There is no clear, direct way to hack MIDI onto the YMW820. So, it’s likely to be MIDI over USB all the way and the USB port is implemented by an ARM media processor chip fronting MIDI to the YMW820 over SPI. The NSX-39 is already a small board/package and there isn’t much to cut away.

Then there is the issue of that insipid Miku voice. MIDI channel 1 is dedicated to Miku and, without writing the flash ROM, you can’t get rid of it. Yamaha had envisioned Real Acoustic Sound (RAS) as an alternative to Miku, but they never released a ROM image. RAS is a form of Articulation Element Modeling (AEM), also known as “Super Articulation 2“. Here is a video demo (AEM saxophone) of what could have been. [Video courtesy of Ken Fujimoto.]

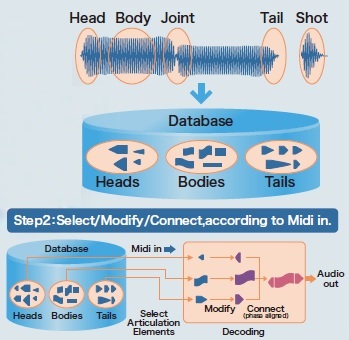
YMW820 Real Acoustic Sound (RAS)

A big issue hanging over all three design options is the inability to send SysEx from the Launchkey. Or, another way of stating the requirement, critical settings need SysEx when most inexpensive MIDI controllers are incapable of sending SysEx. Really, how hard would it be to add SysEx support to a MIDI controller? SAM2695 has two MIDI CCs — CC#80 and CC#81 — which set the reverb type and chorus type, respectively. This capability is very unusual, however.

Yamaha arrangers keep voice set-up data in a few different places. Every voice has a basic set-up in its internal meta-data. One level up in abstraction, each panel voice has a so-called VCE (Voice Edit) file. (“VCE” is one of several file name extensions which denote a Voice Edit file.) The VCE is a MIDI file which selects the base-level voice and then changes EQ, filter characters, attack/release, and insert effect among other things. Styles contain something like a VCE in One Touch Setting (OTS) locations. Registrations can store VCE-like data, too.

The arranger voice design got me thinking. Why not map MIDI Program Change messages to a group of VCE-like MIDI messages in order to set up the SAM2695 (or whatever), i.e., choose reverb and chorus type, tweak EQ, and so forth? My AdaFruit Feather MIDI event processor would be a good platform given the appropriate custom code. A future project?

Copyright © 2025 Paul J. Drongowski

Sound test: Yamaha A50 vs. SAM2695

The Yamaha A50 keyboard and the M5Stack U187 MIDI Unit (synthesizer) are based on two different ultra-low cost chips: the Yamaha SWLL (YMW830) and the Dream S.A.S. SAM2695, respectively.

The SAM2695 implements the full General MIDI (GM) sound set replete with Roland GS control and System Exclusive (SysEx) MIDI messages. The A50 implements forty voices from the GM sound set and a subset of the Yamaha XG MIDI standard. Because the A50 is a subset, it seems only fair to compare equivalent voices and see which synth is stronger.

The table at the end of this post is a voice-to-voice comparison. Neither instrument will have you ditching your Montage or Kronos. 🙂 The price points are definitely entry-level — $120 USD for the A50 (if can find one) and $15 for the M5Stack U187 MIDI Unit.

Surprisingly, the main grand piano voices are nearly identical! Both pianos are single strike and key velocity simply makes the underlying multi-sample louder or softer. Unexpectedly, the A50 electric grand is darker than the main grand. I prefer the darker tone as it is less likely to shatter glass.

The A50 electric pianos correspond to dark Rhodes and FM DX tones. The SAM EP has a bell-like chime, even its attempt at Rhodes.

The organs aren’t going to knock you out being the typical GM fare. The A50 drawbar organ has more low-mid tone and guts. The SAM rock organ is annoying and is especially buzzy in the low end. (An attempt at overdrive?) It’s unusable.

The A50 acoustic guitars have more mid-range body tone. The SAM clean and overdriven electrics are thin and the SAM overdrive (OD) is unconvincing. I selected A50 voices through its front panel and Yamaha may be adding the chorus effect to the clean guitar. Both jazz guitars need chorus to get the classic JC120 effect.

The SAM basses sound like a sampled electric. The SAM acoustic bass is not very jazzy (authentic). The A50 slap bass nails “Seinfeld” and the A50 synth bass almost nails “Chameleon”. The SAM synth bass is all punch and no sustain — doesn’t sound very rezzy.

The SAM solo violin and cello have more attack and body than the A50. Didn’t see that coming! The SAM pizzicato string voice has reverb sampled in, resulting in playback artifacts. The A50 harp low notes are unrealistic.

My biggest knock against SAM is the ensemble string voice. There is a bad, very audible loop lump in the octave about middle C. This gaffe should have never shipped.

Trumpet and trombone are what one would expect of GM solo brass — kind of real, but one-dimensional. Again, it’s a single multi-sample made louder and software by velocity. The A50 French horn is mellower than SAM. The SAM brass section sounds like a sampled synth brass patch, not real horns.

The A50 tenor sax is breathy although it won’t fool anyone. The SAM tenor sounds like a snake-charmers reed recorder. Yuck. I prefer the warmer A50 oboe. The clarinet and flute voices are nearly identical.

What can you say about synth leads and pads? They are what they are. The A50 has a few nasty, aggressive lead voices and the SAM has a few, too. Yamaha nails a few of the classic GM synth voices, but they were there at the beginning of General MIDI, weren’t they? 🙂

Overall, it’s a split decision. I lean Yamaha A50 over SAM2695. Yet, I keep repeating “15 dollars” over and over again. Remember, SAM is a full GM sound set and you might be able to substitute an alternative GM voice in place of a weaker voice.

If you like Akai MPK Mini and want an A50-like experience, I recommend the Akai MPK Mini Plus 37 combined with the M5Stack U187 MIDI unit. The M5Stack gives you a complete GS-compatible synth module (for $15!). Avoid the Akai Mini Play and its brain-damaged SAM implementation.

Copyright © 2025 Paul J. Drongowski

+ mark means "generally useable for a low-price instrument"

PC1  Voice name            A50 SAM  Comments
---  --------------------  --- ---  --------------------------
1    Grand Piano            +   +   Same
3    Electric Grand Piano   +       SAM: bright; A50: dark
5    Electric Piano 1       +       SAM: chimey tines; A50 dark Rhodes
6    Electric Piano 2           +   SAM: Rhodes; A50 DX EP

12   Vibraphone             +   +   Same
13   Marimba                        SAM: more hammer tone

17   Drawbar Organ          +       A50: more low-mid freq
19   Rock Organ             +       SAM: sampled chorus is annoying, buzzy
22   Accordion              +       SAM: thin; A50: chorus/octaves
23   Harmonica                  +   A50: thin

25   Nylon Guitar           +       A50: body tone/resonance
26   Steel Guitar           +       A50: body; SAM: not bad!
27   Jazz Guitar            +   +   A50: dark; SAM; bright; both need chorus
28   Clean Guitar           +       SAM: thin; A50: built-in chorus, sustain
30   Overdriven Guitar      +       SAM: too clean, OD fake-y

33   Acoustic Bass          +   +   SAM: sampled electric?
34   Finger Bass            +       SAM: picked bass?
37   Slap Bass              +       SAM: picked fretless? A50: Seinfeld
39   Synth Bass             +   +   SAM: no sustain; A50: Chameleon

41   Violin                     +   SAM: more attack, body
43   Cello                  +   +   SAM: more body
46   Pizzicato Strings      +       SAM: sampled reverb, artifacts
47   Orchestral Harp            +   A50: low notes unrealistic
49   Strings                +   +   Similar; SAM: Can hear loop point

57   Trumpet                +   +   SAM: slightly warmer; A50: more real
58   Trombone               +   +   A50: more attack blat
61   French Horn            +   +   SAM: brighter, more attack; A50: mellow
62   Brass Section          +       SAM: sampled synth brass?
63   Synth Brass                    Very similar

67   Tenor Sax              +       A50: breathy; SAM: snake charmer
69   Oboe                   +       SAM: bright, almost synthetic
72   Clarinet               +   +   Very similar
74   Flute                  +   +   Very similar

81   Square Lead                    A50: pure; SAM: nasty, chorus/distort
82   Sawtooth Lead                  A50: clean; SAM: nasty, chorus/detune
83   Gemini                         A50: nasty; SAM: Calliope
85   Punchy Chordz          +       A50: nasty; SAM: kind of weak

89   New Age Pad                    SAM: bell-like; A50: classic GM
90   Warm Pad               +   +   Both good; A50: classic GM
101  Brightness                     What can I say?

Review: Akai MPK Mini Play (Mk1)

Now that Akai have introduced the new Akai MPK Mini Play Mk3, original first generation Mini Plays are going on sale. Being a notorious bottom-feeder (doing the most with the least), I cashed in a few loyalty points and bought one.

First generation Akai Mini Play (Mk1)

Sound On Sound magazine recently reviewed the new mk3. Many of their comments apply to the original MPK Mini Play; basic functionality has not changed. The mk3 includes an improved second generation MPK Mini keybed, a bigger and better speaker, a different panel layout and different, narrower pads. Everything else is pretty much the same. Having an OLED in an inexpensive product like the MPK Mini Play is a luxury.

For the el cheapo price, the MPK Mini Play is surprisingly well-made. The keyboard and knobs don’t feel cheap although I doubt if they are very durable. All of the back connectors are mounted directly on the main printed circuit board (PCB) and should be treated with respect and care. There are numerous USB connector repair videos on-line (for the similar Akai MPK Mini), so beware when handling any of the Minis.

As to the Mk3 improvements, I get it. The original’s speaker is quite weak with limited frequency range. The original keybed is a little touchy. Keys need to be struck firmly to reliably trigger notes. One cannot play soft notes; forget nuance. The pads aren’t bad, however. Pads have always been Akai’s strong point.

The sound engine is the Dream S.A.S. SAM2635 with its 8MByte CleanWave® soundset. The Mini Play’s soundset has 128 General MIDI sounds, 9 drum sets and one sound effects (SFX) set. By and large, it’s a decent sounding GM set including the reverb and chorus. The front panel knobs let you tweak filter cut-off, resonance, attack time, release time, reverb level, chorus level, EQ low and EQ high. Edits can be saved to one of eight Favorite locations. In this regard, the Mini Play is one-up on the Yamaha PSS-A50. (The PSS-A50 price is in the same neighborhood as the Mini Play.)

That’s the good news. Now the bad news. As mentioned in the Sound On Sound review, the incoming MIDI implementation is a nightmare. [I’m still figuring it out.] Foremost, the Akai Mini Play is not a multi-timbral GM module. The Akai software modifies (filters? blocks? mangles?) whatever MIDI you send to it before it sends its own internal MIDI stream to the SAM2635.

This is a shame and a lost opportunity for Akai and its customers. The Mini Play could be so much more if it allowed a direct path to the SAM2635. The Dream firmware is a complete GM/GS implementation. WTF, Akai? Akai would sell shed-loads more if the Mini Play was an actual GM module.

I’ve encountered Dream synthesis before in the Modern Device Fluxamasynth and the midiPlus miniEngine USB. Unlike the Akai, both devices suffer from noisy audio. I’m doubly disappointed because the Mini Play audio is relatively clean.

So, if you’re looking for a DAW-driven synth module, pass on both the original and Mk3.

As to the outgoing MIDI implementation — using the Mini Play as a controller — it is basic and functions well. The free software editor gives you access to everything configurable (pads, knobs and joystick), storing configurations into a Favorites slot. No complaints here although MPK Mini users might miss the four additional knobs provided by the plain ole Mini.

The Akai MPK Minis are the gateway drug to MPC production. Akai have always rolled out good value with their bundles. The Mini Play software bundle follows the path and includes:

  • Akai VIP VST instrument and effect host environment
  • AIR Hybrid 3 synthesizer
  • Wobble synthesizer
  • MPC Essentials (AKA tons of samples)
  • ProTools | First

And, of course, Akai’s free MPC Beats application. Download and installation, if you go for everything, is laborious due to partnership arrangements and different authorization and licensing procedures.

Bottomline. A MIDI module it is not. If you want a tiny, inexpensive MIDI controller with a limited in-built synthesizer and a serious stack of content, give it a go. If you expect to play live, go for the Mk3 and the better keybed and speaker.

After initial disappointment about the MIDI implementation, I took a screwdriver to the MPK Mini Play. Naturally, a device this small and inexpensive is mod fodder. I will discuss mod potential in a future post.

Update: If you intend to use the Akai MPK Mini Play as a MIDI module, you must read my analysis of its MIDI implementation. If you want to mod the MPK Mini Play, start here and here.

Like the review? Check out the teardown (disassembly) and mods:

Copyright © 2022 Paul J. Drongowski

Yamaha PSS-A50 stereo mod

I want to give a shout out to Lionel on the PSR Tutorial Forum. He posted a very nice PSS-A50 mod — stereo!

Yep, the PSS-A50 is stereo and, as Lionel discovered, the in-built samples are also stereo. Check out Lionel’s PSS-A50 stereo mod video. His video begins with a great close-up of his changes to the PSS-A50 digital main board (DM).

As noted in my PSS-A50 look inside, the central computer and tone generator is Yamaha’s SWLL processor (YMW830-V). The SWLL is a system-on-a-chip (SOC) which integrates the host CPU, working memory, key/display scanner, and tone generator. Just add a 37-key keyboard, display driver, 2MByte serial flash program/waveform ROM, USB controller, audio electronics and power electronics, and you have a complete ultra-low cost synthesizer.

The digital-to-audio converters (DAC) are integrated into the SWLL. The SWLL has six DAC-related pins:

  • DACLPP (pin 1)
  • DACLMM (pin 2)
  • DAC_VDD (pin 3)
  • DAC_VSS (pin 4)
  • DACRMM (pin 5)
  • DACRPP (pin 6)

DAC_VDD and DAC_VSS are conversion reference voltages. DAC_VDD is derived from DAC_VCC produced by a low drop-out voltage regulator (Texas Instruments TLV74333PDBVR). DAC_VSS is ground.

Yamaha SWLL (YMW830) DAC signals

DACLPP and DACLMM are differential audio signals for the left channel. DACRPP and DACRMM are differential audio signals for the right channel. DACRPP and DACRMM are left unconnected in the PSS-A50. There are two test points, DACL- and DACL+, on the printed circuit board (PCB), in case you would like to probe these signals.

PSS-A50 post-DAC low pass filters

DACL+ and DACL- feed two operational amplifiers which are low pass filters. The low pass filters produce signals LOUT+ and LOUT-, which are sent to the plus and minus inputs of the headphone amplifier (TPA6132A2RTER) and speaker power amplifier (Rohm BD27400GUL). It’s differential audio signals all the way, presumably, to keep noise low.

The Texas Instruments TPA6132A2RTER is a 25 mW stereo headphone amplifier. The Rohm BD27400GUL is a low voltage class-D monaural speaker amplifier.

I have to admire Lionel’s construction skills as it is quite difficult to solder wires to a surface mount IC. Nice work replicating the stereo low pass filters, too.

Keep the Yamaha PSS-A50 hacks coming! Please don’t forget the PSS-A50 MIDI mod.

Here are some additional Yamaha PSS-related stories:

Copyright © 2022 Paul J. Drongowski

Ye olde Yamaha Dance Kit

Ya learn somethin’ every day. Thanks for to Mark — my neighborhood to the north in Vancouver — who looped me in.

As one might expect, Yamaha have updated their drum kit samples over the years. Who knew — the DanceKit circa 2000 is more heavy, punchy and analog than present-day DanceKit. According to Mark (and Musicnik), the Standard Kit had more punch back in the day.

The table below summaries the instruments in the Yamaha Standard Kit and Dance Kit:

                    Standard Kit      Dance Kit 
Keyboard MIDI 127/000/001 127/000/28
-------- -------- ---------------- ---------------
40 E 1 28 E 0 Brush Tap Swirl Reverse Cymbal *
41 F 1 29 F 0 Snare Roll Snare Roll
42 F# 1 30 F# 0 Castanet Hi Q 2 *
43 G 1 31 G 0 Snare Soft Snare Techno *
44 G# 1 32 G# 0 Sticks Sticks
45 A 1 33 A 0 Bass Drum Soft Kick Techno Q *
46 A# 1 34 A# 0 Open Rim Shot Rim Gate *
47 B 1 35 B 0 Bass Drum Hard Kick Techno L *
48 C 2 36 C 1 Bass Drum Kick Techno 2 *
49 C# 2 37 C# 1 Side Stick Side Stick Analog *
50 D 2 38 D 1 Snare Snare Clap *
51 D# 2 39 D# 1 Hand Clap Hand Clap
52 E 2 40 E 1 Snare Tight Snare Dry *
53 F 2 41 F 1 Floor Tom L Tom Analog 1 *
54 F# 2 42 F# 1 Hi-Hat Closed Hi-Hat Close Analog 1 *
55 G 2 43 G 1 Floor Tom H Tom Analog 2 *
56 G# 2 44 G# 1 Hi-Hat Pedal Hi-Hat Close Analog 2 *
57 A 2 45 A 1 Low Tom Tom Analog 3 *
58 A# 2 46 A# 1 Hi-Hat Open Hi-Hat Open Analog *
59 B 2 47 B 1 Mid Tom L Tom Analog 4 *
60 C 3 48 C 2 Mid Tom H Tom Analog 5 *
61 C# 3 49 C# 2 Crash Cymbal 1 Cymbal Analog *
62 D 3 50 D 2 High Tom Tom Analog 6 *
63 D# 3 51 D# 2 Ride Cymbal 1 Ride Cymbal 1
64 E 3 52 E 2 Chinese Cymbal Chinese Cymbal
65 F 3 53 F 2 Ride Cymbal Cup Ride Cymbal Cup
66 F# 3 54 F# 2 Tambourine Tambourine
67 G 3 55 G 2 Splash Cymbal Splash Cymbal
68 G# 3 56 G# 2 Cowbell Cowbell Analog *
69 A 3 57 A 2 Crash Cymbal 2 Crash Cymbal 2
70 A# 3 58 A# 2 Vibraslap Vibraslap
71 B 3 59 B 2 Ride Cymbal 2 Ride Cymbal 2
72 C 4 60 C 3 Bongo H Bongo H
73 C# 4 61 C# 3 Bongo L Bongo L
74 D 4 62 D 3 Conga H Mute Conga Analog H *
75 D# 4 63 D# 3 Conga H Open Conga Analog M *
76 E 4 64 E 3 Conga L Conga Analog L *
77 F 4 65 F 3 Timbale H Timbale H 7
8 F# 4 66 F# 3 Timbale L Timbale L
79 G 4 67 G 3 Agogo H Agogo H
80 G# 4 68 G# 3 Agogo L Agogo L
81 A 4 69 A 3 Cabasa Cabasa
82 A# 4 70 A# 3 Maracas Maracas 2 *
83 B 4 71 B 3 Samba Whistle H Samba Whistle H
84 C 5 72 C 4 Samba Whistle L Samba Whistle L
85 C# 5 73 C# 4 Guiro Short Guiro Short
86 D 5 74 D 4 Guiro Long Guiro Long
87 D# 5 75 D# 4 Claves Claves 2 *
88 E 5 76 E 4 Wood Block H Wood Block H
89 F 5 77 F 4 Wood Block L Wood Block L
90 F# 5 78 F# 4 Cuica Mute Scratch H *
91 G 5 79 G 4 Cuica Open Scratch L *

The starred (“*”) entries denote analog drum machine samples.

I decided to do a side-by-side comparison. I first recorded the DanceKit samples as dry as possible on the Yamaha PSS-A50 and the Yamaha QY-70 (circa 1997). Then I matched everything up, ignoring the toms and a few extraneous instruments.

You’ll hear all the PSS-A50 examples first followed by all of the QY70 examples. I’ll let you decide as to your personal preference. Although I tried to get the A50 dry, there seems to be a hint of reverb remaining.

Without further ado, here is a ZIP file containing the WAV for all of the Yamaha QY-70 Dance Kit instruments starting from the bottom of the keyboard to the top. Have fun! Slice and dice everything into audio mirepois.

If a drum machine plays in the forest and no one is around, does it still make a sound? 🙂

Copyright © 2022 Paul J. Drongowski

Review: Future Kit FK651 stereo simulator

The Yamaha PSS-A50 is strictly MONO OUT and needs a little spice. After trying the Haas effect via a Synthrotek Dev Delay, I ordered a Future Kit FK651 Stereo Simulator. Future Kit — also known as “Thai Kits” — offers a range of audio kits including the FK651. I ordered through Amazon with Future Kit in Thailand handling fulfillment. Thanks to the pandemic and global shipping delays, I finally received the FK651 after a few weeks of waiting. Can’t blame Future Kits for the delay. They shipped right away putting the FK651 on the proverbial “slow boat from Thailand.” Thanks, pandemic!

Future Kit FK651 Stereo Simulator (click to enlarge)

The FK651 takes a MONO signal, splits it, and sends each side into a short filter chain. The left and right filter chains have different peak frequencies:

    Right channel 
-------------
32Hz (Note C1)
500Hz (Note C5)
2kHz (Note C7)
Left channel
-------------
64Hz (Note C2)
1kHz (Note C6)
4kHz (Note C8)

The filter chains alter each side of the stereo pair just enough to create the impression of different source signals coming from the right and left channels.

Kit of parts

The FK651 kit is fairly small making it suitable as a PSS-A50 mod. The small board should fit easily within the PSS-A50 even with the A50’s rather large speaker. I tested the FK651 with a 9V battery and it worked well even though 9V is below the suggested 12V supply voltage. I’m hoping to tap power from the A50’s 6V battery supply. Fingers crossed.

Why order one when you can have two?

You’re not seeing double in the picture above. I ordered two FK651 kits. By the time I paid for one kit and shipping, it wasn’t much more to order two just in case I blew up a kit. It’s happened to me before, e.g., horribly destroying a Blokas MIDIboy during assembly.

Part and board quality are good.

Assembly

Assembly is straightforward. Given the number of parts, I assembled the kit in four phases:

  1. Resistors
  2. IC sockets and quad op amps
  3. Capacitors
  4. Wiring

Due to the placement of the power and audio pads, I couldn’t use terminal blocks. I decided not to use the enclosed terminal pins and soldered external connections directly to the printed circuit board (PCB).

Future Kit FK651 Stereo Simulator (assembled)

There were two minor concerns. Although the printed directions are OK, the instructions do not include a resistor color code chart. If you decide to build an FK651 of your own, here’s my look-up chart.

Ohms       Resistor color code 
---- ------------------------
220 Red - Red - Brown
470 Yellow - Violet - Brown
1K Brown - Black - Red
2K Red - Black - Red
4.7K Yellow - Violet - Red
15K Brown - Green - Orange
47K Yellow - Violet - Orange
56K Green - Blue - Orange
100K Brown - Black - Yellow
470K Yellow - Violet - Yellow

The second concern is a single inconsistency between the parts provided, the schematic, and a silk-screened legend on the PCB. [Does anybody use silk-screening anymore?] I found a 4.7K resistor when the PCB called for a 47K resistor. The part placement picture on the paper instructions has it right — “4K7”, the alternative way of writing “4.7K”. The PCB legend says “47K” and is wrong. Otherwise, it’s all pick, place and solder assembly.

The picture above shows the completed board ready for testing. The audio wires come out to 3.5mm jacks with ring, sleeve, tip (RST) terminal blocks. This should make it easy to reconfigure the FK651 during bench experiments.

The power cabling may look unnecessarily complicated, but I decided to experiment in preparation for possible integration with the PSS-A50. The JST connectors should make for plug and play with the A50. The power wires solder into a tiny “distribution board” that I nibbled out of an old proto-board. The result is a tad ugly.

Use

Power up and the FK651 works the first time. 🙂

As to testing, perceived effect depends upon source material. I had reasonable success with a drum loop (WAV demo). The first half of the demo is the direct A50 audio and the second half is FK651 simulated stereo.

I applied the FK651 to a full mix (WAV demo). Again, the first half of the demo (about 10 seconds) is the direct A50 audio and the second half is simulated stereo. With the full mix, there is a clear difference between direct and effected. Whether it’s a stereo effect or not is subjective.

Clearly, the FK651 messes with the distribution of energy across the frequency spectrum. The effected full mix demo audio has less bass. As it is, the FK651 has a profound effect on a mix, maybe an unwanted effect that undoes your hard work balancing and mixing. The FK651 may be best applied to individual instruments, not a full mix.

Full mix direct and effected spectrum (click to enlarge)

I experimented with ways to visualize the FK651 at work. Here is a false-color spectral plot for the full mix demo. The left and right channel plots are identical during the first half when the right and left channels each carry the same signal. During the second half of the demo, the right and left plots show differences due to the different filter chains applied to the left and right signals, respectively.

As to signal gain, boy, there is an abundance of gain! The A50 line OUT is the headphone OUT, which itself is a fairly hot signal. The FK651 adds even more gain. I had to attenuate source signals heavily in order to sample cleanly without distortion. I also had to carefully balance the level of the first and second halves of the demo to avoid the “louder is better” bias of human hearing.

There are still a few more experiments to try. First, it might be helpful to mix a little of the original source signal into both the right and left channels as a way to mitigate loss in specific frequency bands. This may also be a way to control the depth of the simulated stereo effect (dry plus wet). Another trick to try is putting delay on one of the outgoing channels to enhance the Haas effect.

All in all, the Future Kit FK651 Stereo Simulator is an easy build and a fun toy (tool). It’s not a be all or end all solution. The Volca Mix stereo spread effect beats the FK651 hands-down. The FK651, however, is small and inexpensive enough to deploy in a circuit mod as long as you can tame its gain.

Copyright © 2021 Paul J. Drongowski

Review: Synthrotek Dev Delay

I’d like to add more animation to the distinctly sound of the Yamaha PSS-A50. I really like the Korg Volca Mix stereo width effect and want to add something similar as either a mod or an external effect.

My intuition suggests the Haas effect or as Wikipedia would have it, the precedence effect. This well-known effect delays one side of a stereo pair that changes our perception of a sound source in the stereo field.

Rather than buying — and potentially, disassembling — a delay effect pedal, I decided to give the Synthrotek Dev Delay kit a try. Synthrotek offer a broad range of inexpensive kits and heck, they’re located nearby in the Pacific Northwest!

Synthrotek PT2399 Dev Delay — It’s in the bag

The kit is a relatively straightforward implementation of a PT2399 delay — right off the datasheet. The Princeton Technology PT2399 is a workhorse appearing in many guitar pedals, synth modules, karaoke mixers, etc. The VCO control voltage (pin 6) determines the delay time and is set by a 50K linear potentiometer. The delayed signal is fed back into the input with feedback level set by a second 50K linear potentiometer. In addition to the PT2399 and its discrete minions (resistors and capacitors), there is an LM78L05 +5V power regulator.

Synthrotek Dev Delay — Parts is parts

Synthrotek provide a rather nice board and kit of parts. It includes many unexpected extras: both 3.5mm and 1/4″ phone jacks, knobs, switches, power LED and parts needed for PT2399 mods. Quite decent of them! My only niggle is the quality of the potentiometers. Physically, they appear dingy and functionally they are a little noisy. I would call them “surplus grade.” If building the finished kit into a permanent project like a pedal, I would replace the pots with fresher parts. Please don’t let this concern stop you from buying a kit, however.

Synthrotek Dev Delay — Almost finished

The kit builds quickly enough. For some crazy reason, I had trouble keeping my soldering tip clean. Once I got some flux from Lowes (desperation!), soldering went better. Maybe it’s my eyes, but even the DIP and standard size discretes seem smaller and smaller…

I like reconfigurable builds that are easily re-purposed. So, I added a number of embellishments. I added two three-contact terminal blocks (5mm pitch) for the pots on the PCB. The terminals match up with the potentiometers’ leads and since the pots are linear, I flipped them around and connected them to the terminal blocks directly. I don’t think you can play this trick with log pots, by the way.

Synthrotek PT2399 Dev Delay — Assembled with enhancements

I added a JST connector for battery connections. Audio in and out wires are soldered directly to the PCB. The other end of the audio wires are connected to 3.5mm jacks with in-built terminal blocks for ring, tip and sleeve. These audio jacks are very handy and I intend to use more of them in the future. They have a shaft and nut for panel mounting, making them suitable for permanent installation, not just prototying.

Connect a battery…

… and nothing.

This is the moment which we builders all dread.

Drag out the digital multi-meter (DMM). Power is good to the board. Audio wires are good to the board. Crank up the volume on the powered speaker and a faint signal is heard.

So, what’s up? Check the connections to the audio jacks and, holy smokes! Instead of signal to tip (T) and ground to sleeve (S), I have ground to ring (R). I didn’t pay close enough attention to the terminal order and labels.

After a quick fix, the Dev Delay was up and running. I used the PSS-A50 as my signal source and had it play a drum pattern over and over. Yes, you can get King Tubby with this unit!

My experiments with the Haas effect, however, were less exciting — too subtle for my taste. I noticed that the Korg Volca Mix does not use an analog or digital delay circuit. Thus, my search for a stereo animator goes on. I have a Thai Kits (Future Kit) FK651 stereo simulator in hand and will try it next.

As to the Synthrotek Dev Delay kit, if you need a digital delay in kit form, give it a go! Great for audio innovators.

Copyright © 2021 Paul J. Drongowski

Wire Less: Part 1, Korg Microkey Air 49

With the pandemic raging, I’m searching for ways to reduce my physical gig footprint and schlep factor. I thought I would share my adventure in battery-lowered, almost wireless keyboard-land.

Months ago, I had a good experience with Korg Module Pro. It has the range of high quality sounds that I need for my church gig. So, I decided to eschew battery-powered MIDI modules like the MidiPLUS miniEngine USB and go iPad and Korg Module Pro.

Yamaha SHS-500 Sonogenic (labels added)

I tried a bunch of controller candidates. (See the end of this post for more info.) I had the best experience and minimal number of wires with built-in Bluetooth MIDI. The SHS-500 Sonogenic, in particular, is nearly ideal:

  • Pluses: Built-in Bluetooth, pitch bend and mod wheels, decent mini-keys, narrow depth is good for a lap-board.
  • Estimated battery life is OK (10 hours); AC adapter jack is well-placed and secure.
  • Minuses: 37 keys (3 octaves), no expression pedal input, mod wheel works backwards when played in one’s lap.

No, I am not playing the SHS-500 as a keytar. I find the whole keytar thing to be gimmicky and not appropriate for church. I intend to play the controller in my lap, thereby keeping my physical profile small. (Social distancing!) A lap-board lets me ditch the keyboard stand, minimizing schlep.

Mini-keys deserve comment. Mini-keys enable short, lap-held keyboards. They are very lightweight and easy to transport. If the basic key feel is good, I make peace with play-ability.

My trouble isn’t so much with key size. It’s that three octaves (37 keys) are too short. Many melody and bass lines require two octaves and a player needs two octaves below middle C and two octaves above. Otherwise, I do unnecessary mental and hand gymnastics in real-time to fit the music onto the keyboard. That ain’t right.

Just me? Watch Harry Connick Jr. rock a 3 octave Reface CP. Harry sez, “There’s not a lot of room here.” [Tonight Show: Jimmy Fallon, NBC, 1 September 2016, Playing starts at 3:00.]

Korg Microkey Air 49

In the end, I broke down and bought a Korg Microkey Air 49. It is a good size for a lap-board and the Korg Natural Touch mini-keys ain’t too bad. The Microkey Air firmware was already at v1.04 when it arrived and it connected with Korg Module Pro under IOS 14.1 without a problem. [More on this in a future post.]

The Microkey Air 49 has an estimated 30 hour battery life. Good thing, because Bluetooth operation must use battery power (two AA batteries). Be sure to have two spare AA batteries at the gig; there isn’t a USB powered safety net.

The Microkey Air has a footswitch input. Expression input would be better. Of course, connecting a pedal to the Microkey Air adds a cable. Fortunately, Bluetooth pedals like the Airturn BT200-S4 get the job done. I have a BT200-S4 and found it easy to switch sustain, etc. via Bluetooth in Korg Module Pro. The BT200-S4 is small and light, not any worse than schlepping a wired sustain pedal.

I made a few advances with iPad wiring along the way. The Korg Microkey Air 49 is working out pretty well and I’m practicing with it every day. I have a few custom layers in Korg Module Pro and the day is coming when I’ll try out the rig in front of a congregation.

Going native

For completeness sake, I tried “going native” with sounds built into the Yamaha SHS-500 Sonogenic, Yamaha Reface YC, Yamaha PSS-A50 and Korg microKorg XL+ — all fine battery-powered instruments in their own right with sounds appropriate for rock, soul, jazz, and pop, but not church. I need good strings, reeds, classic organ and gospel B-3. Before moving on, I give props to the Reface YC as it is truly gig-worthy and have play it on the job.

Blooming BLU

I also tried using “the natives” as Bluetooth MIDI controllers. All of the candidates have USB and/or 5-pin MIDI DIN ports, and can be fitted with Yamaha UD-BT01 and MD-BT01 wireless MIDI adapters. The candidate keyboards are battery-powered, so what the heck!

Yamaha UD-BT01 (with AC adapter) and UD-BT01 Bluetooth MIDI

To make a long story short, all candidates worked well with the Yamaha adapters and with Korg Module Pro on iPad — even the lowly, dirt-cheap PSS-A50. A few specific observations:

  • The Yamaha UB-BT01 not only does Bluetooth MIDI, it supplies power to the PSS-A50. If you must add a cable to connect the A50 to the UD-BT01, you might as well get power, too, and save batteries. If you own a PSS-A50 and want to go Bluetooth MIDI, don’t hesitate!
  • The Reface YC has the added bonus of an expression pedal input. An expression pedal is a vital part of my gig toolkit. Korg Module Pro will connect simultaneously to more than one Bluetooth MIDI source (like the BT200-S4 previously mentioned). In one experiment, I used Reface YC as my expression source while playing the black and whites on the SHS-500. Neat. I might add the new Boss EV-1-L wireless expression pedal once it ships.
  • I looked into expected battery life. The Korg Microkey Air is the best at 30 hours estimated life. The other solutions are burdened by tone generation and DSP. The added power-burn is unnecessary if we’re not using the internal synthesis engines.

Even though you take a power hit, an internal engine is a good back-up in case there is a technical problem with Bluetooth, the iPad or Module Pro.

    Instrument     Estimated battery life 
------------- ----------------------
Microkey Air 30 Hours
PSS-A50 20 Hours
SHS-500 10 Hours
Reface YC 5 Hours
microKorg XL+ 4 Hours

In terms of key feel and play-ability, all candidates are acceptable. The Yamaha HD mini-keys are more synth- and organ-like, and are good for legato (especially organ). The Korg Natural Touch mini-keys are more piano-like — good for striking, not quite as good as Yamaha HD for legato. Unlike Microkey Air 49, the other candidates are 37 keys and are too short for unfettered play.

                           Key dimensions 
--------------------
Instrument Width Length Depth
------------------ ----- ------ -----
Reface HD 19mm 88mm 9mm
Korg Natural Touch 20mm 80mm 8mm
MODX 21mm 133mm 10mm
Genos FSX 22mm 133mm 10mm

Check out these related blog posts:

Copyright © 2021 Paul J. Drongowski

PSS chorus: A dusty look back

Here’s a look into the past — and maybe, the present.

A PSR Tutorial Forum member inquired about the chorus effects in the PSR-E463. The PSR-E463 has the usual system chorus effect and the newer DSP chorus effect. I’m going to focus on the older system chorus effect.

The PSR-E series chorus system effect date back to the earliest days of Yamaha XG and arranger keyboards. These are low-cost entry-level keyboards and usually contain a single integrated circuit (IC) which integrates the main processor (CPU), tone generator and effect units. The most price- and cost-sensitive models integrate the wave memory (samples) on the IC, e.g., the SWLL (PSR-F51). Processors in the other models have an external wave memory, e.g., the SWL01 (PSR-E443) and SWX03 (PSR-E463).

Newer DSP effects aside, the E-series models share the same basic reverb and chorus effects. There are three chorus effects:

  • Chorus1 (MSB: 66 LSB: 17)
  • Chorus2 (MSB: 65 LSB: 02)
  • Chorus3 (MSB: 65 LSB: 00)

The LSB has varied, but they all refer to the same CHORUS (CELESTE) effect algorithm. The LSB just selects a set of preset effect parameters. Chorus1, BTW, falls into the XG CELESTE category, not CHORUS.

Due to hardware integration, the chorus effects likely share the same hardware. Since none of these processors have external DSP RAM, the chorus memory is integrated, too.

As far as chorus is concerned, this is the way it has been since the 1990s! Let’s look back to the Yamaha QY-70 XG implementation (1995). I suspect that the current chorus effects are the same or very similar to the good old QY.

The QY-70 had one chorus and celeste effect algorithm:

Param#  Parameter            Value range 
------ ------------------- --------------------
1 LFO Frequency 0.00Hz - 39.7Hz
2 LFO PM Depth 0 - 127
3 Feedback Level -63 - +63
4 Delay Offset 0 - 127
5
6 EQ Low Frequency 50Hz - 2kHz
7 EQ Low Gain -12dB - +12dB
8 EQ High Frequency 500Hz - 16.0kHz
9 EQ High Gain -12dB - +12dB
10 Dry/Wet D63;gt;W - D=W - D<W63
11 ...
15 Input Mode Mono, Stereo
16

These parameters are laid down by the Yamaha XG specification.

The XG specification does not define the preset values, however. Here are the QY-70 preset chorus values:

Param#  Parameter            Chorus1 Chorus2 Chorus3 Chorus4 
------ ------------------- ------- ------- ------- -------
1 LFO Frequency 0.25Hz 0.33Hz 0.16Hz 0.37Hz
2 LFO PM Depth 54 63 44 32
3 Feedback Level +13 +0 +0 +5
4 Delay Offset 106 30 110 104

QY-70 Chorus3 has the same MSB/LSB as PSR-E Chorus2. QY-70 Chorus 1 has the same MSB/LSB as PSR-E Chorus3. Confusing? Yes, but these are probably the PSR values or close to it.

Next are the QY-70 preset celeste values:

Param#  Parameter            Celeste1 Celeste2 Celeste3 Celeste4 
------ ------------------- -------- -------- -------- --------
1 LFO Frequency 0.50Hz 1.17Hz 0.16Hz 0.33Hz
2 LFO PM Depth 32 18 63 29
3 Feedback Level +0 +26 -20 +0
4 Delay Offset 0 2 2 0

None of the QY-70 presets have the same MSB/LSB as PSR, so your guess is as good as mine.

Now, the really bad news. The PSR-E series, at best, is XGlite. XGlite implementations typically don’t support the XG messages that set effect parameters. Therefore, what you hear is that you get. In other words, the effect presets are hardwired.

The Yamaha PSS series with its minimal SWLL processor implements exactly one chorus and exactly one reverb preset. You get what you pay for!

Copyright © 2021 Paul J. Drongowski

Yamaha PSS-A50: Look inside

Let’s take a quick tour of the Yamaha PSS-A50.

Yamaha PSS-A50 top and bottom [Click images to enlarge]

The A50 has two main boards: the digital and analog electronics board (DM) and the front panel board (PN). After removing nine screws — don’t forget the screw hidden in the battery compartment — the A50 splays into two halves: the bottom half containing the battery compartment, DM board and keybed, and the upper half containing the speaker and PN board. The battery connects to a JST XH connector on the DM board. Ribbon cables connect the keybed and the panel board to the DM board.

Yamaha PSS-A50 front panel board (PN)

The PN board has traces for the front panel buttons. The buttons are arranged into a 3 by 8 switch matrix: 3 drive lines and 8 sense lines. The power Standby/ON switch has two dedicated lines. The eight sense lines are shared with the three digit LED display. A further 3 lines are devoted to the display (for a total of eight lines). In addition to the front panel switch matrix, the PN board conducts audio signals to the speaker through two wide PCB traces.

I dare to say that the A50, PSS-E30 Remie and PSS-F30 have the same panel board. Only the front panel graphics and software differentiate the models in that regard.

Yamaha PSS-A50 main electronics board (DM)

The DM electronics board is tiny and is packed with surface mount (SMT) components. Impressive! The main digital components are:

  • Yamaha YMW830-V: Processor and tone generator (IC101)
  • Winbond 25Q16JVS1M: 16Mbit Serial flash memory (IC102)
  • 74VHC273: 8-bit latch for display data (IC301)
  • NXP LPC11U13F/201: USB interface (IC401)

The YMW830-V is also known as “SWLL” and is a Yamaha proprietary system on a chip (SOC). The A50 has separate amplifiers for the speaker (IC701) and headphone output (IC601):

  • TI TPA6132A2RTER: Headphone amplifier (IC601)
  • Rohm BD27400GUL: Mono class-D power amplifier (IC701)
  • NJR NJM2740M: Dual operational amplifier (IC501)

The dual operational amplifier is part of the post-DAC low pass filter. Finally, the power-related components are:

  • TI TLV74333PDBVR: 3.3V regulator (IC001)
  • TI TPS63060DSCR: Switching regulator (IC004)
  • TI TPS25200DRVR: 5V eFuse/power switch (IC006)

The A50 must choose and switch between +5V USB power and battery power. That’s the role of the eFuse/power switch component.

Yamaha PSS-A50 USB interface (NXP ARM MCU)

The NXP LPC11U13F is a bit of a surprise to me. It is an ARM Cortex-M0 32-bit microprocessor (MCU) with 24KB of flash memory. The SWLL sends and receives MIDI through its UART RX/TX ports. The ARM LPC converts simple MIDI from the SWLL to MIDI over USB. Using an ARM MCU to do the job seems like over-kill. It goes to show how far we have come as an industry when an MCU can be dedicated to such a mundane task!

Yamaha PSS-A50 CPU (Yamaha YMW830-V SWLL)

The SWLL (YMW830-V) has many of the specs that we’ve come to know about Yamaha’s entry-level CPUs. The external crystal resonates at 16.9344MHz. The SWLL internal clock is 33.8688MHz and generates a 67.7376MHz master clock. If these numbers look odd to you, simply note that they are even multiples of 44,100Hz, the basic sample rate:

    67.7376MHz = 44,100Hz * 1,536

When an external DAC is used, the master clock provides the bit serial audio clock. 1,536 can be subdivided in all sorts of interesting ways depending upon sample word length.

The SWLL integrates host CPU, memory, tone generation, serial MIDI communication, keyboard and front panel scan ports, and display ports. The digital to analog converter (DAC) is also integrated into the SWLL. The SWLL is truly Yamaha’s low-cost system on a chip solution.

The SWLL loads its software and samples from a 16Mbit serial flash ROM. 2MBytes for software and samples is not much, so one wonders if the SWLL has a preprogrammed flash memory of its own?

With the exception of the ARM LPC chip, the A50, PSS-E30 Remie and PSS-F30 electronics are identical. The software and samples determine the product personality. Such a high degree of commonality allows Yamaha to manufacture PSS keyboards (in India) and sell them at a dirt cheap price. Hats off — the amount of technology at this price — less than $100USD — is simply astounding.

Copyright © 2021 Paul J. Drongowski