
The exploration begins!
Starting in with a new keyboard is like landing on the Moon. What should I explore first?
First stop: Reverb
Effects are critical to good sound. I’ve fallen in love with the Genos™ “Real Small Hall+” effect preset. It just sounds nice to my ears and I want to incorporate it into Performances as I port my MOX voices to MODX. The “Real Small Hall+” preset has a mid-range bump around 700Hz to 800Hz which adds presence.
First off, what the heck is the equivalent effect algorithm on MODX? The Genos “Real Small Hall+” uses the Genos “REAL REVERB” algorithm. Quick comparison between the Genos Reference Manual (RM) and the MODX RM reveals that “HD Hall” is the same as “REAL REVERB”. Frankly, I don’t know why Yamaha names effects differently on different product lines. Slightly bonkers.
MODX provides three presets for “HD Hall”:
- Large Hall
- Medium Hall
- Bright Hall
The “Medium Hall” preset is the closest to “Real Small Hall+”. It’s not the same, so there will be some extra editing ahead. In case you’re wondering, here are the parameter settings for “Real Small Hall+”:
| Number | Parameter | Value |
|---|---|---|
| 1 | Reverb Time | 1.3s |
| 3 | Initial Delay Time | 22.1ms |
| 4 | High Damp Frequency | 8.0kHz |
| 6 | High Ratio | 0.8 |
| 13 | EQ Low Frequency | 700Hz |
| 14 | EQ Low Gain | +6dB |
| 15 | EQ High Frequency | 800Hz |
| 16 | EQ High Gain | +4dB |
| — | Return Level | 64 |
I would love to make a MODX user effect preset with these specific parameter values. Would sure save a lot of editing…
Of course, I tried these settings and so forth. In the course of investigation, I found it easier to navigate with the MODX cursor keys instead of poking the touch screen. As I mentioned in my last post, the small size of the MODX widgets requires care and precision when tapping the screen. I also noticed that more finger pressure is required than the Genos touch screen. Widgets along the edge of the screen are the most troublesome and maybe I’ll need to re-calibrate the touch panel.
Next step: Rotary speaker effects
One big, lingering question in arranger-land is how to make the PSR/Genos drawbar organ more realistic.
I need to port my B-3 patches, so it made sense to drop into the “All 9 Bars!” Performance. “All 9 Bars!” is a 2-part Performance which marshalls 14 voice elements into a pretty decent B-3 plus Leslie emulation. Part 1 implements the first eight drawbars and part 2 implements the 1′ bar plus some other goodies.
I’ll have more to say about the part programming in another post. In the meantime, here is a screen shot showing the insert effects routing for “All 9 Bars!”. [Click images to enlarge.]
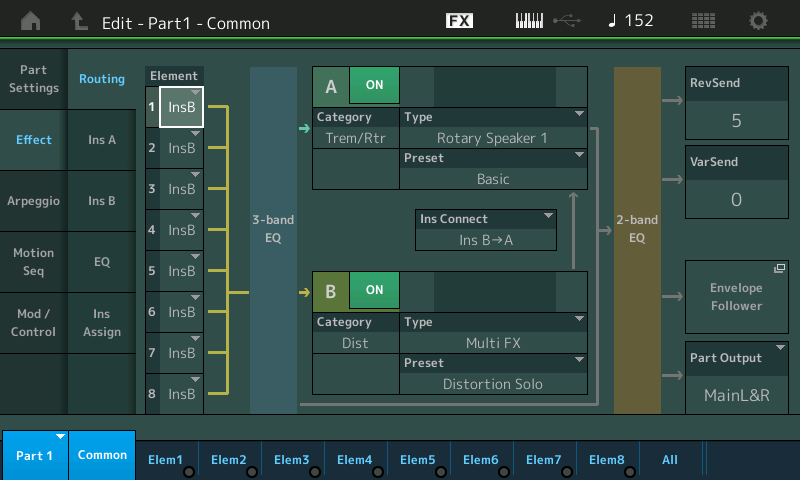
The MODX “Rotary Speaker 1” algorithm is what we could call “the old algorithm.” “Rotary Speaker 2” is the “new algorithm” debuted in Montage. The rotary speaker effect (Insert A) drives the Multi FX (Insert B) algorithm before everything hits the 2-band EQ (flat).
The following screen shot shows the parameters for the “Rotary Speaker 1” effect.
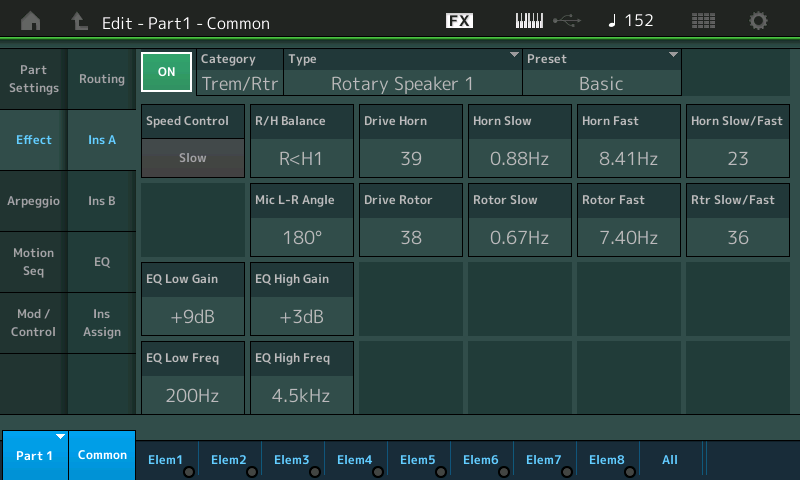
The “Rotary Speaker 1” algorithm includes its own 2-band EQ which gives a kick at 200Hz and 4.5kHz. Thus, the 2-band EQ at the end of the Insert A to Insert B chain is flat.
The next screen shot summarizes the parameter settings for the “Multi FX” effect.
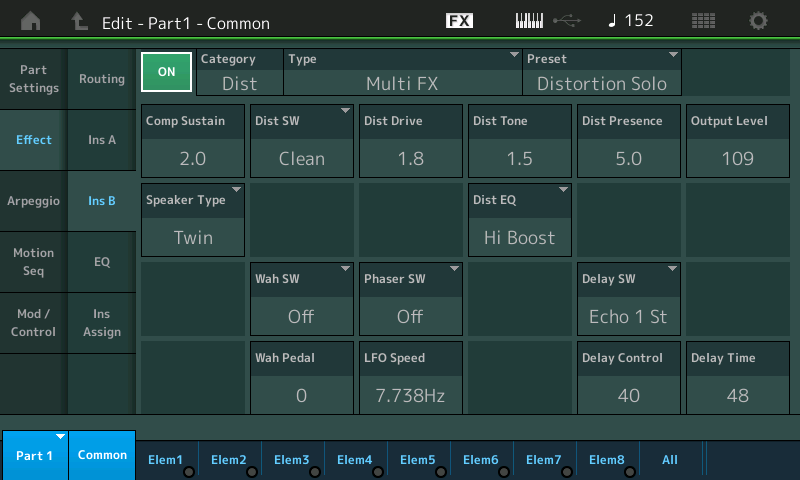
BTW, both the Multi FX and HD Hall reverb were introduced in the Motif XF version 1.50 update. Multi FX is supported in the PSR-S950 (and later) mid-range arrangers, Tyros 5 and, of course, Genos.
The effect routing diagram illustrates one immediate advantage of the Yamaha synth effect architecture over the Genos effect architecture. It is possible to chain two insert effects on Genos, but you need to stand on your head to do it. Also, it’s not easy to chain a distortion effect into the PSR/Tyros “Organ Flutes” mode. These limitations are due to legacy software and the XG voice/effect architecture — and they stick in everyone’s craw like a bad burrito. Yamaha, please?
MODX screen capture
About those screen shots!
Like Montage, the MODX has a double-secret Easter egg for capturing screen shots.
- Insert a USB flash drive into the USB TO DEVICE port.
- Press and hold the A/D INPUT ON/OFF button.
- Press and release the AUDITION button.
- Release the A/D INPUT ON/OFF button.
The MODX writes screen shots to the USB flash drive with names such as “DSNAP_0.png”. I don’t know why Yamaha hides this capability. We live in a modern, visual age, after all, and people need to share screen shots through (anti-)social media.
Here’s two tips. 1. To save wear and tear on the USB TO DEVICE port, I plug a short extender cable into the port and then plug the USB flash drive into the extender cable. The cable brings the port to a place where I can easily reach it and it reduces wear on the port connector. 2. The screen capture procedure doesn’t provide any visual indication that the capture was successful or complete. Use a USB flash drive with an activity LED (e.g., the Kingston Data Traveler Elite G2). You should see the drive’s LED flash when the PNG file is written. Naturally, do not remove the drive when it is active!
Copyright © 2018 Paul J. Drongowski