Out Of The Shadows

I’ve been working on backing and lead instruments for the classic Del Shannon song “Keep Searchin'”.

Yamaha Genos™ is made for this tune. First off, its “ShadowedPop” style is the perfect fit for that old 1950s rock’n’roll vibe. It has just the right amount of swing and attitude.

Next, Genos has very good electric guitars for lead. Want clean Tele or Strat? Genos has them. Genos also has a suite of effects to obtain a complete, authentic guitar tone.

Yamaha arranger styles have “One Touch Settings” which are mini-registrations. Hit an OTS button and Genos will both change song section and bring up an appropriate voice. The Genos “ShadowedPop” style has two OTS mini-registrations that are worth deconstructing to see how the Yamaha sound designers got their Shadows guitar tone: “60sShadowLead” and “ShadowedGuitar”.

Of course, the “shadow” in all of these voice and style names refer to Hank Marvin and The Shadows — one of, or perhaps, THE iconic 1950’s guitar band and sound. The Shadows’ treatment felt absolutely right for the Del Shannon cover. Hank Marvin was perhaps the first English artist to pick up a Fender Strat, usually putting it through a Vox amp.

The PSR “ShadowedGuitar” voice goes back four or five years and is a standard factory preset. If your Yamaha arranger does not have “ShadowedGuitar”, choose a clean, 1960’s vintage guitar preset voice. Change the insert effect to Tempo Echo and set the insert effect send level to 30. Change the effect parameters to:

 Param#  Parameter name       Value 
------ ------------------- ------
1 Delay Time 8th
2 Feedback Level +28
3 Feedback High Damp 1.0
4 L/R Diffusion +14ms
5 Lag 0ms
10 Dry/Wet D34>W
13 EQ Low Frequency 500Hz
14 EQ Low Gain 0dB
15 EQ High Frequency 4.0kHz
16 EQ High Gain 0dB

Reverb is a big part of the 50’s vibe and you’ll need gobs of it on the guitar. Select a hall reverb and set the reverb send level to at least 50. If your arranger has it, I recommend the “Real Medium Hall+” preset. It’s one of Yamaha’s best reverbs, in my opinion.

Only Genos has the “60sShadowLead” voice voice. Fortunately, it’s easy to add a close sound-alike to your instrument. Start with “ShadowedGuitar” or a clean, 1960’s vintage guitar preset. Get into the mixer (or DSP effect page) and change the insert effect to Multi FX Vintage Echo and set the insert effect send level to 127 (if necessary). Then change the effect parameters to:

 Param#  Parameter name       Value 
------ ------------------- ------
1 Comp Sustain 2.9
2 Wah Switch Off
3 Wah Pedal 0
4 Dist Switch Clean
5 Dist Drive 5.0
6 Dist EQ Mid Boost
7 Dist Tone 3.5
8 Dist Presence 4.3
9 Output 110
11 Speaker Type Twin
12 LFO Speed 2.103Hz
13 Phaser Switch Off
14 Delay Switch Delay St
15 Delay Control 60
16 Delay Time 33

We met the Multi FX algorithm once before. This algorithm is like a virtual guitar pedal board:

Compressor -->  Wah --> Distortion --> Phaser --> Delay --> Spkr Sim 

The above parameter values dial in The Shadows’ guitar tone.

You’ll need gobs of reverb, again, to complete the scene. Choose the “Real Medium Hall+” preset and set the reverb send to at least 40.

The “60sShadowLead” OTS also configures the chorus system effect. Having listened to the overall tone with and without chorus, this step is optional. (Possibly some other style part may be affected by this change or a change to any other system-level effect including reverb.) Change the chorus type to “Celeste 1” and set the chorus send level to 12. 12 is not especially high, so you can see why this last step is optional; it’s just a little sweetener.

You might consider changing the chorus effect to tremolo (e.g., “E-Piano Tremolo”). Guitarists in the 50s and 60s didn’t have guitar pedals. (Sorry, Edge.) So, folks relied on guitar amp spring reverb and tremolo (often mislabeled “vibrato”) to get space-y effects. I still have the sound of an Ampeg Gemini going through my head. 😎

Select the “E-Piano Tremolo” effect preset, increase the AM Depth to max, and set the chorus send level to 127:

 Param#  Parameter name       Value 
------ ------------------- ------
1 LFO Frequency 5.38Hz
2 AM Depth 127
3 PM Depth 0
6 EQ Low Frequency 500Hz
7 EQ Low Gain 0dB
8 EQ High Frequency 4.0kHz
9 EQ High Gain 0dB
11 EQ Mid Frequency 2.0kHz
12 EQ Mid Gain 0.0dB
13 EQ Mid Width 1.0
14 LFO Phase Difference +39deg
15 Input Mode Mono
Return Level 127

You’re looking for that deep, “Spaghetti Western”, Ennio Morricone effect. Play the lead line an octave down. Have fun!

The EQ parameters in the tremolo algorithm make this a good guitar tone mangler — swept mid EQ with Q (width)! Mid boost or cut is right at hand.

Here are short demos (MP3) on Genos with tremolo and without tremolo. Yamaha Montage and MODX have the same effect algorithms, so you should be able to apply the same techniques on those instruments, too.

Links to a few other posts about chasing tone on Yamaha gear:

Copyright © 2022 Paul J. Drongowski

And we’re off!

The exploration begins!

Starting in with a new keyboard is like landing on the Moon. What should I explore first?

First stop: Reverb

Effects are critical to good sound. I’ve fallen in love with the Genos™ “Real Small Hall+” effect preset. It just sounds nice to my ears and I want to incorporate it into Performances as I port my MOX voices to MODX. The “Real Small Hall+” preset has a mid-range bump around 700Hz to 800Hz which adds presence.

First off, what the heck is the equivalent effect algorithm on MODX? The Genos “Real Small Hall+” uses the Genos “REAL REVERB” algorithm. Quick comparison between the Genos Reference Manual (RM) and the MODX RM reveals that “HD Hall” is the same as “REAL REVERB”. Frankly, I don’t know why Yamaha names effects differently on different product lines. Slightly bonkers.

MODX provides three presets for “HD Hall”:

  • Large Hall
  • Medium Hall
  • Bright Hall

The “Medium Hall” preset is the closest to “Real Small Hall+”. It’s not the same, so there will be some extra editing ahead. In case you’re wondering, here are the parameter settings for “Real Small Hall+”:

Number Parameter Value
1 Reverb Time 1.3s
3 Initial Delay Time 22.1ms
4 High Damp Frequency 8.0kHz
6 High Ratio 0.8
13 EQ Low Frequency 700Hz
14 EQ Low Gain +6dB
15 EQ High Frequency 800Hz
16 EQ High Gain +4dB
Return Level 64

I would love to make a MODX user effect preset with these specific parameter values. Would sure save a lot of editing…

Of course, I tried these settings and so forth. In the course of investigation, I found it easier to navigate with the MODX cursor keys instead of poking the touch screen. As I mentioned in my last post, the small size of the MODX widgets requires care and precision when tapping the screen. I also noticed that more finger pressure is required than the Genos touch screen. Widgets along the edge of the screen are the most troublesome and maybe I’ll need to re-calibrate the touch panel.

Next step: Rotary speaker effects

One big, lingering question in arranger-land is how to make the PSR/Genos drawbar organ more realistic.

I need to port my B-3 patches, so it made sense to drop into the “All 9 Bars!” Performance. “All 9 Bars!” is a 2-part Performance which marshalls 14 voice elements into a pretty decent B-3 plus Leslie emulation. Part 1 implements the first eight drawbars and part 2 implements the 1′ bar plus some other goodies.

I’ll have more to say about the part programming in another post. In the meantime, here is a screen shot showing the insert effects routing for “All 9 Bars!”. [Click images to enlarge.]

The MODX “Rotary Speaker 1” algorithm is what we could call “the old algorithm.” “Rotary Speaker 2” is the “new algorithm” debuted in Montage. The rotary speaker effect (Insert A) drives the Multi FX (Insert B) algorithm before everything hits the 2-band EQ (flat).

The following screen shot shows the parameters for the “Rotary Speaker 1” effect.

The “Rotary Speaker 1” algorithm includes its own 2-band EQ which gives a kick at 200Hz and 4.5kHz. Thus, the 2-band EQ at the end of the Insert A to Insert B chain is flat.

The next screen shot summarizes the parameter settings for the “Multi FX” effect.

BTW, both the Multi FX and HD Hall reverb were introduced in the Motif XF version 1.50 update. Multi FX is supported in the PSR-S950 (and later) mid-range arrangers, Tyros 5 and, of course, Genos.

The effect routing diagram illustrates one immediate advantage of the Yamaha synth effect architecture over the Genos effect architecture. It is possible to chain two insert effects on Genos, but you need to stand on your head to do it. Also, it’s not easy to chain a distortion effect into the PSR/Tyros “Organ Flutes” mode. These limitations are due to legacy software and the XG voice/effect architecture — and they stick in everyone’s craw like a bad burrito. Yamaha, please?

MODX screen capture

About those screen shots!

Like Montage, the MODX has a double-secret Easter egg for capturing screen shots.

  1. Insert a USB flash drive into the USB TO DEVICE port.
  2. Press and hold the A/D INPUT ON/OFF button.
  3. Press and release the AUDITION button.
  4. Release the A/D INPUT ON/OFF button.

The MODX writes screen shots to the USB flash drive with names such as “DSNAP_0.png”. I don’t know why Yamaha hides this capability. We live in a modern, visual age, after all, and people need to share screen shots through (anti-)social media.

Here’s two tips. 1. To save wear and tear on the USB TO DEVICE port, I plug a short extender cable into the port and then plug the USB flash drive into the extender cable. The cable brings the port to a place where I can easily reach it and it reduces wear on the port connector. 2. The screen capture procedure doesn’t provide any visual indication that the capture was successful or complete. Use a USB flash drive with an activity LED (e.g., the Kingston Data Traveler Elite G2). You should see the drive’s LED flash when the PNG file is written. Naturally, do not remove the drive when it is active!

Copyright © 2018 Paul J. Drongowski

Explicit Sax

Hope you got your Motif XF. The current stock is gone, gone, gone.

Comparing waveforms (Montage vs. XF) got me interested in the tenor sax samples and voices. The Yamaha MOX has the basic tenor sax samples (Med, Hard, Growl) while the Motif XF rounds out the set with Soft dynamic samples and falls. The XF (and MOXF) showcase the tenor sax in the “Tenor Max” preset voice.

Since I was curious to discover “what I’m missing,” I deconstructed four tenor sax patches on the MOX. Also, I compared the MOX voices against the Super Articulation tenor sax voices on the PSR-S950 arranger workstation in a listening test. The A/B test was enlightening as the MOX and S950 use the same waveforms — at least to my aging ears! The S950 triggers the samples using Super Articulation (SA) rules while the MOX triggers the samples using Expanded Articulation (XA) rules. Rules aside, you get to the same sonic place.

With XA, there are three main ways that samples are selected and triggered:

  1. Normal: Triggered when keys are played in the regular way.
  2. Legato: Triggered when Mono/Poly mode is Mono and keys are played in a legato manner, i.e. one or more keys are held while a new key is struck.
  3. AF1 and AF2: Triggered when either AF1 is ON, AF2 is ON or AF1/AF2 are both OFF and a key is struck. (The switch states are exclusive.)

See the Yamaha Synthesizer Paramater Manual for all the gory details. XA and SA differ in the amount of automated decision making made by the control software. SA is more automated and XA is more manual, giving the player more explicit control over articulations.

First up is the PRE5:008(A08)Tenor Dynamic AF1 voice. The AF1 and AF2 buttons are assigned in the following way:

    AF1: Mono/Poly mode
    AF2: FEG-D1

The AF1 and AF2 buttons do not affect sample selection in this voice other than putting the keyboard into Mono mode or Poly mode. Thanks to this simplification, it’s a good place to start ‘splaining.

The table below gives the waveform, key range, velocity range and volume level for each element in the patch.

    Elem#  Waveform            XA      Notes   Veloc  Level
    -----  ------------------  ------  ------  ------ -----
      1    Tenor Sax2 Med      Normal  C-2 G8  1   60   110
      2    Tenor Sax2 Med      Normal  C-2 G8  61  90   110
      3    Tenor Sax2 Med Of   Legato  C-2 G8  1   90    86
      4    Tenor Sax2 Hard     Normal  C-2 G8  91 127   120
      5    Tenor Sax2 Hard Of  Legato  C-2 G8  91 127    95
      6    Small Tabla Dom     Legato  C4  G8  1  127    52
      7    Small Tabla Dom     Legato  C-2 B3  1  127    78
      8    Sine                Legato  C-2 G8  1  127    78

The element levels are programmed to even out the perceived loudness across waveforms. Of course, there are many parameters for each element beyond what is shown in the table. For example, each dynamic level (velocity range) has its own filter and amplitude characteristics. There may even by a little velocity-sensitive pitch scoop at the beginning of a note!

The tenor sax waveforms (elements 1 to 5) cover the entire key range: C-2 to G8. The waveforms are assigned to different velocity ranges and are selected (and triggered) depending upon Normal or Legato playing gestures. The first element is triggered when a Normal (detached) gesture is detected and the key velocity (i.e., how hard the key is struck) is between 1 and 60 inclusive. The second element is triggered under the same conditions except the key velocity is between 61 and 90 inclusive. The AF1 button toggles between Mono and Poly mode — whether a legato gesture triggers a Legato element or Normal element.

You can see that only one of the first 5 elements is triggered at a time depending upon the combination of gesture, note range and velocity range. The Tenor Sax2 Med waveforms are played for quieter dynamic levels and the Tenor Sax2 Hard waveforms are played for the louder dynamic levels.

The Tenor Sax2 Med Of and Tenor Sax2 Hard Of waveforms are triggered by a Legato playing gesture. The “Of” in the waveform name means “Offset” and sample playback starts later in the waveform data, that is, skipping the attack part of the waveform. This eliminates the initial attack which is characteric of a sax playing detached notes.

Elements 6 to 8 are triggered only for Legato notes. These elements add a low-level “pop” at the beginning of each note. Think of this sound as a “connective tone” between notes. Tyros’s Super Articulation 2 technology (also known as “Articulated Element Modeling”) blends actual connective tones between notes, producing realistic articulations. The blending requires considerably more samples and processing power than the MOX or the S950.

The PRE5:009(A09) Tenor Soft Legato voice is a simplified version of the first patch. AF1 selects Mono and Poly modes. (AF2 is unassigned.) The patches use only the “Med” waveforms to achieve an overall softer timbre.

    Elem#  Waveform            XA      Notes   Veloc  Level
    -----  ------------------  ------  ------  ------ -----
      1    Tenor Sax2 Med      Normal  C-2 G8  1   70   110
      2    Tenor Sax2 Med Of   Legato  C-2 G8  1   80    99
      3    Tenor Sax2 Med      Normal  C-2 G8  71 127   110
      4    Tenor Sax2 Med Of   Legato  C-2 G8  81 127    99
      6    Small Tabla Dom     Legato  C4  G8  1  127    46
      7    Small Tabla Dom     Legato  C-2 B3  1  127    75
      8    Sine                Legato  C-2 G8  1  127    59

There are two dynamic levels (lower and higher velocity ranges) and two playing gestures (Normal and Legato) forming four combinations of dynamic level and gesture. Elements 6 to 8 implement a connective tone as previously described.

Life gets more interesting in the PRE5:0010(A10) Velo Growl Legato patch. AF1, again, selects Mono and Poly modes. (AF2 is unassigned.)

    Elem#  Waveform            XA      Notes   Veloc   Level
    -----  ------------------  ------  ------  ------- -----
      1    Tenor Sax2 Hard     Normal  C-2 G8  1    60   119
      2    Tenor Sax2 Med Of   Legato  C-2 G8  1    60    86
      3    Tenor Sax2 Growl    Normal  C-2 G8  61  127   125
      4    Tenor Sax2 Hard Of  Legato  C-2 G8  61  100   102
      5    Tenor Sax2 Growl Of Legato  C-2 G8  101 127    94
      6    Small Tabla Dom     Legato  C4  G8  1   127    52
      7    Small Tabla Dom     Legato  C-2 B3  1   127    78
      8    Sine                Legato  C-2 G8  1   127    78

There are roughly three dynamic levels:

  • Velocity 1 to 60: A hard attack is triggered for Normal notes and a soft attack, medium sax is triggered for Legato notes.
  • Velocity 61 to 100: A growl sax is triggered for Normal notes (up to velocity 127) and a soft attack, hard sax is triggered for Legato notes.
  • Velocity 101 to 127: A soft attack, growl sax is triggered for Legato notes.

This programming allows interesting one-hand control. Play soft to get a pure sax tone and play hard to get a growl. Play detached to get a harder attack and play legato to get a softer note attack (when Mono mode is selected via AF1).

The fourth and final patch is PRE5:011(A11) Tenor Growl AF1. The buttons are assigned in the following way:

    AF1: Mono/Poly mode and growl waveform
    AF2: Tenor Sax1 waveform

As you’ll see in the table below, the AF2 button selects the original Motif Tenor Sax1 waveform.

We again have two dynamic levels triggered by velocity ranges 1 to 100 and 101 to 127. Here, the assignable function buttons really come into play.

    Elem#  Waveform            XA        Notes   Veloc   Level
    -----  ------------------  --------  ------  ------- -----
      1    Tenor Sax2 Med      AllAFOff  C-2 G8  1   100   120
      2    Tenor Sax2 Hard     AllAFOff  C-2 G8  101 127   125
      3    Tenor Sax2 Growl    AF1 On    C-2 G8  1   127   127
      4    Tenor Sax2 Hard Of  Legato    C-2 G8  101 127   102
      5    Tenor Sax2 Hard Of  Legato    C-2 G8  1   100   102
      6    Tenor Sax1          AF2 On    C-2 G8  1   127   119

AF1 brings in a growl waveform (element 3) when it is turned ON. AF2 brings in an entirely different tenor sax waveform and tone (element 6) when it is turned ON. The first two elements play a pure tenor sax tone when all AF buttons are OFF. Elements 4 and 5 play a hard sax tone with a softer attack for legato playing gestures. You would be hard pressed to think about these combinations when actually playing — you just have to “go for it” intuitively, knowing that AF1 kicks in the growl.

Turning OFF AF1 while holding the key cuts off the note. Whether this is a bug or a feature is your’s to decide!

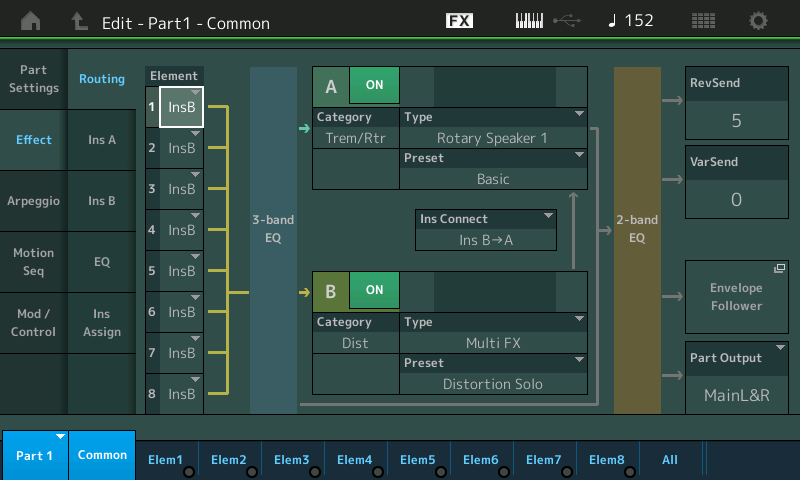
The effect programming in these four presets is not very adventurous. The effects are appropriate for a laid-back, mellow sound. Here’s a quick breakdown:

    Preset voice        Insert A   FX preset    Insert B    Dry/Wet
    -----------------  ----------  ---------  ------------  -------
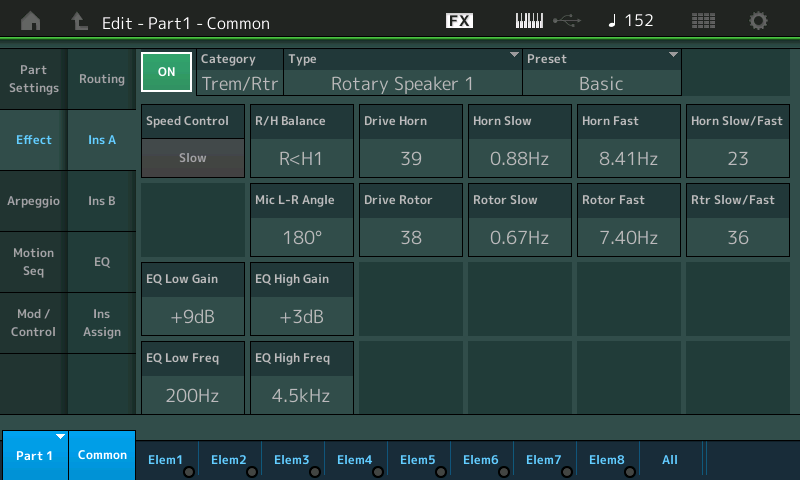
    Tenor Dynamic AF1  VCM EQ 501    Flat     TempoCrosDly   D63>W
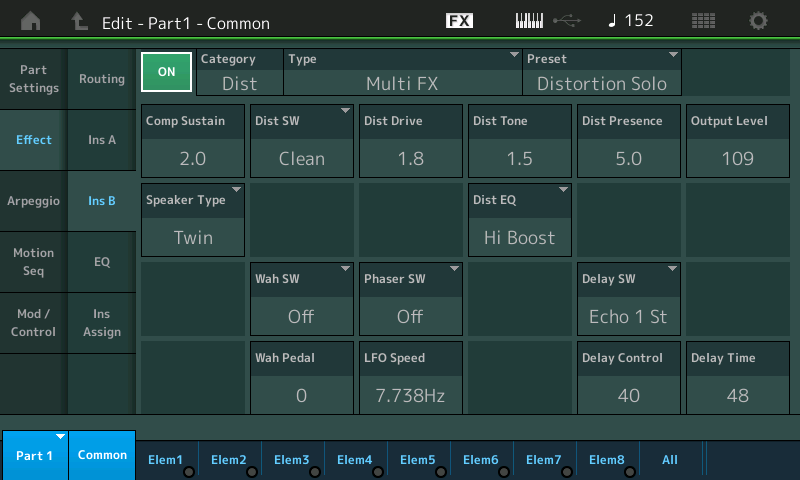
    Tenor Soft Legato  VCM EQ 501    Flat     TempoCrosDly   D59>W
    Velo Growl Legato  VCM EQ 501    Flat     TempoCrosDly   D54>W
    Tenor Growl AF1    VCM EQ 501    Flat     TempoCrosDly   D63>W

The Insert A effect is the VCM multi-band EQ. The EQ curve is flat, so the EQ is not coloring the sound at all. The Insert B effect is a tempo cross delay. The dry/wet mix is set conservatively (D54>W) or just plain off (D63>W). The system CHORUS effect is not applied and the system REVERB is a nice REV-X reverb.

The effect programming on the PSR-S950 is a little more exciting and adds a grittier sound for rock and R&B. The RockSax voice employs a distortion plus delay effect algorithm:

    PSR effect: DISTORTION+ > DST+DELAY1

    Parameter       Value
    --------------  --------
    LCH Delay       250.0 ms
    RCH Delay       300.0 ms
    Delay FB Time   375.0 ms
    Delay FB Level  +16
    Delay Mix       50
    Dist Drive      10
    Dist Output     110
    Dist EQ Low     +3 dB
    Dist EQ Mid     +1 dB
    Dry/Wet         D40>W

Transporting this effect to the MOX, you could assign AMP SIMULATOR 2 to insert A. For insert B, you could stick with the tempo cross delay or you could program a fixed delay instead (e.g., DELAY L,R (STEREO)) using the parameters above. A third possibility is to use the MOX’s COMP DISTORTION DELAY algorithm which combines the distortion and delay into a single effect block.

The S950 GrowlSax voice uses a different distortion plus delay algorithm:

    PSR effect: DISTORTION+ > V_DST S+DLY

    Parameter       Value
    --------------  --------
    Overdrive       14%
    Device          Dist2
    Speaker         Combo
    Presence        6
    Output Level    98%
    Delay Time L    250.0 ms
    Delay Time R    250.0 ms
    Delay FB Time   500.0 ms
    Delay FB Level  +12
    Dry/Wet         D32>W
    Delay Mix       44
    FB High Dump    1.0

Programming options are similar. Set MOX insert A to AMP SIMULATOR 1 and either stay with the tempo cross delay for insert B, or set insert B to a fixed delay algorithm. Or, run everything through the MOX’s COMP DISTORTION DELAY algorithm. Tune the Dry/Wet mix to taste.

Hey, here’s a bonus — the effects for the S950 slapback guitar. This might sound good with a sax, too.

    PSR effect: DISTORTION > V_DIST ROCA

    Parameter       Value
    --------------  --------
    Overdrive       20%
    Device          Vintage
    Speaker         Twin
    Presence        14
    Output Level    66%
    Delay Time      16th/3
    Delay FB Level  +3
    L/R Diffusion   +10ms
    Lag             +0ms
    Dry/Wet         D<W63
    Delay Mix       127
    FB High Dump    1.0

In this case, go with AMP SIMULATOR 1 for MOX insert A. Use either the tempo cross delay for insert B or change insert B to the TEMPO DELAY STEREO algorithm.

Even though I’ve discussed voice and effects programming in the context of the MOX, these techniques all apply to the Motif XS, XF and MOXF, too.

If you would like to know more about Super Articulation voices, then please check out: SA and SA2: Is Motif up to the task? I also saved two informative posts from the Motifator forum about Super Articulation and Expanded Articulation.

Read about Motif XF (MOXF) “Tenor MAX” voice programming. Update: 18 May 2016.

PSR effects for electric piano (Part 1)

A common complaint about the electric pianos on the Yamaha PSR arranger workstations is their lack of “guts” or “grit.” The voice samples are reasonably good, but the effects programming is vanilla and way too polite, especially for rock and soul styles. Here is a table showing the default DSP effect for some of the electric piano voices in the PSR-S950:

    PSR-S950 voice  Category     Effect
    --------------  ----------   -----------------------
    SparkleStack    CHORUS       CHORUS3
    SweetDX         CHORUS       CHORUS3
    BalladDX        CHORUS       ENS DETUNE1
    DX Dynamics     CHORUS       CHORUS2
    BalladBells     CHORUS       CHORUS3
    SuitcaseEP      CHORUS       CELESTE2
    VintageEP       TREMOLO      EP TREMOLO    [DSP off]
    CP80            CHORUS       CHORUS3
    StageEP         CHORUS       CELESTE2
    SmoothTine      SPATIAL      EP AUTO PAN
    ElectricPiano   SPATIAL      EP AUTO PAN   [DSP off]
    Clavi           DISTORTION   DIST SOFT1
    WahClavi        WAH TCH/PDL  CLAVI TC.WAH
    PhaseClavi      PHASER       EP PHASER2

You can see that most of the voices use a chorus effect. In two cases, the DSP effect is turned off by default. (You need to turn it on using the [DSP] front panel button.) The Clavinet voices are a little more fun and use distortion, wah and phaser.

Chorus does not add much “heft” to a voice and it doesn’t add grit. Compression, mid-range boost (EQ) and overdrive are better choices when you need a punchy and/or grungy electric piano sound.

Let’s take a look at the effects programming for a few electric piano voices on the Yamaha MOX synthesizer workstation. The basic voices drive two insert effects connected in series:

    MOX voice             Insert A     Insert B
    --------------------  -----------  -----------
    Crunchy Comp          MltBndComp   CompDistDly
    Vintage Case          AmpSim 2     Auto Pan
    Chorus Hard           ClassicComp  SPX Chorus
    Drive EP AS1          AmpSim 2     Auto Pan
    Natural Wurli         AmpSim 1     Tremolo
    Wurli Distortion AS1  Tremolo      CompDistDly

On the MOX, every voice uses compression, amp simulation or distortion, even the voices employing the evergreen tremolo, pan and chorus effects.

At this point, PSR users tend to throw up their hands and say, “Well, that’s the Motif series!” and back away. Yamaha — bless them — share technology between workstation products. Quite often, you can find the equivalent PSR effect algorithm for an MOX (MOXF) or Motif algorithm.

Consider the MOX “AmpSim2” algorithm. This algorithm shares the same parameters as the PSR “DISTORTION AMP SIM2” algorithm. Here is a table showing the corresponence between MOX and PSR.

    MOX parameter  PSR parameter  MOX value
    -------------  -------------  ---------
    Preset         n/a            Stack1
    AmpType        AMP Type       Tube
    OverDr         Drive          16
    OutLvl         Output Level   70
    LPF            LPF Cutoff     6.3KHz
    Dry/Wet        Dry/Wet        D<W30

The parameter values given here are taken from the MOX “Drive EP AS1” voice. Bring up a PSR voice like “VintageEP,” edit its DSP effect and replace the tremolo effect with “AMP SIM2.” Plug in these values, listen and tweak!

My second example is taken from the MOX “Natural Wurli” voice. The MOX effect algorithm name is “Amp Sim1”. The equivalent PSR effect algorithm is “DISTORTION V_DIST WARM” and its siblings. Here is the equivalency table:

    MOX parameter  PSR parameter  MOX value
    -------------  -------------  ---------
    Preset         n/a            Stack2
    OverDr         Overdrive      2%
    Device         Device         Vintage tube
    Speaker        Speaker        Stack
    Presence       Presence       +10
    OutLvl         Output Level   53%
    Dry/Wet        Dry/Wet        D<W1

Again, change the PSR DSP effect to “V_DIST WARM” and plug in the values. Then, tweak away.

The final example is a multi-effect taken from the MOX “Wurli Distortion AS1” voice. The MOX effect algorithm is “CompDistDly” that is a compressor, distortion and delay effect chain. The equivalency table is:

    MOX parameter  PSR parameter         MOX value
    -------------  --------------------  ---------
    Preset         n/a                   Hard1
    OverDr         Overdrive             15%
    Device         Vin_tube              Vintage tube
    Speaker        Stack                 Stack
    Presence       Presence              +10
    DelayL         Delay Time L          307.3ms
    DelayR         Delay Time R          271.7ms
    FBTime         Delay Feedback Time   306.6ms
    FBLevel        Delay Feedback Level  +31
    FBHiDmp        Feedback High Dump    0.8
    OutLvl         Output Level          22%
    DlyMix         Delay Mix             0
    Compress       n/a                   -29dB
    Dry/Wet        Dry/Wet               D<W12

The almost equivalent PSR effect algorithm is “DISTORTION+ V_DST H+DLY”. The PSR algorithm is missing the compression component (parameter). If you want compression, then consider one of the other PSR distortion algorithms with mono delay.

Keep thinking “multi FX.” I’m going to visit the REAl DISTORTION multi FX algorithm in a future post.

Some of the MOX voices use VCM effects. I didn’t deconstruct the voices with VCM effects because my S950 doesn’t have them. However, if you have VCM effects, for heaven’s sake, use them!

Learn how to save your new creation in Editing and Saving PSR Effects (Part 2).

PSR effects for electric piano (Part 1)
Editing and saving PSR effects (Part 2)
Multi-effects for electric piano (Part 3)
Copy PSR DSP effects (part 4)

TC-Helicon Play Electric

Sometimes the best inexpensive multi-effect stomp box is pitched as a vocal harmony processor.

The built-in effects on the Korg Triton Taktile (TT) are rather plain and unpronounced. So, I cast the net for stomp boxes to beef up the keyboard sounds with reverb, chorus, phaser, flanger, tremolo and the rest of the usual suspects. Something to spice up the guitar sounds is also nice. Vocal harmony processing never entered my mind since I rarely sing.

My first thought was to build a small pedal board of stomp boxes. Based on Internet reviews, I bought a TC-Electronic Hall of Fame (HOF) Reverb pedal. It’s stereo, clean and the preset algorithms are terrific. I love this little red box! Its Toneprint capability is really a gas. Through Toneprint, you can actually add chorus or flanger, making it a good, small, one pedal solution for keyboard effects. I also use the HOF for recording — the algorithms and cleanliness are that good.

Based on that success, my next thought was to add more TC-Electric pedals. TC’s guitar pedals hit the street in the $100 to $150 (USD) range. Thus, you can run up a bill pretty fast covering all of the bases!

Enter the TC-Helicon Play Electric (PE). After finding a very attractive price for the PE at ProAudioStar, I investigated its capabilities. Thanks to smart signal routing, the PE is really like two multi-effect processors in one — one side is a guitar chain and the other side is vocal harmony and effects processing. I’m going to concentrate on the guitar side here as I haven’t explored the vocal harmony processing yet.

The guitar effects chain consists of amp simulation, compression, modulation, delay and reverb. It covers all of the major effect food groups except phaser. What it does cover, it does very well. There are a small number of “greatest hit” algorithms from the Corona Chorus, Vortex Flanger and the HOF — all very usable. The user interface is a breeze and I quickly pulled together presets for chorus, flange, rotor, pan, tremolo and auto filter. The Triton Taktile electric pianos sound great through the PE effects. Thanks to the factory presets, U2 can sound like The Edge (pun intended). The rather lame electric guitars sound huge through the PE presets.

The quality of the rotor effect is a real surpise. Although the Neo Instruments Ventilator doesn’t have anything to fear, the rotor is not bad and it compensates for the TT’s inability to switch between slow and fast rotor speed. (If you can stand the sometimes maddening swirl of rotor-on-rotor violence.) I programmed slow and fast rotor presets in adjacent locations and can switch between fast and slow via the increment and decrement switches on the pedal.

What does the Play Electric give up in favor of lower cost? The individual pedal approach has the advantage of immediacy — lots of knobs and switches to play with. The PE effects are easily tweaked through the UI, but lack the immediacy of front panel knobs. Further, the PE exposes only the most important parameters through the UI, emphasizing convenience over tweaking. The compressor parameters roll up the whole lot of attack, release, etc. into “Amount” and “Makeup” parameters. TC-Helicon offer deeper editing in the much more expensive (and heavier) Voice Live. The Voice Live also has a wider range of effects. From what I’ve heard so far, however, I’m good with the Play Electric.

I look forward to trying the vocal side. The PE does not have MIDI IN for scale detection — it’s all audio, baby. The PE has built-in microphones and will detect scale out of the sonic ether as well as processing the audio signal at the guitar input. I’ll post results after experimenting.

The TC-Helicon Play Electric is normally advertised in the live sound section of on-line and print catalogs. Thus, it’s worth checking out vocal processors when looking for keyboard/guitar effects. You might be surprised at what you’ll find.

There is one alternative to the PE that looks viable for keyboard players. Keyboardists don’t usually chain effects together like a guitar player and often one additional effect through a reverb will do. The Line 6 M5 pedal is the “Swiss Army Knife” of effects. It does one effect at a time and has a very wide range of available effects (much greater than the PE). The M5 has stereo inputs (while the PE is mono). An M5 coupled with the HOF would be a capable duo at a reasonable total cost.

Switching gears a little bit, I don’t know why Keyboard Magazine and other keyboard-oriented publications don’t review effect pedals very often. These pedals are just as vital and useful to keyboard players as they are to guitarists. The Keyboard Magazine guys need to drop by the Guitar Player offices while they are writing their massive annual pedal round-up.

Crunchin’ da drums

In my last post, I discussed Motif/MOX eight zone (8Z) drum kits. The eight zone concept lets you assemble eight different percussion sounds into a custom kit. The waveforms are assigned to voice elements and are stretched/limited to eight different keyboard (MIDI note) zones. The Motif/MOX have matching arpeggios that work with the 8Z kits.

By the way, the 8Z drum kits were first introduced with the Motif XS. My notes on the 8Z kits and this note on effects apply to all later models including the Motif XF and MOXF.

If you have ever tried the percussion sounds alone without effects, the drum sounds are kind of “plain Jane” without a lot of impact. This post deconstructs a couple of effects which can be applied to break beats and other styles that require crunch and animation.

The first effect chain is taken from the Voice PRE8:060 “8Z Romps.” The voice has two insert effects connected in series. INSERT A is a Lo-Fi algorithm with the following parameters (effect preset “Max Lo-Fi”):

    #  Parameter              Value    Numeric
   --  ---------------------  -------  -------
    1  Sampling Freq Control  4.01KHz  (10)
    2  Word Length            93       (93)
    3  Output Gain            +7 dB    (14)
    4  LPF Cutoff             20.0KHz  (60)
    5  Filter Type            Radio    (2) 
    6  LPF Resonance          10.0     (100)
    7  Bit Assign             2        (2)
    8  Emphasis               On       (1)
   10  Dry/Wet                D<W63    (127)
   15  Input Mode             Stereo   (1)

The parameter number, name, values, etc. are taken from the MOX Data List. (See the section titled “Effect Parameter List” in the PDF file). The numeric values — given here in decimal — are what you need to program the effect through System Exclusive MIDI messages. More about this in a minute.

The Lo-Fi effect adds a lot of crunch and crush. But, wait! There’s more. The INSERT B effect is the AmpSim 1 amp simulator. Its parameters are:

    #  Parameter              Value    Numeric
   --  ---------------------  -------  -------
    1  Over Drive             54%      (54)
    2  Device                 dst1     (2)
    3  Speaker                Combo    (2)
    4  Presence               +10      (10)
    5  Output Level           34%      (34)
   10  Dry/Wet                D<W63    (127)

This is the “Beat Crunch” effect preset.

Please remember that my goal is to use the 8Z break beats in a PSR/Tyros style. In order to do accomplish this, I found the equivalent effects algorithms for the Yamaha PSR-S950 arranger workstation. Here are the equivalent algorithms:

    MOX            PSR-S950
    --------       -----------------------------
    Lo-Fi    --->  Lo-Fi DRUM1 (MSB:94 LSB:18)
    AmpSim 1 --->  V_DIST CRUNC (MSB:98 LSB:18 )

Unfortunately, the XG effects architecture supports at most one system-wide variation effect or one per-part insert effect. So, I decided to use the Lo-Fi algorithm because it seemed to provide most of the grit and nastiness that I was seeking.

It took a little detective work to find and match up the corresponding effect algorithms between the Motif/MOX and the PSR/Tyros. The effect type is enough to get into the same neighborhood. The rest of the sleuthing involves comparing the parameter lists in order to find the exact (or best) match. The MOX has Virtual Circuit Modeling (VCM) effects and the S950 does not. Therefore, you may not always be able to find an exact match.

With the S950 Data List in hand, I translated the effect parameters into the hexadecimal System Exclusive (SysEx) messages to configure the Lo-Fi effect on the PSR:

    F0 43 10 4C 02 01 40 5E 12 F7   Variation Type
    F0 43 10 4C 02 01 5A 01 F7      Variation Connection (SYSTEM)
    F0 43 10 4C 02 01 42 00 0A F7   PARAMETER 1 Sampling Freq Control (10)
    F0 43 10 4C 02 01 44 00 5D F7   PARAMETER 2 Word Length (93)
    F0 43 10 4C 02 01 46 00 0E F7   PARAMETER 3 Output Gain (14)
    F0 43 10 4C 02 01 48 00 3C F7   PARAMETER 4 LPF Cutoff (60)
    F0 43 10 4C 02 01 4A 00 02 F7   PARAMETER 5 Filter Type (2)
    F0 43 10 4C 02 01 4C 00 64 F7   PARAMETER 6 LPF Resonance (100)
    F0 43 10 4C 02 01 4E 00 02 F7   PARAMETER 7 Bit Assign (2)
    F0 43 10 4C 02 01 50 00 01 F7   PARAMETER 8 Emphasis (1)
    F0 43 10 4C 02 01 54 00 7F F7   PARAMETER 10 Dry/Wet (127)
    F0 43 10 4C 02 01 74 01 F7      PARAMETER 15 Stereo  (1)

I configured the effect as a system-wide variation effect such that multiple percussion parts may be sent to the effect. I inserted the SysEx messages into the set-up measure of the PSR style file using SONAR (my usual DAW/sequencer). Yow, the difference between the percussion sounds without and with this effect is like night and day!

The MOX insert effects are followed by a system-wide Tempo Cross Delay effect (effect preset “4beat Echo”). This effect adds a nice bit of animation to the overall sound. The MOX effect parameters are:

    #  Parameter              Value    Numeric
   --  ---------------------  -------  -------
    1  Delay Time L>R         4th      (11)
    2  Delay Time R>L         8th.     (10)
    3  Feedback Level         16       (80)
    4  Input Select           L        (0)
    5  Feedback High Dump     0.5      (5)
    6  Lag                    0ms      (64)
   10  Dry/Wet                D<W63    (127)
   13  EQ Low Frequency       250Hz    (22)
   14  EQ Low Gain            0dB      (64)
   15  EQ High Frequency      4.0KHz   (46)
   16  EQ High Gain           0dB      (64)

The equivalent S950 effect is TEMPO CROSS1 (MSB:22 LSB:0). I assigned this effect to the system-wide CHORUS block.

Here are the S950 (XG) SysEx messages to configure the delay effect in the CHORUS block:

    F0 43 10 4C 02 01 20 16 00 F7  Chorus Type TEMPO CROSS1
    F0 43 10 4C 02 01 22 0B F7     PARAMETER 1 Delay Time L<R     (11)
    F0 43 10 4C 02 01 23 0A F7     PARAMETER 2 Delay Time R<L     (10)
    F0 43 10 4C 02 01 24 50 F7     PARAMETER 3 Feedback Level     (80)
    F0 43 10 4C 02 01 25 00 F7     PARAMETER 4 Input Selection    (0)
    F0 43 10 4C 02 01 26 05 F7     PARAMETER 5 Feedback High Dump (5)
    F0 43 10 4C 02 01 27 40 F7     PARAMETER 6 Lag                (64)
    F0 43 10 4C 02 01 2B 7F F7     PARAMETER 10 Dry/Wet           (127)
    F0 43 10 4C 02 01 32 16 F7     PARAMETER 13 EQ Low Frequency  (22)
    F0 43 10 4C 02 01 33 40 F7     PARAMETER 14 EQ Low Gain       (64)
    F0 43 10 4C 02 01 34 2E F7     PARAMETER 15 EQ High Frequency (46)
    F0 43 10 4C 02 01 35 40 F7     PARAMETER 16 EQ High Gain      (64)

A little bit of delay on a busy drum part goes a long way. The send level (not shown here) is relatively low — just enough to add a little animation to the sound without creating a lot of clutter. It sounds OK, but I might adjust the send level dynamically and add more delay to exposed parts like the break while keeping the MAIN sections clean.

I hope this short effects clinic helps you out!