Today’s topic — power — may seem rather mundane. To a modder, though, power gives our circuits life.
I’m going to make a few comments of general interest before diving into details that are relevant to the Yamaha PSS series keyboards, including the PSS-A50 and PSS-E30 Remie.
Most of us don’t think too much about keyboard power. Sure, we know where the AC adapter connects or how to insert batteries. The internal details are hidden from us.
However, did you really read the fine print in the Owner’s Manual? The front panel power button may be labelled “Standby/ON” instead of “OFF/ON”, and the difference is important. The PSS-A50 Owner’s Manual states, “Even when the Standby/On switch is in standby status (display is off), electricity is still flowing to the instrument at the minimum level.”
Yes, that Standby/ON switch is really a “soft” power switch. It does not physically disrupt the flow of electrical current from the AC adapter (battery or USB port). In the PSS series (and other keyboards, too), the Standby/ON switch sends a signal to the keyboard’s processor telling the software to change the current power state. For the technically inclined, the Standby/ON switch pulls one of the processor pins to ground and software detects the ACTIVE LOW signal.
The rest of the story gets complicated fast depending upon power saving techniques supported by the hardware. Let’s assume that we’re changing from ON to Standby. The processor generates a separate signal which switches off the power amplifier — a major drain on battery or external power. Software turns off the display, another power hog. Finally, software places the processor in a low-power state and waits for the Standby/ON switch to be pressed again. Going from Standby to ON, software turns everything back on.
From the user’s perspective, the transition from Standby to ON is fast. No waiting and let’s get playing! The constant low current flow does affect battery life, however. Ever wonder why the batteries drained sooner than expected even though you haven’t turned your keyboard on for a few weeks? The low current flow eventually drains the batteries.
Power management has implications for people intending to mod an instrument. I’m planning to add an audio delay or filter circuit to the A50. The add-on circuit will need to draw power. Ideally, I would like to switch the add-on circuit on and off with the front panel switch. But, where should I take power from the existing design? Is there a PCB pad or trace that is big enough for soldering? Is voltage regulated at that point? Getting power is not a no-brainer!
If you don’t have the instrument’s service manual and schematic, this analysis gets really hairy and uncertain. For the E30/A50, I’ve been working from the PSR-F50 manual available from Elektrotanya. The PSS series keyboards are a revamped PSR-F50 design.
I’m considering a Synthrotek Dev Delay for add-on. The Dev Delay has a 5V regulator and runs on battery power. My thought is to connect the Dev Delay directly to the A50’s batteries through its own power on/off switch. That way I don’t add to the standby drain on the batteries. It just means turning the delay on and off separately.
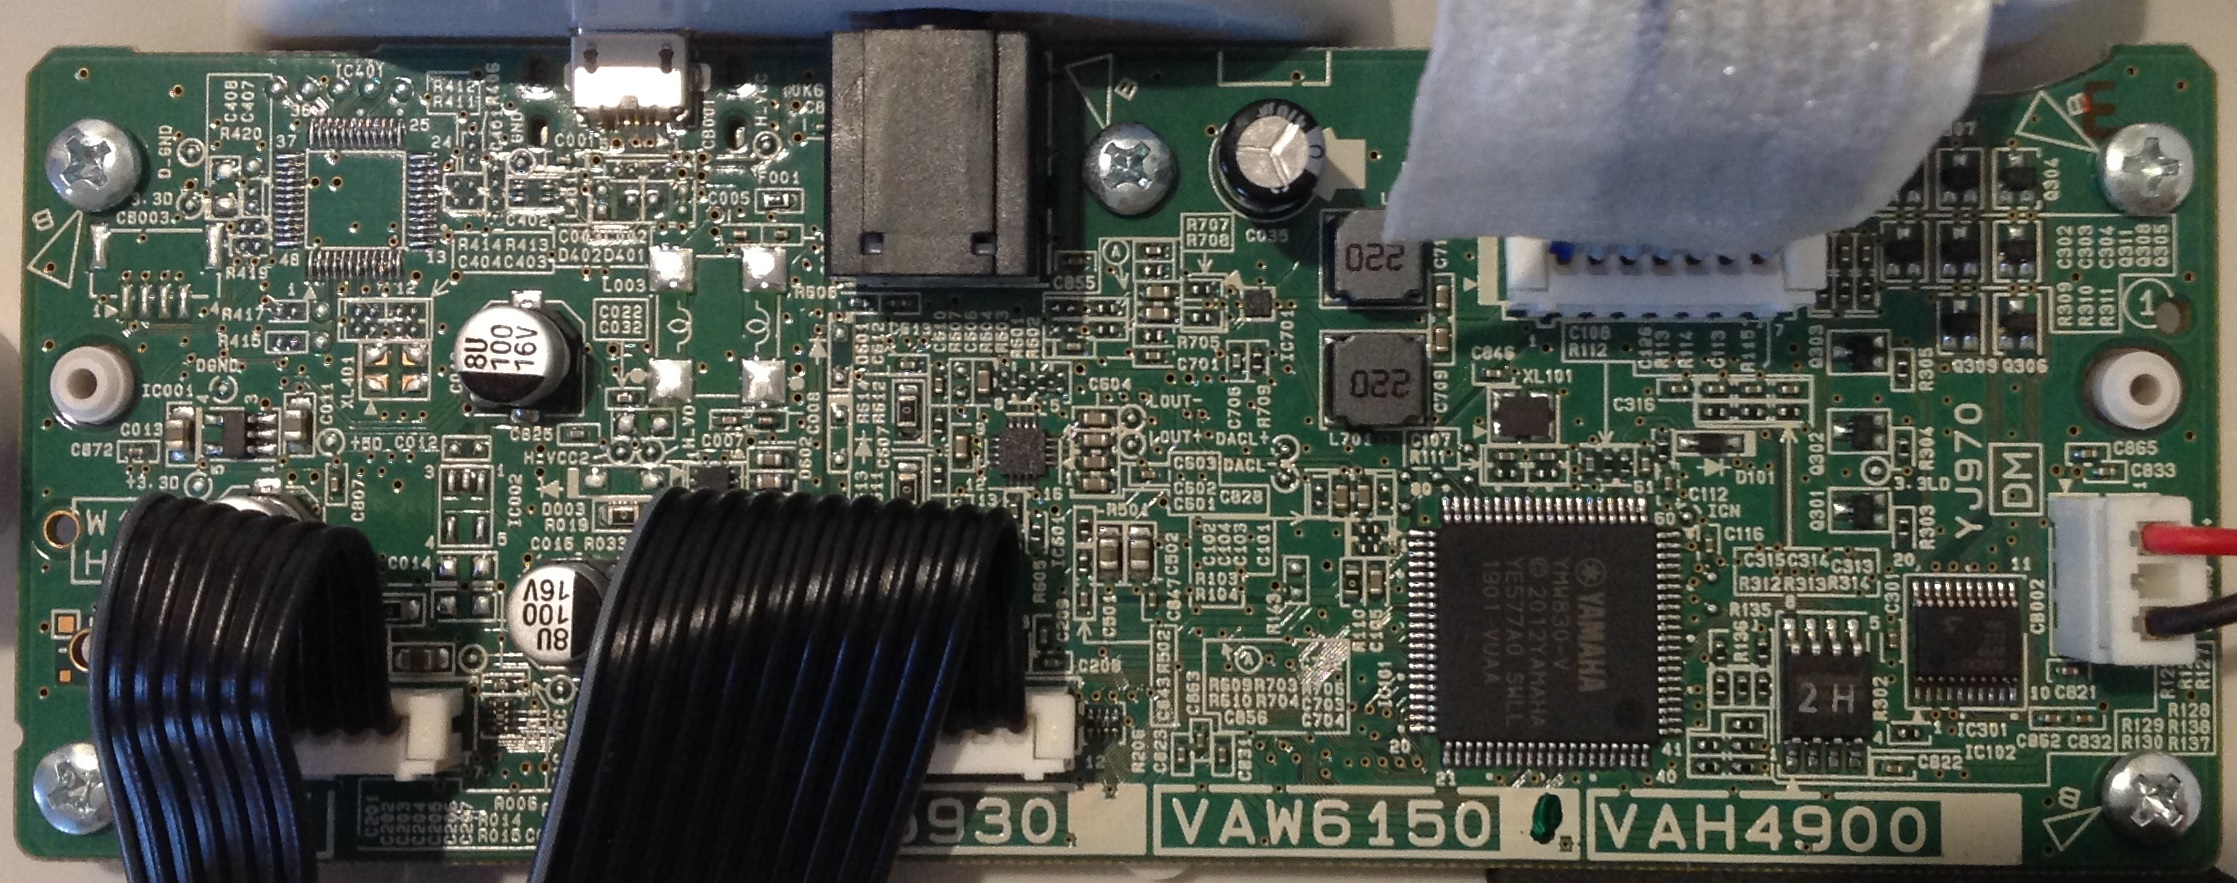
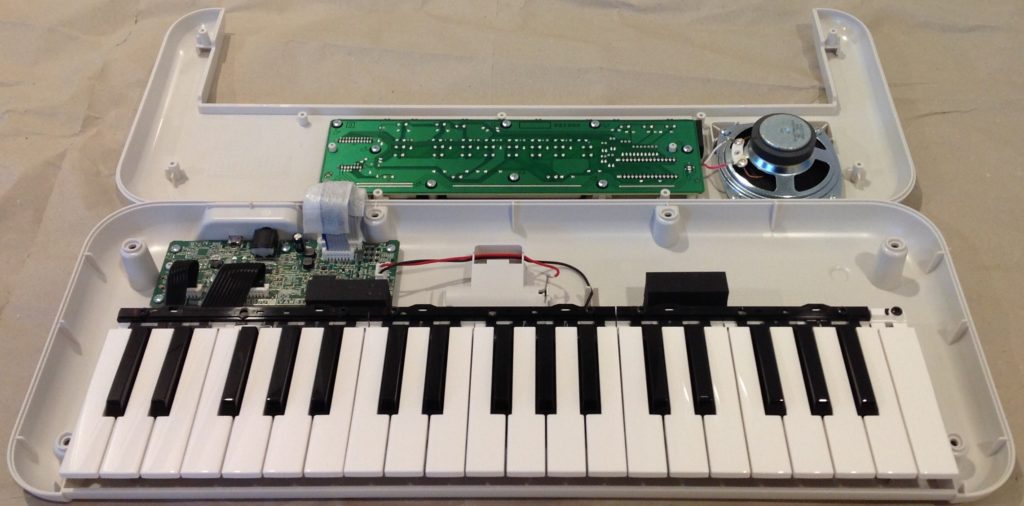
PSS-E30 Remie main board (battery connector at right)
Even better, the A50 main board (DM) has a removable battery connector. If I rustle up a compatible cable and connectors, I can tap into existing battery power without soldering. I was already planning to use a short 3.5mm patch cable to jump the headphone OUT to the Dev Delay IN. Again, no soldering to SMT traces, etc. I like “reversible” mods!
I had enough headaches and scars from soldering mod chips to game console boards back in the day. 🙂
I hope this discussion provided some useful advice — no matter what you mod.
As I mentioned in my PSS-A50 review, the Yamaha PSS-A50 arpeggios date back to the first Motif keyboard (2001). Yamaha — like most manufacturers — recycle content and these arpeggios (arps) have (re-)appeared in several synthesizer and arranger products. The arps even made an appearance in the now unavailable Yamaha Synth Arp and Drum Pad application for Apple iPad.
If you were fortunate enough to buy the Synth Arp and Drum Pad app ($8 USD), don’t throw that joint out the window! As of this writing, the old app still runs on iOS.
The A50 resembles a hardware embodiment of the old arp app. The A50, however, has one trick up its sleeve that the app didn’t have — Motion Effects.
The PSS-A50 Motion Effects add a little animation to performances, arps and playback. There are three kinds of Motion Effects:
Group A: Filter
Group B: Pitch
Group C: Modulation
The filter effects do things like filter sweeps. The pitch group includes pitch bends. The modulation group adds modulation and a little bit of everything else like slicing.
The A50 is an inexpensive little guy with simple synthesis hardware. All of the Motion Effects are implemented through MIDI, keeping hardware cost low. The Motion Effects themselves are based on the MIDI control arpeggios in the original Motif! This bit of recycling keeps development cost ultra-low.
Using a Motion Effect is easy. Select an effect, start playing, and press/hold the MOTION EFFECT button when you want to trigger the effect. The A50 then generates the MIDI needed to make the effect happen. Effects are selected by repeatedly pressing the MOTION EFFECT button while holding SHIFT. (Tip: Hold MOTION EFFECT in order to skip to the next effect group.)
Motion Effect MIDI messages are recorded and transmitted along with note ON/OFF and all the rest of the usual stuff. Thus, the A50 is a bit of an interesting controller as you could use it to add/record pitch bends, etc. to a DAW-based MIDI song or live performance.
Inquiring minds want to know, “How did they do that?” I recorded the MIDI messages produced by each of the Motion Effect types. I simply played a note on the keyboard and hit/held the MOTION EFFECT button. If you would like to hear the results for yourself, here is a ZIP file containing SMFs. Open the SMFs in a DAW and explore.
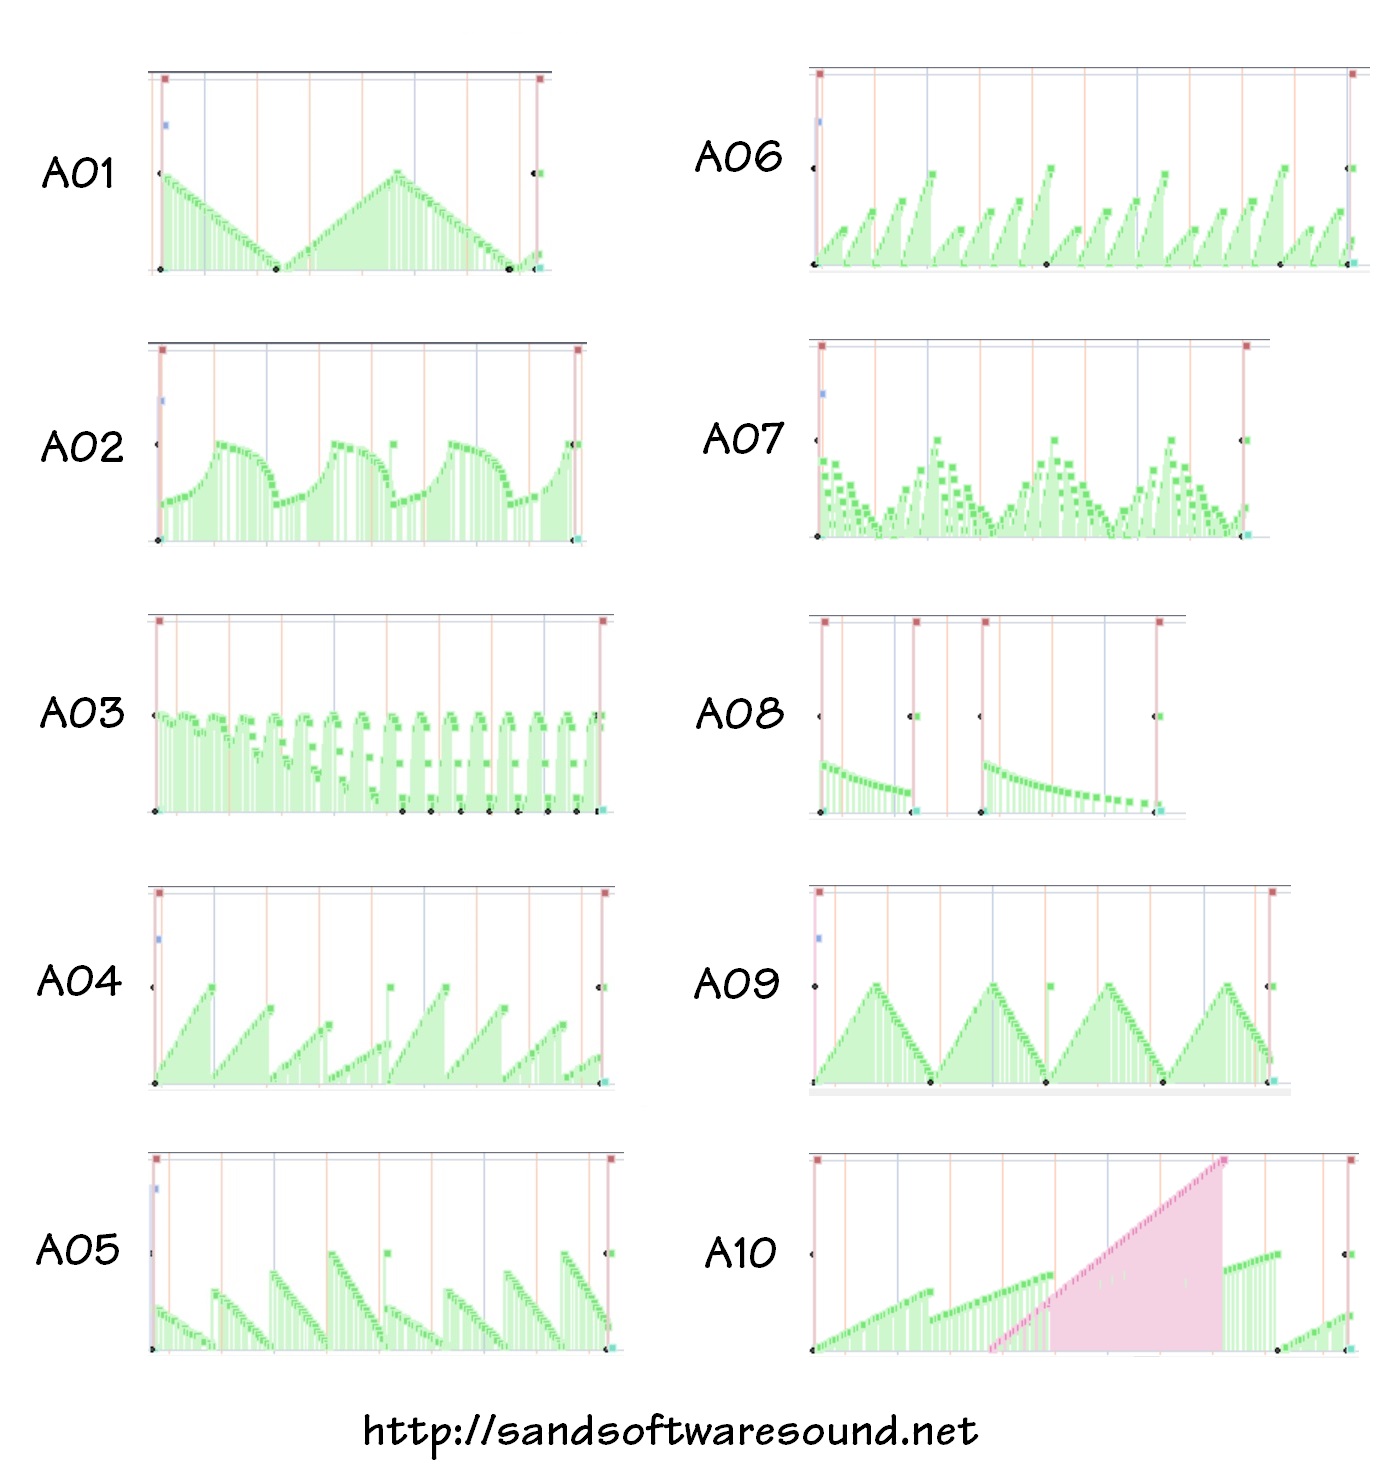
The filter group sends MIDI CC#74 (continuous control) messages. A09 and A10 toss in modulation (CC#1) for a little extra spice:
Since it’s often hard to describe sonic effects in words, here are miniature plots of the MIDI controller data for the filter (Group A) effects. [Click images to enlarge.]
Yamaha PSS-A50 Motion Effects (filter)
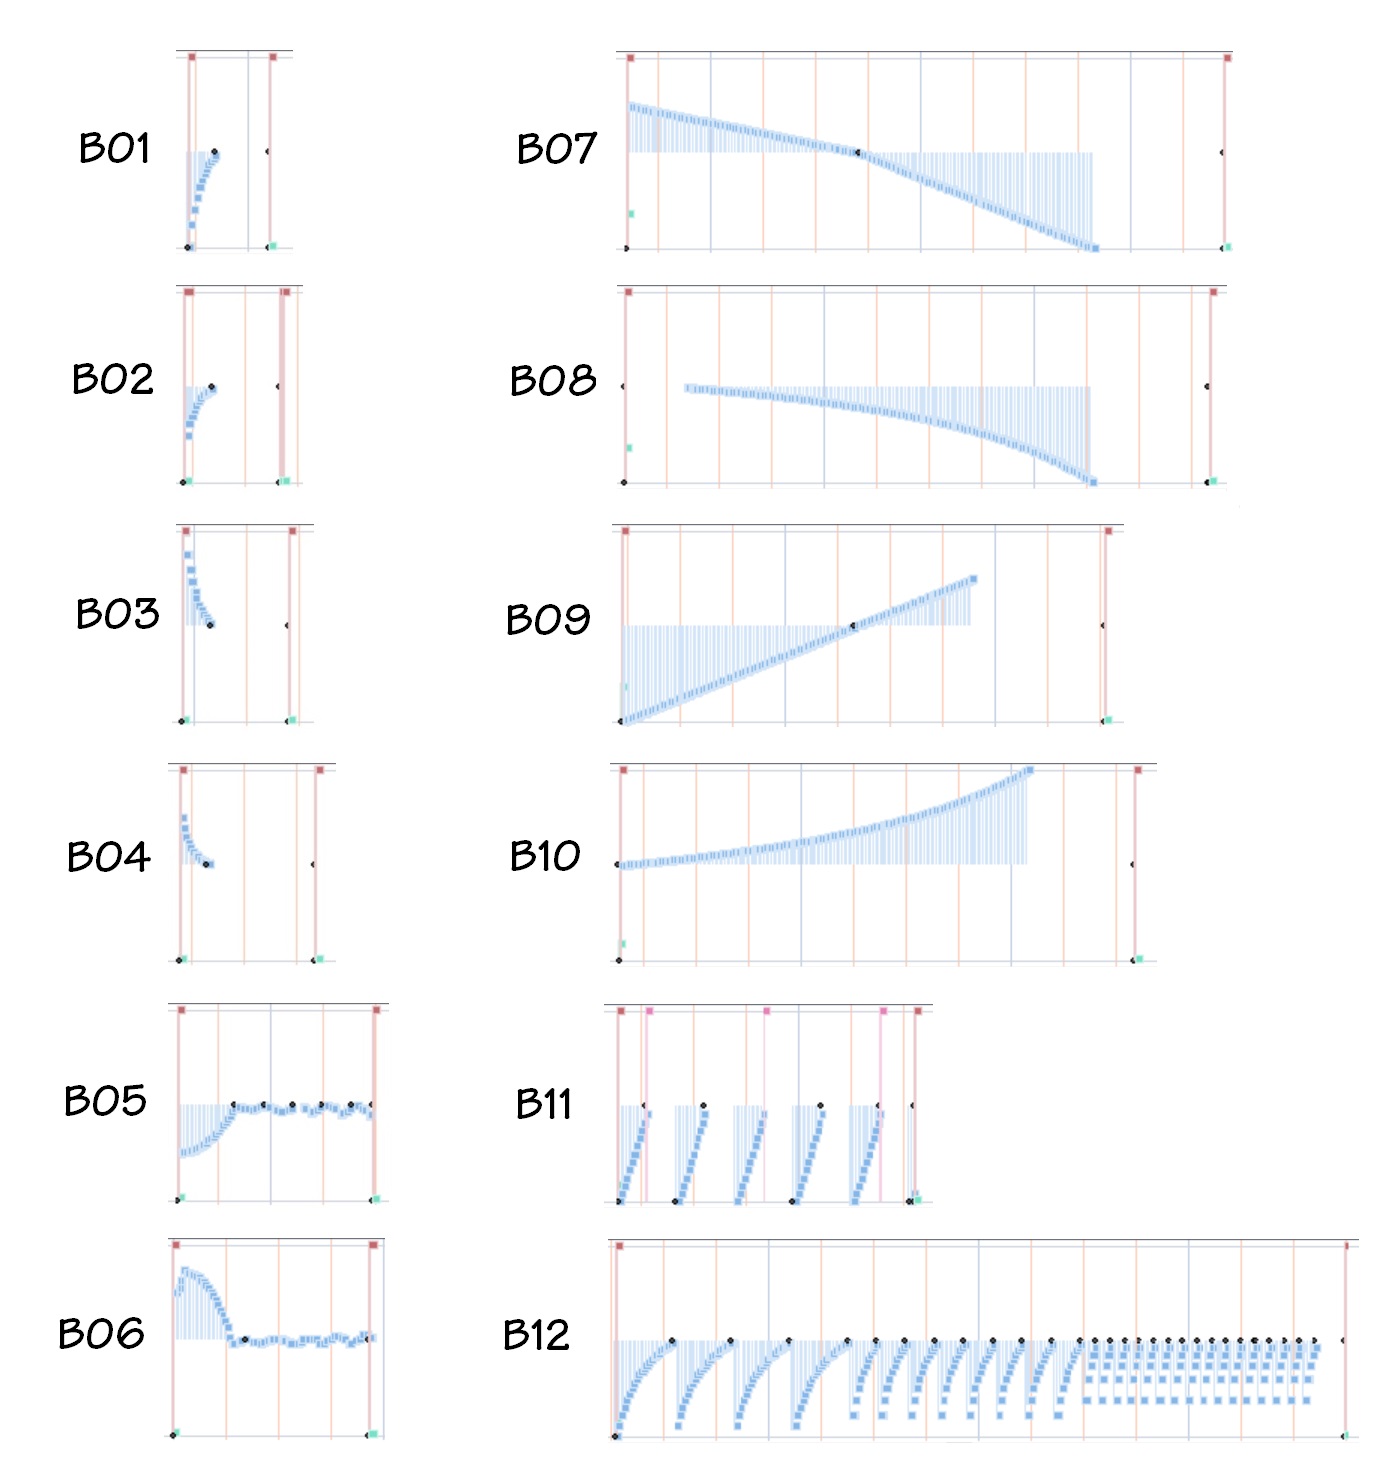
The pitch group sends MIDI pitch bend messages:
Group B PITCH
B01 Pitch Whole-Note Up     PB (wheel)
B02 Pitch Half-Note Up      PB (wheel)
B03 Pitch Whole-Note Down   PB (wheel)
B04 Pitch Half-Note Down    PB (wheel)
B05 Choking Up              PB (wheel)
B06 Choking Down            PB (wheel)
B07 Pitch Down 1            PB (wheel)
B08 Pitch Down 2            PB (wheel)
B09 Pitch Up 1              PB (wheel)
B10 Pitch Up 2              PB (wheel)
B11 Pitch Up + Modulation   PB (wheel), CC#1
B12 Pitch Up 3              PB (wheel)
The first several pitch effects implement guitar-like bends. If you have trouble bending notes with a joystick or wheel, you might want to try the A50. You get a perfect bend every time — maybe too perfect. The plots below illustrate the PSS-A50 pitch (group B) effects.
Yamaha PSS-A50 Motion Effects (pitch bend)
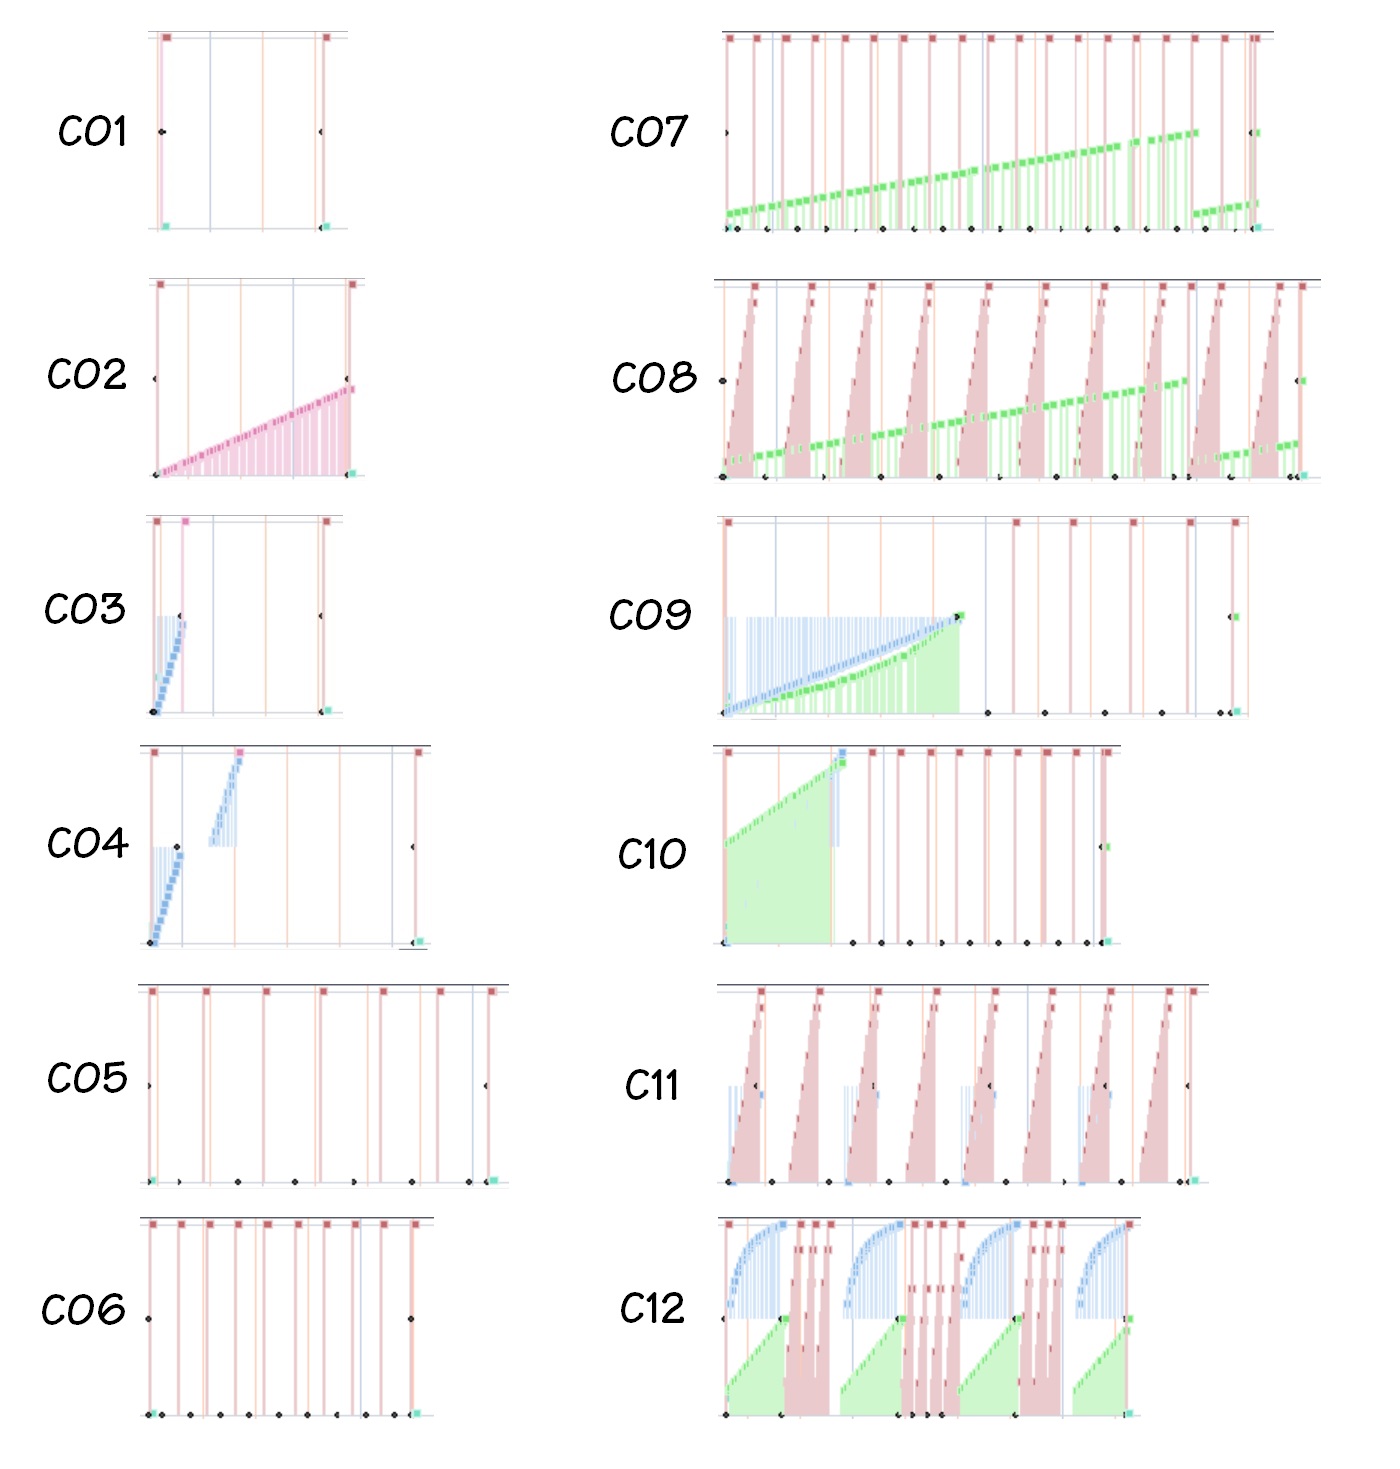
The modulation group has some real variety to it. The simple modulation messages change pitch at a fixed rate; you cannot change the “LFO rate.”
Group C MODULATION
C01 Modulation On 1                 CC#1
C02 Modulation On 2                 CC#1
C03 Pitch Up + Modulation On 1      PB, CC#1
C04 Pitch Up + Modulation On 2      PB, CC#1
C05 Expression Slice 1              CC#11
C06 Expression Slice 2              CC#11
C07 Expression Slice + Filter 1     CC#11, CC#74
C08 Expression Slice + Filter 2     CC#11, CC#74
C09 Pitch Up + Expression Slice 1   PB, CC#11, CC#74
C10 Pitch Up + Expression Slice 2   PB, CC#11, CC#74
C11 Pitch Up + Expression Slice 3   PB, CC#11
C12 Pitch Up + Expression Slice 4   PB, CC#11, CC#74
Slicing implements stutter-like effects using MIDI CC#11 expression messages (alternating volume ON and OFF). The plots below illustrate the modulation (group C) effects.
PSS-A50 Motion Effects (modulation)
Here’s a quick reference guide to the MIDI message types mentioned above:
PB Pitch Bend
CC#1 Modulation
CC#10 Pan (not supported by PSS-A50)
CC#11 Expression
CC#71 Harmonic Content (resonance)
CC#74 Brightness (cutoff)
If you would like more information about the Yamaha PSS-A50 MIDI implementation, check out the basics and advanced topics.
First, the bad news. The PSS-A50 does not have a way to save and restore recorded MIDI data. Thus, you can’t save a song and reload it later.
It is possible to SYNC a DAW (like Sonar) to the A50 and record MIDI data played back by the A50. I accomplished this task rather easily in Sonar. The A50 sends MIDI START, STOP and CLOCK. I simply configured Sonar to accept and sync to the A50. I armed the destination Sonar track, hit Sonar’s record button, and pressed the A50’s play button. Sonar recorded all incoming MIDI data to a single track. Sonar’s selective filtering made it easy to separate data in the track by channel.
Even if MIDI data is recorded to Sonar, there isn’t a way to play it back into the A50. The A50 does not recognize MIDI CLOCK, START or STOP.
Next, I tried MIDI bulk dump request messages. The A50 ignores them — no response. I also tried XG MIDI parameter request messages and they are ignored, too. I’m not too surprised because other entry-level arrangers ignore these kinds of messages, too. [The Yamaha SHS-500 Sonogenic is equally silent.]
In a moment of due diligence, I ran Musicsoft Downloader and it is unable to connect to the A50. Well, for $100, you can’t expect everything!
I experimented with reverb- and chorus-related messages. The A50 responds to MIDI CC#91 Reverb Level and CC#93 Chorus Level messages. However, you cannot change either the chorus or reverb type via standard XG parameter change messages. The chorus and reverb are pretty basic and I’m not really surprised.
In terms of quality, the chorus is just OK. The reverb sounds cheap when it is cranked up. As far as future mods are concerned, I’m inclined to beef up reverb and/or spatial enhancement. The Volca Mix’s enhancer made quite a difference in sound quality. Lacking stereo OUTs, the A50 sound doesn’t have much life by itself. (MIDI-wise, it doesn’t recognize CC#10 Pan.)
The PSS-A50 does respond to MIDI identity request:
F0H 7EH 0nH 06H 01H F7H
In case you’re wondering, identity request and reply are how external software can query and identify external MIDI devices. When the A50 is pinged with an identity request, it responds with:
F0 7E 7F 06 02 43 00 44 27 1F 00 00 00 7F F7 | | | | | | | | | Version | | Model | Family Yamaha
Hex 43 is Yamaha’s manufacturer/vendor code. Hex 44 identifies the device family: arrangers. Hex [27,1F] identifies the specific model within the device family.
I’m itching to examine the PSS-A50 motion effects. That’s the next stop.
To learn more about the Yamaha PSS-A50‘s MIDI implementation, I monitored its MIDI output stream using MIDI Ox and Sonar. Here are my notes. They are quite terse!
After inital start-up, the A50 sends MIDI timing clock and active sensing messages.
The default transmit data and channel settings are:
    Assignment              Ch#
    ----------------------  ---
    Live keyboard:           1    [If OFF, no data is transmitted]
    Live arpeggio sequence:  2
    Recorded keyboard:       3
    Recorded arpeggio seq:   4
Master volume is local. Pressing the Master Volume buttons does not send volume change messages (neither channel volume or MIDI master volume).
Changing Phrase Volume, however, sends channel volume on channel 3 and 4. Legends above keys show setting-related function: what setting, increment and decrement. This is very handy and avoids manual diving. Phrase Volume is changed using the assigned function keys.
Pressing a front panel voice button sends messages on both channel 1 and 2:
    Bank MSB (CC#0)
    Bank LSB (CC#32)
    Program Change (PC)
    Channel Volume (CC#7)
    Reverb Depth (CC#91)
    Chorus Depth (CC#93)
Not all voices have chorus applied and Chorus Depth is not sent for voices without chorus.
The keyboard sends note ON and note OFF messages on channel 1. The mini-keyboard is touch sensitive. it’s difficult to send the full 1-127 velocity range with the default touch response level (level 2).
Pressing the Sustain button has the following behavior:
Sends new release time when sustain button is pressed.
Release time messages are sent on both channel 1 and channel 2.
Turning sustain off resets the release time.
Pressing Portamento (SHIFT+SUSTAIN), has the following behavior:
Sends portamento time and portamento ON/OFF when SHIFT+PORTAMENTO buttons are pressed.
Portamento time and ON/OFF are sent on both channel 1 and 2.
Turning portamento off, sends new portamento status on channels 1 and 2.
Pressing ARP ON doesn’t send MIDI messages! Pressing ARP OFF sends messages on channel 2:
    Bank MSB (CC#0)
    Bank LSB (CC#32)
    Program Change (PC)
    Portamento
    Release Time (channel 1 and 2)
It’s like the A50 software assumes that the arp voice is set-up and ready to go when the arpeggiator is turned ON. Then, the software resets certain parameters when the arpeggiator is turned OFF. The arpeggiator sends note ON/OFF on channel 2 (as determined by the MIDI channel assignments).
Pressing PLAY sends the following messages on channel 1 and 2:
    Start (FA)
    All Sound OFF (CC#120)
Pressing STOP sends the following messages:
    Stop (FC)
    GM Reset (System exclusive)
    Messages to reset voice settings for channel 3 and 4
You can expect to see the following System Exclusive messages after song playback:
I’ve seen these XG MULTI-PART messages on other entry-level arrangers supporting the XG Lite conventions.
For Motion Effect A01 Filter 1, Pressing the Motion Effect button sends
these messages on channel 1 and 2:
    Pitch Bend Sensitivity (RPN 0,0)
    Harmonic Content (CC#71)
    Pitch Bend
    Expression (CC#11)
    Modulation (CC#1)
    Brightness (CC#74)
Harmonic Content (filter resonance is increased to 100). The Brightness (cutoff) messages sweept the filter. Brightness is slowly modulated, i.e., it repeatedly slowly decreases and then increases.
Releasing the Motion Effect button sends messages on channel 1 and 2:
    Pitch bend
    Harmonic Content (CC#71)
    Brightness (CC#74)
    Modulation (CC#1)
    Expression (CC#11)
    Pitch Bend Sensitivity (RPN 0,0)
These messages reset the respective parameters to a default value.
For Motion Effect B01 Pitch Whole-Note Up, pressing the Motion Effect button sends these messages on channel 1 and 2:
    Pitch Bend Sensitivity
    Pitch Bend (center)
    Expression
    Modulation
    Pitch Bend (multiple messages)
The Pitch Bend messages sweept the pitch up then down. Releasing the button resets Modulation, etc. to default values.
Pitch bend sensitivity is sent as an RPN (Registered Parameter Number) message:
    RPN (CC 0x64, CC 0x65)
        0,0 Pitch Bend Sensitivity
The Motion Effect feature is similar to something I built into my two-button Arduino-based MIDI controller. It’s a way to add articulation to live playing. I always wanted a way to play perfect pitch bends. 🙂
I was able to save my recorded MIDI data to Sonar. The A50 insists on sending MIDI clock, START and STOP, so I configured Sonar to receive and respond to external clock. The recorded MIDI data is sent on channels 3 and 4. Thanks to Sonar’s channel selection feature (via event filtering), I could separate the channel 3 and 4 data into two tracks. Another possible solution is to write the data as a MIDI Type 0 SMF and then read the SMF into Sonar. Sonar should separate the channel data into different tracks.
The Yamaha PSS series keyboards are inexpensive, entry-level instruments which are super lightweight, battery powered, portable and fun. The PSS line is like a small group of fantasy characters where each character has its own super-powers.
PSS-E30: A musical game keyboard for younger kids.
PSS-F30: “Honey, I shrunk the arranger” keyboard for people who want to play songs with an accompaniment.
PSS-A50: A phrase-based music machine which records and speaks MIDI over USB to your DAW or other computer- or table-based music applications.
Last year, I reviewed the Yamaha PSS-E30 Remie and passed it along to our grandson as a Christmas gift. Remie is suitable for young kids, but even Mom and Dad have fun with the musical games.
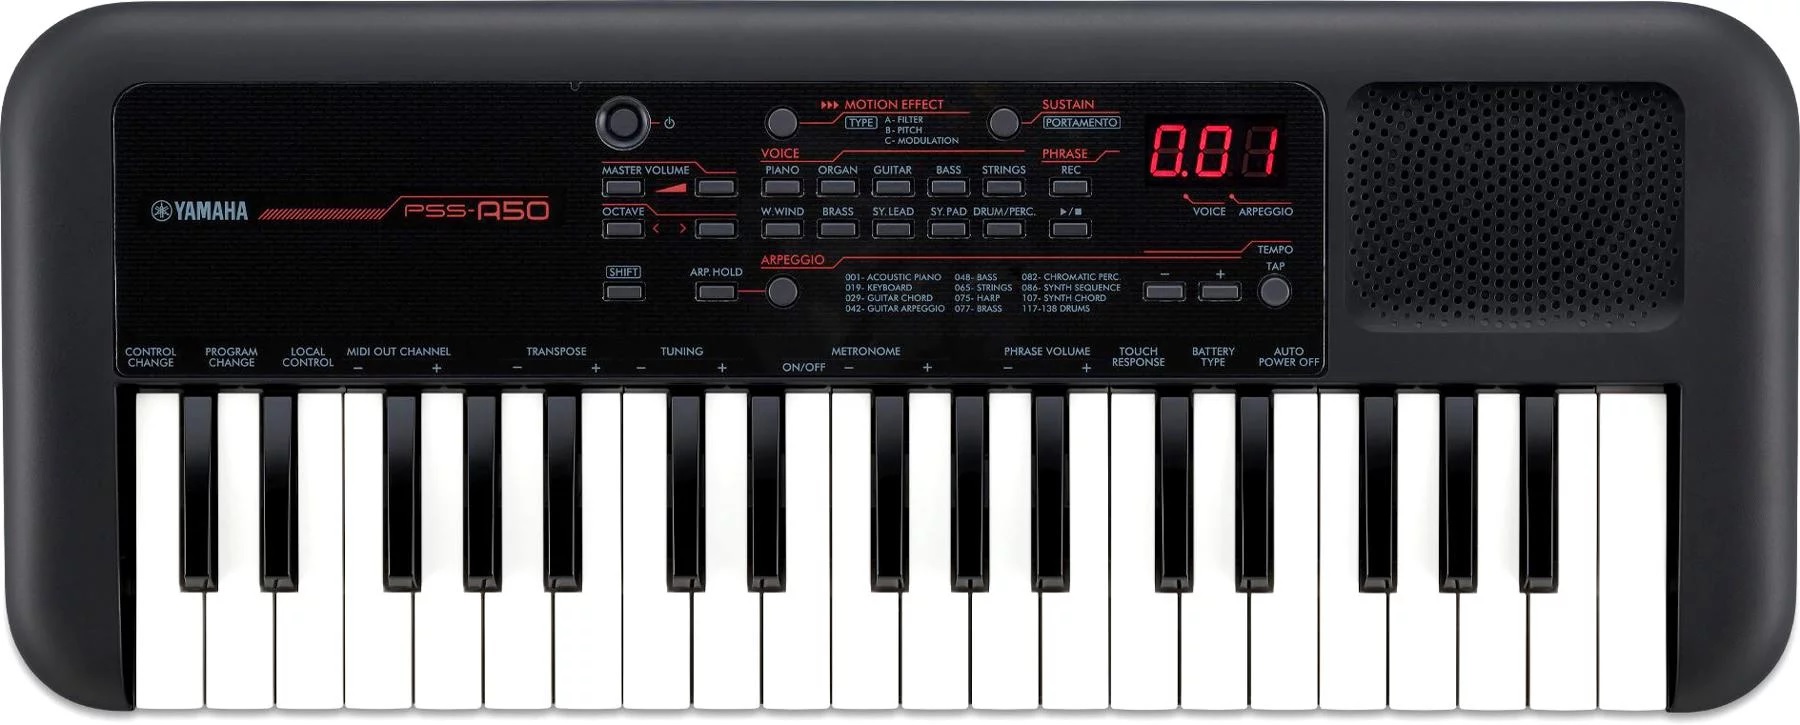
Yamaha PSS-A50 keyboard [Click to enlarge]
The PSS-A50 (henceforth “A50”) is aimed at people who want more flexibility than the fixed accompaniment styles in the PSS-F30. The A50 has 138 musical phrases — “arpeggios” in Yamaha-speak — that drive an in-built arpeggiator. Twenty-two arpeggios are drum patterns; the rest of the arpeggios are melodic, covering both instrument-specific riffs (strums, bass lines, chord comps) and general purpose phrases like up/down broken chords, etc.
Experienced Yamaha players have seen these arpeggios before. In fact, the A50 reminds me of the Yamaha Synth Arp & Drum Pad iOS application. Without getting into the details, you select a voice, select an arpeggio (“arp”), enable the arp, hit record, and go. If you check out Yamaha’s YouTube tutorials, you’ll see how easy it is to get started.
At this point, I suggest watching Keen On Keys excellent video. It covers all the basics, a brief teardown, and more. I won’t go into such details here. (This chap did a terrific job!) I learned quite a lot from this video including basic “how to use it” information.
Oh, how I long for such reviews in Electronic Music (once Keyboard mag), once again. Ken Hughes, where are you? After reading one of those old product reviews, you actually knew a little about playing the instrument. Now, pfffft!
The sounds
Let’s get down to brass tacks. Like Remie, you won’t get Yamahas top sounds. Shucks, it’s only $100 USD (street price).
Truth be told, even though I regarded the A50 as a candidate for mod projects, I wasn’t too wild about the sounds that I heard in on-line demos. I was hesitant to buy one. Once I got the A50 under my fingers, however, I warmed up.
Basically, the A50 and Remie samples and synth engine are at the same level. The A50 adds touch sensitivity and that, I suspect, makes the difference. Sure, the piano (for example) is uni-dimensional and you can hear it play the same sample louder or softer depending upon strike velocity. The overall effect is more musical, however. Weird how that works?!
The A50 audio OUT is mono. Reverb seems to be the only system effect. Even Yamaha’s cheapest chip implementations have chorus, so it may take a little MIDI magic to unlock that door. The whole sound can be sweetened by out-board effects like maybe a guitar pedal (e.g., TC Electronic Hall of Fame reverb) or a spatializer. I slung an A50 beat through the Korg Volca Mix stereo width and compression effects and got a rather nice result. The Volca Mix Hi/Lo Cut let me isolate the tops and kick, too. I strongly recommend adding external effects.
The A50 motion effects let you juice up your performances. I’m still exploring the motion effects and I’m glad to have them. The motion effects add a way to vary the sound during performance, avoiding a uni-dimensional sound. You get filter fun, pitch bends, slicing and all sorts of sonic mayhem. A few effect types would be good for Hawaiian pedal steel. 🙂 It would be nice to leave the auto wah ON in order to play two-handed funk — a small quibble.
The A50 size, features and price invite comparison against the Yamaha SHS-300 and SHS-500 Sonogenic. Unless you really want the keytar format, I don’t see the value in the SHS-300 versus the A50. I will bet dollars to donuts that the SHS-300 is based on the same chip and samples as the A50. Personally, phrase recording is more fun and creative than a pretend, low-budget, cheap build keytar. Speaker quality is probably a wash between the two and the A50 puts out 1.5W versus 0.7W.
The A50 against the SHS-500 is another story. The SHS-500 voices are definitely better quality. Although the SHS-500 LINE OUT is mono, you can look to its PHONE OUT for stereo. The SHS-500 has PSR E-series DSP effects, three forms of MIDI (USB, 5-pin, and Bluetooth), a General MIDI sound set (available via MIDI only), and jam mode integration with Chord Tracker. The SHS-500 beats the A50 on sound. On the other hand, I prefer the A50’s speaker versus the SHS-500. Of course, the SHS-500 is mainly for playing and doesn’t have an arpeggiator or recorder.
Build quality
One big factor is build quality. The SHS-500 is a solid instrument. The SHS-300 and A50 are cheap. Even though Yamaha specs call out “37 HQ (High Quality) mini keys” for all three keyboards, only the SHS-500 is up to the same quality as the Yamaha Reface series. Yamaha marketing may claim otherwise, but you can feel the difference. The Reface and SHS-500 will stand up to abuse — the SHS-300 and A50, not so much.
As to A50 build quality, the electronic boards and cabling look up to snuff. EMI shielding is absent. Audio quality on battery power or external USB power adapter is good and is reasonably quiet. Powered by my HP desktop, the A50 is susceptible to digital schmutz and produces loud noise through its audio out. One could put blame on the desktop, but nearly all computer switching power supplies are dreadfully noisy. USB powered instruments need better filtering on USB power rails.
In use
I want to use the A50 as a looper: put down a rhythm line and a bass, then jam. It takes a little bit of practice to make glitch-free loops. I wish the A50 applied “measure quantize” to recordings, that is, trim recordings to a clean measure timing boundary. Right now, you have to turn off recording by feel and hope you get it right.
While horsing around with MIDI (another subject for another day), I noticed that the A50 has four parts, each on its own MIDI channel:
Keyboard voice: Live, real time performance (Default: channel 1)
Arpeggio sequence: Live, real time arpeggiation (Default: channel 2)
Recorded keyboard: Recorded keyboard performance (Default: channel 3)
Recorded arpeggio sequence: Recorded arpeggio (Default: channel 4)
Hmmm, this makes me wonder if I can layer up to four parts? So far, I can layer 3 distinct musical parts. The fourth part is still elusive.
The main problem is no overdub. It is possible to record two parts at once: arpeggio plus keyboard performance. Thus, you can lay down a drum pattern (arpeggio) and a bass line (by hand). Then, loop the playback and play over the top. Seems like I should be able to add a live arpeggio to the stack.
Play the bass line over the drum pattern. Start playing in time with the drum pattern.
Press REC to stop recording.
Turn the arpeggiator OFF.
Select a piano voice (e.g., voice 2).
Press SHIFT+PLAY to start a looping playback.
Jam over the playback.
Press STOP to stop playback.
Recording doesn’t start until you begin to play the bass line. That locks the bass to the drum pattern. You need to stop recording just before the next loop iteration begins.
If you need some jazzy chords, try: GM7/E, Fm7/B, FM7/D, Em7/A (also notated as Em9, Bm11, Dm9, Am11).
Doggone it, seems like I should be able to layer live arpeggiator into that mix! I’ll keep trying.
Update: Practice makes perfect. Yes, you can get four lines going. I recorded drum and electric piano following the procedure above. With the recorded parts playing, I started a looping bass arpeggio. Finally, I solo’d over the three running parts. Neat, and as complex as you might want for a little practice jam.
Questions
As I begin to explore the A50 MIDI implementation, there are a number of unanswered questions. First and foremost, can I save and restore recorded MIDI data? Does the A50 respond to SysEx messages for reverb and chorus type? Can I drive the A50 with the old Synth Arp and Drum Pad application and make use of its range of arpeggios? Can I load my own simple backing tracks into the A50’s recorder memory?
The final word
After my initial reluctance, I’m glad that I bought the PSS-A50. Apparently, some folks aren’t so happy as A50s turn up as Open Box items quite frequently. Even though $100 is not much, you can save a few extra bucks if you’re willing to buy an open box item. Given the build quality, you might not want to chance it, tho’.
The A50 does not have a full General MIDI sound set. The sound set is close enough for rock and roll, however. Here is an MP3 of the A50 in action (Traffic’s Feelin’ Alright). Wish I could play that piano solo at the end …
Interested in more PSS-A50 content? Check out these posts:
Here are a few experiments testing littleBits audio post-processing. In the first few cases, audio is produced by a Yamaha SHS-500 synthesizer fed into the LINE IN of a littleBits Microphone module. Outgoing audio is sent through a littleBits Speaker module connected to an external amplified speaker.
I did not draw the littleBits Power module into every example circuit. If you’re experimenting at home, hey, “One, Two, you know what to do…”
The first circuit filters incoming audio:
          PowerSnap
              |
              V
           Envelope <-- Button <-- PowerSnap
              |
              V
    Mic --> Filter --> Speaker
The Filter modulation input is driven by a littleBits Envelope module. The (audio) input of the Envelope is connected to a littleBits PowerSnap which supplies a constant +5 Volts to the input of the Envelope. A littleBits Button module is connected to the Envelope’s trigger input. (The second PowerSnap assures a full 5 Volt ON signal through the Button.) The Envelope sweeps from 0 to 5 Volts when the Button is pressed. Of course, the Envelope is shaped by its attack and release settings.
The first circuit operates successfully. The audio is filtered according to the Filter’s cut-off and resonance settings. The Filter quacks (a very scientific term!) when the Button is pushed.
The second circuit replaces the Button with a littleBits Pulse module:
          PowerSnap
              |
              V
           Envelope <-- Pulse <-- PowerSnap
              |
              V
    Mic --> Filter --> Speaker
The Pulse module repeatedly sends a trigger signal to the Envelope module. The triggers cause the Filter to quack correctly. However, there is an audible click when the Pulse module fires — even if no audio is playing. This noise is unacceptible and I don’t know why it is occurring. Power glitches perhaps?
At this point, I began experimenting with the littleBits Threshold module. The (third) simple test circuit below:
Power --> Dimmer --> Threshold --> Number
demonstrated that my intuition about the Threshold behavior is correct: when the voltage into the Threshold exceeds the threshold setting, the Threshold turns ON and outputs +5 Volts. When the input voltage falls below the threshold setting, the Threshold output turns OFF (0 Volts).
Testing tip: The Number module has a “Voltage” setting in which Number displays the incoming input voltage. You can use a Number module as an in-circuit volt meter.
Given that, I couldn’t determine why the Threshold was not acting like a gate generator when driven by a littleBits audio signal, i.e., driven by the Microphone module in its “Sound” setting. Turns out, the littleBits Microphone module converts the incoming LINE IN signal into its own notion of audio — a signal centered around 2.5 Volts. I connected a Bargraph (or Number) module to the output of Microphone, and indeed, the Microphone sends 2.5 Volts when the audio is silent.
Arg! Once again bitten by the lack of signal documentation! When the Microphone is in its “Other” setting, it converts the input signal to swing from 0 to 5 Volts. Bad news, however. The Speaker module expects audio in the 2.5 Volt centered, littlebits convention and it distorts like a bandit when driven with the “Other” setting.
The 2.5 Volt convention also explains why some folks have observed only a 2.5 Volt sweep in the Envelope output. All of this has serious implications when mixing audio and control signals in littleBits. I need to think about this for a while…
The fourth test circuit demonstrates filtering of regular line level audio:
                              Powered Speaker
                                  LINE IN
                                     |
    Power --> Proto --> Filter --> Proto
                |
           Synthesizer
            LINE OUT
This circuit filters incoming audio. Fortunately, the 2.5 Volt convention does not preclude a simplified signal chain, that is, a chain omitting the littleBits Microphone and Speaker modules. A filter is a filter is a filter, I guess.
Although the Filter module operates on a “regular” audio signal, the Delay module does not. Substituting the Delay module into the fourth test circuit produces nasty noise and a whine. It will process the audio (you can hear repeats, etc.), but the noise/whine is horrible. Screams like a banshee. Bummer.
Bottomline, the littleBits Filter module has potential as an add-in for a PSS-A50 mod (or any other mod) without Microphone and Speaker modules. The littleBits Delay is simply too noisy by itself; one needs the Microphone and Speaker to perform signal conversion. As to the Filter, I need to explore alternatives for modulation. Experiments with using the Oscillator module as an LFO were underwhelming. So far, I haven’t successfully cobbled together an envelope following or audio-trigger envelope. Stay tuned.
I’m still thinking about Yamaha PSS mods, most notably, the PSS-A50. Open box A50s are coming on the market and I get the itch to modify an A50. I don’t want to buy a brand new unit since I will immediately tear into it with a screwdriver, drill, and worse! 🙂 Here’s a few more thoughts.
After looking at the PSS-E30 Remie teardown, that speaker has got to go. Even without the speaker, I don’t think there is enough room for the Korg NTS-1 as I first planned.
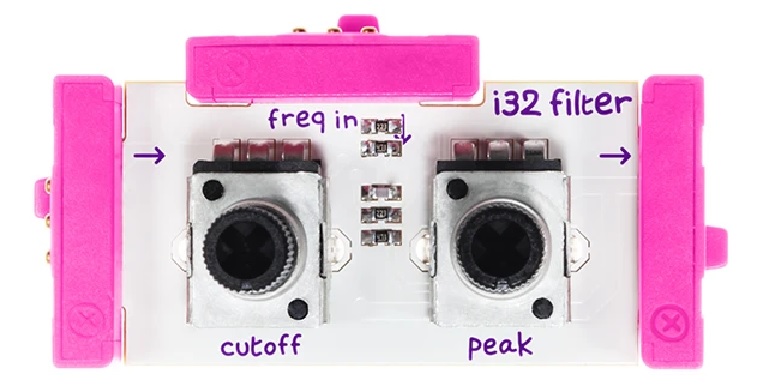
littleBits filter module
Second-besties, I’m considering a littleBits solution. Lots of folks mod the Korg Monotron to get access to its filter, but oddly, they don’t consider the littleBits filter module. I did a few preliminary experiments with the filter and delay modules using the Yamaha SHS-500 Sonogenic as a stand-in for the PSS-A50 sound generator. The filter and delay sound great although I need to add an envelope generator to make the filter quack and bark.
My main concerns at this point are:
Driving littleBits audio without the Microphone module and the Speaker module. Both modules would take up unnecessary space. I’m just don’t know (yet) if regular headphone levels are strong enough for the littleBits 0 to +5 Volt signaling convention.
Physically and electrically securing the littleBits modules to themselves and the A50 chassis.
Finding 5 volt power in the A50 in order to supply the litleBits modules.
Of course, there’s the problem of mounting the littleBits modules so that the controls (potentiometers) poke through the A50 speaker grill.
I investigated the PSR-F50 audio and digital electronics. The PSS audio amp is mostly likely different than the F50. So, I need to get the A50 service manual. The service manual should help me find the +5 Volt rail, too.
I took another look at the Yamaha YMW830-V processor pin-out. The YMW830-V is also known as the “SWLL” processor. It is a system-on-a-chip (SOC) containing the CPU, memory, and tone generator. The SWLL has five pins (TRST, TDI, TMS, TMS, TCK, and TDO) for serial input/output — most likely USB. This doesn’t bode well for people who want to add 5-pin MIDI to the A50 (or other SWLL-based keyboards).
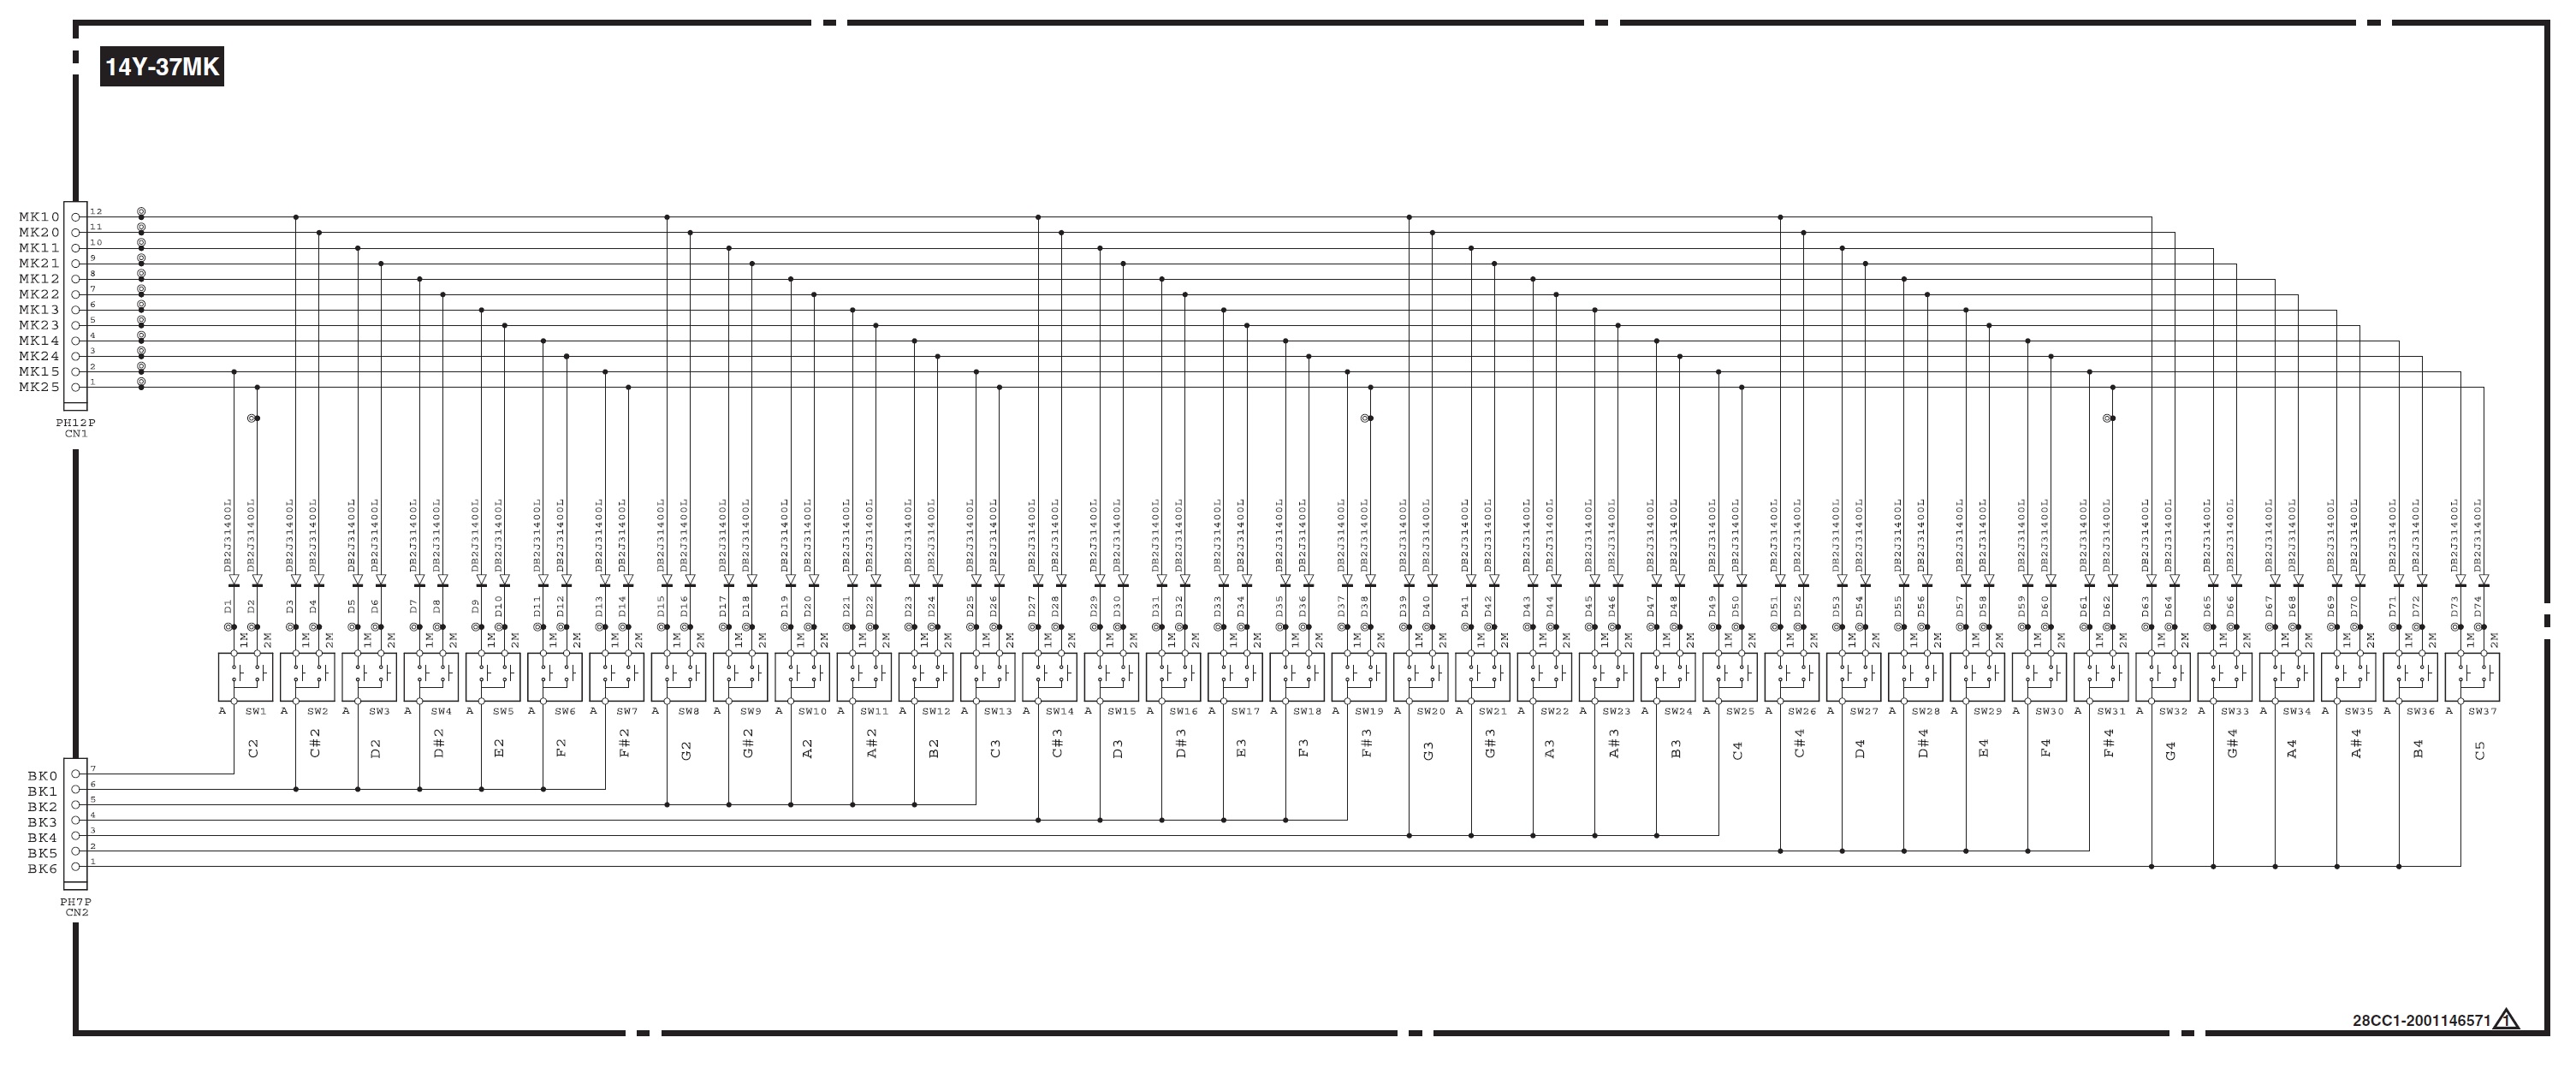
Reface YC key scan matrix
The PSS series, the Reface series and the SHS-500 share the same 37-key keybed. The key switch matrices are similar. They all break the key range into groups of six keys. Each keybed is a 6 group by 6 key matrix with a dedicated group to scan the fourth C key. The PSS and Reface/SHS differ in the number of key contacts as the Reface/SHS are velocity sensitive and the PSS is not. The Reface/SHS have two contacts per key and the PSS has one contact per key. The Reface/SHS have a total of twelve sense lines (2 lines per key) while the PSS has only six sense lines.
6×6 must minimize ribbon cable width or something because Yamaha will subdivide 61 keys into upper and lower banks in order to deploy six keys per group with 6 groups per bank maximum. You’ll see this practice in the synth product line, too. Just sayin’.
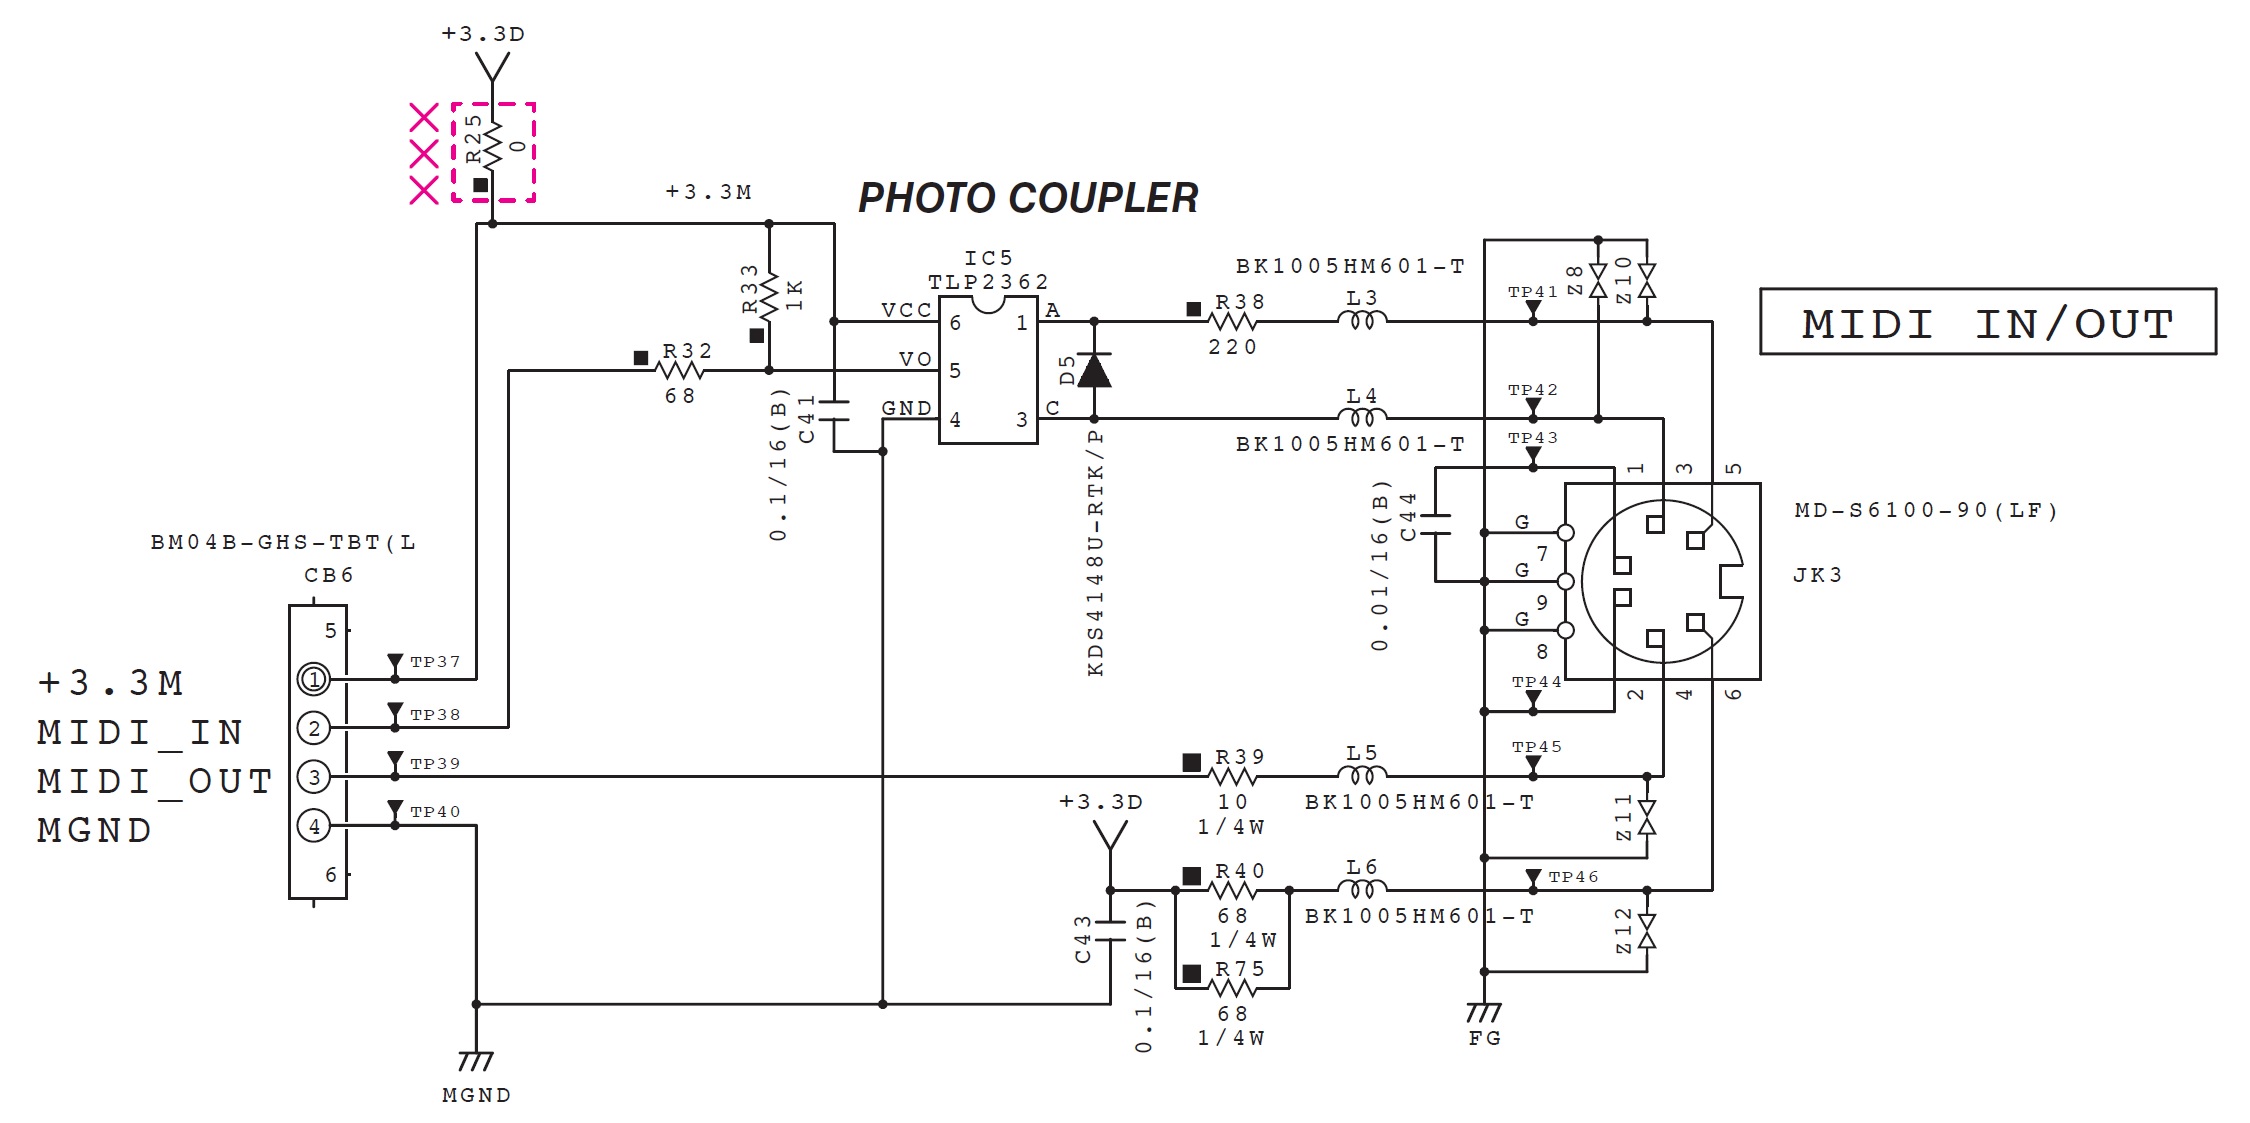
The Yamaha SHS-500 and Reface series use the same MIDI I/O dongle. I came across this rather nice diagram (below) of the SHS’s MIDI port. It should help you to whip up a custom cable or two. [Click image to enlarge.]
I made a little more progress delineating Yamaha’s mini-key product lines. The PSS series is built for low manufacturing cost. Thanks to PSS-E30 (Remie) and PSS-A50 tear-downs, we know that the PSS series is based on the ultra-small, relatively inexpensive SWLL (YWM-830) processor.
So, what to make of the Yamaha SHS-300 and SHS-500 keytars?
The SHS-300 shares the same basic spec as the PSS series: 32 voice polyphony, 8cm speaker, only one effect (reverb), no MIDI, no Bluetooth, etc. Sound quality is comparable to the PSS series. I suspect that the SHS-300 is based on the SWLL, too.
The SHS-500, however, has a much better spec: 48 voice polyphony, MIDI and audio over USB, MIDI over Bluetooth BLE, 9 DSP effects, Master EQ, chorus, reverb, etc. A glance at the SHS-500 service manual shows that the SHS-500 has much in common with the current PSR E-series keyboards, including the SWX03 processor.
If I get the time, I’ll write a quick post about SHS-500 internals.
The SHS-500 is definitely a cut above the SHS-300 in build quality, sound, MIDI capability and tweak-ability. I’m sorely tempted to take a bite of the apple. NAMM, however, is fast approaching (16-19 January 2020) and good sense tells me to wait. Yamaha’s pre-show press release promises 75 new products including a new family-oriented home keyboard.
Product personality is determined by the plastic skin/parts, software in the embedded serial ROM, and the addition/absence of the USB interface integrated circuit (IC). There may be a few other minor differences, but it would be difficult to pin them down without the service manuals. Speaking of which, if you start a mod project, I strongly recommend reading the PSR-F50 Service Manual because the F50’s guts are very similar to the PSS series.
Unless you really want the F50 or E30 voices and functionality, the A50 is the best choice for a mod. The A50 has the USB interface IC and the necessary firmware supporting MIDI over USB. The A50 has a higher street price than the other models, but USB MIDI is worth it.
At the 100,000 foot level, there is plenty of empty space inside for a small microcontroller (e.g., Arduino) or sound mangling analog electronics. You could choose to either keep the speaker if you want portable sound or ditch the speaker and go solely with the headphone output to external amplification.
If keep the speaker, you could easily add some sound mangling circuits like a filter or effects. The littelBits filter might be a good start and is certainly small enough to fit in the empty space. Should be easy to tap into battery power as the battery leads are exposed.
If you ditch the speaker, you have a lot more space to work with. I’d be tempted to add the Korg NTS-1 once it’s available. The NTS-1 can process external audio and has digital effects. Previews have given the digital effects high marks. Unfortunately, the NTS-1 is spec’ed 12.9cm by 7.8cm by 3.9cm, which won’t fit directly into a PSS case. A lot depends upon the size of the NTS-1 electronics board. Even if we can’t fit the NTS-1 into a PSS case, the NTS-1 would be a nice complement to the A50.
Without the speaker, one could use the front panel real estate for additional controls. With all of the arpeggios and such, manual control over filtering and effects would be welcome (in addition to the A50’s fixed motion effects).
At the 50,000 foot level, any one of the PSS models could be stripped down for parts. The case and front panel may or may not float your boat, but you could use the shell and front panel for a keyboard project of your own. It would be easy to apply new graphics to the front panel. The front panel buttons are a switch matrix which can be easily mapped out and then scanned by your code. The front panel has a three digit 7 segment display that needs to be multiplexed and driven.
The keybed is quite useful. The keys are affixed to the bottom of the case, so unless you’re reusing the case, too, you probably will need to cut the keybed out of the case, leaving everything as a unit. The keys sit above a printed circuit board (PCB) with the rubberized switch contacts.
Reface YC switch matrix
I’ll make a leap of faith here and assume that it’s the same keybed as Reface. The schematic above is taken from the Reface YC Service Manual. The key matrix has seven select lines (BK0 to BK6) and twelve sense lines (MK10 to MK21). Your software needs to drive one of the select lines and immediately read the sense lines. There are two sense lines per switch for the “lower” and “higher” key contacts. Software can determine key velocity by measuring the time between contact closures for an individual key.
The most tasty enchilada is the digital logic (DM) board. The A50 board, in particular, could form the basis of a USB MIDI tone module. One could add 5-pn MIDI by bridging a 5-pin DIN and the USB micro-B port. The DM board is quite small: 13.5cm by 4.5cm. And clearly, the DM board can be battery powered. Even if you re-housed the DM board and front panel board, you still would get a very compact module.
Modding at the 10,000 foot level gets difficult. There are the usual difficulties tracing signals and soldering surface mount (SMT) devices and signal paths. Even if you strip out the SWLL (YMW-830) integrated circuit, I’m not sure what you would do with it!
Nor am I confident that the firmware can be easily by re-engineered. Yamaha have never documented wave chip internals, so you don’t have much guidance. There isn’t much code — firmware and waveforms reside together in the 2MByte serial ROM. I would guess that the firmware is SH architecture. Even so, reverse engineering would be a difficult task. I have my doubts about repurposing the code. At best, one might be able to add or change the waveforms?
Personally, I’m inclined to go the sound mangling route.
A few more thoughts before closing.
The A50 is not a General MIDI module. If you want a (mostly) GM/XG compatible Yamaha tone module, I suggest the Pocket Miku NSX-39. Also, while stumbling around the web, you might want to check out the Yamaha YMF-825. It’s a 4-op FM chip which Yamaha released for makers.
With Yamaha PSS-E30 Remie at hand, I’m still comparison shopping the PSS series against the Yamaha SHS-500 Sonogenic. The Sonogenic has better build quality, has 5-pin MIDI as well as MIDI over USB/Bluetooth, and integrates with Chord Tracker.
Then there is the issue of sound quality. Remie and the rest of the PSS series (PSS-F30 and PSS-A50) have only one main DSP effect: reverb. With the exception of the A50’s motion effects, there aren’t the means to tweak sounds.
As to preset voices, I would love to play Remie and Sonogenic side by side. However, in this day and age when brick and mortar stores do not stock inventory or demo units, that’s impossible. Gosh, I ordered Remie from the UK — I live in the big Seattle USA metro area — with the intention of gifting it to our grandson. (A good excuse. 🙂 ) The PSS series keyboards are so inexpensive that even an impulsive purchase is justifiable. I still haven’t seen a Sonogenic alive in the wild and don’t have hand-on experience with it (yet).
First some tech-head stuff. Remie has 32 voice polyphony and my teardown shows that it is based on the tiny Yamaha SWLL (YMW-830) system-on-a-chip (SOC). It stores its program and waveforms on a 2MByte ROM. Right away, I expect Remie’s sound quality to be compromised with respect to the current PSR E-series.
The current PSR E-series is based on the proprietary Yamaha SWX03 processor. The SWX03 is a much larger SOC with external RAM, ROM, digital to analog conversion (DAC), analog to digital conversion (ADC), and LCD display interface. The program/wave memory is 32MBytes (Spansion S29GL256) much larger than Remie. The SWX03 supports 48 voice polyphony and 10 DSP effects in addition to the usual PSR E-series reverb and chorus. Thus, I expect better sound quality from the E-series.
The SHS-500 also has 48 voice polyphony and 10 DSP effects. These characteristics alone make a strong case for the SWX03 as the main engine within the Sonogenic.
The Japanese demo gets rolling roughly 3:30 in. Our jazzer compatriot plays through the presets without a backing track or lots of effects. This is as close to factory stock as one can get. Thank you! Here are direct links to some of the Sonogenic instruments in the video:
These sound pretty good and much better than Remie. The electric piano can bark! The jazz guitar is decent. Many of the brass and woodwind instruments have vibrato sampled in.
The Sonogenic program change table gives us a major clue about the origin of the Sonogenic voices. Most of the Sonogenic voices match up with the PSR series:
 SHS-500            Bank  Bank
 Sonogenic           MSB   LSB  PC#  PSR/Genos voice
 -----------------  ----  ----  ---  -----------------------
 Saw Lead 1          104    20   91  Gemini
 Saw Lead 2            0   104   82  RS Saw Lead1
 Quack Lead            0   112   85  Portatone
 Bright Decay        104    21   85
 Square Lead           0   112   81  Square Lead
 Under Heim          104    51   88  Under Heim
 Analogon            104    52   82  Analogon
 Synth Brass           0   113   64  Ober Brass
 Electric Piano      104    28    5
 DX Electric Piano     0   112    6  DX Modern
 Electric Guitar     104     3   31
 Jazz Guitar         104     0   27  Cool! Slide Jazz Guitar
 Acoustic Guitar       0   117   26  Steel Guitar
 Electric Bass       104     6   34
 Slap Bass             0   112   37  Slap Bass
 Synth Bass            0   112   39  Resonance Bass
 DX Bass               0   118   40  DX100 Bass
 Piano                 0   112    2  Bright Piano
 Piano & Strings     104    39    1
 Piano & Pad         104    40    1
 Air Choir             0   112   55  Air Choir
 Strings               0   116   49  Bow Strings
 Brass                 0   117   63  Pop Brass
 Trumpet               0   115   57  Sweet! Trumpet
 Flute                 0   115   74  Sweet! Classical Flute
 Alto Sax            104     2   66
 Tenor Sax           104     3   67
 Harmonica             0   112   23  Sweet! Harmonica
I verified the matches by comparing the YouTube video against the same voices on Genos. (Removing the Genos effects, of course.) The blank spots in the table are voices which Yamaha re-sampled from PSR or elsewhere. That’s why the electric piano is so darned good. The piano layer voices have a warmer, mellower timbre than the Bright Piano (which really lives up to its name).
So, there you have it. On the basis of sound quality, the Sonogenic SHS-500 wins over the PSS family. Yes, the Sonogenic is more expensive, but you do indeed get more for the money. If Sonogenic had even a single organ voice, it would be a no-brainer and I would have bought one by now. Oh, Yamaha, why do you leave these things out?