Free DJX-II styles/patterns for PSR/Tyros

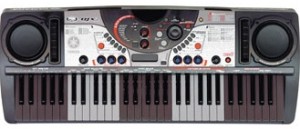
Once upon a time (around the year 2000), Yamaha was into beat boxes and other spiffy tools for creating dance, hip hop, and other forms of “electronic” music. The DJX-II groove machine was an entry-level keyboard designed for budding DJs and musicians. It combined a funky looking 61-key keyboard, pattern-based sequencer and basic sound engine into an all-in-one, battery-powered instrument with built-in amplifier and speakers. Genres included techno, trance, garage, hip hop, old skool and trip hop.

DJX-II

The musician or DJ could select from 70 preset patterns, each pattern with ten variations. The variations were further categorized into six MAIN patterns and four FILL patterns. The keyboard was divided into five 12-key zones where each octave performed a specific performance function. One of the zones selected the current variation allowing the player to switch between pattern variations. Another zone transposed the pattern into the current root key.

Yamaha still makes the original DJX-II patterns available through its support site. Each of the files is a standard MIDI file (SMF) containing a single pattern. Although they are in SMF format, the files are not immediately useable. The rhythm tracks are programmed for some truly ancient and arcane Yamaha drum kits, none of which adhere to GM or XG layout conventions. Further, the files cannot be imported and played as an arranger workstation style, i.e., they do not contain the information and format needed by a PSR/Tyros style.

Last December, I developed a process for converting a DJX-II pattern file to a PSR/Tyros style file. I wrote and posted an earlier article on the DJX-II style format and conversion process. I then got to work and converted fifteen patterns to PSR/Tyros style format.

The patterns are all on the jazz tip and they include some pretty hip chord changes! I quickly found that I needed to transcribe the chord changes and bass lines in order to play along. I used Sibelius First to notate the MIDI data in each pattern and saved the lead sheets in PDF files. Knowing the changes makes jamming easier and a lot more fun.

At long last, I’m ready to distribute the converted patterns. Here is a link to the the ZIP file. The ZIP file contains fifteen style files (one for each DJX-II pattern), fifteen PDF lead sheets and a README.TXT file with performance tips.

Update: Check out version 2 of the DJX-II style collection. It’s still free!

I strongly recommend reading the README.TXT file before using the new styles. The converted patterns behave like the new Yamaha DJ styles on the PSR-S670. You only need to play a single note in the left hand accompaniment. No chords are necessary because the chord progressions are cooked into the patterns. The note sets the root note for the progression and the arranger and DJ style take over from there.

Current and recent workstation arrangers should play these styles without problem, save the occasional kit or voice substitution. Good news for musicians with entry-level models (e.g., PSR-E443) as the style files are SFF1 and no OTS. Thus, entry-level arrangers should load and play these pattern styles, too.

Please enjoy playing with these “DJ styles.” In terms of the future, the DJX-II trip hop styles are genuinely sick and I hope to convert them one of these days!

What’s in a name?

Anything that we want to go from just a beginner to a pro,
You need a montage (montage)
Oh, it takes a montage (montage)
Team America Lyrics

Back in January before Winter NAMM 2015, there was a lot of speculation about a new Yamaha workstation to replace the venerable Motif product line. Yamaha filed for the trademark name “Montage” in December 2014 and many wondered if this would be the name of the new workstation. (Yamaha have a teaser ad for “Reface” at https://www.yamahasynth.com with a countdown clock leading up to Summer 2015 NAMM week. Your guess is as good as mine!)

Getting a little bit Zen for a moment, it doesn’t matter what a thing is called. All that matters is what the thing is.

Periodically, I troll the United States Patent and Trademark Office (USPTO) database for interesting patents and patent applications. Yamaha carefully (and wisely!) protects its inventions through patents. Yamaha R&D, by the way, rarely publishes in the scientific literature, which is another way to stake your ground. Patent protection is stronger legally. A patent costs money, so a corporation is usually serious about a technology when it makes the commitment to file. The Yamaha patent applications cite Japanese applications/patents to establish priority in the United States. Thus, there is usually an existing Japanese application or patent that was filed at an earlier date for each US application.

Of course, a patent does not necessarily indicate that a product will follow. However, I’ve noticed a trend in some (relatively) recent filings by Yamaha.

Let’s start with US Patent Application Publication 2013/0305902, “Accompaniment Data Generating Apparatus,” published November 21, 2013. Quoting the application, “An object of the present invention is to provide an accompaniment data generating apparatus which can generate automatic accompaniment data that uses phrase waveform data including chords.” This rather lengthy patent application describes a musical instrument keyboard that uses audio waveforms in the same way that an arranger or Motif-series workstation uses MIDI phrases (AKA arpeggios). The application cites Japanese Patent Publications No. 2900753 (MIDI-based accompaniment) and No. 4274272 (MIDI-based arpeggio performance) as prior art.

US Patent Application Publication 2013/0047821 (published February 28, 2013) covers similar ground. This application adds waveform pitch shifting and time stretching. It cites Japanese Patent Publication No. 3397082 on the specific capability of pitch shifting and time stretching. Audio phrases (waveforms) need to be transposed via pitch shifting and must fit into the rhythm via time-stretching.

US Patent Application Publication 2013/0305907 (published November 21, 2013) is related to the previous two application. It covers production of chords using audio waveforms, guided by chord root and chord type.

US Patent Application Publication 2014/0033902 (published February 6, 2014) is titled “Technique for Analyzing Rhythm Structure of Music Audio Data.” The technique described in this application identifies the beat positions and intervals in a piece of music in audio form (i.e., rhythm pattern analysis). Figure 1 shows the embodiment (design) of the technique within an accompaniment generation system. The beat position information is used to synchronize playback of both MIDI and audio phrases. The diagram shows a “MIDI reproduction section” and an “Audio reproduction section.”

The most recent publication is 2015/0154979 (June 4, 2015) and is titled “Automated Performance Technology Using Audio Waveform Data.” The application deals with a specific issue that arises when audio waveforms are used for accompaniment (pitch shifting and time stretching). Quoting the application, “it is an object of the present invention to properly deal with a processing delay and sound quality deterioration that are likely to occur when audio waveform data is reproduced with time axis expansion/contraction control performed on the audio waveform data in accordance with a desired performance tempo.”

These are long documents with a lot of detail expressed in excrutiating “patent language.” They are too long and detailed to summarize here. I recommend downloading the patent applications from the USPTO, brewing coffee, and then reading the applications.

Looking at the overall trend, Yamaha are thinking about automated accompaniment that incorporates both MIDI and audio phrases. This technology could be applied to arranger instruments or a new generation of synthesizer workstation. The latest arrangers have “audio styles” which only use audio for the rhythm track. No “harmonic” phrases (e.g., bass line, electric piano comping, etc.) are available. The current Motif generation (the XF and MOXF) have only MIDI-like arpeggios. Possibly, combined audio/MIDI accompaniment was not fully cooked in time for the PSR-S950 and Tyros 5.

I am very interested to see if Yamaha rolls out this technology in future products. The definition of “montage” is “the process or technique of selecting, editing, and piecing together separate sections of film to form a continuous whole.” Hmmm.

Footloose and fancy free

Maybe you would like to play your music in the great outdoors at a family picnic. Or, like me, you would like an extremely light, battery-powered rig for quick set-up at rehearsals.

Modern battery technology to the rescue! More musical instruments and portable speakers than ever run on battery power. Many of these devices sport an integrated rechargeable battery and a USB-based charge or power outlet. You can have that light battery-powered portable rig by combining a battery- or USB-powered keyboard with one of the many available portable speakers.

Here’s how I designed my portable rig.

I started with the KORG TRITON Taktile 49 USB-powered MIDI controller and synthesizer. The TRITON Taktile (TT) has 49 keys and is very light-weight (less than 8.5 pounds). The TT incorporates the Triton Classic sound engine and programs which are under the control of eight front panel knobs and sliders. I reviewed the TT here and here , so I won’t go into more detail about its sonic capabilities.

The TT does not have built-in battery power. However, it runs quite well on a rechargeable USB battery pack. USB battery packs are readily available and are usually intended to power or recharge personal electronic devices such as MP3 music players, phones, tablets and so forth. Fortunately, electricity is electricity and the TT is happy to operate on power supplied by a USB battery pack. As long as a battery pack can supply the necessary current (usually stated in milli-amperes or “mA”), the pack should be able to power any compatible musical instrument keyboard.

Let’s explore power requirements a little bit more, using the TT as the example. KORG claim that the TT draws 550mA of power through the 5 Volt DC USB-B port. I purchased an Incase Portable Power 5400 recharging “brick.” The Incase brick can supply up to 2.1 Amps (2100 mA) of current, more than enough to power the TT. The “5400” in the product name refers to the battery capacity: 5,400 mAH. In theory, the Incase 5400 brick should be able to power the TT for nearly 10 hours. (God helps us if we ever rehearse that long!) I have been using the TT/Incase combination during practice for the last few days under light use and haven’t burned off 20% of total capacity yet.

So far, so good. But, what about a portable speaker? Unfortunately, you can’t expect to drag your keyboard into Target or Best Buy and audition portable speakers. Most of the speakers on display in box stores are wired into a point-of-sale demonstration system which plays back canned demo tracks. You won’t be able to disconnect from the demo system and connect a synth to the back of the portable speakers on display. Thus, you should audition as many speakers as possible with the canned tracks and try to find the one with the best overall reproduction without “boxiness” and weak low end.

I tried out portable speakers in-store rather obsessively and exhaustively. I eventually settled on the JBL Charge 2 Bluetooth speaker. The JBL Charge 2 has reasonably flat response and good low end without the boxiness of many small speakers (such as the higher priced Jambox Mini). The Charge 2 is a little bit chunky weighing about 0.5 pounds. It specs out pretty well: 2×7.5 Watts and 75Hz – 20kHz frequency response. Two passive radiators provide solid bottom end; bass notes are distinct with recognizable pitch.

Sonically, I’m quite happy with the TRITON Taktile and JBL Charge 2 combination. The JBL handles high energy sounds like organ and French horn without distortion and flappy speakers. The headphone output from the TT is a little too low, however, and I must turn the volume all the way up on the JBL in order to get to rehearsal-level volume. Our church group rehearsals are “unplugged” (except for me, of course), so I don’t anticipate any problems on the job. However, I’m considering the addition of a battery-powered gain stage between the TT and the JBL. The following candidates for gain stage look viable:

  • Boostaroo R234 Revolution Headphone Amplifier
  • Rolls MX56C Minimix A/V Battery Powered Mixer
  • MCM Custom Audio Compact Headphone Amplifier

The Rolls MX56C is attractive because, hey, who couldn’t use a battery powered utility mixer for other production applications? The MCM headphone amplifier has a Micro USB-B power input in addition to a 9V barrel connector. The MCM can be powered from a USB-A port just like the one on the Incase power brick.

Potentially, a fourth alternative is a guitar boost pedal. The pedal solution is viable as long as the pedal is flat and does not color the sound of the acoustic voices. I tried a Danelectro D-2 FAB Overdrive pedal with the jazz/pop voices and the overdrive does a great job of dirtying up the voices while adding gain. The TT voices are exceptionally clean and the added grit on electric pianos and guitars is especially welcome. As Moe the Bartender would say, “He ain’t pretty no more.”

There are two other aspects of the JBL Charge 2 that are worth mentioning. First, the JBL is such a chunk because it incorporates a 6000 mAh Lithium-ion Polymer battery and a 2.0 Amp USB-A charging/power port. Originally, I intended to power the TT using the JBL Charge 2. Unfortunately, there is too much digital noise on the USB power line when the TT is connected and is drawing power. One can clearly hear undesirable synthesis artifacts and noise at a completely unacceptable level when the JBL both powers and amplifies the TT. Now, I run the TT on the Incase power brick separately. I am thinking that the JBL could power the MCM headphone amplifier, hopefully without the digital noise.

Second off, the JBL is a Bluetooth speaker. (It works quite well in this capacity having tried the JBL with an iPad.) It seems like a no-brainer to send audio from the TT to the JBL over Bluetooth assuming that a Bluetooth audio transmitter is attached to the 3.5mm stereo output of the TT. This is a loser for live play, however. The transmitter must encode and compress the audio which imposes an unacceptable delay between playing a note and actually hearing the note through the JBL. I’ll stick to good ole latency-free audio cable.

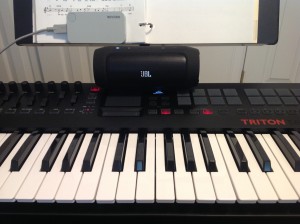
The picture below shows the whole rig: the gray Incase power brick, the TRITON Taktile, and the JBL speaker resting on top of the TT. The TT does not have much clear room on top. Most of the top is taken by buttons, switches, sliders, pads, etc. The JBL’s perch is rather precarious. I would feel better having the JBL on the floor or a stable resting place nearby.

TT_and_Charge2

The entire rig fits into a Kaces 49-key gig bag and weighs 12 pounds. Finally, a self-powered rig that is as easy to handle and move as an acoustic guitar!

Triton Taktile: A few more thoughts

A quick follow-up to my earlier snap review about the Korg Triton Taktile.

I’ve spent more time playing the Triton Taktile and generally remain pleased with many of the on-board preset sounds and the keyboard feel. The only major disappointment is a way to toggle the rotary speaker speed for B-3 organ sounds. Speed changes are an important part of B-3 playing style and I sorely miss this capability. I hope that Korg can find a way to add speed change in a future update. Unfortunately, the Leslie effect seems to be sampled into many of the sounds, so an update of this kind may not be possible technically.

I wanted to register my favorite patches, so I decided to download and install the Korg Kontrol Editor. The front panel procedure for registering favorites is not particularly fiddly, but the Kontrol Editor allows entry in one go and presents a WYSIWYG view on the contents of favorites Set A and Set B. I like to see how the patches are laid out across the buttons and to juggle their order. The Kontrol Editor does the business as you can see in the screen below. The Kontrol Editor leaves tool/keyboard synchronization up to you. When you have something worth writing then you click a button to transfer the edits to the keyboard. When you want to read something back from the keyboard into the editor, then click the appropriate button.
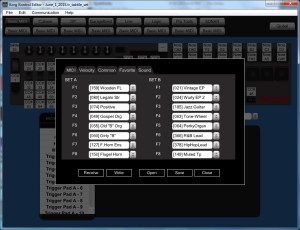
KontrolEditor

The screenshot shows my favorite sixteen patches. Set A is my “church” group consisting of voices that I am most likely to use at rehearsals with the music ministry. Set B is my “jazz/pop” group of voices that are fun for jamming with MP3 backing tracks or even PSR-S950 styles.

If you ever go to use Korg Kontrol Editor on Windows, please note that you must install the Korg USB-MIDI driver first. The install documentation has a small hiccup and doesn’t mention the need for the driver right up front. No biggee, but you will need the driver.

The Korg part of the installation is smooth. The Windows part, however, became a learning experience. A-hem. I had plugged the Triton Taktile (TT) into a USB port before installing the Korg driver. Windows installed some default driver of its own. This is not surprising. However, the Kontrol Editor did not recognize the TT after installing the Korg USB-MIDI driver. The editor has a means of manually selecting MIDI ports and the TT did not appear in the editor’s list of available (connected) ports.

Time for the usual Windows driver-Hell troubleshooting. Before doing anything else, I uninstalled the Korg driver and rebooted.

While searching the Web for a solution, I found several references to the notorious Windows XP MIDI limit. Windows installs a separate driver for not only each different MIDI device (keyboard), but each unique combination of device and physical USB port. Yep, this means that you get two instances of the same driver if you plug your TT (or whatever) into physical USB port A today and into physical USB port B tomorrow! Windows XP remembers up to ten MIDI drivers and if you tend to move your MIDI devices around USB ports, the ten slots get filled up. Then, no more.

There is some debate as to whether this limitation is present in Windows 7 or not. (I’m using Windows 7.) One solution to the problem is to manually remove registry entries for unused (inactive) MIDI devices. Tromping around inside the Windows registry, however, is not a particularly safe or fun activity.

There are two better and safer methods for removing inactive MIDI drivers:

  1. A method suggested by Craig Anderton on Harmony Central. (Search on “windows midi limit”.
  2. The Korg USB driver uninstall utility.

Craig’s method is clear, but requires a little Device Manager knowledge. Basically, you need to execute these two commands as Administrator:

    set devmgr\_show\_nonpresent\_devices=1
    start Devmgmt.msc

Windows launches the Device Manager where you can navigate to the “Sound, video and game controllers” part of the device tree. There, inactive drivers are shown with a greyed out speaker. Right click on each unwanted inactive driver and select “Uninstall” from the contextual menu. Once slots are freed up, you should be good to go.

Or, better yet, try the Korg USB driver utility. This utility program is installed along with the Korg USB driver itself. The uninstall utility displays the unconnected (inactive) MIDI devices and lets you uninstall the associated driver. I installed the Korg USB driver (leaving the TT unattached) and ran this utility on my machine. I selected and removed all of the inactive devices/drivers. Then, I plugged in the TT and voila, the KORG driver and editor recognized the Triton Taktile. All was then good with the world.

Even if you don’t own or use a Korg keyboard, I recommend this utility as a way to work around the Windows MIDI driver divot. Korg really should be commended for writing this utility and making it freely available. As to Windows, I really don’t need any more learning experiences of this type…

Another minor issue is dealing with the 3.5mm (1/8″) stereo output. This output is fine when connecting in stereo to either a 3.5mm or 1/4″ stereo phone input or connecting to two 3.5mm or 1/4″ phone mono inputs — just use the appropriate cable (i.e., TRS to TRS or an insert cable). Connecting from 3.5mm stereo to 1/4″ mono is more troublesome as the right and left channels need to mix down to mono. I received the following reply from Korg USA product support:

You should be ok to connect the Triton Taktile to a mono input by using an 1/8” stereo to a (1/4” or 1/8”) mono cable. I don’t think there are any programs that have sounds panned hard right so all the programs should sound fine.

The HOSA (Livewire) CMP-105 is such a cable. Properly, one should mix down the right and left signals, passing each side through a 1K ohm resistor into a common electrical node (the mono output). You might also want to check out the advice and circuits at Why not wye?

I’m happy to use the CMP-105 as long as there aren’t any long term reliability issues on the Triton Taktile side. The stereo to mono cable does work as suggested by Korg. I will mainly use this solution when driving a mono-only effect like a guitar pedal. Otherwise, there are usually enough available inputs to do a more proper mix down.

Finally, I was curious about the MIDI bank select and program change messages that are needed to select Triton Taktile programs. The TT follows the typical Korg convention: Bank Select MSB is 121 (decimal) for regular voices and Bank select MSB is 120 for drum kits.

The program layout is somewhat schizoid. Korg did not collect all of the drum kits at the end of program list (as Mr. Spock would expect). The drum kits are interspersed with regular voices in the final quartile. Normal voices are assigned banks and program change numbers in the expected fashion up to program number 399, which is the first drum kit. Program number 1 has bank select MSB 121, bank select LSB 0 and program change 0. The program change numbers increase to 127 when the bank select LSB increases to 1 and the program change number rolls over to 0. This continues in an orderly fashion until program number 299 and the first drum kit. After that, the assignment is difficult to enumerate. (Please see the table below.)

I determined the bank select and program change values by monitoring the TT’s MIDI OUT while changing programs through the front panel. If you want to fill out the rest of the table, grab a copy of MIDI OX and monitor the MIDI OUT. Yeah, I’m lazy. 🙂

Program# MSB LSB PC# Program name
1 121 000 000 A. Piano
127 121 000 126 F.Horn Ens
128 121 000 127 Flute
129 121 001 000 Sax Ens
255 121 001 126 Hybrid Brass
256 121 001 127 Blind Brass
257 121 002 000 Reso Brass
383 121 002 126 Brass/Lead
384 121 002 127 PWM Lead
385 121 003 000 Glide Lead
415 121 003 030 Monster
399 120 000 007 Std Kit 1
400 120 000 011 House Kit
401 120 000 015 Psycho Kit
402 120 000 017 Orch&Ethno
403 121 003 018 Velo Hit
404 121 003 019 Gtr Hit
416 120 000 120 Std Kit 2
417 120 000 010 Brush Kit
418 120 000 009 Power Kit