Audio Modeling: Camelot and SWAM Flute

I hope you took advantage of Audio Modeling’s Black Friday sale. I took the plunge and bought Camelot Pro and SWAM Flute for IOS. Why did I wait all these years? 🙂

Camelot Pro (IOS)

Obviously, I’ve only been working with Camelot Pro for a short time. However, I now get why many iPad musicians are into it. Camelot Pro is feature rich including an audio player, music score reader, etc. I’ll get into those features someday. My primary purpose now is a smart MIDI-routing host for software and hardware instruments.

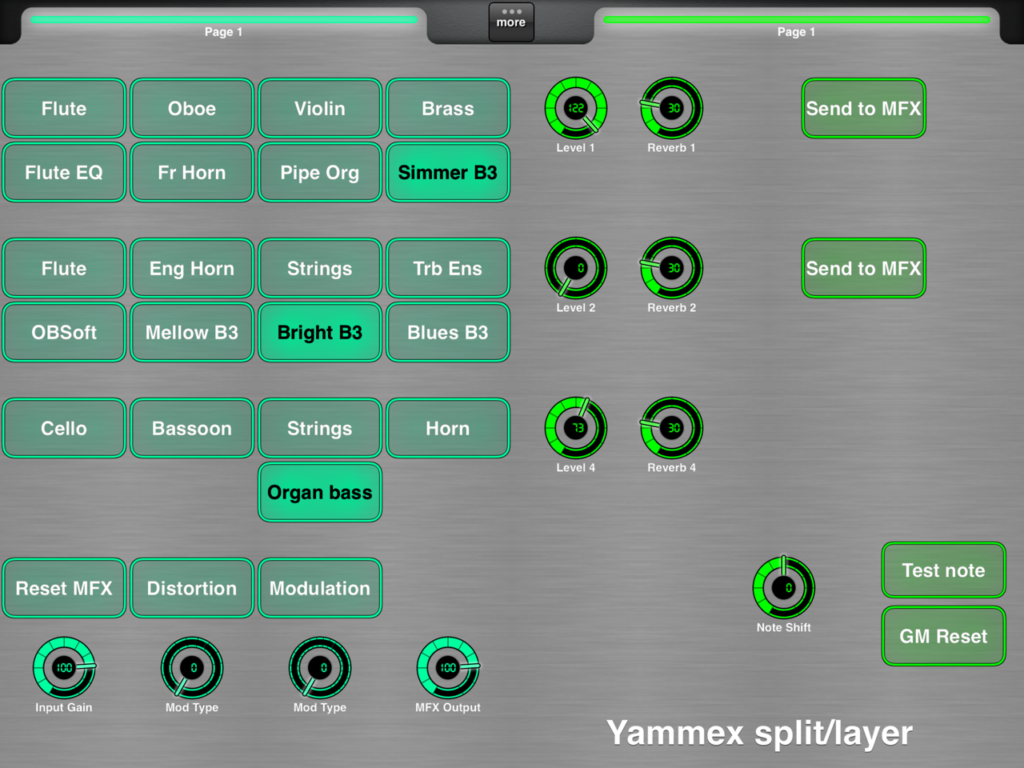
My first experiment was a split and dual layer combi for the V3 Sound Yammex module. Camelot Pro comes with many pre-defined patch maps for popular instruments like the Yamaha MODX. Since the V3 Yammex is a niche product, Yammex ain’t lucky enough to have a pre-defined map. With a little menu digging, I found the Bank Select and Program Change parameters for each patch for the split and layer. With a little more menu digging, I found sliders for bread-and-butter patch parameters like cutoff and resonance, reverb send, and so forth.

Camelot Pro simple example

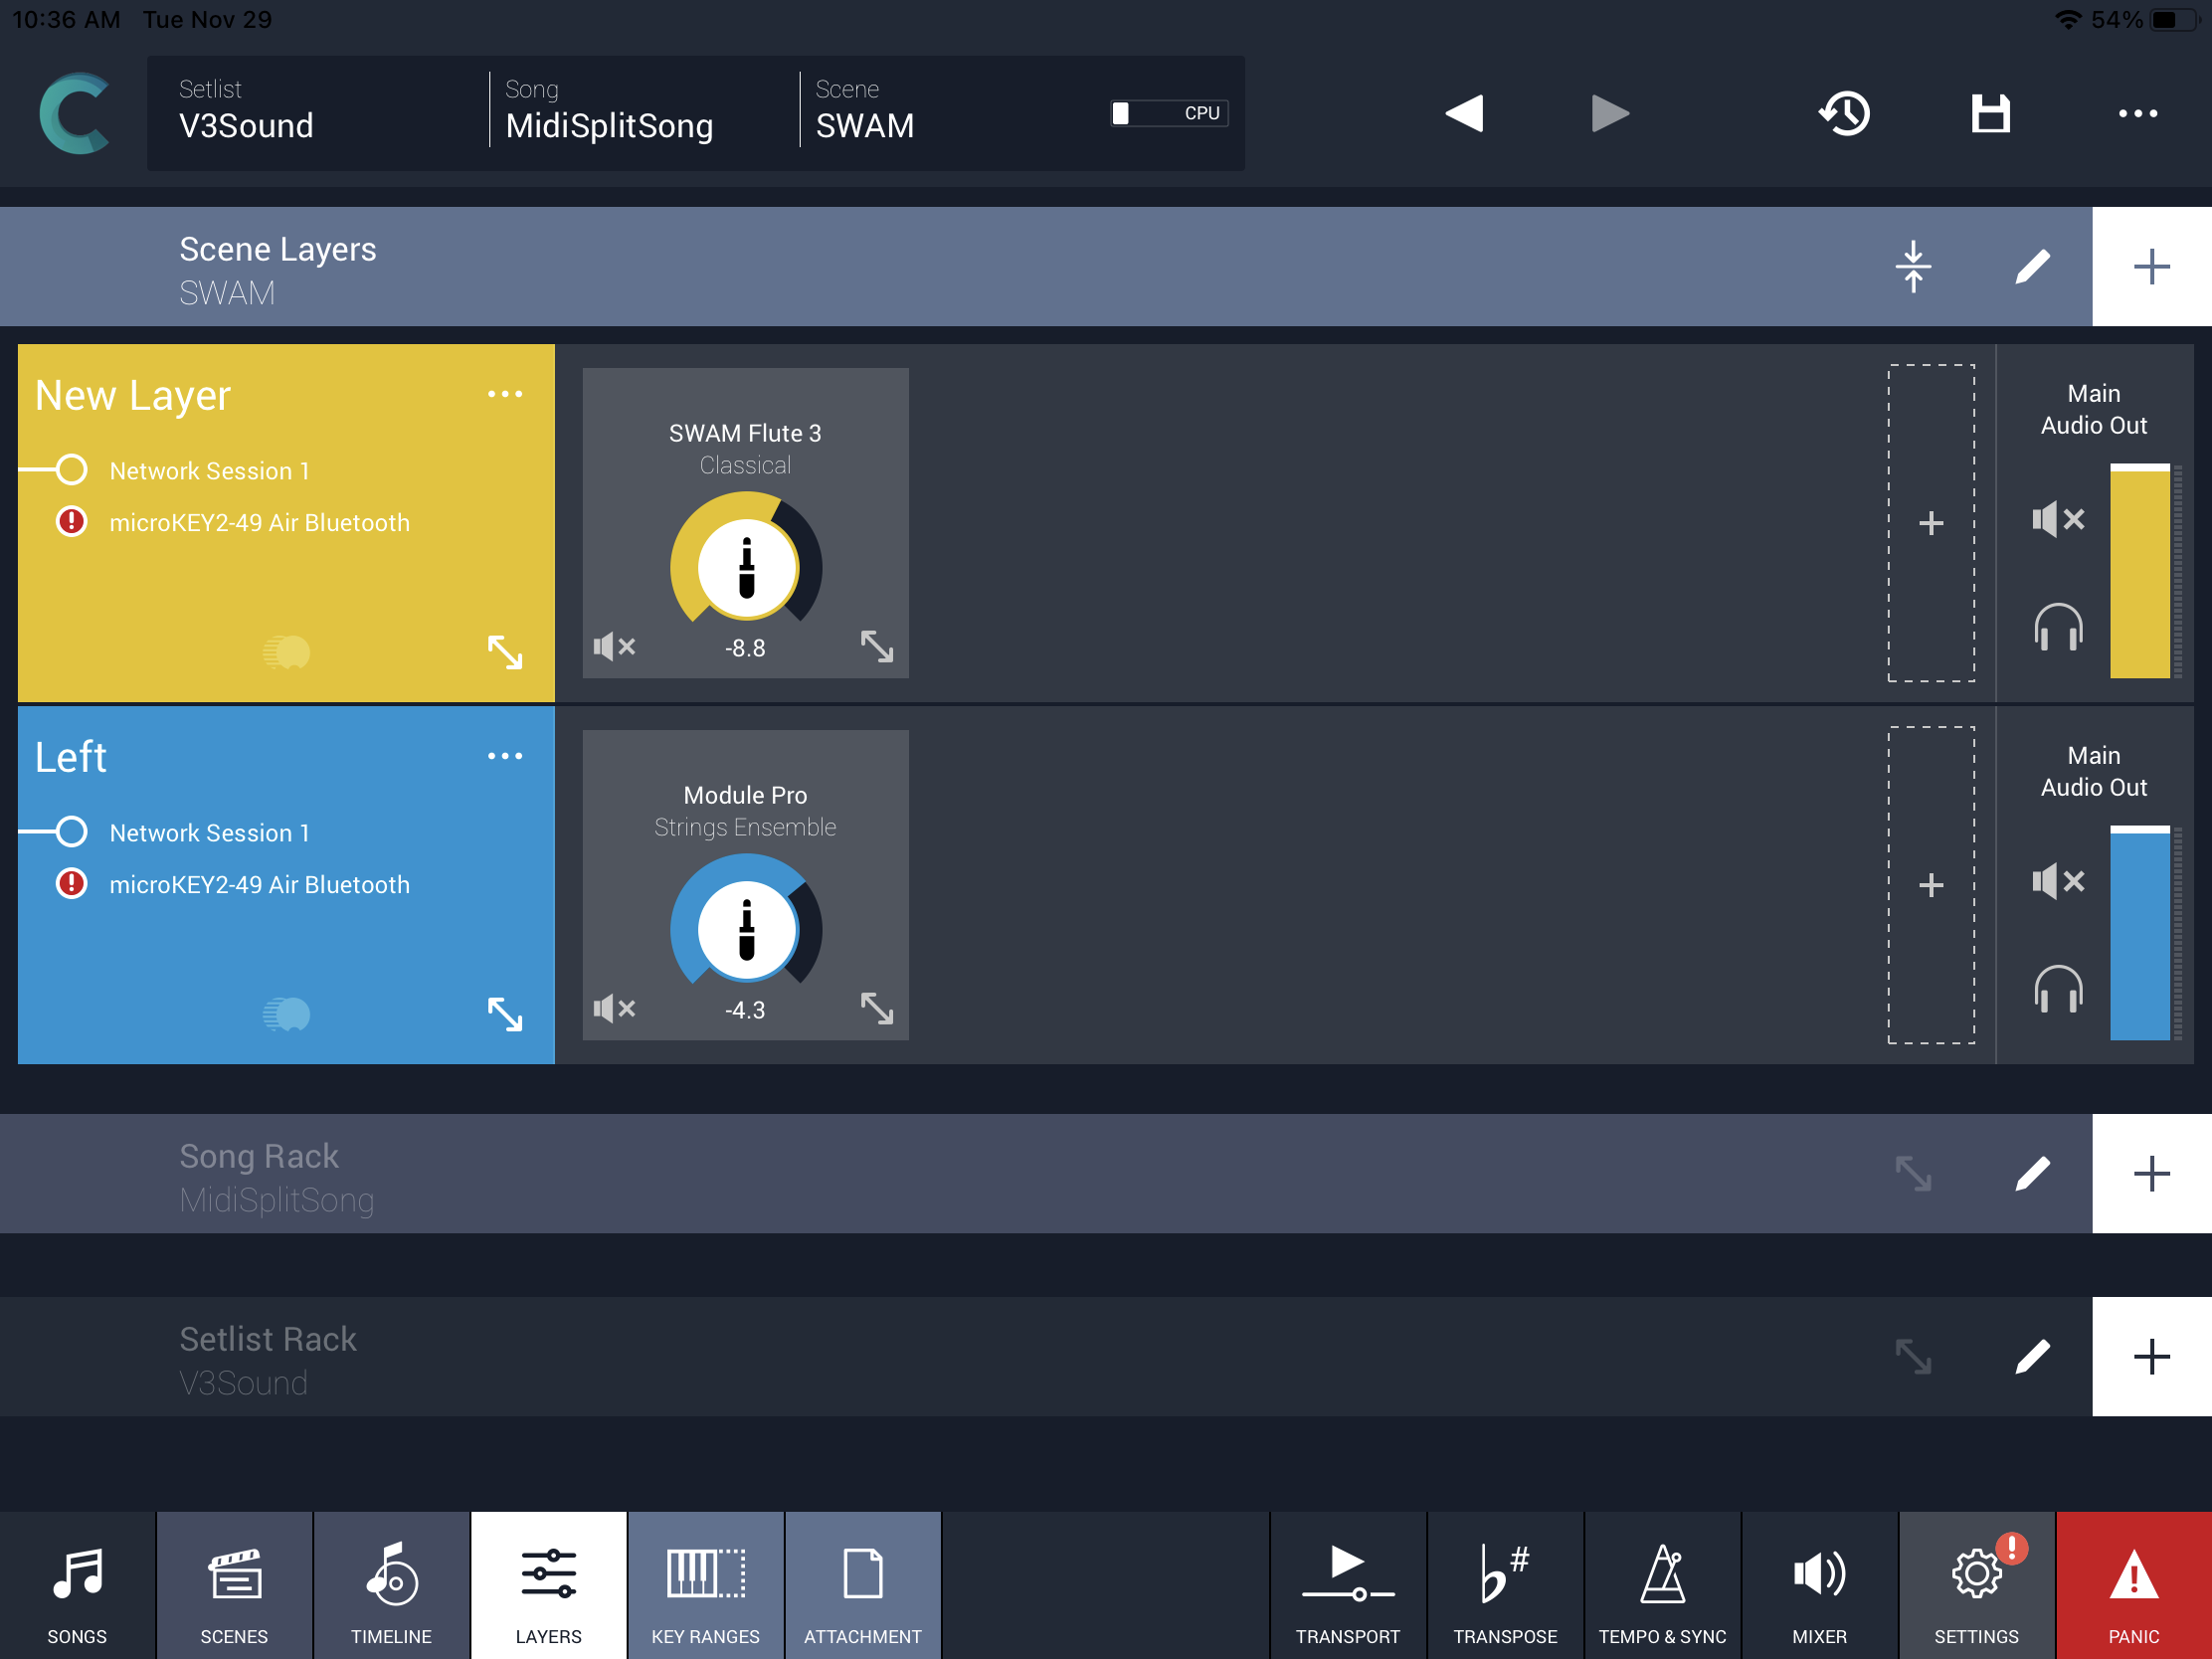
My second experiment was a split and dual layer combi for SWAM Flute and Korg Module. Having the first experiment under my belt, it was much easier to set up the software instruments. Double-tapping a software instrument box gives access to patch selection.

I sometimes use a wired Arturia Keylab Essential and other times I play a Korg Microkey Air wireless. So, one needs to pay attention to the MIDI connection status icons in a layer in order to re-enable any missing connections. In the example above, please note the missing Microkey Air connection.

Not bad. My main quibble with Camelot Pro is Audio Modeling’s exaggerated claim of an intuitive interface that doesn’t need a manual. No, you do. At the very least, watch the Camelot introductory video and browse the on-line documentation.

No matter what your marketing people claim, don’t ever say your interface is so intuitive it doesn’t need documentation. This is the most idiotic remark a software engineer or vendor can make. I failed students for less…

In order to use Camelot Pro, you need to understand the structure and relationship of songs, scenes and layers — at the very least. You also need to know how to add instruments and change key ranges. Yep, the graphic controls are nicely done — once they are found and exposed.

Here’s another instance when the on-line documentation was helpful. I didn’t know that you could create your own user patch maps! If I continue to use Camelot with the V3 Sound Yammex XXL, I will surely create a map containing the twenty or so favorite Yammex patches. On the up-side, Camelot Pro has enough capability and parameter tweaking power to ditch my MIDI Designer user interface (UI) and just go Pro.

SWAM Flute (IOS)

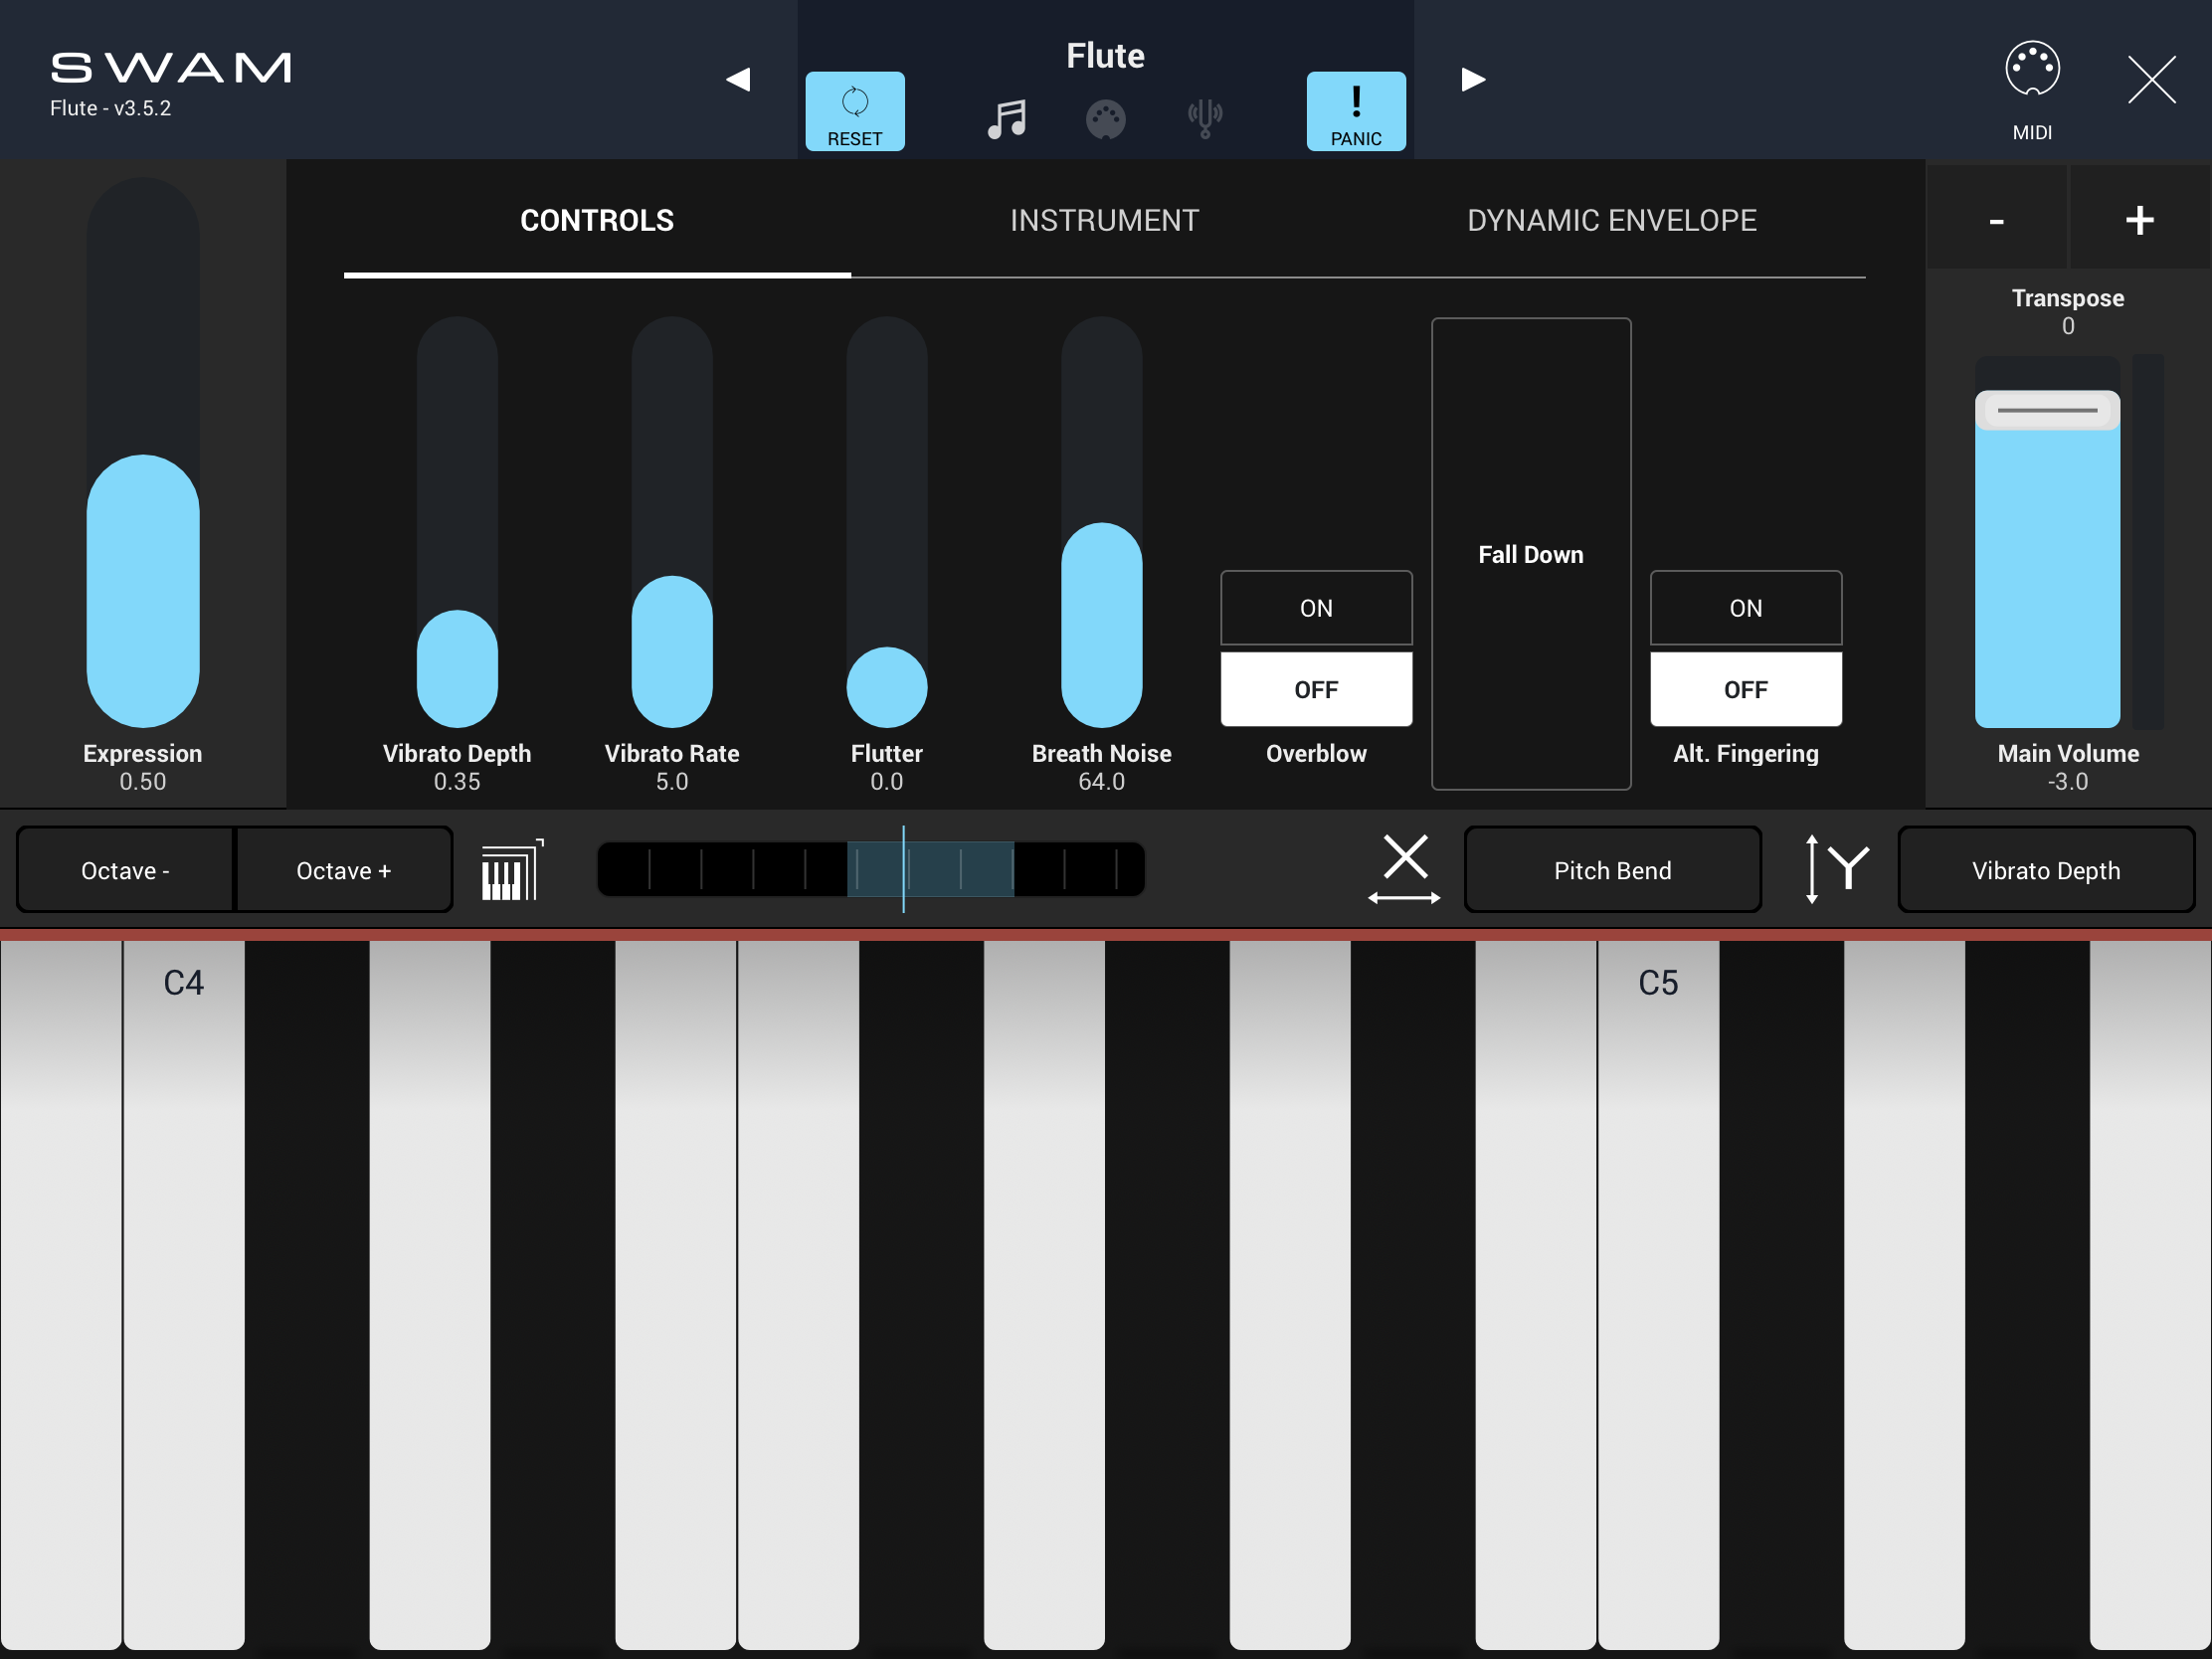
If you want to get your Herbie Mann or Brian Jackson on, you need one of these. SWAM Flute comes up configured as a jazz flute and, wow, is this thing expressive.

Audio Modeling SWAM Flute

Be sure to hit the PLAY icon and play the flute using SWAM’s on-screen controls. Swiping left/right and up/down are probably as close as us cheapskates will get to a Roli experience. 🙂 I like the articulation status display which indicates legato, detached, etc. It’s a good tool for learning on-screen gestures.

Then dive into the advanced parameters through the tabs. There are a number of fun toys hidden in these treasure boxes. Growl! Flutter! Falls! Oh, my gosh, this is sweet!

SWAM Flute gestural PLAY interface

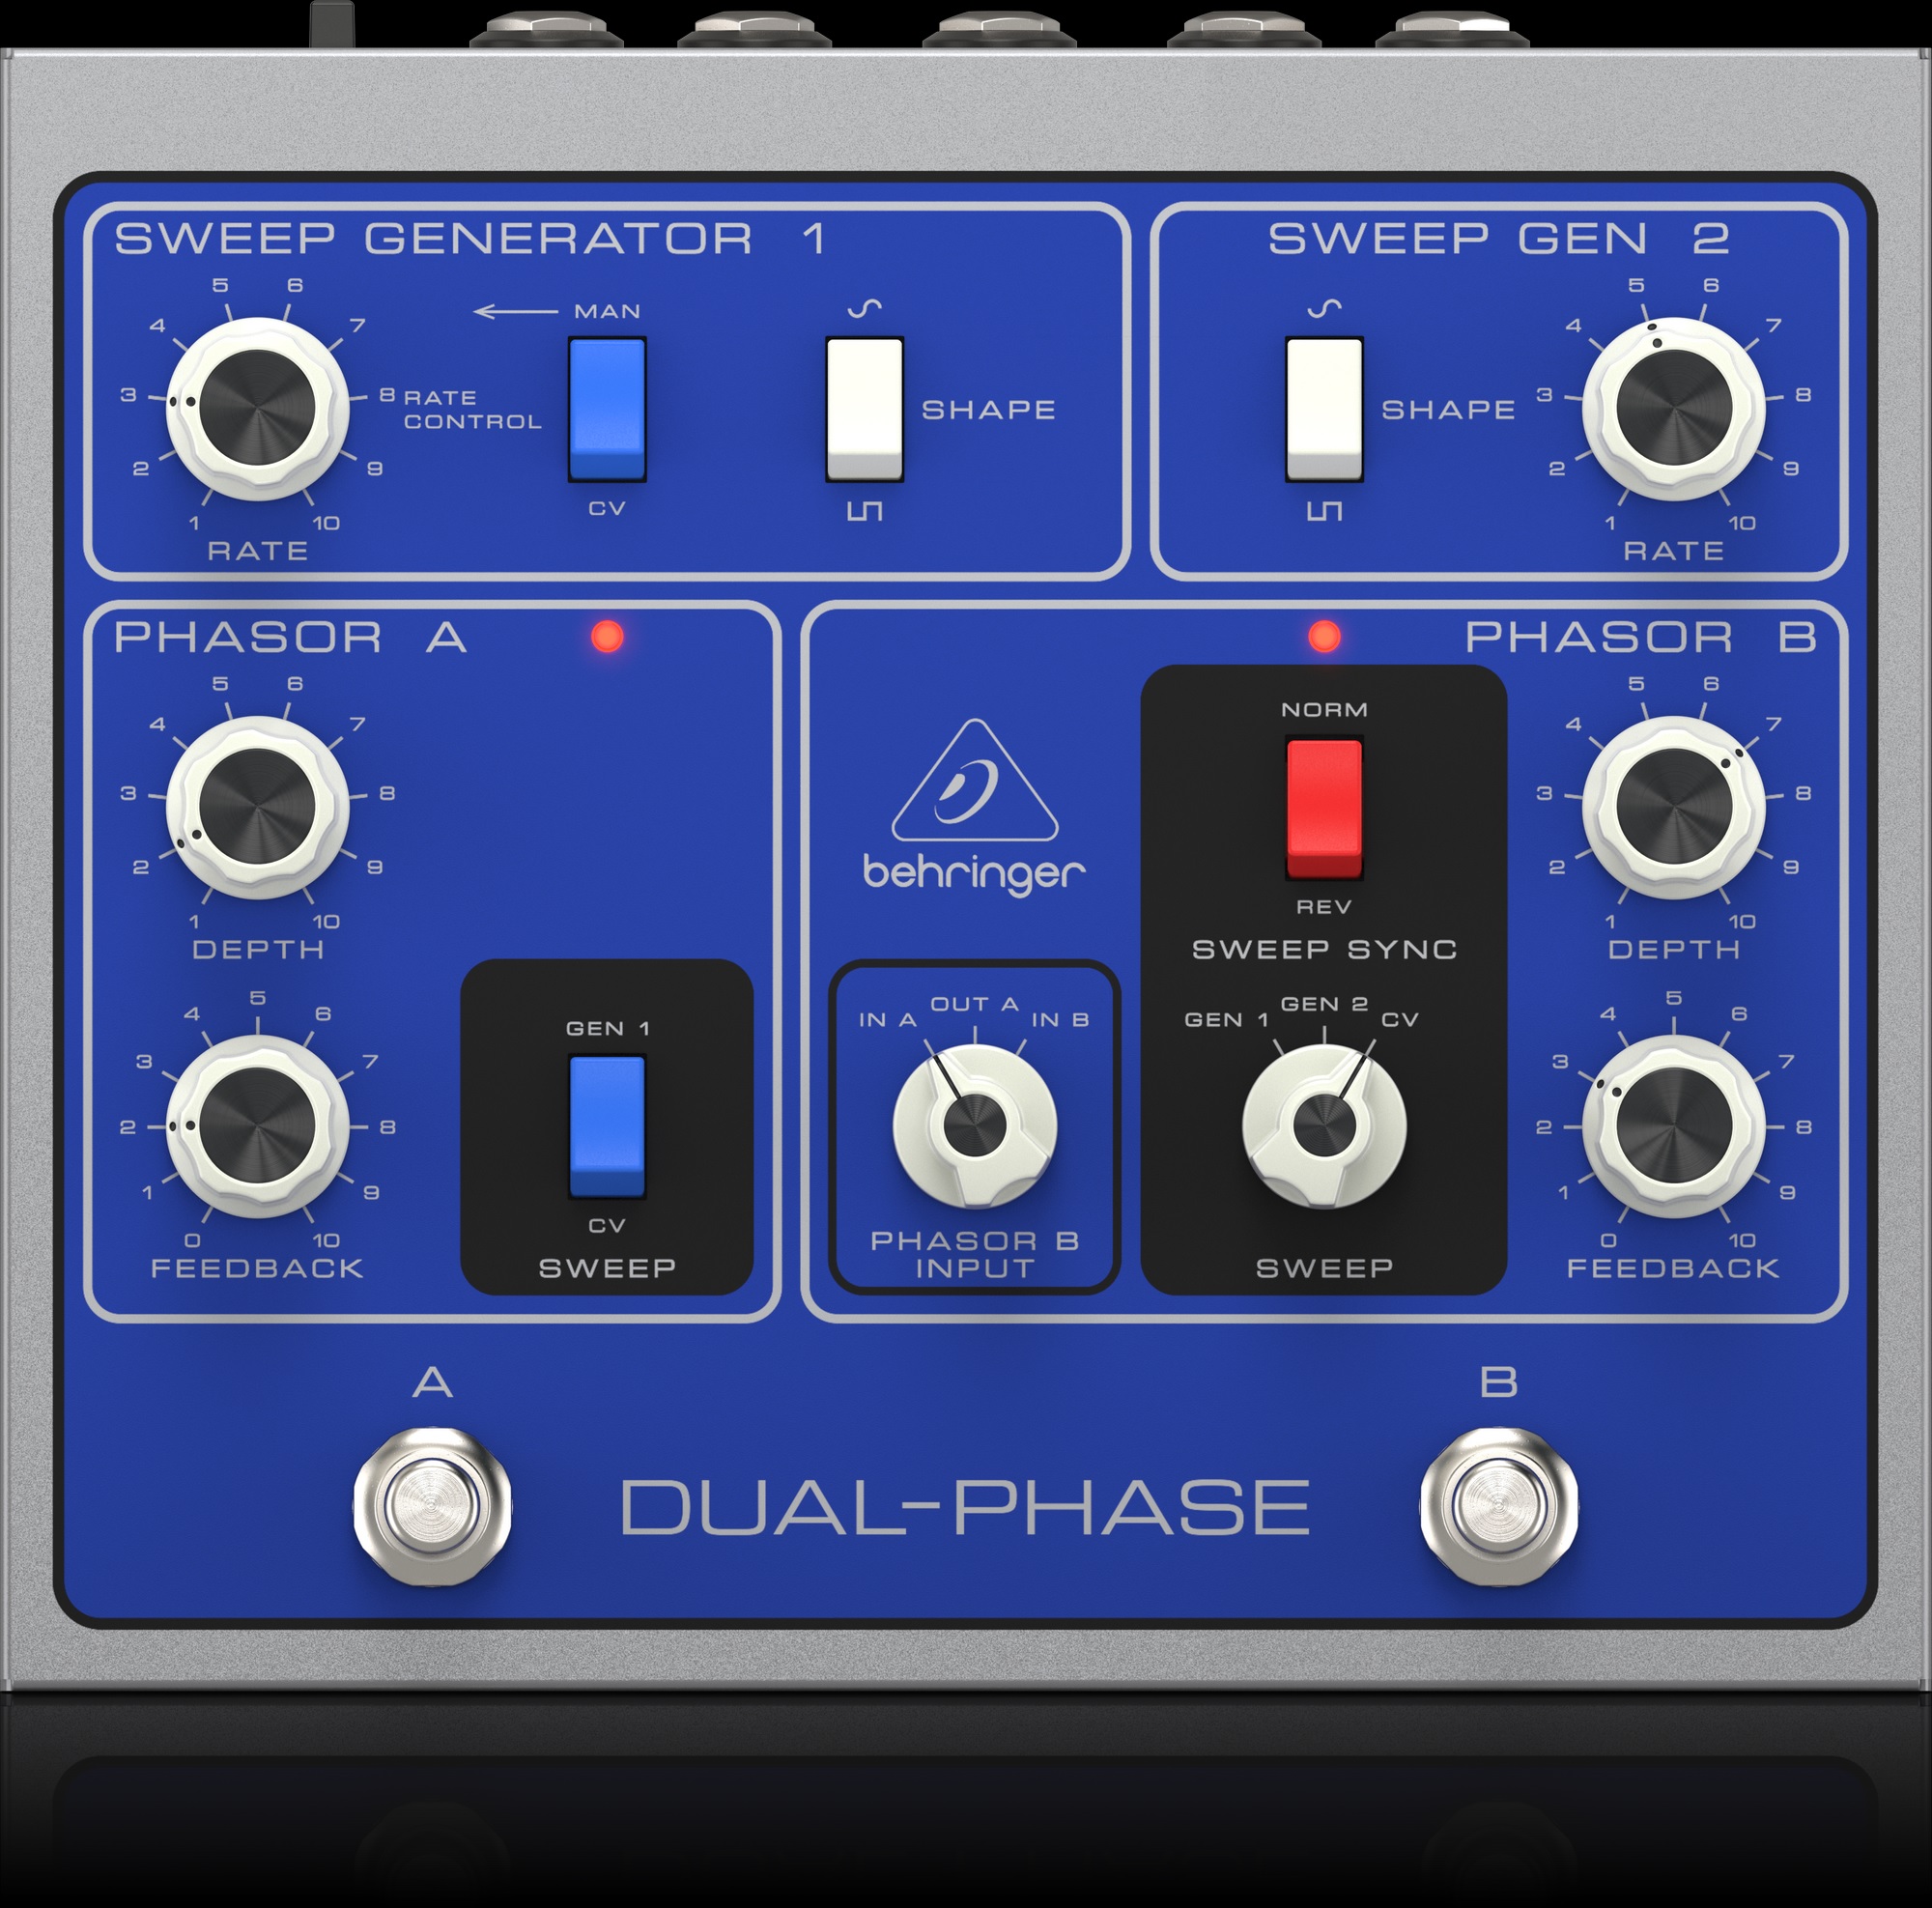
After all of that excitement, hooking up to the Arturia Keylab Essential felt like a let-down. The flute still sounds darned good — among the best one can find in a hardware synth. But, I misses all of the fun on-screen articulations. There is solace in the MOD wheel which adds spot-on vibrato. With the snow beginning to fly, it’s time to put those Arturia knobs and sliders to work…

The SWAM flute is a beautiful solo instrument. This is true of all current SWAM instruments. Ensembles are a DIY affair and, unfortunately, the individual solo instruments are pricey. Putting together a woodwind section will set you back a pretty penny. So, I will await SWAM ensembles because they are my primary need and I’m cheap.

On the other hand, if you need a few instruments for exposed solos, definitely give Audio Modeling SWAM a try. I don’t regret buying SWAM Flute (IOS) as it is fun to play and it opens the door for advanced, expressive control. WX-11?

Copyright © 2022 Paul J. Drongowski

V3 Sound YAMMEX: Progress report

Here’s a quick update on my progress with the V3 Sound YAMMEX XXL sound module.

The V3 Sound XXL series are very compact, light-weight MIDI sound modules based on the Dream S.A.S. SAM5716B synthesis engine. The YAMMEX and its sister, the V3 Sound Grand Piano XXL, have hundreds of high quality voices — 3GBytes of factory samples in a 4GByte waveform memory. The modules also provide two multi-effect (MFX) pipelines which enrich the sound.

V3 Sound YAMMEX XXL expansion module

The XXL modules do not have a built-in user interface (UI) having no display or buttons for selecting voices. All sounds and effects are selected through the MIDI and USB-A ports. V3 Sound provide the tablet-based V3 Sound Control app and two comprehensive MIDI Designer UI templates. The V3 Sound Control app, unfortunately, does not support the YAMMEX. V3 Sound considers the YAMMEX as a Genos/PSR expansion only and expect users to control YAMMEX through a set of predefined voice (VCE) files and the normal Genos/PSR voice selection process.

Well, those VCE files do send MIDI Bank Select MSB, Bank Select LSB and Program Change messages. I can now assure you that these messages are enough to select YAMMEX voices even if you are not using a Genos or PSR.

Yamaha MODX Zone Master works quite well. You need to build MODX Performances consisting of external MIDI zones. Thanks to Zone Master you can select, split and layer YAMMEX voices. The trick is to assign a separate YAMMEX voice to each MIDI channel and use Zone Master channel and note ranges to affect splits and layers.

I have also successfully used the Arturia Keylab Essential with YAMMEX. It took only 15 minutes work to make a control template using Arturia’s MIDI Control Center application. I assigned eight of my favorite YAMMEX voices to the eight Keylab pads and assigned the most common MIDI continuous controllers to the knobs and sliders.

Both of these scenarios are dirt-simple involving a direct 5-pin MIDI connection. Unfortunately, Keylab Essential by itself cannot do splits and layers over 5-pin MIDI. Keylab Essential does not provide the functional equivalent of Zone Master. Keylab Essential can send on only one MIDI channel at a time and doesn’t implement the concept of key ranges (zones). Keylab Essential also restricts the number of selectable voices to what you can programmed into its key pads.

All is not lost, however, as MIDI Designer once again comes to the rescue. First, you need to make connections:

                                 iPad 
|
Keyboard controller --> iRig MIDI --> YAMMEX

The keyboard controller sends MIDI over a 5-pin cable to the iPad which, in turn, sends MIDI to the YAMMEX over a second 5-pin cable. Bonus: I successfully tested Bluetooth MIDI input from Korg Microkey Air. The iPad acts as a Bluetooth wireless interface to YAMMEX.

The iPad runs two applications: StreamByter and MIDI Designer:

    MIDI IN --> StreamByter --> MIDI Designer --> MIDI OUT

Incoming note messages are passed THRU StreamByter and MIDI Designer. StreamByter remaps (rechannelizes) the MIDI notes to three zones/streams:

    Channel 1: UPPER1 
Channel 2: UPPER2
Channel 4: LOWER

UPPER1 and UPPER2 form a two-voice layer above the split point. LOWER is a solo left-hand voice below the split point. I borrowed this simple zone structure from the Casio CT-S1000V. It’s intuitive and is quite powerful even in its simplicity.

StreamByter maps and mangles MIDI data according to user-defined rules. The rules are rather cryptic, so I refer you to the StreamByter documentation. Currently, I am using the following rules to split/layer:

    NX 00-3A = X3 
NX 3A-7F = X0
NX 3A-7F = X1 +C

Yes, the UPPER and LOWER zones have a one note overlap. I’m still experimenting and may make the overlap larger, if a bigger overlap is useful. I don’t like abrupt breaks between upper and lower zones.

Well, the rest of the work is done by MIDI Designer and my YAMMEX control template. The V3 Sound templates struck me as too complicated — the main reason why I went with “the Casio voice structure” and my own template. Here is the first prototype, work-in-progress template:

MIDI Designer template for YAMMEX (work in progress)

There are eight radio buttons to select the UPPER1, UPPER2, and LOWER voices. [Well, I need to add three more voices to LOWER, as you can see.] These are my favorite YAMMEX voices and they will let me build my most frequently used combinations. Knobs set the voice and reverb level for each zone.

The MFX controls do not function correctly at this time. I seem to be missing some magic; YAMMEX is not responding to the MIDI messages sent by the template even though the V3 Sound “factory” template sends the same darned messages! At this point, I need to ask V3 Sound for advice.

All in all, things are coming along — many successes, a few failures. That’s to be expected at this stage!

Copyright © 2022 Paul J. Drongowski


New Fall 2022 Products

A few products of interest…

The Behringer Bi-Phase has done its Houdini act and has returned as the Behringer “Dual-Phase”.

I was a lover of all things Mu-tron back in the day. I still have a Musitronics MU-TRON Micro V poor man’s envelope-controlled filter, a MU-TRON C-200 volume-wah pedal, and an original MU-TRON T-shirt! The C-200 is robust enough to double as a storm shelter. The Micro V and C-200 have achieved heirloom status since I await a puff of smoke every time I apply power to either device. Old electronics is just that way.

Behringer Dual-Phase (nee Bi-Phase)

I never could afford a MU-TRON Bi-Phase and always lusted after one. Thanks to Behringer ($159 USD), I may get my chance. I’m very glad that Behringer retained much of the original livery after their negotiations with [whomever].

I hope there is still love between Behringer and the Musitronics (MU-TRON) heirs as I would love to see an inexpensive MU-TRON III filter re-issue.

Roland/Boss are continuing along the Bluetooth wireless control path with the Boss FS-1-WL Wireless Footswitch. Here are the basic details in a nutshell:

  • Three footswitches
  • Configure via FS-1-WL app
  • Ports galore:
    • Full-size USB-B
    • MIDI OUT (3.5mm)
    • Expression (1/4″ TRS )
    • Control 1 and 2 (1/4″ TRS)
    • DC IN
  • Two AAA batteries or PSA adapter (optional)
  • Weight: 10 ounces (258 grams)
  • $129.99 USD

I have the Boss EV-1-WL wireless expression pedal which is integrated into my wireless iPad rig.

The new FS-1-WL goes beyond the EV-1-WL and I wish the FS was available before the EV. The FS adds proper footswitches to expression pedal capability. I have expression pedals in hand already and would have appreciated button control for page turns, patch changes, etc. Boss/Roland are finally thinking outside of the guitar player box.

Boss FS-1-WL Wireless Foot Switch

One potential drawback is the narrow spacing of the footswitches. I have trouble hitting footswitches accurately on the EHX Lester K with its closely spaced switches. Since I play in a sitting position, I can’t see my feet and need to hit switches with confidence. Looking down is not an option.

The other big question is how well the FS-1-WL would integrate with synths and software instruments. Most programming details are covered in the FS-1-WL editor user guide. Basic MIDI message types are supported: continuous controller (CC) and program change (PC). There is a third mode, “PC+CC”, and provision for BANK MSB and BANK LSB messages. What is not clear from the user guide is the ability to send a full BANK MSB, BANK LSB, PC message sequence which typically is needed to select a patch in a modern synth.

If anyone gets their hands on an FS-1-WL, please confirm the ability to send a full three message patch change sequence. [Thanks in advance.]

As a keyboard player, I would go straight to the FS-1-WL and use my own expression pedal. The quick start guide calls out the Roland EV-5 explicitly, so I would simply pull out one of my old Roland/Boss pedals and plug in.

I hope Roland continues to explore Bluetooth wireless control. Now, if we can get two synths to communicate over Bluetooth without the need of a computer (or USB host box) in between…

Copyright © 2022 Paul J. Drongowski

In the house: V3 Sound YAMMEX XXL

Thought I would post a quick note about the new unit under test — the V3 Sound YAMMEX XXL tone module. The YAMMEX is a member of the V3 Sound XXL family of tone modules. They all share the same triangular shape and are light as a feather:

V3 Sound YAMMEX XXL expansion tone module

The lump-in-the-middle power supply is roughly the same weight!

You might have seen and heard Piano Man Chuck demonstrate the V3 Sound Grand Piano XXL module. [Piano Man Chuck is a V3 Sound dealer, BTW.] Well, the YAMMEX has the same sound set as the Grand Piano XXL. The main differences are:

  • The MIDI bank and program change layouts are different: Grand Piano XXL for general use as an expander, YAMMEX XXL as a Genos/PSR expander.
  • Grand Piano XXL is supported by the V3 Sound Control app; the YAMMEX XXL is not.
  • Grand Piano XXL is supported by two different MIDI Designer templates; the YAMMEX is not.
  • YAMMEX XXL voices are selected using custom Genos/PSR user voices.

YAMMEX XXL arrives from the factory with a USB flash drive containing the custom user voices (VCE files) needed to select voices through Genos/PSR. It’s all described in the YAMMEX XXL manual. [Henceforth, “Yammex” means “YAMMEX XXL”.]

I found a Yammex on ebay at a price that was impossible to refuse. It would be a shame to confine Yammex to Genos duty alone, so I studied the heck out of its MIDI implementation. I also examined the VCE files available from the V3 Sound Web site. Hmmm, looks like it’s a simple matter of uttering the appropriate Bank Select MSB, Bank Select LSB and Program Change messages. We can do that!

An inquiry to V3 Sound about compatibility was answered quickly, but implied that Yammex was only for Genos/MIDI. If you know MIDI and your controller’s capabilities, and if you don’t mind a little work, Yammex definitely can do more than Genos/PSR.

I was sorely tempted by the V3 Sound XXL series because it is based on the Dream S.A.S. SAM5716B synthesis chip. After hearing the SAM2635 and its GM/GS sound set, I wanted to hear what a high-end Dream chip could do with 3GBytes of professionally produced instrument samples. Cut to the chase, V3 Sound do not disappoint especially at the price I paid.

Jeff’s Music Gear is Sweetwater!

The box arrives. I open the shipping carton and what the? The Yammex box is in fine shape, but is covered in round “Demo” labels. I instantly smell “Sweetwater”. And there’s candy, and a Sweetwater “Thank You” card. The ebay seller is Jeff’s Music Gear. After a Google, I discover that Jeff’s Music Gear is Sweetwater’s ebay consignment shop! Nice to know that I was in good hands all along.

OK, then, plug everything up using Yamaha MODX as a controller. (See my article about Yamaha MODX Zone Master.) Ooops, no flashing MIDI light and no sound. I’m already composing a message to Jeff’s when I remember this note in the Yammex manual:

No sound? The YAMMEX XXL sound expander only creates a tone when you call up a sound from the V3 folder in your keyboard’s display. Just connecting it to your keyboard is not enough.

They aren’t kidding! I select a voice through the MODX Zone Master screen and suddenly the MIDI light starts flashing and Yammex starts talking. Delete the message to Jeff’s.

One other note from the manual is helpful during bring up:

Testing MIDI connections and settings. After connecting your MIDI cable and making sure your MIDI settings are correct, select a V3 User Voice. The MIDI LED on the YAMMEX XXL should now blink with every keystroke.

I find this behavior to be a dubious design decision. The purpose of a MIDI light is to indicate MIDI reception under any condition. While troubleshooting, I connected the Yammex THRU port to MIDI-OX on a PC and verified MIDI operation. Most of V3 customers will not be that savvy…

I’ve just begun auditioning sounds and already I’m pleased. I like and prefer the Bösendorfer Imperial 290 (Vienna) over the Steinway Model D (Hamburg). I fell in love with Bösendorfer when I first touched one in 1980. The electric pianos are good although too clean and polite. The organ samples are damned good. There are two flavors: No Leslie and Leslie sampled in. Sans-Leslie voices are meant to be dirtied up by an external pedal. I’ll try the Electro-Harmonix Lester K for spin and throw some overdrive on the EPs, too.

I like the Oberheim pads — another love. The classical strings are solid. That’s as far as I’ve gotten into the sound set. I’m looking forward to hearing the rest.

As to the supplied USB flash drive, the previous customer zorched the factory VCE files. I found an X6A file instead which I recognize as a Yamaha MOXF dump file. I guess the previous customer tried Yammex with MOXF and was disappointed. Fortunately, V3 Sound provide the Genos/PSR VCE files on their Web site. The supplied drive is only 64MB. [Not really a complaint.]

Experiments to come? Once I get my faves down to 8, 16 voices or so, I’ll configure the Arturia Keylab Essential. The extra knobs and sliders will come in handy. Also, I will whip up a simplified MIDI Designer template for the Yammex. The existing templates are comprehensive — yet overwhelming. I’m thinking about a UI similar to Korg Module. Those Korg folks are definitely on to something. Simplicity is king. MIDI Designer (with StreamByter) on iPad should give me splits and layers — maybe even a wireless Bluetooth interface to Yammex? Finally, Dream multi-FX.

Copyright © 2022 Paul J. Drongowski