Korg have released a new expansion pack for Korg Module — General 128.
General 128 is one of those expansions where you say “Why didn’t they release this on Day One?” Essentially, General 128 is a 108MB General MIDI sound set minus drums.
Most of us will not sequence MIDI tunes using Korg Module. However, General 128 covers all of the bases, making Korg Module generally useful in a flash. As GM sound sets go, all of the voices are reasonably pleasant and usable enough.
The only real knock on voice quality is their rather plain sonics. The effect programming is very ordinary. Once suitably dressed, individual voices are brought to life. For example, throw a little tremolo on that electric piano. Having a small memory footprint, one shouldn’t expect many (any?) velocity-switched multi-samples. To my ears, most of the voices are very “uni-dimensional” single level multi-samples which just get softer or louder with touch.
This isn’t all bad! I stumbled onto Korg’s introductory sale while casting around for new voices to layer within Module. [The introductory sale price, $9.99 USD, is good through Monday, 31 October 2022.] It’s much easier to layer up simple timbres than harmonically rich, dynamic sounds. For example, you wouldn’t use the oboe for an exposed solo, but it does add a reediness to a French horn producing a more WW section-like tone.
Allowing for the sound set limitations (i.e., one velocity layer), my favorite voices are the Acoustic Grand (warm), Electric Piano 1 (What’d I Say), Synth Strings 1 (warm, not too synthetic), French Horn (fanfare-ish), Bassoon (warm double reed), Flute (simple without devolving to Mellotron).
At the introductory price, the General 128 expansion is a no-brainer. In addition to Korg Module, the pack can be used in Korg Gadget Glasgow and as an AUv3 plug-in. General 128 might get me using Korg Gadget — maybe sequence a demo.
Big picture, I’m feeling quite comfortable with my iPad rig these days and I think it’s rehearsal ready. I would use either the Korg Microkey Air or Arturia Keylab Essential 49 depending upon my degree of laziness on any given day.
I tried going wireless with the Arturia Keylab Essential getting good results with the Yamaha MD-BT01 5-pin Bluetooth dongle. Only the MIDI OUT side is connected since the Arturia doesn’t have a 5-pin MIDI IN port. Connects up to Korg Module without problems. I don’t recommend the Yamaha UD-BT01 USB Bluetooth adapter for the Arturia; I get stuck notes.
If you mix and match your gear over MIDI, you will eventually need to send a program change message. Yesterday, I wanted to audition the sounds in my hacked Akai MPK Mini Play and needed to send a full Bank Select MSB (CC#0), Bank Select LSB (CC#32) and Program Change message sequence to the Akai MPK Mini Play.
Usually I scramble around looking for cables and hook up a MIDI controller like the Arturia Keystep or Keylab Essential. Inevitably, I scratch my head trying to remember how to send a full sequence of bank and program change messages from the controller. Maybe a trip through a PC-based control editor is required. It’s amazing that in this day and age, it is still difficult or impossible to send a full three message sequence in one go! [Grr.]
This time I said “Why not MODX?” and the best solution of all was in front of me.
The trick is to use the MODX Zone Master feature. I don’t intend to deep-dive Zone Master here and recommend the Mastering MONTAGE: Zone Master FAQ on the Yamaha Synth site. The MODX and Montage are enough alike such that the Montage tutorial applies to MODX, too.
The basic concept is simple. When Zone Master is enabled, a part in an MODX Performance can send MIDI messages over the 5-pin MIDI OUT. One needs to configure a few things before setting up a part and zone in a Performance.
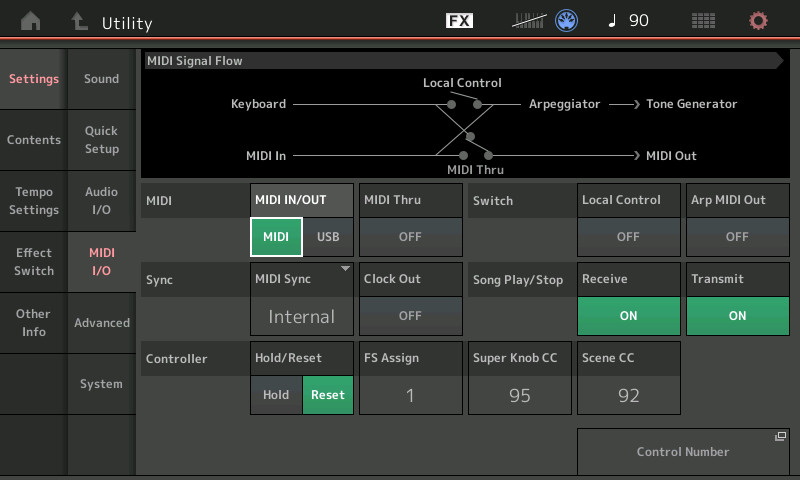
Yamaha MODX MIDI I/O settings
For my experiment, I hit the UTILITY button and tapped the MIDI I/O tab under Settings. There, I made two changes:
I changed MIDI IN/OUT to MIDI in order to send MIDI messages through the 5-pin MIDI OUT. If this parameter is USB, you won’t send or see messages on the 5-pin port.
I turned Local Control OFF. If MODX isn’t connected to a powered speaker (or whatever), this step is optional.
Don’t forget to change these settings back to what they were when you’re done. MODX remembers them across power down and you may be surprised to find a silent MODX when you turn it on again.
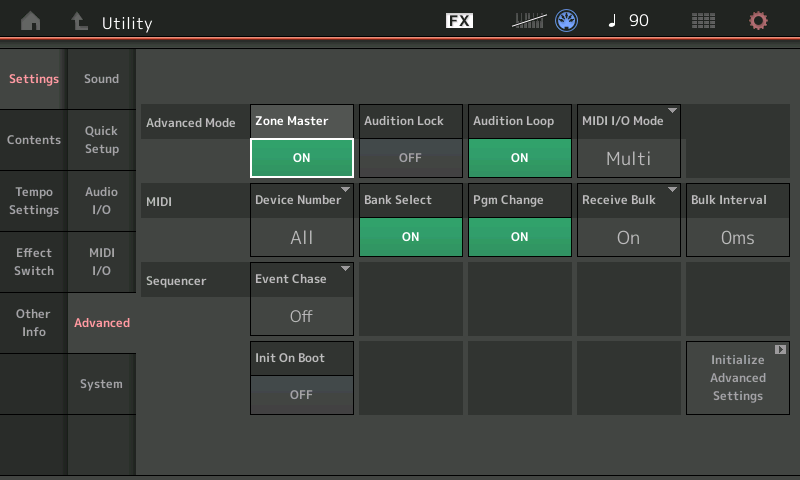
MODX advanced settings (including Zone Master)
Next, tap the Advanced tab. Turn Zone Master ON. Zone Master is not enabled by default. If you don’t enable Zone Master, you will not see zone-related tabs and parameters when editing the Performance part.
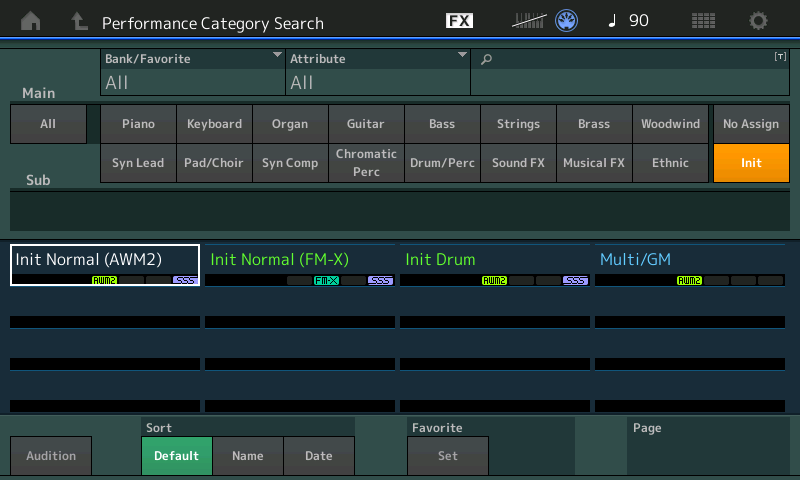
Create an empty MODX Performance
Hit the EXIT button and click CATEGORY. We’re going to create a new, empty Performance. Tap the Init category button. Then tap Init Normal (AWM2). This creates a new empty (AWM2) Performance.
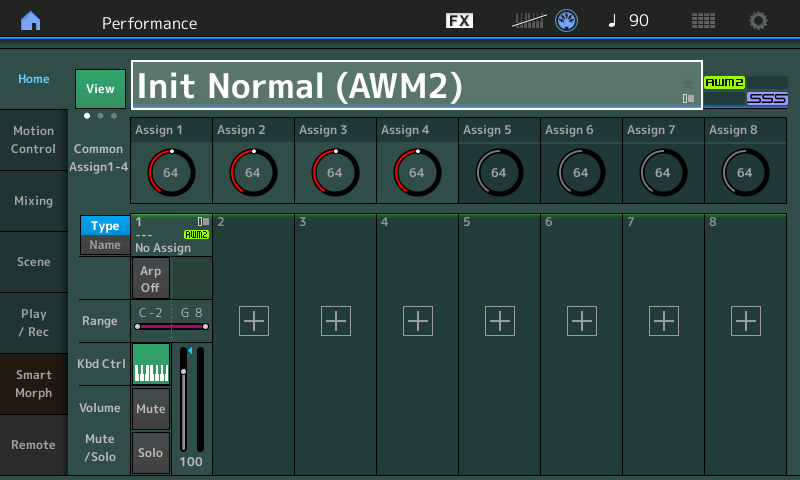
A brand new empty Performance to edit
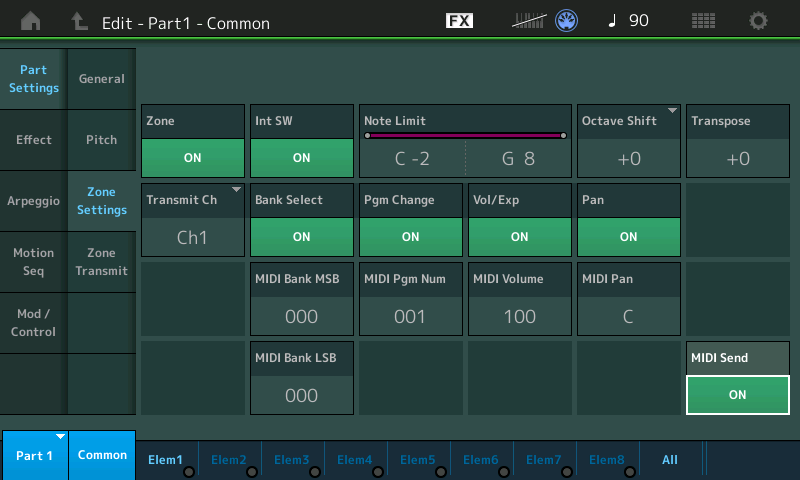
MODX Zone Master settings
Cursor over to the part and hit the EDIT button. You should see two additional Zone Master tabs that normally aren’t displayed in Part Common Edit (i.e., when Zone Master is disabled). Tap the Zone Settings tab. Make the following changes:
Turn Zone ON.
Set the Transmit Channel to Channel 1 or your heart’s desire.
Turn MIDI Send ON.
Make sure Bank Select and Program Change are enabled (ON). Now you’re ready to send bank and program change messages to the target device. You did connect your target device to the 5-pin MIDI OUT port, right?
For those of you who are building a Performance to be saved and used in the future, check out the Internal Switch (Int SW) parameter. Turn it OFF if you don’t want MODX to send messages to the internal tone generator, that is, make this a locally silent part.
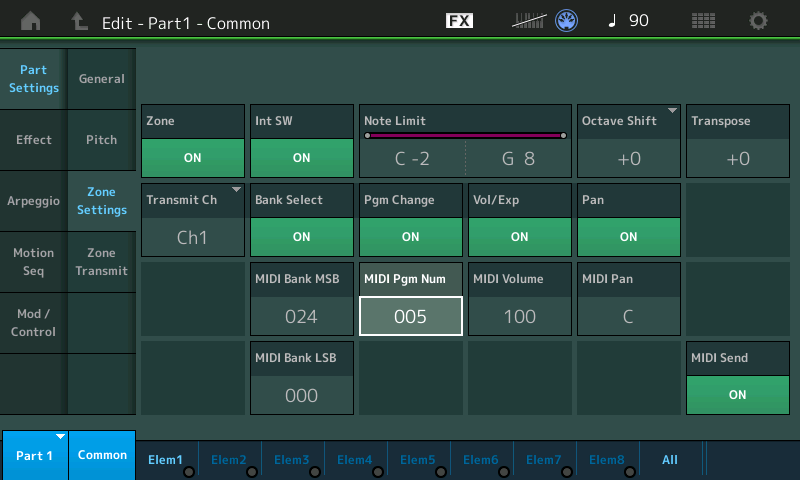
Cursor over to (or tap) the MIDI Bank MSB, MIDI Bank LSB and MIDI Program Number parameters to change values. MODX sends a full three message sequence when the Program Number is changed. So, if you change Bank MSB or LSB, you must send a Program Number to send the full sequence and make the actual patch change in the target device.
MODX bank select and program change example
In the screenshot above, Bank MSB 24, Bank LSB 0, and Program Change 5 selects the 60’s vintage electric piano (Wurli) in the Akai MPK Mini Play tone generator. Oh, you didn’t know the MPK Mini Play had a Wurli variation? Read on, below.
Conveniently, you can send MIDI volume (CC#7) and MIDI pan (CC#10) messages from this same screen. You can mess with local Octave Shift and Transpose. Pitch bend and mod wheel messages go out, too, and you can play away and freely audition sounds in the target device/module.
Overall, I find the MODX Zone Master method an easy way to experiment with a target device or tone module. If you’re a MODX owner, give it a try!
The MPK Mini Mod is functioning quite well and is stable. Just remember that only one source can send MIDI messages to the SAM2635 at a time, i.e., either the MPK Mini Play host microcomputer or the 5-pin DIN MIDI IN, not both. Messages are not merged and will collide electrically, leaving the SAM2635 confused.
The Dream SAM2635 is a full Roland GS implementation, not just General MIDI. The SAM2635 offers variation sounds including different organs and electric pianos. I really need to write a short run-down and review…
MODX screen capture
Just in case you’ve forgotten the steps to capture a MODX screen, here they are:
Insert A USB flash drive into the USB To DEVICE port on the back panel.
Press and hold the A/D INPUT ON/OFF button.
Press and release the AUDITION button.
Release the A/D INPUT ON/OFF button.
Simple, eh? And so easy to forget. 🙂 The screen shots are written to the USB flash drive in PNG files.
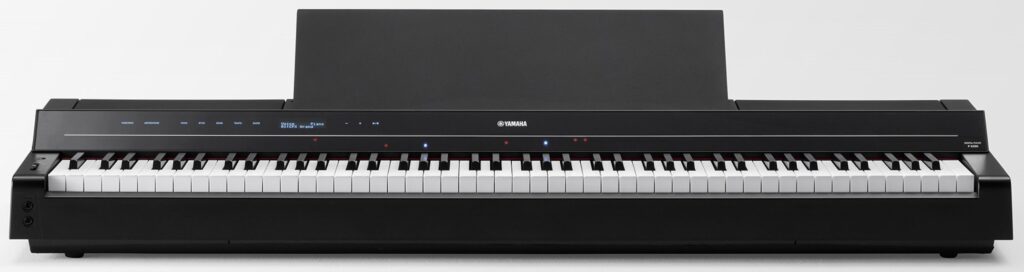
While we’re distracted with “CK”, “AN”, and whatnot, Yamaha sneaks out a new P-series digital piano in Europe: the Yamaha P-S500.
Natch, you can read all about the P-S500 at Yamaha’s European web site. Physically, it’s a minimalist slab that’s designed primarily for the home or small studio market segments. Cost is about 2,100 Euro and I would expect it to retail for about $2000 USD in the States.
Yamaha P-S500 digital piano
Basic features [courtesy of Yamaha] are:
Compatible with Smart Pianist app installed to a smart device
Stream Lights feature helps you perform even if you can’t read music notation
Enjoy playing along with the 403 preset Songs, covering a wide range of genres from pop music to classical music
Audio To Score function converts your favorite audio songs into piano accompaniment scores
Authentic Yamaha CFX & Bösendorfer Imperial concert grand piano Voices
Virtual Resonance Modeling (VRM)
88-note weighted GHS keyboard
Huge variety of 660 high-quality instrument Voices, including Super Articulation Voices
Built-in Auto Accompaniment features with 370 Styles
Microphone input and automatic Vocal Harmony
Auto-accompaniment, styles, Super Articulation voices? We’ve seen these features in the DGX series, notably, the most recent DGX-670 model. The table below compares the P-S500 against the DGX-670. The DGX-670, by the way, goes for considerably less dough: $850 USD.
                DGX-670           P-S500
                ----------------- ---------------------------------
Main piano:     Yamaha CFX        CFX, Bösendorfer Imperial
VRM:            Yes               Yes
Key-off sound:  Yes               Yes
Action:         GHS               GHS
Piano Room:     Yes               Yes
PB wheel:       Yes               No
Dual/layer:     Yes               Yes
Split:          Yes               Yes
USB audio:      Play/record       Play/record
Bluetooth:      Yes               Not built-in (optional)
Amplification:  2 x 6W            2 x (20W + 6W)
Speakers:       2 x (12cm + 5cm)  2 x (12cm x 6cm oval+2.5cm dome)
Display:        480x272 color     80x16 mono LCD
Weight          47.2 pounds       48.1 pounds
Here’s the decoder ring for Yamaha acronyms: Virtual Resonance Modeling (VRM), Graded Hammer Standard (GHS), Super Articulation (SA), Cool (velocity switched), Live (stereo), Organ Flute (drawbar organ).
The P-S500 looks to be the upscale, uptown sibling of the DGX-670. At 48 pounds, I don’t think you’ll want to schlep the P-S500 out of the house very often. In terms of styles and voices, the P-S500 is superior:
                          DGX-670  P-S500
                          -------  ------
Total voices              601      660
    VRM voices            9        13
    SA voices             49       111
    Natural voices        11       25
    Sweet voices          26       27
    Cool voices           53       47
    Live voices           68       58
    Organ Flute voices    0        29
Total styles              263      370
    Pro styles            215      328
    Session styles        19       25
    Free Play styles      0        3
    Pianist styles        29       13
Drum Kits                 29       29
The P-S500 factory voice set includes many of my favorites. If you’re looking for a more than decent, mid-level keyboard with auto-accompaniment and a graded hammer keyboard, the P-S500 is worth a look. Versus a mid-level arranger keyboard, you’re still giving up a pitch bend wheel, multi-pads, style control buttons, MIDI record/edit, etc. If you just want to play and have a good piano experience, I’d go with the P-S500 in a heartbeat. (The DGX-670 is no slouch, either.)
There are many other differences that I’ve glossed over. So, if you’re trying to decide between DGX-670, an arranger or the P-S500, be sure to dig into the manuals and data list files. Yamaha doesn’t always make it easy to compare, especially as to your specific musical goals and use cases.
One enormous difference needs to be emphasized, however. The P-S500 front panel is utterly minimalist. If you want to exploit the P-S500 to its fullest, you must use the P-S500 with the Yamaha Smart Pianist app on a tablet (Apple or Android). In this respect, the P-S500 is more like the CSP series of digital pianos for the home. It’s like a CSP without the furniture. The CSP models have enhanced GH3X or NWX keybeds which improve the piano playing experience. Given that the Smart Pianist is almost a necessity, it’s kind of weird (cheap) to omit built-in Bluetooth.
Yamaha are certainly giving us choices!
A final, electronics nerd comment. While studying the internal design of current arranger, synth and digital piano products, the designs often seem like a deconstructed tablet connected to a keybed, tone generator and MIDI/USB interface. The digital electronics are remarkably similar. With the P-S500 and the CSP series, it’s like Yamaha said “Aw, the heck with it” and moved functionality out of the piano (arranger, synth) chassis into a stock, commercial tablet like iPad or Google Pixel tablet. I don’t think we have seen the end of this approach to instrument design…
I’ve been working on backing and lead instruments for the classic Del Shannon song “Keep Searchin'”.
Yamaha Genos™ is made for this tune. First off, its “ShadowedPop” style is the perfect fit for that old 1950s rock’n’roll vibe. It has just the right amount of swing and attitude.
Next, Genos has very good electric guitars for lead. Want clean Tele or Strat? Genos has them. Genos also has a suite of effects to obtain a complete, authentic guitar tone.
Yamaha arranger styles have “One Touch Settings” which are mini-registrations. Hit an OTS button and Genos will both change song section and bring up an appropriate voice. The Genos “ShadowedPop” style has two OTS mini-registrations that are worth deconstructing to see how the Yamaha sound designers got their Shadows guitar tone: “60sShadowLead” and “ShadowedGuitar”.
Of course, the “shadow” in all of these voice and style names refer to Hank Marvin and The Shadows — one of, or perhaps, THE iconic 1950’s guitar band and sound. The Shadows’ treatment felt absolutely right for the Del Shannon cover. Hank Marvin was perhaps the first English artist to pick up a Fender Strat, usually putting it through a Vox amp.
The PSR “ShadowedGuitar” voice goes back four or five years and is a standard factory preset. If your Yamaha arranger does not have “ShadowedGuitar”, choose a clean, 1960’s vintage guitar preset voice. Change the insert effect to Tempo Echo and set the insert effect send level to 30. Change the effect parameters to:
 Param#  Parameter name       Value
 ------  -------------------  ------
      1  Delay Time           8th
      2  Feedback Level       +28
      3  Feedback High Damp   1.0
      4  L/R Diffusion        +14ms
      5  Lag                  0ms
     10  Dry/Wet              D34>W
     13  EQ Low Frequency     500Hz
     14  EQ Low Gain          0dB
     15  EQ High Frequency    4.0kHz
     16  EQ High Gain         0dB
Reverb is a big part of the 50’s vibe and you’ll need gobs of it on the guitar. Select a hall reverb and set the reverb send level to at least 50. If your arranger has it, I recommend the “Real Medium Hall+” preset. It’s one of Yamaha’s best reverbs, in my opinion.
Only Genos has the “60sShadowLead” voice voice. Fortunately, it’s easy to add a close sound-alike to your instrument. Start with “ShadowedGuitar” or a clean, 1960’s vintage guitar preset. Get into the mixer (or DSP effect page) and change the insert effect to Multi FX Vintage Echo and set the insert effect send level to 127 (if necessary). Then change the effect parameters to:
 Param#  Parameter name       Value
 ------  -------------------  ------
      1  Comp Sustain    2.9
      2  Wah Switch      Off
      3  Wah Pedal       0
      4  Dist Switch     Clean
      5  Dist Drive      5.0
      6  Dist EQ         Mid Boost
      7  Dist Tone       3.5
      8  Dist Presence   4.3
      9  Output          110
     11  Speaker Type    Twin
     12  LFO Speed       2.103Hz
     13  Phaser Switch   Off
     14  Delay Switch    Delay St
     15  Delay Control   60
     16  Delay Time      33
We met the Multi FX algorithm once before. This algorithm is like a virtual guitar pedal board:
The above parameter values dial in The Shadows’ guitar tone.
You’ll need gobs of reverb, again, to complete the scene. Choose the “Real Medium Hall+” preset and set the reverb send to at least 40.
The “60sShadowLead” OTS also configures the chorus system effect. Having listened to the overall tone with and without chorus, this step is optional. (Possibly some other style part may be affected by this change or a change to any other system-level effect including reverb.) Change the chorus type to “Celeste 1” and set the chorus send level to 12. 12 is not especially high, so you can see why this last step is optional; it’s just a little sweetener.
You might consider changing the chorus effect to tremolo (e.g., “E-Piano Tremolo”). Guitarists in the 50s and 60s didn’t have guitar pedals. (Sorry, Edge.) So, folks relied on guitar amp spring reverb and tremolo (often mislabeled “vibrato”) to get space-y effects. I still have the sound of an Ampeg Gemini going through my head. 😎
Select the “E-Piano Tremolo” effect preset, increase the AM Depth to max, and set the chorus send level to 127:
 Param#  Parameter name       Value
 ------  -------------------  ------
      1  LFO Frequency        5.38Hz
      2  AM Depth             127
      3  PM Depth             0
      6  EQ Low Frequency     500Hz
      7  EQ Low Gain          0dB
      8  EQ High Frequency    4.0kHz
      9  EQ High Gain         0dB
     11  EQ Mid Frequency     2.0kHz
     12  EQ Mid Gain          0.0dB
     13  EQ Mid Width         1.0
     14  LFO Phase Difference +39deg
     15  Input Mode           Mono
         Return Level         127
You’re looking for that deep, “Spaghetti Western”, Ennio Morricone effect. Play the lead line an octave down. Have fun!
The EQ parameters in the tremolo algorithm make this a good guitar tone mangler — swept mid EQ with Q (width)! Mid boost or cut is right at hand.
Here are short demos (MP3) on Genos with tremolo and without tremolo. Yamaha Montage and MODX have the same effect algorithms, so you should be able to apply the same techniques on those instruments, too.
Links to a few other posts about chasing tone on Yamaha gear: