Tuning up a littleBits oscillator

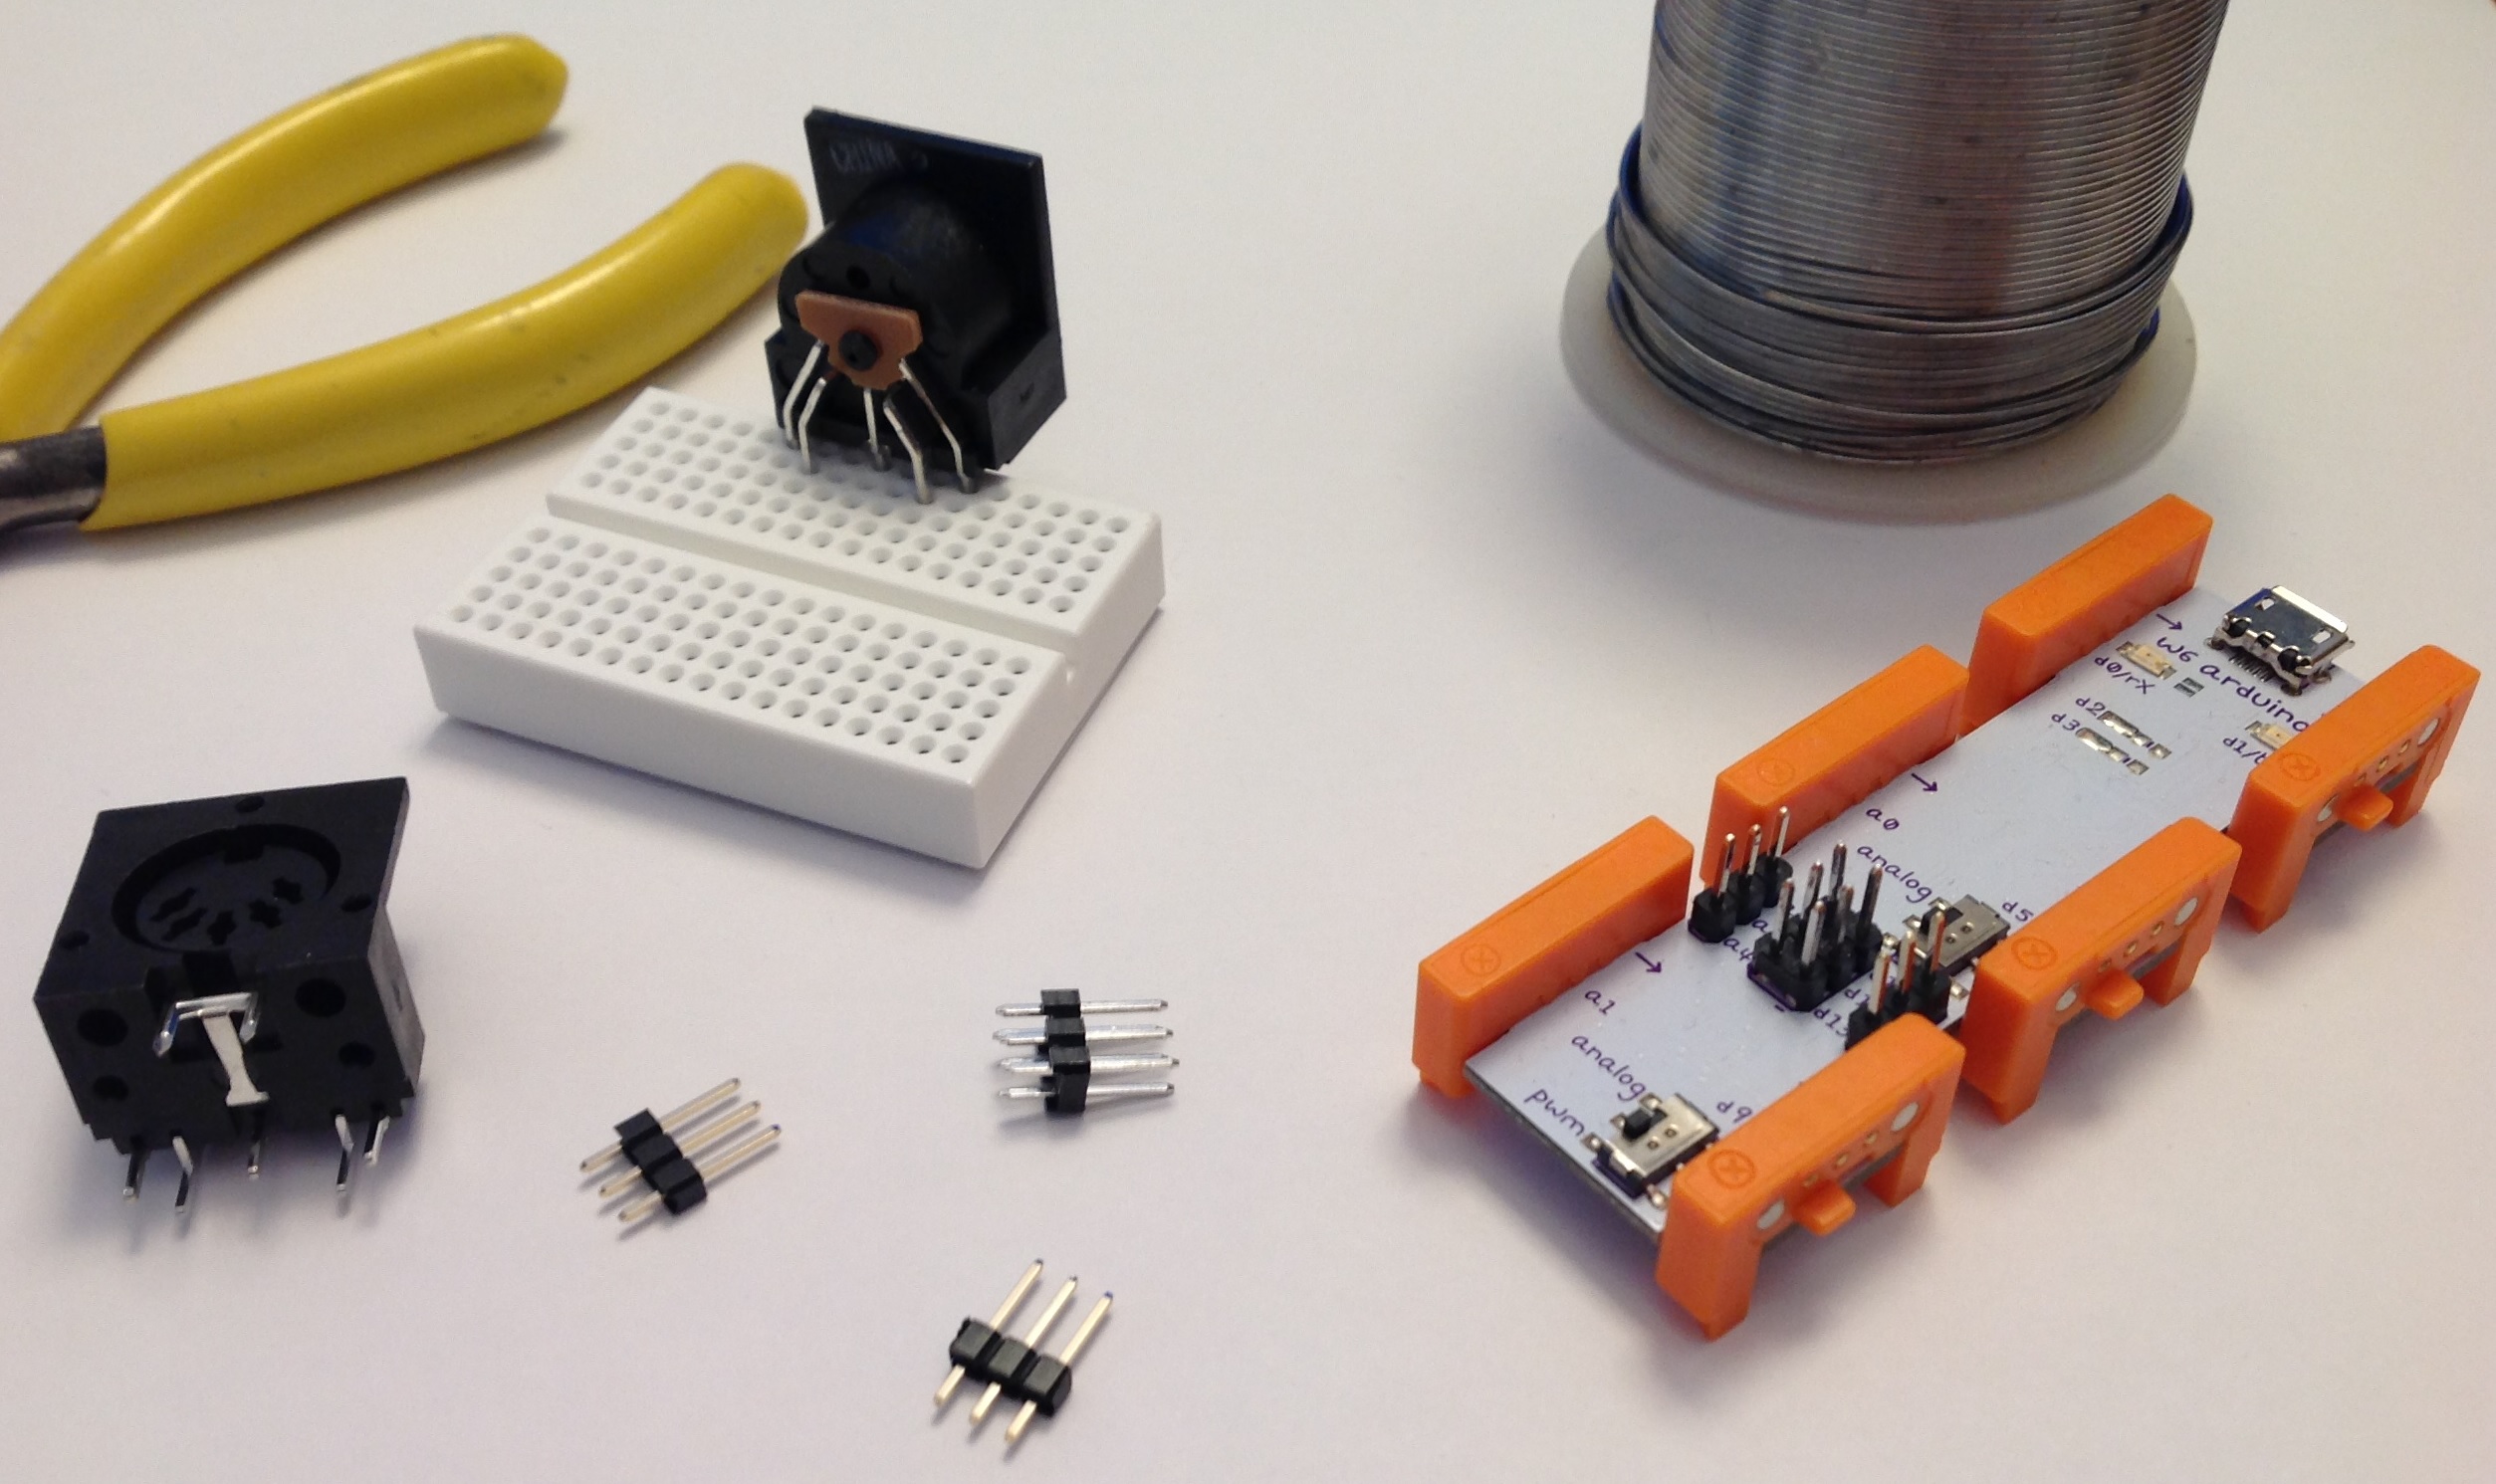
I’m starting to experiment with the littleBits oscillator and synth bits. I’d like to control the oscillators using an Arturia Keystep either through MIDI or through the Keystep’s control voltage (CV) and gate outputs.

Perusing the littleBits forum, I noticed several complaints about how difficult the oscillators are to tune. Setting the basic pitch is not a problem — just turn the PITCH knob. The issue is really intonation. Guitarists are very familiar with intonation, that is, being in tune along the fretboard. The keyboard equivalent is being in tune across the entire keyboard or a given range of keys.

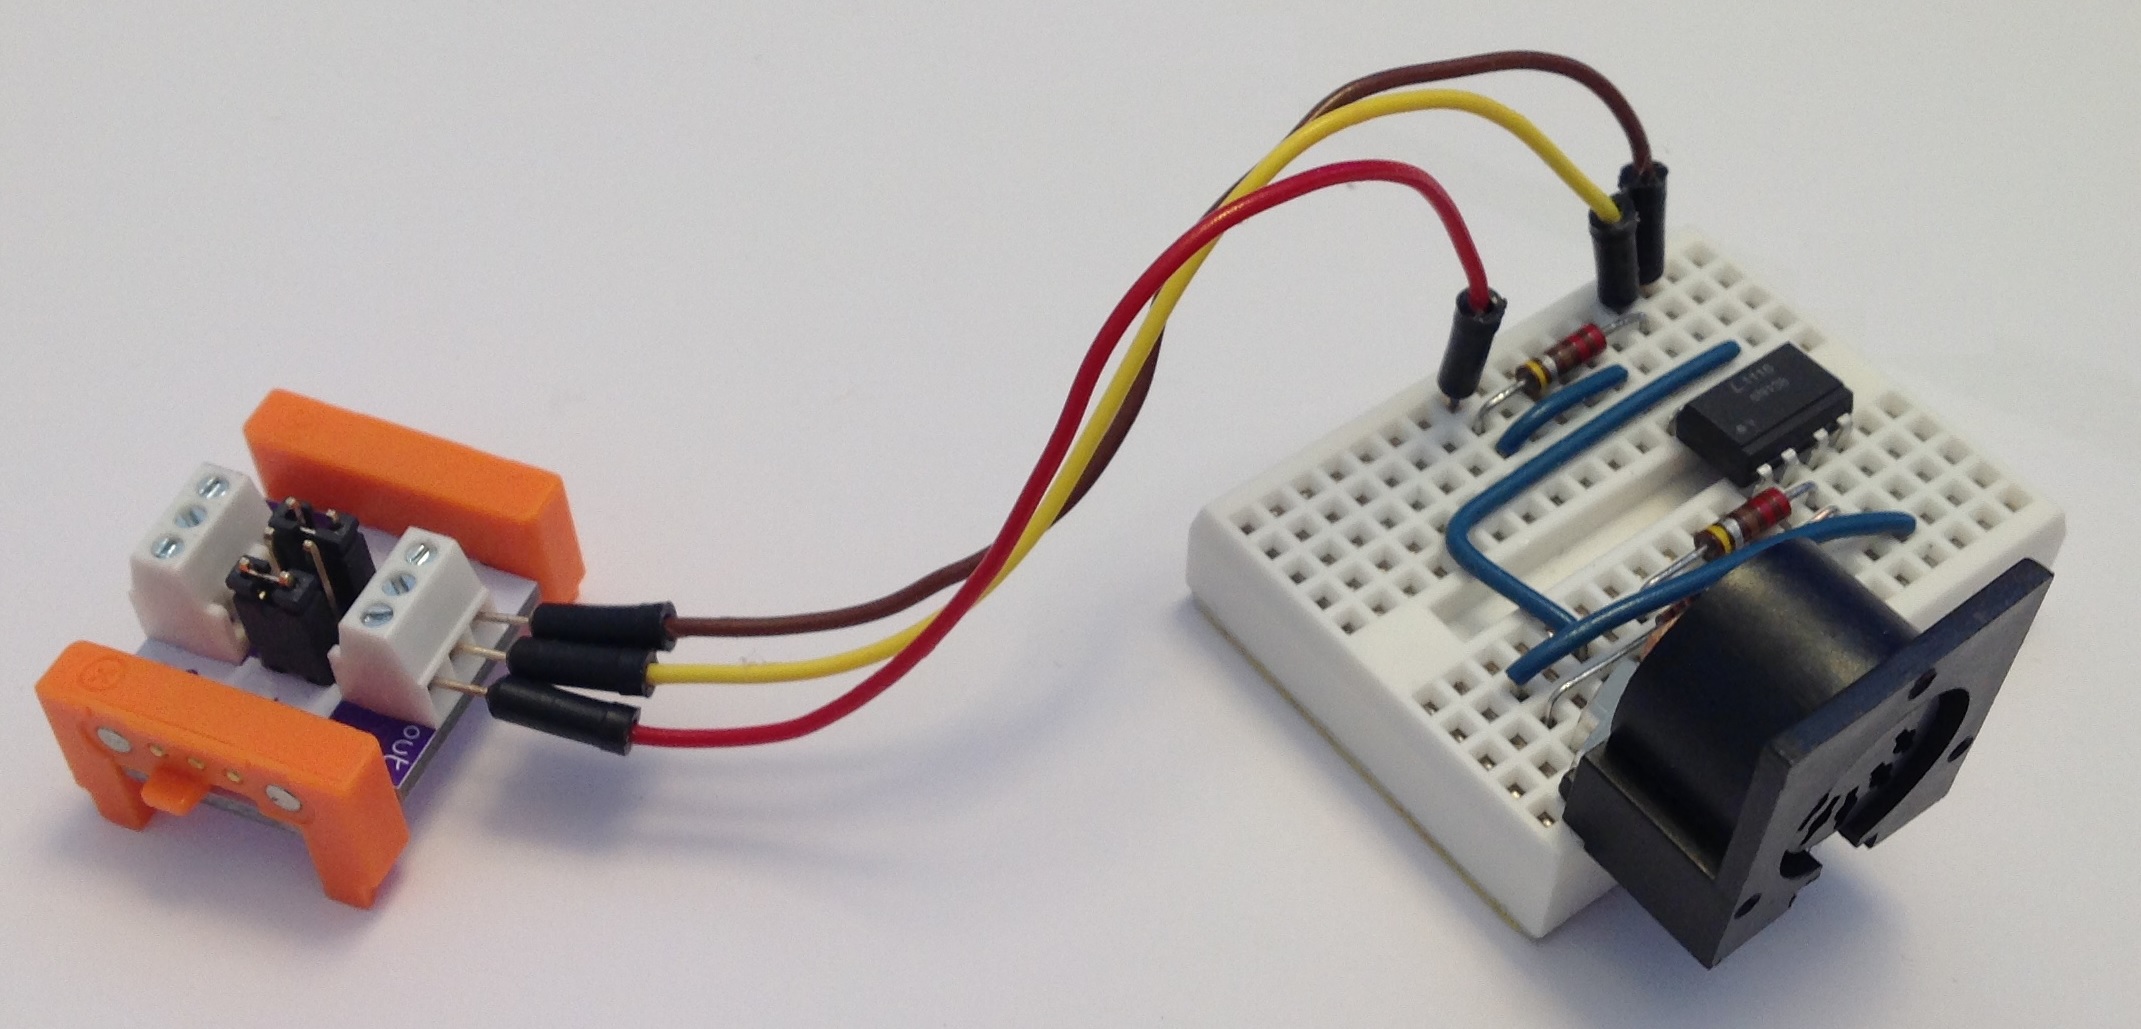
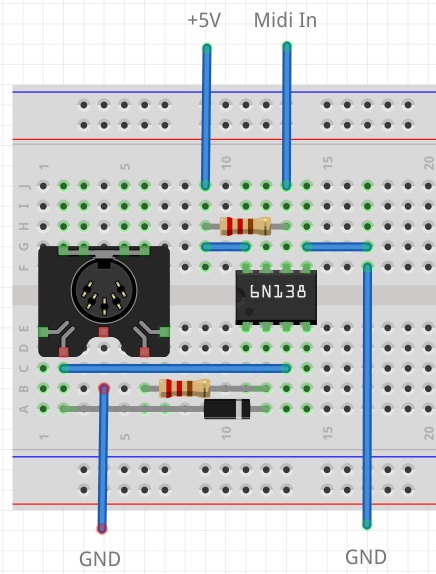
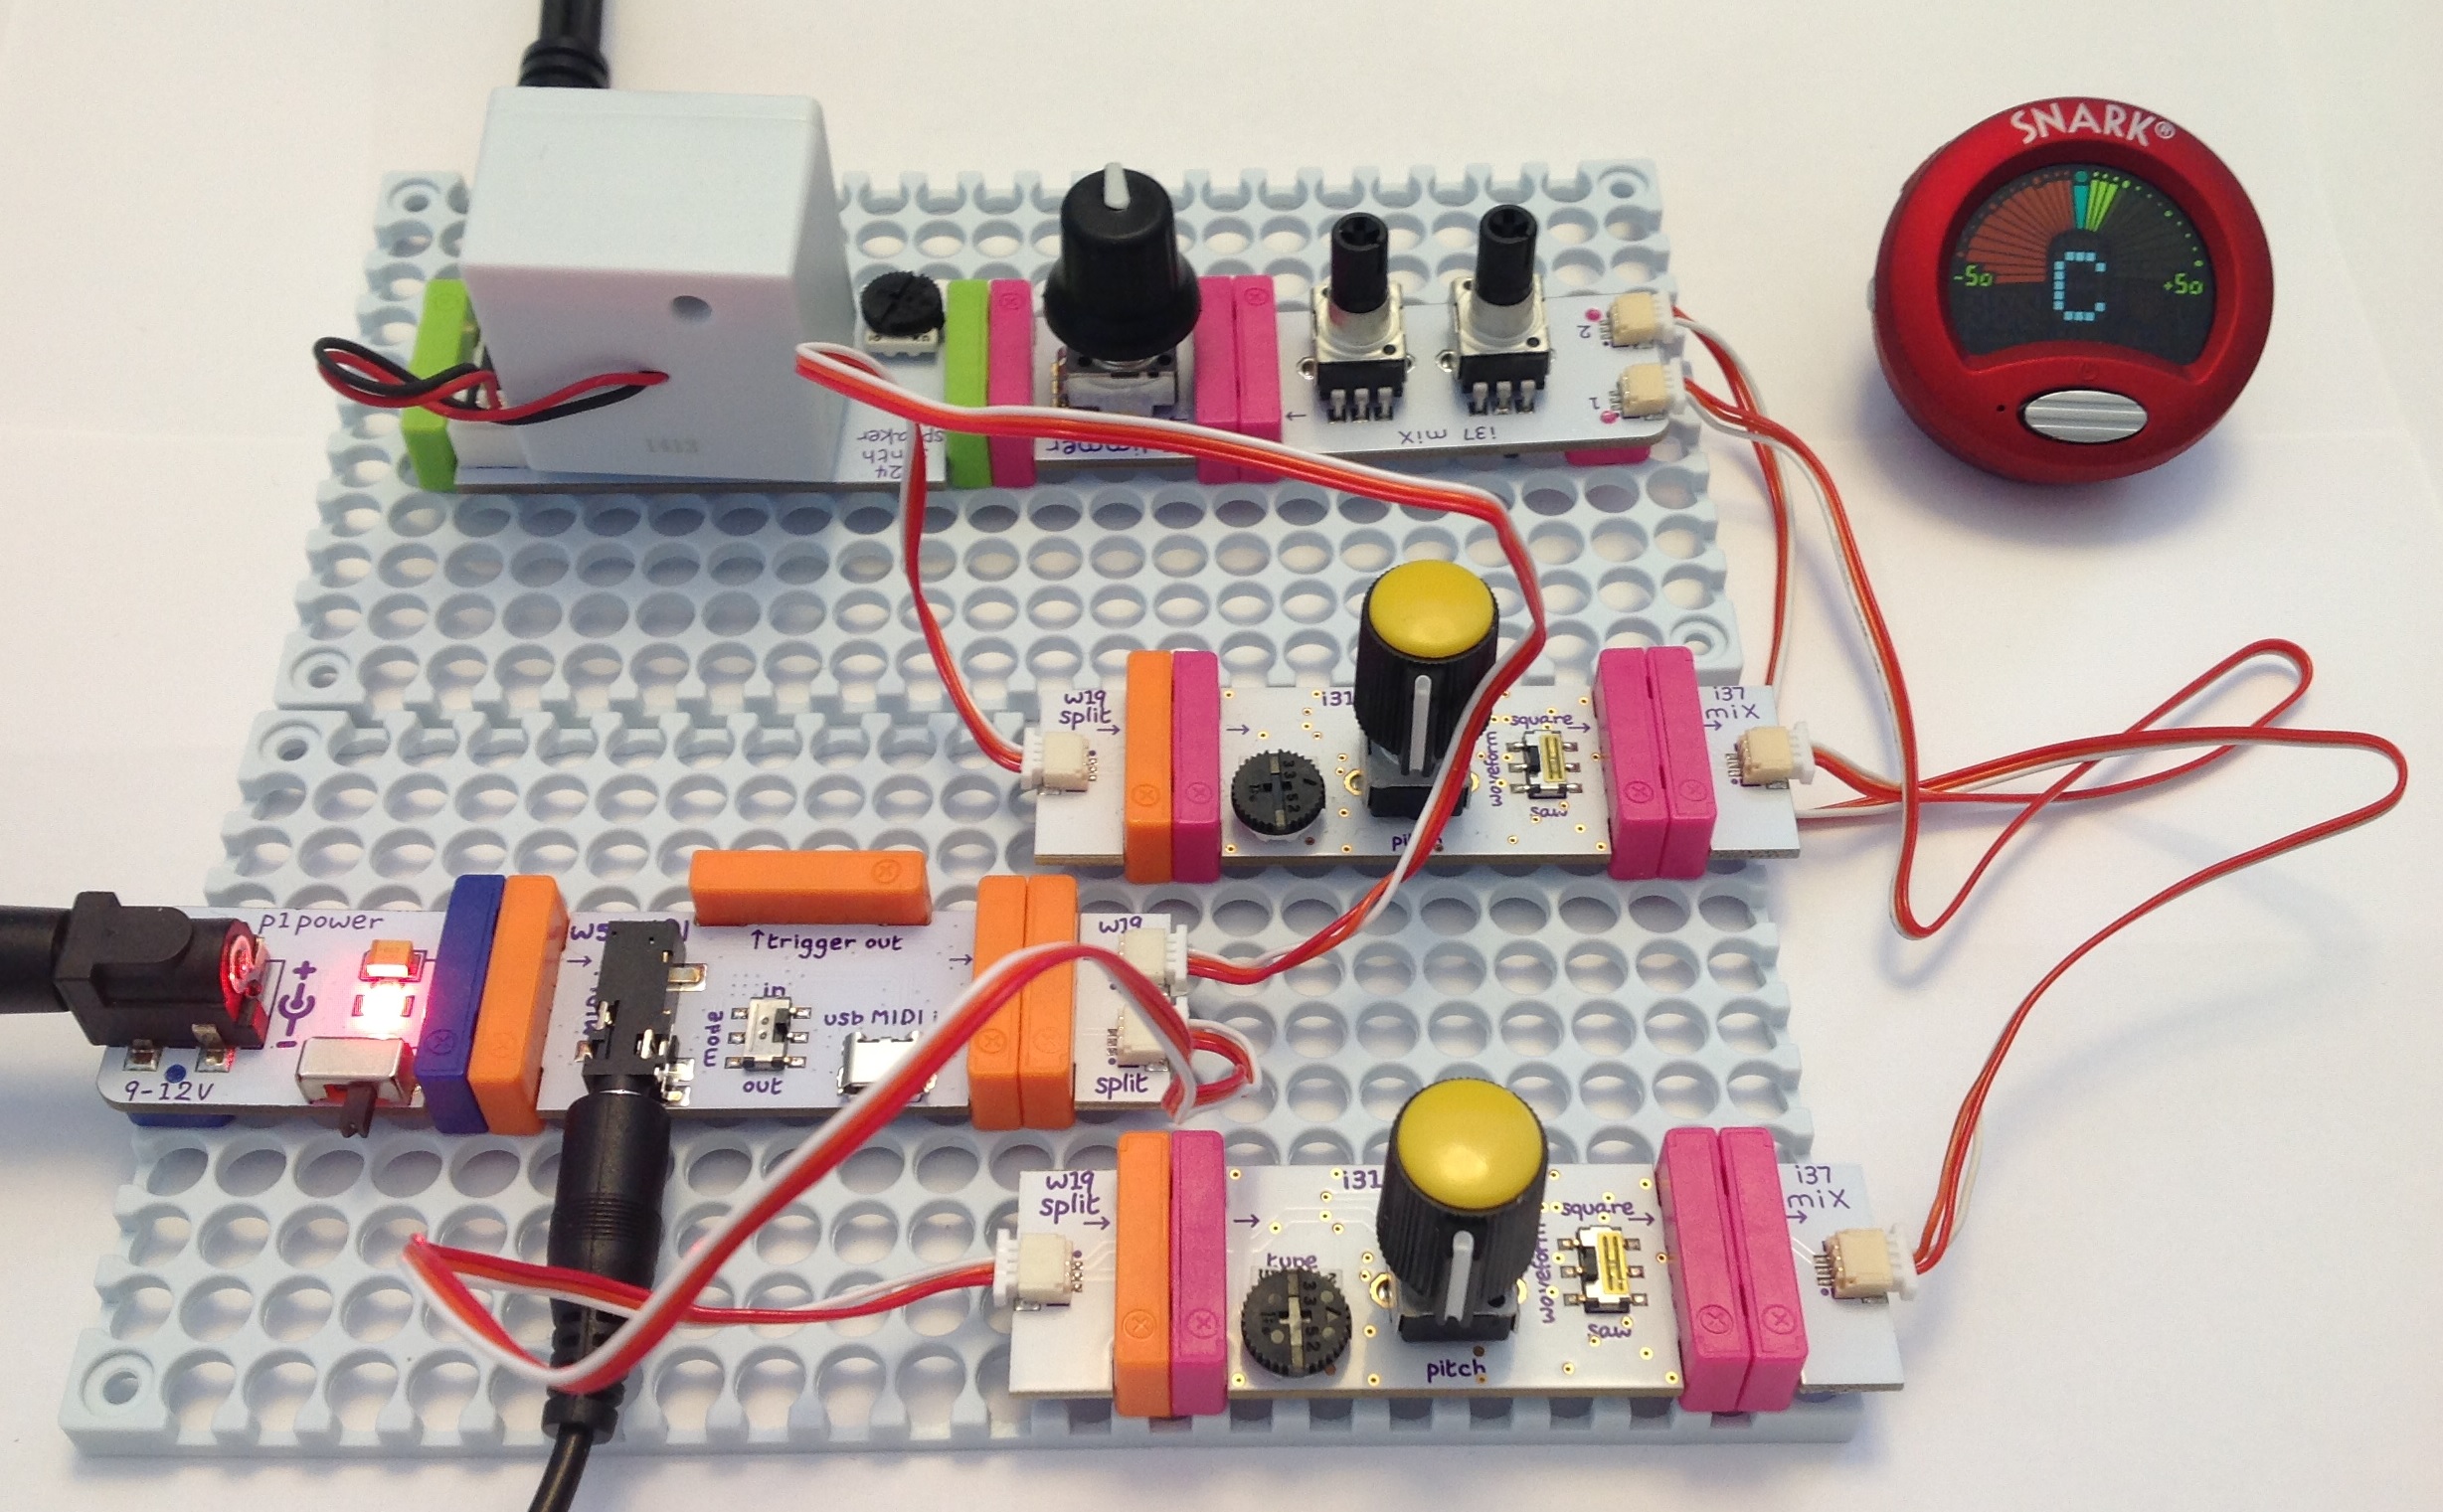
For my initial testing, I assembled a simple littleBits circuit:

Power -> MIDI module -> Oscillator -> Dimmer -> Synth Speaker

The littleBits MIDI module was connected to an Arturia Keystep and for comparison’s sake, a Korg MicroKORG. The MIDI module translates incoming MIDI note on and note off messages into littleBits-compatible CV. The Dimmer is the volume control. I find it much easier to set volume levels, etc. with a full-size pot instead of a trimmer. Also, I strongly recommend putting knobs on the oscillator PITCH pot. It is much easier to set the oscillator pitch accurately when a knob is installed. (Funny how the little things make a big difference.)

My first concern was the actual control voltage being sent to the oscillator. I pulled out my trusty multimeter and measured the Keystep’s pitch (CV) over a wide range of keys (notes). I also measured the CV generated by the littleBits w5 MIDI module. The voltages all look reasonable for 1 volt per octave CV, modulo the limited 3 digit precision of the multimeter. Two notes separated by an octave produced a one Volt difference as expected.

The Keystep generates CV from 0 Volts to 10 Volts. littleBits signals are limited to the range from 0 Volts to 5 Volts. Rather than tempt fate and drive the littleBits oscillator from the Keystep CV output, I decided to put a littleBits CV interface module on order. The CV interface scales CV to the littleBits range — whatever that means. Stay tuned.

The voltage for each note as produced by each CV source (Keystep CV vs. MIDI module) is not the same. For example, the Keystep generates 4.03 Volts for MIDI note C2 while the MIDI module generates 1.20 Volts. Relax. This isn’t a big deal as the basic pitch is easily set by the oscillator’s PITCH control. It’s all relative, man.

I used a Snark guitar tuner to set the pitch and to test intonation. The Snark is an inexpensive small tuner with a microphone input. I like the Snark because it shows the detected note (C, C#, D, etc.) and whether the note is flat or sharp. I don’t like the Snark because the clip-on thingy breaks off almost immediately! The clip-on thingy isn’t necessary for desktop testing, however.

I first tried setting the pitch and intonation by ear. This is where the MicroKORG was really handy. I sent the MicroKORG’s MIDI out to the MIDI-to-CV module and routed the MicroKORG’s audio output to the mixer feeding the studio monitors. I also patched the littleBits audio into the mixer, so I could easily dial up the MicroKorg audio as a pitch reference. Hit a single key on the MicroKORG and both the oscillator and MicroKORG attempt to play the same note. Adjust the PITCH and TUNE knobs appropriately.

The Snark tuner method is much better. The Snark’s display shows when things are sharp or flat. I recommend using a tuner like the Snark instead of matching pitch by ear.

At first I couldn’t get satisfactory intonation beyond a one octave range. This is disappointing and appears to be the place where most forum members gave up. I read the Korg littleBits Synth booklet paying particular attention to the tuning procedure on page 21. One of my biggest complaints about the littleBits system is the lack of detailed documentation and the Synth book was kind of sketchy about tuning and intonation. However, a light did turn on in my head.

I decided to turn the TUNE trimmer fully clockwise (thinking “OFF”). Then, I set the base pitch, i.e., the lowest pitch in the desired range. Next, I checked the highest note in the desired range — about two octaves. Natch, the intonation was bad, so I slowly turned the TUNE trimmer clockwise until the pitch of the highest note was correct. This disturbed the pitch of the lowest note and I had to find a balance between pitchiness at the low and high ends.

The result is fairly playable. I played the chromatic scale from lowest to highest and checked the Snark at each step. The intonation was acceptable.

To make sure this procedure wasn’t a fluke, I tuned the second oscillator using the same method and got the same result. Finally, I wired up the MIDI module driving both oscillators and mixed the audio:

                             |-> Osc ->|
Power -> MIDI -> Split ->|         |-> Mix -> Dimmer -> Speaker
                             |-> Osc ->|

The pitches were danged close and the intonation of the individual oscillators matched quite well. I just needed to adjust the relative tuning to get a good phat sound.

Not bad for “cheap” $16 USD oscillators! It’s rather unfair to blame the oscillator design at this price. Plus, you did say that you want analog synthesis, right? We’ve gotten spoiled by decades of pitch-perfect digital synths. Making the tuning and intonation right is all part of the analog game.

One final thought. The littleBits CV signal driving the oscillators is somewhat under-documented. Voltage Control Lab have a nice analysis. They explain the littleBits OUT signal from the Korg SQ-1. They say that the CV signal plays two roles as a combined gate and pitch control. When the CV is asserted, i.e., the gate is high, the voltage level sets the pitch.

Here’s a more MIDI-centric interpretation. When a MIDI note is off, the CV signal is 0 Volts. The oscillator is silent at 0 Volts. When a MIDI note is on and held, the CV signal sets the pitch. When the MIDI note goes off, the CV signal returns to 0 Volts and silences the oscillator. This appears to be the behavior of the MIDI module (when it is in MIDI IN mode).

The Arduino combo organ is back

If you have a taste for cheesy 1960s combo organ sounds, I just posted the littleBits MIDI organ project. This project is an updated littleBits take on my old Combo Organ project. It uses the same “bottom octave generator” technique to squeeze five sample playback voices out of an Arduino.

Here’s an MP3 demo of the Farfisa voice and a demo of the Vox voice. I drove the MIDI organ from SONAR on a PC.

Here’s why you should prefer the littleBits version. The original project uses the MidiVox shield which is out of production. The littleBits version replaces the MidiVox with two breadboard-based circuits: a MIDI input interface and a Small Peripheral Interface (SPI) digital-to-analog converter (DAC). Easy to build and functionally equivalent. The new sketch incorporates improvements made to the Arduino SPI library and PROGMEM. The current SPI library uses a different convention for sending data to the DAC. PROGMEM is way different now; the old code won’t compile. The newer version of PROGMEM is stricter about typing and const.

The littleBits MIDI organ could form the basis of a sample playback synthesizer. Just replace the Farfisa and Vox waveforms with single cycle samples of your favorite synth or retro keyboard. Waveform space in PROGMEM is still tight, but hey, this is science. It’s supposed to be fun!

You’ll need to add a few headers to the littleBits Arduino module in order to use SPI. Here are some simple directions and tips:

Add SPI to littleBits Arduino Part 1
Add SPI to littleBits Arduino Part 2
Add SPI to littleBits Arduino Part 3

You’ll also find the SPI DAC and MIDI interface designs in parts 2 and 3, respectively.

While you’re at the littleBits site, check out f.j2’s Solina string synthesizer. Retro is bustin’ out all over!

I need to switch gears for a little while and be a musician again. So, I’ll be taking a short break from Arduino projects. More to come on the music side of things…

Add SPI to littleBits Arduino 3

At some point, you’ll want to go beyond the few inputs and outputs provided by the littleBits Arduino bitSnaps.

The stock littleBits Arduino module has twelve unpopulated signal pads:

  • Three analog inputs: A2, A3 and A4.
  • Three digital inputs/outputs: D10, D11 and D13.
  • Six ICSP signals: GND, MOSI/D16, VCC, RESET, SCK/D15, and MISO/D14.

Three of the ICSP pads can be used as ordinary digital inputs/outputs: D14, D15, D16. The same three ICSP pads also implement the Small Peripheral Interface (SPI): MOSI, MISO and SCK.

         GND ---O  O--- RESET
    MOSI/D16 ---O  O--- SCK/D15
         VCC ---O  O--- MISO/D14

The first article in this short series discusses the ICSP pads and how to solder a 2×3 header to the pads. The second article describes a circuit and code for a SPI-based digital-to-analog (DAC) converter using the Microchips MCP4921 integrated circuit.

The MCP4921 requires an active-low chip select (also known as “Slave Select”) signal to activate data communication with the SPI master (the Arduino). As described in part 2, I generated chip select through one of the bitSnap digital pins: D1, D5 or D9. D5 and D9 are buffered by a relatively slow-acting op amp. The op amp effectively imposes a delay on the chip select signal necessitating a long busy wait in the DAC’s interrupt routine. Pin D1 is not buffered, doesn’t require the busy wait and is faster.

Pin D1 itself does double duty. Depending upon its configuration, pin D1 functions as either an ordinary digital output or as the serial data output (TX). My latest project incorporates MIDI input and uses the Arduino MIDI library to parse and dispatch MIDI messages. After much experimentation and frustration, I determined that the MIDI library just doesn’t know how to keep its paws off pin D1 (TX). Even with MIDI THRU turned off (i.e., calling MIDI.turnThruOff()), the library seems to interfere with D1/TX. The interference disrupts communication with the MCP4921 DAC. Sending chip select by D5 or D9 is too slow, so it became time to populate the rest of the Arduino’s input and output pads.

We need two 1×3 pin headers to finish the job. I bought 1×3 pin headers from Jameco. In order to save time and money, you could just cut two 1×3 headers from a long header strip instead. Once again, I used a solderless breadboard as a jig to hold the headers in place while soldering. Here’s a tip (pun intended). Apply pressure to the side of each pin with the soldering tip; do not push down on the pin. If you push down, the pin may sneak down into the through-hole!

The 1×3 pin headers and the finished Arduino module are shown in the picture below. (As always, click on images for higher resolution.) With the 1×3 header pins soldered in place, I connected the MCP4921 chip select to Arduino pin D10 using a male-to-female jumper wire and changed the sketch to toggle D10.

When I was searching for the headers, I came across “breadboard friendly” 5-pin DIN sockets sold by Adafruit. Adafruit charges a pretty penny for these sockets, but they are well worth it. With the success of the SPI DAC implementation, I decided to build the MIDI input interface on a small solderless breadboard (picture below). These small 170 point breadboards are so inexpensive, there isn’t much need to build on a prototyping board.

Here are the schematic and broadboard layout for the MIDI input interface. Have fun!

A tale of three keyboards

First, another customer service success story!

I was watching and waiting for a controller keyboard to complement the littleBits Synth modules. I especially wanted a keyboard that generates gate, control voltage (CV) and standard 5-pin MIDI all-in-one. The Arturia Keystep fit the bill and it’s been getting rave reviews. So, when I saw a “mint” Keystep at Musician’s Friend for a few dollars off, I put one on order.

Musician’s Friend (MF) does a good job of assessing the condition of customer returns. Once again, they didn’t disappoint. Physically and electronically, everything is ship-shape. It’s a good way to save a few bucks, although a brand new Keystep is not a budget-buster at $119 USD street.

The only issue — and it’s not exactly MF’s fault — is that someone registered the Keystep and copped the Ableton Live Lite activation code. Cheeky and damned annoying. The Arturia site would not let me register the product (my main goal).

Fortunately, Arturia has excellent customer service. (A shout-out to Amine and Guillaume!) Within 24 hours, the Keystep was registered and I had the code for Ableton Live Lite. Great job!

I’m trying to spin out another littleBits project and haven’t been able to dive into the Keystep as yet. However, my first impression while unboxing is highly favorable. For a product that streets at $119, this beast is solid — perhaps the best build quality that I’ve seen in an inexpensive controller. Arturia have a “slim key” design of their own. The slim keys are quite playable and they feel positively robust.

The unboxing led me to a quick comparison between the three short controller keyboards that I have on-hand. The picture below shows, from top to bottom, the Roland SK88Pro (37 keys), the Arturia Keystep (32 keys), and the Korg MicroKORG XL+ (37 keys). I shot all three keyboards together in the same image, then edited the image to compare the relative key and keyboard sizes. The SK88Pro is a “full” size synth keyboard and is comparable to the old Roland JV, XP, XV keybeds. The Arturia Keystep keys are a little wider and a little longer than the MicroKorg XL+. It always takes me a few minutes to adjust to the XL+. Adjustment to the Keystep is even easier.

I hope this short post helps you out!