And your keytar can sing

A day with excessive heat and humidity can strand you indoors as effectively as a New England snow storm. Time for a virtual quest into parts unknown.

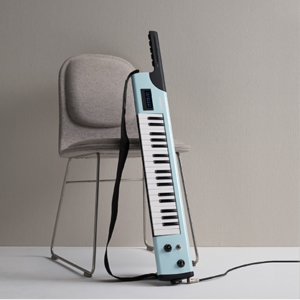
I stumbled onto this beautiful web page on the Japanese Yamaha web site. Lo and behold, a Vocaloid™ keyboard in the shape of a keytar. I strongly suggest visiting this page as the commercial photography is quite stunning in itself.

The Vocaloid keyboard is a prototype that was shown at the “Two Yamahas, One Passion” exhibition at Roppongi Hills, Tokyo, July 3-5, 2015. Some form of Vocaloid keyboard has been in the works for several years and this prototype is the latest example.

The overarching idea is to liberate Vocaloid from the personal computer and to create an untethered performance instrument. The Vocaloid engine is built into the keyboard. The keyboard also has a built-in speaker along with the usual goes-outtas. The industrial design — by Kazuki Kashiwase — tries to create the impression of a wind instrument such as a saxophone.

The performer must preload the lyrics into the instrument before performing. This lets the performer concentrate on the melody when performing, not linguistics. The keyboard adjusts the pitch and timing of the vocalization. The left-hand neck buttons navigate through the lyrics: back one note, advance phrase, go to the end, etc. The ribbon controller raises and lowers the pitch. Control knobs select vibrato, portameno, brightness, breath and gender. Other knobs set the volume and select lyrics. Up to five lyrics can be saved.

The prototype synthesizes the “VY1” Japanese female voice developed by Yamaha for Vocaloid version 2. Somewhat confusingly, “VY1” stands for “Vocaloid Yamaha 1.” The voice has the codename “Mizki.”

The Vocaloid engine is based on the Yamaha Vocaloid Board, not eVocaloid which is built into the NSX-1 integrated circuit (LSI). Yamaha sell the Vocaloid Board to OEMs, eventually intending to incorporate the board into entertainment, karaoke and musical instrument products of its own. The Vocaloid Board has MIDI IN/OUT, by the way, and reads the vocal database from an SD card.

Many of these details are taken from the article by Matsuo Koya (ITmedia). Please see the article for close-up photographs of the Vocaloid keyboard prototype.

The NSX-1 IC (YMW 820) mentioned above is a very interesting device itself. The NSX-1 is a single chip solution designed for embedded (“eVocaloid”) applications. It uses a smaller sized voice database, “eVY1”.

The NSX-1 has a General MIDI level 1 engine. Plus, the NSX-1 has a separate engine to reproduce high quality acoustic instrument sounds thanks to “Real Acoustic Sound” technology. This technology is based on Articulation Element Modeling (AEM) which forms the technical basis of Tyros 5 Super Articulation 2 (S.Art2) voices. Real Acoustic Sound and eVocaloid cannot be used simultaneously.

Holy smokes! I conjectured that AEM and Vocaloid are DSP siblings cousins. This is further evidence in support of that conjecture.

NSX-1 can be controlled using a Javascript library conforming to the Web MIDI API. Wanna make your browser sing? Check out the Yamaha WebMusic page on github.

The company Switch Science sells an eVY1 SHIELD for Arduino. Kit-maker Gakken Educational has developed a stylus gadget based on eVocaloid and the NSX-1 — Pocket MIKU. And, of course, here is the Pocket Miku video.

Only 13 more days until Summer NAMM 2017.

Copyright © 2017 Paul J. Drongowski

Roland GO:KEYS is GONE:KEYS

As I mentioned in my initial review, my GO:KEYS had a defective key right out of the box. The key was in a particularly bad spot: A below middle C. While practicing music for Sunday, the key was nearly dead and I just couldn’t live with it. So, I returned the GO:KEYS to Guitar Center. The folks at Guitar Center offered to get a replacement from Roland, but I didn’t want to take another chance on the first production run. I chose a refund.

Happy to say, the salespeople at Guitar Center (Nashua, NH) were very helpful and understanding. This is the first time that I received a keyboard with an obviously non-working key. Guitar Center handled the situation quite well and efficiently. It pays to be courteous and kind to the staff of your local musical instrument store!

I think Roland have a good concept with the GO:KEYS. But, even the best of ideas are thwarted by bad components, poor manufacturing, or ineffective quality control. Overall, this is a shame. The GO:KEYS clearly is a little brother to the JUNO-DS workstation. The basic sound of the GO:KEYS is quite good, especially its electric pianos.

After writing my review, I spent a few hours producing a demo track. (Here is the MP3 file.) The GO:KEYS is MIDI class compliant and I had Ableton Live Intro communicating with it in seconds. I pulled in a few ambient loops from Equinox Sounds Total MIDI: Funk and assigned MIDI channels according to the GO:KEYS’ convention:

Ch#  Part       Allocation
---  ---------  ----------
 1   PIANO      User/Panel
 2   ORGAN      User/Panel
 3   STRINGS    User/Panel
 4   BRASS      User/Panel
 5   BASS       User/Panel
 6   SYNTH      User/Panel
 7   FX/GUITAR  User/Panel
 8   Bass       Loop Mix
 9   Part A     Loop Mix
10   DRUM       User/Panel
11   Part B     Loop Mix
12   Part X     Loop Mix
13   Part X     Loop Mix
14   Part X     Loop Mix
15   Part X     Loop Mix
16   Drum       Loop Mix

Each of the GO:KEYS panel categories (PIANO, ORGAN, etc.) has its own MIDI channel. Each of the Loop Mix parts has its own MIDI channel. When sequencing in Live, I assigned tracks to the “User/Panel” channels.

The GO:KEYS tones follow the Roland JUNO-DS patch map. This is further proof that the GO:KEYS is directly derived from the JUNO-DS. I recommend downloading the JUNO-DS Parameter Guide which contains the JUNO-DS patch list. Finding the bank select and program change for a GO:KEYS tone is simply a matter of scanning the JUNO-DS patch list for the equivalent voice. A few of the patches have been renamed. See my partial tone list for examples. (I won’t be finishing the list now that I’ve returned the GO:KEYS.)

For example, here is a partial list of drum kits and patch select values:

    Hex            Dec
-----------    -----------
MSB LSB PC#    MSB LSB PC#
 56  40  03     86  64   3  HipHop Kit
 56  40  04     86  64   4  R&B Kit
 56  40  00     86  64   0  Pop Kit 1
 56  40  08     86  64   8  Pop Kit 2
 56  40  01     86  64   1  Rock Kit
 56  40  05     86  64   5  Dance Kit 1
 56  40  06     86  64   6  Dance Kit 2
 56  40  07     86  64   7  Dance Kit 3
 56  40  09     86  64   9  Dance Kit 4
 56  40  02     86  64   2  Brush Jz Kit

 78  00  00    120   0   0  GM2 Standard Kit
 78  00  08    120   0   8  GM2 Room Kit
 78  00  10    120   0  16  GM2 Power Kit
 78  00  18    120   0  24  GM2 Electric Kit
 ...

Mind the index of the program change values (zero vs. one). Remember, in Live, all indices start at one, including bank select values.

Additional experiments with MIDI OX show that the touch strip sends both modulation (MIDI continuous controller 1) and pitch bend messages. Like the JUNO-DS, the GO:KEYS “includes a GM2 compatible sound set.” Neither the JUNO-DS or GO:KEYS implement all of the CCs, NRPN, etc. required by the General MIDI 2 standard. The GO:KEYS does respond to the same CC messages as the JUNO-DS. Nice.

Once I had things grooving in Live, I went through the tedious process of exporting each MIDI track to a Standard MIDI File (SMF), and then importing each SMF into SONAR to form a merged SMF. Come on, Ableton, people have been begging for proper full MIDI export for years. Please implement this feature! It’s ridiculous that it hasn’t been done already.

Once I had a complete SMF, I used the GO:KEYS restore function to transfer the SMF to the GO:KEYS. Just to be safe, I named the file to “SONG02.MID” to keep the GO:KEYS happy. The GO:KEYS successfully played the (loaded) SMF and I recorded the audio output of the GO:KEYS on a Roland Micro-BR. (A handy little recorder, that.)

In the end, I’m left with considerable respect for the JUNO-DS sound. I wish that the JUNO-DS had built-in speakers as well as battery power, given its more robust build. The Roland GO:KEYS has potential to be a successful, portable, little brother to the JUNO-DS once Roland resolves its quality issues.

Copyright © 2017 Paul J. Drongowski

Roland GO:KEYS – First impressions

I’m happy to write what may be the first end-user review of the Roland GO:KEYS.

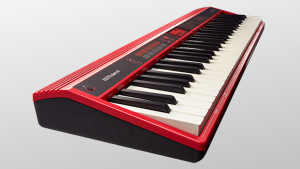
The GO:KEYS is one of two new entry-level keyboards from Roland. The GO:KEYS has a street price (MAP) of $299 USD and is intended to inspire new keyboard players without a big out-of-pocket outlay.

The hook is the five zone, Loop Mix mode. The 61 keys are separated into 5 one octave zones: Drum, Bass, Part A, Part B and Part X. Each key in a zone triggers a two measure musical loop that repeats until the zone-specific STOP key is struck. The Drum and Bass zone lay down the basic groove while Part A and Part B add the harmonic bread and butter, like electric piano comping or a string pad. Part X adds variation with up to four phrase subgroups. Only one phrase can play in a zone at a time.

The preceding paragraph takes more time to read than it takes to set up a backing track. When you have the band grooving, you can switch to regular keyboard mode and solo to your heart’s content. Whenever you feel like it, you can switch back to Loop Mix mode and move the band to a different place.

There are twelve different Loop Mix Sets. Each set is a scale-compatible collection of Loop Mix phrases. The twelve style names suggest the musical genres and the target audience for GO:KEYS. No polkas. The Sets are modern sounding, however, I can’t speak to the authenticity of the EDM styles. The FUNK set sounds more like funky smooth jazz — no JB, no George Clinton, here.

However, don’t let that stop you. Please watch the GO:KEYS videos that Roland has posted on Youtube. (Search “Roland GO:KEYS”.) You’ll quickly decide if the GO:KEYS is for you or not. I certainly have had a lot of fun jamming away.

Many aspects of the GO:KEYS are well-thought out. It’s clear that the developers tried to play their own creation and added a number of convenience features like using the touch strip to step through the Function menu. The GO:KEYS can remember previous settings across power-off and it remembers the last patch selected in each of the eight categories (piano, organ, strings, brass, drum, bass, synth and FX/guitar).

Recording and playback are fairly rudimentary. Don’t expect a workstation at this price point! You can record an improvised backing and save it to a song file. Thanks to USB, the song file, etc. can be saved to a PC or Mac through the back-up function. The PC or Mac treat the GO:KEYS like a flash drive. You copy the back-up folder to the PC/Mac and you’re done. The directions in the user manual are simple and accurate, so I won’t go into those details here.

Windows 7 recognized the GO:KEYS when I plugged it in. Windows installed the Microsoft generic USB audio driver. Windows didn’t try to install the flash driver until I attempted the first back-up. The driver installation at first appeared to fail. When I unplugged and replugged the GO:KEYS, everything was fine and the GO:KEYS drive appeared in Windows Explorer.

My GO:KEYS arrived with version 1.04 of its software installed. There is a version 1.05 update on the Roland support site. Roland’s on-line directions are simple and accurate. The update to 1.05 went smooth.

The GO:KEYS sound set is a real bright spot. The standard “panel” voices are taken from the successful JUNO-DS series. In fact, I auditioned these voices by trying them out on a JUNO-DS88 before ordering the GO:KEYS. The GO:KEYS voices sound very similar, especially when you send the GO:KEYS through decent monitors. The built-in speakers are OK, but again, don’t expect super high quality in an inexpensive keyboard. The GO:KEYS is perfectly respectable through the Mackie MR5 mk3 monitors on my desktop.

Here are the sonic highlights:

  • The electric pianos are really strong. Many voices have tasty, appropriate effects (e.g., phaser) applied. If you need acoustic piano, try GO:PIANO instead.
  • There are a slew of synth leads and basses. I’m in love with Spooky Lead which is a classic fusion, R&B tone.
  • Organs are typically Roland — OK, but not tachycardia-inducing.
  • The strings are also typically Roland — darned good.
  • Acoustic sounds — few as they are — are decent. I like Soft Tb and Ambi Tp. Other acoustic sounds may be found in the GM2 sound set. (Don’t forget to enable them in the settings!) The woodwinds are surprisingly good for GM2.

I haven’t dug too deeply into the rest, but the voices triggered by the phrases sound good and are well-chosen. Clearly, the JUNO-DS is the original source.

At this price level, the GO:KEYS is a preset-only machine — no voice editing. The most you get is the ability to set the reverb level. Even the reverb type is fixed (a nice hall). There are decent multi-effects under the hood as heard in the electric piano and clavinet voices. Alas, everything is preset and fixed. Roland would still like to sell you a JUNO-DS.

The GO:KEYS includes a full General MIDI 2 (GM2) sound set. It sounds like an improved set over the much older RD-300GX for which I have produced many GM2 Standard MIDI Files (SMF). I have not tested GM2 compatibility. Roland are very careful about this and have not advertised full compatibility. This is not much of an issue for me as I have plenty of sequencing resources on hand already.

The GO:KEYS does not have conventional pitch bend or modulation wheels. The touch panel has two strips that apply pitch bend or filter/roll effects. The adjacent FUNC button selects the mode. The filter and roll are applied to everything, so you get a DJ-like effect that rolls the rhythm or squishes frequencies. Pitch bend mode also seems to include modulation. I hear the rotary speaker change speed on some organ voices. Unfortunately, attempts to change rotary speed also bend the pitch.

Hey, Roland! I regard this behavior as a bug. The documentation is really loose about what these touch strips do. In the next update, please make one strip pitch bend only and make the other strip modulation only. Punters everywhere will thank you!

The GO:KEYS is very light weight coming in under nine pounds. Power is supplied by either the included adapter (5.9V, 2A) or six AA batteries. The voltage rating is a little odd, 5.9V. I wonder if it’s OK to use a more common 6V adapter provided that the current rating is sufficient?

The GO:KEYS has two slots to accomodate a music rest, but doesn’t come with a music rest. The GO:PIANO bundle includes a music rest, not the GOKEYS. I want to use the GO:KEYS at rehearsals and will call Roland to see if I can buy a music rest. Of course, the Yamaha music rests that I have on hand do not fit the slots and cannot be easily adapted. (Arg. Put the Dremel tool away.)

As you might think, the keybed is not super stellar at $299 street. The keys are piano size and shape with a nice texturing (not plastic-y smooth). The keys don’t feel too bad although it’s more difficult to palm swipe piano-shaped keys with an edge.

Key response is OK, but not as good as a more expensive instrument. (Full disclosure, I played a $3,000 Yamaha Montage last night.) One key is a little dead and its response is quirky. I’ve encountered the same problem with a single key on the otherwise superb Arturia Keystep, too. It’s hard to make a keyboard at this price point that provides high quality and reliability. Even though the GO:KEYS’ case feels sturdy, I wouldn’t gig this machine too hard. You get what you pay for.

Overall, I’m pleased with the GO:KEYS. It’s a good starter keyboard and it looks (and sounds) to be a decent portable rehearsal instrument. The GO:KEYS is an attractive alternative to Yamaha and Casio products in the same price bracket. Definitely worth a look and a listen.

Update: After writing this review, I sequenced a GO:KEYS demo track in Ableton Live. The defective key became worse and I returned the GO:KEYS. Please read about my experience and listen to the demo track.

Copyright © 2017 Paul J. Drongowski

Ableton Live: 2 books, head2head

I’m ramping up my Ableton Live skills. Being somewhat old fashioned, I like to have a good print manual or guide by my side. Recently, I had a chance to compare two books, both worthy of recommendation:

  • Ableton Live 9 Power! The Comprehensive Guide by Jon Margulies (publisher: Cengage Learning, 2014)
  • Ableton Live 9: Create, Produce, Perform by Keith Robinson (publisher: Focal Press, 2014)

Each book is quite comprehensive and a little bit behind the latest version 9 features. (The hazards of print.) I don’t think you can go wrong with either book, but here are a few comments that might guide your choice.

Both volumes go through the Session and Arrangement views, tracks, scenes, clips, automation and warping in great detail. These topics are bread and butter. Here, I favor the book by Keith Robinson. Keith better describes how Live fits into the composition or production process. This context provides a bit of “Why” not just “How.” One on-line reviewer didn’t like this approach, but I appreciate it. For example, I didn’t how or why I would want to translate my tracks from the linear Arrangement view back to the Session view. Now I get the to-and-fro of Live as a tool.

Both books give you the complete rundown (circa 2014) on Live’s instruments, chaining and audio effects. For these topics, I give the book by Jon Margulies the edge. Jon does a better job describing the individual controls. His treatment of MIDI effects, in particular, is more thorough.

Both books cover MIDI control. Neither book has anything to say about using a Novation Launchpad. Push (version 1) barely wins much more than a mention. Both volumes need to be updated for the Ableton Push 2.

Jon Margulies’ book has a short chapter on using Live for live performance. Much of this chapter is devoted to track preparation and warping, material which is better covered by Keith Robinson’s book. Just having a chapter on performance isn’t reason enough to shy away from Keith Robinson’s book even if you intend to use Live mainly for performance, however.

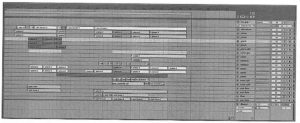
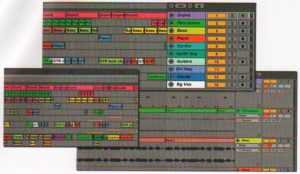
Keith’s book uses color screenshots throughout. It’s easier to understand certain kinds of figures when they are presented in color. Please consider scans of an Arrangement view taken from each book.

The difference is striking and doesn’t need further comment!

In the end, I decided to buy Ableton Live 9: Create, Produce, Perform by Keith Robinson. I definitely prefered the use of color illustrations and his exposition placing Live within the writing process.

Music Expo Boston 2017

Saturday was a glorious warm day in Boston — perfect for a trip to Cambridge and Music Expo Boston. Music Expo is a series of mini-conferences produced in association with Sound On Sound magazine. Boston is fortunate to have Music Expo this year along with Miami and San Francisco. Loic Maestracci is the main organizer and he did he bang up job. The iZotope development labs and studios were the local host and venue.

Music Expo has an informal workshop feel to it. Even the more “formal” presentations had a friendly, laidback vibe with people freely getting into Q&A. Several companies had exhibits which were hands-on. (More about this later.) For example, Ableton had three Push 2 systems on hand where you could sit and try one out with the guidance of the booth staff.

Two session tracks and the exhibits ran in parallel, so one needed to pick and choose carefully. If I leave anyone out from this review, apologies — there was just too much going on at once.

My day got started with a fine performance by Elyssa Nicole Fontes and Megazoid. Elyssa is a composer and vocalist who uses backing tracks to perform. The staff had made a decision to move Elyssa and Megazoid to a more accomodating studio, so Elyssa had to fill dead air while the techs brought up her gear and tracks. This goes to show that artists always need to be prepared to handle tech issues in front of a live audience. Elyssa handled the situation with poise and aplomb. It also gave the attendees a chance to ask many questions about her technique, gear, mix, etc.

I then dropped by the Arturia booth to say “Hello.” The Arturia team certainly showed how to travel light with various ‘steps, a laptop and a MiniBrute. That MiniBrute is too cool for school and tiny! I’m glad that I visited the booth early because they seemed quite busy throughout the day.

Next stop was the Yamaha booth. “Booth” is not quite the right word as Yamaha were ensconced in a recording studio. They were demonstrating their latest — the MX88, Montage and Reface — with the MX88 and Montage routed through Yamaha HS8s and a sub. And joy of joy, the demonstrator was Phil Clendeninn! Like most studios, this one had a comfy couch in the back, so I kicked back while Phil ran through 30+ minutes of the best of Montage. Among other sounds, he desconstructed the Seattle Strings performance. The violins are far more realistic and expressive than the MOX patch which I am now using for exposed lines. Oh, I am so ready for this.

Highlight of the day number one: I finally had a chance to meet and chat with Phil. Phil is better known as “Bad Mister” (yes, the dude can play) who has written many useful, informative Motif and Montage guides and has answered zillions of questions on the Yamaha synth site and on the langouring Motifator site.

We covered a lot of ground. When I mentioned Yamaha arrangers, his response was “Oh, ho, you just wait!!” BTW, having done booth duty at SIGGRAPH and elsewhere, I’m amazed at the amount of energy and enthusiasm that Phil brings, and brings, and brings. It’s very hard to maintain that kind of level.

While we were conversing, I finally had a chance to try a Yamaha Reface YC. Of all the Reface, the YC could still win my heart thanks to Vox and Farfisa nostalgia. I always wanted a Continental as a kid, but had to settle for a Mini Deluxe Compact. (More well-kept vintage gear which I wish that I still had.)

I mentioned to Phil that I hadn’t been able to play a YC since launch despite efforts to find one in Boston, Seattle, and Lord knows where else. He acknowledged that this is a problem in this day and age of Internet sales. He ran through a list of concerns that a physical retailer would have: physical security to keep demo units from developing legs, knowledgable staff, etc. He thought that the lack of knowledgable staff also hurts mid- to high-end arranger sales in North America. Sometimes musicians need to be shown what an instrument can do in order to make a sale. The array of buttons on a modern arranger or synth can be intimidating and you don’t often know where to dive in.

From my point of view, there is only one nationwide brick and mortar music store in the U.S., Guitar Center, and unfortunately, knowledgeable keyboard staff are few and far between. I had a flashback to AMD days and the brick and mortar dominance of Best Buy in the computer, laptop, tablet space. It’s difficult to sell and support technogically complicated products to end users. (Please keep this thought.)

With a crush of people coming in, I bade Phil farewell and stopped at the Q Up Arts booth. Q Up Arts were demonstrating the California Keys (for N.I. Kontakt) — a sampled Fazioli 10ft grand. California Keys is cleverly packaged and I won’t spoil the surprise.

Highlight of the day number two: My wide-ranging conversation with Douglas Morton of Q Up Arts. To those in the know, Douglas is a talented, veteran sound developer and artist. I used a number of Q Up Arts products back in the day when samples were provided on audio CDs. (And dinosaurs roamed the Earth.) We began discussing the good old days of audio editing, vintage computer gear, Douglas’s work for the Salt Lake City Aquarium, ending with cross-country skiing in Utah. Douglas lives in two gorgeous locations: Dana Point, CA and Park City, UT. (Been to both and once lived in SLC myself.)

One of the subjects that we touched on was how to bring up the next generation of players on new software and gear. (Familiar theme now, huh?) Youtube videos only go so far; it’s got to be hands on. I quickly thought back to my experience in the morning at the Ableton booth. Push 2 is a spiffy product. That display, c’est magnifique! The Push 2 user interface, however, is not as immediately intuitive as the Novation Launchpad, for example. Thank goodness there was an Ableton staff member on hand to guide me. (Shades of gramps with a smart phone. 🙂 )

Douglas thought that an educational tour of high school and college music labs might be part of the solution. I thought of Living Computers Museum+Labs in Seattle. Education is where Living Computers could ace the synth exhibits at the Museum of Pop Culture, also in Seattle. (MoPOP was formerly known as the “EMP Musuem” and is another Paul Allen venture.) The MoPOP synth exhibits, at least when I visited a few years ago, didn’t offer much in the way of guidance and weren’t inspirational. Living Computers, however, have enthusiastic staff, labs and an educational outreach mission.

Lunchtime and I was able to hear Decap deconstruct his track See You Out There. Decap is a West Coast hip hop music producer (Talib Kweli, Snoop Dogg, Ne-Yo, and Tim Kile). I enjoyed his presentation very much while unwinding and eating lunch in the iZotope cafeteria. Coffee was provided, gratefully, as I had left the house early to drive to the MBTA subway stop. Decent coffee at that.

One big take-away from Decap is the need for playfulness and persistence. His tracks grow from ten minutes of sheer inspiration through four or more days of perspiration as he experiments and shapes it. His experience fits with my current personal philosophy. Put the phone (or tablet) down, start playing and stick with it. Stop pining after the next new tool. You probably have everything that you need already. Just get on with it! Be spontaneous, playful, and take advantage of happy accidents.

Cakewalk demonstrated a prototype virtual reality (VR) system for clip-based composition. You navigate a 3D space where you are surrounded by instruments and virtual pads that select and control clips. Reflecting on the experience today, I think they have a solid technology demonstrator. I give them my computer science respect for getting their system up and running. Cakewalk still need to find the killer hook that makes you want to pull out your credit card though. Surround sound development? It’s early days yet and I wish them the best.

Next session was a panel discussion about “D.I.Y. in the Recording Studio: Building and Maintaining your Analog Gear.” The panel consisted of six folks who are hands on engineers and producers. Great advice from all although I have a small quibble with making one’s own cables. I make terrible cables! I’d rather build a kit to gain electronics experience than fighting crappy home-built cables while performing or making a track. That’s just me.

The panelists spoke about how they got started. It struck me that all of the panelists got started by playing with electronics even if early experiments didn’t work out so well. Just do it! The notion of playful, enthusiastic, self-directed learning is totally at odds with today’s mania for educational accountability and teaching to the test. What is happening to the creative dimension of engineering and the arts in this country? Engineers and artists are bright, intelligent people and we seem to be actively stifling early enthusiasm. Arg!

At that point in the day, I had to call it quits and head home. It takes a while to get home from Cambridge and I didn’t want to get too strung out. What a glorious day walking in Cambridge. Kendall Square looks like “Science City” in a futuristic sci-fi movie with all of its computer and bio labs. The trains were a little crowded with very colorful people heading to and from Boston Pride. A great day all around.

My conversations and experiences convinced me of the value of Music Expo. Youtube videos, e-mail, texts, etc. are not enough. You need to rub shoulders with other kindred souls, converse, handle gear, ask questions, hear other people’s questions, get answers, be guided. NAMM is not the right venue. Music Expo Boston had it right: friendly, personal and interactive.

Copyright © 2017 Paul J. Drongowski

Out with the old…

I apologize for the dearth of new blog posts. Springtime brought the usual crush of yard work and the double whammy of spring cleaning. We hope to move to Seattle sometime in the next few years and we need to scrape off decades of old stuff.

I’ve gotten to the point where it’s a no-brainer to recycle or toss items that I will never use again. I’m beyond emotional attachment or sentimentality. However, I recently did disposed of two kinds of things that are near and dear to my heart. I couldn’t bear to see either go into the town incinerator or landfill, and it took a fair bit of time, thought and effort to find them a new home.

First, I cleared out my old vinyl records. I’m not one of those guys with thousands of records, mind you, but I did have some decent albums. I used to be obsessive about record care, so I knew that someone, somewhere would enjoy them just as much as I did. This job took a while to complete thanks to my aching back!

I want to give a shout out to two local vinyl shops: Vinyl Vault in Littleton, MA and Vinyl Destination in Lowell, MA. The best part of this job was meeting the proprietors of both stores and having a wonderful time talking vinyl and music. If you’re in the Merrimack Valley region of Massachusetts, please visit them and give them your business. You might even come across one of my old favorites!

Next to go were two old Macintosh computers: a Performa 6400 Video Editing Edition (VEE) and a Mac SE. Both machines are still up and running although there are a few creaky parts. The same can be said for my aging body. 🙂

This is where my visit to the Living Computers Museum in Seattle paid off. (Please see my trip report about the museum.) I’m happy to say that the machines are on their way to the Museum in Seattle. It took a while to catalog all of the pieces and parts, including a fairly extensive collection of vintage Mac software. The Museum staff are friendly, easy to work with, and very helpful.

A big part of prepping these old machines was scrubbing personal data. Neither Mac OS 6 and OS 9 (!) provide native facilities for securely deleting files. Fortunately, I found an old version of Norton Utilities on the Web and used its “file wipe” feature.

I know that the Museum will put the machines to good use. As C3PO once said, “You must repair him! Sir, if any of my circuits or gears will help, I’ll gladly donate them.” Please visit Living Computers + Labs in Seattle and maybe you’ll have a chance to use two of my old favorites.

Public service announcement: Good grief, people, let’s keep computers out of landfills. There are many folks who need machines. I want to mention one other organization: Computer Technology Assistance Corps (CTAC) in Manchester, NH. CTAC not only provides computers, they run training programs to teach computer-based employment skills. They’re a great outfit! Please support them.