Review: Synthrotek Dev Delay

I’d like to add more animation to the distinctly sound of the Yamaha PSS-A50. I really like the Korg Volca Mix stereo width effect and want to add something similar as either a mod or an external effect.

My intuition suggests the Haas effect or as Wikipedia would have it, the precedence effect. This well-known effect delays one side of a stereo pair that changes our perception of a sound source in the stereo field.

Rather than buying — and potentially, disassembling — a delay effect pedal, I decided to give the Synthrotek Dev Delay kit a try. Synthrotek offer a broad range of inexpensive kits and heck, they’re located nearby in the Pacific Northwest!
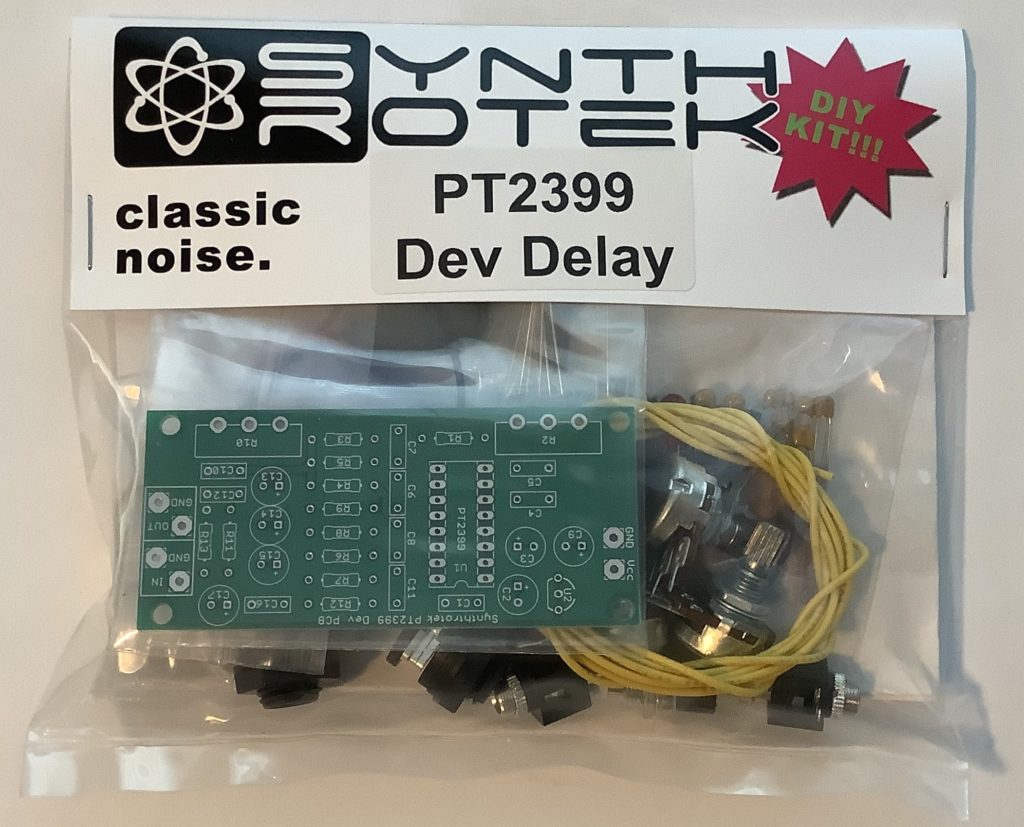
Synthrotek PT2399 Dev Delay — It’s in the bag

The kit is a relatively straightforward implementation of a PT2399 delay — right off the datasheet. The Princeton Technology PT2399 is a workhorse appearing in many guitar pedals, synth modules, karaoke mixers, etc. The VCO control voltage (pin 6) determines the delay time and is set by a 50K linear potentiometer. The delayed signal is fed back into the input with feedback level set by a second 50K linear potentiometer. In addition to the PT2399 and its discrete minions (resistors and capacitors), there is an LM78L05 +5V power regulator.
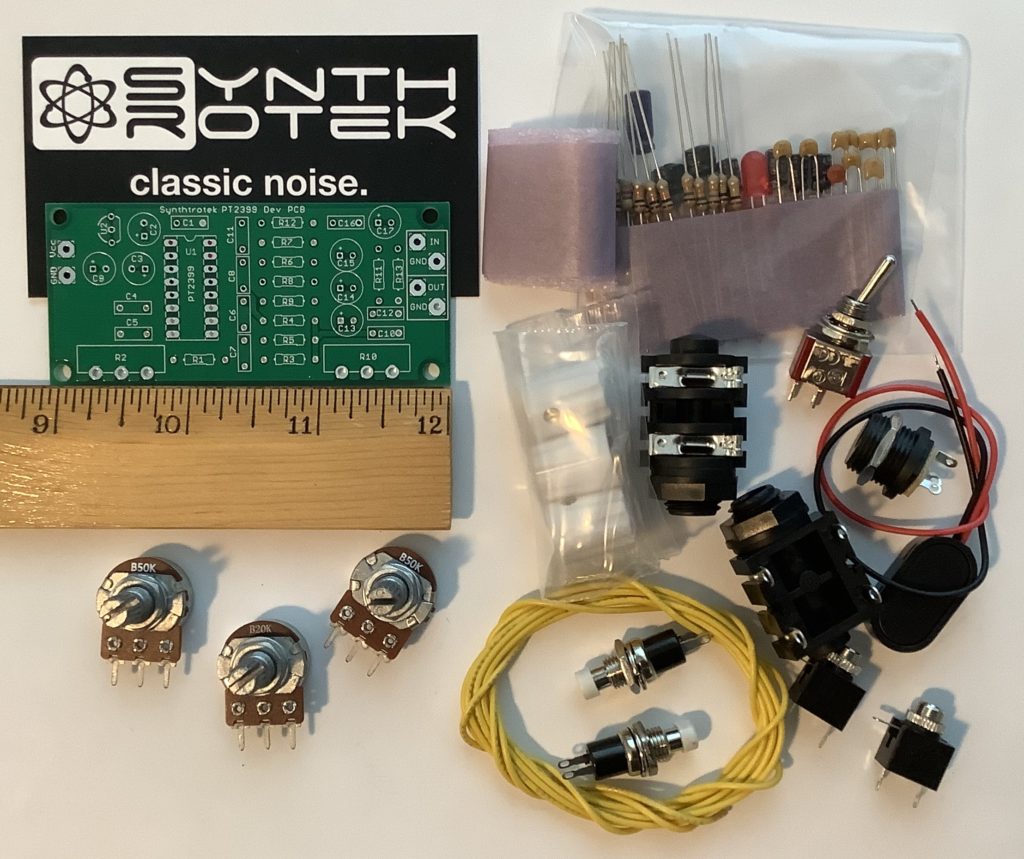
Synthrotek Dev Delay — Parts is parts

Synthrotek provide a rather nice board and kit of parts. It includes many unexpected extras: both 3.5mm and 1/4″ phone jacks, knobs, switches, power LED and parts needed for PT2399 mods. Quite decent of them! My only niggle is the quality of the potentiometers. Physically, they appear dingy and functionally they are a little noisy. I would call them “surplus grade.” If building the finished kit into a permanent project like a pedal, I would replace the pots with fresher parts. Please don’t let this concern stop you from buying a kit, however.
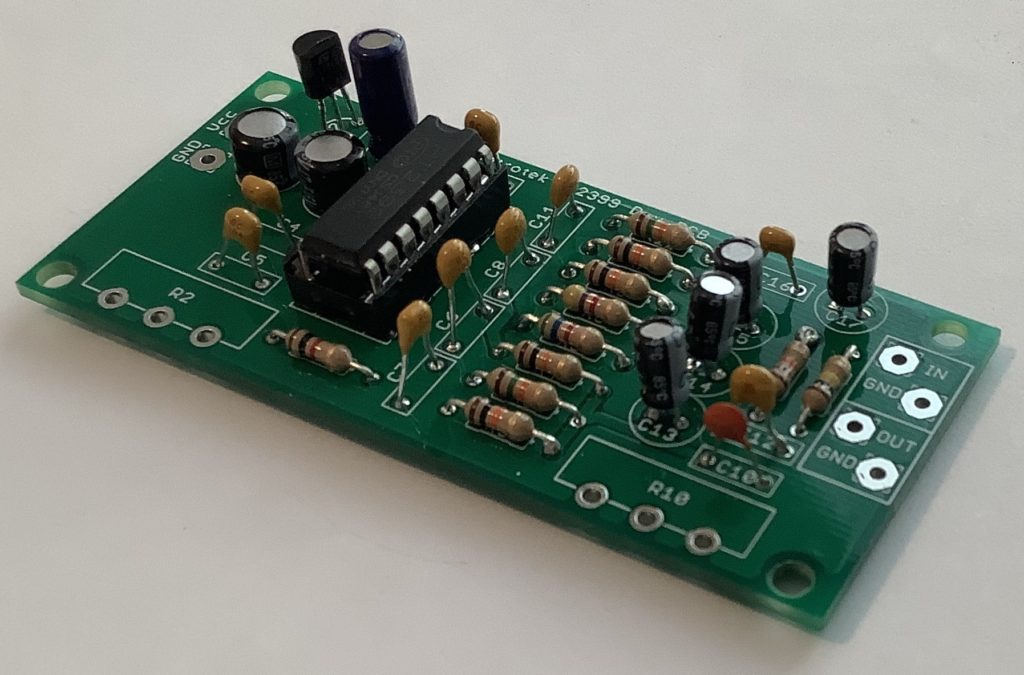
Synthrotek Dev Delay — Almost finished

The kit builds quickly enough. For some crazy reason, I had trouble keeping my soldering tip clean. Once I got some flux from Lowes (desperation!), soldering went better. Maybe it’s my eyes, but even the DIP and standard size discretes seem smaller and smaller…

I like reconfigurable builds that are easily re-purposed. So, I added a number of embellishments. I added two three-contact terminal blocks (5mm pitch) for the pots on the PCB. The terminals match up with the potentiometers’ leads and since the pots are linear, I flipped them around and connected them to the terminal blocks directly. I don’t think you can play this trick with log pots, by the way.
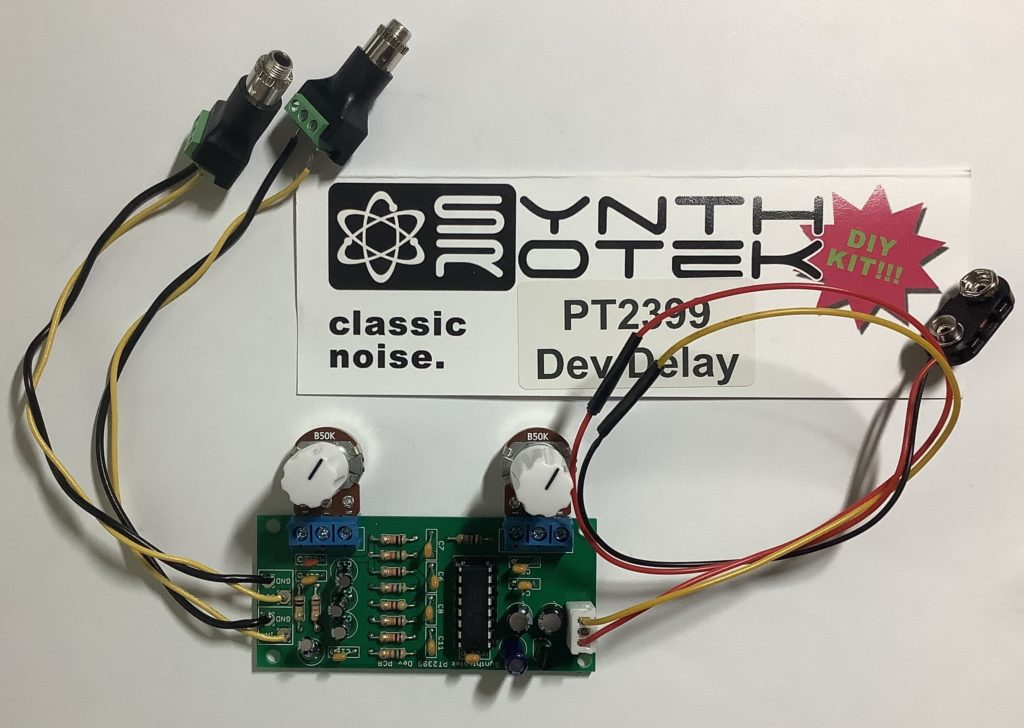
Synthrotek PT2399 Dev Delay — Assembled with enhancements

I added a JST connector for battery connections. Audio in and out wires are soldered directly to the PCB. The other end of the audio wires are connected to 3.5mm jacks with in-built terminal blocks for ring, tip and sleeve. These audio jacks are very handy and I intend to use more of them in the future. They have a shaft and nut for panel mounting, making them suitable for permanent installation, not just prototying.

Connect a battery…

… and nothing.

This is the moment which we builders all dread.

Drag out the digital multi-meter (DMM). Power is good to the board. Audio wires are good to the board. Crank up the volume on the powered speaker and a faint signal is heard.

So, what’s up? Check the connections to the audio jacks and, holy smokes! Instead of signal to tip (T) and ground to sleeve (S), I have ground to ring (R). I didn’t pay close enough attention to the terminal order and labels.

After a quick fix, the Dev Delay was up and running. I used the PSS-A50 as my signal source and had it play a drum pattern over and over. Yes, you can get King Tubby with this unit!

My experiments with the Haas effect, however, were less exciting — too subtle for my taste. I noticed that the Korg Volca Mix does not use an analog or digital delay circuit. Thus, my search for a stereo animator goes on. I have a Thai Kits (Future Kit) FK651 stereo simulator in hand and will try it next.

As to the Synthrotek Dev Delay kit, if you need a digital delay in kit form, give it a go! Great for audio innovators.

Copyright © 2021 Paul J. Drongowski

Steinberg WaveLab Cast bundle

This deal is too good to go unnoticed. If you bought a Yamaha AG03 or AG06 mixing interface, I hope you saved (or used) the Cubase AI download access code. It’s your ticket to a free copy of Steinberg Wavelab Cast.

Yamaha added Wavelab Cast to the AG series software bundle during August 2021. You can download and activate WaveLab Cast even if you are an existing customer.

Fortunately, I’m a pack-rat and saved all the paperwork with the AG06. Wavelab Cast looks to be a fast way to touch up live recordings among other uses. The Track Inspector offers a menu of the most common audio tune-ups: denoise, de-ess, EQ, reverb, etc., featuring no-brainer one-knob control.

My only wish is a written (PDF) getting started guide. The PDF manual is a reference manual and isn’t organized well for getting started. At a minimum, a beginner user needs to know about the “Audio Montage” and how to get audio clips into the Audio Montage pane. Audio Montage isn’t discussed until Chapter 10! Also, one should know that the audio editor mainly twiddles bits (errr, samples) and that effects are applied through Audio Montage.

Please don’t let these quibbles slow your roll to a free copy.

I’ve been using the Yamaha AG06 as my desktop mixer and audio interface. It has performed reliably over the past several months and I feel comfortable recommending it even though the internal tech is a little bit behind the Steinberg UR22c (its closest alternative in the Steinberg product line). I like the small mixer format and the audio I/O options. Plus, the AG06 has been dead quiet when attached via USB to an HP desktop computer and its schmutzy (noisy) power. The AG06 has a separate 5V external power port for mobile operation, too.

Cash in!

Copyright © 2021 Paul J. Drongowski

Wire Less: Part 2, Belkin RockStar™

Well, as you might have guessed, your Apple iPad synthesis rig cannot be entirely wireless (at least inexpensively so). The audio part ain’t there yet. Bluetooth audio has too much latency and Apple does not provide any other built-in solution. So, it’s wires, again, folks.

In my first post, I discussed the MIDI part: an Apple iPad running Korg Module Pro communicating with a Korg Microkey Air 49 over MIDI BLE. The MIDI part works quite well and I haven’t had any issues.

As to the audio part, I absolutely detest the iPad 3.5mm phone connector. Any plug is exposed and even the slightest movement emits a nasty grind from a powered speaker or other downstream audio device. Buzzzzzz — literally. I simply wouldn’t risk this method in a high volume situation in front of a church congregation.

The Lightning connector, however, is relatively snug and secure. Like most people, I opt for a Lightning-based solution. With Bluetooth handling MIDI duties, one needs only an audio interfacing solution.

Sorry, USB-C people, I don’t have a USB-C iPad and don’t address USB-C solutions here.

By now, everyone knows that the Apple Lightning to USB Camera Adapter is not just for cameras. Thanks to the Camera Adapter, you can hook up a USB-based audio interface to your iPad (or iPhone). The Camera Adapter’s street price has dipped to $9USD, making this a very inexpensive solution. If — if — your bus-powered audio interface draws a small amount of power, the Camera Adapter will supply power although the iPad battery drains faster. If your bus-powered audio interface is a power hog, you will get the infamous “This accessory requires too much power” message and iPad will refuse to play along, shutting down the interface.

Enter the Apple Apple Lightning to USB3 Camera Adapter ($39USD). The USB3 Camera Adapter has two ports: a USB3 host port and a Lightning charge port. The USB3 port connects to your audio interface while the Lightning port connects to an AC adapter. The Lightning port both charges the iPad battery and supplies power to your audio interface.

At one time, I considered the Steinberg UR22C as a solution for both desktop use and mobile. The UR22C has the necessary functional features and sports its own external power port. This is definitely another way to go and I wish more manufacturers would provide an external power port and not rely solely on bus power. I decided to eschew “yet another box at the gig” in favor of an even smaller, lighter solution. (For desktop, I eventually chose the Yamaha AG06, BTW).

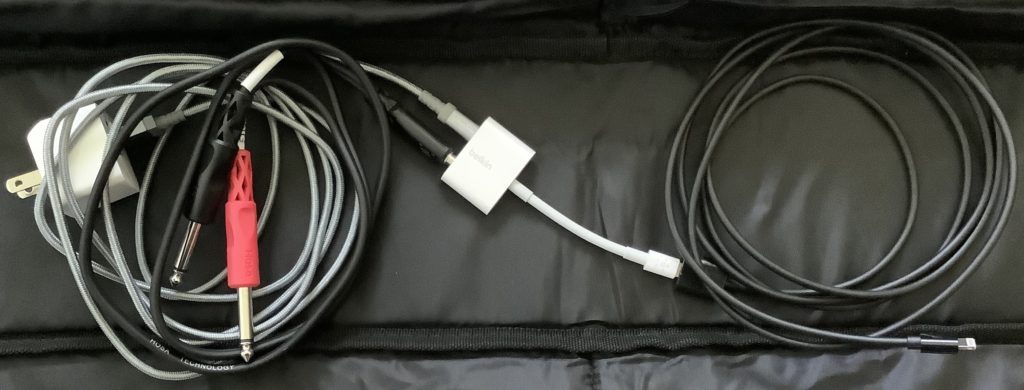
Belkin adapter and the tangled mess o’cables

For smaller and lighter, I went with the somewhat neglected Belkin 3.5mm Audio + Charge RockStar™ ($40). This Belkin adapter provides a more robust 3.5mm jack and a Lightning charge port. My only beef is the short iPad to adapter Lightning cable. The short cable is good enough for casual listeners, but I feel that it still requires too much stress on the 3.5mm jack. I added a 2 meter Lightning extension cable, letting me rest the adapter and 3.5mm plug on the floor. This arrangement reduces the physical stress on the iPad Lightning port, too. One flexible cable to the iPad makes it easier and safer to move the iPad during a gig.

A few fine points. I configure Korg Module Pro for MONO out and use a 3.5mm stereo to 1/4″ breakout cable (tip and ring) for the final audio connection. MONO is close enough for rock’n’roll. I realize this is audio religion to purists. 🙂

If you don’t want 3.5mm audio, Belkin offers the Belkin Lightning Audio + Charge RockStar™ ($45USD). It has a two Lightning ports: one for audio and one for charge.

Before closing, I want to mention an ultra-cheap, simple solution: an Apple Lightning to 3.5mm Headphone Jack Adapter plus an extension cable. You may already have one of these adapters! When Apple dropped the 3.5mm jack, it began selling these adapters so people could connect their headphones to the jackless iPhone. It’s ultra-inexpensive at $8USD (street).

Check out these related blog posts:

Copyright © 2021 Paul J. Drongowski

Random answer day (1)

Maybe it’s the first day of the regular NFL season or the phase of the moon. Here’s a recap of a few questions that came into the forums.

How are arranger/synth preset voices stored? First, one may ask, “How is a preset represented?” Typically, a preset voice consists of waveforms (AKA “samples”) and voice (meta-)data. The voice data control how the sample-playback engine applies filtering, amplitude envelope, modulation and so forth. The waveforms, of course, provide the basic digital audio data.

There is such a broad range of arranger/synth products at different price points, that the amount of storage and the kind of storage varies quite a lot.

The lowest of the low in the Yamaha range: PSS-A50, -E30, -F30, PSR-F51. Presets are stored on a 2MByte serial flash ROM and are loaded into the processor (SWLL) at start-up. The 2MBytes include code, too! Tone generation is integrated into the SWLL. Insanely small, and very low cost.

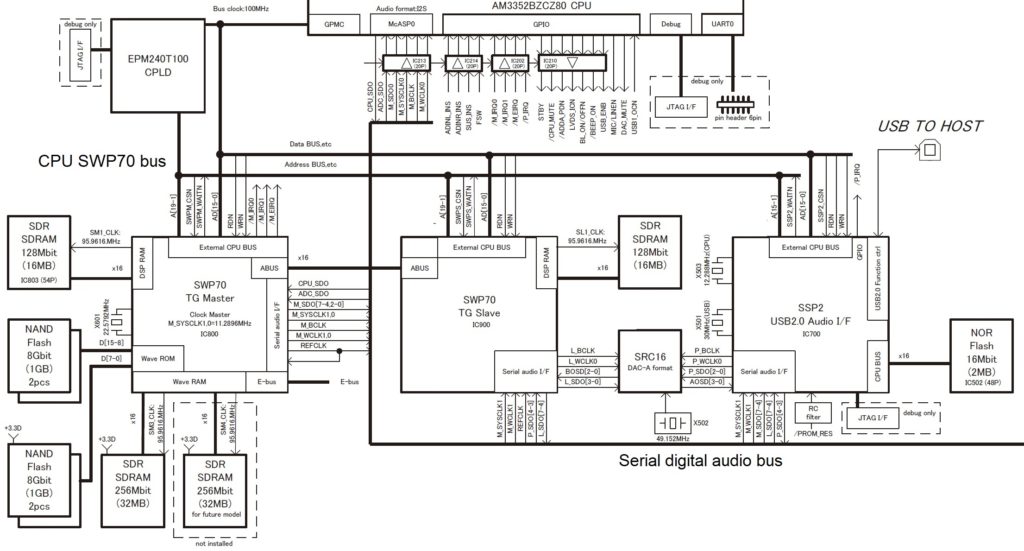
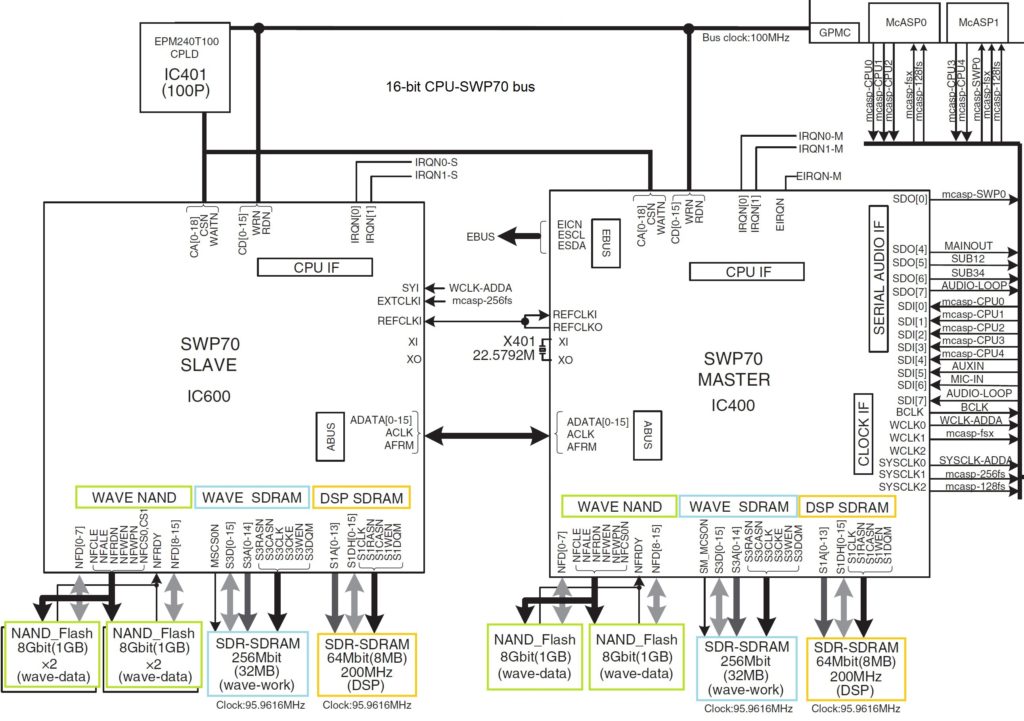
The highest of the high in the Yamaha range: Genos. Factory presets are stored in four 1GByte ONFI NAND flash devices. Expansion memory consists of two 1GByte ONFI NAND flash devices. Wave memory connects directly to external tone generators (SWP70).

I’ve looked at the diagrams for Genos and I’m not sure about the size and function of those memory units, especially Genos USER memory and expansion memory.

Yamaha confuses people when they speak of “user memory,” “internal memory,” etc. They are usually referring to logical, user visible storage.

When getting down to the hardware level, there are many different physical memory units. since we’re not discussing fairy dust or magic, the logical storage must be assigned to one or more physical memory units. And, of course, the physical memory units themselves may be composed of multiple integrated circuits. The other dimension is “what communicates to what.” Memory is passive and needs a processor to initiate reads and writes and to do something with all that data. At the physical level, a memory unit essentially belongs to a single processing unit (host computer, tone generator) and directly communicate with it.

Sometimes I think of the SWP70 as a parallel processor just like a GPU. The CPU/SWP70 is not exactly analogous to host CPU plus GPU, however. Graphics memory is shared between CPU and GPU. The SWP70 does not share its waveform memory with anybody — it’s dedicated to the tone generator. That’s why installing an expansion pack (voice library) is kind of slow and technically complicated, and why a Genos reboot is required.

Yamaha Genos SWP70 tone generators

Staying with Genos, Genos has two SWP70 tone generators: one handles factory presets and the other handles user expansion voices. The factory SWP70 has 4GBytes of flash memory while the expansion flash memory has 1GB of flash memory. That’s physical memory. Yamaha boosted the effective capacity to 3GB expansion through compression.

The SWP70s also have DSP RAM. As a user, you never know about this memory. It’s scratchpad memory for DSP effects. Physically, the DSP RAM is completely separate and independent from the waveform memory, and communicates with only its parent SWP70.

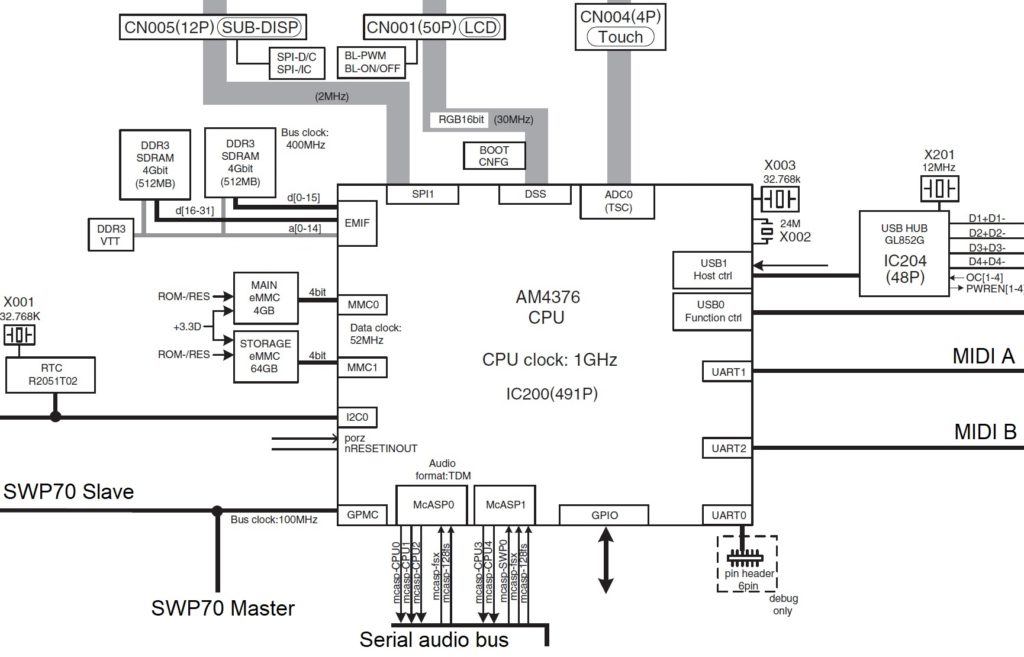
Yamaha Genos Host CPU

The host CPU has two kinds of memory (as determined by its bus interfaces): 1GB of working RAM on the CPU memory bus (EMIF) and two embedded eMMC memory devices that act like solid state storage drives (MMC0 and MMC1). As far as a user is concerned, the user never sees the 4GB eMMC drive (MMC0) just like you don’t see the DSP RAM; it’s hidden. The MMC0 drive contains the Linux operating system kernel and the root file system.

The user sees only part of the second 64GB eMMC drive (MMC1). The user sees the logical storage which Yamaha calls “Internal memory” or “USER drive.” What’s in the remaining 6GB? I don’t know — Yamaha haven’t left any clues.

What about Montage and its 5.67GByte waveform memory? 5.67GB is the capacity when the waveforms (samples) are compressed. Again, this is logical storage capacity.

Yamaha Montage SWP70 tone generators

Montage has two SWP70s. One SWP70 is dedicated to FM-X and it does not have waveform memory. The second SWP70 handles AWM2 synthesis (sample playback) and has waveform memory connected to it. The waveform memory consists of four 1GByte devices totaling 4GBytes. Thanks to Yamaha’s proprietary compression, Montage stores 5.67GBytes-worth of data in the physical waveform memory. The remaining space, 1.75GB physical, is available for user samples.

How does sample capacity relate to price? It doesn’t. Component cost is outweighed by manufacturing costs, software development cost and sound design cost.

If the memory components are so cheap, why isn’t there more waveform memory? If there was more, then you wouldn’t buy the Mark II model, would you? 🙂

I understand that E30/F30 do NOT offer velocity sensitivity. My question is about the internals. Is it confirmed that it’s a keybed with two switches per key, that just aren’t supported in software?

Yes, you need to be careful here. There are hardware model differences: E30 and F30 are not velocity sensitive. A50 is velocity sensitive.

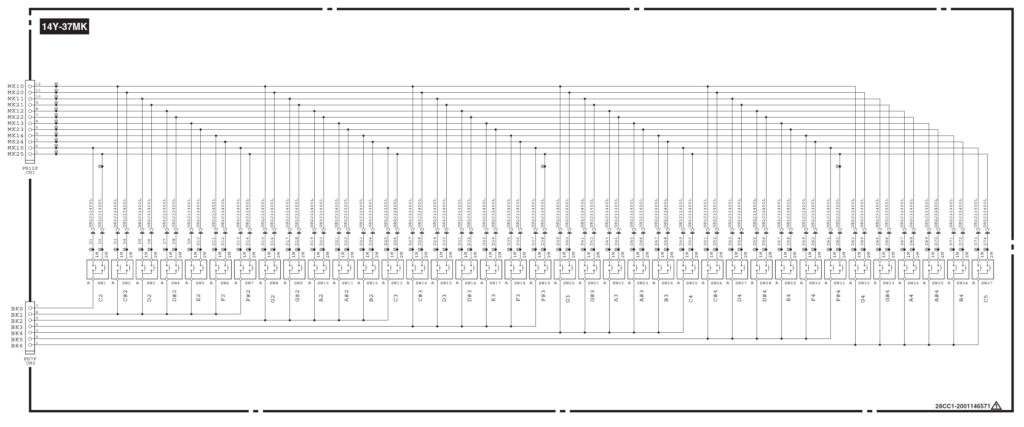
There are two different keybed printed circuit boards (PCB). Yamaha part number VAY27800 for F30/E30 and VAY28500 for A50. The A50 PCB has the necessary diodes installed for velocity sense. The F30/E30 PCB does not have the diodes. Further, the A50 board has a 12-pin connector while the F30/E30 board has an 11-pin connector — perhaps to avoid assembly mistakes.

Yamaha Reface key switch matrix schematic

Is velocity sense worth the extra bucks? There may be other differences, too, but these differences are plainly visible.

And the usual caution/disclaimer — kiss the warranty good-bye! For the money, the PSS should be good mod-fodder. Korg probably sold a mess o’monotron that way. 

Copyright © 2021 Paul J. Drongowski
Wire Less: Part 1, Korg Microkey Air 49

With the pandemic raging, I’m searching for ways to reduce my physical gig footprint and schlep factor. I thought I would share my adventure in battery-lowered, almost wireless keyboard-land.

Months ago, I had a good experience with Korg Module Pro. It has the range of high quality sounds that I need for my church gig. So, I decided to eschew battery-powered MIDI modules like the MidiPLUS miniEngine USB and go iPad and Korg Module Pro.

Yamaha SHS-500 Sonogenic (labels added)

I tried a bunch of controller candidates. (See the end of this post for more info.) I had the best experience and minimal number of wires with built-in Bluetooth MIDI. The SHS-500 Sonogenic, in particular, is nearly ideal:

  • Pluses: Built-in Bluetooth, pitch bend and mod wheels, decent mini-keys, narrow depth is good for a lap-board.
  • Estimated battery life is OK (10 hours); AC adapter jack is well-placed and secure.
  • Minuses: 37 keys (3 octaves), no expression pedal input, mod wheel works backwards when played in one’s lap.

No, I am not playing the SHS-500 as a keytar. I find the whole keytar thing to be gimmicky and not appropriate for church. I intend to play the controller in my lap, thereby keeping my physical profile small. (Social distancing!) A lap-board lets me ditch the keyboard stand, minimizing schlep.

Mini-keys deserve comment. Mini-keys enable short, lap-held keyboards. They are very lightweight and easy to transport. If the basic key feel is good, I make peace with play-ability.

My trouble isn’t so much with key size. It’s that three octaves (37 keys) are too short. Many melody and bass lines require two octaves and a player needs two octaves below middle C and two octaves above. Otherwise, I do unnecessary mental and hand gymnastics in real-time to fit the music onto the keyboard. That ain’t right.

Just me? Watch Harry Connick Jr. rock a 3 octave Reface CP. Harry sez, “There’s not a lot of room here.” [Tonight Show: Jimmy Fallon, NBC, 1 September 2016, Playing starts at 3:00.]

Korg Microkey Air 49

In the end, I broke down and bought a Korg Microkey Air 49. It is a good size for a lap-board and the Korg Natural Touch mini-keys ain’t too bad. The Microkey Air firmware was already at v1.04 when it arrived and it connected with Korg Module Pro under IOS 14.1 without a problem. [More on this in a future post.]

The Microkey Air 49 has an estimated 30 hour battery life. Good thing, because Bluetooth operation must use battery power (two AA batteries). Be sure to have two spare AA batteries at the gig; there isn’t a USB powered safety net.

The Microkey Air has a footswitch input. Expression input would be better. Of course, connecting a pedal to the Microkey Air adds a cable. Fortunately, Bluetooth pedals like the Airturn BT200-S4 get the job done. I have a BT200-S4 and found it easy to switch sustain, etc. via Bluetooth in Korg Module Pro. The BT200-S4 is small and light, not any worse than schlepping a wired sustain pedal.

I made a few advances with iPad wiring along the way. The Korg Microkey Air 49 is working out pretty well and I’m practicing with it every day. I have a few custom layers in Korg Module Pro and the day is coming when I’ll try out the rig in front of a congregation.

Going native

For completeness sake, I tried “going native” with sounds built into the Yamaha SHS-500 Sonogenic, Yamaha Reface YC, Yamaha PSS-A50 and Korg microKorg XL+ — all fine battery-powered instruments in their own right with sounds appropriate for rock, soul, jazz, and pop, but not church. I need good strings, reeds, classic organ and gospel B-3. Before moving on, I give props to the Reface YC as it is truly gig-worthy and have play it on the job.

Blooming BLU

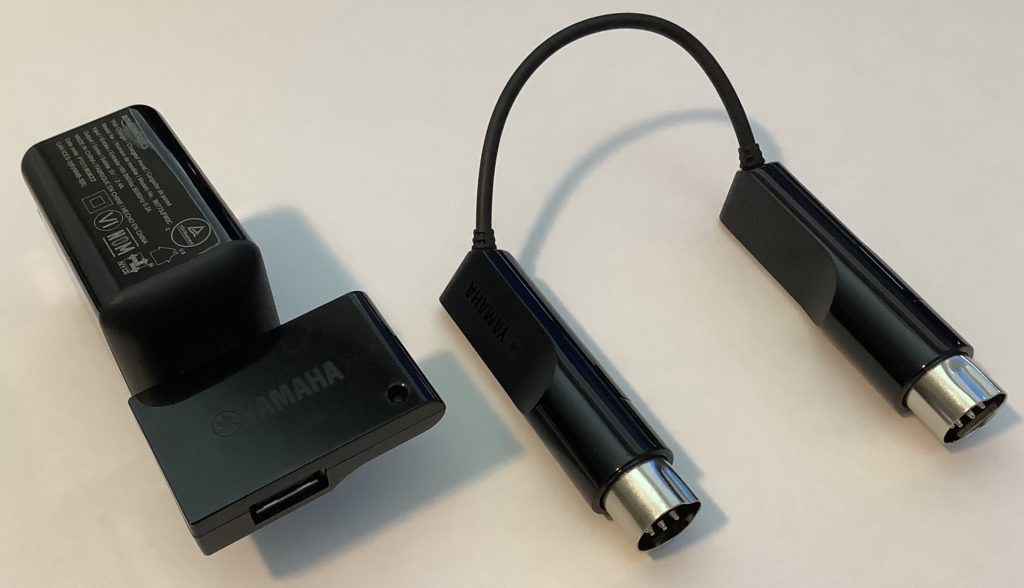
I also tried using “the natives” as Bluetooth MIDI controllers. All of the candidates have USB and/or 5-pin MIDI DIN ports, and can be fitted with Yamaha UD-BT01 and MD-BT01 wireless MIDI adapters. The candidate keyboards are battery-powered, so what the heck!

Yamaha UD-BT01 (with AC adapter) and UD-BT01 Bluetooth MIDI

To make a long story short, all candidates worked well with the Yamaha adapters and with Korg Module Pro on iPad — even the lowly, dirt-cheap PSS-A50. A few specific observations:

  • The Yamaha UB-BT01 not only does Bluetooth MIDI, it supplies power to the PSS-A50. If you must add a cable to connect the A50 to the UD-BT01, you might as well get power, too, and save batteries. If you own a PSS-A50 and want to go Bluetooth MIDI, don’t hesitate!
  • The Reface YC has the added bonus of an expression pedal input. An expression pedal is a vital part of my gig toolkit. Korg Module Pro will connect simultaneously to more than one Bluetooth MIDI source (like the BT200-S4 previously mentioned). In one experiment, I used Reface YC as my expression source while playing the black and whites on the SHS-500. Neat. I might add the new Boss EV-1-L wireless expression pedal once it ships.
  • I looked into expected battery life. The Korg Microkey Air is the best at 30 hours estimated life. The other solutions are burdened by tone generation and DSP. The added power-burn is unnecessary if we’re not using the internal synthesis engines.

Even though you take a power hit, an internal engine is a good back-up in case there is a technical problem with Bluetooth, the iPad or Module Pro.

    Instrument     Estimated battery life 
------------- ----------------------
Microkey Air 30 Hours
PSS-A50 20 Hours
SHS-500 10 Hours
Reface YC 5 Hours
microKorg XL+ 4 Hours

In terms of key feel and play-ability, all candidates are acceptable. The Yamaha HD mini-keys are more synth- and organ-like, and are good for legato (especially organ). The Korg Natural Touch mini-keys are more piano-like — good for striking, not quite as good as Yamaha HD for legato. Unlike Microkey Air 49, the other candidates are 37 keys and are too short for unfettered play.

                           Key dimensions 
--------------------
Instrument Width Length Depth
------------------ ----- ------ -----
Reface HD 19mm 88mm 9mm
Korg Natural Touch 20mm 80mm 8mm
MODX 21mm 133mm 10mm
Genos FSX 22mm 133mm 10mm

Check out these related blog posts:

Copyright © 2021 Paul J. Drongowski
PSS chorus: A dusty look back

Here’s a look into the past — and maybe, the present.

A PSR Tutorial Forum member inquired about the chorus effects in the PSR-E463. The PSR-E463 has the usual system chorus effect and the newer DSP chorus effect. I’m going to focus on the older system chorus effect.

The PSR-E series chorus system effect date back to the earliest days of Yamaha XG and arranger keyboards. These are low-cost entry-level keyboards and usually contain a single integrated circuit (IC) which integrates the main processor (CPU), tone generator and effect units. The most price- and cost-sensitive models integrate the wave memory (samples) on the IC, e.g., the SWLL (PSR-F51). Processors in the other models have an external wave memory, e.g., the SWL01 (PSR-E443) and SWX03 (PSR-E463).

Newer DSP effects aside, the E-series models share the same basic reverb and chorus effects. There are three chorus effects:

  • Chorus1 (MSB: 66 LSB: 17)
  • Chorus2 (MSB: 65 LSB: 02)
  • Chorus3 (MSB: 65 LSB: 00)

The LSB has varied, but they all refer to the same CHORUS (CELESTE) effect algorithm. The LSB just selects a set of preset effect parameters. Chorus1, BTW, falls into the XG CELESTE category, not CHORUS.

Due to hardware integration, the chorus effects likely share the same hardware. Since none of these processors have external DSP RAM, the chorus memory is integrated, too.

As far as chorus is concerned, this is the way it has been since the 1990s! Let’s look back to the Yamaha QY-70 XG implementation (1995). I suspect that the current chorus effects are the same or very similar to the good old QY.

The QY-70 had one chorus and celeste effect algorithm:

Param#  Parameter            Value range 
------ ------------------- --------------------
1 LFO Frequency 0.00Hz - 39.7Hz
2 LFO PM Depth 0 - 127
3 Feedback Level -63 - +63
4 Delay Offset 0 - 127
5
6 EQ Low Frequency 50Hz - 2kHz
7 EQ Low Gain -12dB - +12dB
8 EQ High Frequency 500Hz - 16.0kHz
9 EQ High Gain -12dB - +12dB
10 Dry/Wet D63;gt;W - D=W - D<W63
11 ...
15 Input Mode Mono, Stereo
16

These parameters are laid down by the Yamaha XG specification.

The XG specification does not define the preset values, however. Here are the QY-70 preset chorus values:

Param#  Parameter            Chorus1 Chorus2 Chorus3 Chorus4 
------ ------------------- ------- ------- ------- -------
1 LFO Frequency 0.25Hz 0.33Hz 0.16Hz 0.37Hz
2 LFO PM Depth 54 63 44 32
3 Feedback Level +13 +0 +0 +5
4 Delay Offset 106 30 110 104

QY-70 Chorus3 has the same MSB/LSB as PSR-E Chorus2. QY-70 Chorus 1 has the same MSB/LSB as PSR-E Chorus3. Confusing? Yes, but these are probably the PSR values or close to it.

Next are the QY-70 preset celeste values:

Param#  Parameter            Celeste1 Celeste2 Celeste3 Celeste4 
------ ------------------- -------- -------- -------- --------
1 LFO Frequency 0.50Hz 1.17Hz 0.16Hz 0.33Hz
2 LFO PM Depth 32 18 63 29
3 Feedback Level +0 +26 -20 +0
4 Delay Offset 0 2 2 0

None of the QY-70 presets have the same MSB/LSB as PSR, so your guess is as good as mine.

Now, the really bad news. The PSR-E series, at best, is XGlite. XGlite implementations typically don’t support the XG messages that set effect parameters. Therefore, what you hear is that you get. In other words, the effect presets are hardwired.

The Yamaha PSS series with its minimal SWLL processor implements exactly one chorus and exactly one reverb preset. You get what you pay for!

Copyright © 2021 Paul J. Drongowski