Casio CT-S1000V: Free registration banks

I hope today’s post will help liturgical musicians who want to play the Casio CT-S1000V and CT-S500 at church services. I invested a fair amount of effort building patches and registrations which fit contemporary and traditional church music. The sounds would also be compatible with soft pop and gospel-tinged genres, too.

I’ve gig-tested there sounds, having played them at services. So, if you would like to try them yourself, please download the ZIP file. The ZIP contains six CT-S registration files:

  1. RegBank01.RBK: Woodwinds
  2. RegBank02.RBK: Strings
  3. RegBank03.RBK: Horns / Brass
  4. RegBank04.RBK: Drawbar organs
  5. RegBank05.RBK: Pipe organs
  6. RegBank06.RBK: Miscellaneous

The sixth bank is a work in progress. The first five banks cover most of my needs, but there are always a few miscellaneous sounds that pop up.

Each CT-S1000V and CT-S500 registration has four slots (patches). The following table summarizes the registration and patch layout.

       1              2              3              4 
-------------- -------------- -------------- --------------
Bank 1 Horn+Wood Flute+Cla Wood Sect ChamberWinds
Bank 2 MellowStrings StereoStrings SoloViolin ChamberStrings
Bank 3 FrenchHorns NobleHorns HighSchool Tp + Tb
Bank 4 MellowGospel SoftGospel BrightChurch Simmering
Bank 5 Pipe Organ 3 Chapel Organ Organ Flute Bandoneon
Bank 6 SoftPad VoiceEnsemble StageE.Piano StageE.Piano Trem

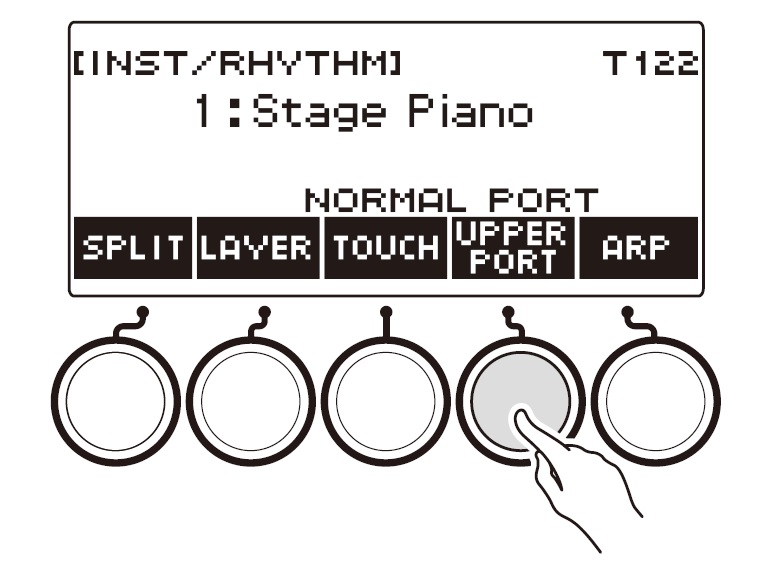
I usually pre-select a bank and patch before each musical piece. Then I switch to a different patch within the same bank in order to add a different color. I wish it was a little easier to change registration bank on the fly. Maybe I’ll get better with practice.

Patch details

The CT-S patches are based on combinations which I used on old Roland JV- and XV- series gear. The following tables show the CT-S tones in each patch and the level for each tone. You’re welcome to tweak the levels using the BALANCE menu.

Woodwinds      Upper1            Upper2             Lower           
---------------- ----------------- ----------------
Horn+Wood English Horn 100 Fr.Horn Sect 110 Mellow Str.2 127
Flute+Cla Flute 1 100 VeloClarinet 100 Mellow Str.2 127
Wood Sect Flute & Oboe 100 VeloClarinet 100 Mellow Str.2 127
ChamberWinds Flute & Oboe 95 VeloSopranoSax 85 Mellow Str.2 127

Strings Upper1 Upper2 Lower
---------------- ----------------- ----------------
MellowStrings SlowStreoStr 100 Warm Pad 120
StereoStrings SlowStreoStr 120
SoloViolin Slow Violin 75 Mellow Str.2 90
ChamberStrings Chamber 100

Brass Upper1 Upper2 Lower
---------------- ----------------- ----------------
FrenchHorns French Horn 100 Fr.Horn Sect 80
NobleHorns Fr.Horn Sect 100 Flugelhorn 80
HighSchool Clarinet 100 Glockenspiel 80 French Horn 80
Tp + Tb Flugelhorn 100 Trombone 80 Tuba 80

B-3 Organ Upper1 Upper2 Lower
---------------- ----------------- ----------------
MellowGospel GospelOrgan2 127 Organ Bass 100
SoftGospel Rock Organ 2 127 Organ Bass 110
BrightChurch Elec.Organ 1 100 Organ Bass 127
Simmering Elec.Organ 6 110 Organ Bass 127

Pipe Organ Upper1 Upper2 Lower
---------------- ----------------- ----------------
Pipe Organ 3 Pipe Organ 3 100
Chapel Organ Chapel Organ 100
Organ Flute Organ Flute 120
Bandoneon Bandoneon 120

Pads Upper1 Upper2 Lower
---------------- ----------------- ----------------
SoftPad Soft Pad 127
VoiceEnsemble VoiceEnsembl 120

I dialed down the reverb in all cases and settled on the ROOM2 reverb type. These patches are intended for live playing in a reverberant church hall, so additional reverb is unnecessary. You might find the pipe organ patches to be waaay dry when compared with the factory tones. I removed the initial reflections and delay which create the impression of a large space — totally unwanted in a live church.

I added 3-band EQ (ACTIVE DSP) to the woodwind patches to add warmth and to reduce harshness. Feel free to tweak away!

For string patches, Knob 1 and 2 are assigned to attack time and release time, respectively. I had to decrease the release time to reduce a simulated reverb tail. Knob 3 is usually modulation.

For drawbar organ patches, Knob 1 is rotary speaker speed, Knob 2 is scanner vibrato/chorus and Knob 3 is rotary speaker brake. Drive Rotary (ACTIVE DSP) is enabled with ACTIVE DSP HOLD. Here are the Drive Rotary DSP parameters:

                                       BrightChurch 
Param MellowGospel SoftGospel Simmering
------- ------------ ---------- ------------
Type 2 2 2
OD Gain 30 42 42
OD Level 30 42 42
Speed SLOW SLOW SLOW
Brake ROTATE ROTATE ROTATE
FallAcel 35 35 20
RiseAcel 40 40 35
SlowRate 45 45 65
FastRate 95 95 100
Vib/Cho OFF OFF OFF
WetLevel 100 110 110
DryLevel 0 0 0
Bypass OFF OFF OFF

I programmed Organ Bass in the left hand because I didn’t care for the sound of the rotary speaker on notes below middle C (or so). Drive Rotary does not have a parameter for the horn/rotor balance — maybe that would help.

I hope these patches help you to get started with your own registrations!

Copyright © 2022 Paul J. Drongowski

Casio CT-S1000V: Master EQ

Beware, this post is going to bury you in numbers. 🙂

I’ve been investigating master equalization in the Casio CT-S1000V. The CT-S500 has the same master EQ, so everything discussed here applies to the CT-S500, too.

The CT-S1000V master EQ is a four band, semi-parameteric equalizer. The four bands are: LOW, MID1, MID2, and HIGH. It’s possible to create and store a USER setting. The edit page let’s you set the center frequency and gain for each of the four bands. You cannot set the band quality factor, Q, which determines the bandwidth spread.

The CT-S1000V provides ten master EQ presets with suggestive names. Casio, unfortunately, do not publish the center frequencies and gains for the presets. Listening to each preset, one thinks “Yeah, that’s bright,” or whatever. Details are missing in action, however.

One can assign LOW, MID1, MID2, and HIGH gain levels to a knob. Thanks to the knob edit function, it’s possible to suss out the gain level for each band within a preset. After much button pushing and knob twiddling, here are the gain levels (dB) for each preset:

                LOW  MID1  MID2  HIGH 
--- ---- ---- ----
Standard 0 0 0 0
Loudness +3 +6 +1 +7
Treble + 0 0 +4 +6
Bass + +3 +4 0 0
Mellow -3 0 0 -8
Bright -4 0 +6 +4
Rock +3 +2 -6 +6
Jazz +3 0 +6 0
Dance +3 +4 +2 +8
Classic -2 +6 +2 0

As to the band frequencies, we turn to the published table of master EQ frequencies:

    LOW frequency range      50Hz to 800Hz 
MID1 frequency range 100Hz to 8.0kHz
MID2 frequency range 100Hz to 8.0kHz
HIGH frequency range 2.0kHz to 16.0kHz

That’s enough to get into the right ballpark.

Yamaha XG Multi EQ

Never content, I worked out a table for Yamaha XG Multi EQ. Multi EQ is an optional master EQ in the Yamaha XG effects chain. Multi EQ is fully parameteric and has five bands: LOW, LOW-MID, MID, HIGH-MID, and HIGH. The LOW and HIGH bands support a peak mode, but are usually configured for shelving.

Multi EQ has five presets: Flat, Jazz, Pops, Rock and Concert (AKA “Classic”).

           Flat          Jazz            Pops          Rock          Concert 
------------- ------------- ------------- ------------- -------------
Freq Q dB Freq Q dB Freq Q dB Freq Q dB Freq Q dB
------------- ------------- ------------- ------------- -------------
Low 80Hz 0 50Hz -6 125Hz +4 125Hz +7 80Hz +3
L-mid 500Hz 0.7 0 125Hz 0.3 +2 315Hz 2.0 -4 200Hz 0.7 +4 315Hz 0.7 +4
Mid 1.0kHz 0.7 0 900Hz 0.3 +4 1.0kHz 0.7 +3 1.2kHz 0.5 -4 1.0kHz 0.5 0
H-mid 4.0kHz 0.7 0 3.2kHz 0.5 -4 2.0kHz 2.0 -4 2.2kHz 1.0 +4 6.3kHz 0.7 +2
High 8.0kHz 0 6.3kHz -6 5.0kHz +6 6.3kHz +2 8.0kHz -3

None of the Q’s are high, so the peaks/curves are rather gentle. [I wish there was an easy way to plot the curves for each preset.]

Of course, you can plug these settings into the CT-S1000V and merrily tweak away.

Yamaha Genos Master EQ

The Yamaha Genos™ Master EQ is an eight band, parametric equalizer. The Low and High bands are shelving.

Yamaha Genos provides five presets: Flat, Mellow, Bright, Loudness and Powerful:

           Flat          Mellow         Bright        Loudness       Powerful 
------------- ------------- ------------- ------------- -------------
Freq Q dB Freq Q dB Freq Q dB Freq Q dB Freq Q dB
------------- ------------- ------------- ------------- -------------
Low 80Hz 0 80Hz 0 100Hz 0 100Hz +1 140Hz +3
1 250Hz 0.7 0 250Hz 0.7 0 250Hz 0.7 -1 250Hz 1.2 +1 315Hz 0.5 +2
2 500Hz 0.7 0 500Hz 0.7 0 500Hz 0.7 -1 450Hz 1.0 -2 560Hz 1.5 +2
3 630Hz 0.7 0 800Hz 1.0 +1 800Hz 0.7 -2 630Hz 0.5 -1 800Hz 0.5 +2
4 800Hz 0.7 0 1.8kHz 0.5 -1 1.0kHz 0.7 0 1.0kHz 1.3 0 1.6kHz 1.2 +1
5 1.0kHz 0.7 0 3.6kHz 1.0 -2 1.6kHz 1.7 +2 3.6kHz 1.0 +1 3.6kHz 1.6 +1
6 4.0kHz 0.7 0 6.3kHz 1.3 -2 4.0kHz 0.7 +1 6.3kHz 0.8 +1 5.6kHz 1.4 +2
High 8.0kHz 0 9.0kHz -1 7.0kHz +3 8.0kHz +2 10.0kHz +2

The settings match the names. Mellow knocks down the highs. Bright cuts the lows and boosts the highs. Loudness is a bathtub boosting both lows and highs. Powerful kicks all bands up a notch.

If I find a way to discover the CT-S1000V band frequencies, I will update its table. In the meantime, have fun!

Copyright © 2022 Paul J. Drongowski

Casio CT-S1000V: More tips

A few new Casio CT-1000V tips and observations. Hope they’re helpful.

Portamento

The CT-S1000V (CT-S500) has portamento. Control over portamento is quite flexible. Be prepared to experiment, however, as the interaction between portamento settings is not immediately obvious. Unfortunately, the User Guide is not super helpful as it refers to several terms with “portamento” in the name, e.g., “Upper Portamento,” “Part Portamento”, etc.

All of these tips apply to the CT-S500, too.

There are two different ways to access portameto-related settings: through the MENU button and through the Settings sub-menu.

The MENU parameters allow the following adjustments:

  • UPPER PORT: Turn on Upper Portamento.
  • PART PORT: Turn on Part Portmento for each part (Upper1, Upper2, Lower).
  • TIME: Change portamento time for Upper1, Upper2 and Lower, individually. Each part has its own time.

When Upper Portamento is enabled, you can enable/disable portamento on the Upper part using a front panel button.

Casio CT-S1000V/CT-S500 UPPER PORT soft button [Casio]

Ah, so which panel button is that? If you press the INSTRUMENT button, the CT-S1000V displays five soft buttons: SPLIT, LAYER, TOUCH, SUS and ARP. The SUS button controls sustain. If you want to control Upper Portamento instead, dive into the Settings sub-menu and scross to “SUS/UPPER PORT button”. Change the value from “SUS” to “UPPER PORT”. Now the INSTRUMENT button shows “UPPER PORT” instead of “SUS”. Pressing the “UPPER PORT” soft button applies portamento to the Upper part. This feature allows you to apply portamento selectively during a solo line.

I hope this brief overview helps when reading the User Guide. I recommend reading the fine print about Upper Portamento because Upper Portamento can override Part Portamento. (Surprise!)

Expression pedal

For some crazy reason, I didn’t hook up and configure an expression pedal on Day 1. In retrospect, one should probably tangle with pedal set-up early just in case pedal settings are saved in user memory locations like CT-S1000V registrations.

The User Guide gives good step-by-step directions concerning pedal set-up. The CT-S1000V is vendor agnostic, thankfully. I have three (!) Yamaha FC-7 pedals and didn’t want to buy another pedal. The CT-S1000V supports two TRS wiring schemes as shown in the diagrams below:

Casio CT-S1000V/CT-S500 pedal polarity types [Casio]

To make a long story short, the Yamaha FC-7 is polarity type 1. The FC-7 resistance is 50K ohms and be sure to go through the simple calibration steps in the User Guide. For reference, the FC-7 TRS signals are:

  • Tip: Reference voltage
  • Ring: Wiper
  • Sleeve: Ground

You wouldn’t believe how many forum posts get this wrong!

Roland, Kurzweil and Fata are polarity type 2. The User Guide confirms operation for the Roland EV-5, Kurzweill CC-1, Fatar VP-25 and Fatar VP-26. Type 2 TRS signals are:

  • Tip: Wiper
  • Ring: Reference voltage
  • Sleeve: Ground

The Roland FV-500L should work, too. Be aware that the EV-5 and FV-500L have a “minimum volume” potentiometer (variable resistor) in series with the main control potentiometer. Turn the minimum volume control to 0 before calibrating. The main control potentiometer resistance is 10K ohms; the minimum volume potentiometer resistance is 50K ohms.

Rant of the day: I have a nice, light-weight Boss EV-1-WL expression pedal. Wish I could use it with the CT-S1000V (and others). No device to device BLE, no 5-pin MIDI, no host compatibility. Arg.

Are pedal settings really stored?

I posted this question on the Casio Music Forums site. Even though the User Guide claims the pedal settings are stored in MY SETUP and registrations, I haven’t seen evidence. If you change the pedal settings and load a registration (or MY SETUP), the changed settings remain.

I hope that Casio will clarify.

Drawbar organ tones

As mentioned earlier, I pulled together a bank of drawbar organ registrations. I settled on the following tones:

    Gospel Organ 2    Mellow 
Rock Organ 2 Mellow
Elec.Organ 1 Bright church-y for hymns
Elec.Organ 6 Simmerin' for grease

In all four cases, I split the keyboard putting the “Organ Bass” tone in the left hand. I like the way Organ Bass holds down the low-end and doesn’t sound swirly. Split point is E4.

Movin’ on to pipe organs…

Copyright © 2022 Paul J. Drongowski