Qsynth and FluidSynth on Raspberry Pi: The basics

The first four articles in this series are a quick guide to getting started with audio and MIDI on Raspberry Pi 2:

  1. Get started with Raspbian Jessie and Raspberry Pi 2
  2. Get started: Linux ALSA and JACK
  3. Raspberry Pi soft synthesizer: Get started
  4. USB audio for Raspberry Pi

Although the articles address Raspbian JESSIE, the HOW-TOs should be able to get you started with pretty much any version of Linux.

I showed how to use a simple monophonic soft synthesizer (amsynth) in part 3. Now, it’s time to move on to a multi-timbral synth: FluidSynth. FluidSynth has a graphical front-end, Qsynth, and I’ll demonstrate Qsynth, too. This tutorial assumes that JACK (and/or ALSA) is properly configured. The second and third articles will help you with configuration.

The Web sites for FluidSynth and Qsynth are:

Please visit these sites to learn about the advanced capacilities that are offered by these programs. You can always consult manual pages while you are working:

    man fluidsynth
    man qsynth
    man qjackctl
    man aplay

or you can request help directly, e.g., fluidsynth --help.

Installation

Installation is a breeze:

    sudo apt-get install fluidsynth
    sudo apt-get install qsynth

These commands should automatically download and install the General MIDI SoundFont. The path name for the GM SoundFont is:

    /usr/share/sounds/sf2/FluidR3_GM.sf2

If you did not get the GM SoundFont by installing Qsynth or FluidSynth, then enter the command:

    sudo apt-get install fluid-soundfont-gm

to install it. If you want a Roland GS-compatible SoundFont, install it with the command:

    sudo apt-get install fluid-soundfont-gs

The General MIDI SoundFont file is about 140MBytes and the GS-compatible SoundFont file is about 32MBytes in size.

FluidSynth

Although you’re most likely to use FluidSynth via Qsynth, it’s worth discussing FluidSynth’s unique capabilities first. Some things can be done quite handily from the command line. The number of FluidSynth’s command line options can be overwhelming, so if you skip to Qsynth, that’s understandable.

FluidSynth is a multi-timbral software synthesizer based on SoundFont 2 specifications. It is a command line application program that accepts MIDI input from either a MIDI controller keyboard or a software MIDI sequencer. FluidSynth needs a SoundFont file containing instrument definitions and samples. It plays the incoming notes using the selected SoundFont instruments. FluidSynth supports sixteen MIDI channels (default). It provides chorus and reverb effects.

There are many SoundFonts available for download from the Web. Two of the best known and widely used SoundFonts are:

  • FluidR3_GM.sf2: A General MIDI sound set
  • FluidR3_GS.sf2: A Roland GS-compatible sound set

The General MIDI sound set is pretty good; don’t let the “General MIDI” label drive you away!

FluidSynth has three main usage modes:

  1. Interactive command mode.
  2. One-liner mode. “One-liner” is my name for this mode of operation.
  3. Server mode.

If you just type fluidsynth on the command line, FluidSynth launches into its interactive mode, i.e., FluidSynth accepts and interpets commands of its own. I won’t go into interactive mode here, but suffice it to say, that you can set parameters, load SoundFont files, etc. using FluidSynth commands. Enter help when you are in interactive mode in order to get information about commands and parameters. Interactive mode is a good way to explore FluidSynth configuration such that you can write out complicated combinations of FluidSynth command line options.

“One-liner mode” (option -i) launches FluidSynth without dropping into its interactive mode. You’re mostly likely to use this mode when launching FluidSynth from a shell script or if you just have a simple job to do from the command line.

One-liner mode means that you need to dive into FluidSynth’s command line options. There are many command line options including:

  • -C, --chorus: Turn chorus ON or OFF
  • -R, --reverb: Turn reverb ON or OFF
  • -K, --midi-channels: Set the number of MIDI channels
  • -j, --connect-jack-outputs: Connect JACK outputs
  • -F, --fast-render: Render MIDI to an audio file
  • -O, --audio-file-format: Audio file format for fast rendering
  • -r, --sample-rate: Set the sample rate
  • -T, --audio-file-type: Audio file type for fast rendering
  • -i, --no-shell: Don’t run in interative mode
  • -S, --server: Start FluidSynth as a server process

A full list of command line parameters is given in the FluidSynth User Manual.

One-liner mode handles two everyday tasks without a lot of GUI hoopla:

  1. Play back MIDI given a list of MIDI files on the command line.
  2. Render a MIDI file to an audio file (fast render).

FluidSynth looks for command line options, followed by a SoundFont file, followed by a list of MIDI files. Enter the following command to play back a MIDI file (“EvilWays.mid” in these examples) through the ALSA audio port such as the 3.5mm stereo jack on the Raspberry Pi 2:

fluidsynth -a alsa -n -i /usr/share/sounds/sf2/FluidR3_GM.sf2 EvilWays.mid

The -a option selects the ALSA audio device, -n suppresses MIDI input, and -i suppresses interactive mode. ALSA should be configured to use the 3.5mm audio jack. (See the second article in this series about ALSA and JACK.)

If you prefer to use JACK instead of vanilla ALSA, start the JACK server running via qjackctl. (See the third article in this series about using JACK with a soft synth.) Then, enter the following command:

fluidsynth -a jack -j -n -i /usr/share/sounds/sf2/FluidR3_GM.sf2 EvilWays.mid

The -a option selects JACK and the -j option tells JACK to connect the audio output of FluidSynth to the system audio output. If you leave out the -j option, JACK will not make the audio connection and you will be left wondering why there isn’t any sound coming from your speakers! You can also make this connection in the qjackctl Connections or Patchbay windows. In practice, if you aren’t getting audio output or MIDI, check your connections in JACK — audio or MIDI connections may be missing.

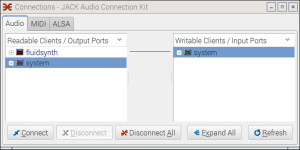
The image below shows the audio connection from FluidSynth to JACK. (Click on the image to enlarge it to full resolution.) This is a snapshot of the qjackctl Connections window while FluidSynth is playing a MIDI file. The audio connection is broken when FluidSynth is done with playback (i.e., when FluidSynth exits).

qjackctl_fluidsynth

Fluidsynth provides a way to fast render a MIDI file to a digital audio file. “Fast” is a relatively term. Perhaps “non-realtime render” may be a more accurate description. The following command:

fluidsynth -T wav -F EvilWays.wav /usr/share/sounds/sf2/FluidR3_GM.sf2 EvilWays.mid

converts a MIDI file (“EvilWays.mid”) to a WAV format audio file (“EvilWays.wav”). The -T option specifies the file format and the -F option specifies the name of the output file. The rendering process grinds on for a little while, so please be patient. Once you have the audio file, play it back using the ALSA aplay program:

    aplay -D hw:CODEC,0 EvilWays.wav

This example command sends digital audio to the CODEC audio device. Of course, you may use the built-in audio port or some other device. (See part 2 of this series for more examples. These tutorial articles build on each other!)

The way to get a list of audio types (-T) and audio file formats (-O) is confusing. You need to pass “help” to the appropriate command line option. (Grrrrrr.) The command:

    fluidsynth -O help

produces the following output on Raspbian JESSIE:

-O options (audio file format):
   'double','float','s16','s24','s32','s8','u8'

s8, s16, s24, s32: Signed PCM audio of the given number of bits
float, double: 32 bit and 64 bit floating point audio

The command:

    fluidsynth -T help

produces the output:

-T options (audio file type):
  'aiff','au','auto','avr','caf','flac','htk','iff','mat','mpc','oga',
  'paf','pvf','raw','rf64','sd2','sds','sf','voc','w64','wav','wve','xi'

auto: Determine type from file name extension, defaults to "wav"

Finally, server mode is needed when you want to run FluidSynth as a stand-alone server process. Qsynth is more convenient, so I won’t discuss server mode here just to keep things short.

I have to warn you, working with FluidSynth in either interactive mode or one-liner mode is not always smooth. Feedback is limited and you often have to work through rather cryptic error messages. Qsynth makes life much easier and interesting.

Qsynth

Qsynth is a graphical user interface (GUI) for FluidSynth. Qsynth is based on the Qt framework and toolset for user interface design and implementation.

Qsynth is the way to go if you want to use it as a soft synth with a MIDI controller or sequencer. It pairs up rather nicely with QJackControl, too.

We intend to demonstrate Qsynth using an M-Audio Keystation Mini 32 controller. If you’re working along with me, plug a MIDI keyboard controller into an available Raspberry Pi 2 USB port. Launch qjackctl:

    qjackctl &

and start the JACK server by clicking the Start button in the QJackCtl control panel. JACK routes the audio to the selected audio output port. Then, launch qsynth:

    qsynth

Qsynth automatically searches for the JACK server and connects audio to it. Qsynth displays a control panel which resembles an old school MIDI module. The panel knobs control master gain and the reverb and chorus effects. There are also buttons to Restart FluidSynth, to stop stuck notes (Panic), to Reset settings and to view/edit MIDI channel settings (Channels).

qsynth_panel

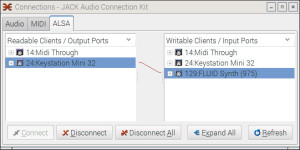
At this point, you need a MIDI connection from the Keystation (or other MIDI controller) to Qsynth. In the demo, I clicked the Connect button on the QJackCtl panel and made the MIDI connection using the Connections window. (See the image below. Click on the image for full resolution.)

qjackctl_qsynth

Select the Keystation entry on the left and select the FluidSynth entry on the right. Click the Connect button to make the MIDI connection. “FluidSynth” appears as a destination in the right hand column instead of “Qsynth.” Remember, Qsynth is a graphical front-end for a FluidSynth running in the background. The MIDI controller needs to communicate with the soft synth.

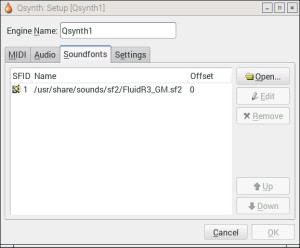
Play a few notes on the MIDI controller to make sure that audio and MIDI are working. Then, click the Setup button on the Qsynth front panel. Qsynth displays its Setup window which has four tabs: MIDI, Audio, Soundfonts and Settings. Click SoundFonts to go to the Soundfonts tab.

qsynth_setup

The SoundFonts tab displays the SoundFont files that are currently loaded into Qsynth (FluidSynth). Click on the Open button to load a SoundFont file like:

    /usr/share/sounds/sf2/FluidR3_GS.sf2

Use the Remove button to unload a SoundFont. Click the OK button when you are finished making changes.

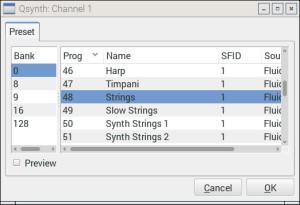
If you start Qsynth with the General MIDI SoundFont and play notes on MIDI channel 1, you hear a grand piano voice. Click the Channels button on the front panel in order to change voices. With the Channels window open, double click on a row in the MIDI channel table. Should you prefer contextual menus instead, right click on a row and select Edit in the pop-up menu. This action gets you to the same place: the channel edit window (below).

qsynth_edit_channel

The channel edit window displays a list of available SoundFont voices. Voices are organized and selected in the conventional way, namely, banks and individual programs (voices). Choose a different voice like Strings (General MIDI bank 0, program 48). Qsynth does not change the voice until you click the OK button to confirm the change. If you would like to browse and try voices, check the Preview box. When Preview is enabled, Qsynth temporarily changes the voice, letting you plink away on the controller and hear the voice before changing it (or perhaps just leaving things alone by cancelling).

Click the Quit button on the Qsynth front panel when you’re finished. Then, stop the JACK server using the QJackCtl control panel.

That’s all there is to it!

Copyright © 2016 Paul J. Drongowski

Raspberry Pi soft synthesizer: Get started

Now let’s make some noise!

This article shows how to install, configure and play a simple software synthesizer (amsynth) on Raspberry Pi 2. The first part in this series is a quick installation and configuration guide for Raspbian Jessie Linux. The second part is an introduction to the Linux audio infrastructure (ALSA and JACK). Please consult these articles for background information. I assume that you know a little about JACK and ALSA aconnect in this article.

amsynth

amsynth is a basic virtual analog (i.e., analog modeling) synthesizer for Linux. It is polyphonic (16 voices max). Each voice has two oscillators, a 12 or 24dB per octave resonant filter and dual ADSR envelope generators. All can be modulated using a low frequency oscillator (LFO). The synth also has distortion and reverb effects. Read more about amsynth at the amsynth web site.

amsynth is a good starting point for exploration since it is easy to set up and use. It can operate standalone (JACK, ALSA or OSS) or as a plug-in (DSSI, LV2, VST). When amsynth launches, it automatically searches for a JACK audio server. If it cannot find a JACK server, it switches to ALSA audio.

Run the following command to install amsynth:

    sudo apt-get install amsynth

The package manager fetches amsynth and the libraries, etc. that amsynth needs.

I’m going to show amsynth running on ALSA and JACK in this tutorial. I had the most success running on JACK and I recommend that approach for practical work. My goal is to play amsynth from an external MIDI keyboard — an M-Audio Keystation Mini 32 in this demonstration.

amsynth running on ALSA

ALSA seemed like the fastest way to test amsynth. Indeed, it came right up and I was able to play amsynth using the Keystation once I connected the ALSA MIDI ports for amsynth and the Keystation.

To repeat my initial experiment, start two terminal windows on the desktop. In the first window, run amsynth:

    amsynth

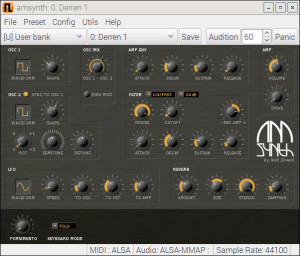
Simple, huh? No command line arguments to mess with. You should see the amsynth front panel as shown in the image below. Notice the status at the bottom of the amsynth front panel. The synth expects to use ALSA for both MIDI and audio.

amsynth_alsa

With the Keystation plugged in, run aconnect in the second window to identify the available ALSA MIDI ports:

    > aconnect -o
    client 0: 'System' [type=kernel]
        0 'Timer           '
        1 'Announce        '
    client 14: 'Midi Through' [type=kernel]
        0 'Midi Through Port-0'
    client 20: 'Keystation Mini 32' [type=kernel]
        0 'Keystation Mini 32 MIDI 1'
    client 128: 'amsynth' [type=user]
        1 'MIDI OUT        '
    > aconnect -o
    client 14: 'Midi Through' [type=kernel]
        0 'Midi Through Port-0'
    client 20: 'Keystation Mini 32' [type=kernel]
        0 'Keystation Mini 32 MIDI 1'
    client 128: 'amsynth' [type=user]
        0 'MIDI IN         '

The aconnect -i command displays ALSA MIDI sender ports including the MIDI coming in from the Keystation. The aconnect -o command displays the ALSA MIDI receiver ports that accept MIDI data including the MIDI IN port belonging to amsynth.

Use aconnect, again, to patch the Keystation to amsynth:

    aconnect 20:0 128:0

ALSA ports are identified by client and client-specific port number. The first port in the command line above is the sender port and the second port is the receiver port.

Enter aconnect -l to display port and connection status. Here is what I saw after connecting the Keystation to amsynth:

    client 0: 'System' [type=kernel]
        0 'Timer           '
        1 'Announce        '
    client 14: 'Midi Through' [type=kernel]
        0 'Midi Through Port-0'
    client 20: 'Keystation Mini 32' [type=kernel]
        0 'Keystation Mini 32 MIDI 1'
            Connecting To: 128:0
    client 128: 'amsynth' [type=user]
        0 'MIDI IN         '
            Connected From: 20:0
        1 'MIDI OUT        '

Click the Audition button on the front panel. amsynth plays a sound. Hit the keys on the Keystation and amsynth plays the notes.

Now that you’re in business, here are a few things to do:

  • Try different presets.
  • Turn the virtual knobs while holding a note.
  • Twist MIDI controller knobs and watch amsynth track the changes.
  • Explore amsynth’s menus.

You probably noticed a few greyed out items in the Utils menu:

  • MIDI (ALSA) connections
  • Audio (JACK) connections

These items refer to utility programs that make MIDI and audio connections (kaconnect, alsa-patch-bay, qjackconnect). I couldn’t locate pre-built versions of these programs for Raspbian. This isn’t a big deal, since we’re going with JACK anyway.

If you followed these directions and played amsynth with a MIDI keyboard of your own, you probably noticed the latency (lag) between striking a key and hearing a sound. The lag under ALSA alone is unacceptable — another reason to go with JACK.

Should you need a virtual keyboard, here are two Linux applications for ya:

    vkeybd         Virtual MIDI Keyboard
    vmpk           Virtual MIDI Piano Keyboard

Install these with the sudo apt-get install command.

amsynth running on JACK

Let’s run amsynth along-side JACK for audio.

JACK is a server that runs as a separate Linux process. A process running a system service like JACK is called a “daemon” in Linux terminology. (Just in case you see this term when reading supplementary articles on the Web.) We need to start JACK running before amsynth so that amsynth can discover the JACK server and connect to it.

Here is the general flow of things when getting down to work:

  1. Plug in your MIDI controller.
  2. Launch qjackctl.
  3. Change JACK settings, if necessary.
  4. Start the JACK server.
  5. Launch amsynth or other JACK-aware application.
  6. Make connections in qjackctl or ALSA.

Full disclosure, I first started JACK from the command line using a variety of suggested options and had only limited success. I got a few runtime errors along the way and the latency was unacceptably long.

These first experiments produced one useful tip: Add yourself to the Linux audio group. The notion of a group in Linux is similar to the different classes of users that you find on a different operating system, e.g., the group of Administrator users on Windows. Users belonging to the audio group have special rights which improve the performance of realtime applications like a soft synthesizer. These rights include the ability to reserve and lock down memory and to run time-critical operations at a higher priority.

The Raspbian Jessie image comes equipped with the audio group. The following command checks to see if the audio group is already defined (just in case you’re working on a different version of Linux):

    grep audio /etc/group

If this command doesn’t display anything, then you need to create the audio group yourself. The command:

    sudo groupadd audio

adds the audio group. You will need to define the rights and privileges for the audio group — an expert task that I will not explain here. See the references at the bottom of this page for more details.

Run the following command to display your group membership:

    groups

If “audio” is not listed in the output, then you need to add yourself to the audio group:

    sudo usermod -a -G audio XXX

where XXX is your user name. The next step is vital to your sanity. Log out. Log all the way out. If you logged in from the text shell and started the X Windows system, then leave X Windows and log out from the text shell. Then, log back in. Run groups and the system should now show you as a member of the audio group. Group membership is established and inherited when you log in.

Finally, it’s time to start JACK. Fortunately, JACK has a graphical control panel called qjackctl. The control panel uses the cross-platform Qt graphical user interface (GUI) package which supplies all of the buttons, drop-down lists and so forth. Start the control panel with the following command:

    qjackctl &

The ampersand at the end of the command line is not accidental. It tells the Linux shell to run qjackctl and detach the control panel from the terminal window. This leave the terminal window live and ready to accept new commands.

The qjackctl control panel is shown in the following image.

qjackctl

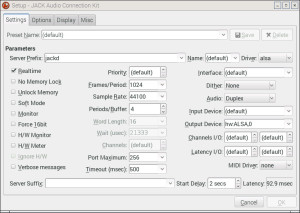
Click the Setup button in order to make a few small changes. Change the Sample Rate parameter to 44100Hz, which is the rate prefered by amsynth. Set the Periods/Buffer parameter to 4. If the number of periods is less than 4, you will probably hear noisy, glitchy audio. JACK and amsynth work just fine when the Output Device is set to “(default)”. I decided to set the Output Device parameter by hand to “hw:ALSA,0” as a way of testing the ALSA settings. Please see the settings that I used in the following image. (Click images to get full resolution.)

qjackctl_setup

Now launch amsynth:

    amsynth

The soft synth will search for the JACK audio server and should connect to it.

You could follow the procedure in the ALSA section (above) to connect the Keystation to the MIDI IN belonging to amsynth. However, qjackctl has two convenient ways to make MIDI connections:

  1. Connections
  2. Patchbay

These features reside behind the Connect and Patchbay buttons. They each have similar capabilities and allow you to make connections between MIDI and audio ports. The main difference is persistence or lack thereof. Connections are temporary and are broken when a client is terminated. Connections are forgotten when the JACK server is terminated, too. The Patchbay lets you define, save and load port-to-port connections in a file. JACK is also pretty good about restoring the active patchbay even if you haven’t started applications, soft synths, etc. in an orderly way. (JACK needs to be running first, of course.)

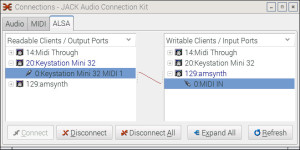
I made connections using both techniques just for fun. The image below is a snapshot of the Connections dialog box. There are three tabs — one for each type of connection (port). I made MIDI connections using the ALSA tab because the Keystation MIDI ports were not registered with JACK. (They did not appear on the MIDI tab even though the MIDI tab did show amsynth‘s MIDI ports.) To make a connection, just select a sender in the left column and a receiver in the right column. Then click the “Connect” button. If you terminate amsynth or JACK, the connection is lost and forgotten.

qjackctl_alsa_midi

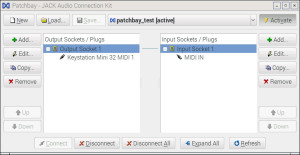
The Connections dialog is a good place to experiment while you’re getting your virtual, in-the-box studio together. When you have a set-up that you like, it’s time to capture the set-up in the Patchbay. First, click the “Patchbay” button on the qjackctl control panel. Click the New button. Use the appropriate Add button to add output sockets to the left column or to add input sockets to the right column. Then, choose two ports and click the Connect button. After making connections, save the set-up to a file. The interface is intuitive. You can save and load as many different set-ups as you would like (as long as there is free drive space!)

qjackctl_patchbay

When you quit JACK, it remembers the last active Patchbay set-up. JACK recalls this set-up when you launch JACK, again. In case you’re wondering, qjackctl saves its configuration (settings) in:

    /home/XXX/.config/rncbc.org/QjackCtl.conf

where “XXX” is your Linux user name. The “.” character at the beginning of “.config” hides the “.config” file. Use ls -a to show all files in a directory including the hidden ones. The JACK daemon saves its configuration in:

    /home/XXX/.jackdrc

where “XXX” is your linux user name. This, by the way, is your home directory. Linux applications typically store configurations in hidden files within your home directory. The “.jackdrc” file contains the command that was last used to launch JACK, e.g.,

    /usr/bin/jackd -dalsa -dhw:0 -r44100 -p1024 -n4 -D -Phw:ALSA,0

This is good to know when you want to find out the initial launch conditions for the JACK daemon.

The one aspect that qjackctl does not handle well is the deletion of Patchbay set-up files. qjackctl stores a Patchbay set-up in an XML file. If you delete or move the XML file, then you will get a warning message like:

    Could not load active patchbay definition. Disabled.

You will need to delete the reference to the missing file from the “QjackCtl.conf” file.

At this point, you should be able to play amsynth from an external MIDI controller with acceptable latency. Have fun!

Finally, I found three well-written guides to JACK, qjackctl, and the JACK patchbay. Here are the links. If you read my introduction to ALSA and JACK and this articles, then you have sufficient background to dive into the finer points.

Demystifying JACK – A Beginner’s Guide to Getting Started with JACK
HOW-TO QjackCtl Connections
QjackCtl and the Patchbay

If you enjoyed this article, then be sure to check out:

Qsynth and FluidSynth on Raspberry Pi: The basics

Copyright © 2016 Paul J. Drongowski