The Yamaha SHS-500 Sonogenic is a good sounding syntheizer which lets you jam along with ChordTracker songs. The SHS-500 includes a General MIDI Level 1 multi-timbral tone generator that is accessible over MIDI (Bluetooth, 5-pin or USB). Yamaha doesn’t promote the General MIDI capability, but it’s there!
Update: I added a post showing how to customize the Sonogenic voice editor user interface.
The Sonogenic lacks three critical features that one finds in a typical desktop synth:
- Although the Sonogenic has 28 great voices and two drum kits built-in, it lacks many important instruments like organ, double reeds, tuned percussion and soft synth pads.
- Internal voices cannot be edited, e.g., attack, filter cutoff and so forth cannot be adjusted.
- The chorus and reverb types are preselected and cannot be changed.
- Edits and changes cannot be stored into and recalled from user memory slots.
This is the ideal situation for a tablet-based app.
MIDI Designer is an iPad-based tool which supports creation and use of MIDI voice editors and controllers called “layouts.” Users have built and shared layouts for many popular synths. Now, I’m pleased to add the SHS-500 Sonogenic layout. With this layout, you can play the General MIDI (GM) voices, change reverb and chorus types, edit General MIDI (GM) voices and save all of your work in MIDI Designer presets. If you turn Sonogenic LOCAL sound generation on, you can layer an internal voice with a GM voice.
This post describes the Sonogenic layout. I recommend reading my post about MIDI Designer to Sonogenic communications (MIDI flow) first. It will help you to understand the relationship between the SHS-500 and the MIDI Designer Sonogenic layout. The write-up may even inspire a new way of using MIDI Designer with Sonogenic.
One thing that’s nice about MIDI Designer and layouts — you can customize them. So, if you want to modify my layout, don’t hesitate. First, though, you should read my post describing Sonogenic’s MIDI implementation. Then you will know more about the MIDI messages behind the layout’s controls.
Click this link to download my Sonogenic layout for MIDI Designer. Use iTunes file sharing to install the layout in MIDI Designer. I plan to upload the Sonogenic layout to the MIDI Designer web site.
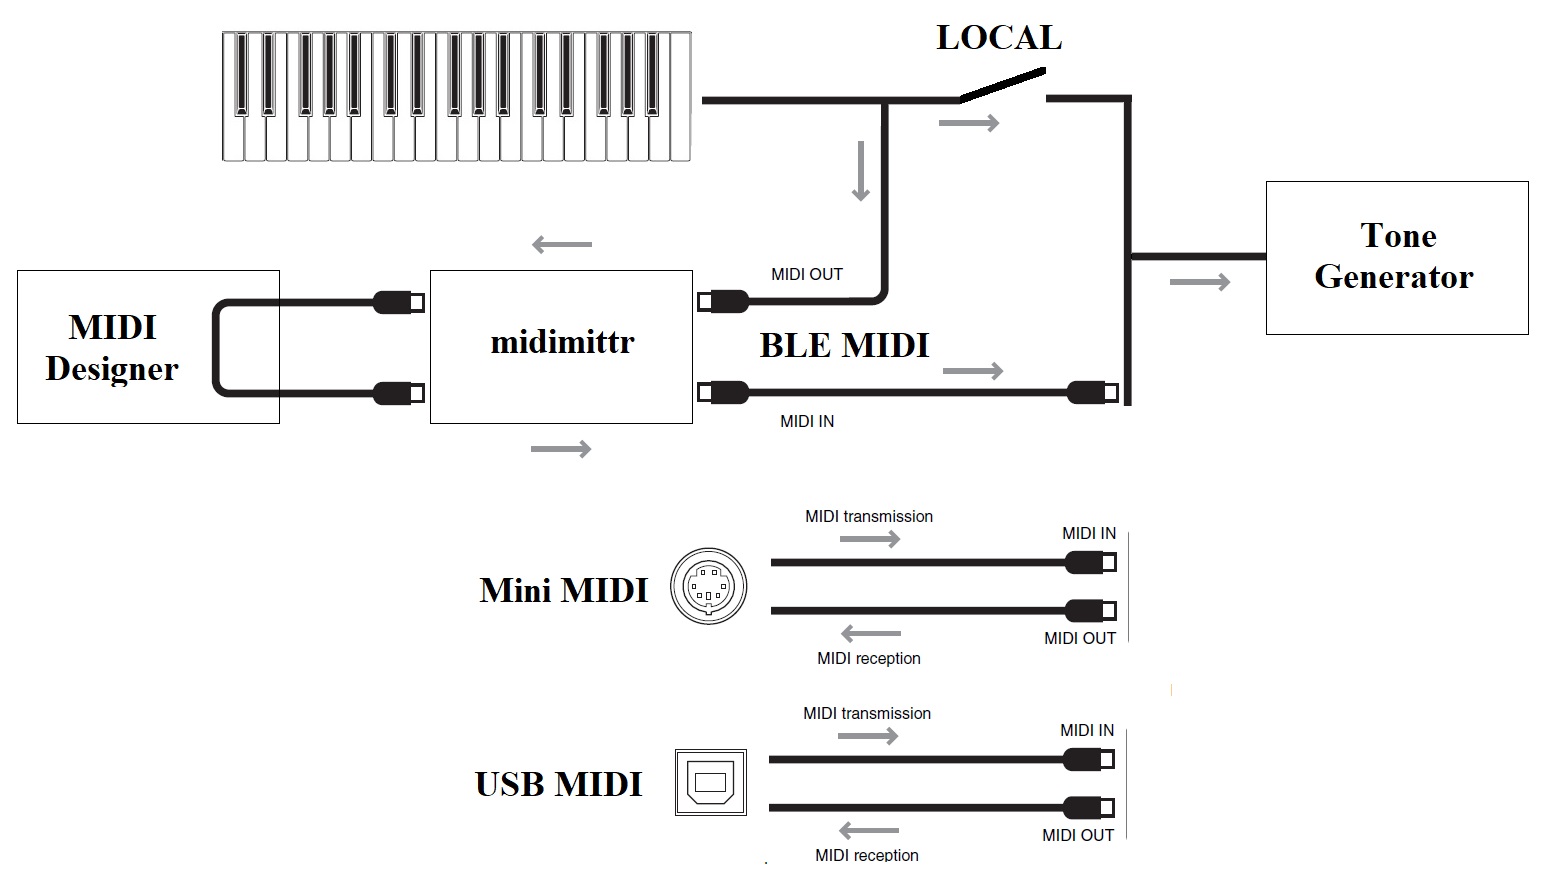
Connection
Although you could connect by USB or 5-pin MIDI, the Sonogenic, MIDI Designer and Bluetooth MIDI are made for each other.
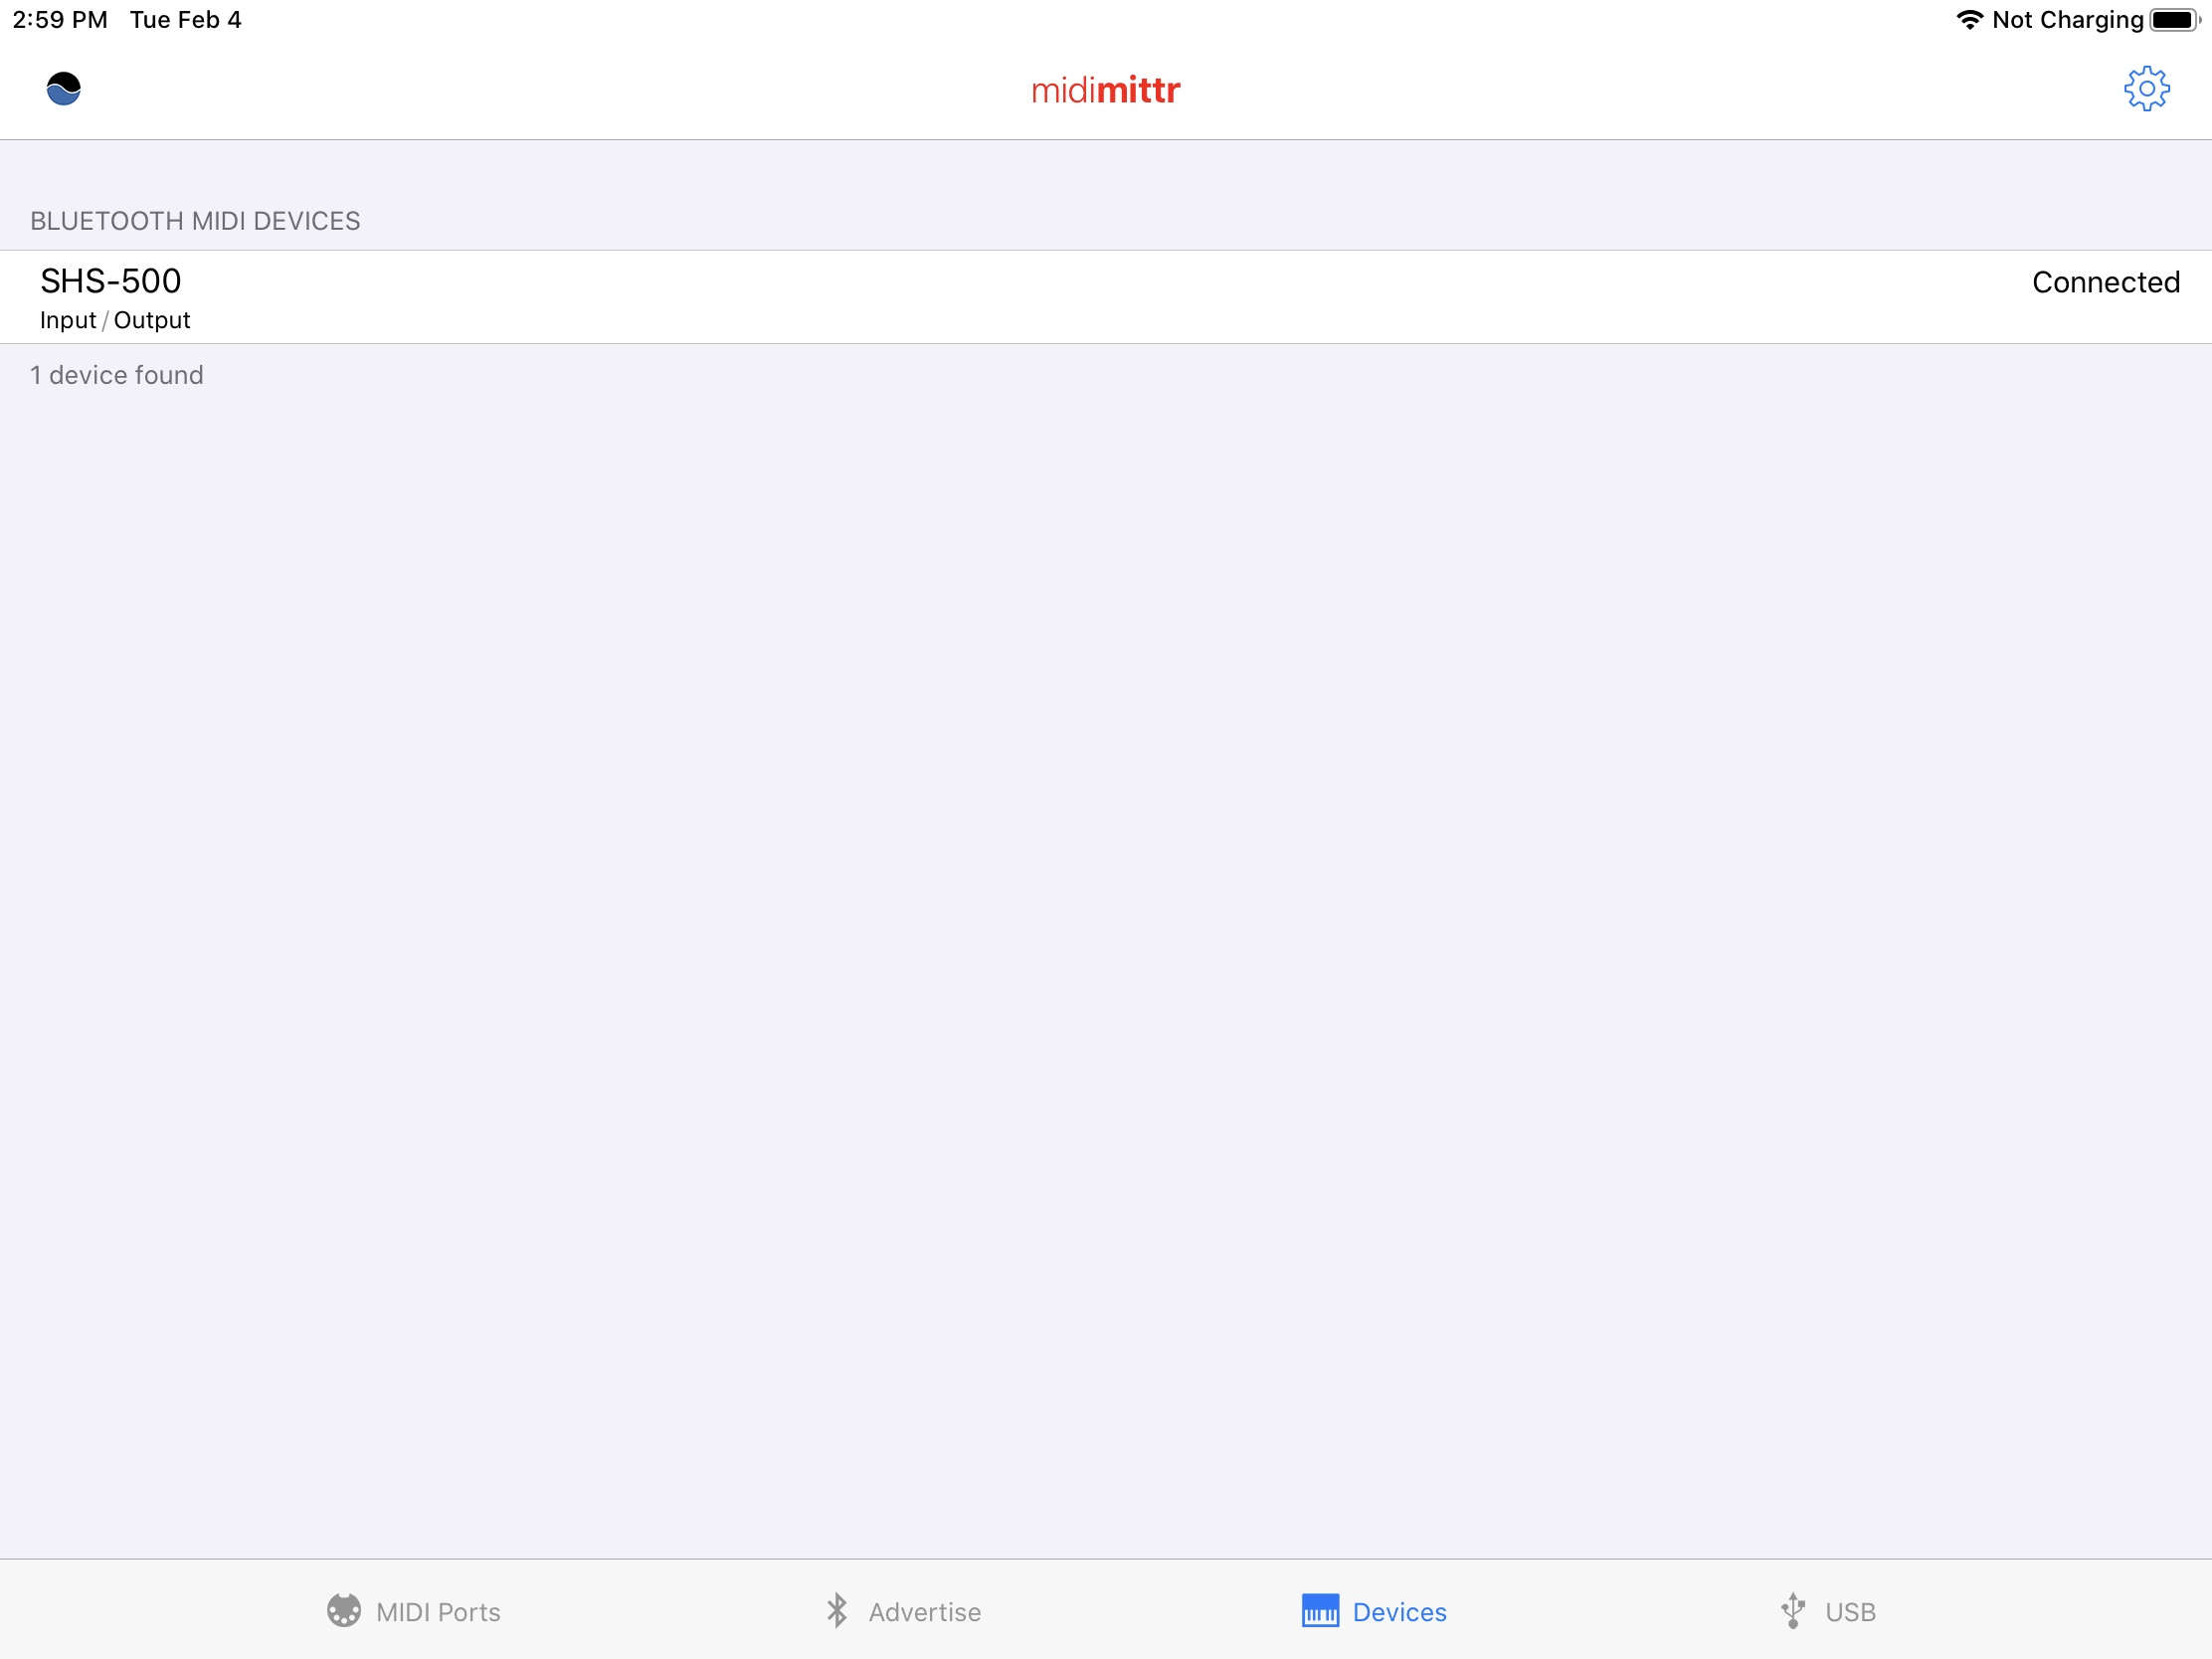
First, launch the free midimittr app which acts as a bridge between Sonogenic, Bluetooth MIDI and MIDI Designer. midimitter lets MIDI Designer echo Sonogenic’s MIDI note on/off, modulation and pitch bend messages back to the Sonogenic. You should turn Sonogenic LOCAL off unless you intend to layer a Sonogenic voice with a GM voice.
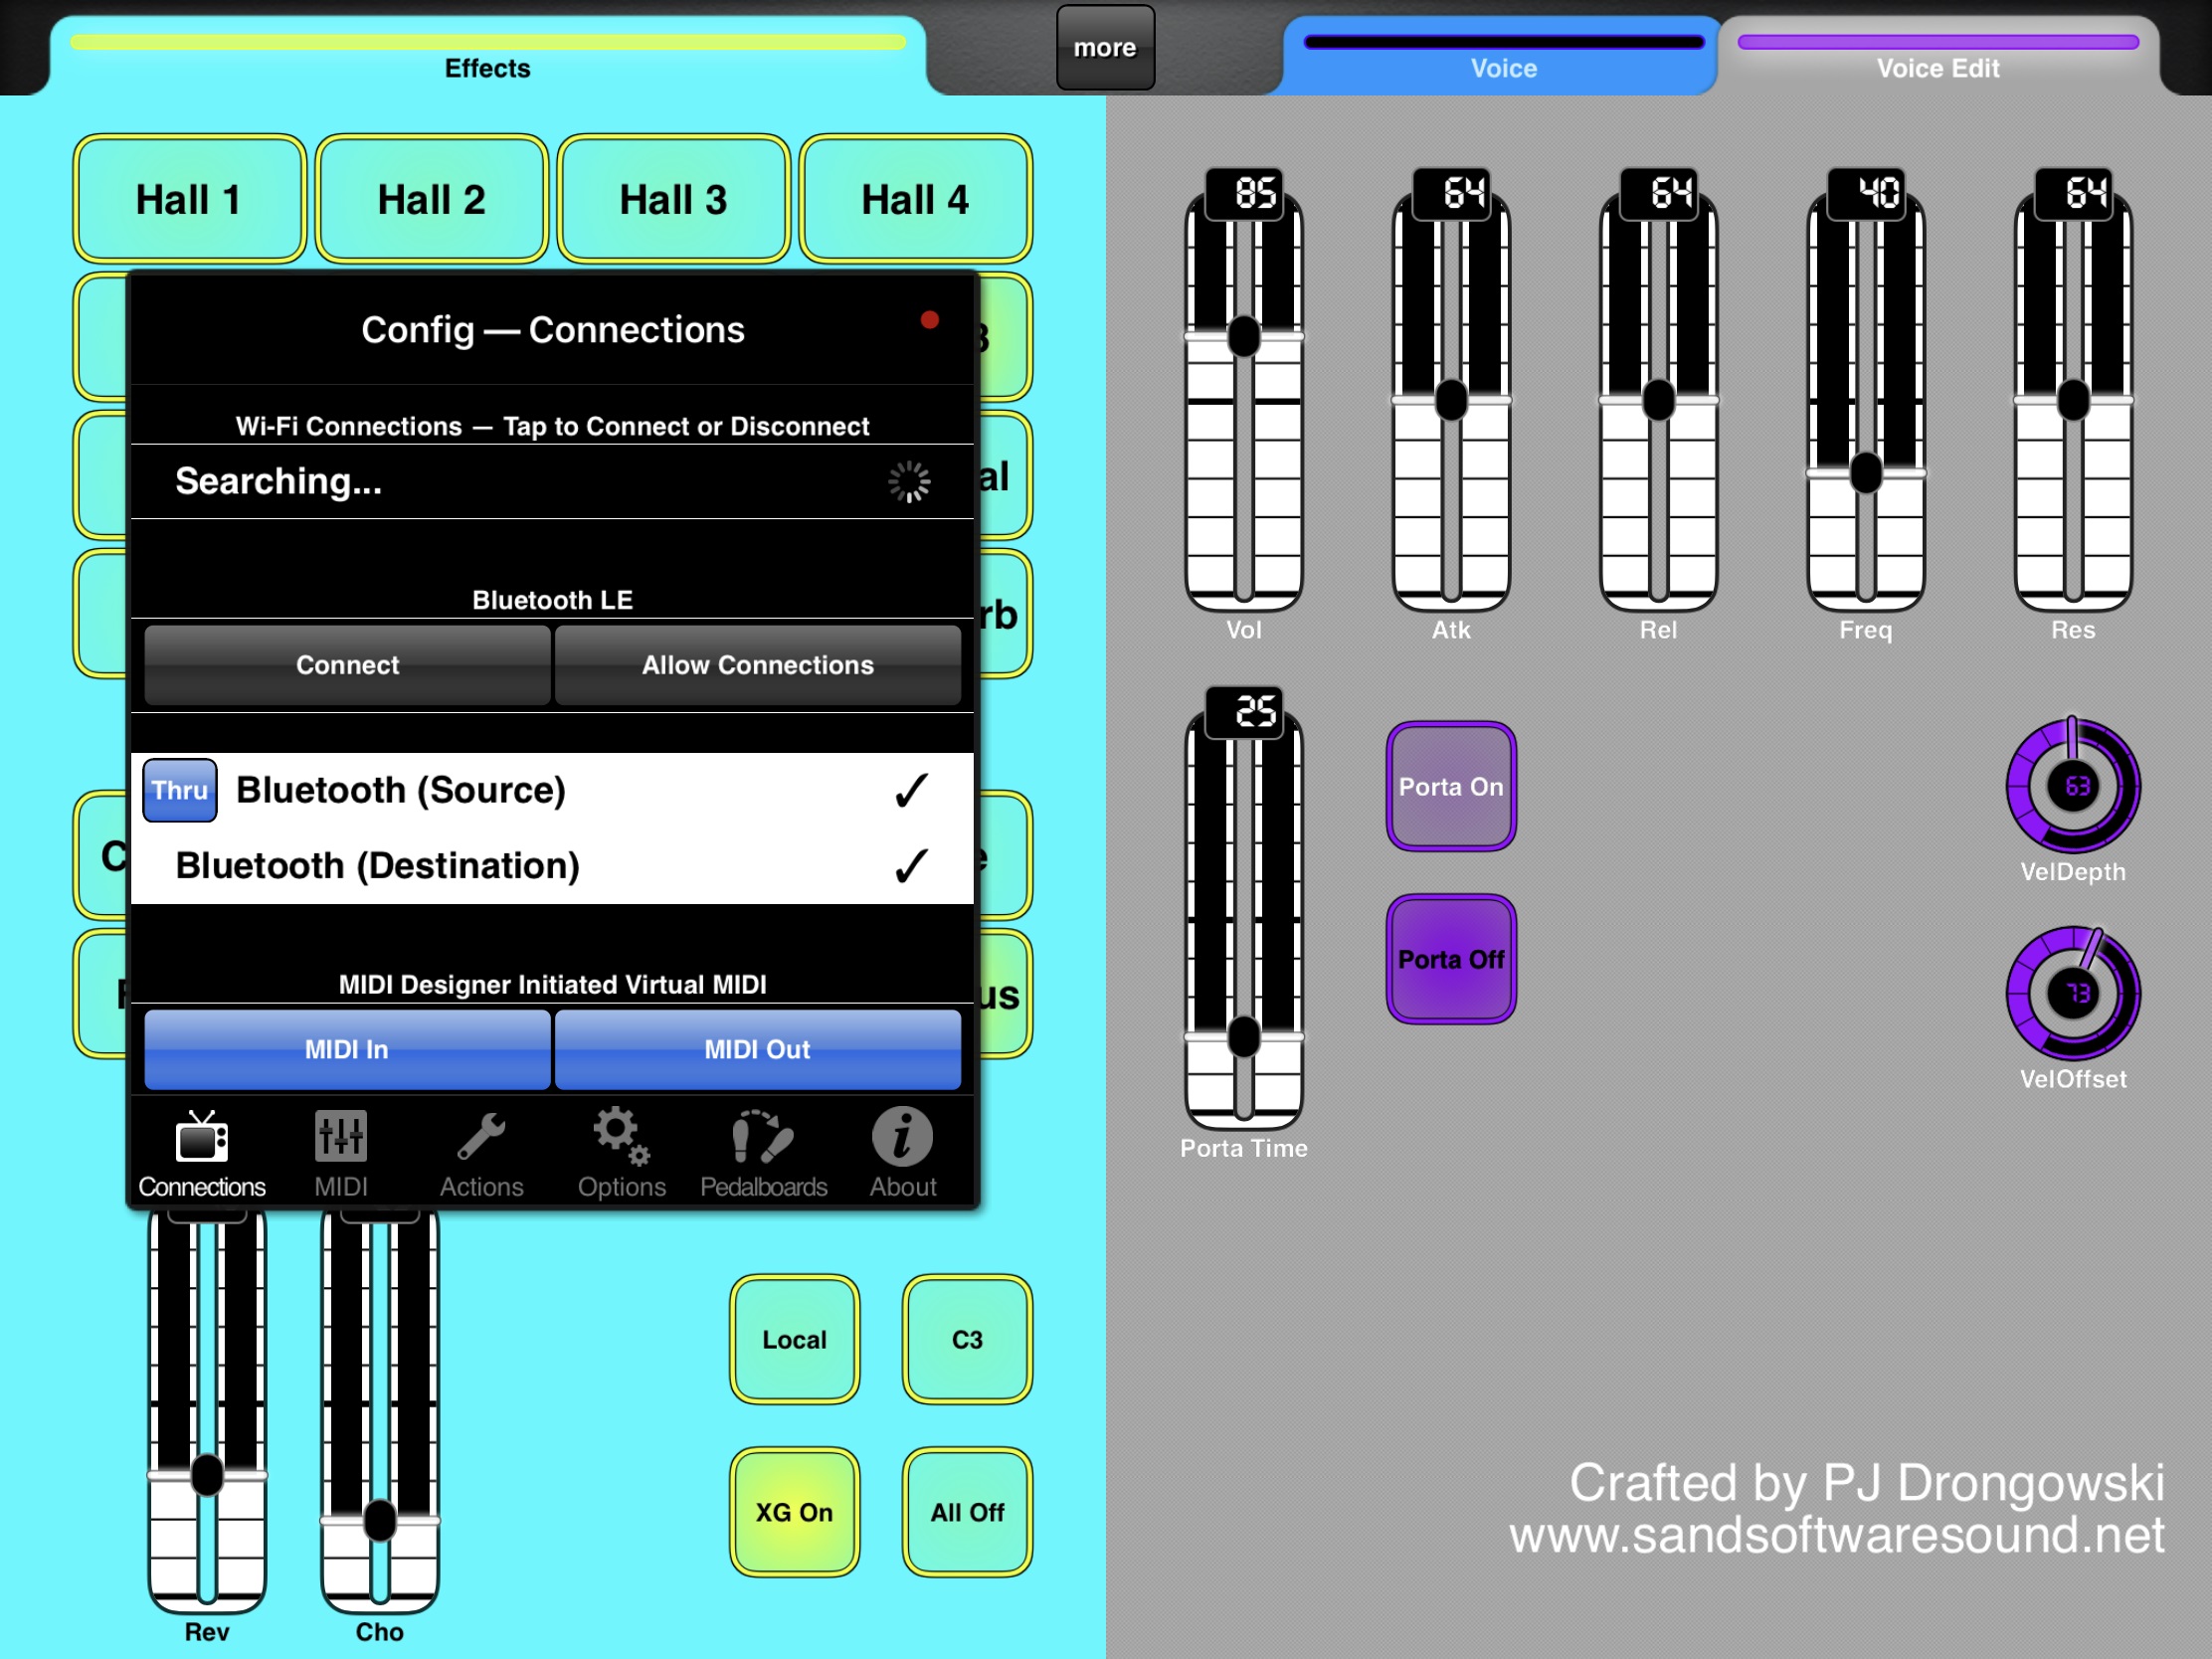
Next, launch MIDI Designer and make connections to midimittr as shown in the screenshot above. Then load the Sonogenic layout into MIDI Designer. You should be ready to go at this point.
Voices and effects
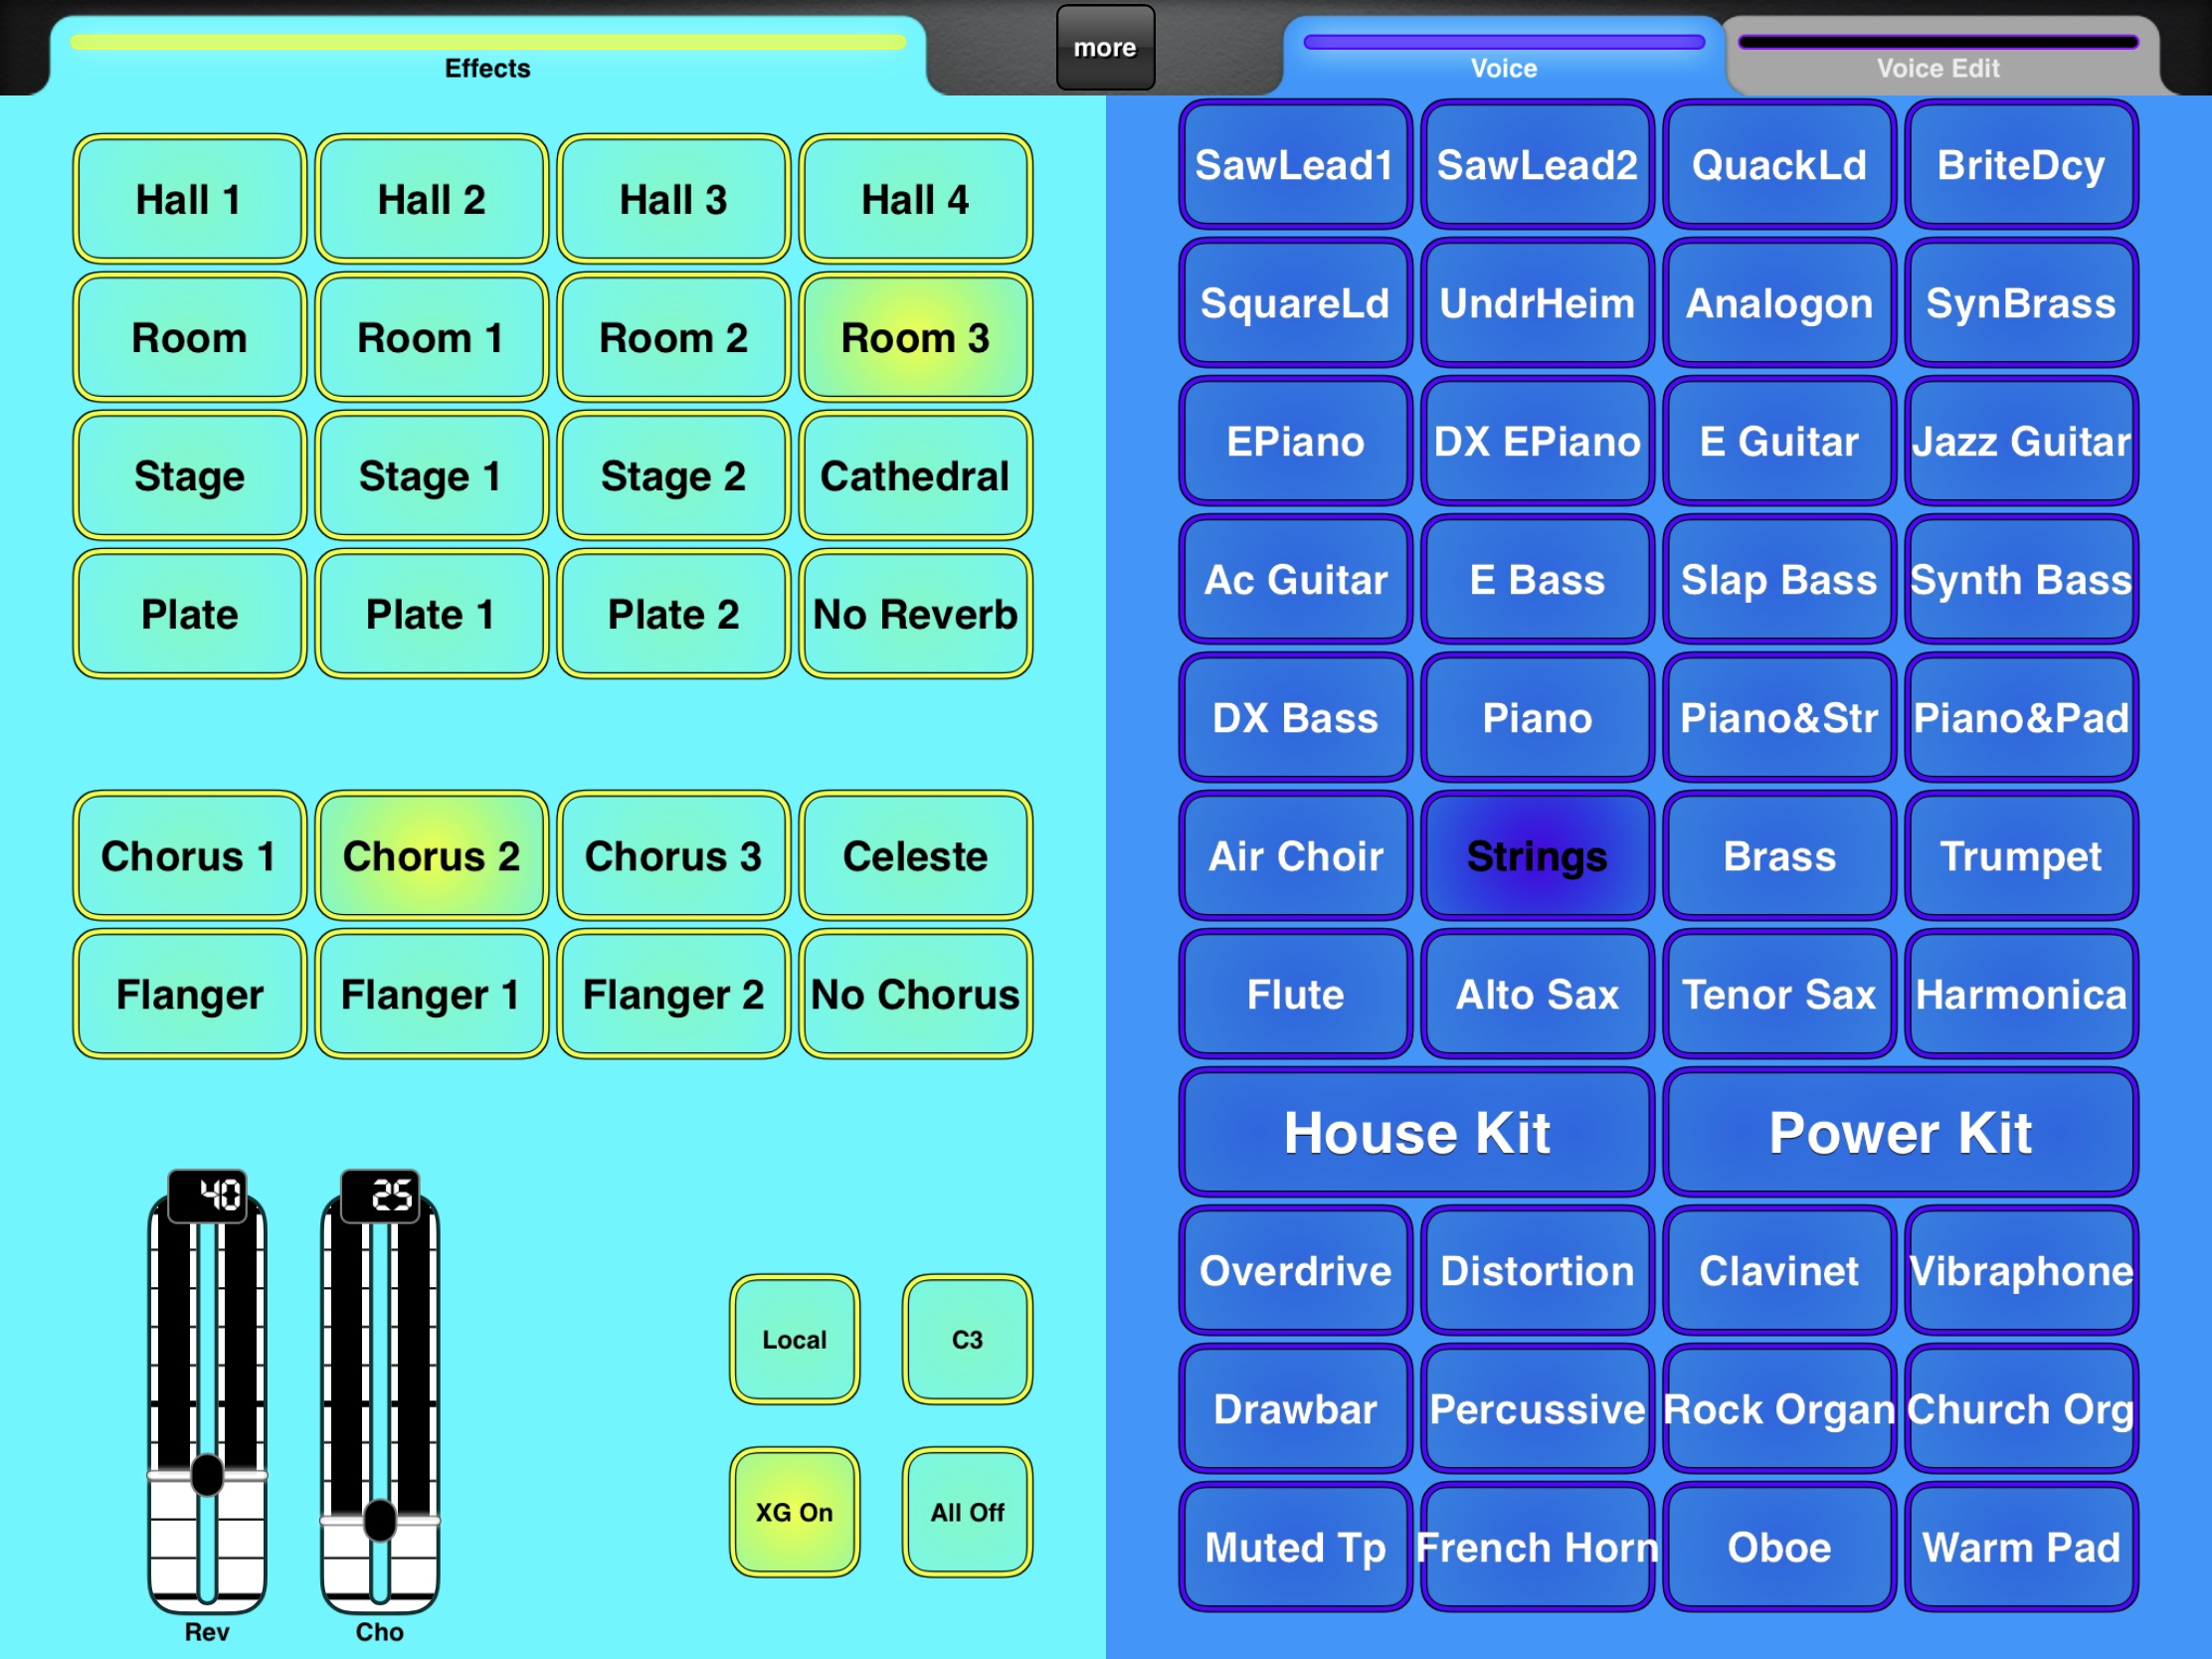
The Sonogenic layout is separated into three tabs: Effects, Voice and Voice Edit. (See the screenshot below.) Effect-related controls are on the left-hand side of the screen and voice-related controls (tabbed pages) are on the right-hand side.
Selecting a GM voice
The Sonogenic has a strict division between its keyboard sound and the General MIDI sounds over MIDI. You can think of the keyboard sound and GM sounds as two distinct tone generators, each with their own controls. The keyboard sound is selected and controlled through the Sonogenic front panel. The GM sound(s) is selected and controlled by the MIDI Designer layout.
The Voice page has an array of voice buttons. The 28 buttons at the top of the page select one of the preset “panel” voices. The two large buttons in the middle select one of the two preset panel drum kits. The buttons at the bottom of the page select a voice from the General MIDI sound set.
Please note: if you select a panel voice on the Voice page, you are changing the current General MIDI sound. The Sonogenic keyboard sound remains the same. The separation may seem artifical, but it lets us layer two sounds: the keyboard sound and a General MIDI sound.
The Sonogenic panel voices are generally better-sounding than the equivalent GM voice. The layout provides direct access to the panel voices while providing 12 buttons which can be customized for your own favorite GM voices. Of course, you’ll need to learn how to edit the GM buttons…
Effects
The large buttons on the Effects page choose the current reverb and chorus type. Like the voice buttons, the reverb and chorus effect type buttons are “radio buttons,” i.e., you can select only one effect type at a time within the reverb group or chorus group.
The reverb (Rev) and chorus (Cho) sliders adjust the reverb and chorus level for the General MIDI sound. [By the way, the GM voice and its effect levels are on MIDI channel 1.] Change the amount of reverb or chorus effect here. The sliders do not affect the keyboard sound — only the GM sound.
Changing the chorus and reverb type also affects the keyboard sound because the chorus and reverb units are shared by the keyboard sound and the GM tone generator. Reverb and chorus level only affect the GM sound [MIDI channel 1].
The four small buttons are utility buttons:
- XG On: Sends an XG System reset to the GM tone generator. This resets the voice (acoustic piano) and all internal MIDI controller values.
- Local: Turns Sonogenic LOCAL CONTROL on and off.
- All Off: Turns off all notes which may be sounding — a panic button.
- C3: Plays the MIDI note C3. Good for testing edits and changes.
Use the XG On button sparingly. The GM tone generator and layout do not automatically re-synchronize with each other.
Voice editing
The Voice Edit page is where you adjust basic voice characteristics like volume (Vol), attack time (Atk), release time (Rel), filter frequency (Freq) and filter resonance (Res). You can spruce things up with these controls. The attack, release, frequency and resonance controls behave like “quick edit” controls, that is, they are offsets from the preset voice parameter values. The middle position (64) specifies a zero offset leaving the original value unchanged. Higher values add an offset and lower values subtract an offset. So, if you want to increase attack time, move the attack slider up. If you want to shorten attack time, move the attack slider down.
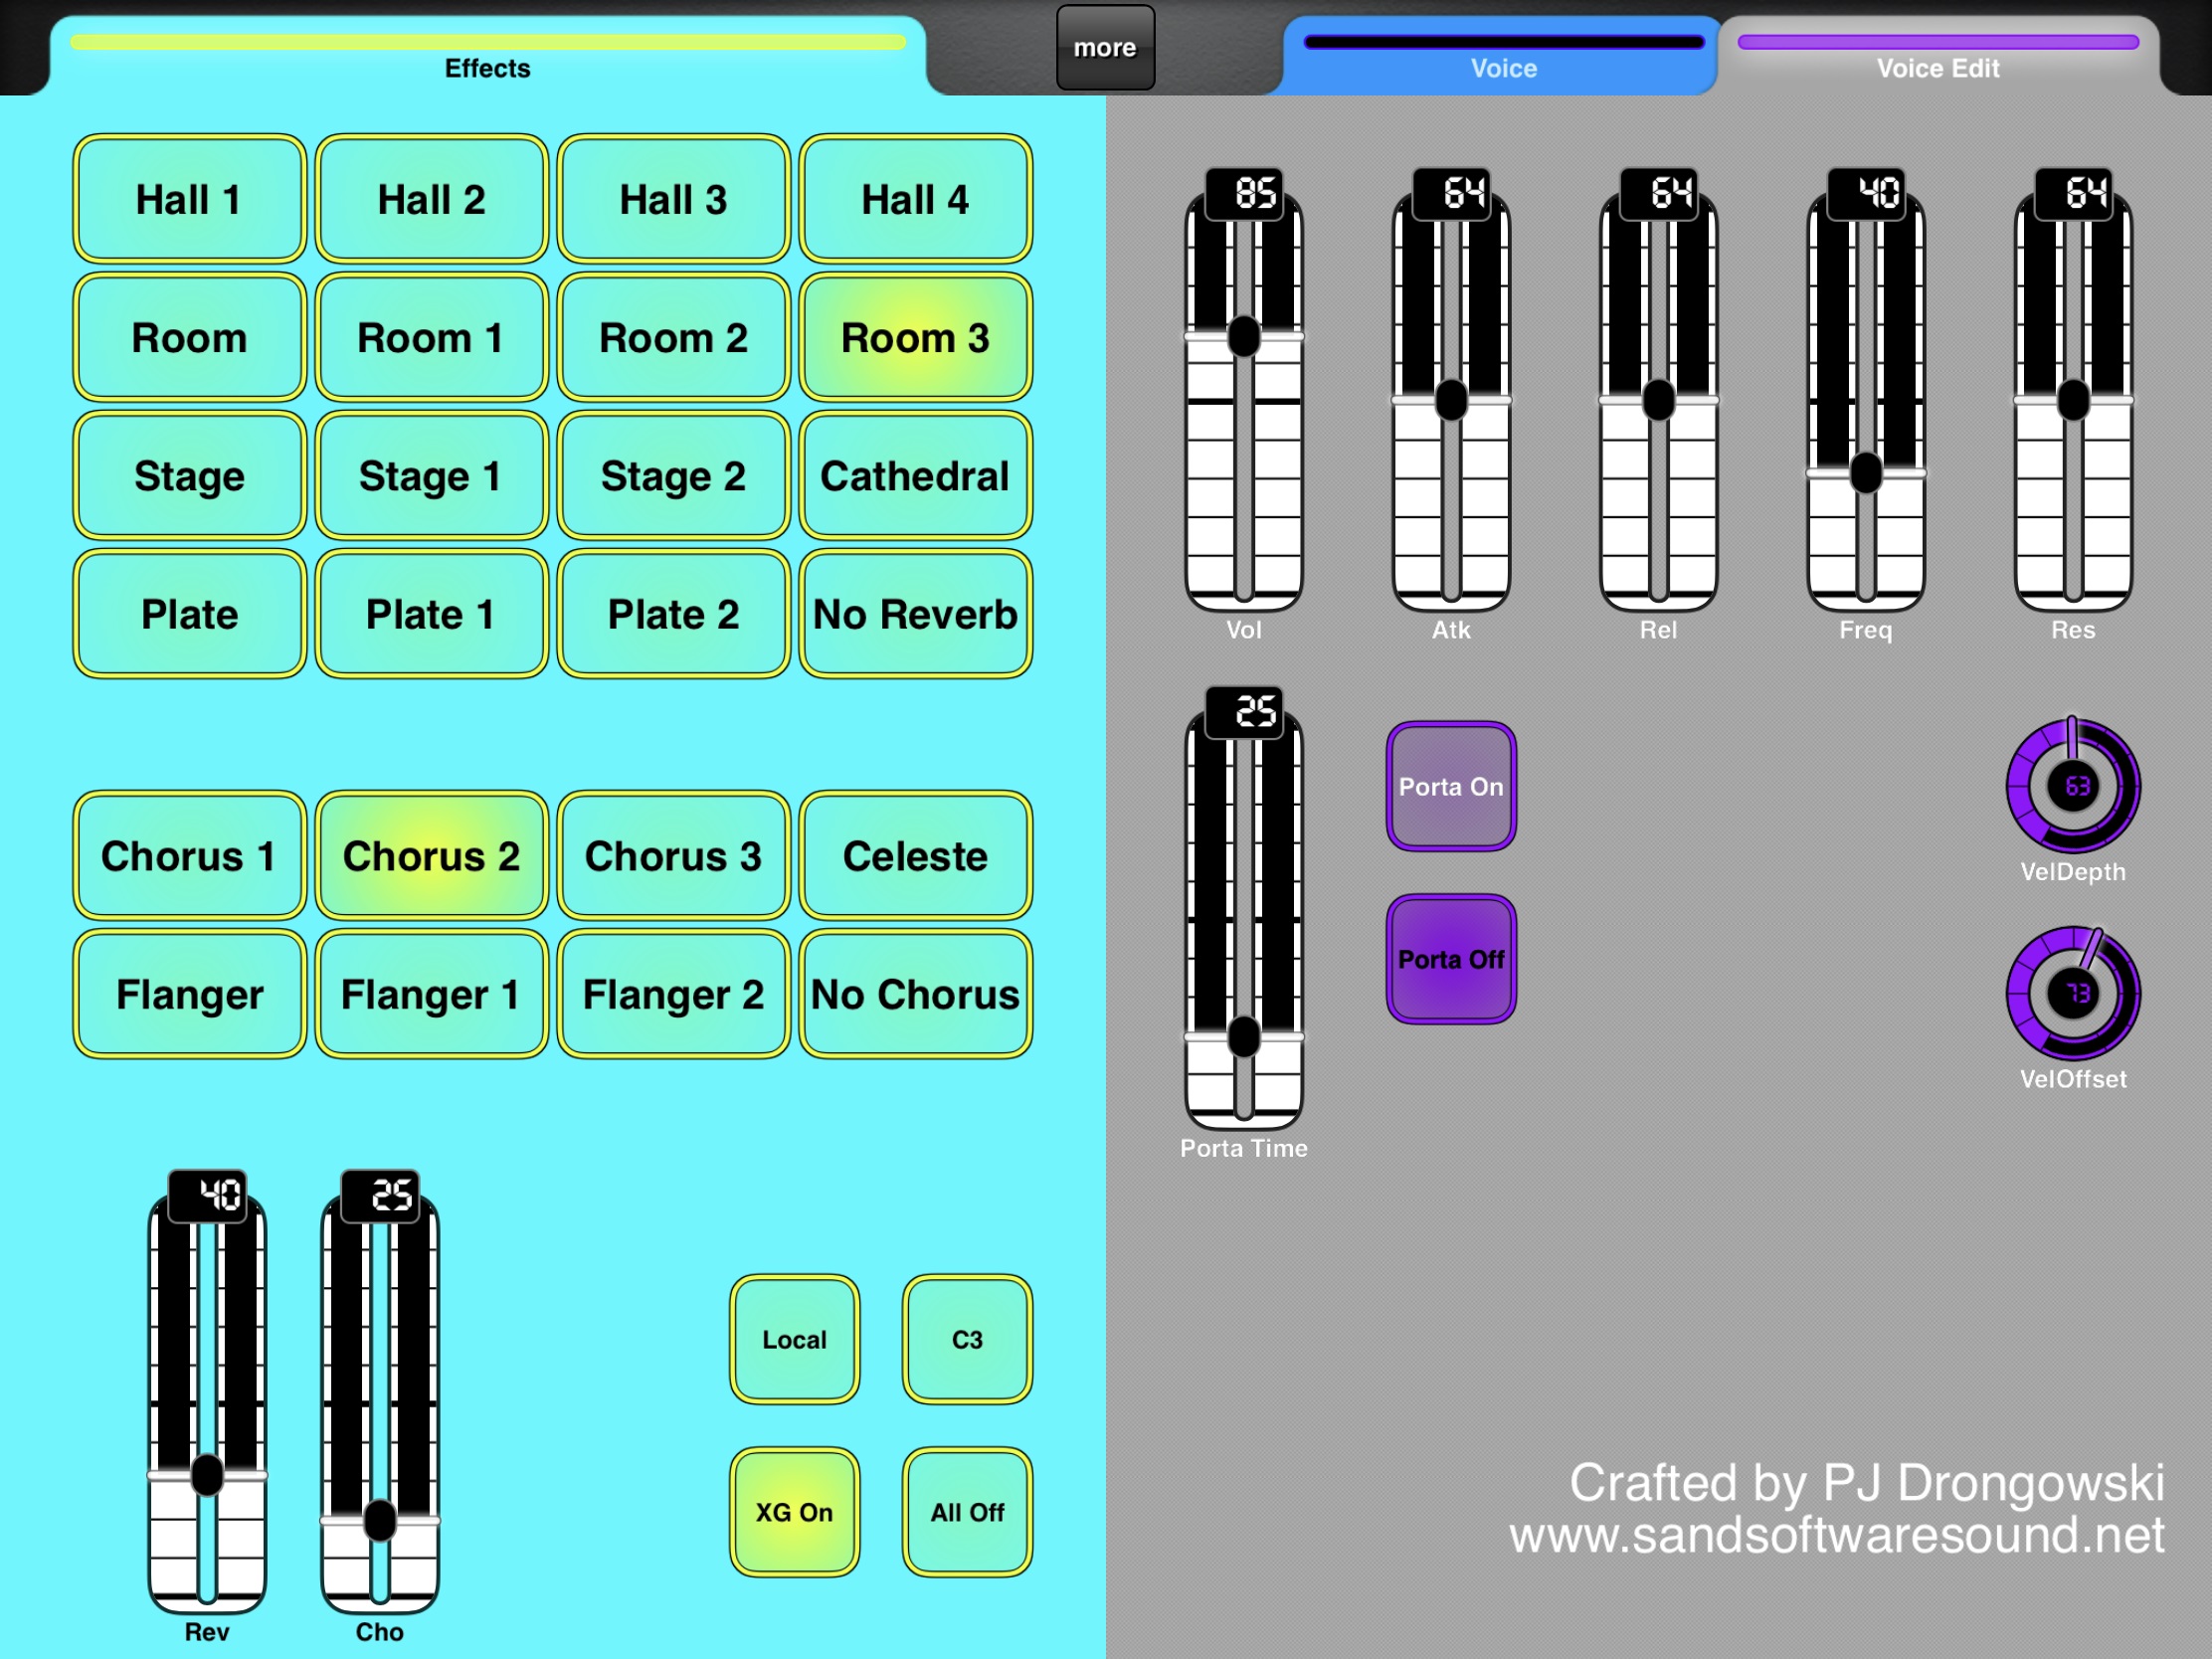
Portamento adds a glide between notes. Press “Porta On” to turn portamento on and press “Porta Off” to turn portamento off. The portamento time slider (Porta Time) sets the glide time.
The velocity sensitivity knobs change how the voice responds to MIDI note velocity (touch). The two voice parameters are:
- Velocity Sense Depth (VelDepth)
- Velocity Sense Offset (VelOffset)
Please see Yamaha’s explanation in the figure below.
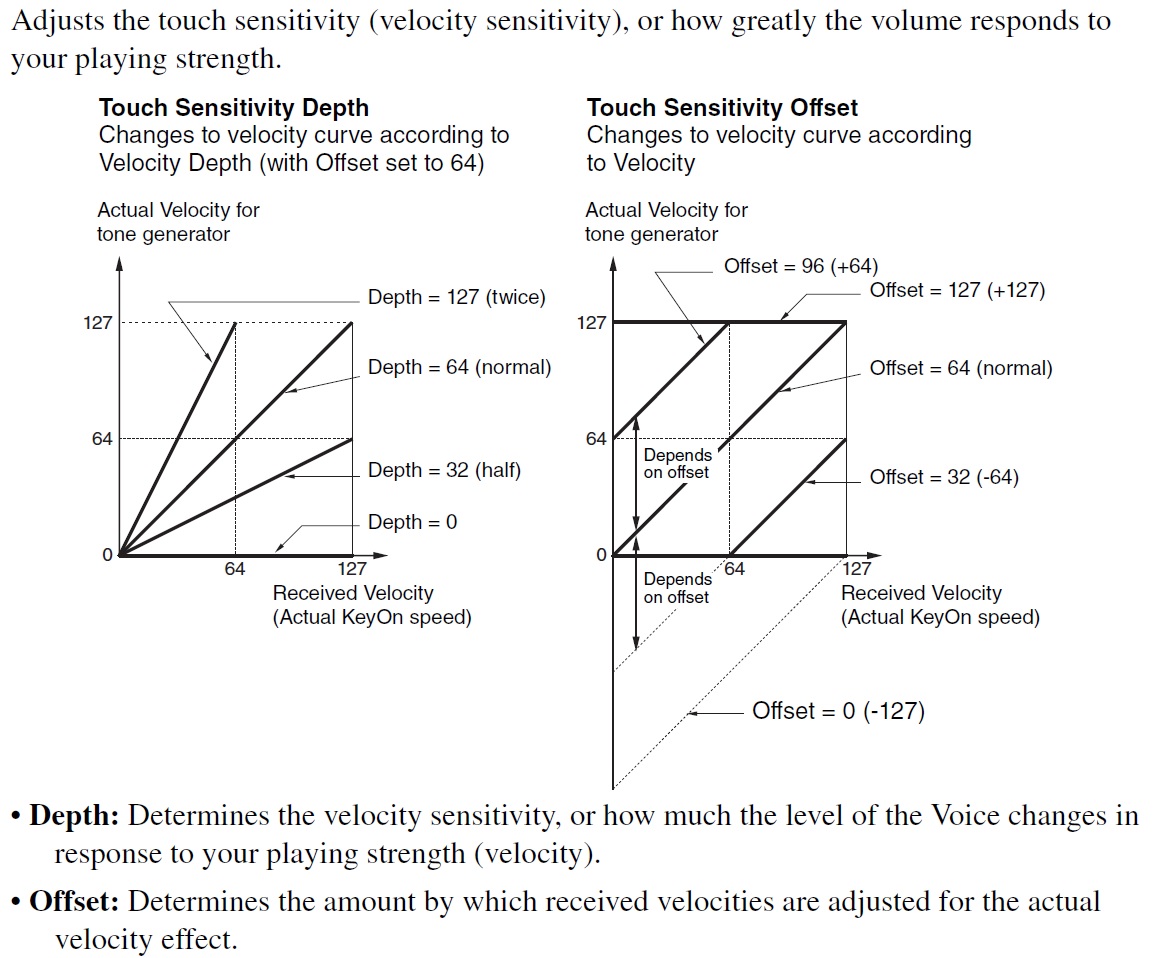
Organ voices, in particular, should not respond to velocity, i.e., a note is either on or off. To achieve this kind of touch response, set velocity sense depth to zero and set velocity sense offset to a value in the range 110 to 127.
The keyboard voices have a default volume which is louder than the General MIDI voices. You may need to set the volume slider (Vol) above 100 in order to get a better balance (mix) between panel and GM voices.
MIDI Designer presets
MIDI Designer itself implements preset storage and recall. A MIDI Designer preset is a snapshot of all the current values in a layout. Here’s a typical usage scenario:
- Select a voice.
- Select and adjust chorus and reverb effects.
- Tweak the voice (e.g., change filter cutoff, etc.)
- Save the finished voice as a MIDI Designer preset.
It’s easy to save a preset. Press the more button, press the “Save” button at the bottom of the drop-down menu, and then press one of the ten preset buttons. To recall a preset, simply press more followed by the desired preset button.
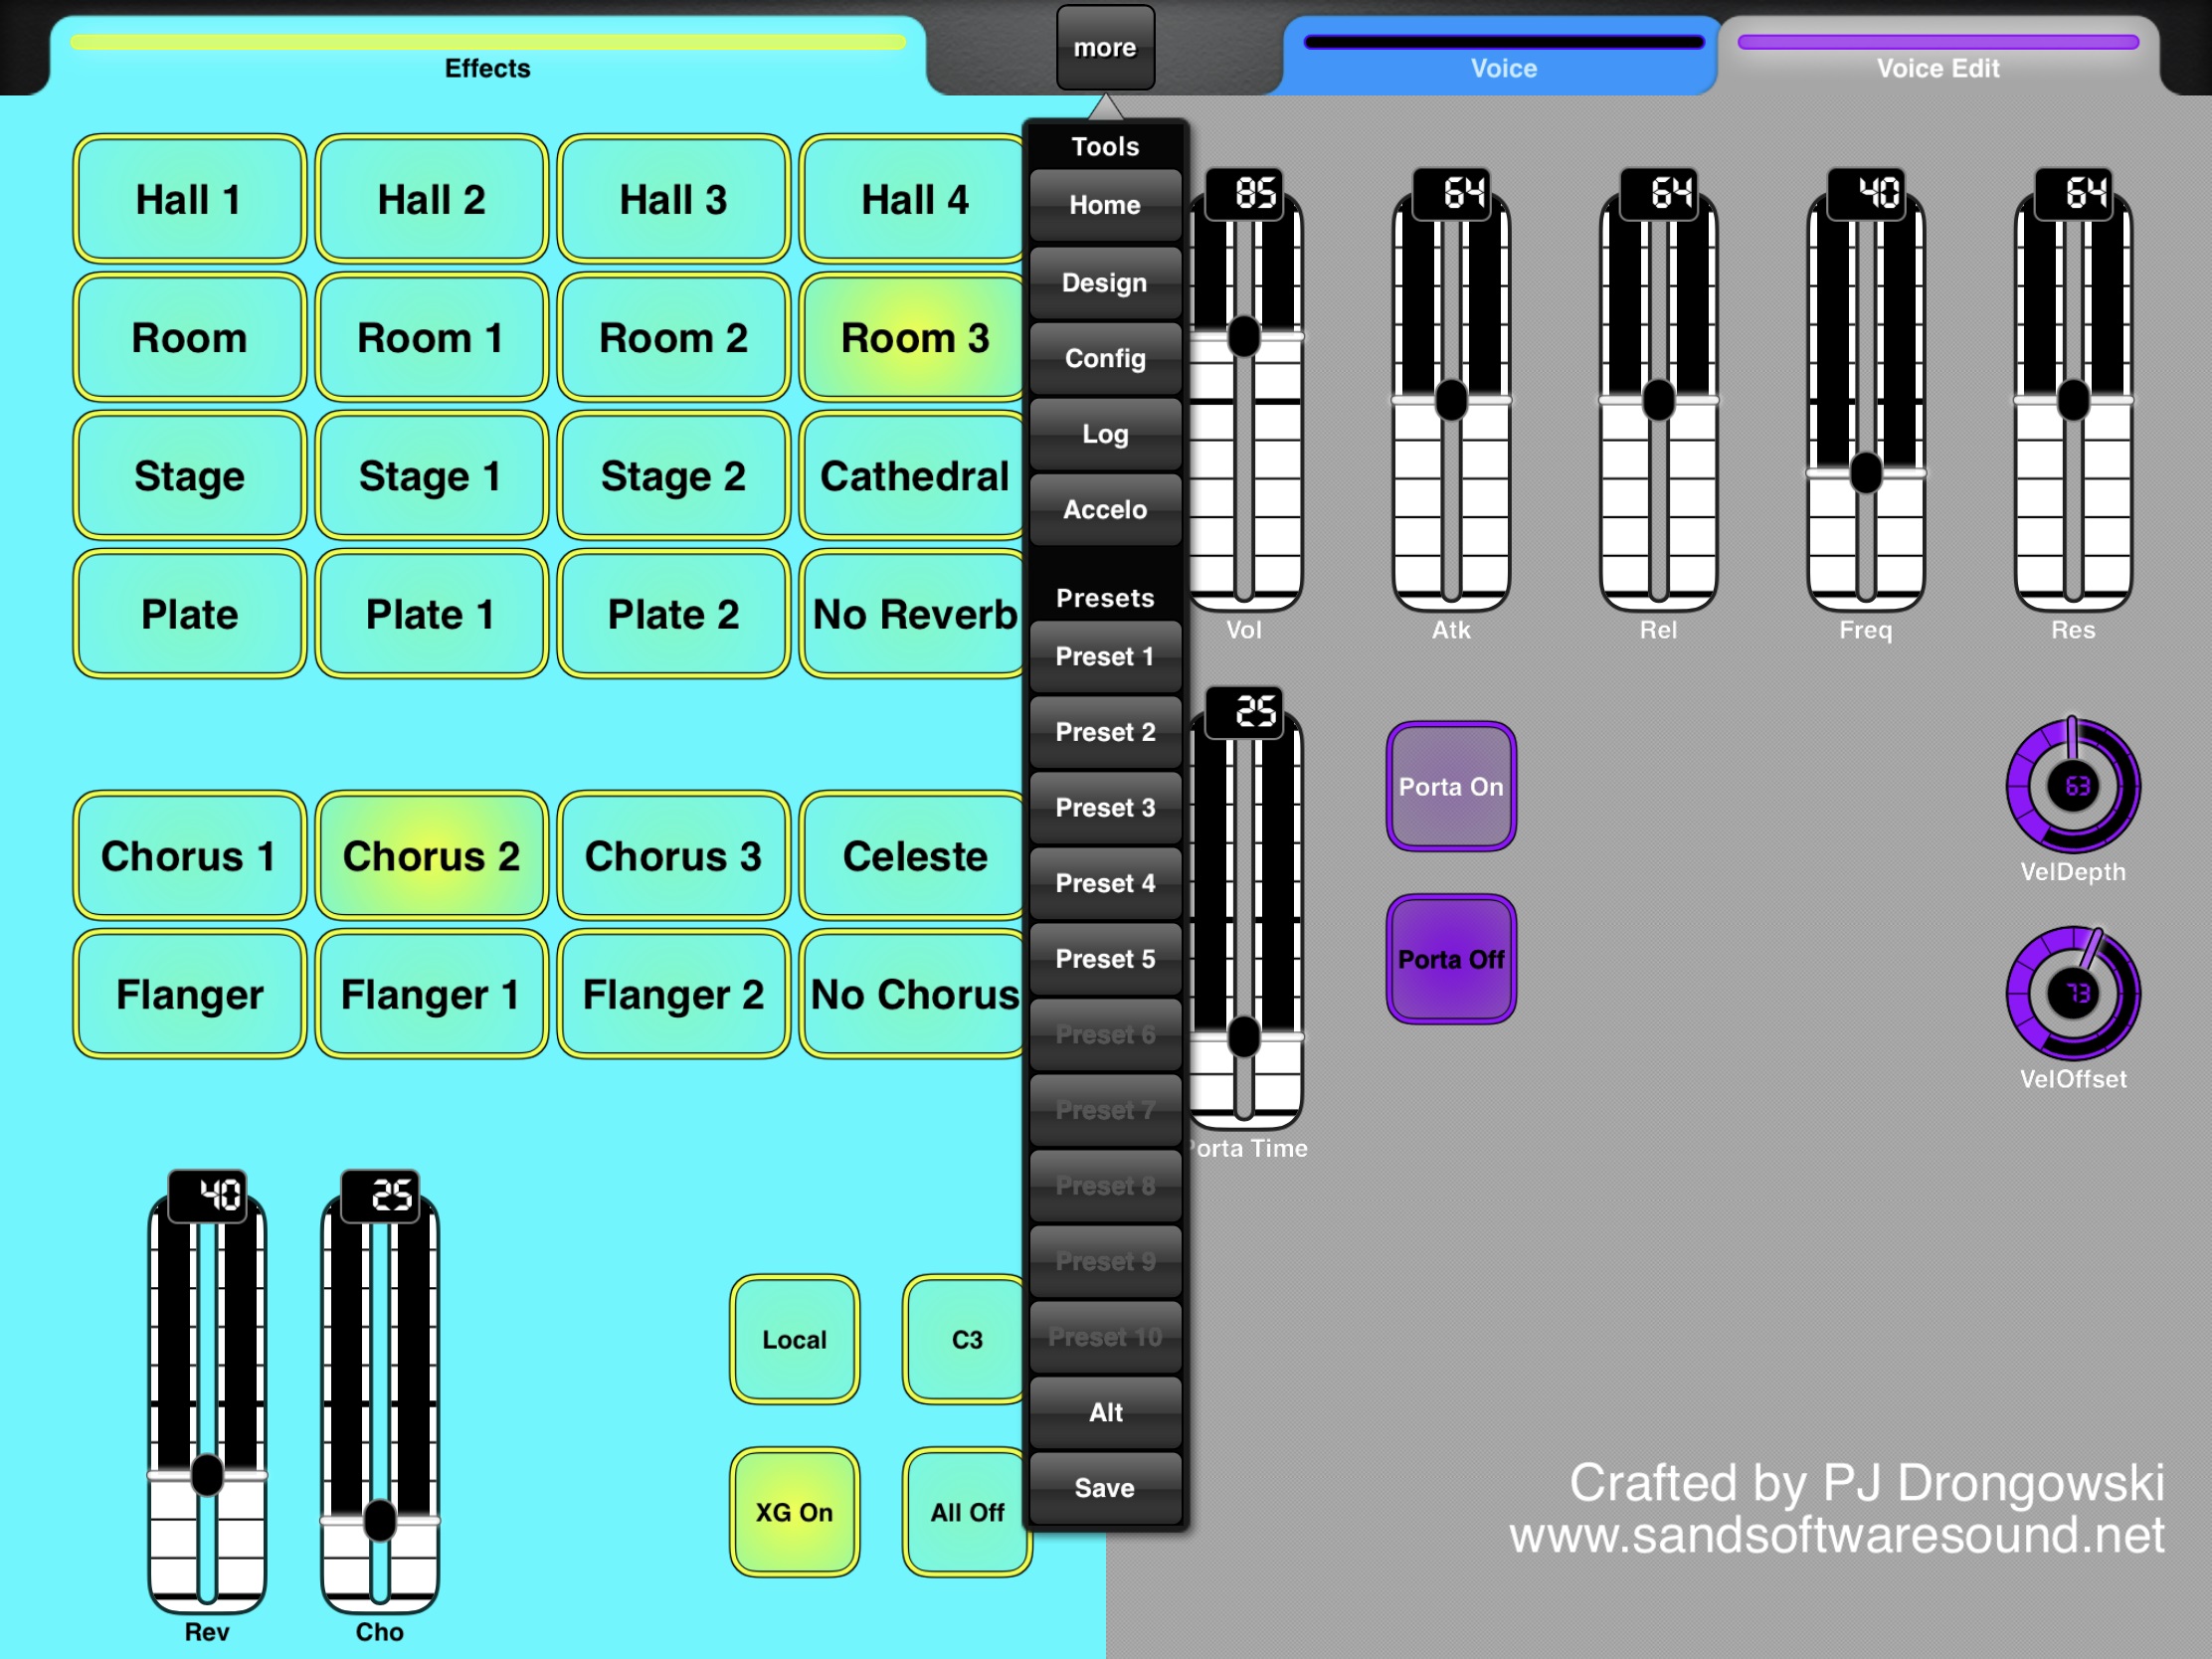
MIDI Designer has two groups of presets: regular and alternative. There are ten preset slots in each group, so you get twenty presets total. The Alt button selects the alternative group.
Potential issue: Portamento sometimes stays on (or off) after selecting a preset that changes portamento state. [I’m still investigating.]
Limitations
I experimented with several other controls of the kind normally found on a desktop synth. Unfortunately, the SHS-500 MIDI implementation is rather limited. Here are some known shortcomings:
- Transpose and note shift
- DSP effect control
- Mono and poly mode selection
Should I make any progress with these deficiencies, I will issue an update.
Copyright © 2020 Paul J. Drongowski