MODX: Creating a new waveform

Whether it’s scientific papers or Web how-to’s, you would think that no one ever made a mistake or tried something and failed. The path to success is really crooked.

So, here is a blog post about an experiment that almost worked out.

I’ve been hoarding pipe organ samples for decades (literally). For example, some of my collected samples are from the venerable Yamaha TX16W. The TX16W samples are small enough to fit into the 1MByte expansion waveform of my TG-500. Yes, 1MByte. The 1GByte MODX expansion waveform memory looks positively enormous in comparison.

The scenario that I describe here creates a new waveform using nothing more than the Yamaha MODX user interface (UI). Back in the day, I created voices through the TG-500’s 24×2 line character display. The MODX UI is heaven in comparison. Yeah, I’m going to give Sample Robot for Montage a spin eventually. Not today.

Where to start? I started with the free “CMS Classic Organ” samples distributed by CSM Sounddesign. Thank goodness I picked up a little German years ago because the English CMS pages are under construction…

The samples are part of the “CMS Classic Organ” expansion pack (PPF) for Yamaha Genos™ — not the typical place where one would start. The samples are relatively small, the demos sounded OK, and the price was right. Four steps are needed to extract the samples:

  1. Find the sample files and the UVF (XML) voice description files in the Yamaha Expansion Manager pack database.
  2. Extract keybank information from the UVF file.
  3. Rename the sample files to meaningful names, e.g., “Plein_kb0_C1.raw”.
  4. Convert the sample files to Microsoft WAV format.

Admittedly, this is more work than the average Jane or Joe would do. But, hey, this is a learning exercise, plus a chance to dink around with Genos stuff, too.

The next preparation step is important no matter how you obtain your sample files. Make a table summarizing the keybank information:

KB#  Low High  Center  Size  LoopStart LoopEnd  WAV file
---  --- ----  ------  ----- --------- ------- ------------------
 0   C-2  D#1    C1    27627     25594   27623 Plein_kb0_C1.wav
 1    E1   B1    E1    31332     29717   31328 Plein_kb1_E1.wav
 2    C2  D#2    C2    31816     31136   31812 Plein_kb2_C2.wav
 3    E2   G2    E2    25030     24757   25026 Plein_kb3_E2.wav
 4   G#2   B2   G#2    30869     30652   30865 Plein_kb4_G#2.wav
 5    C3  D#3    C3    30744     30571   30740 Plein_kb5_C3.wav
 6    E3   G3    E3    24084     23812   24080 Plein_kb6_E3.wav
 7   G#3   B3   G#3    17917     15783   17913 Plein_kb7_G#3.wav
 8    C4  D#4    C4    20514     20172   20510 Plein_kb8_C4.wav
 9    E4   G4    E4    22128     21655   22124 Plein_kb9_CE4.wav
10   G#4   B4   G#4    24853     24424   24849 Plein_kb10_G#4.wav
11    C5  D#5    C5    26788     26615   26784 Plein_kb11_C5.wav
12    E5   G8    E5    27574     27368   27570 Plein_kb12_E5.wav

You’re gonna need this. Trust me, once you get into the guts of waveform construction, you don’t want to be puzzling out the center note, etc. The CMS samples are 41000Hz, 16-bit, mono, LINEAR16.

MODX needs looped samples. I’ve run into this issue before when creating PSR/Genos voices via Yamaha Expansion Manager (YEM). You would think that loop point data is standard in WAV. It isn’t. Good old Yamaha Tiny Wave Editor (TWE) worked for PSR/Genos, so I reached for TWE. Fortunately, TWE let’s you enter loop points numerically and I entered the loop start and end points extracted from the UVF file. [Not so crazy as I may seem after all.]

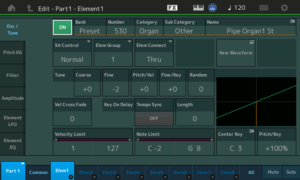
I transfered the looped sample files to a USB flash drive and inserted the flash drive into the MODX. I brought up a simple existing pipe organ Performance, Church Organ, which has two voice elements. I silenced the second element since it won’t be needed. Select the first element. Take a deep breath and touch the New Waveform button.

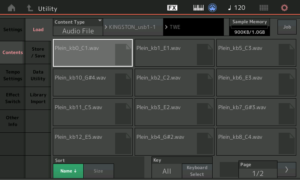
MODX displays a screen allowing you to select and load the WAV file for the first keybank. As you can see in the screenshot, you can easily get into the weeds if you haven’t come prepared with a table like the one shown above. [Click images to enlarge.]

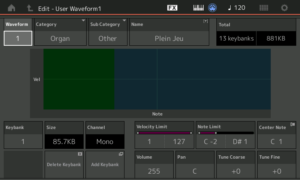
After loading the correct file, MODX displays the keybank editing screen. Now, it’s time to enter the key range and center note information from the first row in the table. Then, touch Add Keybank, rinse and repeat twelve more times. If you make a mistake, touch the Keybank number field and scroll the existing keybanks. When all looks correct, press the EXIT button.

When MODX creates the waveform, it gives the new waveform the same name as the first sample file. I recommend renaming the waveform and specifying the waveform Category and Subcategory using the appropriate fields. I named the waveform “Plein Jeu,” the French name for an organ registration consisting of principal pipes. Good naming and data management will eventually pay off.

OK, so what went wrong?

  1. In my quest for CMS samples, I extracted voice information for a few other voices. Then, stupidly, when entering keybank information, I started with the wrong freakin’ table. I quickly realized my mistake because the center note information and what I was hearing were whack. Thank goodness for the ability to scroll through keybanks.
  2. The CMS loops are très short. Short pipe organ loops lose all of the nice shifting harmonic stuff that we hear from the real deal.
  3. The split points between keybanks are sonically rocky. This may be due to the unorthodox key layout. The center note is supposed to be the middle of the key range, not the lowest note in a range. Layout can be fixed and uneven levels can be fixed. But, I hear differences in basic tonality, too. Not good, not fixable.
  4. The organ voice plays back too quietly even with all of the levels max’ed out. I forgot to normalize the samples.

Lack of normalization I can fix. TWE (or any other DAW) performs normalization. The short loops, however, are a deal breaker and further effort with the CMS pipe organ samples is not worth it. I’ve got better candidates in the treasure hoard.

Throw the first pancake away

When you flop on your kiester, what do you do next?

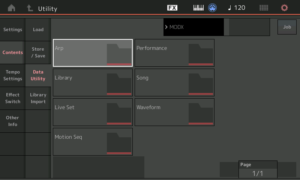
In this case, delete the waveform. Press the UTILITY front panel button and touch the Waveform folder.

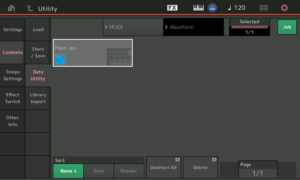
MODX displays the waveforms that you’ve created. In this example, it shows the “Plein Jeu” waveform. Touch the on-screen Job button and select the waveform to be deleted. Then, touch the Delete button.

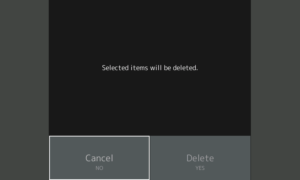
MODX display a dialog box requesting confirmation. Touch Delete and wait for the delete operation to complete.

When it’s gone, it’s gone. If you edit the parent Performance, the waveform field is empty.

Now, let’s try this again with feeling. Or at least, normalized waveforms. 🙂 Stay tuned.

Copyright © 2018 Paul J. Drongowski

Code: Display Genos UVF voice info

February and March have proven to be a very busy months. On top of everything, the weather in the U.S. Northeast has been atrocious and we have suffered through long power outages. One rapidly realizes how dependent we are on electricity for light, heating and even water. Our house has its own well and we lose water, too, when we lose power.

If you read my series of articles about Yamaha Genos™ voice editing with Yamaha Expansion Manager (YEM), you’re aware that Yamaha store voice information in UVF files. “UVF” (most likely) stands for “Universal Voice File” because UVF is able to represent the voice information supporting many kinds of Yamaha synthesis. YEM ships with UVF files for normal, sample-playback voices.

YEM does not display all of the voice information in a UVF file. As we saw in the tutorial series, many voice parameters cannot be seen or modified in YEM.

Since UVF is XML with predefined tags, I wrote a quick and dirty Java program to display the voice information in a UVF file. I meant to clean up and extend the code, but life has just gotten away from me. I’m posting the code here in order to encourage other folks to experiment with UVF.

//
// Display voice information in a Yamaha UVF (XML) file
//

// Author:  P.J. Drongowski
// Version: 0.1
// Date:    9 February 2018
//
// Copyright (c) 2018 Paul J. Drongowski
//               Permission explicitly granted to modify and distribute


import javax.xml.parsers.DocumentBuilderFactory;
import javax.xml.parsers.DocumentBuilder;
import org.w3c.dom.Document;
import org.w3c.dom.NodeList;
import org.w3c.dom.Node;
import org.w3c.dom.Element;
import java.io.File;

public class ShowVoice {

    public static void main(String argv[]) {

	String voiceName ;
	String veNumber ;
	String veName ;
	String veVolume ;
	String vePan ;
	String veNoteShift ;
	String veNoteLimitHi ;
	String veNoteLimitLo ;
	String veVelocityLimitHi ;
	String veVelocityLimitLo ;
	String veWaveform ;

	try {

	    File fXmlFile = new File("Clarinet&Flutes.uvf") ;
	    DocumentBuilderFactory dbFactory = 
		DocumentBuilderFactory.newInstance() ;
	    DocumentBuilder dBuilder = dbFactory.newDocumentBuilder() ;
	    Document doc = dBuilder.parse(fXmlFile) ;

	    // Normalize text nodes
	    doc.getDocumentElement().normalize() ;

	    System.out.println("Root element: " + 
			       doc.getDocumentElement().getNodeName()) ;

	    NodeList vList = doc.getElementsByTagName("information") ;
	    Node vn = vList.item(0) ;
	    Element ve = (Element) vList.item(0) ;
	    voiceName = ve.getElementsByTagName("voiceName").item(0).getTextContent() ;
	    System.out.println("Voice: " + voiceName) ;
	    System.out.println("----------------------------") ;

	    NodeList nList = doc.getElementsByTagName("voiceElement") ;

	    for (int temp = 0; temp < nList.getLength(); temp++) {
		Node n = nList.item(temp) ;

		if (n.getNodeType() == Node.ELEMENT_NODE) {
		    Element e = (Element) n ;

		    veNumber = e.getAttribute("number") ;
		    veName = e.getElementsByTagName("name").item(0).getTextContent() ;
		    veVolume = e.getElementsByTagName("volume").item(0).getTextContent() ;
		    vePan = e.getElementsByTagName("pan").item(0).getTextContent() ;
		    veNoteShift = e.getElementsByTagName("noteShift").item(0).getTextContent() ;
		    veNoteLimitHi = e.getElementsByTagName("noteLimitHi").item(0).getTextContent() ;
		    veNoteLimitLo = e.getElementsByTagName("noteLimitLo").item(0).getTextContent() ;
		    veVelocityLimitHi = e.getElementsByTagName("velocityLimitHi").item(0).getTextContent() ;
		    veVelocityLimitLo = e.getElementsByTagName("velocityLimitLo").item(0).getTextContent() ;

		    Element ew = (Element) e.getElementsByTagName("presetWaveformProduct").item(0) ;
		    veWaveform = ew.getElementsByTagName("number").item(0).getTextContent() ;

		    System.out.println(veNumber + " " +
				       veName + " " + 
				       veVolume + " " +
				       vePan + " " +
				       veNoteShift + " " +
				       veNoteLimitLo + " " + 
				       veNoteLimitHi + " " + 
				       veVelocityLimitLo + " " + 
				       veVelocityLimitHi + " " + 
				       veWaveform) ;
		}
	    }
	} catch (Exception e) {
	    e.printStackTrace() ;
	}
    }
}

Creating a Mega Voice in YEM

With all of the Genos™ hoopla, let’s not forget about technique and skills! A few interesting questions popped up on the PSR Tutorial Forum and I’m reposting my answers here.

Today’s blog describes how to create a Mega Voice for PSR/Tyros using Yamaha Expansion Manager (YEM). With this background information in mind, I go on to discuss maximum polyphony in AWM2 and how to count voices against maximum polyphony.

The discussion has a PSR/Tyros focus, but a lot of the information applies to Motif, MOX and Montage, too. If you want to learn more about the Yamaha AWM2 voice architecture, I recommend reading the first chapter of a Motif- or Montage-series reference manual and the corresponding synthesizer parameter manual. (Download these manuals from the Yamaha manual library.)

Creating a Mega Voice in YEM

Regular voices are the usual MIDI voice: 128 velocity levels and only one basic sound. For example, nylon guitar is just the pitched, melodic sound of the notes either louder or softer depending on note velocity.

Mega Voice guitars (and other Mega Voices) are different. Please look at the Mega Voice Map starting on page 16 of the Tyros Data List PDF.

Let’s take a look at the Mega NylonGuitar voice. For MIDI notes B5 and below, the MIDI velocity is broken into eight (8) ranges:

    1- 20 Open soft
   21- 40 Open med
   41- 60 Open hard
   61- 75 Dead
   76- 90 Mute
   91-105 Hammer
  106-120 Slide
  121-127 Harmonics

Each range plays a different kind of sound. So, the MIDI velocity determines which guitar sound. Then, the velocity within that limited range determines how loud it will be.

Example 1: MIDI note A4, velocity 38 makes an Open Med guitar sound which is loud.

Example 2: MIDI note A4, velocity 2 makes an Open Med guitar sound which is quiet.

Example 3: MIDI note A4, velocity 110, makes a Slide guitar sound.

Now, let’s look at the last two columns in the Mega Voice map, again, for the Mega NylonGuitar voice. For MIDI notes between C6 and B7, the Tyros plays a Strum noise. The velocity in this case determines the Strum noise loudness over the full range 1-127.

For MIDI notes above C8, the Tyros plays a Fret noise. The velocity determines the fret noise volume and is full range 1-127.

Example 4: MIDI note D8, velocity 127 plays a very loud fret noise.

Put this knowledge into action with YEM

Now you need to figure out how to do this using the voice editor in Yamaha Expansion Manager (YEM). Each voice has up to eight elements. Think of each element as a mini, controllable synthesizer.

You will need one element for each of the velocity ranges that form the main body of your Mega Voice. In the case of the Mega NylonGuitar voice, that’s eight elements!

In YEM, build one element at a time. Layout the samples for one velocity range of the many body. You may have one waveform or you may have several waveforms. Each waveform occupies a key range. Do not map any waveforms onto the keys C6 and above (yet). These keys are reserved for the noise notes.

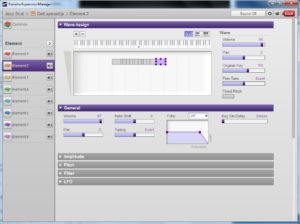
When you select a waveform belonging to an element, YEM highlights the color and displays eight resizing dots on the edges of the waveform. Use these dots to resize the waveform. Moving left or right changes the key assignment for the waveform. Moving an edge up or down changes the lower or upper limit of the velocity range to be assigned to the waveform.

If you have a lot of samples, be prepared to do a lot of work! Now you’re learning how much work Yamaha puts into voice development!

Once you have assigned the waveforms (samples) for the main body of your new voice, you can work on the noise notes, that is, any keys C6 and above.

Select the first element. Assign the waveforms for the noise notes to the keys C6 and above. The actual layout is up to you, but you must use only the keys C6 and above.

If your noise notes have only one velocity range, 1 to 127, then you must set the velocity range for only those waveforms (1 to 127). If your noise notes have two or more velocity ranges (not recommended), then you must use more than one element.

So, you can see that YEM has enough editing power to create a Mega Voice. Be prepared to study carefully how Yamaha voices are constructed. Please don’t expect to just jump in, clap your hands, and be finished. I regard Mega Voice development as a fairly advanced, expert job. If you haven’t created a voice before using YEM, then I suggest trying something simple until you understand elements, waveform layout across keys, and velocity ranges.

Counting voices against maximum polyphony

Now that you’re schooled in voice structure, it’s a good time to discuss maximum polyphony and counting voice elements against maximum polyphony.

This has always been a somewhat confusing topic because of the way polyphonic voices are counted.

As I mentioned above, a Tyros or Motif or Montage (AWM2) voice consists of up to 8 elements. Assume that only the RIGHT1 part is enabled and thus, only one Tyros voice is enabled. When a key is struck, the AWM2 engine determines the active elements and assigns each active element to a physical-level, hardware tone generation channel. One or more elements may be active simultaneously for a given note under the assumption.

Assignment and channel use is additive. If RIGHT1 and RIGHT2 are enabled (i.e., two layered voices), then there are one or more active elements from the RIGHT1 voice and one or more active elements from the RIGHT2 voice. This is why layers chew up polyphony.

The number of tone generation channels determines the maximum number of active tones playing at any time — the maximum polyphony.

Be prepared to be confused!

Even if all eight elements are defined in a Mega Voice, not all eight elements may be active at a time. One to eight elements may be active depending upon the incoming MIDI note and the element programming (i.e., the velocity range and note range for each element.) When the synthesis engine gets a MIDI note (consisting of a MIDI note number and velocity), it decides which elements to play. If only one element matches, then only one polyphony voice is used up. If two elements match, then two polyphony voices are used up, and so on.

Thus, depending upon the combination of note ranges and velocity levels, a voice may use anywhere from one to eight voices of polyphony. It all comes down to the particular design (programming) of a user voice.

If you’re not confused yet, hold on, there’s more. In the past, a stereo voice would use two tone generation channels while mono uses one channel. The left waveform is assigned to an element and the right waveform is assigned to its own element. Montage and Genos have the new tone generator, the SWP70. The new tone generation hardware supports 128 mono/stereo voices (channels) of polyphony. That is, stereo elements get mapped to a stereo channel. This is a big deal because it allows greater use of stereo waveforms without cutting too deeply into the available polyphony.

Think like a coder

By now, if you’re a programmer, you’re thinking of pseudo-code somthing like:

    if ((MIDI note number >= lowest key in key range) &&
        (MIDI note number <= highest key in key range) &&
        (MIDI note velocity >= lowest velocity in velocity range) &&
        (MIDI note velcotiy <= highest velocity in velocity range))
    {
        Generate the tone for the MIDI note
    }

This conditional statement summarizes what I discussed earlier.

As usual, there's more.

The AWM2 synthesis engine defines and evaluates other conditions:

  • Detached (non-legato) or legato
  • Articulation button ON or OFF
  • Jump in note interval less than one octave

Motif and Montage people will recognize the first two conditions as Expanded Articulation (XA). PSR and Tyros people will recognize all three conditions as part of Super Articulation (SA). These additional conditions also control element triggering. Think about extending the pseudo-code's condition with other conjunctive terms.

The Motif and Montage voice editors expose the XA conditions. Yamaha Expansion Manager does not expose these conditions. Thus, it's not possible to create Super Articulation voices using YEM.

Copyright © 2017 Paul J. Drongowski