SDR flight tracking with ADS-B

Watching ADS-B “flight radar” has been cheap entertainment and a window into the larger world.

ADS-B, in case you didn’t know, is an alternative means for tracking aircraft. (“ADS-B” stands for “Automatic Dependent Surveillance-Broadcast”. Who came up with that acronym?) Aircraft carry an ADS-B transmitter which broadcasts identification and positional information. Aircraft are identified by a 24-bit ICAO address and (optional) call sign. In the case of commercial aircraft, the call sign is typically the airline and flight number. Position is determined by on-board GPS and altimeter data. So, the aircraft is telling ADS-B receivers where it is.

ADS-B is bi-directional, too. In some regions, aircraft may receive temporary flight restrictions (TFRs) and notices to airmen (NOTAMs), for example.

ADS-B data links operate at 1090MHz or 978MHz. 978MHz frequency reduces message congestion on 1090MHz. ADS-B on 1090 is essentially a modified Mode S transponder.

Since ADS-B operates on such high (UHF) frequencies, it is a line-of-sight system. If you have an ADS-B receiver, it will receive only aircraft in sight of the antenna (assuming sufficient signal strength). Because all ADS-B reception is local, web sites like Flight Radar 24 and ADS-B Exchange aggregate ADS-B data from receivers around the world and display current data on a map. That’s how they create the illusion of being global.

The airspace in eastern Europe has been especially interesting. The Ukraine war zone is dark as one might expect for contested — and dangerous — airspace. Occasionally you will see an aircraft fly into Ukraine and immediately kill it’s ADS-B transmission. Conversely, a pilot forgets to turn off ADS-B and you might spot a fighter near the border! Other popular aircraft for trackers include NATO AWACS, drones, tankers and cargo planes.

Let’s say you want to track aircraft in your own nearby airspace. If you have a software-defined radio (SDR) receiver, you’re most of the way there. I have successfully tracked flights in the northern Seattle area using both an RTL SDR Blog V3 radio and a nooelec Nano 2+ SDR. Comparing the two, the RTL SDR blog radio seems to have a wider range and is more responsive than the nooelec Nano 2+.

ADS-B at-home antennas

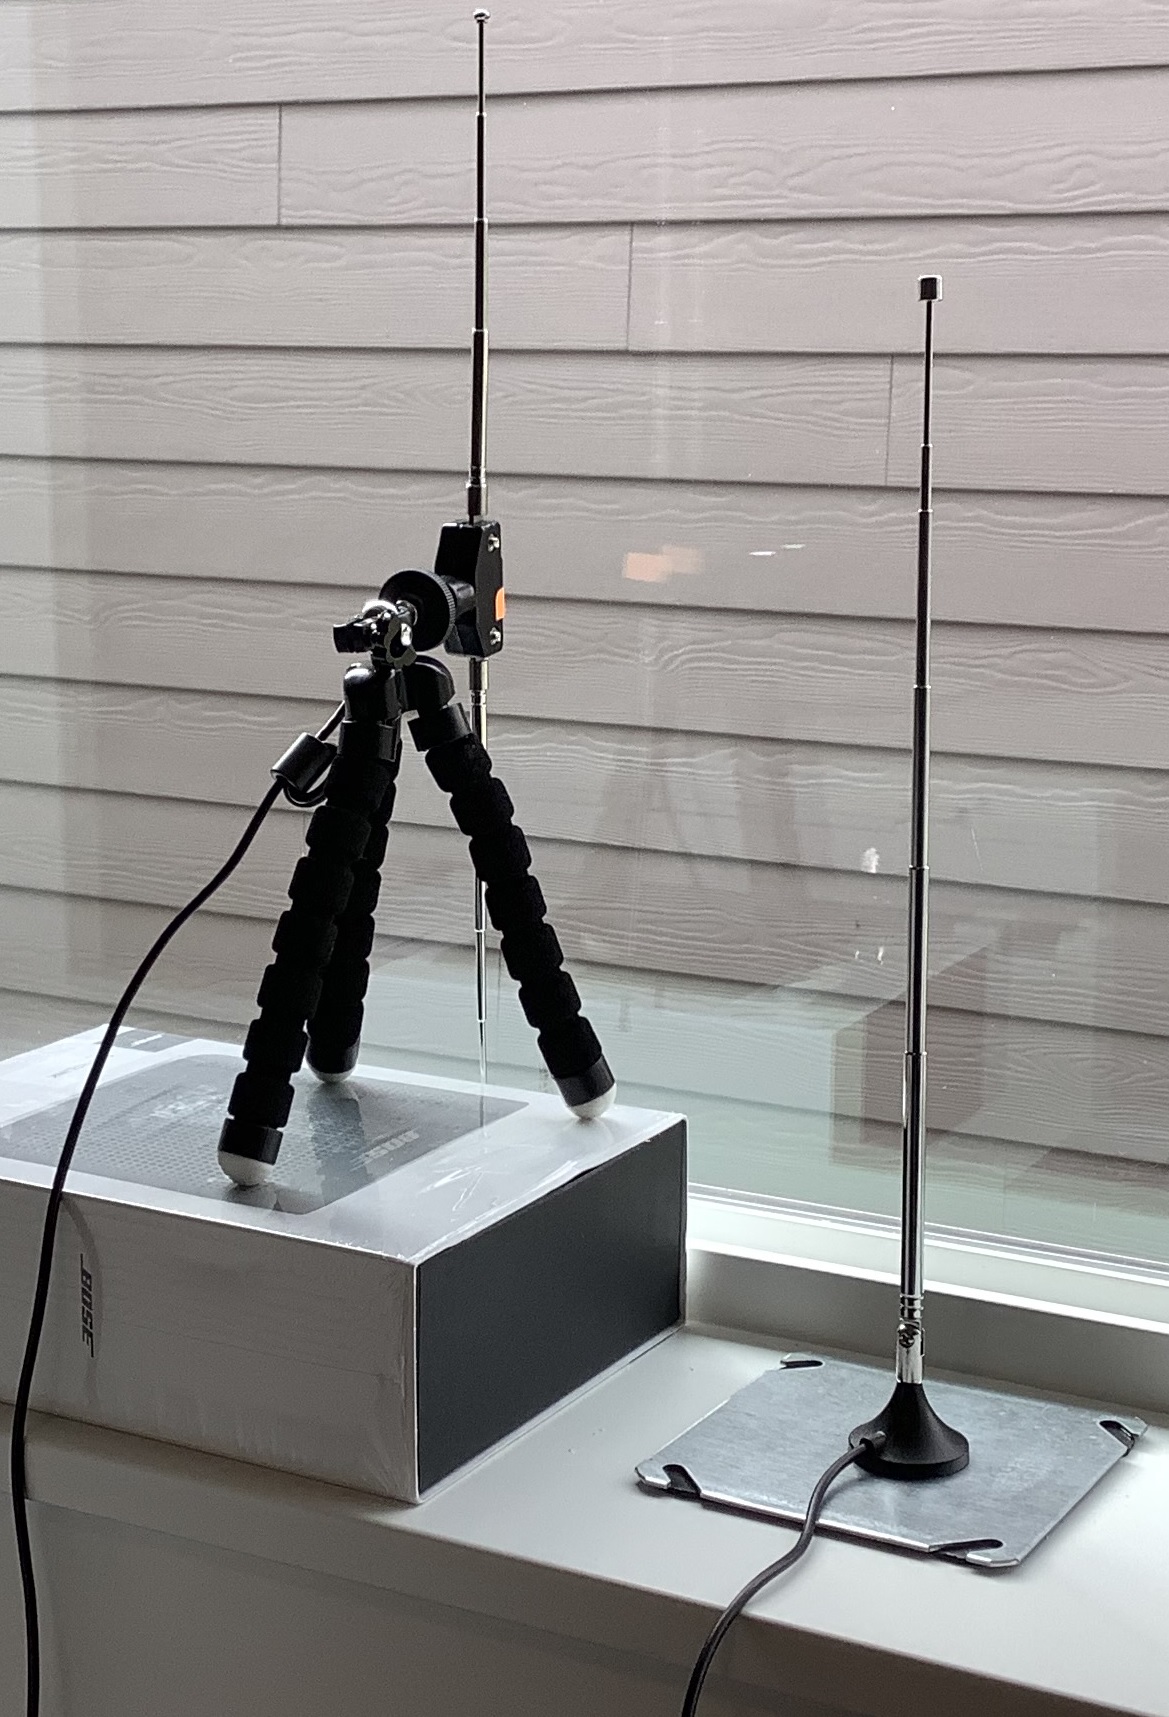
In addition to a receiver, you need an antenna. I used the bundled antennas which came with the receivers. The nooelec is a vertical whip antenna set to a 1090MHz full wave, 27.5cm. The RTL SDR antenna is a vertical dipole where each element is set to a half-wave. The difference in range may be due to the different antennas. Unfortunately, I don’t have the right coax adapters to mix and match. (Maybe after the next Amazon order.)

ADS-B radio signals are vertically polarized so get those antennas straight up and down!

Finally, the keyword in software-defined radio is “software.” You’ll need a program to tune the receiver, demodulate the ADS-B signal and display the ADS-B data (in either a table or on a map).

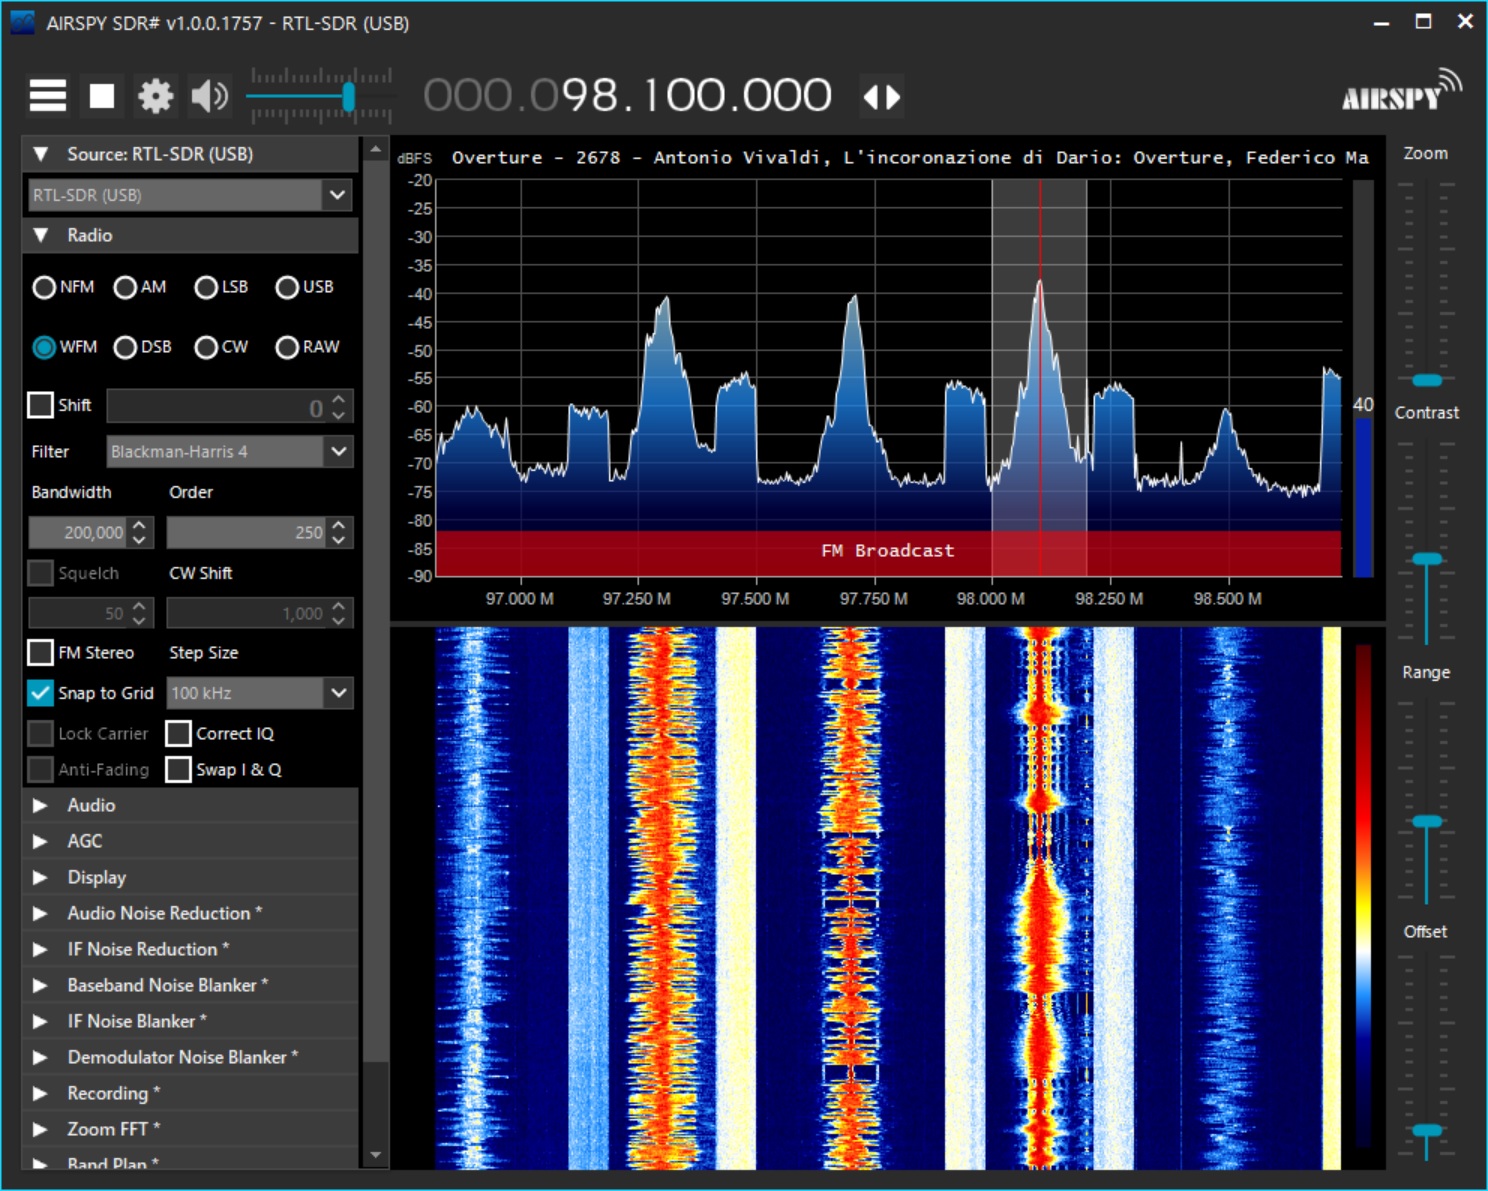
After seeing a positive review on the RTL SDR blog, I decided to try SDRangel on Windows 10. SDRangel has come a long way since I first took a look. SDRangel is set up differently than programs like AirSpy SDR# (SDR-sharp). To my point of view, SDR# and other programs like it are intended mainly for voice (audio) signal modes. They make great receivers for wide band FM, narrow band FM and AM. You’re on your own when it comes to digital modes like ADS-B. The SDR# signal processing chain is already set up like a radio and is pretty much ready to go after installation and launch.

ADS-B via SDRangel (north Puget Sound/Seattle area)

SDRangel, on the other hand, requires a little bit of knowledge about the processing signal chain. First you create a workspace to hold the signal chain. Then you create a receiver to tune in a signal. Finally, you create one or more “channels” where each channel is a demodulator. SDRangel provides a wide range of demodulators (plug-ins), one of which is ADS-B.

I recommend trying an audio mode first, just to learn your way around SDRangel. I tuned in a local National Weather Service (NWS) station on 162.55MHz narrow band FM (NBFM) using the NBFM demodulator (plug-in). The NWS station is 24/7 and is fairly strong. None the less, I needed to raise the RF gain and turn off the squelch in order to hear anything. Not the same “out of the box” experience as SDR#.

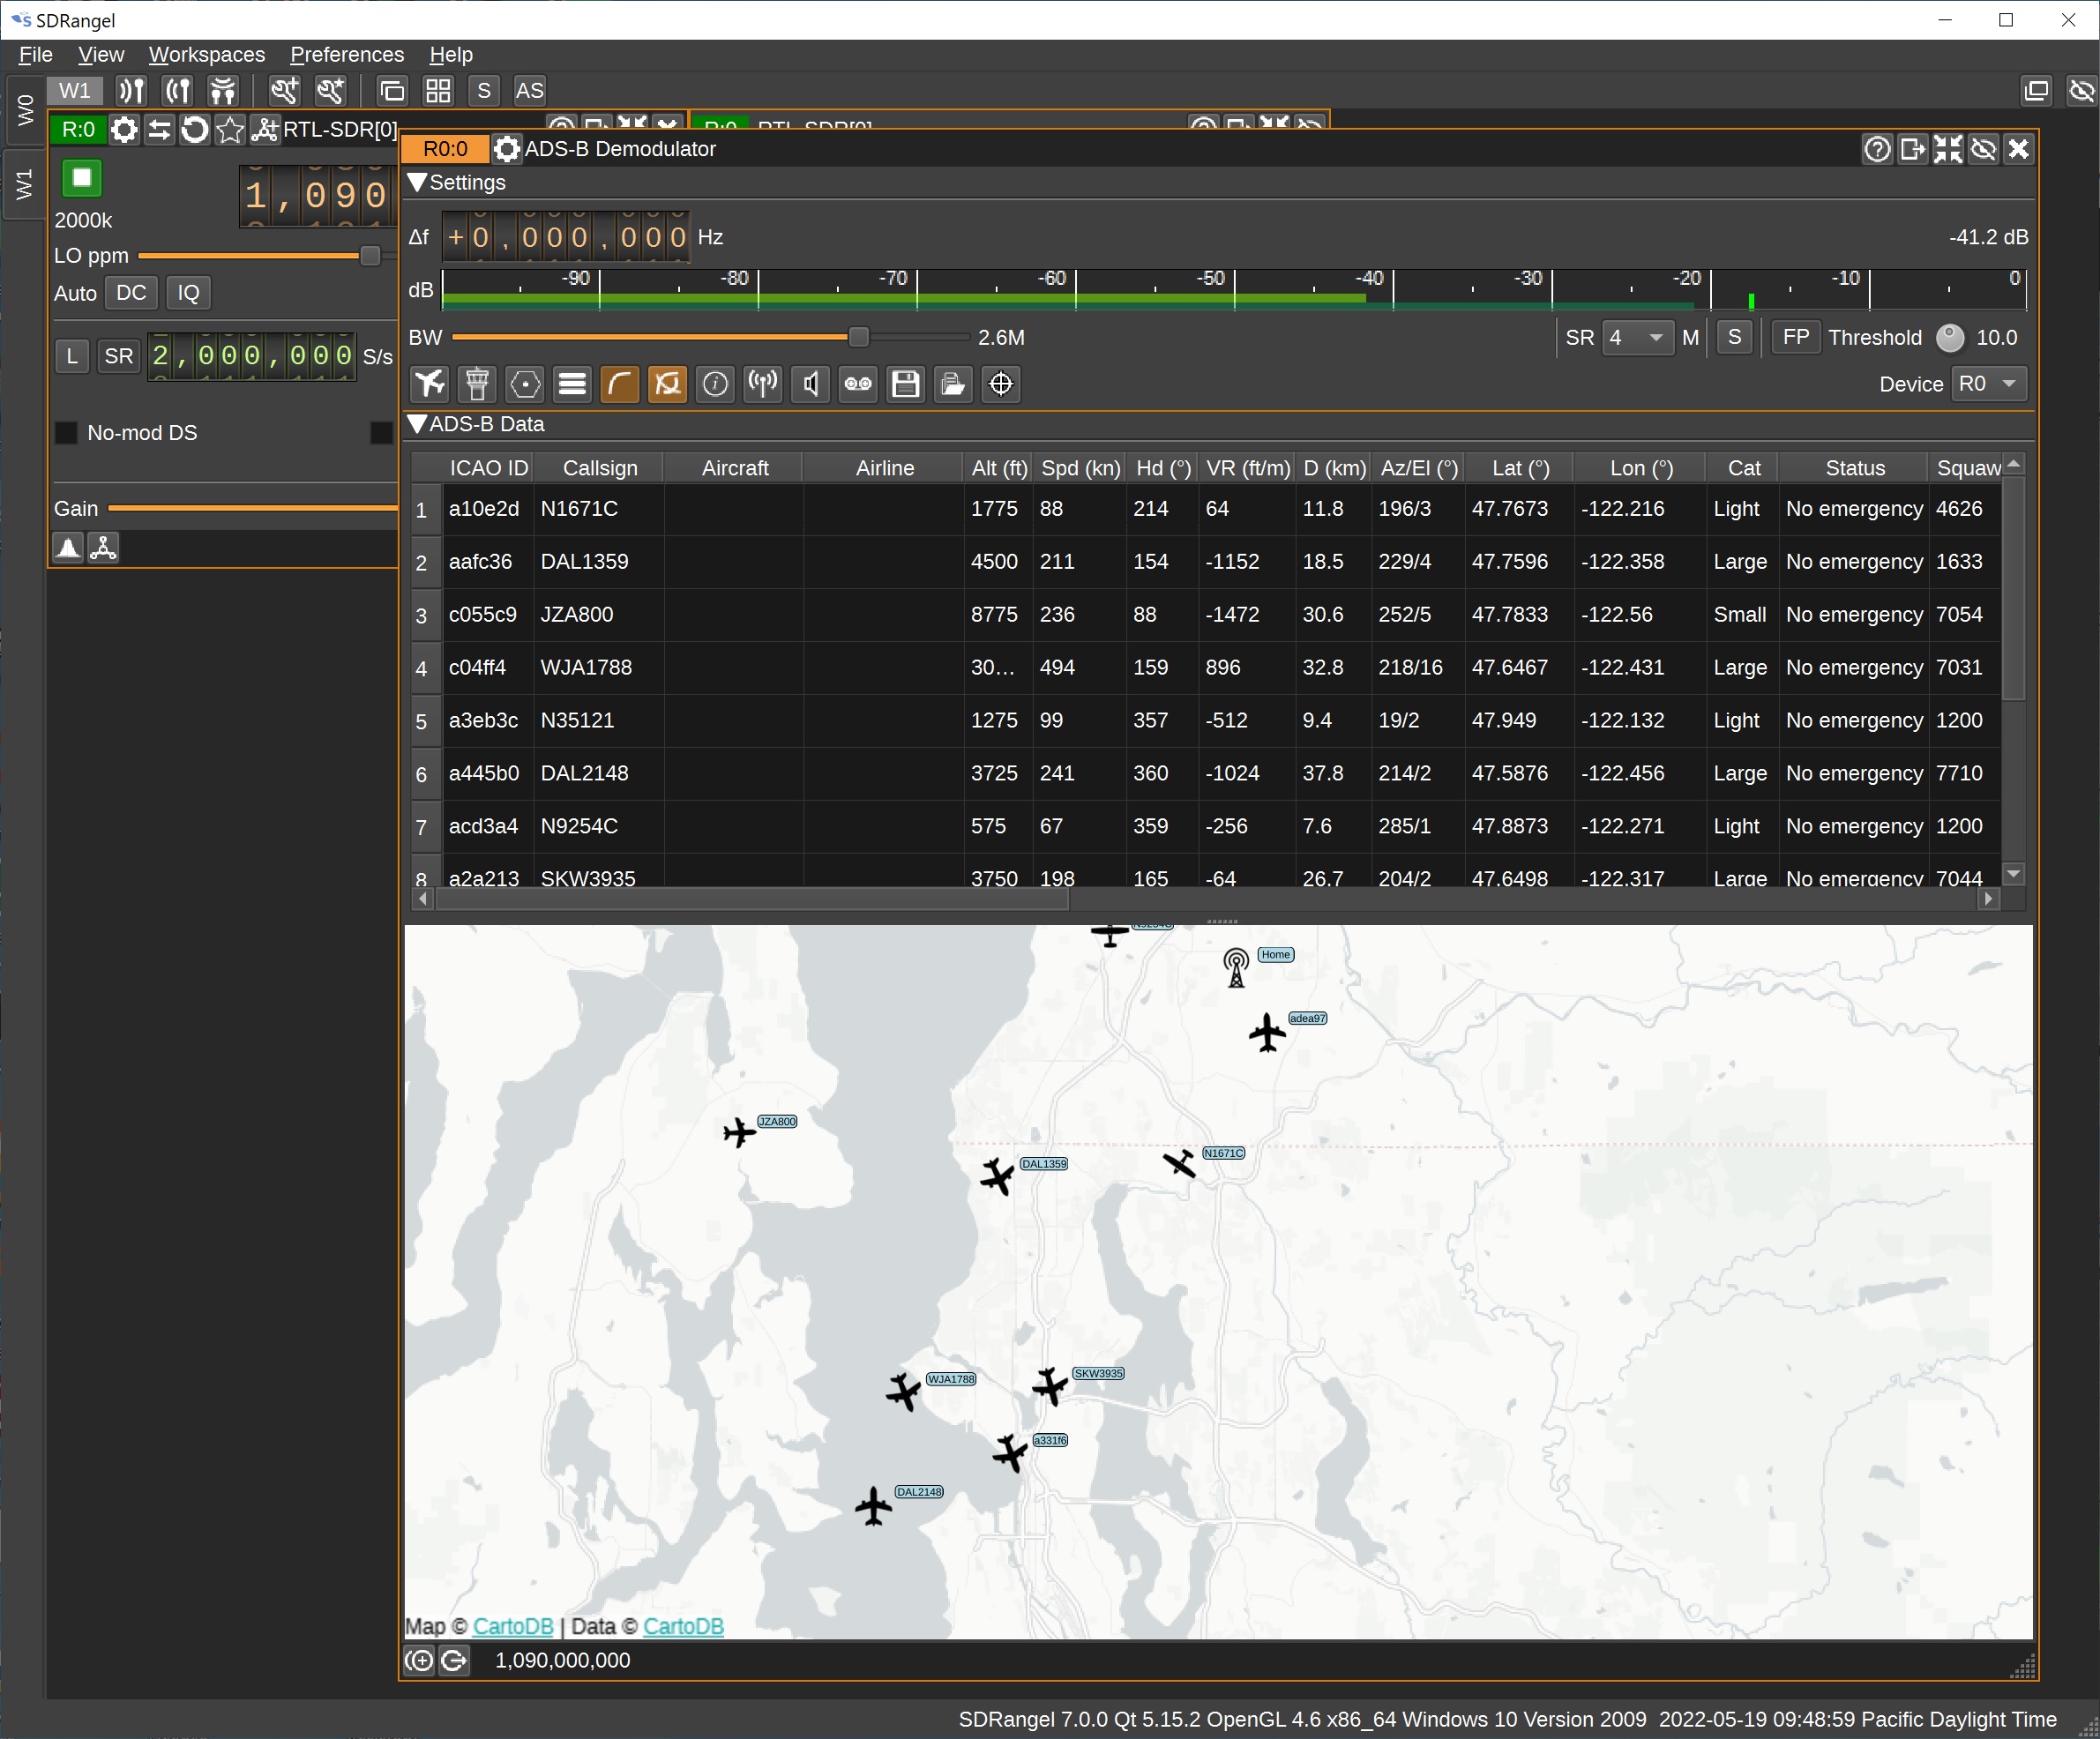
Once set up, though, turning to ADS-B was a snap. I created a new workspace and put a receiver (tuned to 1090MHz) and ADS-B demodulator into it. I needed to increase the SDR sampling rate to 2,000,000 (hint: set the decimation factor to 1). If you don’t up the sampling rate, you’ll get a red warning message and no ADS-B data.

With this set-up, I can track flights in the north Puget Sound area. The antenna is indoors (house rules), but it will still see quite a few flights between the Sound to the west and the Cascade mountains to the east. I compared the SDRangel output with Flight Radar 24 and was satisfied. Because I was receiving on 1090MHz only, I am missing flights on 978MHz. More experiments to do one day. 🙂

Copyright © 2022 Paul J. Drongowski N2OQT

RTL-SDR: Earth ground are easy

If you’re into software defined radio and you’re looking for better HF reception, invest time in your antenna system and grounding.

I don’t have the space to string a dipole, so I’m working with a simple (random) long wire antenna. The long wire antenna is connected to an RTL-SDR receiver through a Nooelec Balun Nine One and a short length of coaxial cable. The long wire is connected to the antenna input on the balun.

Unfortunately, my early experiments with grounding did not work out very well. I tried connecting the balun ground port to various cold water pipes in the house. I do not recommend using house ground. House ground merely adds a mess o’noise to the original signal — bad, bad, bad. Thus, I left the balun ground unconnected and pressed on.

With the start of the war against Ukraine, I began monitoring HF, again, just to hear what I can hear on the left coast of North America. If you are interested in Europe and Ukraine specifically, I recommend the Wide-band Web SDR at the University of Twente in the Netherlands. Aside from radio access, there is an active chat area. Twente gets you much closer to the action.

Counterpoise

Counterpoise is a fancy name for wires or cables that substitute for an earth ground.

If you cannot connect to an earth ground, you should consider adding a counterpoise to your long wire antenna. Sounds like work, but it’s simple! Just connect another long wire to the ground side of the balun. String the counterpoise in the opposite physical direction of the long wire antenna. Done.

Consistent with my usual sleazy methods, I grabbed a 25 foot length of bell wire, twisted the pair at both ends, and connected one end to the balun ground. This quick and dirty counterpoise was good enough for +3dB or so in signal-to-noise ratio (SNR) as measured by Airspy SDR-Sharp.

A weeder?

My studio window is about 15 feet above ground, so it made sense to drop the bell wire out of the window and connect it to earth.

Really? A garden weeder for an earth ground rod!

A good earth ground typically consists of 4 to 8 feet of grounding rod buried in the earth. I know there are drain pipes located in the ground beneath my window and frankly, planting 4 feet (8 feet!) of rod sounds like too much work. So, I grabbed a garden weeder — yes, a garden tool — and stuck it in the ground. Then I wrapped the end of the bell wire around the weeder.

This quick and literally dirty solution was good for about +12dB (or more) improvement in the SNR.

Metal edging stake

I didn’t want to expose the weeder to good old Pacific Northwest wet weather and found a cheap, simple substitute — a galvanized metal edging stake. Normally, one uses edging stakes in the garden. However, they are inexpensive and expose more surface area to the earth than a weeder. 🙂

Edging stake

I upgraded the bell wire to 16 gauge primary wire. Unfortunately, the primary wire makes it more difficult to close the sliding window into my studio. The bell wire is flatter and mushable.

Inexpensive edging stake earth ground

As to SNR, I’m getting similar results. Unless I get the gumption to drive a grounding rod, this is close enough for rock and roll. (73)

If you would like more help with software-defined radio (SDR), here are links to my earlier posts:

Copyright © 2022 Paul J. Drongowski, N2OQT

RTL SDR Blog V3 Radio

Based on my positive experience with the nooelec Nano 2+ software defined radio, I bought an RTL-SDR Blog V3 receiver bundle. I meant to write a quick review of the RTL-SDR Blog V3 (henceforth, the “V3”), but I wound up having too much fun with the new toys!

For $35USD, you get the USB receiver stick, a dipole antenna kit with telescoping elements, cables, a tripod and a suction mount. The V3 uses SMA connectors everywhere. In comparison, the nooelec Nano 2+ bundle includes a small magnetic mount telescoping antenna and uses tiny MCX connectors.

RTL SDR Blog V3 Software Defined Radio bundle

If you want to mix and match components between bundles, you will need adapters. SMA connecters thread onto each other and provide a more firm and reliable connections than MCX. On that basis, I give the V3 points.

Further points go to V3 for its build quality. The V3 is somewhat larger, but the electronics are mounted in a metal (shielded) case. The case is also the heat sink. If you want metal shielding in the nooelec line, you should purchase the nooelec Nano 3. Both the V3 and Nano 2+ run warm, so heat dissipation is important.

Both units make adequate low-cost VHF/UHF receivers when used with their respective bundled antenna system. If you’re most interested in broadcast FM or aircraft band, you can’t go wrong either way. I give the V3 points for the option of HF reception and the ability to tune antenna length for the radio band to be monitored. You can see the effect of tuning with your own eyes. Dial in a weather station, for example, and adjust the antenna elements. You’ll see the signal increase and decrease in strength as you change element length.

Tips: The V3 antenna system is a dipole, so you need to make both elements the same length. Divide the frequency (in MHz) into 468 to get the total antenna length (in feet). Then divide the total length by two to obtain the length of each element. Pop the cap on the central Y junction and find the element which is connected to the coax shield. Orient the shield-side element down towards the earth.

So far, the V3 is winning on points. Then consider HF. The V3 receiver is HF capable, but you will need to build or add an HF antenna. This is where life gets a little bit tricky. Short story — Yes, the V3 receives HF. I’ll save the longer story for a future blog post.

Bottom line. If you are only interested in VHF/UHF, then either unit will do the business. If you prefer a magnetic mount antenna, go with a nooelec Nano bundle. If you want to optimize tuning for a VHF/UHF band, then go with the V3 bundle. If you want to get your feet wet with HF and don’t want to spend a lot of money, then pick up the V3 bundle, a nooelec balun and at least 23 feet of wire.

Even though the V3 won this match-up, nooelec won my respect as a solid citizen. They make the Ham It Up HF up-converter which adds HF reception to a VHF/UHF only SDR. Based on my experience with the Nano 2+, I would give the Ham It Up a try without trepidation.

Most of all, have fun!

Copyright © 2020 Paul J. Drongowski, N2OQT

Nooelec Nano 2+ Software Defined Radio

One side-benefit of unpacking after a move is getting reacquainted with old electronic gear, in this case, a Drake R8 shortwave receiver. HF is definitely alive, but it whet my appetite for more listening, more action.

Rather than pull out the old Radio Shack 2006PRO — another old acquaintance — I decided to give software defined radio (SDR) a try.

Like everything else electronic, VLSI digital signal processing revolutionized radio design. Smart folks realized that the RTL2832U chipset could be repurposed into a wideband SDR receiver. The RTL2832U chipset was originally designed as a DVB-T TV tuner and repurposing it is a spiffy hack!

Even better, the RTL2832U SDR is dirt cheap. Why spring for a $300 ICOM when you can buy a dongle for about $25USD? There are “high end” solutions such as the Airspy R2 ($169USD) or SDRPlay RSPdx ($199USD).
The Airspy HF+ Discovery extends coverage to HF (0.5kHz to 31MHz) for $169USD. Mid-range solutions include the Airspy Mini SDR ($99USD) and SDRPlay RSP1A ($109USD) among others. If you’re interested in adding HF, the Nooelec Ham It Up up-converter ($65USD) is an option.

Cheapskate that I am, I believe in the low-end theory — how much can I do with the least amount of money. 🙂 Thus, I chose the Nooelec NESDR Nano 2+ for $24. The original Nooelec Nano had a reputation for running hot. The Nano 2+ mitigates heat dissipation; the newer Nano 3 ($30) has a metal case/heatsink.

nooelect Nano 2+ Software Defined Radio

I went cheap. Yes, the Nano 2+ gets warm to the touch, but not to the level of concern. An x86 running full tilt is HOT — not the Nano 2+. It doesn’t run much hotter than my vintage Datong AD270 active antenna.

For software, I installed SDR#. The “sharp” comes from C#, the implementation language. There are many good getting started guides on-line. I especially like:

There are several more software options out there like CubicSDR. I chose SDR# because it has a number of useful plug-ins including a frequency manager/scanner.

The Nano 2+ is the size of a USB flash drive. The low-cost Adafruit dongle is similar, but it’s out of stock. The Nano 2+ is a nice replacement. The Nano 2+ is bundled with a tiny magnetic-mount telescoping antenna which is good enough for VHF/UHF. I placed the mag-mount on a small electrical junction box cover which provides a more stable base.

FM broadcast via SDR# and Nooelec Nano 2+ software defined radio

Follow the on-line guides! RTL SDR is quite mature for “hobby” software. I tuned in FM broadcast literally within minutes.

Based on this short experience, I splurged for an RTL-SDR Blog V3 receiver and antenna bundle ($35USD). The V3 has a metal enclosure and enables HF reception through direct sampling. The bundle includes a dipole antenna with a variety of mounting options. I believe that the innards of the dipole antenna can be adapted for HF, but decided to buy a Nooelec Balun One Nine V2 ($15), too. The balun can be used as an unun in order to match impedance with a long-wire antenna.

I also recommend a set of antenna adapters. The Nooelec Nano 2+ uses an MCX antenna connector and the V3 uses an SMA connector. So, if you want to mix and match components, be prepared with adapters.

HF for $35? I can’t vouch for receiver sensitivity, etc. at this point, not having received the V3. The potential, however, is amazing. If you’re good with just VHF and UHF, then give the Nooelec Nano 2+ a try.

Copyright © 2020 Paul J. Drongowski