Of course, I’m interested in learning more about the recent aerial incidents over North America. I hope the U.S. and Canadian governments release more information and images, soon. Surely, someone had a camera. 🙂
Recovery in Alaska and Yukon will be difficult. The objects are relatively small, the weather has been bad and the days are short (about six hours of daylight).
Flightradar24 has been a good resource along with ADS-B Exchange. Here are a few screen snaps of the Lake Huron incident (February 12, 2023).
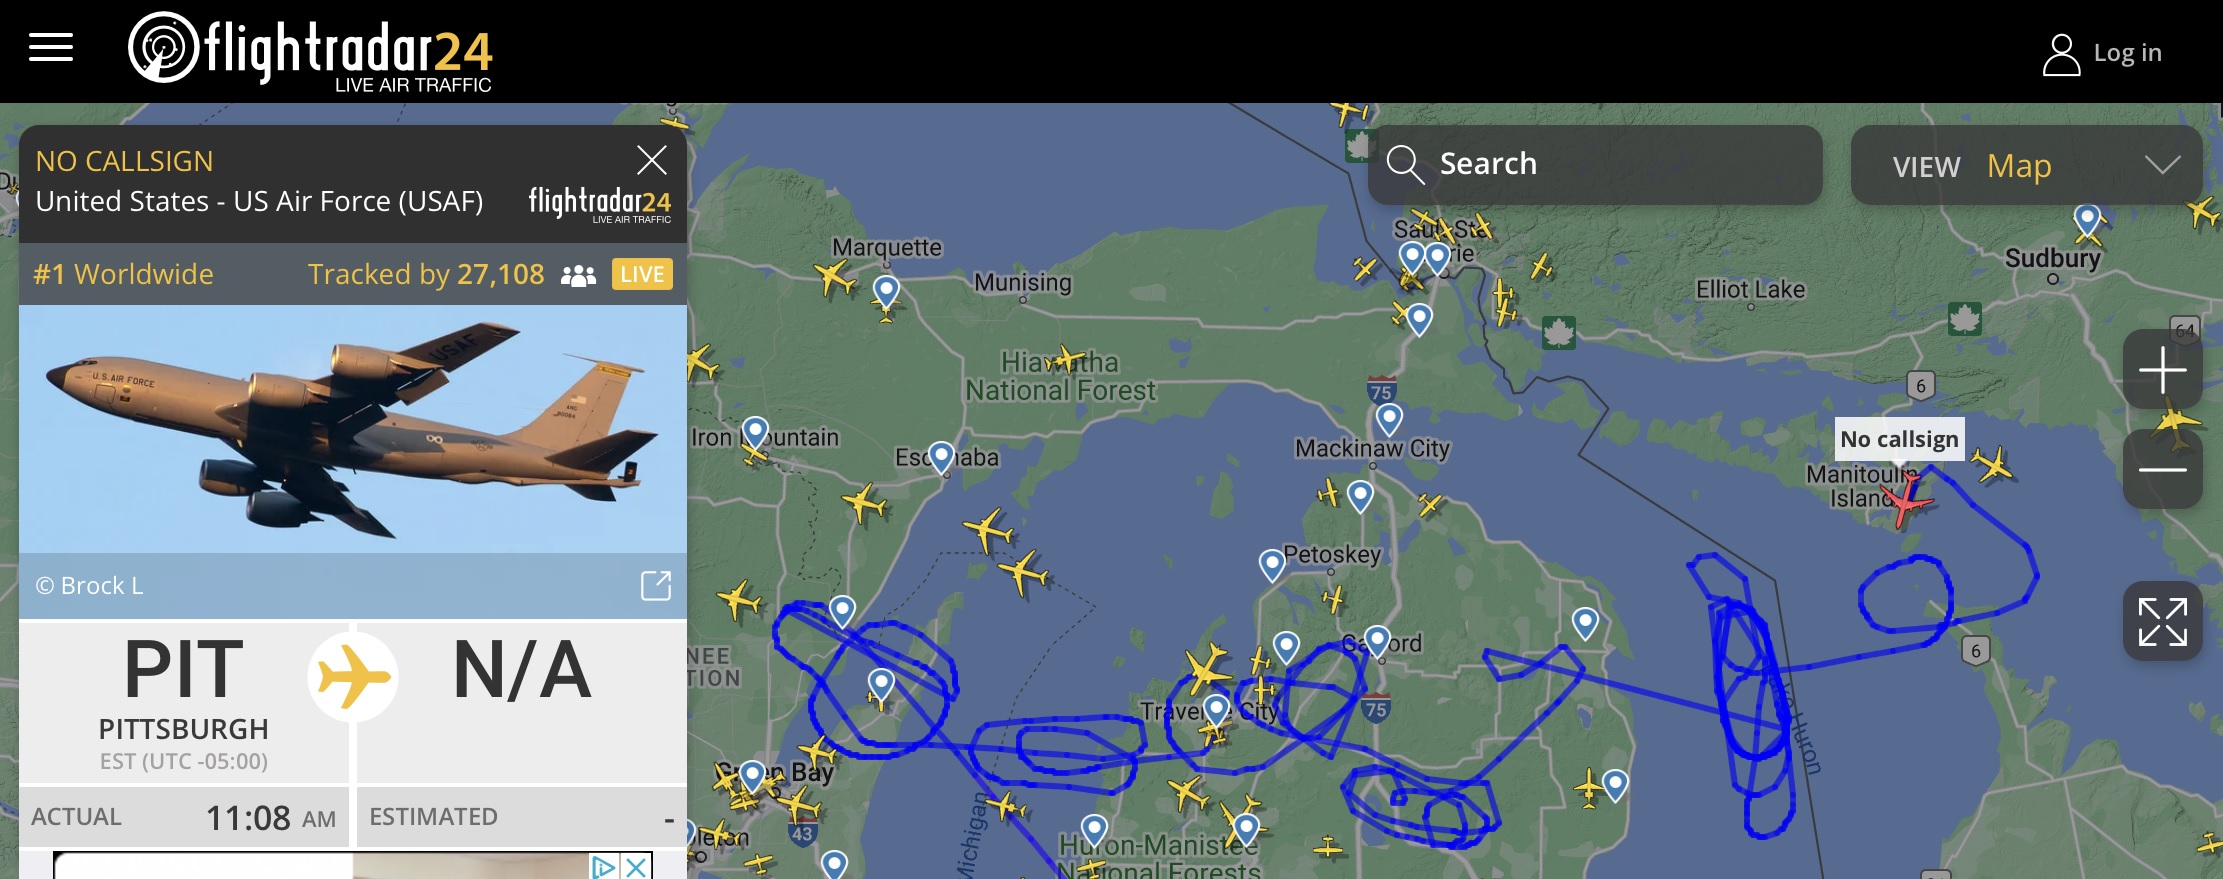
USAF KC-135T over Lake Huron (February 12, 2023)
The U.S. has flown a variety of aircraft, especially tankers. Tankers have aircrew who have a lot of experience operating in commercial airspace. Tankers are well-suited for the job, i.e., relatively slow. Plus, their avionics have been upgraded for multiple roles including Link 16 and intelligence, surveillance and reconnaissance (ISR). Link 16 assists information fusion for military and civilian decision makers.
Tankers are the most visible on Flightradar24 or ADS-B Exchange. The first track above is a KC135T (shout out to Pittsburgh ANG) following the unidentified object. Its path is similar to what I observed during the Chinese balloon incident. They squawk loud and clear for civilian ATC. Fighter jets? No. That’s why the FAA issues a temporary flight restriction (TFR) or ground stop when fast movers are operating. If you want to catch fighters, try ADS-C Exchange or DIY (if you have line of sight).
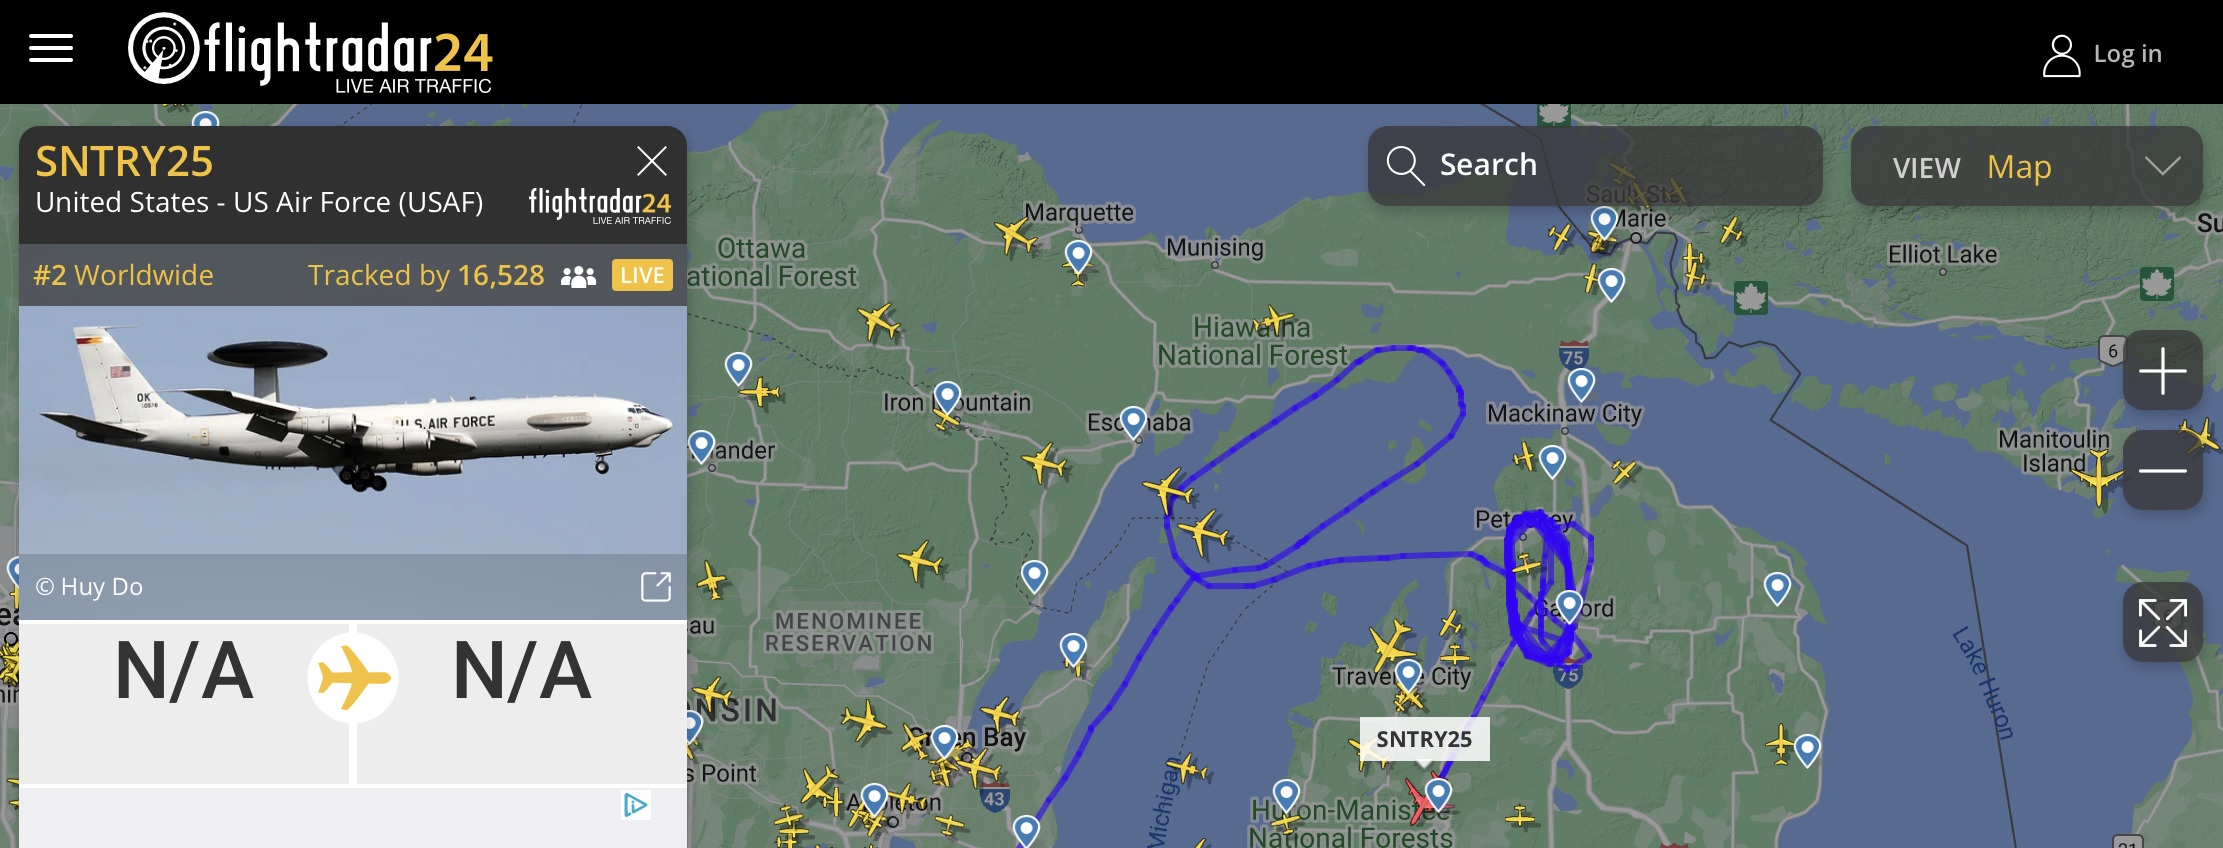
USAF E-3 AWACS near Lake Huron (February 12, 2023)
In addition to tankers, the U.S. has launched a variety of ISR aircraft. The Lake Huron incident was monitored by an E-3 AWACS (Sentry). None of these aircraft are strangers to people monitoring the airspace near Ukraine!
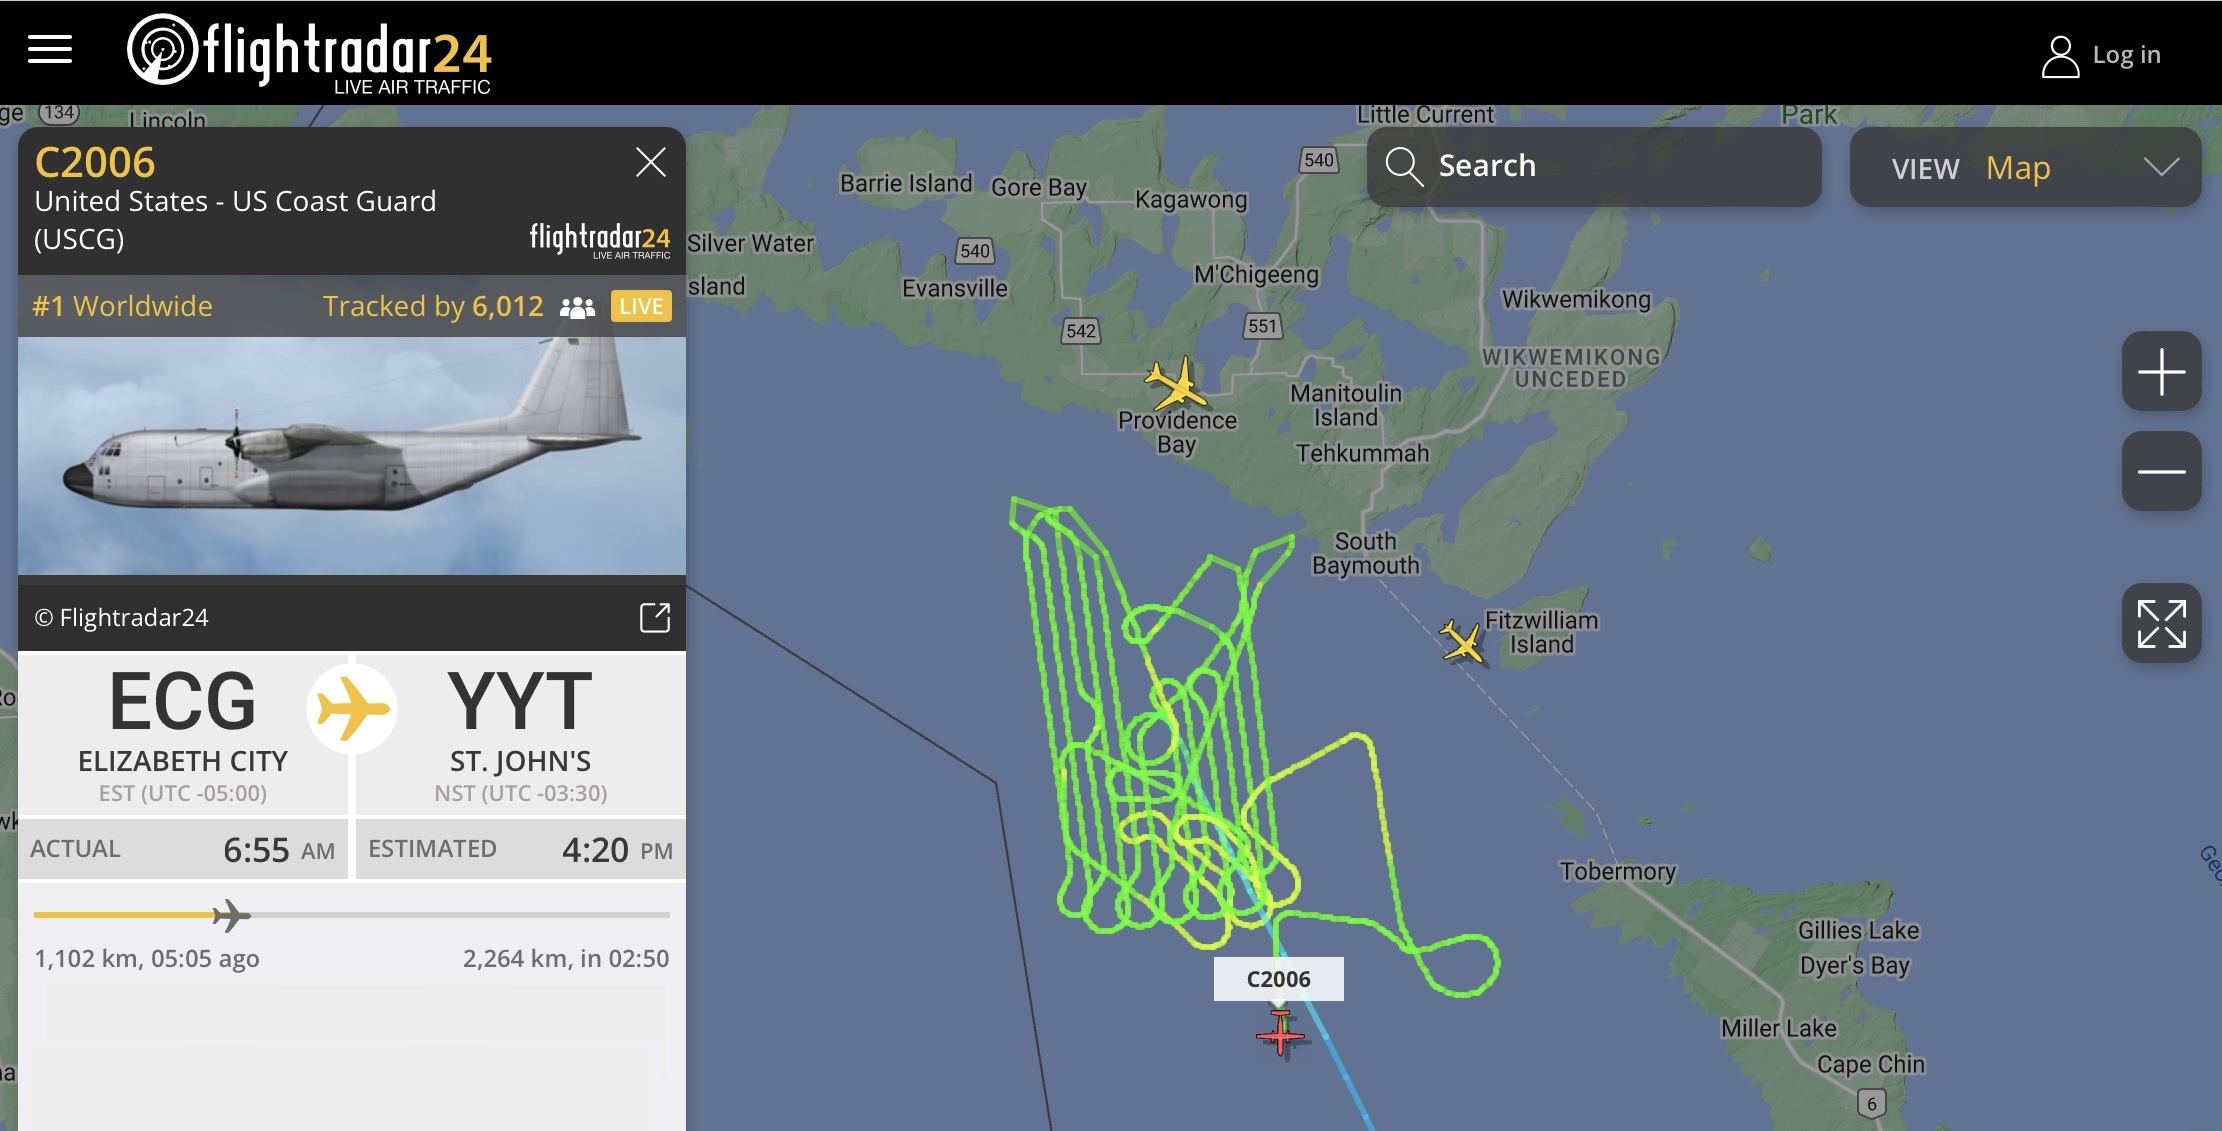
U.S. Coast Guard HC-130J over Lake Huron (February 13, 2023)
After action is recovery. The HC-130J Super Hercules is the tool for the job. Aircrew are trained for low-level night operations and can drop illumination flares. The avionics suite is extensive including night vision. It’s dark up there in the Yukon and Prudhoe Bay. The HC-130J can conduct air-to-air helicopter refueling, too. An USAF HC-130 was observed over the Prudhoe Bay incident (February 10, 2023).
Let’s give the professionals a chance to do their jobs. Hopefully, more information will be quickly forthcoming. In the meantime, read my posts about do-it-yourself ADS-B monitoring. 🙂
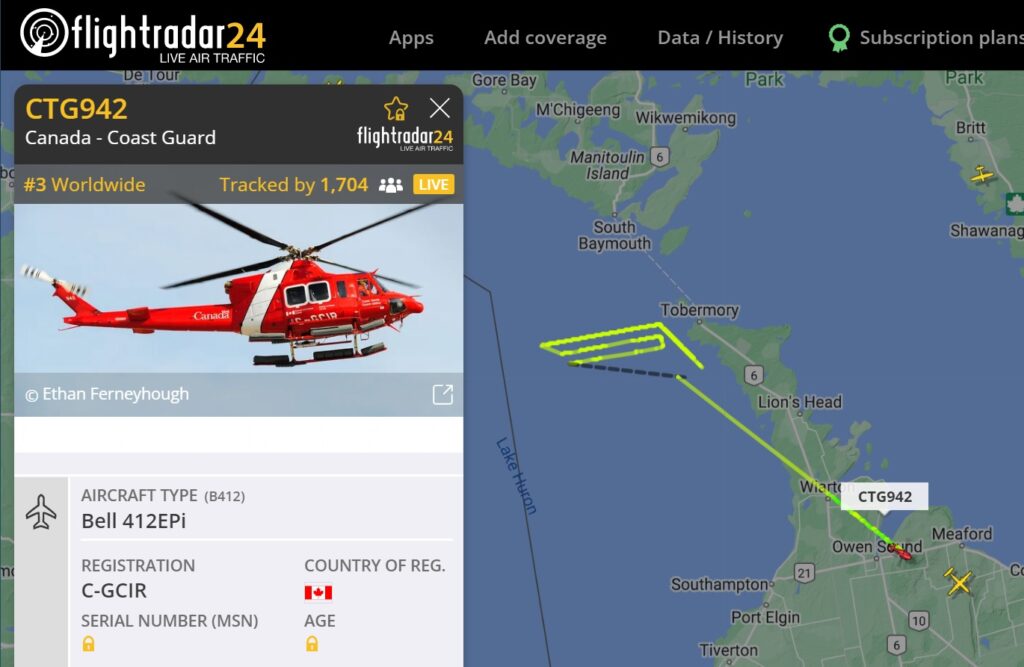
Brief flight over the region of interest (Lake Huron, February 13, 2023)
[Update] Canada’s turn! Looking at the Lake Huron depth chart, the object may be under 300+ feet of water. This will not be an easy recovery.
Watching ADS-B “flight radar” has been cheap entertainment and a window into the larger world.
ADS-B, in case you didn’t know, is an alternative means for tracking aircraft. (“ADS-B” stands for “Automatic Dependent Surveillance-Broadcast”. Who came up with that acronym?) Aircraft carry an ADS-B transmitter which broadcasts identification and positional information. Aircraft are identified by a 24-bit ICAO address and (optional) call sign. In the case of commercial aircraft, the call sign is typically the airline and flight number. Position is determined by on-board GPS and altimeter data. So, the aircraft is telling ADS-B receivers where it is.
ADS-B data links operate at 1090MHz or 978MHz. 978MHz frequency reduces message congestion on 1090MHz. ADS-B on 1090 is essentially a modified Mode S transponder.
Since ADS-B operates on such high (UHF) frequencies, it is a line-of-sight system. If you have an ADS-B receiver, it will receive only aircraft in sight of the antenna (assuming sufficient signal strength). Because all ADS-B reception is local, web sites like Flight Radar 24 and ADS-B Exchange aggregate ADS-B data from receivers around the world and display current data on a map. That’s how they create the illusion of being global.
The airspace in eastern Europe has been especially interesting. The Ukraine war zone is dark as one might expect for contested — and dangerous — airspace. Occasionally you will see an aircraft fly into Ukraine and immediately kill it’s ADS-B transmission. Conversely, a pilot forgets to turn off ADS-B and you might spot a fighter near the border! Other popular aircraft for trackers include NATO AWACS, drones, tankers and cargo planes.
Let’s say you want to track aircraft in your own nearby airspace. If you have a software-defined radio (SDR) receiver, you’re most of the way there. I have successfully tracked flights in the northern Seattle area using both an RTL SDR Blog V3 radio and a nooelec Nano 2+ SDR. Comparing the two, the RTL SDR blog radio seems to have a wider range and is more responsive than the nooelec Nano 2+.
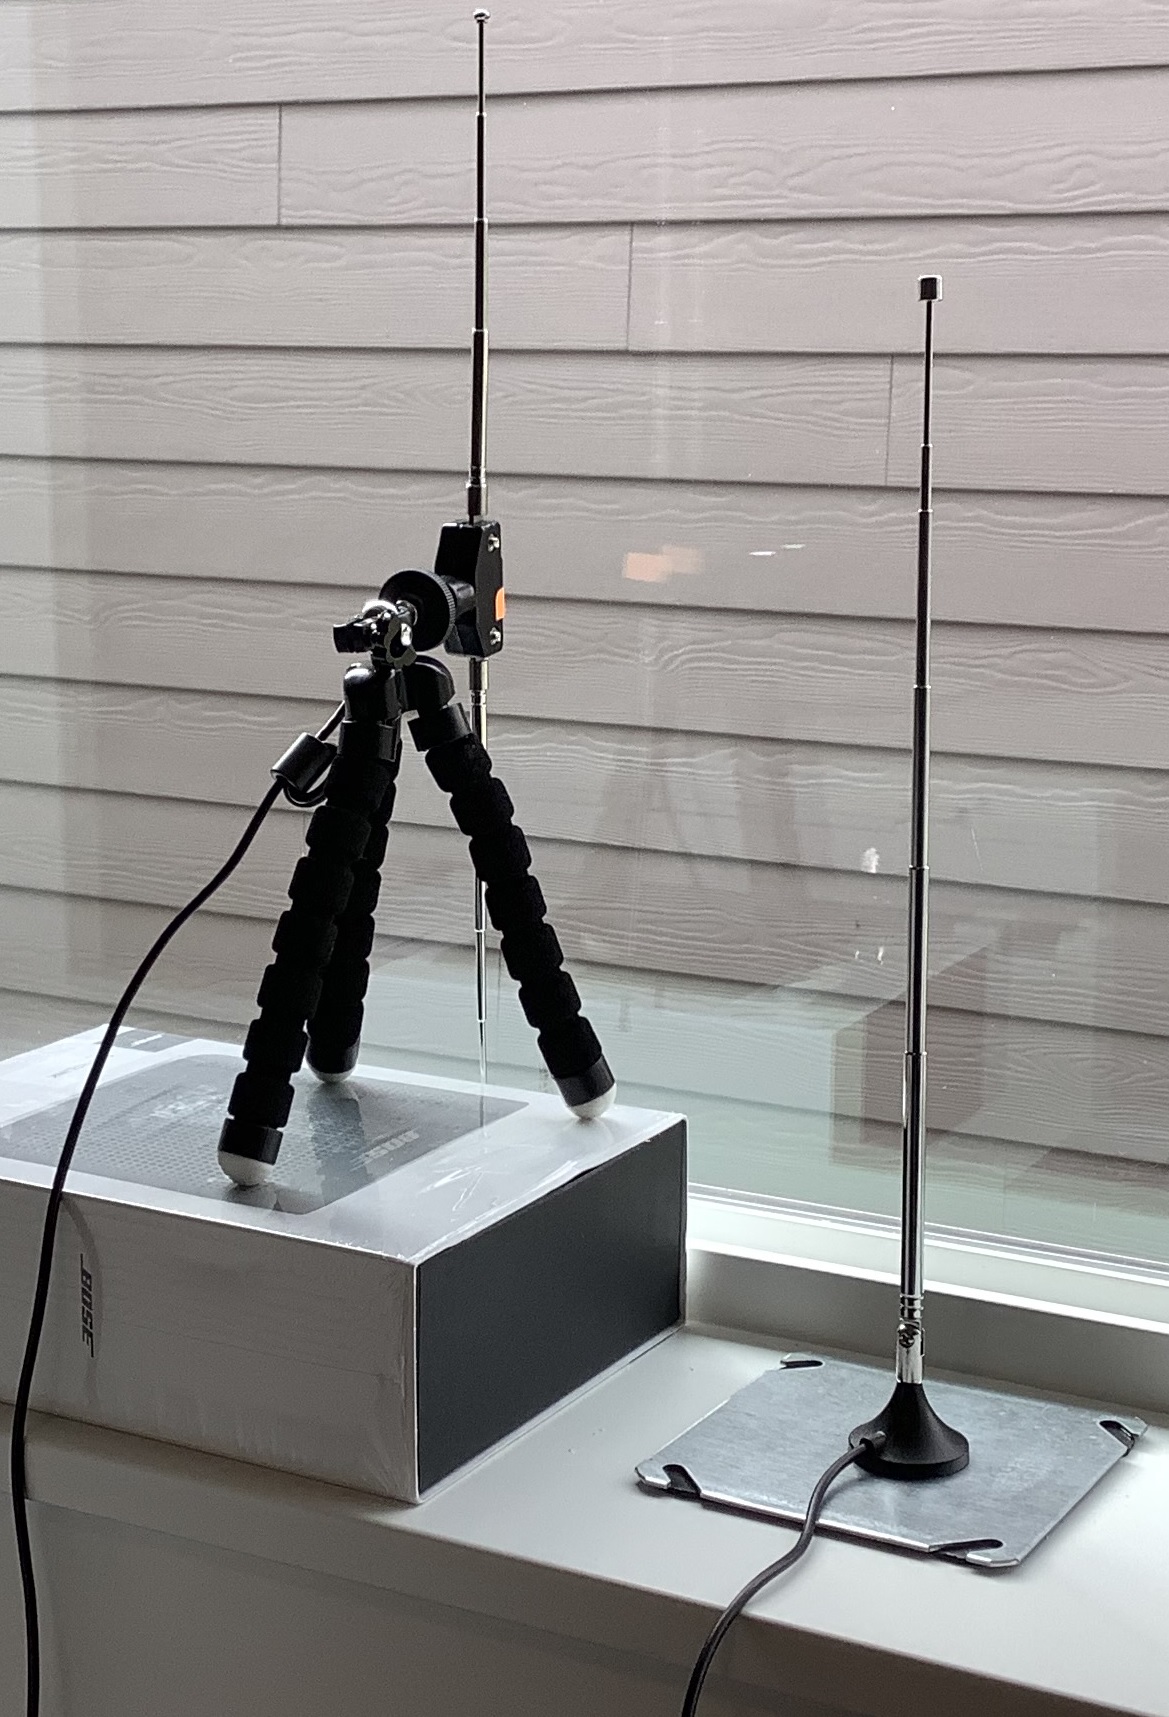
ADS-B at-home antennas
In addition to a receiver, you need an antenna. I used the bundled antennas which came with the receivers. The nooelec is a vertical whip antenna set to a 1090MHz full wave, 27.5cm. The RTL SDR antenna is a vertical dipole where each element is set to a half-wave. The difference in range may be due to the different antennas. Unfortunately, I don’t have the right coax adapters to mix and match. (Maybe after the next Amazon order.)
ADS-B radio signals are vertically polarized so get those antennas straight up and down!
Finally, the keyword in software-defined radio is “software.” You’ll need a program to tune the receiver, demodulate the ADS-B signal and display the ADS-B data (in either a table or on a map).
After seeing a positive review on the RTL SDR blog, I decided to try SDRangel on Windows 10. SDRangel has come a long way since I first took a look. SDRangel is set up differently than programs like AirSpy SDR# (SDR-sharp). To my point of view, SDR# and other programs like it are intended mainly for voice (audio) signal modes. They make great receivers for wide band FM, narrow band FM and AM. You’re on your own when it comes to digital modes like ADS-B. The SDR# signal processing chain is already set up like a radio and is pretty much ready to go after installation and launch.
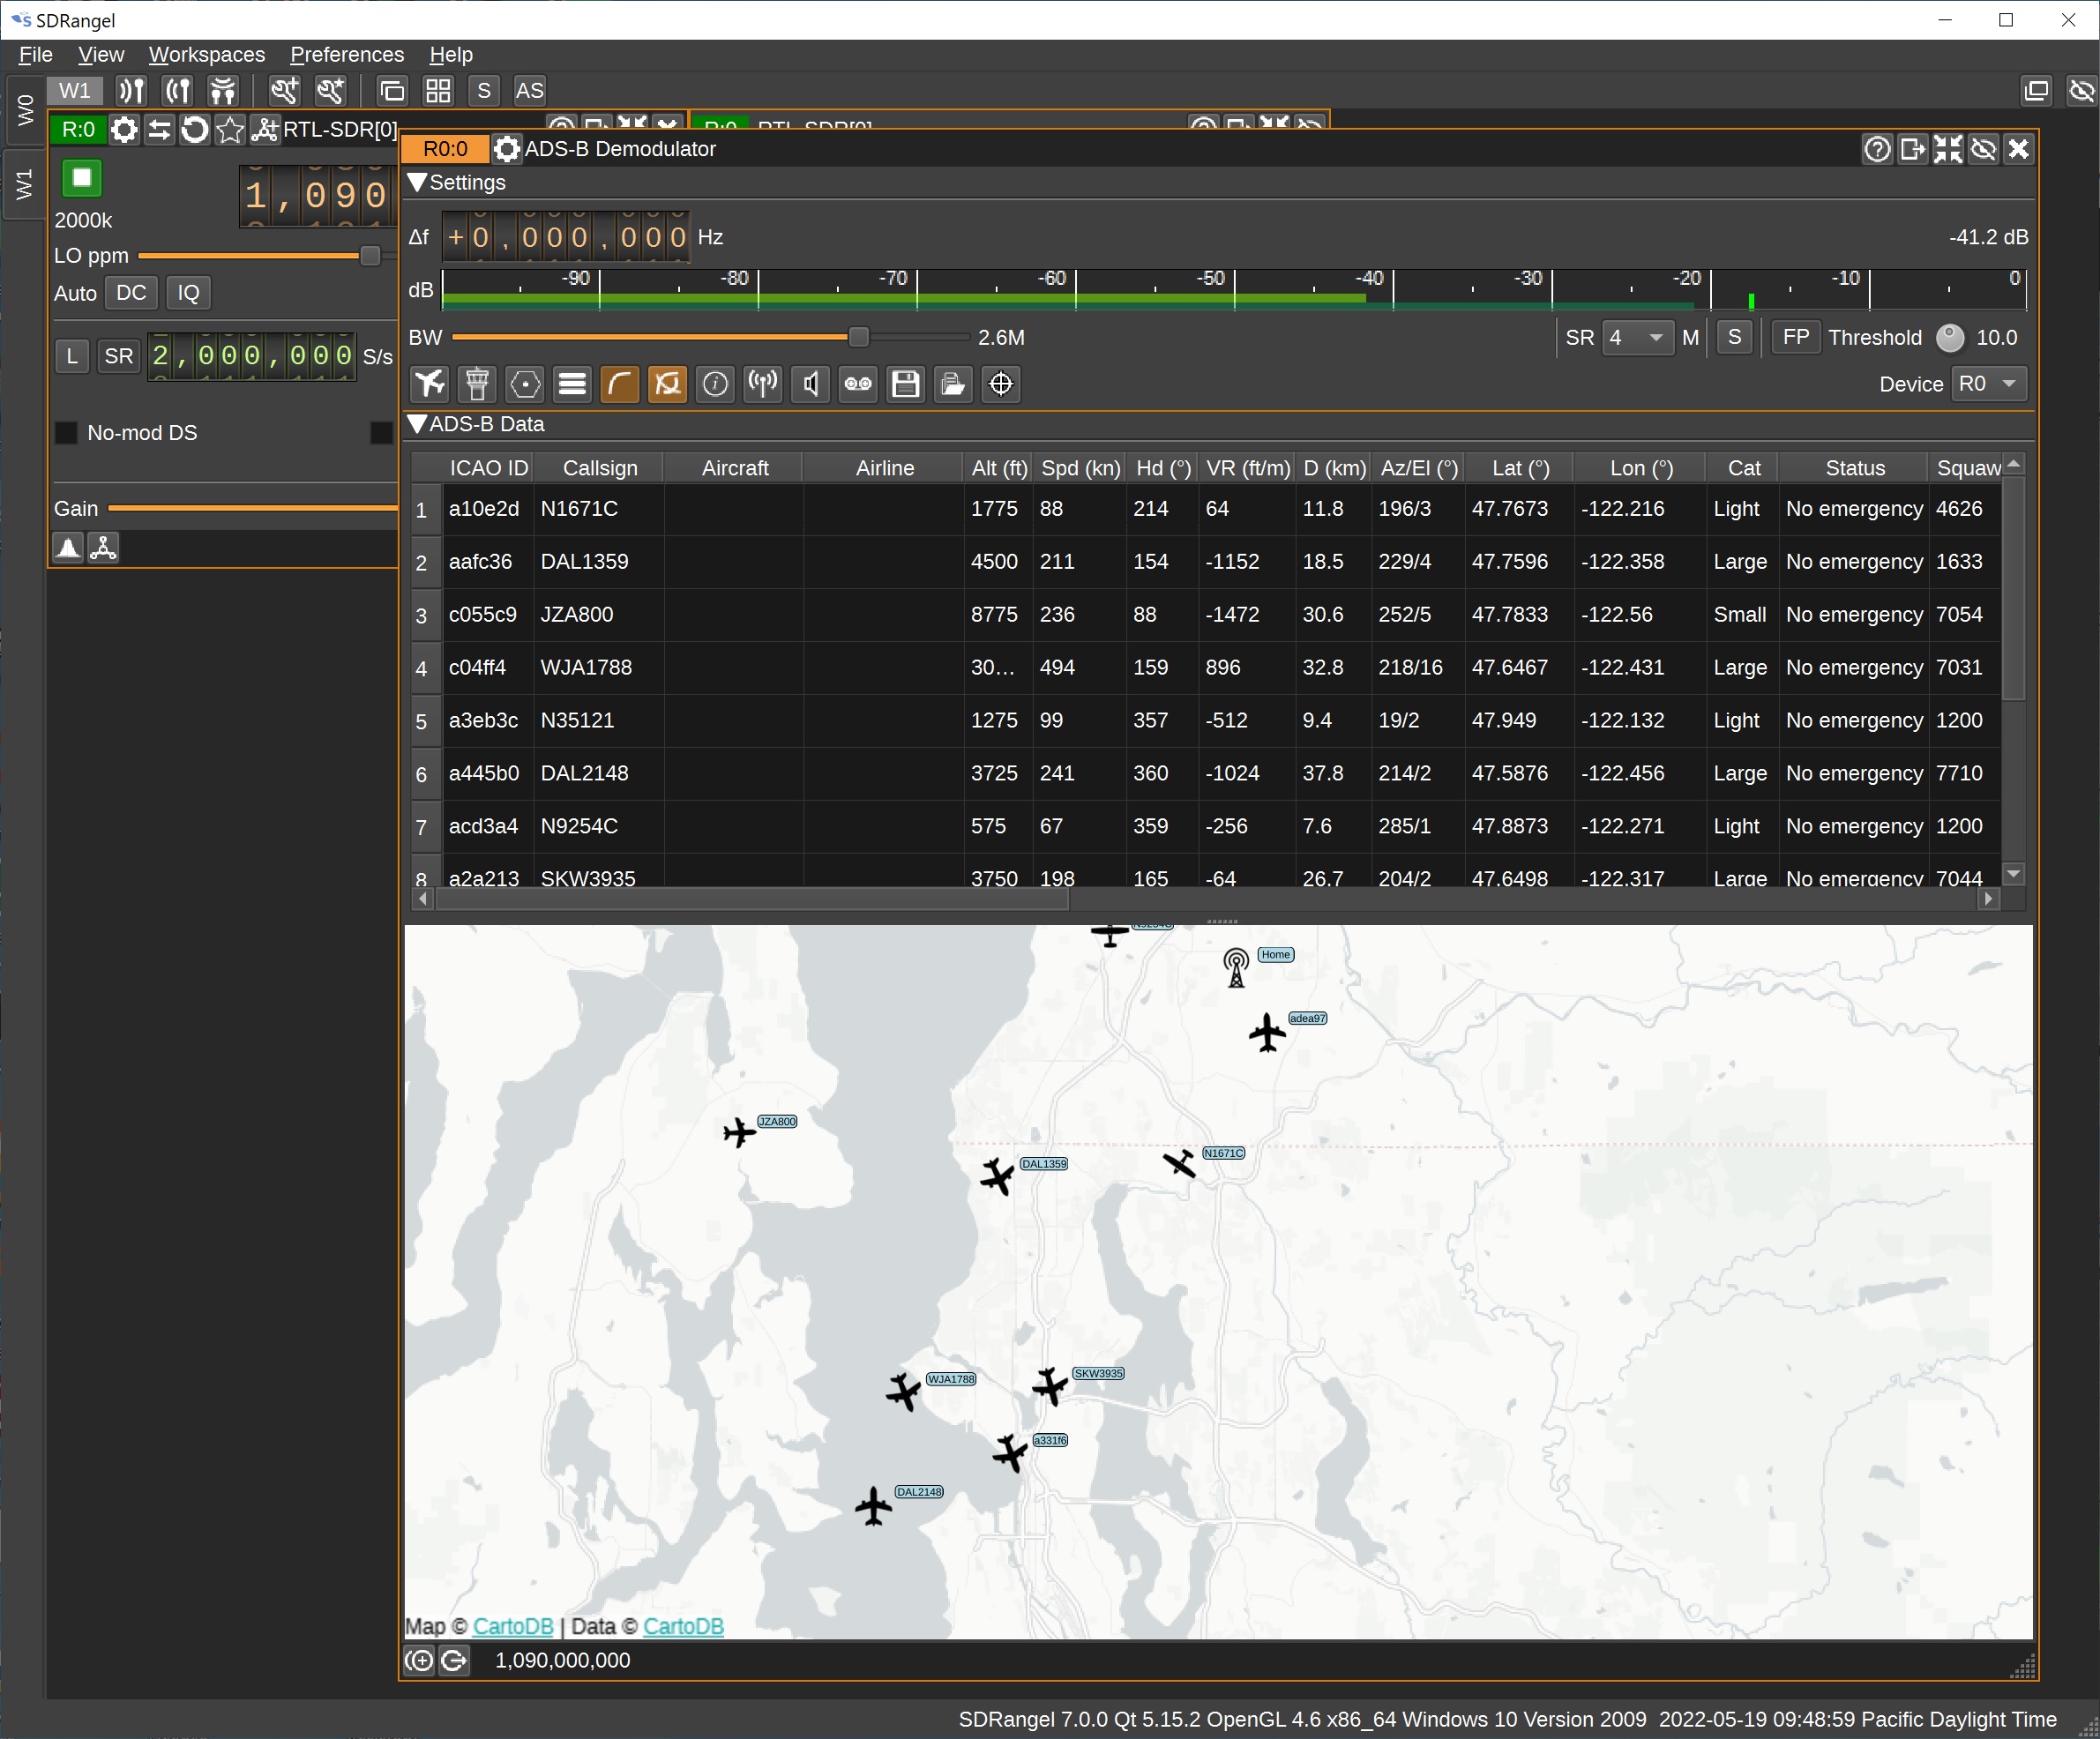
ADS-B via SDRangel (north Puget Sound/Seattle area)
SDRangel, on the other hand, requires a little bit of knowledge about the processing signal chain. First you create a workspace to hold the signal chain. Then you create a receiver to tune in a signal. Finally, you create one or more “channels” where each channel is a demodulator. SDRangel provides a wide range of demodulators (plug-ins), one of which is ADS-B.
I recommend trying an audio mode first, just to learn your way around SDRangel. I tuned in a local National Weather Service (NWS) station on 162.55MHz narrow band FM (NBFM) using the NBFM demodulator (plug-in). The NWS station is 24/7 and is fairly strong. None the less, I needed to raise the RF gain and turn off the squelch in order to hear anything. Not the same “out of the box” experience as SDR#.
Once set up, though, turning to ADS-B was a snap. I created a new workspace and put a receiver (tuned to 1090MHz) and ADS-B demodulator into it. I needed to increase the SDR sampling rate to 2,000,000 (hint: set the decimation factor to 1). If you don’t up the sampling rate, you’ll get a red warning message and no ADS-B data.
With this set-up, I can track flights in the north Puget Sound area. The antenna is indoors (house rules), but it will still see quite a few flights between the Sound to the west and the Cascade mountains to the east. I compared the SDRangel output with Flight Radar 24 and was satisfied. Because I was receiving on 1090MHz only, I am missing flights on 978MHz. More experiments to do one day. 🙂
If you’re into software defined radio and you’re looking for better HF reception, invest time in your antenna system and grounding.
I don’t have the space to string a dipole, so I’m working with a simple (random) long wire antenna. The long wire antenna is connected to an RTL-SDR receiver through a Nooelec Balun Nine One and a short length of coaxial cable. The long wire is connected to the antenna input on the balun.
Unfortunately, my early experiments with grounding did not work out very well. I tried connecting the balun ground port to various cold water pipes in the house. I do not recommend using house ground. House ground merely adds a mess o’noise to the original signal — bad, bad, bad. Thus, I left the balun ground unconnected and pressed on.
With the start of the war against Ukraine, I began monitoring HF, again, just to hear what I can hear on the left coast of North America. If you are interested in Europe and Ukraine specifically, I recommend the Wide-band Web SDR at the University of Twente in the Netherlands. Aside from radio access, there is an active chat area. Twente gets you much closer to the action.
Counterpoise
Counterpoise is a fancy name for wires or cables that substitute for an earth ground.
If you cannot connect to an earth ground, you should consider adding a counterpoise to your long wire antenna. Sounds like work, but it’s simple! Just connect another long wire to the ground side of the balun. String the counterpoise in the opposite physical direction of the long wire antenna. Done.
Consistent with my usual sleazy methods, I grabbed a 25 foot length of bell wire, twisted the pair at both ends, and connected one end to the balun ground. This quick and dirty counterpoise was good enough for +3dB or so in signal-to-noise ratio (SNR) as measured by Airspy SDR-Sharp.
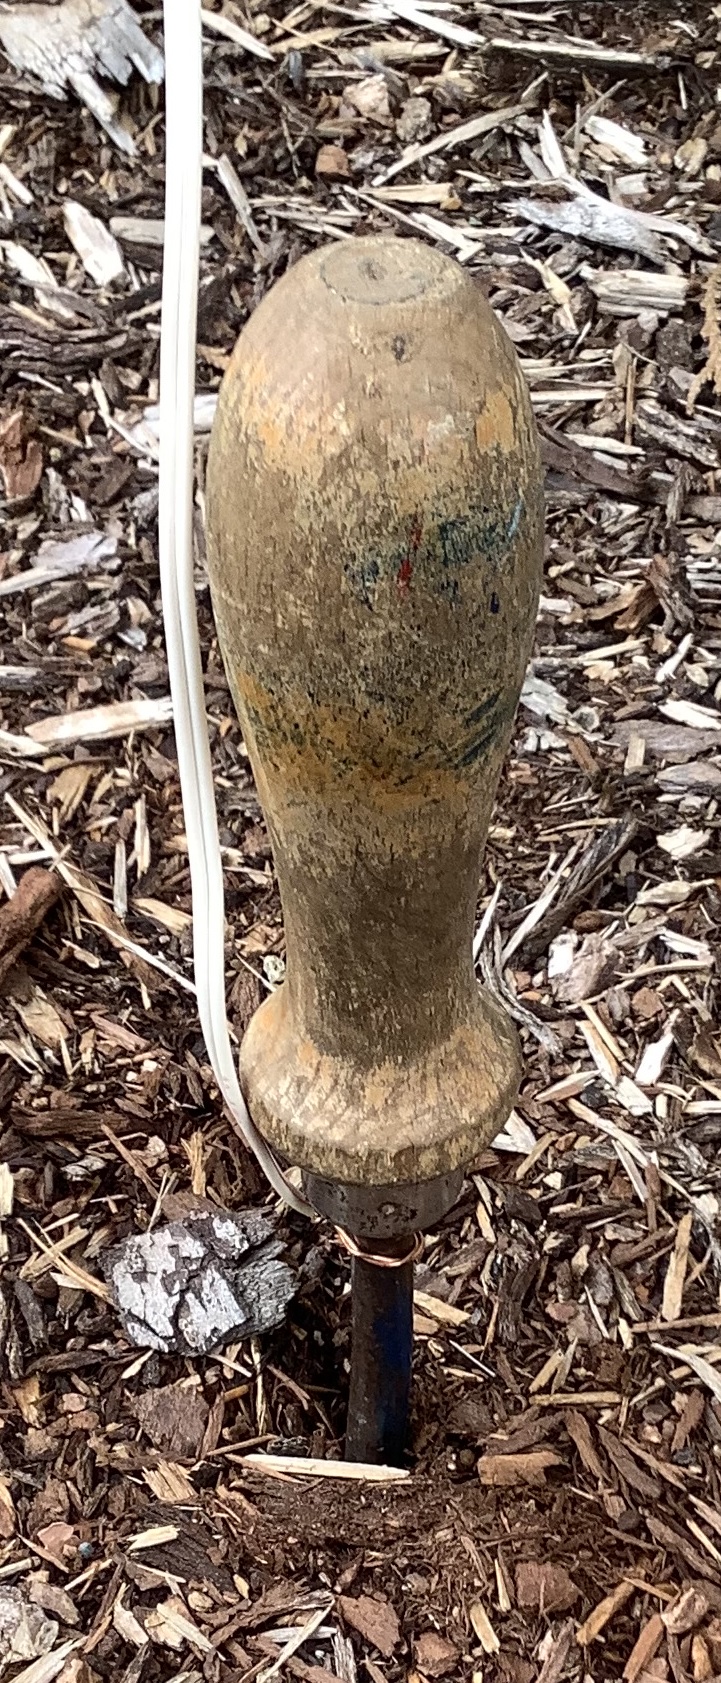
A weeder?
My studio window is about 15 feet above ground, so it made sense to drop the bell wire out of the window and connect it to earth.
Really? A garden weeder for an earth ground rod!
A good earth ground typically consists of 4 to 8 feet of grounding rod buried in the earth. I know there are drain pipes located in the ground beneath my window and frankly, planting 4 feet (8 feet!) of rod sounds like too much work. So, I grabbed a garden weeder — yes, a garden tool — and stuck it in the ground. Then I wrapped the end of the bell wire around the weeder.
This quick and literally dirty solution was good for about +12dB (or more) improvement in the SNR.
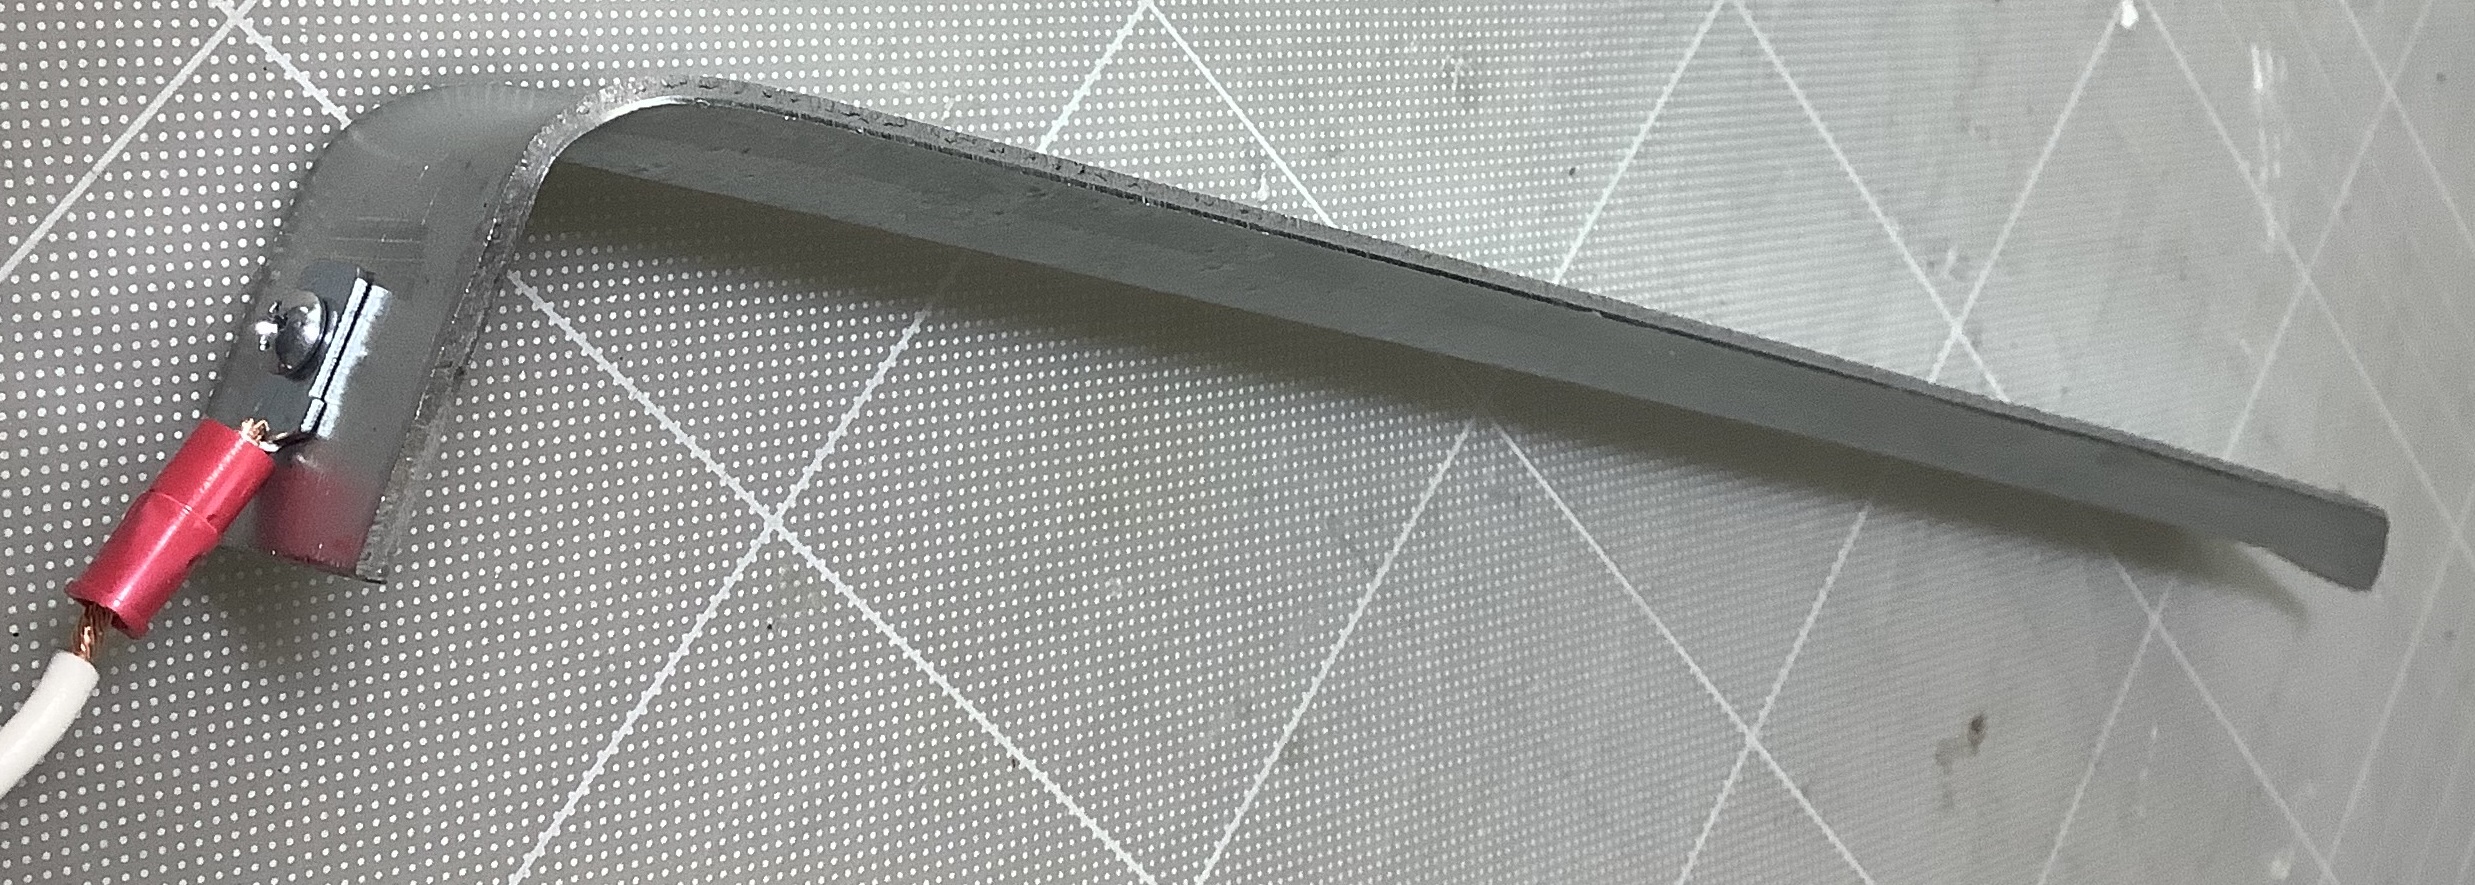
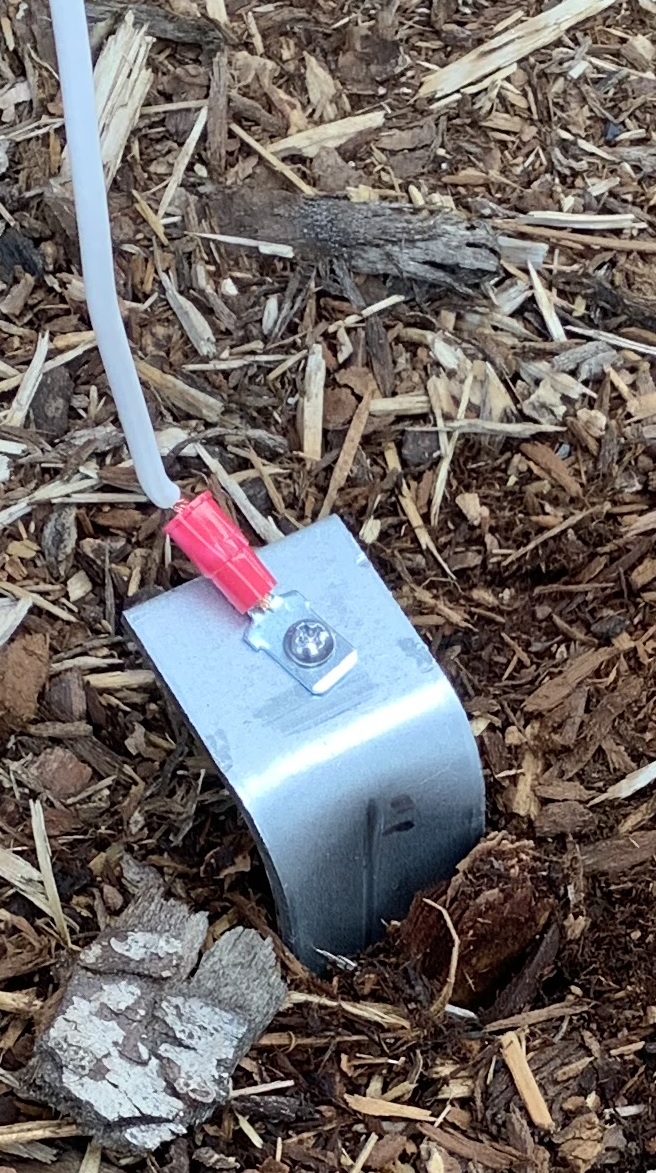
Metal edging stake
I didn’t want to expose the weeder to good old Pacific Northwest wet weather and found a cheap, simple substitute — a galvanized metal edging stake. Normally, one uses edging stakes in the garden. However, they are inexpensive and expose more surface area to the earth than a weeder. 🙂
Edging stake
I upgraded the bell wire to 16 gauge primary wire. Unfortunately, the primary wire makes it more difficult to close the sliding window into my studio. The bell wire is flatter and mushable.
Inexpensive edging stake earth ground
As to SNR, I’m getting similar results. Unless I get the gumption to drive a grounding rod, this is close enough for rock and roll. (73)
If you would like more help with software-defined radio (SDR), here are links to my earlier posts:
Success with the RTL-SDR Blog V3 software defined radio (SDR) inspired me to try SDR on Raspberry Pi. I pulled out the old Raspberry Pi 2, updated to the latest Raspberry Pi OS (Buster), and installed CubicSDR and GQRX.
Both CubicSDR and GQRX ran, but performance was unacceptably slow. Audio kept breaking up, possibly due to a small audio buffer and/or insufficient CPU cycles. The poor old Raspberry Pi 2 Model B (v1.1) is a 900MHz Broadcom BCM2836 SoC, a quad-core 32-bit ARM Cortex-A7 processor. The RPi 2 has 1GB of RAM. If you would like to know more about its internals, please read about the BCM2835 micro-architecture and performance analysis with PERF (Performance Events for Linux).
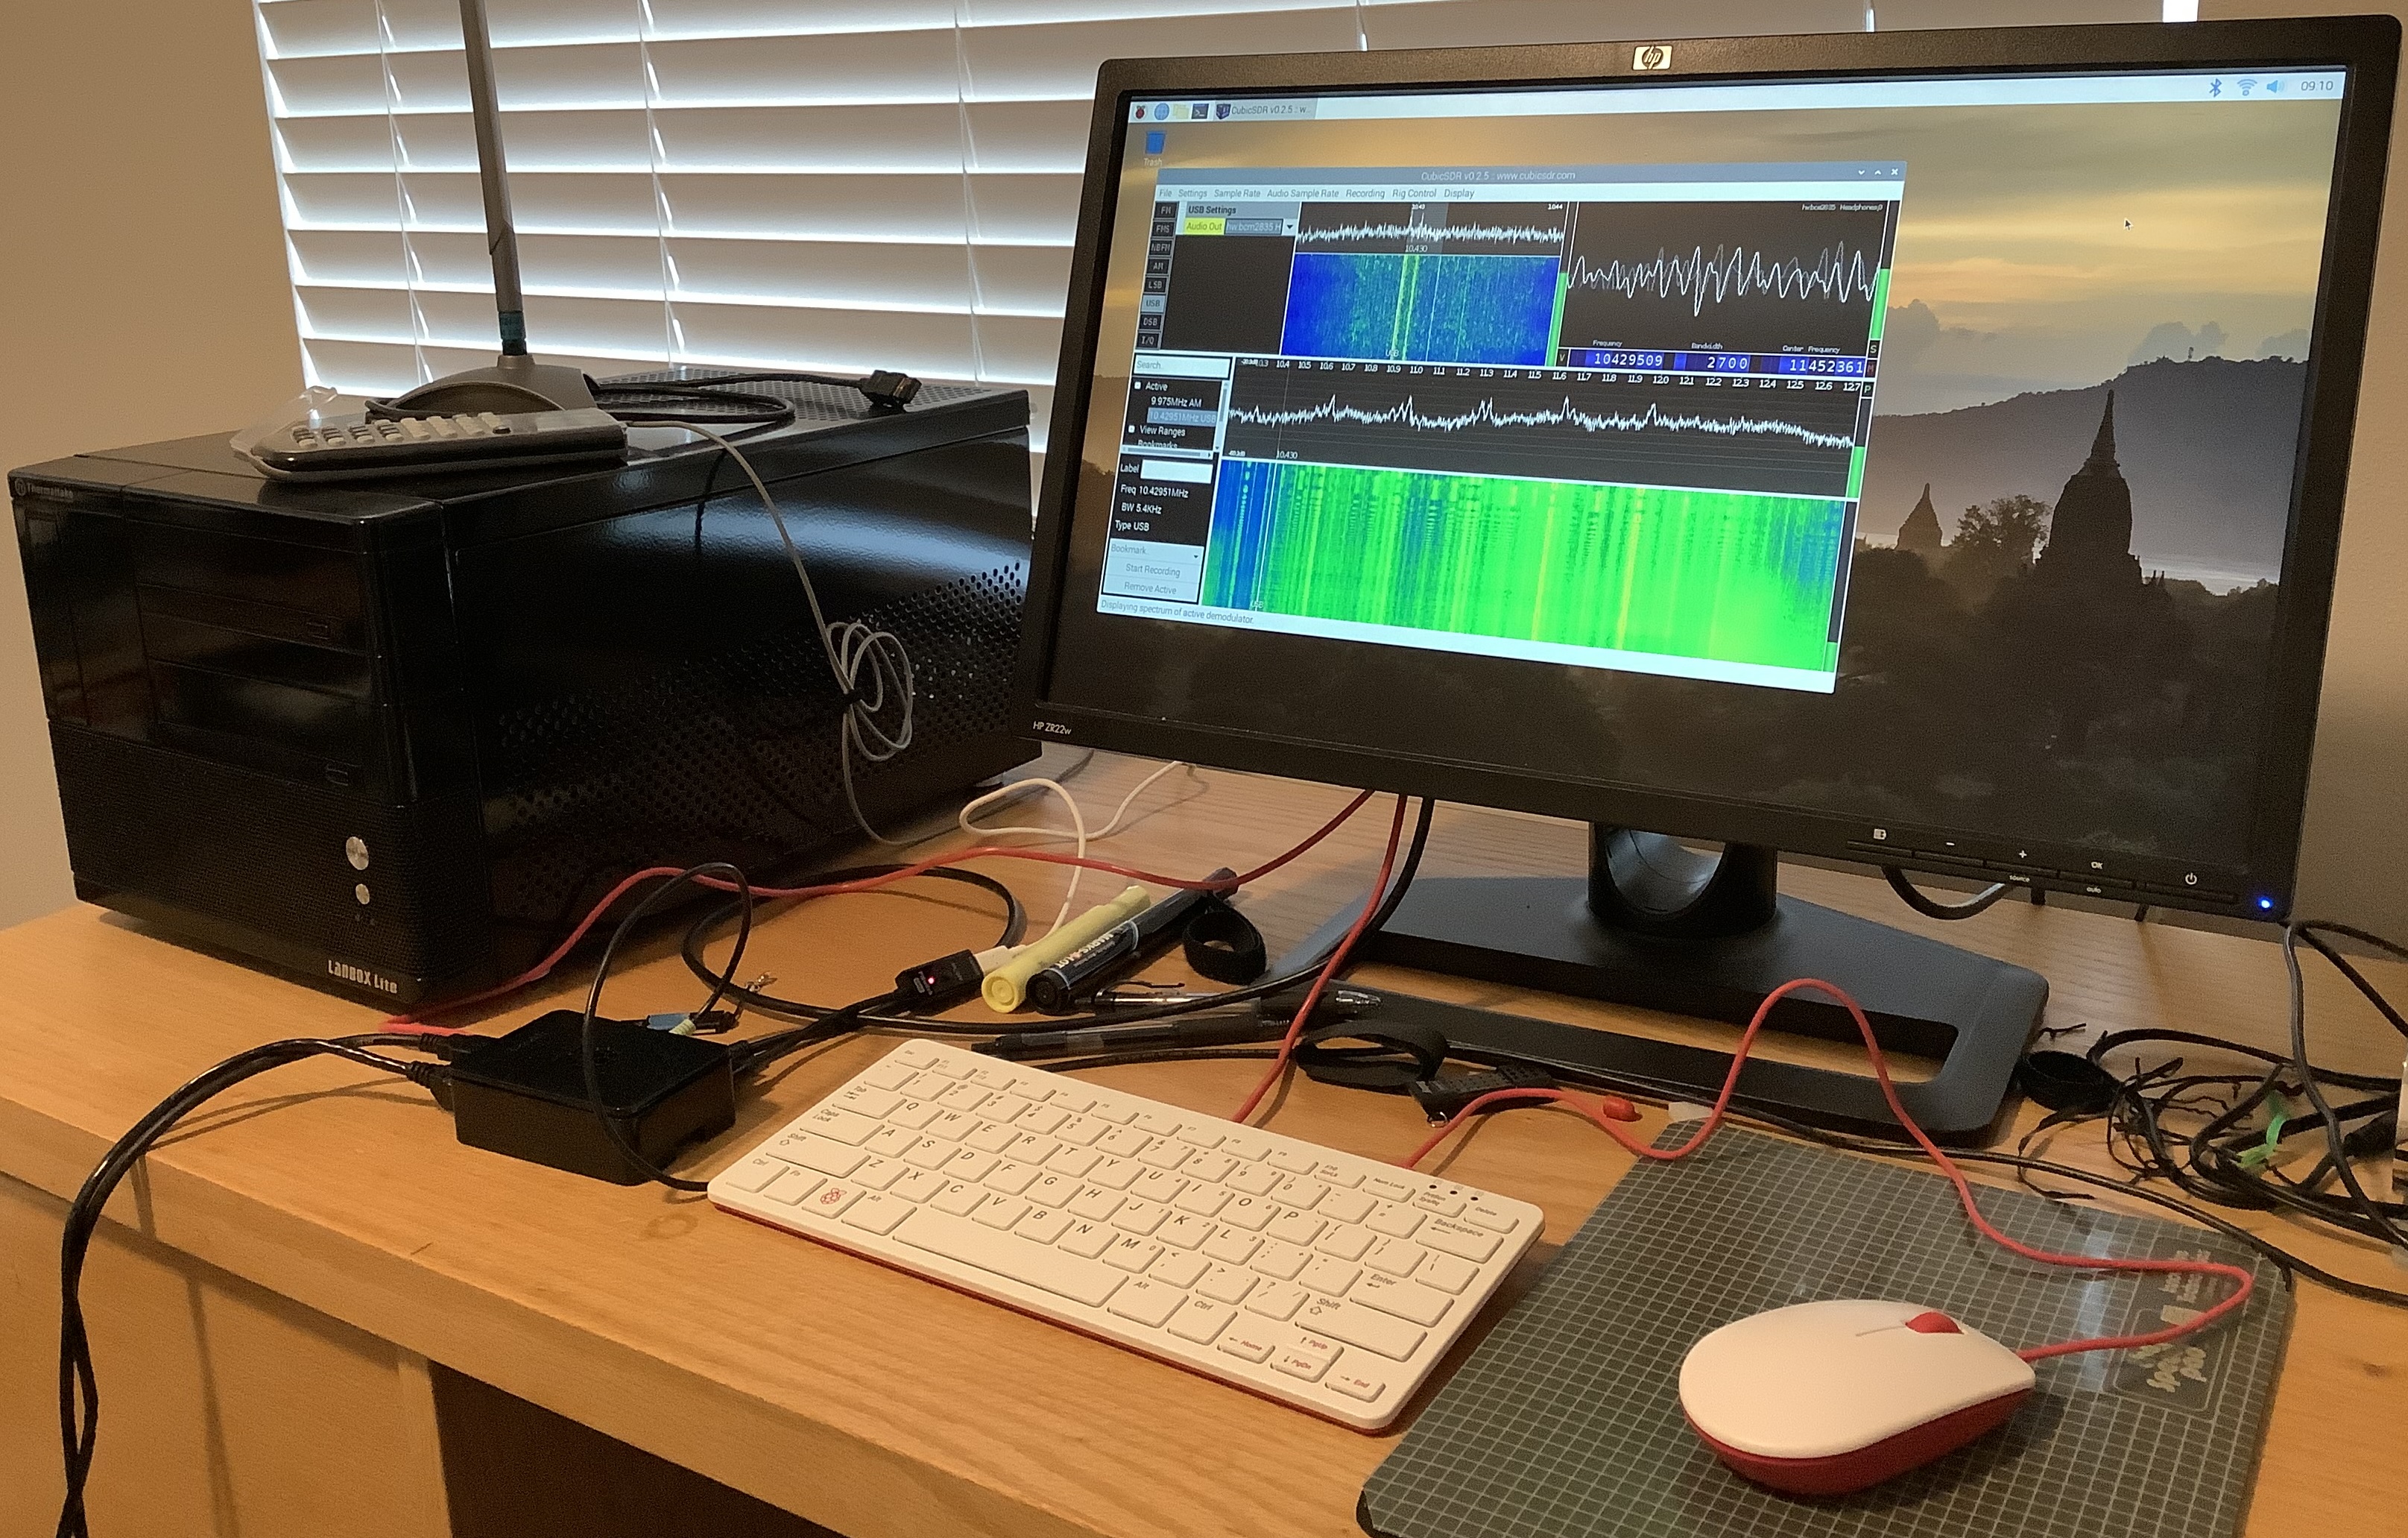
Time to upgrade! I had been meaning to retire the Black Hulk — a 2011 vintage power-sucking LANbox with a Greyhound-era dual-core AMD processor. Upgrading gives me the opportunity to try the latest Raspberry Pi 4 and gain a lot of desktop space. The image below shows my office work space including the Black Hulk and the intsy RPi 4.
Raspberry Pi 4 running CubicSDR software defined radio
I decided to accessorize a little and purchased a Raspberry Pi branded keyboard and mouse. The Raspberry Pi keyboard is a small chiclet keyboard with an internal hub. The internal hub is a welcome addition and postpones the need for an external USB hub. The keyboard has a decent enough feel. It is smaller than the Logitech which it replaces, giving me more desktop space albeit with a slightly cramped hand feel. The Raspberry Pi mouse is just OK. I like the splash of color, too, a nice break from boring black and grey.
Raspberry Pi 4 is faster without question. The desktop and web browser are snappier. RPi 4 boosts the Ethernet port to 1000 BaseT (Gigabit) and you can see it.
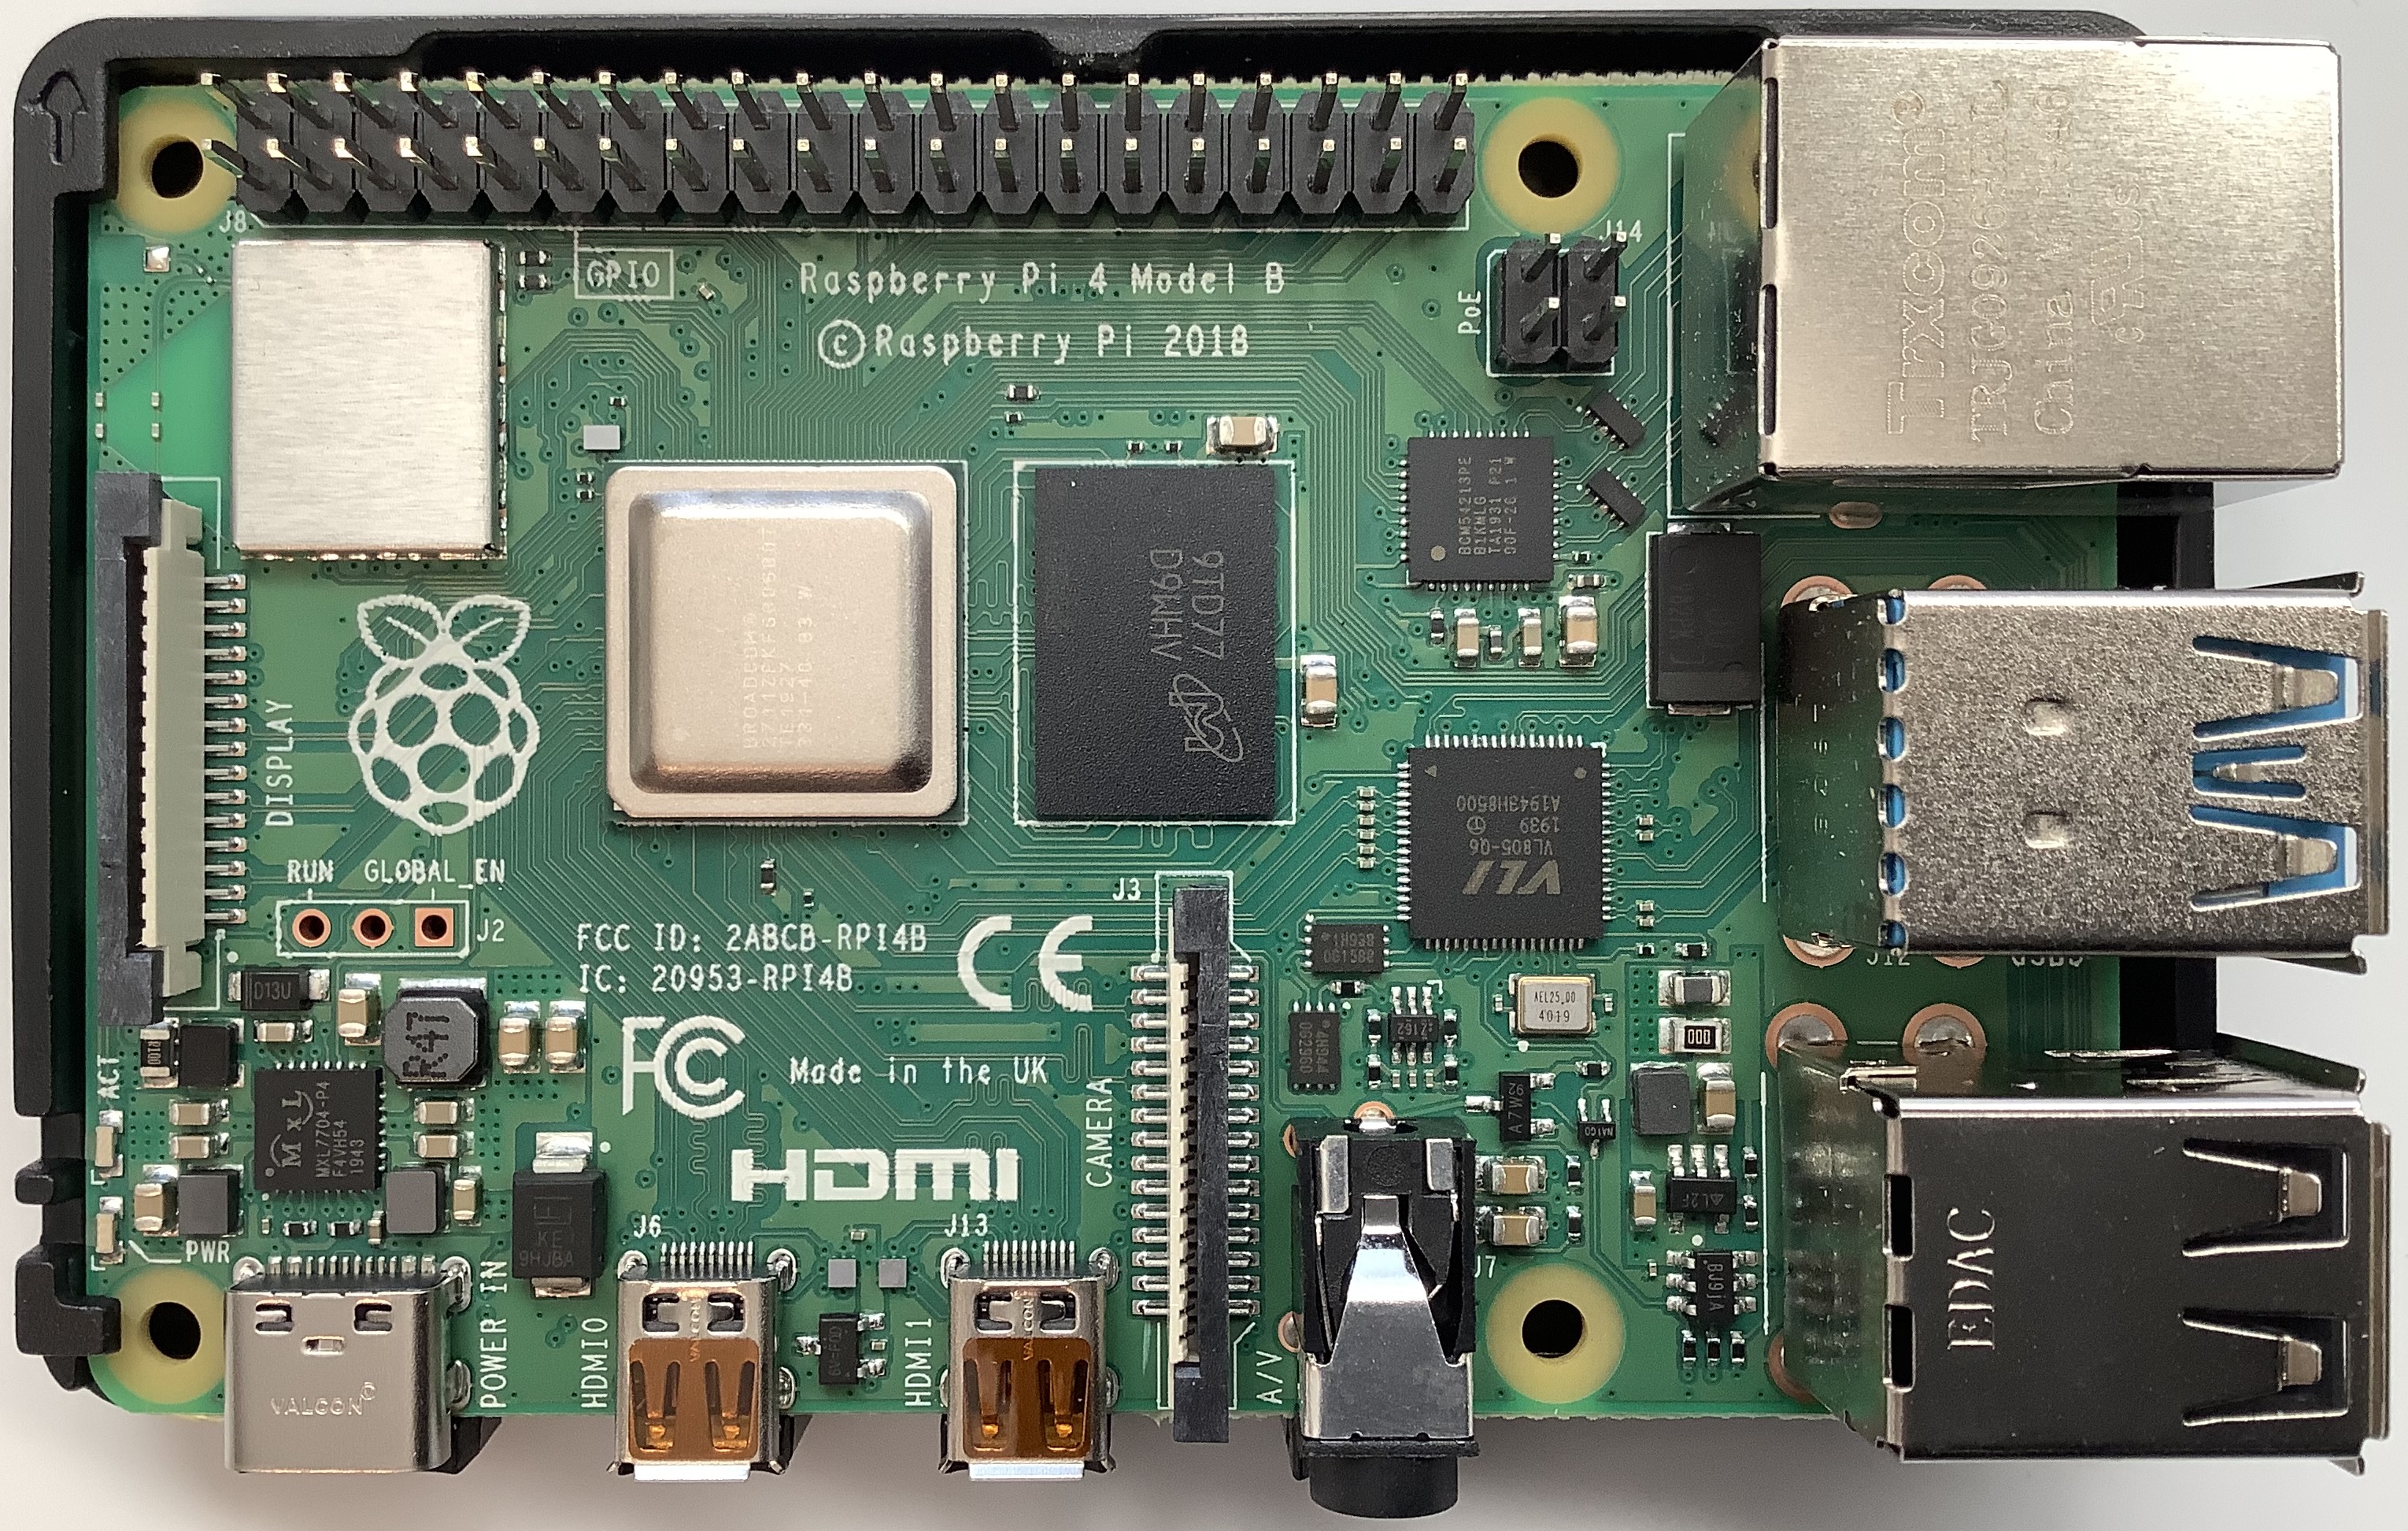
The Raspberry Pi 4 is a 1.5GHz Broadcom BCM2711, a quad-core 64-bit ARM Cortex-A72 processor. I ran an old naive matrix multiplication program and it finished in 0.6 second versus 2.6 seconds on the Raspberry Pi 2. Naturally, I’m curious about the speed-up. I hope to dig into the BCM2711 micro-architecture.
Raspberry Pi 4 PCB (Broadcom BCM2711 and 4GB RAM)
I recommend upgrading to Raspberry Pi 4 without hesitation or reservations. I bought the Canakit PI4 Starter PRO Kit at Best Buy, not wanting to wait for delivery. The kit includes an RPi 4 with 4GB RAM, black plastic case, Canakit power supply, heat sinks, cooling fan, micro HDMI cable, USB card reader, NOOBS on a 32GB MicroSD card, and a Canakit power switch (PiSwitch). It seemed like the right combination of accessories.
By the way, you might want to consider the newly announced Raspberry Pi 400. It integrates a Raspberry Pi 4 and keyboard into one very compact unit. Its price ($70USD) is hard to beat, too.
The PiSwitch sits between the USB-C power supply and the RPi4, and is a convenient desktop power ON/OFF switch. Canakit could be a little more forthcoming about proper power up and power down sequencing. When powering down, I let the monitor go to sleep before turning power off. This should give the Raspberry Pi OS time to sync and properly shut-off.
I recommend checking the connecters on your monitor before placing any kind of web order. My HP monitor does not support HDMI, doing DisplayPort, DVI-D and VGA. The Canakit cable is micro-HDMI to HDMI. I bought a mini-HDMI to DVI-D cable on-line and wound up waiting after all! No way I’m paying Best Buy prices for a cable. 🙂
Assembly is a piece of cake. The processor and case fit together without screws or other hardware. The case fit and finish is good and holds together well just by fit alone. I installed the heat sinks, but not the fan. If I run into thermal issues, I will add the fan.
I didn’t bother with the NOOBS MicroSD card as I already had Buster installed. I see the value in NOOBS for beginners who don’t want to deal with disk images and such. I will probably repurpose the NOOBS card.
The only annoyance is due to the Raspberry Pi OS package manager. The add/remove software interface shows waaaaay too much detail. I want to install CubicSDR and GQRX, but where the heck are they? Why do I have to sort through a zillion libraries, etc. when searching on “SDR”? I installed via command line apt-get — a far more convenient and direct method.
The higher processor speed and bigger RAM pay off — no more glitchy audio. After trying both CubicSDR and GQRX, I prefer CubicSDR. I didn’t have any issues configuring for HF reception in either case. You should read the documentation (!) ahead of time, however.
I hope this quick Raspberry Pi 4 rundown is helpful.
I wanted to spend more time experimenting with HF before posting a follow-up about the RTL-SDR Blog V3 software defined radio. Due to shifting ionospheric conditions and such, a 5 minute snap evaluation is no evaluation at all. Here’s the scoop after really working with the V3.
Yes, the V3 does HF — with limitations. What it does, it does surprisingly well for $35 USD.
I configured the V3 with a nooelec 9:1 V2 balun (unun) and a 23 foot (7 meter) long-wire antenna. I did a number of experiments in grounding and eventually just went with the simplest solution: long-wire to the antenna input and no ground. Electrical ground (wall outlet) was unsatisfactory and cold water pipe didn’t produce any improvement. [More on these experiments some day.] I compared the V3 against my old Drake R8 communication receiver using both long-wire (23 feet) and Datong DA270 active dipole antennas. The old Datong DA270 is long in the tooth and I got slightly better results with the long wire. The Drake is in terrific shape for its age (25 years). Wish I could say the same for myself. 🙂
The V3 tunes in quite a few stations! It took a bit of time to find my way around SDR#, trying this feature (noise reduction) and that (audio filtering). Reception-wise, the Drake has the edge, but not by much. I can easily tune the stronger shortwave stations out of Asia, for example.
The SDR# spectrum display makes a good companion to the Drake. I could pick out the most likely candidates on the spectrum display, then turn to the Drake and dial them in. Using the V3, I could tune in some weaker stations like a Honolulu weather station and the U.S. Air Force High Frequency Global Communications System (HFGCS). You haven’t done nothin’ till you hear an EAM. 🙂 The SDR# memory feature made it easy to follow an HFGCS simulcast through its primary stations. I may stick with this productive workflow in the future.
The RTL-SDR blog documentation states the V3’s limitations clearly and accurately. The V3 has an analog-to-digital converter (ADC) that samples the baseband radio frequency (RF) signal directly. Quoting the data sheet and user’s guide:
The result is that 500 kHz to about 24 MHz can be received in direct sampling mode.
Direct sampling could be more sensitive than using an upconverter, but dynamic won’t be as good as with an upconverter. It can overload easily if you have strong signals since there is no gain control. And you will see aliasing of signals mirrored around 14.4 MHz due to the Nyquist theorem. But, direct sampling mode should at least give the majority of users a decent taste of what’s on HF. If you then find HF interesting, then you can consider upgrading to an upconverter like the SpyVerter (the SpyVerter is the only upconverter we know of that is compatible with our bias tee for easy operation, other upconverters require external power).
Note that [the V3] makes use of direct sampling and so aliasing will occur. The RTL-SDR samples at 28.8 MHz, thus you may see mirrors of strong signals from 0 – 14.4 MHz while tuning to 14.4 – 28.8 MHz and the other way around as well. To remove these images you need to use a low pass filter for 0 – 14.4 MHz, and a high pass filter for 14.4 – 28.8 MHz, or simply filter your band of interest.
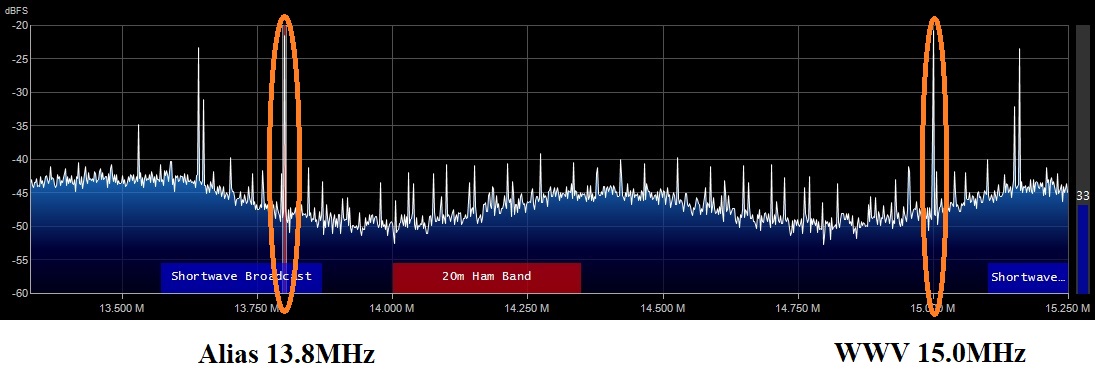
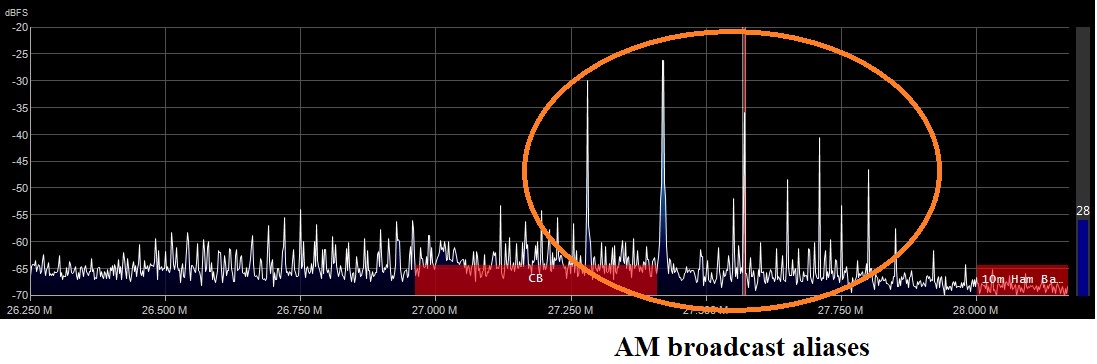
I definitely saw and heard aliases. The best example is WWV at 15.0MHz. Yep, I could tune in 15.0MHz directly. But, what’s this strong signal in the 20 meter shortwave band at 13.8MHz? It’s a WWV alias. Hmmm, 15MHz is 600kHz above 14.4MHz and 13.8MHz is 600kHz below 14.4MHz. Not a coincidence? I also found aliases of strong medium wave AM broadcast stations up around 27 to 28MHz.
SDR# spectrum display: WWV and its aliasSDR# spectrum display: AM broadcast aliased near CB radio band
So, I would say that the V3 is quite a good low-cost HF receiver, especially in the range from 2 to 15MHz, where I spent most of my time. I have an AM band-stop filter on order and hope to attenuate the strong AM broadcast stations. I did a quick survey of local transmitters and discovered three powerful stations within a few miles of my location. All transmit several thousand watts or more — enough to be troublesome. In addition to the aliasing issue, the stations may be overloading the V3 and degrading its weak signal performance. [More on this some other time.]
I find RTL-SDR’s assessment of the V3’s HF capabilities to be fair and transparent. If you’re a serious radio hobbyist, I recommend an up-converter (e.e., the nooelec Ham It Up) or an upscale SDR like the SDRplay RSP1A/RSPdx or the AirSpy HF+. The upscale models cost more, but have better HF support (no aliases, better RF front-end, etc.)
I’m good with the nooelec baluns, by the way, and have purchased a second one for the Drake R8. Rather than buy another SDR, I’m going to spend time on antennas instead. As to workflow, I like getting an overview of the spectrum via SDR and then focusing through the Drake R8. I want to try and evaluate an AM band-stop filter, too. I will post results once I get more experience under my belt. If I didn’t have the Drake R8, I would probably look into an RSPdx or an HF+ as the next step.
Based on my positive experience with the nooelec Nano 2+ software defined radio, I bought an RTL-SDR Blog V3 receiver bundle. I meant to write a quick review of the RTL-SDR Blog V3 (henceforth, the “V3”), but I wound up having too much fun with the new toys!
For $35USD, you get the USB receiver stick, a dipole antenna kit with telescoping elements, cables, a tripod and a suction mount. The V3 uses SMA connectors everywhere. In comparison, the nooelec Nano 2+ bundle includes a small magnetic mount telescoping antenna and uses tiny MCX connectors.
RTL SDR Blog V3 Software Defined Radio bundle
If you want to mix and match components between bundles, you will need adapters. SMA connecters thread onto each other and provide a more firm and reliable connections than MCX. On that basis, I give the V3 points.
Further points go to V3 for its build quality. The V3 is somewhat larger, but the electronics are mounted in a metal (shielded) case. The case is also the heat sink. If you want metal shielding in the nooelec line, you should purchase the nooelec Nano 3. Both the V3 and Nano 2+ run warm, so heat dissipation is important.
Both units make adequate low-cost VHF/UHF receivers when used with their respective bundled antenna system. If you’re most interested in broadcast FM or aircraft band, you can’t go wrong either way. I give the V3 points for the option of HF reception and the ability to tune antenna length for the radio band to be monitored. You can see the effect of tuning with your own eyes. Dial in a weather station, for example, and adjust the antenna elements. You’ll see the signal increase and decrease in strength as you change element length.
Tips: The V3 antenna system is a dipole, so you need to make both elements the same length. Divide the frequency (in MHz) into 468 to get the total antenna length (in feet). Then divide the total length by two to obtain the length of each element. Pop the cap on the central Y junction and find the element which is connected to the coax shield. Orient the shield-side element down towards the earth.
So far, the V3 is winning on points. Then consider HF. The V3 receiver is HF capable, but you will need to build or add an HF antenna. This is where life gets a little bit tricky. Short story — Yes, the V3 receives HF. I’ll save the longer story for a future blog post.
Bottom line. If you are only interested in VHF/UHF, then either unit will do the business. If you prefer a magnetic mount antenna, go with a nooelec Nano bundle. If you want to optimize tuning for a VHF/UHF band, then go with the V3 bundle. If you want to get your feet wet with HF and don’t want to spend a lot of money, then pick up the V3 bundle, a nooelec balun and at least 23 feet of wire.
Even though the V3 won this match-up, nooelec won my respect as a solid citizen. They make the Ham It Up HF up-converter which adds HF reception to a VHF/UHF only SDR. Based on my experience with the Nano 2+, I would give the Ham It Up a try without trepidation.
One side-benefit of unpacking after a move is getting reacquainted with old electronic gear, in this case, a Drake R8 shortwave receiver. HF is definitely alive, but it whet my appetite for more listening, more action.
Rather than pull out the old Radio Shack 2006PRO — another old acquaintance — I decided to give software defined radio (SDR) a try.
Like everything else electronic, VLSI digital signal processing revolutionized radio design. Smart folks realized that the RTL2832U chipset could be repurposed into a wideband SDR receiver. The RTL2832U chipset was originally designed as a DVB-T TV tuner and repurposing it is a spiffy hack!
Even better, the RTL2832U SDR is dirt cheap. Why spring for a $300 ICOM when you can buy a dongle for about $25USD? There are “high end” solutions such as the Airspy R2 ($169USD) or SDRPlay RSPdx ($199USD). The Airspy HF+ Discovery extends coverage to HF (0.5kHz to 31MHz) for $169USD. Mid-range solutions include the Airspy Mini SDR ($99USD) and SDRPlay RSP1A ($109USD) among others. If you’re interested in adding HF, the Nooelec Ham It Up up-converter ($65USD) is an option.
Cheapskate that I am, I believe in the low-end theory — how much can I do with the least amount of money. 🙂 Thus, I chose the Nooelec NESDR Nano 2+ for $24. The original Nooelec Nano had a reputation for running hot. The Nano 2+ mitigates heat dissipation; the newer Nano 3 ($30) has a metal case/heatsink.
nooelect Nano 2+ Software Defined Radio
I went cheap. Yes, the Nano 2+ gets warm to the touch, but not to the level of concern. An x86 running full tilt is HOT — not the Nano 2+. It doesn’t run much hotter than my vintage Datong AD270 active antenna.
For software, I installed SDR#. The “sharp” comes from C#, the implementation language. There are many good getting started guides on-line. I especially like:
There are several more software options out there like CubicSDR. I chose SDR# because it has a number of useful plug-ins including a frequency manager/scanner.
The Nano 2+ is the size of a USB flash drive. The low-cost Adafruit dongle is similar, but it’s out of stock. The Nano 2+ is a nice replacement. The Nano 2+ is bundled with a tiny magnetic-mount telescoping antenna which is good enough for VHF/UHF. I placed the mag-mount on a small electrical junction box cover which provides a more stable base.
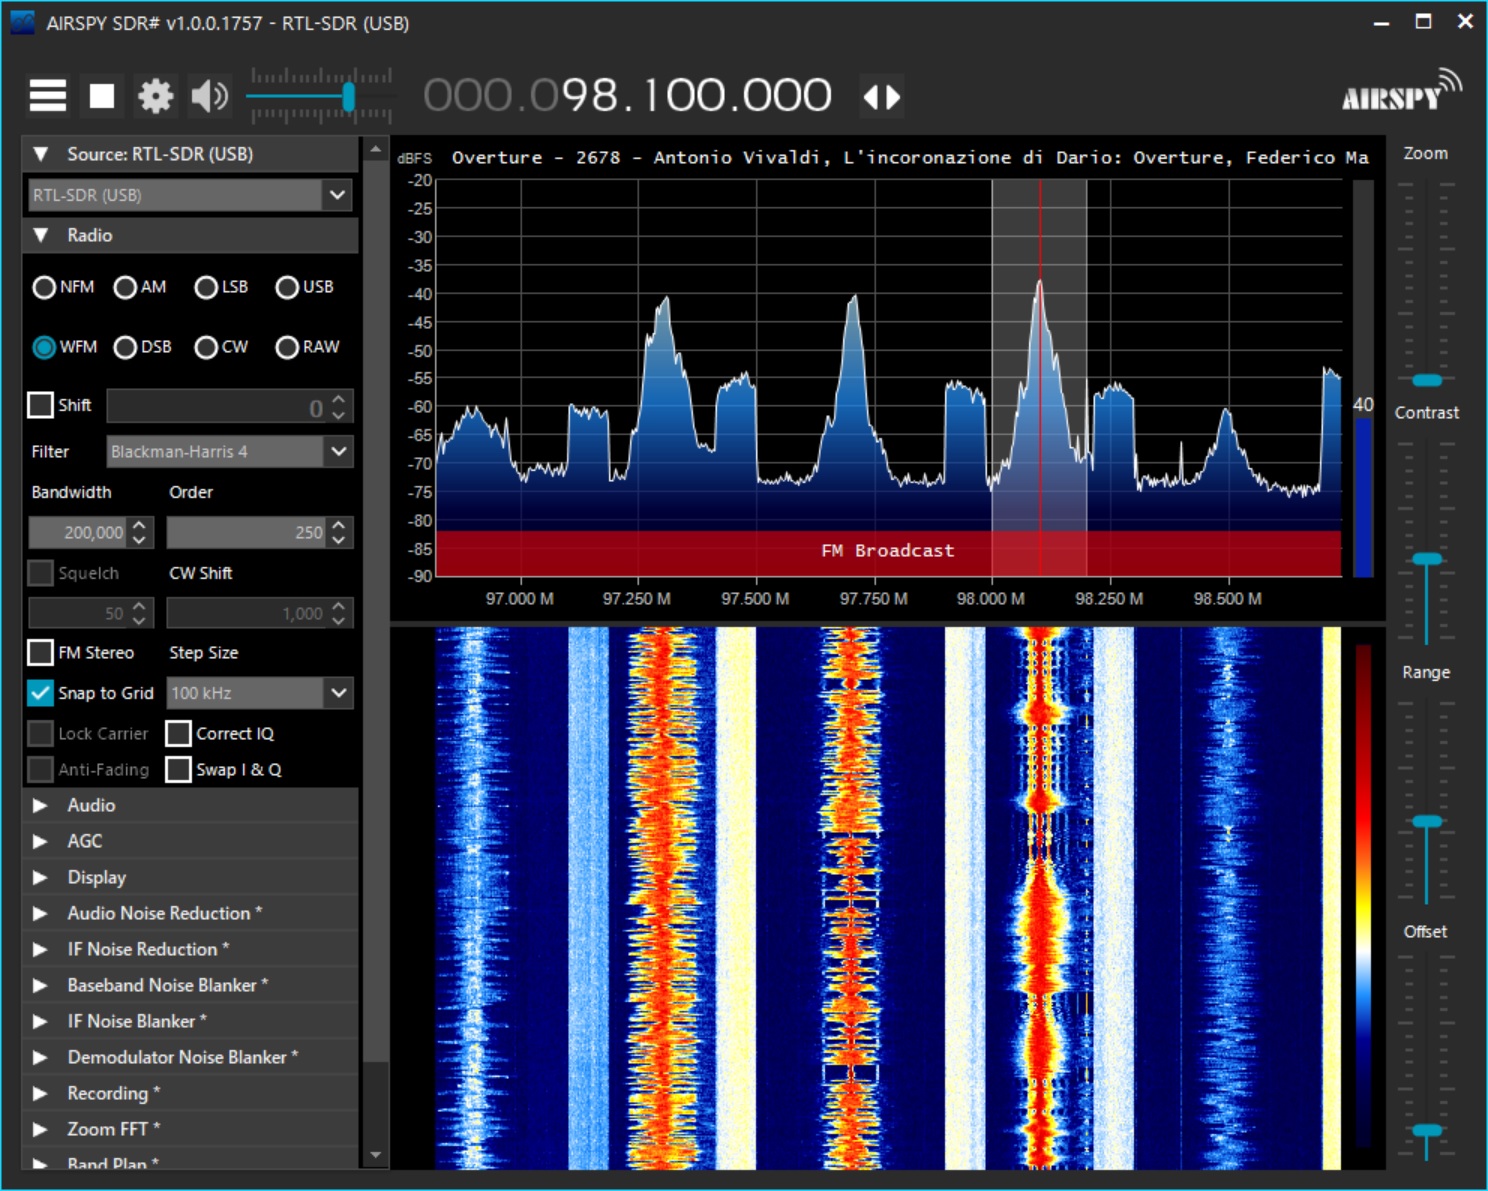
FM broadcast via SDR# and Nooelec Nano 2+ software defined radio
Follow the on-line guides! RTL SDR is quite mature for “hobby” software. I tuned in FM broadcast literally within minutes.
Based on this short experience, I splurged for an RTL-SDR Blog V3 receiver and antenna bundle ($35USD). The V3 has a metal enclosure and enables HF reception through direct sampling. The bundle includes a dipole antenna with a variety of mounting options. I believe that the innards of the dipole antenna can be adapted for HF, but decided to buy a Nooelec Balun One Nine V2 ($15), too. The balun can be used as an unun in order to match impedance with a long-wire antenna.
I also recommend a set of antenna adapters. The Nooelec Nano 2+ uses an MCX antenna connector and the V3 uses an SMA connector. So, if you want to mix and match components, be prepared with adapters.
HF for $35? I can’t vouch for receiver sensitivity, etc. at this point, not having received the V3. The potential, however, is amazing. If you’re good with just VHF and UHF, then give the Nooelec Nano 2+ a try.