I’m trying to recreate the experience of playing the new Yamaha CK keyboards with MODX. A bird in the hand is worth two in the bush…
I received a few comments and ideas that are worth passing along. All of the basic principles and sonic DNA are applicable to Genos and PSR, I might add.
First up, what makes a good overdrive or distortion? My colleague Uli is pursuing a similar investigation and he is using an Electro Harmonix Lester K as a reference. Using a reference sound is a super idea.
So, I dug into my old bag of tricks — literally. I have four different references on hand:
ART Tube MP
Electro Harmonix Lester K
Behringer GDI21 guitar preamp
Fender Super Champ xD modeling guitar amp
As yet, I haven’t tried the Super Champ xD because it is a solid state and tube hybrid. I will need to find a way to isolate the effect of the 12AX7/6V6 power stage. That experiment will likely require high volume and there’s only so much my poor ears can take! [Be sure to protect your ears.]
I bought the ART Tube MP mic preamp a zillion years ago. Tube MPs are still inexpensive going for roughly $100 USD. I used the Tube MP to warm up the sound of my old Nord Electro 2, trying to file the edge off of its digital sound.
The Tube MP is really intended as a mic preamp having a 12AX7 vacuum tube gain stage. If you crank up the gain, you can hit the 12AX7 pretty hard and get gobs of distortion. The Tube MP distortion gradually increases with gain and is warm and smooth. By “smooth”, I mean distortion which is not grainy or fizzy. To me, grainy distortion has an uneven clickiness to it, like a fast-ticking geiger counter instead of an old analog TV receiving the sounds of the universe. [Really.]
That said, the Lester K overdrive — a digital simulation — is not bad. The Lester K overdrive gets good reviews and deservedly so. The Lester K overdrive has a pleasing smoothness.
The Behringer GDI21 is sometimes disparaged as a copy of the Tech21 SansAmp. Compare schematics and you will find differences. The GDI21 uses a pair of JFETs to simulate a tube preamp (12AX7).
Both GDI21 and SansAmp emulate the input stage and power amp effects of a guitar amp. There are lots of variations to dial in, but you pretty much get three flavors: Fender Tweed, Mesa/Boogie high-gain and British lead. Maybe the GDI21 is authentic on guitar, but I didn’t care for its sound when applied to drawbar organ. The Tube MP and Lester K are better references, IMHO.
Given all that, what is my favorite MODX (Genos) amp sim (or whatever) for overdrive? Here are my top three picks:
SMALL STEREO (Preset: Overdrive)
US COMBO (Preset: Rich clean)
BRITISH LEAD (Preset: Dirty)
Judging from its distortion parameters, the SMALL STEREO is part of the MULTI FX pedal board chain. Thus, if you want to slap pedal effects on a drawbar organ, MULTI FX is a good way to go, giving you a pedal or two for free along with the amp sim. Uli is experimenting with chorus, too, and is giving MULTI FX a try.
The presets mentioned above are just starting points. Check out other settings in Part 3.
I grew up with the sound of 1960s Fender and that’s probably why I have a fondness for the US COMBO. I always wanted a Fender Twin Reverb (or Bassman) as a kid. Well, THAT dream never came true. [Might as well add a Vox Continental to the list of broken dreams, too.] 🙂 Twin and Bassman amps were the weapons of choice for combo organ back in the day.
The BRITISH LEAD conjures the sound of Wakeman, Emerson and others. Nuf said.
Yamaha Genos and PSR-SX900 arranger workstations have a feature called “Chord Looper”. Chord Looper records your left hand chords and saves them in a memory slot. (8 slots per Chord Looper bank.) Once recorded and saved, you can play back the chord progression and play over the changes. Neat.
Obviously, one way to enter a chord progression is to play it in. Let’s say, that the chord progression is long and has jazz chords like the Coltrane changes (AKA “Giant Steps”). These changes are notoriously difficult to solo over because the changes come fast, furious, and in three different scales! On top of musical difficulty, Chord Looper does not allow edits. Make a mistake and you need to record the entire sequence over again. So, folks are looking for ways to create and edit Chord Looper progressions.
Chord Looper CLD files
Fortunately, Chord Looper let’s you import and export individual chord progressions (i.e., a slot). Chord Looper exports a progression into a file with the CLD extension. Henceforth, I will call these files “CLD files”.
A CLD file is actually a Type 0 Standard MIDI File (SMF) in disguise. You can examine (or possibly edit/create) a CLD file by renaming the extension to “MID”. Once renamed, conventional software tools (Cubase, SONAR, etc.) will recognize the renamed CLD file as a Type 0 SMF and import it.
A CLD file recorded by Chord Looper is very simple inside. It contains a sequence of Yamaha XF chord events, one event for each chord change. Here are the metadata events for a simple progression (C-Am-F-G) played in by hand:
Chord Symbol   1.1.1.0     Metadata    Chord:  C/C
Chord Symbol   1.4.4.112   Metadata    Chord:  Am/A
Chord Symbol   3.1.1.34    Metadata    Chord:  F/F
Chord Symbol   4.1.1.40    Metadata    Chord:  G/G
Each event specifies the chord root, chord type and alternate root bass. That’s it! A CLD file does not contain any other kind of event (notes, controller, time signature, tempo, etc.)
Each chord is a Yamaha XF Metadata chord event. The event time is the time of the chord event, i.e., when the player changed the chord and Genos recognized the chord. In the example above, the chord was changed at the beginning of each measure (sometimes a little early, sometimes a little late).
Chord STEP EDIT to CLD
Folks on the PSR Tutorial Forum have found a few ways of creating CLD files using existing software tools. Flip over to the forums and check out some of the Chord Looper threads.
Here’s a new method!
Yamaha arrangers have long supported a basic MIDI sequencer and editor. Like many software editors, the Yamaha sequencer supports step edit, letting you enter notes, control events, etc. with precise timing. One better, the Yamaha sequencer supports Chord STEP EDIT through which one can easily enter a chord sequence from a lead sheet into a separate chord track.
Thus, it’s possible to enter a chord progression easily using STEP EDIT and save the progression in a Type 0 Standard MIDI File. Initially, the progression is stored in a special part (Cds chunk) within the SMF. DAWs and so forth ignore the special proprietary data and typically delete it when writing the file back to MIDI. This kind of Chord STEP EDIT data does not contain the Yamaha XF chord events needed by Chord Looper. If you import one of these files into Chord Looper, Chord Looper comes up empty.
Once you EXPAND the step edit chord sequence, however, the expansion process creates Yamaha XF chord metadata events along with the notes and other MIDI events for the accompaniment parts. That’s the normal compositional process anyway — step edit the chord part, expand the chord part using the selected style, and save the expanded file as a Standard MIDI File.
One fly in the ointment. The Yamaha arranger software hides file extensions. This streamlines user workflow, but it inhibits interesting experiments! So, save the expanded MIDI file to a USB flash drive, take the flash drive to a personal computer, and rename the expanded SMF. Replace the “MID” extension with “CLD”. Copy the CLD file to the flash drive and reinsert the flash drive in the arranger workstation.
Import the newly renamed CLD file into Chord Looper. Voila! Chord Looper scans the file and produces a chord progression using the embedded Yamaha XF chord events. If you export the progression as a different CLD file, the exported data includes all of the other MIDI data, e.g., notes, etc. [I wouldn’t count on Chord Looper always doing this; software subject to change by Yamaha.)
Bottom line: If you pine to create and edit Chord Looper progressions with precision, use Chord STEP EDIT to create the progression, expand the backing, save as a Standard MIDI File, replace the file extension with CLD, and import into Chord Looper. Of course, you need to rename the MID file to a CLD file using a personal computer, but that’s a small hassle. Give it a try!
I tested this procedure on Genos with the Coltrane changes. Once the progression was captured in Chord Looper, I could try different tempos and different styles. Those changes do come fast and furious indeed!
The ChordPro to Yamaha auto-accompaniment program, cp2mid, translates an extended ChordPro song file to a MIDI file containing Yamaha-compatible auto-accompaniment messages. The MIDI file is compatible with recent mid- and high-end Yamaha arranger workstations like Yamaha Genos™. Once you transfer the MIDI file to the arranger, it plays like any other Standard MIDI File (SMF). Instead of directly playing notes, however, it tells the arranger’s auto-accompaniment engine what to play: the style, the tempo, the chords and the section (intro, main, fill in, or ending). The arranger displays chords and lyrics in sync with play-back.
What can you do with ChordPro auto-accompaniment? Here’s a few ideas.
Play along with a song from the Web
ChordPro is one of the most widely used song formats on the Web. Pros and punters alike use ChordPro as shorthand lead sheets. You’ve probably seen formatted ChordPro songs like:
 G      G7          C         G
Amazing Grace! (how sweet the sound)
                         D
That saved a wretch like me!
  G        G7        C      G
I once was lost, but now am found,
    Em         D     G
Was blind, but now I see.
Presumably, a musician is already familiar with the song’s tempo and melody, needing only to follow and change chords in time.
In extended ChordPro, the chords are embedded within the lyric text:
[G]Amazing [G7] Grace! (how [C] sweet the [G] sound)
That [G] saved a [G]wretch like [D] me! [D]
I [G] once was [G7] lost, but [C] now am [G] found,
Was [Em] blind, but [D] now I [G] see. [G]
Chords are surrounded by square brackets. Here, we assume each chord is held for a single measure. Songs on the Web are very loose (flexible!) about time. Auto-accompaniment, however, is precise. You will probably need to tighten up timing when using a song file from the Web.
You’ll also see ChordPro directives in song files:
You’ll want to add the time signature, tempo, stylecode, and start_accomp directives to the song. The stylecode directive selects one of the hundreds of built-in arranger styles. (A convenient list of codes is included in the distribution.)
You can always leave out the stylecode and select the accompaniment style on the arranger keyboard itself. You can choose one of the preset styles or user styles. Thus, you can try out different arrangements or use a style of your own design.
Finally, extended ChordPro allows annotations which select an accompaniment section like an intro, main, fill-in or ending. Here is “Amazing Grace” ready to go:
# Verse [G][*MA] Amazing [G7] Grace! (how [C] sweet the [G] sound) That [G] saved a [G]wretch like [D] me! [D][*FA] I [G][*MA] once was [G7] lost, but [C] now am [G] found, Was [Em] blind, but [D] now I [G] see. [G][*FA]
# Ending [G][*EA]
Don’t forget to turn on the Lyric or Score display. Song chords and lyrics are displayed during play-back.
Jam
Auto-accompaniment is a tireless band! Plug in some chords and play along.
Here is a fast blues shuffle. Copy and paste the 12-bar sections as many times as you like. Change the accompaniment sections to build up energy as the tune progresses.
Experiment with different intros: [*IA], [*IB] or [*IC]. Try different endings: [*EA], [*EB] or [*EC]. An intro or ending will follow the preceding chord as if you played it on the keyboard itself. Generally, the A variations are one measure long. Length of the B and C variations depend on the chosen style. You will need to specify the root chord for each measure in order to keep play-back in sync.
Write a song of your own
Why not write a song of your own? Yamaha’s built-in Chord Step Edit is too detailed and clunky for songwriting. Use cp2mid instead.
[Cm7][*MA] My baby left me. [Cm7] [Cm7] Now I'm all alone. [Cm7][*FA] [Fm7][*MA] My baby left me. [Fm7] [Cm7] And I'm all alone. [Cm7][*FA] [Ab7][*MA] I still love her, [G7] [Cm7] Won't answer the phone. [Cm7][*FC]
[Cm7][*MB] It's about money, [Cm7] [Cm7] I know it's true. [Cm7][*FB] [Fm7][*MB] It's about money, [Fm7] [Cm7] I know it's true. [Cm7][*FB] [Ab7b5][*MB] Can't keep a job, [G7] [Cm7] I am so blue. [Cm7][*FC]
[Cm7][*EA]
It’s easy to change the chord progressions and song structure. Plus, the lyrics are all in front of you. Once the song is loaded, you have the freedom to change the tempo and style on the keyboard. Unlike Chord Step Edit, you can manually choose a user style; you aren’t limited to the preset styles.
Turn on Lyric or Score display. You’ll be able to sing and play along with your new song!
cp2mid doesn’t have a fancy graphical user interface (GUI). A GUI is too much for a simple tool that translates an extended ChordPro file into a Standard MIDI File (Type 0).
I’m distributing both Java source code and a JAR file. The JAR file contains the compiled Java — the Java executable, if you will. “JAR” is an acronym for “Java Archive” and is produced by the Java archive program (jar), which is part of the Java development environment (JDK). JAR is a way to package up a compiled Java program, hiding all of the interior classes, etc. An end user doesn’t really need to know about JAR.
Given the JAR file, enter the following command line to run cp2mid:
java -jar cp2mid.jar AFile.cho
“AFile.cho” is the name of an extended ChordPro file to be translated. You can hide the cp2mid.jar file within a Windows BAT file or shell file. Here is cp2mid.bat:
java -jar cp2mid.jar %1
Nothing complicated, here.
cp2mid recognizes the “.cho” file name extension. It does not recognize any other extensions. If you snag a ChordPro file from the Web, you may need to change its extension to “.cho”. cp2mid replaces “.cho” with “.mid” in order to make the MIDI file name. Thus, “AFile.cho” is translated to “AFile.mid”.
During development and testing, you can run cp2mid starting with the compiled classes, e.g., cp2mid.class. Enter the command line:
java cp2mid AFile.cho
to run cp2mid. The Java interpreter will look for “cp2mid.class” and the rest of the compiled classes needed by cp2mid. These compiled classes must be available in the same directory as cp2mid.class. “cp2mid”, by the way, is the main class in the application. You’ll need to specify the main class when creating a JAR file. Again, these steps are relevant only to developers.
Java classes
cp2mid has five Java classes:
cp2mid (cp2mid.java) Main class and driver
SongElement (SongElement.java) Basic element (parts) of a Song
Song (Song.java) Represents a ChordPro song in terms of SongElements
Song2mid (Song2mid.java) Translates the internal song representation to MIDI
MidiFile (MidiFile.java) Represents and manipulates a standard MIDI File (SMF)
The MidiFile class was used in an earlier prototype and still contains a bit of unused legacy code. This may change in future versions. The MidiFile class exploits the standard Java MIDI packages and classes. It creates a MIDI file and inserts MIDI messages (meta, SysEx and otherwise) into a MIDI file.
cp2mid is the boss. It calls on the other classes to do their jobs. Processing is broken into five phases:
Check and manipulate file names.
Read the ChordPro file into a String array, one line per array element.
Translate each line into one or more SongElements.
Translate the SongElements into MIDI.
Write the internal MIDI representation to a Type 0 SMF.
The translation phases do the heavy lifting.
Song and song elements
A Song is a list of SongElements. A SongElement represents one of several ChordPro song constituents:
Directive
Chord
Lyric
Line
Annotation
Comment
Tab
All SongElements have the same data members. Each SongElement has a tag which identifies its type. The type determines the validity and interpretation of the other data members.
The Song class translates extended ChordPro to a list of SongElements. This is, effectively, the intermediate, internal representation of a ChordPro song.
ChordPro directives begin with ‘{‘ and end with ‘}’. Usually ChordPro directives control song formating. Extended ChordPro uses key, tempo, time signature, style code, start accompaniment and stop accompaniment directives to issue MIDI messages that will control the accompaniment engine when the MIDI file is played back.
ChordPro chords and lyrics are what it’s all about. Chords begin with ‘[‘ and end with ‘]’. Chords are extended by an optional beat count which specifies how long the chord is held. A lyric is text and may be multiple syllables long (i.e., anything up to the next chord, annotation, or end of line.)
A line element is a marker for important end-of-lines. Line elements affect lyric formating.
Normally, a ChordPro annotation is text added to a song when it is displayed. Annotations begin with ‘*[‘ and end with ‘]’. Certain predefined annotations, e.g., [*MA], [*FA], etc. change the accompaniment section during play-back.
Comments are just that. cp2mid saves the text, but doesn’t do anything with it.
A ChordPro song may contain guitar tablature (tab). Right now, cp2mid ignores tablature. This has not been tested. I’m not sure how to handle or translate tablature as yet.
Song to MIDI
The Song2mid class translates the internal intermediate song representation to MIDI messages and adds the MIDI messages to a MIDI sequence. The MidiFile class helper functions create specific types of messages. Base MIDI message and sequence classes belong to the standard Java MIDI package.
The Song2mid class walks the SongElement list from front to back. Based on element type, it dispatches to an element type-specific handler. The handler adds one or more MIDI messages to the sequence.
I tried to encapsulate most of the “Yamaha-ness” in the Song2mid and MidiFile classes. ChordPro is very loose and forgiving when it comes to chord syntax. Song2mid recognizes only the 33 or so Yamaha chord types as defined in the Genos Data List PDF. If Song2mid doesn’t recognize a chord, it issues either a major or minor triad.
Example songs
I will distribute 15 example songs in extended ChordPro and MIDI format. Even if you don’t run cp2mid (or look at its implementation), please take a look at the extended ChordPro songs and try the MIDI files on your arranger. All sorts of fun and crazy things happen in real music (key changes, time signature changes, anticipation) and the examples demonstrate how to handle many exceptional situations. I chose certain songs as examples for testing because they are weird. 🙂
I tested the MIDI files on Genos and I’m curious about their behavior on other arranger keyboards. The MIDI files are similar to those generated by Yamaha ChordTracker. If your arranger plays ChordTracker MIDI files, it should play cp2mid MIDI files.
I don’t want to lead you on — it takes a fair bit of effort to take an Internet ChordPro file and whip it into shape. ChordPro as a formating tool is very lenient and forgiving. Accompaniment requires tighter semantics and precision like most “executable” computer stuff. It’s fun to whip a song into shape, but it requires work.
Work continues on my Java program to translate ChordPro songs to Yamaha accompaniment (SMF). The code is fairly stable and mostly I’ve been writing example songs in ChordPro format for testing. The range and variety of musical craziness is amazing: weird chords (“Superstition”, “Michelle”), changing time signatures (“Two Of Us”), changing key signatures (“My Girl”), unusual time signature (“Everybody Wants To Rule The World”), and more.
Today, I want to give a taste of what to expect. I plan to distribute the Java executable as a “jar” file and will also make the source code available. To keep things simple, the program runs from a command line — no graphical user interface:
java -jar cp2mid.jar ItsTooLate.cho
The program is named “cp2mid” and “cp2mid.jar” is the Java executable. We need to invoke java explicitly because it is an interpreted language and the executable consists of Java bytecodes.
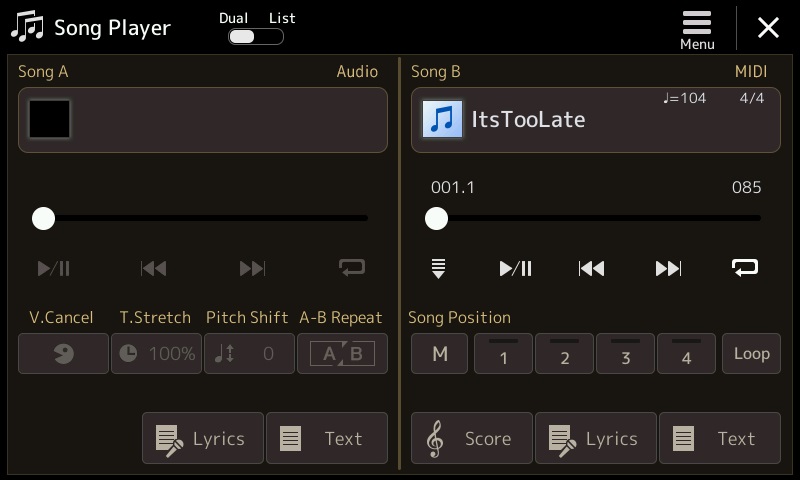
The above command produces a Type 0 Standard MIDI File (SMF) named “ItsTooLate.mid”. This file must be sent to a Yamaha arranger like Genos™ by whatever means you have at your disposal, i.e., a USB flash drive or Yamaha Musicsoft Downloader.
Here is the first part of “ItsTooLate.cho”. The song begins with set-up directives including “{stylecode: }”, which selects the accompaniment style (“Cool8Beat”). You could leave out key, time, tempo, or stylecode and go with the current panel settings. This flexibility allows experiments with different tempos or different styles, including USER styles.
{t: It's Too Late } {key: Am} {artist:Carole King} {time: 4/4} {tempo: 104} # Style: Cool8Beat {stylecode: 5635}
{c: Verse 1} [Am7] Stayed in bed all morning just to [D6] pass the time. [Am7] There's something wrong here there can [D6] be no denying. [Am7] One of us is changing Or [Gm7] maybe we've just stopped [Fmaj7] trying. [Fmaj7][*FA]
{start_of_chorus} And it's too [Bbmaj7][*MB] late baby now [Fmaj7] it's too late Though we [Bbmaj7] really did try to [Fmaj7] make it. [Bbmaj7] Something inside has [Fmaj7] died And I can't hide [Dm7] and I just can't [Esus4:2][*FB] fake it. [E7#9:2] {end_of_chorus}
The screenshot above shows the Genos song player with “ItsTooLate.mid” loaded and ready. Choose either the Lyrics or Score display (optional). Then hit play!
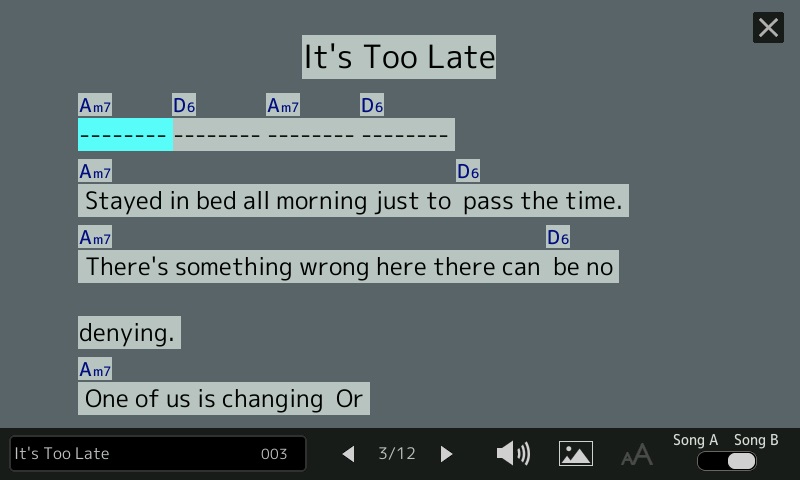
The next screenshot shows the Lyrics display. It should look familiar if you have played a Yamaha arranger. The arranger highlights the current lyric syllable or phrase in time with playback. Compare the screenshot with the ChordPro song and you’ll get an idea of what to expect for each ChordPro construct. A lyric phrase is not broken into syllables, but is associated with the chord preceding the phrase.
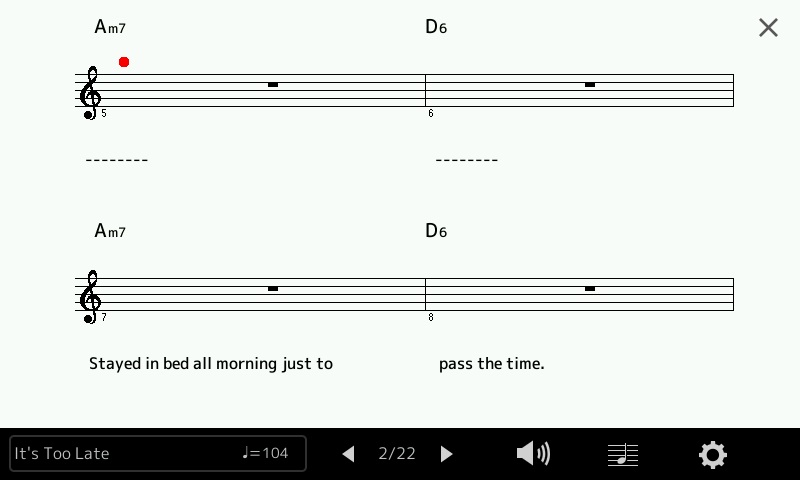
The following screenshot shows the Score display. It’s a different view of the same song. Lyrics appear below the staff and chords appear above. The time and key signature are displayed on the first page. Follow the bouncing ball during playback.
So, how does it sound? Listen to a quick demo (MP3) with me noodling on top.
That’s a taste of what’s ahead. I hope you will try cp2mid when it’s ready.
The MIDI file contains MIDI meta and SysEx (System Exclusive) messages which drive the Yamaha accompaniment engine. When the MIDI file is played back on a compatible Yamaha arranger keyboard (e.g., Genos), the keyboard generates an accompaniment as directed by the chord and section change messages in the MIDI file. It may sound odd to hear this, but the MIDI file doesn’t contain a single note ON or note OFF message! It’s all accomplished through control messages and the accompaniment is produced in real-time.
The MIDI file is a Type 0 Standard MIDI File. It starts with a bunch of set-up messages:
  F0 05 7E 7F 09 01 F7                           GM Reset
  F0 08 43 10 4C 00 00 7E 00 F7                  XG System ON
  FF 58 04 04 02 18 08                           Time signature
  FF 59 02 02 00                                 Key signature
  FF 51 03 07 EF eb                              Tempo
  F0 0D 43 73 01 51 05 00 03 04 00 00 2C 05 F7   Style code
  F0 04 43 60 7A F7                              Accompaniment Start
All of these message types are defined in the Yamaha Genos™ Data List PDF document. The messages beginning with “F0” are System Exclusive (SysEx) messages. Messages starting with “FF” are MIDI SMF meta messages. All messages are Yamaha proprietary (code “43”). The trick, of course, is filling in the correct values for the tempo, key, etc.
GM Reset and XG System ON initialize the tone generator. Time signature, key signature and tempo are SMF meta messages which control and arranger’s sequencing engine. The Style Code message selects one of the many built-in accompaniment styles. The Accompaniment Start message tells the accompaniment engine to get busy.
Once set-up is complete, the rest of the MIDI file consists of Chord, Lyric and Section Control messages. Again, these messages are all defined in the Genos Data List PDF document.
Here is a typical chord message:
F0 08 43 7E 02 37 08 37 7F F7 Chord Bm/B
It tells the accompaniment engine to play a B minor chord (0x37 0x08) with a B bass note (0x37 0x7F). The neatest thing about the ChordPro conversion program? It makes it easy to play and hear difficult to finger chords like slash chords and unusual chord types like Cminmaj7-9.
Lyrics are inserted into the MIDI file using the SMF Lyric meta message:
No attempt is made to separate lyric text into syllables or to assign syllables to individual beats. When a lyric phrase is encountered in the ChordPro file, the phrase is inserted right after the preceding Chord message, i.e., it has the same MIDI timestamp as the preceding Chord message.
A Section Control message selects the current accompaniment section (pattern). The following message:
F0 06 43 7E 00 09 7F F7 Section Control Main B: ON
selects the “MAIN B” section (0x09 0x7F). Because playback is fully automated, section changes are precise.
The penultimate message stops accompaniment:
F0 04 43 60 7D F7 Accompaniment Stop
The final SMF meta message ends the SMF sequencer track:
FF 2F 00 End Of Track (mandatory)
Overall, that’s a lot of power with just a few message types! Most of the Java code involves scanning the ChordPro input, book- and time-keeping. Java has a good MIDI library which makes coding easier.
As to time-keeping, all MIDI events (messages) have a timestamp. Messages issued from set-up directives before start_accomp occur in the first song measure. The start_accomp directive advances the MIDI clock to the first beat of the second measure. Thus, the first chord and lyric (if any) occurs at the beginning of the second measure. Thereafter, MIDI time advances in accord with each chord beat count (default: a full measure as determined by the current time signature).
Time to take the wrapping paper off my current development project.
It starts with ChordPro. ChordPro Format is perhaps the most popular notation for rock, pop, soul and folk tunes. A ChordPro format song contains lyrics and chords, usually formatted for easy display and reading. Strummers and plinkers everywhere use ChordPro songs as lead sheets.
It ends with Yamaha Genos, Tyros and PSR accompaniment. Genos — and other recent Yamaha arrangers — play MIDI files containing chords and lyrics. Genos displays either a running score or lyrics (plus chords) during playback.
What is missing is the bridge between ChordPro and Genos. My current project is the bridge. It translates an extended ChordPro file to a MIDI file which is compatible with Genos and other mid- to high-end Yamaha arranger keyboards. So far, I have a prototype up-and-running.
I emphasized the word “extended” because ChordPro format by itself is not sufficient for playback. The format does not have a precise notion of time. ChordPro relies on the musician to interpret the song on the fly. It assumes that the musician has heard the song before and knows when to change chords. As usual with computer stuff, playback needs more precise semantics. That’s where the extensions come into play.
Since there are a gazillion ChordPro songs on the Interwebs, I wanted to play back ChordPro files with as few modifications as possible. Thus, the first rule is “Each notated chord is held for one measure.” Of course, many songs change chords within a measure, too. (Even “Louie, Louie”!) Enter the first extension. A notated chord may have an optional beat count which specifies the number of beats to hold the chord, or more precisely, the number of time divisions (quarter notes or eigth notes) to hold the chord.
As I discovered during testing, existing ChordPro song files have a fair number of warts. Sometime the chord progressions are whack. The files often have random playing directions which ChordPro happily snarfs up as lyric text. ChordPro is very forgiving as it is primarily a formatting representation and tool. The initial goal — playing a ChordPro song with just a few additions — is unrealistic; expect to do some clean-ups.
Plain, unchanging accompaniment is pretty boring after a short while. Therefore, I added annotations for section changes, fills and breaks. Certain ChordPro directives are optional, but strongly recommended: key, tempo, and time signature. Tempo and time signature obviously guide playback speed and the interpretation of chord hold time. The key signature will set the arranger’s score display to the appropriate key.
Stylecode is an extension. It is a decimal number that selects the arranger accompaniment style, .e.g., 60sVintageRock, Oldies R&R, etc. A style name would be more convenient, but then I would need to develop a style name to code database for each arranger. Forget it; keep it simple. Besides, the PSR Tutorial site has such spreadsheets — just look up the style code yourself.
Start_accomp and stop_accomp are extensions, too. Start_accomp should (must) appear after all the basic playback settings are made. When the MIDI file is played back, the arranger will start or stop the accompaniment engine as directed. Start_accomp begins playback from the second measure; the first measure is reserved for set-up.
The translation program does not implement every and all ChordPro directive. It ignores formatting related directives and it doesn’t handle tablature (tab).
Let’s put all of this together and look at an example. Here is a snippet of “It’s Too Late” by Carole King.
{t: It's Too Late } {key: Am} {artist:Carole King} {time: 4/4} {tempo: 104} # Style: Cool8Beat {stylecode: 5635} {start_accomp}
{c: Verse 1} [Am7] Stayed in bed all morning just to [D6] pass the time. [Am7] There's something wrong here there can [D6] be no denying. [Am7] One of us is changing Or [Gm7] maybe we've just stopped [Fmaj7] trying. [Fmaj7][*FA]
{start_of_chorus} And it's too [Bbmaj7][*MB] late baby now [Fmaj7] it's too late Though we [Bbmaj7] really did try to [Fmaj7] make it. [Bbmaj7] Something inside has [Fmaj7] died And I can't hide [Dm7] and I just can't [Esus4:2][*FB] fake it.[E7#9:2] {end_of_chorus}
Lines beginning with ‘#’ are comments. Lines beginning with ‘{‘ are directives. Each directive must have a closing ‘}’ and consist of one line only. My translation tool supports the following simple directives:
title (or ‘t’): Song title
key: Song key
artist: Performing artist
composer: Song composer
copyright: Copyright information
comment (or ‘c’): Comment to be ignored
time: Time signature
tempo: Song tempo in BPM
stylecode: Yamaha style code (a decimal number)
start_accomp, stop_accomp: Starts and stops the accompaniment
As I mentioned, time, tempo and stylecode are optional, but necessary — unless you are willing to roll with the defaults. Start_accomp must be the final directive before the first chord and lyric in the song. Start_accomp generates the magic message needed to start accompaniment.
Chords look like regular ChordPro chords. Chord names are surrounded by square brackets, e.g., “[Am7]”. Nothing looks amiss until the end of the chorus, e.g., “[Esus4:2]” and “[E7#9:2]”. “:2” is a beat count. Each chord is held for two quarter notes — quarter notes because the number of divisions per bar (the “denominator”) of the time signature is four. It’s our job to make sure that the counts add up to a full measure in order to keep everything synchronized to measures.
The translation program (yet unnamed!) is very forgiving when it comes to chord spelling. However, it only recognizes and generates the 34 Yamaha chord types which are supported by Yamaha arrangers:
    Maj        7        min        minMaj      aug      dim
    Maj6       7sus4    min6       minMaj7     aug7     dim7
    Maj7       7b5      min7       minMaj7-9
    Maj7#11    7-9      min7b5
    Maj9       7#11     min9
    Maj7-9     7-13     min7-9
    Maj6-9     7b9      min7-11
    7aug       7aug
               8
               5
               sus2
               sus4
If the chord is not recognized, you will get a major or minor triad.
ChordPro allows annotations, that is, constructs beginning with “[*” and ending with “]”. Annotations ordinarily are playing instructions that are displayed in a pretty-printed ChordPro song. Annotations are extended with accompaniment section control commands:
Introduction: [*IA] [*IB] [*IC] [*ID]
Main section: [*MA] [*MB] [*MC] [*MD]
Fill in: [*FA] [*FB] [*FC] [*FD]
Break: [*BR]
Ending: [*EA] [*EB] [*EC] [*ED]
A section control command usually follows a chord and takes effect at the same time as the chord change.
I am currently experimenting with these directives to control lyric and chord formatting. Yamaha’s lyric display allows line breaks and page breaks. Start of chorus (abbreviated “{soc}”) generates a page break. I added a new directive pair for handling long instrumental breaks, e.g.,
Yamaha’s lyric display runs chords together when no lyric text is present. The new directive provides some separation between chords by generating filler lyric text (dashes, to be exact).
That’s the story. Testing continues. I will make the Java source code available as soon as possible. So far, so good. The concept works.
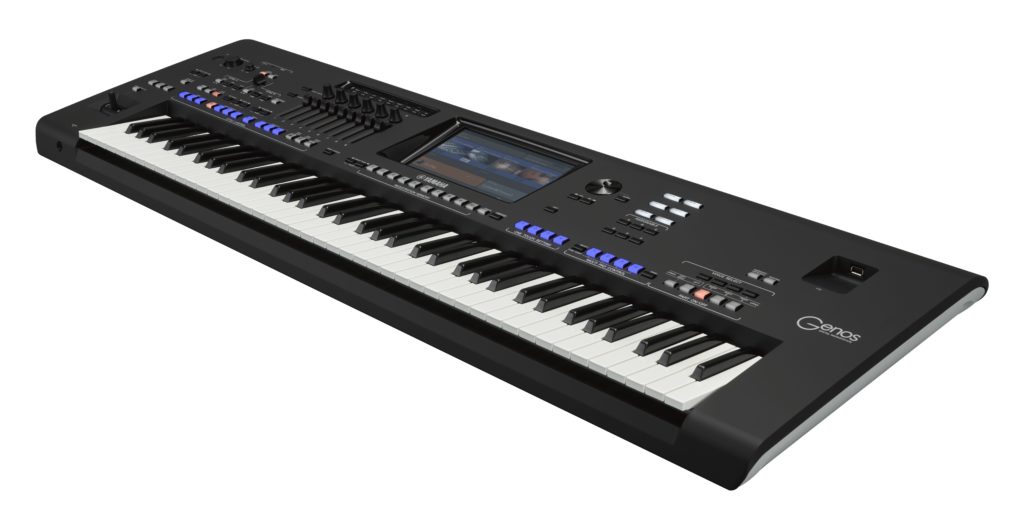
Mid- to upper-level Yamaha arranger workstation have long had a drawbar organ feature which Yamaha calls “Organ Flutes.” This feature dates back to 1999, appearing in the PSR-9000 keyboard. Although a few details have changed over the years, Yamaha has not substantially overhauled Organ Flutes. It’s time, Yamaha — the world has moved on. I’d love to see the new YC organ technology in Genos. It’s the flagship of the arranger line and YC organs would definitely differentiate Genos from its lower-cost brethren.
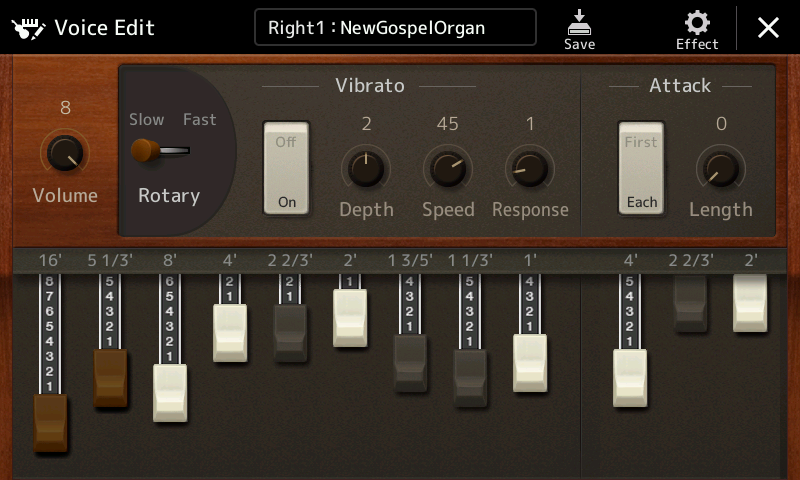
Yamaha Organ Flutes main voice editing screen
The main, tweakable organ parameters are:
Nine drawbars
Percussion (first note/each note, length)
Percussion pitch (4′, 2-2/3′, 2′)
Response (onset delay of drawbar and percussion sounds)
Vibrato (on/off, depth, speed)
Rotary speaker speed (slow/fast)
Volume level (1 to 8)
DSP effect (e.g., rotary speaker)
For B-3’ers, the 4′ percussion pitch is the 2nd harmonic setting and the 2-2/3′ percussion pitch is the 3rd harmonic setting. The 2′ pitch supports non-Hammond organs which require it.
Compared with a contemporary clonewheel, one immediately notes a few missing features:
Vibrato only, no chorus
No key click
No rotor noise
No leakage
Overall, the Genos B-3 is super clean and polite — not vintage. MODX (Montage) provides key click, rotor noise (grit) and rotor whistle waveforms. Why does Genos lag behind? Although MODX is AWM2, not modeling, these extra waveforms are better than nothing at all.
The Genos synthesis engine is also AWM2 sample-playback and AWM2 provides the Organ Flutes vibrato. Organ Flutes does not simulate the one-of-a-kind Hammond vibrato/chorus scanner. The Korg Module “Gospel Organ” voice incorporates C-3 chorus and the AMW2 vibrato just doesn’t cut it (head-to-head comparison). I had to substitute Genos’ V-2 setting and move on.
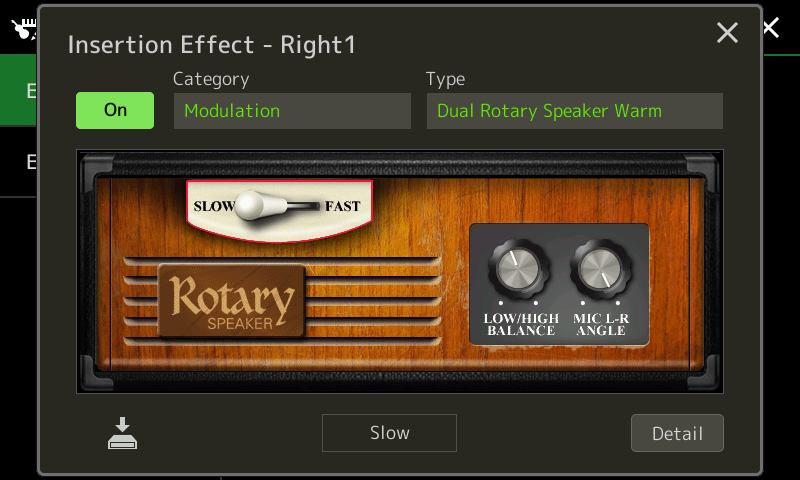
Simplified, graphical rotary speaker interface
If you want to change the rotary speaker type, you need to dive through the effect setting button at the top of the Organ Flutes screen. After selecting the insertion effect, Genos displays a skeuomorphic (graphical) rotary speaker cabinet with a few knobs. In the screenshot above, we get rotary speed, horn and rotor balance, and microphone left/right angle. Like many (most?) rotary speaker simulations, the rotary effect emulates the sound of a mic’d up, stereo recording of a Leslie, not a horn and rotor moving air in a room.
Additional rotary speaker (DSP) parameters are changed by tapping the “Detail” button in the lower right corner. deep-diving reveals a few more deficiencies:
Missing parameters due to a limitation on the number of DSP effect parameters (16 parameters maximum)
Only one insert effect (typically the rotary speaker)
Volume control is post-effect and does not affect overdrive
Here is a little more information about each issue.
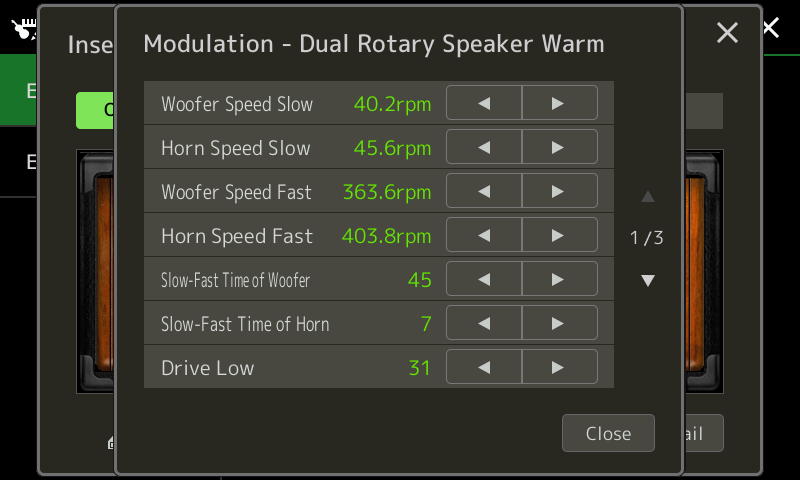
First page of rotary speaker parameters
At heart, the Genos (PSR, Tyros) sound engine implements the Yamaha XG synthesis and effects architecture. The XG architecture allows up to sixteen (!6) parameters per DSP effect unit. Unfortunately, Yamaha’s DSP engineers are creating effect algorithms (AKA “effect types”) with more than sixteen parameters! The MODX ROTARY SPEAKER 2 algorithm has eighteen (18) parameters. The Genos REAL ROTARY effect type is the same algorithm as MODX. However, only 16 parameters are accessible or stored on Genos. The two missing REAL ROTARY parameters are:
Slow-Fast Time of Rotor
Fast-Slow Time of Rotor
You cannot change these rotor ramp times on Genos, yet, you can change them on MODX.
This issues affects the Genos UNI COMP compressor algorithm (MODX: UNIVERSAL COMPRESSOR DOWN). Dare I mention the inability to specify a side-chain part, too? People are trying to create EDM on arrangers.
The XG architecture allows only one insert effect per part. The Organ Flutes insertion effect is typically a rotary speaker simulator. The MODX effect architecture, on the other hand, allows two insert effects per part. Yamaha synths take advantage of the second insert effect to add overdrive or vintage EQ:
Rotary speaker 1 → Multi FX (Distortion Solo)
Rotary speaker 2 → VCM 501 EQ (Flat)
Amp Simulator 3 (Tube) → VCM 501 (Flat)
Amp Simulator 1 (Stack 2) → Rotary Speaker 1
VCM 501 EQ (Flat) → Rotary Speaker 1
The rotary speaker drive alone is not enough to warm up the basic sound nor is it enough to get a sweet, realistic overdrive with guts. I experimented with the Genos REAL ROTARY effect and got some very squirelly results at high drive levels. The algorithm can be pushed in unexpected, undesirable ways while searching for true funk.
Unlike a real Hammond/Leslie combination, the Genos expression pedal controls post-effect part volume. This is like putting the volume control after the Leslie speaker. A Hammond B-3 pedal controls the level into the Leslie pre-amp. Thus, the pre-amp frequency characteristics and overdrive track the Hammond pedal. The Yamaha YC61 modeling gets this right. Putting the volume pedal before the pre-amp lets the player get clean or dirty in the same way a guitarist uses picking and/or the guitar volume knob to distort or clean up their tone.
If the Genos developers must work around the XG architecture, they should consider a new effect algorithm that combines overdrive with the rotary speaker simulation. The algorithm should allow foot pedal control over the Leslie pre-amp input level. Genos and other PSRs allow wah pedal control, so they obviously know how to achieve this capability within the current architecture.
Contemporary workstation instruments offer several options for combo organ emulation. Every workstation has at least a few internal combo organ waveforms. Korg Kronos, for example, has two Vox organ waves built in. Even the lowly Korg microKorg XL+ has two Vox waveforms (DWGS single cycle).
Yamaha MODX and Montage — my focus in this article — have a good variety of Vox and Farfisa waveforms. Yamaha Genos has a lesser endowment as we’ll see. Yamaha Reface YC shares sonic DNA (AWM2 and effects) with the Motif XF and will be the subject of a future post.
Motif, Motif ES and Motif XS
Models in the early Motif series primarily base combo organ patches on two waveforms:
Portable Electronic: Vox-y tone
Compact Electronic: Farf-y tone
You can hear these waveforms at work in the Tiny Combo Bars 1 performance and the Tiny Combo Bar 2 performance. The patches layer three are more elements playing Portable Electronic or Compact Electronic (respectively). Each element is filtered differently: low pass, band pass and high pass. The net effect is like several distinctive tab stops or drawbars pulled at once.
These waveforms are very old, going back to the original Motif (maybe S80) in the early 2000s. I’ll bet dollars to donuts that the Portable Electronic waveform is the basis for the 60’sOrgan voice (MSB: 0, LSB: 116, PC: 18) in PSR and Tyros keyboards. The 60’sOrgan voice was the sole combo organ mainstay in the arranger line for a loooong time.
Motif XF, Montage, MODX
Motif XF got a big shot of combo juice. Motif XF added several combo organ waveforms:
Fr All Tabs
Fr Bright Boost
Fr Flute
Fr String Lo
Fr String Hi
Fr Trumpet
Fr Piccolo
Fr Pedal
Fr KeyOff
Vx Drawbar1-3
Vx DrawbarIV
Vx KeyOff
The Farfisa (Fr) waveforms support emulation of specific Farfisa features: individual voice tabs (flute, string, trumpet and piccolo), the wicked Bright Boost knee lever, bass keys (pedal), and key off sound. The Fr All Tabs waveform covers one of the most common use cases — all of the tab stops turned on. Subtlety was not a hallmark of sixties combo organ music. 🙂
The Vox (Vx) Vx Drawbar1-3 waveform covers the three Continentel footage drawbars while the mixture drawbar is handled by the Vx DrawbarIV waveform. The Vox waveforms include a Vox key-off noise.
In terms of voice programming, one uses note shift to achieve different footage ranks. Passive filtering is emulated through filter type (low pass, band pass, high pass) and cutoff frequency. Of course, everything can be routed into insert effects for distortion, amp simulation, and other grunge.
Since Montage and MODX inherit all things Motif, these waveforms and the Motif performances are there for you. The Montage and MODX sliders allow control over individual voice elements. For example, choose the Raspy Tabs performance and assign slider control to element level. The Fr Raspy Tabs waveform-to-element assignment is:
El# Waveform     KeyLo KeyHi VelLo VelHi Coarse Level Cutoff XA Ctrl
--- ------------ ----- ----- ----- ----- ------ ----- ------ -------
 1  Fr String Lo   C2    G8     1   127     0     97   255   Normal
 2  Fr Trumpet     C2    G8     1   127     0     82   255   Normal
 3  Fr Flute       C2    G8     1   127    24    120   236   Normal
 4  Fr Pedal      C-2    B1     1   127     0    127   160   Normal
 5  Fr String Hi   C2    G8     1   127    19     24   236   A.SW2 On
 6  Fr KeyOff      C2    G8     1   127     6     87    80   Key Off
Different tabs are brought in and out by moving the corresponding slider. Assignable switch 2 turns on additional brightness. The low keyboard octaves play the bass (pedal) tones. Overall, this is a fairly controllable representation of a wheezy Farfisa Compact.
Because the sliders are not discrete, you can probably make up Farfisa tones which aren’t entirely authentic. But, really, should one care? 😉
Vox performances have similar control-ability. Here is the waveform-to-element assignment in the Vx Full Bars performance:
The first three sliders control the 16′, 8′ and 4′ Vox drawbar settings and the fourth drawbar controls the Mixture (IV) tone. Go ahead, just everything to eleven. 🙂
Montage and MODX FM
But, wait, there’s more! Montage and MODX have two FM combo voices: BOX FM Combo Organ and FM YC Combo Organ. Although these performances don’t sound authentic to my ears, they provide starting points for further programming. I haven’t heard the YC61 as yet, but I wonder if the YC61 combo emulations can be ported to Montage and MODX?
Genos
As I mentioned earlier, the arranger series has been historically short on combo organ sounds, relying on the old 60’sOrgan voice. Wheezy, raspy Farfisa tones are noticably absent. The 60’sOrgan voice sounds like the Portable Electronic waveform on which the Motif 1967 Keys performance is based.
Tyros 4 and Motif XF were introduced at approximately the same time. They certainly were together in the development lab during late 2009. Tyros 4 added four combo organ voices:
60sComboOrgan1: VoxContiComb1_Full_NoVib waveform
60sComboOrgan2: VoxContiComb1_Full_VibOn waveform
60sComboOrgan3: VoxCombi4NoVib waveform
60sComboOrgan4: VoxCombi4NoVib091117 waveform
Voices 1 and 2 capture one Vox Continental drawbar combination (Comb1) and voices 3 and 4 capture a second combination (Combi4).
Voices 1 and 3 are without vibrato. Voices 2 and 4, unfortunately, have an excessive amount of vibrato — almost painfully so. When I use voices 2 and 4 in a MIDI sequence, I dial down the vibrato depth using MIDI CC#77 messages. Vibrato frequency is about 5Hz. I also remove touch sensitivity by setting:
Velocity sensitivity depth to zero, and
Velocity sensitivity offset to 114.
An organ voice should not respond to touch (key velocity) — ever.
PSR, Tyros and Genos players shouldn’t forget the “hidden” Italian 60s organ voice (It60’sOrgan) in the GM2 sound set. On PSR and Tyros, you’ll find It60’sOrgan within the Legacy voices Organ subfolder. On Genos, you need to download GM2 and XG user voices to the USER voice folder. (See this thread in the PSR Tutorial Forum.) Of course, you can select It60’sOrgan from a DAW (MSB: 121, LSB: 2, PC: 17) .
All-in-all, you can get a nice Vox tone out of Genos. Farfisa is still missing in action, tho’. Kind of an odd shortcoming of a keyboard with styles and a user base that want to play popular hits from days past.
In the next post, I’ll compare Reface YC combo organs against Montage/MODX (Motif XF). The result may surprise you.
Several weeks ago, I decided to record the church tunes that I enjoy playing. It’s best to start with favorites, as most of you know how you come to detest a track after playing it over, and over, and over again during production. Energy quickly dissipates when micro-editing MIDI events or digital audio…
Before getting into production notes, here are links to the final tracks (all MP3). The goal was to crank out a new tune each week and send it to the folks in our music ministry. Some tunes are a little more polished than others. Please consider them “demo quality.”
Without going too far into the technical weeds, the primary sound source is Yamaha Genos™ and the primary vocalist is my spouse Fran. With the Mill Creek Chorale on hiatus — aren’t we all? — I was happy that she could contribute and have fun, too.
Production notes
So, how did all of this go down?
These demoes show off the Yamaha Genos as a sound source and production tool. I had two main subgoals:
Learn how to record a demo with Genos in either audio or MIDI format.
Learn how to mix down with Steinberg Cubase Artist and try out a few of the freebie plug-ins that I’ve collected.
By and large, Genos and Cubase were the main production tools although I back-slid into SONAR on a few occasions for MIDI editing. Old habits die hard. Workflow was not strictly linear from Genos to Cubase. In a few cases. MIDI and/or audio (stereo 16-bit 44,100 WAV) were slung back and forth between tools.
Yamaha Genos
Genos is the sound source with one big exception: drawbar organ. When you hear B-3, you’re hearing Yamaha MODX through an Electro-Harmonix Lester K. I wanted to hear Lester K in musical context. It sits in a song pretty well and has more guts than the Yamaha MODX Leslie simulator. By itself, though, Lester K has some high-end swirliness in the upper drawbars, but in a track, it seems to mesh. You be the judge.
Emphasis was on speed. Get the tracks down quickly and finish a song each week ASAP. The Beatles used to call this recording “on heat.” Even so, it’s amazing how modern technology will drag you into the dank chasm of production minutiae. Don’t you just love hearing the same three measures fifty times while tweaking and tweezing. Not.
All vocals were recorded directly to Genos using its microphone input. Full backing and raw vocal tracks were exported to Cubase via WAV. Everything was processed and mixed in Cubase. The final mix was exported from Cubase as WAV, and then trimmed and converted to MP3 using Sound Forge Audio Studio.
Our God Is Here This was the first demo in the series and the process doesn’t get any simpler than this. All was recorded into Genos Audio Multi Recording. Find a beat, turn it on, lay down the organ part. Unfortunately, I didn’t plan for the ending, which is quite ragged. The organ is Genos in this case (not MODX). Kinda plain, huh? The bass is an overdub.
Audio Multi Recording is a nicely done sound-on-sound recorder a la Les Paul, minus tape hiss. There are two stereo tracks: main and sub. You can record directly to either main or sub, and bounce (sub+main) to main. There are options for punch in and overdub. Audio Multi Recording provides WAV import and export, functionality which eventually got a true work-out.
Audio Multi Recording keeps digital audio in a persistent project. A project resides in the internal Genos 60GB user solid-state drive and is always ready. The project remembers audio and mix settings without requiring explicit save and load user operations. That makes for a clean workflow. Export is the way to get digital audio into a WAV file and it mixes the main and sub on the way to WAV. In order to export a solo vocal track from sub, one needs to dial down the main and then wait while Genos writes the WAV file in real time. I wish there was a simple, direct fast export to WAV supporting both main to WAV and sub to WAV.
In The Day Of The Lord I quickly realized that I do need to think ahead and assemble a basic skeleton on which I could build a tune. (Duh!) In this case, Toontrack EZDrummer provided the drum patterns which I pulled together in Cubase. Genos played the MIDI drum track while I recorded the flute as a melodic guide and layered in the bass and organ — all recorded as audio. We then did a few vocal takes to Genos. I transferred all of the Genos audio as WAV into Cubase for the final mix. Vocal processing typically was light: a little pitch correction, EQ, and maybe double tracking. A touch of reverb (Cubase Revelation) blends everything together here.
Stop By, Lord This tune makes use of the Genos rhythm accompaniment consisting of main patterns and one-bar fills. I recorded a basic guide track in MIDI using the “BigBandBallad” style as the drummer. This meant switching the main and fill patterns with my left hand while playing the melody with my right hand. I layered in the piano, bass and horns, discarding the guide melody along the way. I added the B-3 organ (MODX through Lester K) in an audio pass. Everything was recorded and produced on Genos since we didn’t record vocals.
Psalm 95 If Today “If Today” makes full use of the Genos arranger features. I played the basic accompaniment track using the “Sunny Reggae” style. Whoever built that style, it must have been a labor of love and it fits this song quite well. I vocoded my voice. Both the accompaniment and vocal tracks where exported to Cubase for final assembly and mix down. I had a lot of fun adding dub effects and tons of reverb, Long live King Tubby!
Rise Up With Him “Rise Up” was recorded to MIDI, again using the Genos rhythm accompaniment as the drummer. The electric piano went down first followed by the bass. The B-3 organ is MODX through Lester K. Backing and vocal audio were exported to Cubase for final mix down. Overall, a pretty simple demo to pull together.
O Sacred Head I recorded the MIDI for this tune a long time ago — in the early 2000s on a Roland XP-60. The guitar picking was carefully edited and assembled (years ago!) from Twiddly Bits. I imported the XP-60 MIDI into Cakewalk, choosing Genos voices and effects. The Genos result versus the original XP-60 is amazing. Fran encouraged me to leave it as an instrumental.
This Is The Day This psalm is long out-of-print. A few years agao, I transfered a scruffy copy of the piano score into Sibelius. So, to kickstart this tune, I exported MIDI from Sibelius, restructured the sections, and humanized the piano as much as possible. I tried to keep the accompaniment simple adding just bass and horns. Once again, the backing and vocal tracks were mixed in Cubase. This demo is a good example of Arturia’s Plate-140 reverb — a freebie that Arturia gave away during the Christmas holiday. I love it.
Lead Me, Lord Another simple turn-on-the-beat-box, sound-on-sound production. Everything was recorded to Genos with the backing and vocal tracks exported to Cubase. (Another example of Plate-140, BTW.) The vocal harmony was generated by a TC Helicon Play Electric added in real time. Recording and production was dirt simple although it took a while to get the TC Helicon configured.
Alleluia! Love Is Alive This was the penultimate demo in the series. The basic track is a stripped down Genos “6-8PopBallad” style. Yamaha tends to over-orchestrate styles, so I kept drum, bass and guitars, tossing the rest. Instead of playing the basic track, I created the accompaniment using chord step-record. This MIDI Multi Recording feature lets a musician enter chords and sections from a lead sheet, quickly creating the song skeleton. You can even try different styles if you haven’t chosen one already. Once the skeleton is set, you expand the chord track into MIDI events, thereby obtaining the full backing track in a Standard MIDI File (SMF).
I added the Celtic violin by playing it into a free MIDI track. Using Sonar, I tweaked the tempo in the full MIDI song in order to add energy as the song progressively builds to the end. Finally, with the MIDI finished, I froze the backing tracking to WAV audio. The backing and vocal tracks were mixed down in Cubase with a little automation here and there to add vocal depth and double tracking.
Conclusions?
The preceding discussion is already a lot to absorb and to process. I’ll take a step back in a future post and try to summarize. All the best to ya.