Raspberry Pi soft synthesizer: Get started

Now let’s make some noise!

This article shows how to install, configure and play a simple software synthesizer (amsynth) on Raspberry Pi 2. The first part in this series is a quick installation and configuration guide for Raspbian Jessie Linux. The second part is an introduction to the Linux audio infrastructure (ALSA and JACK). Please consult these articles for background information. I assume that you know a little about JACK and ALSA aconnect in this article.

amsynth

amsynth is a basic virtual analog (i.e., analog modeling) synthesizer for Linux. It is polyphonic (16 voices max). Each voice has two oscillators, a 12 or 24dB per octave resonant filter and dual ADSR envelope generators. All can be modulated using a low frequency oscillator (LFO). The synth also has distortion and reverb effects. Read more about amsynth at the amsynth web site.

amsynth is a good starting point for exploration since it is easy to set up and use. It can operate standalone (JACK, ALSA or OSS) or as a plug-in (DSSI, LV2, VST). When amsynth launches, it automatically searches for a JACK audio server. If it cannot find a JACK server, it switches to ALSA audio.

Run the following command to install amsynth:

    sudo apt-get install amsynth

The package manager fetches amsynth and the libraries, etc. that amsynth needs.

I’m going to show amsynth running on ALSA and JACK in this tutorial. I had the most success running on JACK and I recommend that approach for practical work. My goal is to play amsynth from an external MIDI keyboard — an M-Audio Keystation Mini 32 in this demonstration.

amsynth running on ALSA

ALSA seemed like the fastest way to test amsynth. Indeed, it came right up and I was able to play amsynth using the Keystation once I connected the ALSA MIDI ports for amsynth and the Keystation.

To repeat my initial experiment, start two terminal windows on the desktop. In the first window, run amsynth:

    amsynth

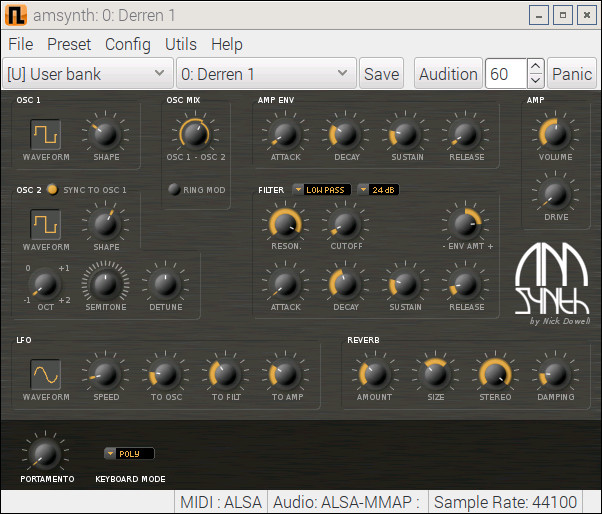
Simple, huh? No command line arguments to mess with. You should see the amsynth front panel as shown in the image below. Notice the status at the bottom of the amsynth front panel. The synth expects to use ALSA for both MIDI and audio.

amsynth_alsa

With the Keystation plugged in, run aconnect in the second window to identify the available ALSA MIDI ports:

    > aconnect -o
    client 0: 'System' [type=kernel]
        0 'Timer           '
        1 'Announce        '
    client 14: 'Midi Through' [type=kernel]
        0 'Midi Through Port-0'
    client 20: 'Keystation Mini 32' [type=kernel]
        0 'Keystation Mini 32 MIDI 1'
    client 128: 'amsynth' [type=user]
        1 'MIDI OUT        '
    > aconnect -o
    client 14: 'Midi Through' [type=kernel]
        0 'Midi Through Port-0'
    client 20: 'Keystation Mini 32' [type=kernel]
        0 'Keystation Mini 32 MIDI 1'
    client 128: 'amsynth' [type=user]
        0 'MIDI IN         '

The aconnect -i command displays ALSA MIDI sender ports including the MIDI coming in from the Keystation. The aconnect -o command displays the ALSA MIDI receiver ports that accept MIDI data including the MIDI IN port belonging to amsynth.

Use aconnect, again, to patch the Keystation to amsynth:

    aconnect 20:0 128:0

ALSA ports are identified by client and client-specific port number. The first port in the command line above is the sender port and the second port is the receiver port.

Enter aconnect -l to display port and connection status. Here is what I saw after connecting the Keystation to amsynth:

    client 0: 'System' [type=kernel]
        0 'Timer           '
        1 'Announce        '
    client 14: 'Midi Through' [type=kernel]
        0 'Midi Through Port-0'
    client 20: 'Keystation Mini 32' [type=kernel]
        0 'Keystation Mini 32 MIDI 1'
            Connecting To: 128:0
    client 128: 'amsynth' [type=user]
        0 'MIDI IN         '
            Connected From: 20:0
        1 'MIDI OUT        '

Click the Audition button on the front panel. amsynth plays a sound. Hit the keys on the Keystation and amsynth plays the notes.

Now that you’re in business, here are a few things to do:

  • Try different presets.
  • Turn the virtual knobs while holding a note.
  • Twist MIDI controller knobs and watch amsynth track the changes.
  • Explore amsynth’s menus.

You probably noticed a few greyed out items in the Utils menu:

  • MIDI (ALSA) connections
  • Audio (JACK) connections

These items refer to utility programs that make MIDI and audio connections (kaconnect, alsa-patch-bay, qjackconnect). I couldn’t locate pre-built versions of these programs for Raspbian. This isn’t a big deal, since we’re going with JACK anyway.

If you followed these directions and played amsynth with a MIDI keyboard of your own, you probably noticed the latency (lag) between striking a key and hearing a sound. The lag under ALSA alone is unacceptable — another reason to go with JACK.

Should you need a virtual keyboard, here are two Linux applications for ya:

    vkeybd         Virtual MIDI Keyboard
    vmpk           Virtual MIDI Piano Keyboard

Install these with the sudo apt-get install command.

amsynth running on JACK

Let’s run amsynth along-side JACK for audio.

JACK is a server that runs as a separate Linux process. A process running a system service like JACK is called a “daemon” in Linux terminology. (Just in case you see this term when reading supplementary articles on the Web.) We need to start JACK running before amsynth so that amsynth can discover the JACK server and connect to it.

Here is the general flow of things when getting down to work:

  1. Plug in your MIDI controller.
  2. Launch qjackctl.
  3. Change JACK settings, if necessary.
  4. Start the JACK server.
  5. Launch amsynth or other JACK-aware application.
  6. Make connections in qjackctl or ALSA.

Full disclosure, I first started JACK from the command line using a variety of suggested options and had only limited success. I got a few runtime errors along the way and the latency was unacceptably long.

These first experiments produced one useful tip: Add yourself to the Linux audio group. The notion of a group in Linux is similar to the different classes of users that you find on a different operating system, e.g., the group of Administrator users on Windows. Users belonging to the audio group have special rights which improve the performance of realtime applications like a soft synthesizer. These rights include the ability to reserve and lock down memory and to run time-critical operations at a higher priority.

The Raspbian Jessie image comes equipped with the audio group. The following command checks to see if the audio group is already defined (just in case you’re working on a different version of Linux):

    grep audio /etc/group

If this command doesn’t display anything, then you need to create the audio group yourself. The command:

    sudo groupadd audio

adds the audio group. You will need to define the rights and privileges for the audio group — an expert task that I will not explain here. See the references at the bottom of this page for more details.

Run the following command to display your group membership:

    groups

If “audio” is not listed in the output, then you need to add yourself to the audio group:

    sudo usermod -a -G audio XXX

where XXX is your user name. The next step is vital to your sanity. Log out. Log all the way out. If you logged in from the text shell and started the X Windows system, then leave X Windows and log out from the text shell. Then, log back in. Run groups and the system should now show you as a member of the audio group. Group membership is established and inherited when you log in.

Finally, it’s time to start JACK. Fortunately, JACK has a graphical control panel called qjackctl. The control panel uses the cross-platform Qt graphical user interface (GUI) package which supplies all of the buttons, drop-down lists and so forth. Start the control panel with the following command:

    qjackctl &

The ampersand at the end of the command line is not accidental. It tells the Linux shell to run qjackctl and detach the control panel from the terminal window. This leave the terminal window live and ready to accept new commands.

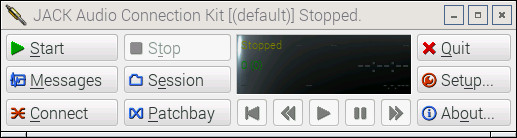
The qjackctl control panel is shown in the following image.

qjackctl

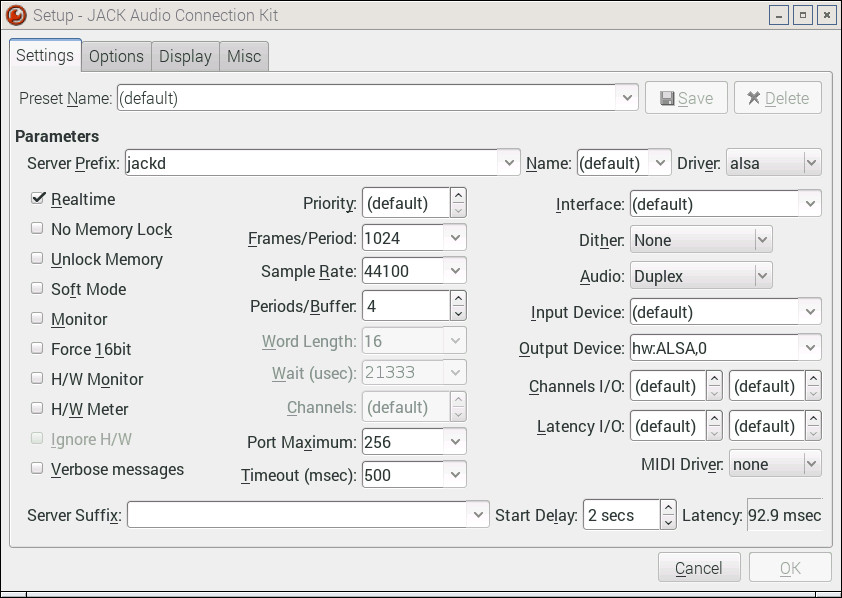
Click the Setup button in order to make a few small changes. Change the Sample Rate parameter to 44100Hz, which is the rate prefered by amsynth. Set the Periods/Buffer parameter to 4. If the number of periods is less than 4, you will probably hear noisy, glitchy audio. JACK and amsynth work just fine when the Output Device is set to “(default)”. I decided to set the Output Device parameter by hand to “hw:ALSA,0” as a way of testing the ALSA settings. Please see the settings that I used in the following image. (Click images to get full resolution.)

qjackctl_setup

Now launch amsynth:

    amsynth

The soft synth will search for the JACK audio server and should connect to it.

You could follow the procedure in the ALSA section (above) to connect the Keystation to the MIDI IN belonging to amsynth. However, qjackctl has two convenient ways to make MIDI connections:

  1. Connections
  2. Patchbay

These features reside behind the Connect and Patchbay buttons. They each have similar capabilities and allow you to make connections between MIDI and audio ports. The main difference is persistence or lack thereof. Connections are temporary and are broken when a client is terminated. Connections are forgotten when the JACK server is terminated, too. The Patchbay lets you define, save and load port-to-port connections in a file. JACK is also pretty good about restoring the active patchbay even if you haven’t started applications, soft synths, etc. in an orderly way. (JACK needs to be running first, of course.)

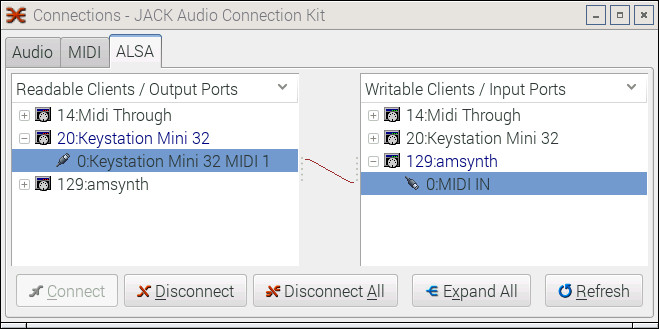
I made connections using both techniques just for fun. The image below is a snapshot of the Connections dialog box. There are three tabs — one for each type of connection (port). I made MIDI connections using the ALSA tab because the Keystation MIDI ports were not registered with JACK. (They did not appear on the MIDI tab even though the MIDI tab did show amsynth‘s MIDI ports.) To make a connection, just select a sender in the left column and a receiver in the right column. Then click the “Connect” button. If you terminate amsynth or JACK, the connection is lost and forgotten.

qjackctl_alsa_midi

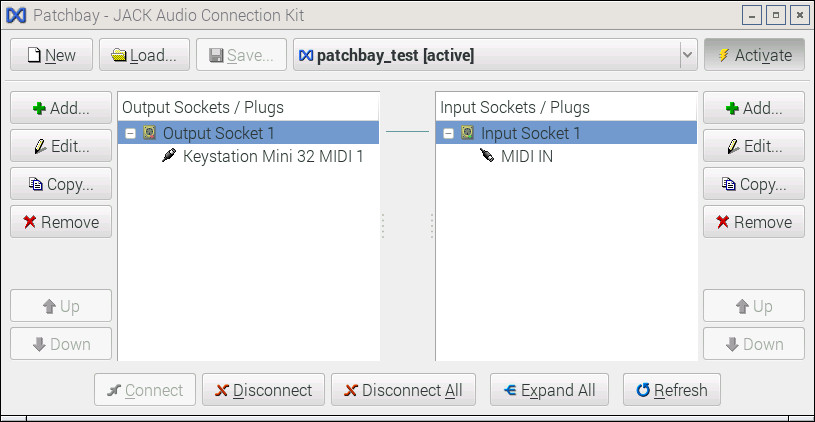
The Connections dialog is a good place to experiment while you’re getting your virtual, in-the-box studio together. When you have a set-up that you like, it’s time to capture the set-up in the Patchbay. First, click the “Patchbay” button on the qjackctl control panel. Click the New button. Use the appropriate Add button to add output sockets to the left column or to add input sockets to the right column. Then, choose two ports and click the Connect button. After making connections, save the set-up to a file. The interface is intuitive. You can save and load as many different set-ups as you would like (as long as there is free drive space!)

qjackctl_patchbay

When you quit JACK, it remembers the last active Patchbay set-up. JACK recalls this set-up when you launch JACK, again. In case you’re wondering, qjackctl saves its configuration (settings) in:

    /home/XXX/.config/rncbc.org/QjackCtl.conf

where “XXX” is your Linux user name. The “.” character at the beginning of “.config” hides the “.config” file. Use ls -a to show all files in a directory including the hidden ones. The JACK daemon saves its configuration in:

    /home/XXX/.jackdrc

where “XXX” is your linux user name. This, by the way, is your home directory. Linux applications typically store configurations in hidden files within your home directory. The “.jackdrc” file contains the command that was last used to launch JACK, e.g.,

    /usr/bin/jackd -dalsa -dhw:0 -r44100 -p1024 -n4 -D -Phw:ALSA,0

This is good to know when you want to find out the initial launch conditions for the JACK daemon.

The one aspect that qjackctl does not handle well is the deletion of Patchbay set-up files. qjackctl stores a Patchbay set-up in an XML file. If you delete or move the XML file, then you will get a warning message like:

    Could not load active patchbay definition. Disabled.

You will need to delete the reference to the missing file from the “QjackCtl.conf” file.

At this point, you should be able to play amsynth from an external MIDI controller with acceptable latency. Have fun!

Finally, I found three well-written guides to JACK, qjackctl, and the JACK patchbay. Here are the links. If you read my introduction to ALSA and JACK and this articles, then you have sufficient background to dive into the finer points.

Demystifying JACK – A Beginner’s Guide to Getting Started with JACK
HOW-TO QjackCtl Connections
QjackCtl and the Patchbay

If you enjoyed this article, then be sure to check out:

Qsynth and FluidSynth on Raspberry Pi: The basics

Copyright © 2016 Paul J. Drongowski

Get started: Linux ALSA and JACK

Before we dive into specific music applications, I need to provide a little background information about audio and MIDI support on Linux.

If you’re coming from Mac OS X or Windows, you may not have heard very much about the Linux way of doing audio and MIDI. Seems like the “mainstream media” don’t want to have much to do with Linux. Linux has a very well-developed infrastructure for audio and MIDI. Linux audio is a “stack” (a layer cake) with audio/MIDI applications on top:

  • Audio applications
  • JACK (Jack Audio Connection Kit)
  • ALSA (Advanced Linux Sound Architecture)
  • Linux kernel

You probably haven’t heard about JACK and ALSA before, so a little explaining is in order.

The Advanced Linux Sound Architecture (ALSA) uses the kernel to implement low-level — but extremely powerful — audio and MIDI features. ALSA provides several useful applications, but I like to think of ALSA as a tool to build higher level tools. ALSA is the layer that supports “soundcards,” which is the Linux catch-all term for hardware audio interfaces, MIDI interfaces, and more. Go to the ALSA project homepage to get more information from the developer’s perspective.

You are far more likely to interact with the Jack Audio Connection Kit (JACK) than ALSA. JACK is an audio/MIDI server that provides audio and MIDI services to JACK-based applications (i.e., applications using the JACK API). The list of JACK-enabled applications is impressive. In fact, this list is a rather good summary of the audio and MIDI applications that are available on Linux! Check out the JACK project page to get more information from the developer’s point of view. End-users (us normal people) should read the JACK FAQ which covers some of the finer points about JACK.

ALSA utils

The ALSA utility applications are collectively known as “ALSA utils.” Use the apt-get command to download and install the ALSA utils:

    sudo apt-get install alsa-utils

Here is a list of the ALSA utility applications:

    alsactl    Change and save settings for an audio device
    amixer     Adjust volume and sound controls (ncurses version)
    alsamixer  Adjust volume and sound controls (ncurses version)
    aconnect   Make MIDI connections
    aseqview   Display ALSA sequencer events (e.g., note ON, note OFF)
    aplay      Play back an audio file from the command line
    arecord    Record an audio file from the command line

Let’s take a look at a few of these applications in action.

Test speaker output

Although not strictly part of ALSA utils, speaker-test is a quick way to make sure that the built-in Raspberry Pi audio output is properly connected and configured.

First, connect the RPi2 audio output to your powered monitors using a 3.5mm to whatever patch cable. The Raspberry Pi built-in audio can be routed to either the 3.5mm audio jack (“analog”) or to the the HDMI port. Enter the command:

    amixer cset numid=3 N

to route the built-in audio. Replace “N” with one of the following choices:

    0: auto   1:analog   2:HDMI

In this case, use N=1 to route the audio to the 3.5mm audio jack. Then, run the command:

    speaker-test -t sine -f 440 -c 2

to send a 440Hz tone to the audio output. You should hear a test tone from your speakers.

If you don’t hear a test tone, double check your connections. You may need to add the current user to the audio group: sudo adduser XXX audio, where “XXX” is the user’s name. (I don’t believe this is strictly necessary.)

Play an audio file

Once speaker output is working, why not play an audio file? The aplay program plays an audio file. It supports just a handful of audio formats: voc, wav, raw or au. The default format is WAV.

    aplay -c 2 HoldingBackTheYearsDb.wav

The -c option specifies two channels. (The default is one channel of audio.)

If you listen carefully, you’ll notice that the built-in audio is a little bit noisy. I’ll get into the issue of audio quality in a future blog entry.

The command aplay -l displays a list of all sound cards and digital audio devices.

ALSA mixing

There are two ALSA utility mixer applications: amixer and alsamixer. amixer is a command line tool that controls one or more soundcards. The command (which does not have any command line arguments):

    amixer

displays the current mixer settings for the default soundcard and device as shown below:

    Simple mixer control 'PCM',0
      Capabilities: pvolume pvolume-joined pswitch pswitch-joined
      Playback channels: Mono
      Limits: Playback -10239 - 400
      Mono: Playback -2000 [77%] [-20.00dB] [on]

The output shows a list of the simple mixer controls at your disposal.

The alsamixer application is a bit more visual. alsamixer turns the terminal window into a visual mixer. Try:

    alsamixer

and see. Start alsamixer in one window and play an audio file in different window. Use the UP and DOWN arrows to control the playback gain (volume). Use the escape key (ESC) to exit alsamixer.

MIDI patch-bay

ALSA provides a virtual MIDI patch-bay that lets you interconnect MIDI senders and receivers. MIDI data is communicated from sender ports to receiver ports. A port may belong to either a MIDI hardware interface or a software application. The virtual patch-bay allows for very flexible, powerful MIDI data routing.

The aconnect utility application both displays the status of the virtual patch-bay and makes connections. First off, we need to know the available sender and receiver ports. The command:

    aconnect -i

displays a list of the sender ports including external MIDI input ports. External MIDI input ports (-i) are ALSA sender ports because they send MIDI data to ALSA receiver ports. I connected a Roland UM-2ex MIDI interface to one of the RPi’s USB ports and got the following output with aconnect -i:

client 0: 'System' [type=kernel]
    0 'Timer           '
    1 'Announce        '
client 14: 'Midi Through' [type=kernel]
    0 'Midi Through Port-0'
client 20: 'UM-2' [type=kernel]
    0 'UM-2 MIDI 1     '

The UM-2ex has one 5-pin MIDI IN (client 20, port 0).

Likewise, the command:

    aconnect -o

displays a list of the receiver ports including external MIDI output ports. External MIDI output ports (-o) are ALSA receiver ports because they receive MIDI data from ALSA sender ports. Here is the output when the UM-2ex is connected:

client 14: 'Midi Through' [type=kernel]
    0 'Midi Through Port-0'
client 20: 'UM-2' [type=kernel]
    0 'UM-2 MIDI 1     '
    1 'UM-2 MIDI 2     '

The UM-2ex has two 5-pin MIDI OUTs (client 20, port 0 and port 1).

The notions of sender and receiver may seem a little confusing especially in the context of external MIDI INs and OUTs. Please keep in mind that “send” and “receive” are defined with respect to ALSA itself (and ALSA objects).

Now, I want to really blow your mind. Let’s connect both the Roland UM-2ex and an M-Audio Keystation Mini 32 to the RPi2. Here is the output generated by aconnect -i:

client 0: 'System' [type=kernel]
    0 'Timer           '
    1 'Announce        '
client 14: 'Midi Through' [type=kernel]
    0 'Midi Through Port-0'
client 20: 'UM-2' [type=kernel]
    0 'UM-2 MIDI 1     '
client 24: 'Keystation Mini 32' [type=kernel]
    0 'Keystation Mini 32 MIDI 1'

We can see the MIDI IN for the UM-2 and the Keystation.

Here is the output generated by aconnect -o:

client 14: 'Midi Through' [type=kernel]
    0 'Midi Through Port-0'
client 20: 'UM-2' [type=kernel]
    0 'UM-2 MIDI 1     '
    1 'UM-2 MIDI 2     '
client 24: 'Keystation Mini 32' [type=kernel]
    0 'Keystation Mini 32 MIDI 1'

We see the MIDI OUTs for the UM-2 and the Keystation.

Let’s patch the Keystation (client 24, port 0) to the MIDI OUT of the UM-2ex (client 20, port 0):

    aconnect 24:0 20:0

The sender port is (24:0) and the receiver port is (20:0). MIDI messages are sent from the Keystation to the MIDI OUT of the UM-2ex. If you physically connect the MIDI IN of a tone module or synthesizer to the UM-2’s MIDI OUT, you can now play the tone module or synth using the Keystation. Guess what we just built? A USB MIDI to 5-pin MIDI bridge. Ever need to control an old school 5-pin MIDI synth using a new school USB-only MIDI controller? Now you can with Raspberry Pi and ALSA!

Run aconnect -l to display the connection status. Here is the output for the virtual patch bay:

client 0: 'System' [type=kernel]
    0 'Timer           '
    1 'Announce        '
client 14: 'Midi Through' [type=kernel]
    0 'Midi Through Port-0'
client 20: 'UM-2' [type=kernel]
    0 'UM-2 MIDI 1     '
	Connected From: 24:0
    1 'UM-2 MIDI 2     '
client 24: 'Keystation Mini 32' [type=kernel]
    0 'Keystation Mini 32 MIDI 1'
	Connecting To: 20:0

The output shows the connection from the Keystation to the UM-2ex.

To break the connection, run the command:

    aconnect -d 24:0 20:0

Run aconnect -l, again, and you’ll see that the connection has been removed.

More resources

If you’re a long-time reader of my site, you know that I blogged about the USB to 5-pin MIDI bridge technique before. If you have a Raspberry Pi and know how to run aconnect, you have a bridge!

The Ardour folks have two good articles about JACK on Linux (here and here).

New to Linux (Raspbian Jessie) on Rapsberry Pi? Then be sure to check out my article about getting started with Raspbian Jessie and Raspberry Pi.

Get started with Raspbian Jessie and RPi2

The Raspberry Pi 2 Model B (RPi2) is a computational gem. For $40 USD, you get a 900MHz quad-core ARM processor, a built-in graphics core, 1GBytes of RAM, 4 USB ports, HDMI, an Ethernet port, audio output and a Micro SD card slot. (The RPi2 does not have a built-in audio input.) This platform can handle most of the every-day tasks that people can sling at it and could easily replace platforms costing 10 times as much. Add in the cost of a keyboard/mouse, display and Micro SD card, and the total package price tips the scale at a little over $100.

When the RPi2 was introduced in February 2015, the Raspberry Pi Foundation released Raspsian Wheezy, the first Linux distribution supporting the RPi2. I installed the first release last February, and it felt, well, kind of wheezy.

I just installed the latest release, Raspbian Jessie (February 2016) and all I can say is “Wow.” This release feels finished. If you tried Raspbian on RPi2 before and were disappointed, it’s time to come back into the fold. (Download Raspbian.) This is the release that should have been there at the RPi2 launch! (See a quick introduction to the Jessie desktop.)

With a foot of snow on the ground, it seems like an opportune time to see what RPi2 and Jessie can do for musicians. I intend to try the RPi2 as a synthesizer and will post my experiences here. In the meantime, here are some tips for getting started with RPi2 and Jessie.

Linux requires just a little more work to get started than Mac OS X or Windows. However, if you put in just 10 or 20 minutes, you can have a quad-core music making machine for cheap. Shucks, even OS X and Windows 7 need to know your account name, etc. and Jessie doesn’t require much more information than that. So, what follows is my personal checklist for getting started with Raspberry Pi 2.

Hardware

Of course, you need the hardware. I bought a Canakit Raspberry Pi 2 kit last year. The Canakit includes most of the accessories that you need to get started. I imagine that future Canakit’s will include the latest Raspbian release (Jessie) pre-installed on Micro SD card.

My RPi2 lives in a cheap plastic case. That’s good enough — no fans, no heatsinks. I use an old HP monitor with an HDMI input and an even older Logitech wireless keyboard and mouse. The Logitech wireless interface takes up a single USB port, leaving three open USB ports. I connect the RPi2 Ethernet port directly to our router since I like to have the network up and running right from the start. The Canakit package included a USB Wi-Fi interface, but I never felt motivated to bring it up. Cables work good, too.

Once you have everything connected, it’s time to move on to software.

Download and install

Since our house is littered with computers, I first downloaded Raspbian Jessie to a Windows 7 PC. I followed the installation guide for Windows and wrote the disk image to an 8GByte Micro SD card. I do not recommend using anything smaller than an 8GByte card since you will need room for all the applications, samples and stuff for your projects.

The installation guide recommends the Win32DiskImager utility from Sourceforge. This utility works like a champ. Just be sure that you write to the correct destination disk!

If you’re installing from Linux or Mac OS X, there are installation guides for you, too. I do not recommend upgrading an old Wheezy system to Jessie. I read through the process and it is far easier to do a clean install.

First and second boot

Plug the Micro SD card into the RPi2 and apply power (i.e., plug in the power supply). It takes a few moments until the RPi2 boots the kernel (AKA “the OS”) and starts the X Windows system. The stock RPi2 boots into the desktop. The default user name is “pi” and the default password is “raspberry”.

At this point, it’s important to get a few housekeeping tasks out of the way. These tasks are similar to the ones you need to perform after installing OS X or Windows. These tasks use the raspi-config utility.

First, launch a terminal window by clicking on the terminal window icon in the task bar at the top of the screen. This action brings up a textual “shell” where you enter commands. Enter:

    sudo raspi-config

to launch the raspi-config utility. The sudo tells Linux that you want to use administrator (“super user”) privileges when running raspi-config. Linux will prompt for a password. Enter “raspberry”, the default password for the default user, “pi”.

raspi-config displays a rather 70s-ish interface with several options. Use the arrow keys to move between items. Use the ENTER key to select an item.

The disk image which you wrote to the Micro SD card probably didn’t use all of the available space on the card. So, your first job is to extend the Linux file system to use the entire Micro SD card. Use the arrow keys to move to the “Expand filesystem” item. Hit ENTER. When prompted to reboot, choose OK. You need to reboot to get access to the full capacity of the Micro SD card.

After reboot, you should be back in the desktop again. Launch a terminal window to get the shell. Enter sudo raspi-config to perform a few more housekeeping steps related to internationalisation. Use the arrow keys to move to the “Internationalisation options” item and hit ENTER.

It’s called “Internationalisation,” but it’s really configuring your RPi2 to your local country or region. raspi-config displays a short list of options. Choose the “Change timezone” option, follow the on-screen directions, and set your local timezone.

Next, choose your locale. The locale controls language and formating of date, time, currency, etc. The default locale is set for Great Britain. If you’re in the United States, for example, select one or more locales for the US, e.g., “en_US.UTF-8 UTF-8”. The text interface is a little weird here — use the SPACE key to mark one or more locales and hit ENTER when finished.

Then, change the keyboard layout. Follow the on-screen directions to find a close match for the keyboard that is connected to your RPi2. When you see questions about “compose key,” etc., fake your way through the menus. You probably won’t be doing this stuff anyway.

Finally, reboot. Rebooting the system at this point makes sure that the locale and other internationalization changes kick in.

Explore and browse

After reboot, the RPi2 should again return to the desktop. Now it’s time to explore the desktop a little bit. I recommend taking a tour through the start menu in the upper left corner of the desktop. When you find a menu item for the browser, try it out! If all is good with your network connection, then you should be able to access the Web. This is my lifeline to helpful information about Raspbian Linux and the many tutorials and HOW-TOs on the Web.

Also, check out the File Manager. This is a graphical way to browse through your files. Linux uses a hierarchical file system where absolute path names begin from the root, which is symbolized by the slash (“/”) character. More about this in a minute.

Just a few more things

I recommend creating a new user for yourself and keep the default user “pi” around for emergencies or administration. The Raspberry Pi folks have a nice introduction to user management. It’s a short read and now that you have the browser running, why not?

If you’re too lazy to read the guide, then use the following command to create a new user:

    sudo adduser XXX

where “XXX” is the name of the new user. The system prompts for the new user’s password. This part is up to you! You can remove the password for a user by entering the command:

    sudo passwd XXX -d

where “XXX” is the name of the user. The passwd command can be used to change your own password, too. If you want to remove a user, then run the command:

    sudo userdel -r XXX

where “XXX” is the name of the user to be removed.

The guide to user management describes “sudoers” and how to grant permission to a user to execute the sudo command. This process changes an internal user privileges file, so you must be careful. Enter the command:

    sudo visudo

and find the line:

    root	ALL=(ALL:ALL) ALL

Create a new line using this line as a model, except replace “root” with the name of the user who is to be a new sudoer, e.g.,

    XXX		ALL=(ALL:ALL) ALL

Save the changes and exit the editor. Oh, the editor here is nano, which is one of the pre-installed applications.

Users have their homes in the directory “/home”. If the user’s name is “XXX”, then their home directory is named “/home/XXX”. Here are a few commands that you can use to navigate through the file system via the shell.

    ls          List directory
    cd          Change the working directory
    pwd         Display the current working directory
    mkdir       Make new directory
    rmdir       Remove directory
    cp          Copy file (or directory)
    mv          Rename a file (or directory)
    rm          Remove file
    cat         Display file contents
    more        Display file contents
    nano        Edit text file
    date        Displays the current date

If you need help, you can always enter the desired command with the “–help” option. Or, you can display the manual page for the command, e.g., “man ls”. All of these commands have many options, making them quite flexible and powerful.

You can find more basic information about using Linux on this page.

Install applications

Speaking of new applications, you can install a new application from the command line if you know the package name. This is the most straightforward way to install a package (application). For example, I like the emacs text editor. The following command installs emacs:

    sudo apt-get install emacs

The apt-get command searches for the package on-line, downloads it and installs it. The command also installs any other packages which the target package needs (e.g., libraries). In Linux terms, it resolves dependencies. Installation is sometimes slow, so please be patient.

There is also a package manager with a nice user interface. Find the package manager in the desktop start menu and browse through the available applications. I’ll revisit this subject in future posts when we discuss specific music-oriented applications.

USB flash drives

The need for a USB flash drive is sure to come up. I recommend this guide to adding and using USB drives. Here are a few quick commands for reference. Create a mount point:

    sudo mkdir /mnt/usb_flash

Mount the USB flash drive (after inserting the drive):

    sudo mount -o uid=XXX,gid=XXX /dev/sda1 /mnt/usb_flash

where XXX is your user name. Unmount the flash drive when you’re finished using it:

    sudo umount /mnt/usr_flash

You can display the currently mounted file systems with the command:

    df -h

This command also shows the amount of used and available space in the various file systems and drives.

Raspbian Jessie is smart enough to recognize when a USB drive is inserted. It displays the File Manager automatically. If you are a File Manager type of person, definitely go this route. You must eject (unmount) the drive before removing it. The EJECT button appears in the upper right hand corner of the desktop.

Boot to a login shell

Raspbian Jessie boots into the desktop as the default user “pi”. You probably want to boot into your own account instead. At the moment, you need to dig into some system files to make the change and I simply don’t recommend diving into that, especially if you are new to Linux.

Instead, you can easily change the boot behavior using raspi-config. Launch raspi-config and choose the “Enable Boot To Desktop” option. Then, choose to boot to the command line. The next time you boot, the system will display a login prompt where you can enter your user name and password. Once your identity is validated, Linux puts you directly into a command line shell. If you want to, you can enter any Linux command into the shell and do some work. When you want to start the X Windows system and the desktop, just type:

    startx

Read the on-line documentation about respi-config for more information.

Shutting down

All operating systems like to shut down in an orderly way. OSes often times keep data in temporary buffers that need to be flushed to disk or flash memory. An orderly shutdown helps keep data in a consistent, correct state.

You can shutdown the system through the desktop start menu. (Yeah, that sounds oxymoronic.) You can also shutdown the system via the command line shell. Just execute the command:

    sudo shutdown -h now

The -h option asks Linux to halt the processor after shutting down. The shutdown command has other options for rebooting and so forth:

    sudo shutdown -r now

Here’s another way to force a reboot. Just enter:

    sudo reboot

on the command line.

If you enjoyed this introduction, you might want to check out the Raspberry Pi tips and tricks page that I wrote for the first generation Pi.

Well, that wasn’t so bad, was it? Good luck and have fun with Raspberry Pi 2!

All site content is Copyright © Paul J. Drongowski unless otherwise indicated.

PERF tutorial part 3 is now on-line

Just wrapped up Part 3 of the Linux-tools PERF tutorial.

The tutorial now consists of three parts. Part 1 covers the most basic PERF commands and shows how to find program hot-spots using software performance events. Part 2 discusses hardware performance events and performance counters, and demonstrates how to measure hardware performance events using PERF counting mode. Part 2 introduces several derived performance metrics like instructions per second (IPC) and applies these metrics to the sample application programs.

Part 3 is the newest addition to the tutorial series. It builds on parts 1 and 2, showing how to use hardware performance events and counter sampling to profile an application program. Part 3 discusses sampling period and frequency, the sampling process, overhead, statistical accuracy/confidence and other practical concerns.

I hope you find the PERF tutorial to be useful in your work! Although I produced the example data on the ARM-based Raspberry Pi, the commands and techniques will also work on x86.

PERF tutorial part 2 now available

Part 2 of a three part tutorial about Linux-tools PERF is now available.

Part 1 of the series shows how to find hot execution spots in an application program. It demonstrates the basic PERF commands using software performance events such as CPU clock ticks and page faults.

Part 2 of the series — just released — introduces hardware performance counters and events. I show how to count hardware events with PERF and how to compute and apply a few basic derived measurements (e.g., instructions per cycle, cache miss rate) for analysis. Part 3 is in development and will show how to use sampling to profile a program and to isolate performance issues in code.

All three parts of the series use the same simple, easy to understand example: matrix multiplication. One version of the matrix multiplication program illustrates the impact of severe performance issues and what to look for in PERF measurements. The issues are mitigated in the second, improved version of the program. PERF measurements for the improved program are presented for comparison.

The test platform is the latest second generation Raspberry Pi 2 running Raspbian Wheezy 3.18.9-v7+. The Raspberry Pi 2 has a 900MHz quad-core ARM Cortex-A7 (ARMv7) processor with 1GByte of primary memory. Although the tutorial series demonstrates PERF on Cortex-A7, the same PERF commands and analytical techniques can be employed on other architectures like x86.

A special note for Raspberry Pi users. The current stable distribution of Raspbian Wheezy — 3.18.7-v7+ February 2015 — does not support PERF hardware events. Full PERF support was enabled in a later, intermediate release and full PERF support should be available in the next stable release of Raspbian Wheezy. In the meantime, Raspberry Pi 2 users may profile their programs using PERF software events as shown in Part 1 of the tutorial. First generation Raspberry Pi users are also restricted to software performance events.

Brave souls may try rpi-update to upgrade to the latest and possibly unstable release. I recommend waiting for the next stable release unless you really, really know what you are doing and are willing to chance an unstable kernel with potentially catastrophic consequences.

RPi2: Work in progress 1

Here’s a quick status update on working with Raspberry Pi gen 2. The installed operating system is Raspbian Wheezy 3.18.7-v7+ built on 16 February 2015.

I’m happy to report that I could profile programs using PERF software events. I’m disappointed to report that PERF does not recognize any hardware (performance counter) events. This distro has Linux-tools-3.2 installed. I uninstalled 3.2 and installed 3.18 which matches the kernel:

sudo apt-get remove Linux-tools-3.2
sudo apt-get install Linux-tools-3.18

Still no joy when attempting to use hardware events. If you want to profile your program using PERF software events, please see my current PERF tutorial about finding execution hot-spots. I tried all of the commands and, with the exception of one typo, everything still works!

I’m in the process of troubleshooting my loadable kernel module for user-space performance counter events. I’ve encountered many of the same old stumbling blocks (e.g., finding the correct headers and Module.symvers file). At the present time, the kernel will attempt to load the module, then die. I cannot tell at this stage if there is a problem in the module itself or if there is a bug in Raspbian Wheezy. In case you want to dive into module development yourself, I’ve started a permanent page for building kernel modules on RPi2.

Once again, after two+ years, I want to make a public plea for more open information about the underlying hardware and for guidance and support for end-user device driver development. Quite frankly, Broadcom plays this situation too close to the chest, especially for a computer that’s advertised as a vehicle for learning and education. The dearth of information is stifling. People still struggle to identify and download essential information (e.g., Module.symvers) for device driver development. This is not true of other major Linux distros and the Raspbian folks really need to take note! Broadcom, in particular, runs the risk of killing off the goose laying the golden eggs.

Before signing off, here is a quick PERF command cheat sheet. I recommend reading the tutorial, but if you really must peck away at the keyboard… All the best!

perf help
perf list
perf stat -e cpu-clock ./program
perf record -e cpu-clock ./program
perf record -e cpu-clock,faults .program
perf report
perf report --stdio --sort comm,dso --header
perf report --stdio --dsos=program,libc-2.13.so
perf annotate --stdio --dsos=program --symbol=function
perf annotate --stdio --dsos=program --symbol=function --no-source
perf record -e cpu-clock --freq=8000 ./program
perf evlist -F

Replace “program” with the name of your application program and replace “function” with the name of a function in your program.

Second generation RPi is here

The second generation Raspberry Pi (RPi2) is now shipping in large quantities! Given the excitement on the Web, this machine should be at least as popular as its first generation parents. Although the RPi2 model B has the same overall form factor as the first generation model B+, the designers made two substantial improvements which make the RPi2 a contender for your desktop:

  1. The single core Broadcom BCM2835 is replaced by the quad core BCM2836.
  2. Primary memory is increased to 1GByte of LPDDR2 RAM.

That’s just the face of it. Not only does the BCM2836 have four processor cores instead of one core, the cores are based on the ARMv7 architecture (Coretx-A7) including the NEON single instruction, multiple data (SIMD) instructions. The clock frequency is increased to 900MHz (from 700MHz). I’ve already begun to explore the ARMv7 micro-architecture and plan to write up a short, concise summary of its performance-related characteristics.

The BCM2836 has a different memory controller. Primary memory is no longer implemented using the Package on Package (PoP) approach. The Elpida (Micron) B8132C4PB-8D-F memory chip is mounted on the bottom of the RPi2 board (instead of the PoP piggyback).

The RPi2 sold out at Sparkfun almost immediately. Fortunately, Canakit, Element14 and Microcenter have received shipments, too. Amazon advertised the Canakit Raspberry Pi 2 Ultimate Starter Kit at a very attractive price and I immediately bought a kit. Microcenter in Cambridge had a mound of RPi2s and impatience took the best of me — I bought one. Yes, after getting the mail, I now have two.

I copied the latest Raspbian Wheezy release (16 February 2015) to a 16MByte microSD card using Win32DiskImager. The Canakit ships with NOOBS on an 8GByte card and I hope to try and report about NOOBS later. There was a little drama while bringing up Raspbian Wheezy as some relatively small, but annoying problems did crop up. Once I got past the sand traps, the new RPi2 proved to be an able performer.

Today, I copied my test software over to the RPi2. Here is a quick comparison between the older RPi model B and the new RPi2.

Platform Naïve MM Interchange MM
RPi model B gen 1 18.67 sec 6.75 sec
RPi gen 2 3.15 sec 2.42 sec

The two test cases are the naïve matrix multiplication program and the loop nest interchange matrix multiplication program. (Get the code in the source section of the web site.) Yes, that is a 6x improvement in performance for the naïve case. It’ll be fun to explore and find the reasons behind the speed-up. Fast matrix multiplication depends upon memory bandwidth and there must be some significant improvements in the memory subsystem. Naïve matrix multiplication incurs a lot of translation lookaside buffer (TLB) misses, so improvements in TLB miss handling could also contribute to the speed-up in the naïve test case.

I ditched the Epiphany Web browser as it seems to have significant bugs. The browser crashed repeatedly when loading the New York Times front page. This is unacceptable. I installed Midori, which came with the initial release of Raspbian Wheezy. The New York Times front page is a bit of a torture test. Midori loaded the page in less time than the RPi gen 1, but still felt slow and logy. I suspect that many applications will need to be compiled for ARMv7 before we end-users get the full benefit of the BCM2836. The initial result, however, is encouraging.

Well, I’ve started to reorganize the site’s menu structure in order to get ready for new content about the RPi2. I intend to retain the older articles as they remain quite relevant. More to come!

Send MIDI from USB-B to 5-pin

Please see the bottom of this page for an update.

Way back in January 2014, I outlined a way to send MIDI from a USB-B only controller to a keyboard or module with classic 5-pin MIDI using Raspberry Pi as a bridge. Finally, one year later, I got to try out this idea.

It seems like MIDI over USB has taken over the MIDI controller world!

New controllers now communicate MIDI data over USB instead of using the old 5-pin DIN interface. 5-pin MIDI is dirt simple and is just a faster form of plain old serial communication — no bus protocol, no host/client, no hassles.

The world was 5-pin MIDI for a long time and many classic synthesizers and workstations only have a 5-pin DIN interface. Most of the new controllers have only a USB-B device port and expect to be connected to a USB-A host port for power and communication. If you want to use your new controller with an old 5-pin MIDI synth, you have a communication gap to bridge. Because USB is a peripheral bus with a sophisticated protocol, USB cannot be directly connected/converted to simple 5-pin MIDI signals.

There are two ways to bridge the gap:

  1. Buy a bridge box like the Kenton MIDI USB Host (about $115USD) or iConnectivity iConnectMIDI4+ ($200USD).
  2. Use a PC-based DAW to bridge 5-pin MIDI ports and USB MIDI ports.

Both solutions involve software, a computer, a 5-pin MIDI IN/OUT interface, and a USB-A Host interface. The old synth (or whatever) is connected to the computer through the 5-pin MIDI IN/OUT interface and the controller is connected to the USB-A Host port. The software streams the MIDI data between the 5-pin and USB worlds.

The Kenton is portable, but is a little bit pricey for my taste. Also, the Kenton is not readily available in all parts of the world (e.g., the USA) and shipping is expensive. The PC-based bridge is not so portable and maybe you don’t want to take a laptop to the gig.

Hmmm, let’s see. Computer? USB Host interface? Software? Raspberry Pi!

The Rapsberry Pi B+ would be the ideal model with its four USB Host (A) ports. From the hardware perspective, here’s what we need to do:

  • Connect the USB MIDI controller to one of the Raspberry Pi USB-A Host ports.
  • Connect a bog standard 5-pin MIDI to USB-A interface to one of the other USB Host ports.
  • Connect the 5-pin MIDI IN/OUT ports on the interface to the appropriate 5-pin MIDI ports on the old synth.

This is exactly how we would connect the controller and synth if we used the PC and the DAW except we have replaced the PC with the Raspberry Pi (much smaller and only $40USD).

For software, the Raspbian Linux operating system comes with ALSA audio and MIDI support. We need to use the ALSA aconnect utility to identify the incoming and outgoing MIDI ports and to connect the appropriate ports.

I wanted to try this approach without buying any new hardware. Unfortunately, my Raspberry Pi is the earlier model B with only two USB-A Host ports. I need at least one more port to connect a keyboard and mouse, so a hub has to enter the picture somewhere. I found that the ALSA software did not recognize the controller or MIDI interface through my cheapo non-powered USB hub. Please keep this possible limitation in mind during your own experiments.

Here’s my test set-up. The keyboard controller is an M-Audio Keystation Mini 32. I used an Apple keyboard and mouse for regular user I/O. The Apple keyboard has a built-in hub and adds two USB-A ports. The keyboard is connected to the Raspberry Pi and the mouse is connected to one of the keyboard USB-A ports. The Keystation is connected to the second USB-A port on the Apple keyboard through a USB-A to USB-B cable.

USB-B to 5-pin MIDI connection diagram

The 5-pin MIDI IN/OUT ports are provided by a Roland (Edirol) UM-2ex USB MIDI interface. This interface is connected to one of the Raspberry Pi USB-A Host ports. The UM-2ex has a switch to select either the standard driver or an advanced proprietary driver. Select the standard driver setting. You want to be “class compliant” all the way for best results. Connect the 5-pin MIDI IN/OUT ports to the synth using standard MIDI cables. For this test, the synth is a Yamaha PSR-S950 arranger workstation.

Boot Raspbian and log in. You can either run aconnect from the initial shell or you can start the X Windows systems. For this example, I chose to start X Windows so I could capture output from aconnect.

Type “aconnect -i” to display a list of the readable input ports. These are the ports which provide incoming MIDI data.

$ sudo aconnect -i
client 0: 'System' [type=kernel]
    0 'Timer           '
    1 'Announce        '
client 14: 'Midi Through' [type=kernel]
    0 'Midi Through Port-0'
client 20: 'UM-2' [type=kernel]
    0 'UM-2 MIDI 1     '
client 24: 'Keystation Mini 32' [type=kernel]
    0 'Keystation Mini 32 MIDI 1'

The “$” charcter in the example output is the shell command prompt. The output shows the UM-2ex MIDI input port (client 20) and the Keystation (client 24). The Keystation input port is the source of the MIDI data that we want to send to the synth.

By the way, sudo is required when entering these commands through X Windows as an ordinary user. Superuser privilege is needed to set up ALSA connections.

Type “aconnect -o” to display a list of the writeable output ports. These are the ports which send outgoing MIDI data.

$ sudo aconnect -o
client 14: 'Midi Through' [type=kernel]
    0 'Midi Through Port-0'
client 20: 'UM-2' [type=kernel]
    0 'UM-2 MIDI 1     '
    1 'UM-2 MIDI 2     '
client 24: 'Keystation Mini 32' [type=kernel]
    0 'Keystation Mini 32 MIDI 1'

The output shows the two UM-2ex MIDI OUT ports (client 20 ports 0 and 1) and the Keystation (client 24).

Finally, type “aconnect 24:0 20:0” to establish a bridge between the Keystation port and the UM-2ex MIDI OUT port.

sudo aconnect 24:0 20:0

The first port (24:0) on the command line is the sender and the second port (20:0) is the receiver.

Play a few notes on the controller. If the controller and synth are communicating on the same MIDI channel (usually channel 1 by default), then you should hear some sound from the synth — assuming that the volume is turned up and the synth is connected to an amp, and so forth!

Type “aconnect -x” to remove all connections when finished. Individual connections can be removed using the -d option. If you ever need usage information about aconnect, just type “aconnect -h” or “man aconnect”.

Just for fun, I tried using the Yamaha PSR-E443 for input instead of the Keystation. I replaced the Apple keyboard hub with a powered USB hub, too. (Apple keyboards and Linux don’t always interoperate as friends!) The PSR-E443 keyboard sends on MIDI channels 1 (main voice), 2 (dual voice) and 3 (split voice). By assigning these MIDI channels to RIGHT1, RIGHT2 and LEFT on the S950, I could play a layer in the right hand with a split bass in the left hand.

So, there you go! A simple, cheap bridge between a USB MIDI controller and an old school 5-pin MIDI synthesizer. The next step is to find a way to discover and connect MIDI ports through a boot time, start-up script. If you solve this problem, please post the solution!

Update:If you enjoyed this blog post, then you might like these articles, too:

RPi MIDI bridge

[Update: See Send MIDI from USB-B to 5-pin.]

Here’s a vexing problem that many electronic musicians face.

Let’s say that you own a lot of gear, some of which uses the old school 5-pin DIN MIDI interface. For example, there are a ton of classic (and not so classic) tone modules and keyboards that have 5-pin MIDI IN and MIDI OUT ports.

Then, you buy a new mobile MIDI controller which only does MIDI over USB through a USB B device port. The M-Audio Keystation Mini 32 is an example. This design covers the most common case — hooking the controller to a computer having a USB A host port — but you can’t connect the controller directly to the 5-pin MIDI IN port on one of your old tone modules or keyboards. USB ain’t RS-232 and class-compliant MIDI over USB has its own protocols, too. So, you can’t just whip up a simple cross-over cable or signal converter.

There are two commercial solutions to this problem: the Kenton USB MIDI host and the iConnectivity iConnectMIDI4+. Neither of these solutions is cheap and they cost more than a lot of MIDI controllers themselves!

Some people on the web have suggested an Arduino-based solution. However, here’s an easy riddle. What super low cost single-board computer has two USB host ports? Answer: The Raspberry Pi Model B.

The RPi Model B seems like a natural for this problem. It’s inexpensive, it has the necessary ports, and there are plenty of rugged cases available. Musicians will want to use this solution at the gig, so a good case is essential. There are two issues. First, the RPi can source only a limited amount of power to a USB device. Some MIDI controllers may draw too much current. Second, musicians don’t like to haul extra gear to a gig, so they won’t want to take a display and keyboard to a gig just to boot the RPi and run the software needed to bridge the two USB A ports. The solution must be stand-alone, plug-and-play, and consist only of the RPi itself, a power source, and a few cables.

Here’s what I have in mind for the hardware. The MIDI controller is connected to the RPi using a standard USB A to USB B cable. The MIDI controller draws power from the RPi. Some MIDI controllers have a dedicated power supply jack and in that case, a separate power adapter for the MIDI controller seems prudent. The other USB host port on the RPi is connected to an inexpensive commercial USB to 5-pin MIDI interface — the kind used to connect 5-pin equipment to computers. The commercial interface should be MIDI class-compliant and should not require special drivers. Knowing the state of the world such as it is, you may not easily find proprietary Linux drivers for the interface. The commercial MIDI interface provides the connection to the 5-pin DIN MIDI ports on your old piece of gear.

Musicians usually have an old USB MIDI interface like the Edirol/Roland UM-2EX in the studio. These interfaces are readily available at very low cost on the web for not much more dosh than a cable. This approach doesn’t require custom hardware or shields like an Arduino-based solution.

Here’s what I have in mind for the software. Folks already bridge PC MIDI ports using MIDI-OX. Linux has the ALSA MIDI software. The amidi -l command displays the physical and virtual MIDI ports. The aconnect command connects MIDI ports. The trick will be discovering and connecting MIDI ports after boot without manual intervention, i.e., the RPi boots and builds the bridge without a keyboard, display, a log in, etc.

So, there it is! My hardware lab is currently in disarray so I can’t easily do a proof of concept implementation. However, if you have the RPi and the pieces/parts, please give this a try.

If you enjoyed reading this article, you may find these articles interesting, too:

A sweet one-liner for histograms

Here is a shell script one-liner that is just too sweet to go unrecognized.

I’ve written a program (latency.c) to measure the execution time of individual chase operations in a linked list pointer chasing loop. The program writes the execution times into a file named samples.dat. The distribution of the execution times should show the access time to different levels of the ARM1176 memory hierarchy.

I still needed a way to view the distribution in a histogram. So, I wrote a short C program (histogram.c) to postprocess the execution times. The program produces a histogram-like table — not a chart. Bummer.

A quick search of the Web brought up some rather sophisticated data visualization tools. I experimented with a few of them, but still couldn’t get want I wanted.

Then, this little gem came up from Small Labs, Inc. (Search on “command line histogram.)

history | awk '{h[$2]++}END{for(i in h){print h[i],i|"sort -rn|head -20"}}' |awk '!max{max=$1;}{r="";i=s=60*$1/max;while(i-->0)r=r"#";printf "%15s %5d %s %s",$2,$1,r,"\n";}'

This one-liner displays a histogram of recent command lines (history) from the most to least frequently used. It displays only the 20 most frequent commands (head -20).

This one-liner looks quite promising, but it needs a few changes. First, it needs to read data from the file samples.dat. It needs to read only one item from each line of the file; history produces two items per line. Finally, we can discard some of the white space in the output and make the lines in the chart narrower.

Here is the revised one-line written in the form of a bash shell script. We’re going to analyze several files and it’s appropriate to put the one-liner into a shell command file.

#!/bin/bash

cat samples.dat | awk '{h[$1]++}END{for(i in h){print h[i],i|"sort -rn|head -20"}}' |awk '!max{max=$1;}{r="";i=s=60*$1/max;while(i-->0)r=r"#";printf "%6s %5d %s %s",$2,$1,r,"\n";}'

Here is some sample output.

    62  517 ###########################################################
    61  301 ################################### 
     9  119 ############## 
    70   12 ## 
    63   11 ## 
    65    9 ## 
    64    4 # 
    17    4 # 
   336    2 # 
   168    2 # 
   154    2 # 
    71    1 # 
    67    1 # 
    60    1 # 
   525    1 # 
   521    1 # 
   390    1 # 
   389    1 # 
   386    1 # 
   378    1 # 

We can easily see the most frequent values, but this doesn’t really show the distribution in a useful way. So, let’s just sort the output on the leading numeric values (sort -n). The numbers in the first column are access/latency times in cycles, by the way.

     9  119 ##############
    17    4 # 
    60    1 # 
    61  301 ###################################
    62  517 ###########################################################
    63   11 ## 
    64    4 # 
    65    9 ## 
    67    1 # 
    70   12 ## 
    71    1 # 
   154    2 # 
   168    2 # 
   336    2 # 
   378    1 # 
   386    1 # 
   389    1 # 
   390    1 # 
   521    1 # 
   525    1 # 

Ah, now we can see the level 1 data cache hits (9 cycles including measurement bias) and reads to primary memory (61 and 62 cycles). The bi-modal nature of the distribution is revealed.

Before leaving this topic, I’d like to give a shout-out to Dave Christie at AMD. Dave always gave me a good-natured kidding about these old school histograms. Dave, BTW, is one of the true unsung technical heroes at AMD. All the best!