Blazin’

Baby, I’m amazed at how fast I have pulled together enough MODX Performances to take MODX to my gig tomorrow. This is definitely a set up record and testimony to efficient workflow through the touch screen user interface. Of course, being familiar with the Yamaha AWM2 synthesis architecture (and its many parameters) is a big help.

There were only a few sticking points like how to delete a Part from an MODX Performance. It works like a right-click context menu — hold SHIFT and touch the Part that you want to delete, etc. The MODX pops a menu.

I did a little A/B testing between MODX and Genos™ as a sanity and ear check. I compared my MODX Performances against the Genos registration settings that I crafted for my church sounds (mainly orchestral instruments/layers and B3 organ).

I was surprised to hear the difference between the MODX and Genos drawbar organ. The MODX was grungier and I had to find out why.

All 9 Bars!

It’s worth unpacking the “All 9 Bars!” Performance simply to learn about MODX Performance (and voice) programming. Please remember that MODX (and Montage) Performance structure is relatively flat. A Performance consists of Performance Common data and one or more Parts. Look inside Performance Common for Variation, Reverb and Multi-effects (MFX) effect routing and parameters. These are the system-level effects that affect all Parts in the Performance.

Each Part contains Part Common data and one to eight voice elements. A voice element is either a mini AWM2 or FM-X synthesizer depending on voice type. Part Common is where the Insert A and Insert B effects are defined. They affect one or more voice elements depending upon insert effect switch status. In “All 9 Bars!” the Insert A and B effects are “Rotary Speaker 1” and “Multi FX”, respectively. Please see my last post for more details.

The MODX does not have an explicit Voice (capital “V”) object type; voice (lower case “v”) information is contained within a part. I will use “voice” (lower case “v”) at times in my writing. Please keep the distinction in mind.

“All 9 Bars!” consists of two parts. Part 1 handles the first eight drawbars:

Element# Waveform
1 Draw 16′
2 Draw 5 1/3
3 Draw 8′
4 Draw 4′
5 Draw 2 2/3′
6 Draw 2′
7 Draw 1 3/5
8 Draw 1 1/3

Expanded Articulation (XA) is “Normal” meaning that all of the elements trigger with a key press. This chews up polyphony pretty quick. Good thing the MODX has 128 AMW2 voice polyphony.

Part 2 has the ninth drawbar (1′) and special effects goodies. Think of “All 9 Bars!” in the same way as a multi-part piano voice with key noises, etc.

Element# Waveform Purpose
1 Draw 1′ 1′ drawbar
2 Percussion Percussion
3 Rotor Grit Rotor noise
4 Rotor More rotor noise
5 Draw 8′ Key click
6 Draw 8′ Key click

If you want to clean up the sound or turn off key click, look into Part 2.

The SuperKnob is programmed to control the amount of distortion drive in the Insert B “Multi FX” effect. The MOD wheel and Assignable Function button 1 (AF1) controls the rotary speaker speed.

Why the Genos B3 is soooo polite

The Genos B3 is too polite and clean, especially for rock and grungier forms of jazz, funk and gospel. Both the MODX and Genos have the same rotary speaker effect. The MODX, however, has a longer effects chain and includes a “Multi FX” distortion with top boost effect. After shutting down “Multi FX,” the MODX is still grungier. That’s why I decided to deconstruct “All 9 Bars!”.

The Genos does not have the rotor noise or key click components. Each of Genos’ RIGHT1, RIGHT2, RIGHT3 and LEFT parts are what MODX folks would call single Part Performance. RIGHT1, etc. each implement a single voice consisting of one to eight elements. Even though an “Organ Flutes” voice behaves like a multi-Part Performance, you cannot extend it or reprogram it. “Organ Flutes” is a closed black box.

One could, however, construct a Genos organ FX voice with percussion, rotor and key click elements and then layer the organ FX voice with an Organ Flutes voice, i.e., assign an Organ Flutes voice to RIGHT1 and assign the organ FX voice to RIGHT2. One would have to build the organ FX voice in (Yamaha Expansion Manager) YEM — totally do-able. I wish Yamaha published a waveform list as the necessary samples may already be hiding in the Genos waveform ROM.

Seen it, done that

Here’s a peek at the Live Set for Sunday. This is an experimental layout. I hope that I can poke the buttons on the fly. [Click images to enlarge.]

I took what I learned about the “All 9 Bars!” Performance and build a new Performance called “B3 Church Scene PJ”. The Performance uses scenes to switch in additional drawbars. I have three signature settings that I use every Sunday. I start out with a basic church sound and then add drawbars to it as the hymn (or whatever) progresses.

BTW, I have the EQ low dialed way down. Too much bass gets in the way of our pianist. Also, thankfully, Performances remember the state of the selected knob parameters. I make occasional EQ changes on the fly.

The MODX Scene mechanism seems to be built for this kind of voice switching. Plus, the Scene buttons are so close at hand. I successfully put the AF1 and AF2 buttons to work this way on the MOX6. Building a new MODX Performance from “All 9 Bars!” was a good learning experience and it got me ready for Sunday. Maybe I can make orchestral combinations with Scenes and maybe, gasp, put the SuperKnob to work? Stay tuned.

Copyright © 2018 Paul J. Drongowski

Audio Style file format

Yamaha introduced audio styles in the PSR-S950 arranger workstation. Audio styles are both loved and hated. Loved when they sound good, but hated when people try to change or repurpose them in new styles.

The term “audio style” is a bit of an overstatement. Only the percussion track is audio. At least, that’s how audio styles have been developed and used to this day. Yamaha just released the Audio Phraser application for creating and editing the basic skeleton of an audio style, so this situation may change now that people can more freely create, edit and share their own audio styles.

Audio style file internal format

Ever since Yamaha distributed the audio styles for Genos, I’ve been meaning to take a look inside of an audio style file. Here’s a little preliminary information.

An audio style file is an IFF-like container just like a Standard MIDI File (SMF). In fact, an audio style file has the same internal organization as a regular style file which we know to be a Type 0 SMF with extra chunks.

An audio style file has the following chunks (in order):

    Type    Purpose
    ----    ------------------------------------
    MThd    SMF header chunk
    MTrk    SMF track chunk
    CASM    Yamaha CASM chunk
    AASM    Audio assembly (descriptor) chunk
    AFil    Audio file (waveform) chunk
    OTSc    Yamaha OTS chunk

The AASM and AFil chunks are new, additional chunks beyond the known MIDI, CASM and OTS chunks. All chunks have a four byte chunk identifier and a four byte chunk size. The chunk size does not include the identifier or chunk size bytes, as usual.

The AASM chunk is relatively small, about 2,500 bytes. It consists of 15 variable length ASEG subchunks. The ASEG subchunk has a four byte subchunk size. Each ASEG corresponds to a style section; that’s why there are fifteen of them.

An ASEG subchunk has three parts:

    Type    Purpose
    ----    ------------------------------------
    Adec    Identifies the style section
    Atab    Identifies the audio file; other functions unknown
    AMix    Function unknown

The Adec part is variable length, having an explicit four byte size. The Atab and AMix parts appears to be fixed length (101 and 28 bytes, respectively) and do not have an explicit size field.

The Adec part is ASCII text and is a style section name like “Main A” or “Fill In DD”. That is the only information in Adec.

I don’t know exactly what the Atab does. The Atab part contains an ASCII string which identifies the audio file associated with the style section. This string is clearly visible in a dump. (Example below.) All of the Atab and AMix parts in the test audio file have the same values except for the audio file names.

File Offset:       36965
Subchunk type:     'ASEG'
Subchunk size:     151
Section name:      Main D
Atab type:         'Atab'
   0    0    0   97    0   32   32   32 | 00 00 00 61 00 20 20 20 | ...a.
  32   32   32   32   32   41   56   48 | 20 20 20 20 20 29 38 30 |      )80
 115   67   97  110   97  100  105   97 | 73 43 61 6E 61 64 69 61 | sCanadia
 110   82  111   99  107   95   77   97 | 6E 52 6F 63 6B 5F 4D 61 | nRock_Ma
 105  110   32   68    0    0    0    0 | 69 6E 20 44 00 00 00 00 | in D....
   0    0    0    0    0    0    0    0 | 00 00 00 00 00 00 00 00 | ........
   0    0    0    0    0    0    0    0 | 00 00 00 00 00 00 00 00 | ........
   0    0    0    0    0    0    0    0 | 00 00 00 00 00 00 00 00 | ........
   1   15   -1    7   -1   -1   -1   -1 | 01 0F FF 07 FF FF FF FF | ........
   0    0    0  127    0    0    0    0 | 00 00 00 7F 00 00 00 00 | ........
 127    0    0    0    0    0  127    0 | 7F 00 00 00 00 00 7F 00 | ........
   0    0    0    0  127    0    0    0 | 00 00 00 00 7F 00 00 00 | ........
   0    0    0    0    0    0    0    0 | 00 00 00 00 00 00 00 00 | ........
AMix type:         'AMix'
   0    0    0   24    7 -128    0   -1 | 00 00 00 18 07 80 00 FF | ........
  88    4    4    2   24    8    0  -80 | 58 04 04 02 18 08 00 B0 | X.......
   7   71    0   10   64    0   91    0 | 07 47 00 0A 40 00 5B 00 | .G..@.[.
   0   -1   47    0    0    0    0    0 | 00 FF 2F 00 00 00 00 00 | ../.....

Etienne from the PSR Tutorial Forum points out that the AMix subchunk contains MIDI event codes:

AMix : header
00 00 00 18 : length of data
07 80 : 0780 hex = 1920 decimal (PPQN ?)
00 : delta time
FF 58 04 04 02 18 08 : meta event Time signature 4/4
00 : delta time
0B 07 70 : controller volume
00 : delta time
0A 40 : controller Panpot
00 : delta time
5B 00 : Controller Reverb send level
00 : delta time
FF 2F 00 : end of MTrk trunk

Nice catch, Etienne! The AMix content makes sense because something needs to set up the channel volume, pan and reverb level for the audio phrase. Yamaha love to use MIDI events for other purposes (like voice files, OTS, etc.) Why not?

The AFil chunk has substructure, too. The AFil chunk consists of ADSg chunks. As you might guess, the AFil chunk is pretty big because it contains waveform data.

The following table shows the offset and length information for the first ADSg in the example’s AFil:

    AFil     37287  15261858
    ADSg     37295   1219275      Container for an audio file
    ANdc     37303        50      File name
    AWav     37361   1219209      Container for audio waveform
    WAVE     37369       n/a      Marker (no subchunk size)
    Afmt     37373        16      Audio format information
    Sfmt     37397       217      Container for section information
    Sdec     37608         6      Section name, e.g., Main A
    Adat     37622   1218300      Waveform data
    AInf   1255930       640      Container for audio information
    BPnt   1255938       136
    OPnt   1256082       240
    APnt   1256330       232
    ATmp   1256570         0      Empty, subchunk size is 0
    ADSg   1256578                Container for the next audio file
    ....

The container relationships are important because the containers and subchunks are nested:

    AFil contains ADSg
    ADSg contains ANdc, AWav
    AWav contains WAVE, Afmt, Sfmt, Sdec, Adat, AInf
    AInf contains BPnt, OPnt, APnt, ATmp

The nesting is a bit of a pain in the patootie when writing code to parse a style file.

ADSg is the container chunk holding audio waveform (meta-)information. Like ASEG, there are fifteen ADSg chunks — one for each audio file. The ANdc subchunk inside contains the audio file name which matches up with the name in the ASEG. AWav is the container holding the audio waveform data itself.

The audio “file” format is WAV-like, but it is not exactly WAV (Microsoft RIFF). I was able to playback the audio by importing the audio style file as a raw (untyped) audio file. The audio format seems to be 44,100Hz, 16-bit stereo, big endian. No compression or encryption. It isn’t be too hard to dump the audio.

Yamaha Audio Phraser

Now that you know a little bit about what’s inside of an audio style file, here is brief overview of what the Audio Phraser program generates.

Audio Phraser generates an MThd MIDI file header chunk, a single MTrk chunk (Type 0), an ASEG chunk for each audio waveform, an AFil chunk (containing an ADSg subchunk for each audio file) and a CASM chunk.

The MIDI tempo and time signature are the same as the tempo set in Audio Phraser. The MIDI song title is set to “Audio Phraser”.

The MIDI track contains the usual markers at the beginning: SFF2 and SInt. A single SysEx message is generated after SInt: General MIDI System ON (F0 7E 7F 09 01 F7). The key signature is set to C/Am, followed by:

  • SMPTE Offset
  • Sequencer specific metadata: ff 7f 04 43 00 01 00 00

Oddly, MIDI channel 4 has four, whack-looking MIDI OFF events:

    NOTE OFF G#9
    NOTE OFF G5
    NOTE OFF C0
    NOTE OFF C0

A bug? The remaining markers indicate the start of the style sections. The section length corresponds to the length of the audio waveform for the section. Thus, if the audio waveform for “Main A” is 2 bars, then the MIDI section for “Main A” is 2 bars long.

The CASM chunk is minimal and sets NTR/NTT for MIDI channel 9 (Subrhythm). NTR is “Root Fixed” and NTT is “Bypass/Bass Off”. No NTR/NTT is given for channel 10 (rhythm/drums).

Audio Phraser does not generate an OTSc (One Touch Settings) chunk.

Audio Phraser creates an AWI file for each waveform that it imports into an audio style file. The AWI file most likely holds the results of Audio Phraser’s analysis (i.e., beat detection and so forth). It would be interesting and informative to compare the contents of an AWI file against the ASEG and AInf chunks in the resulting audio style file. I’m guessing that the AWI file is the “prototype” for the ASEG and AInf chunks.

Java source code

If you would like to explore audio style files, then download the source code for a simple audio style dump program. The code is relatively brittle and expects to encounter chunks in a certain order and/or quantity. Thus, be prepared to modify the code. This is an experimenter’s kit, after all. 😉

Copyright © 2018 Paul J. Drongowski

Code: Display Genos UVF voice info

February and March have proven to be a very busy months. On top of everything, the weather in the U.S. Northeast has been atrocious and we have suffered through long power outages. One rapidly realizes how dependent we are on electricity for light, heating and even water. Our house has its own well and we lose water, too, when we lose power.

If you read my series of articles about Yamaha Genos™ voice editing with Yamaha Expansion Manager (YEM), you’re aware that Yamaha store voice information in UVF files. “UVF” (most likely) stands for “Universal Voice File” because UVF is able to represent the voice information supporting many kinds of Yamaha synthesis. YEM ships with UVF files for normal, sample-playback voices.

YEM does not display all of the voice information in a UVF file. As we saw in the tutorial series, many voice parameters cannot be seen or modified in YEM.

Since UVF is XML with predefined tags, I wrote a quick and dirty Java program to display the voice information in a UVF file. I meant to clean up and extend the code, but life has just gotten away from me. I’m posting the code here in order to encourage other folks to experiment with UVF.

//
// Display voice information in a Yamaha UVF (XML) file
//

// Author:  P.J. Drongowski
// Version: 0.1
// Date:    9 February 2018
//
// Copyright (c) 2018 Paul J. Drongowski
//               Permission explicitly granted to modify and distribute


import javax.xml.parsers.DocumentBuilderFactory;
import javax.xml.parsers.DocumentBuilder;
import org.w3c.dom.Document;
import org.w3c.dom.NodeList;
import org.w3c.dom.Node;
import org.w3c.dom.Element;
import java.io.File;

public class ShowVoice {

    public static void main(String argv[]) {

	String voiceName ;
	String veNumber ;
	String veName ;
	String veVolume ;
	String vePan ;
	String veNoteShift ;
	String veNoteLimitHi ;
	String veNoteLimitLo ;
	String veVelocityLimitHi ;
	String veVelocityLimitLo ;
	String veWaveform ;

	try {

	    File fXmlFile = new File("Clarinet&Flutes.uvf") ;
	    DocumentBuilderFactory dbFactory = 
		DocumentBuilderFactory.newInstance() ;
	    DocumentBuilder dBuilder = dbFactory.newDocumentBuilder() ;
	    Document doc = dBuilder.parse(fXmlFile) ;

	    // Normalize text nodes
	    doc.getDocumentElement().normalize() ;

	    System.out.println("Root element: " + 
			       doc.getDocumentElement().getNodeName()) ;

	    NodeList vList = doc.getElementsByTagName("information") ;
	    Node vn = vList.item(0) ;
	    Element ve = (Element) vList.item(0) ;
	    voiceName = ve.getElementsByTagName("voiceName").item(0).getTextContent() ;
	    System.out.println("Voice: " + voiceName) ;
	    System.out.println("----------------------------") ;

	    NodeList nList = doc.getElementsByTagName("voiceElement") ;

	    for (int temp = 0; temp < nList.getLength(); temp++) {
		Node n = nList.item(temp) ;

		if (n.getNodeType() == Node.ELEMENT_NODE) {
		    Element e = (Element) n ;

		    veNumber = e.getAttribute("number") ;
		    veName = e.getElementsByTagName("name").item(0).getTextContent() ;
		    veVolume = e.getElementsByTagName("volume").item(0).getTextContent() ;
		    vePan = e.getElementsByTagName("pan").item(0).getTextContent() ;
		    veNoteShift = e.getElementsByTagName("noteShift").item(0).getTextContent() ;
		    veNoteLimitHi = e.getElementsByTagName("noteLimitHi").item(0).getTextContent() ;
		    veNoteLimitLo = e.getElementsByTagName("noteLimitLo").item(0).getTextContent() ;
		    veVelocityLimitHi = e.getElementsByTagName("velocityLimitHi").item(0).getTextContent() ;
		    veVelocityLimitLo = e.getElementsByTagName("velocityLimitLo").item(0).getTextContent() ;

		    Element ew = (Element) e.getElementsByTagName("presetWaveformProduct").item(0) ;
		    veWaveform = ew.getElementsByTagName("number").item(0).getTextContent() ;

		    System.out.println(veNumber + " " +
				       veName + " " + 
				       veVolume + " " +
				       vePan + " " +
				       veNoteShift + " " +
				       veNoteLimitLo + " " + 
				       veNoteLimitHi + " " + 
				       veVelocityLimitLo + " " + 
				       veVelocityLimitHi + " " + 
				       veWaveform) ;
		}
	    }
	} catch (Exception e) {
	    e.printStackTrace() ;
	}
    }
}

Genos: Needed DSP improvements

I’ve really enjoyed playing Genos. The Super Articulation 2 (SArt2) voices take emulative synthesis to a new level of realism.

Although Yamaha have added the new rotary speaker effect to the Genos, there is still work needed to make the drawbar organ experience realistic and competitive with Hammond clones. Yamaha needs to bring the drawbar experience up to the same level as SArt2.

The current drawbar organ implementation is much the same as the previous Tyros and S-series drawbar organ mode. The drawbar signal chain consists of a tone generation stage followed by the rotary speaker effect:

                                 Rotary
    Drawbar tone generator ----> Speaker ----> Mixing Console
                                 Effect

The output is sent into the usual Genos/Tyros/PSR Mixing Control and system-level effects architecture.

The drawbar tone generator has an eight level volume control that determines the level of the pure drawbar signal. The user sets this level using a virtual drawbar in the drawbar mode graphical user interface (GUI). So, the signal that hits the input of the rotary speaker effect is constant at the level set by the user. In Genos-land, the foot pedal sets XG MIDI channel volume, i.e., changes the post-effect volume level of the organ’s channel in the Mixing Console.

Problem is, that’s not the way the real-world works. On a Hammond, for example, the foot pedal changes the signal level hitting the rotary speaker. The foot pedal does two things:

  1. It changes the overall volume level of the instrument (i.e., what the audience hears), and
  2. It changes the signal level hitting the rotary speaker pre-amp.

The second point is crucial for realism as the amount of pre-amp distortion changes with the signal level. A higher signal produces more distortion and a low-level signal is relatively clean.

The existing Genos drawbar implementation does not do this. The amount of distortion is set once and is constant. The amount of distortion does not change with the organ volume. The way the expression pedal changes channel volume sounds unnatural and is not realistic.

Many of us, including Uli and Stuart on the PSR Tutorial Forum, have tried to work around this problem. We also find the drive in the new rotary speaker effect to be, well, wimpy. So, we have tried inserting a distortion effect before the rotary speaker effect, etc. and have run into several limitations and roadblocks. These issues have to do with DSP effect chaining, access to DSP effect parameters and control of DSP effect parameters.

Here’s a short list of issues:

  • Be able to control the signal level from the drawbar tone generator into the rotary speaker drive effect. The distortion level must track the input level in order to accurately emulate real world distortion.
  • Be able to insert a distortion block between the drawbar tone generator and the rotary speaker in order to make up for the wimpy drive in the new rotary speaker effect.
  • Be able to edit parameters of a DSP effect when more than one DSP is assigned to a part. Only the last DSP in the chain is displayed in voice and can be edited. In Firmware v1.02, there was an edit button in DSP assignment dialog. Please bring this feature back. [Thanks for this one, Uli!]
  • Be able to edit more than 16 DSP effect parameters, including the missing parameters for the UNI COMP and new rotary speaker effect.
  • Be able to use the foot pedal to control all user controllable parameters for all DSP effects that have them, not just the WAH effect.
  • Provide access to the UNI COMP side-chain input, i.e., a way to connect a signal to the side-chain input.

Yamaha’s own engineers are getting ahead of the Genos developers by designing effect algorithms with more than 16 parameters, side-chain inputs and so forth. These features are currently hidden or inaccessible to Genos users. For example, we cannot change the slow-fast and fast-slow times of the rotor nor can we connect a signal into the side-chain input of the UNI COMP compressor.

The XG architecture has always provided for effect parameters which can be controlled by an assignable controller (e.g., AC1). Yet, the only two Genos effects which may practically be controlled in this way are the WAH effect and rotary speaker speed. Yamaha need to unleash the power of Genos’ assignable sliders, knobs and buttons by generalizing control. Please let us assign any MIDI controller to any parameter in any effect block. (Rotary speaker speed only affects the rotary speaker block in the drawbar signal chain.)

So, I hope Yamaha takes these suggestions into consideration and makes them part of a future update. These improvements would make Genos truly competitive against other premium-priced keyboards — clones, not just arrangers.

DSP effect signal flow

When Yamaha’s Genos developers design the graphical user interface (GUI) to manage chained DSP effects, they should call their colleagues at Line 6.

The Helix Native plug-in has a spiffy signal flow window (see image below) in which a Helix user creates and edits a virtual pedal board. The user creates effect blocks and interconnects them. Genos should have a similar visual interface for creating and managing DSP effects that are chained. Touching an effect block should open the detailed parameters for the block. The Genos touch panel would be a natural for this kind of interaction.

[Click image to enlarge.]

Slider value pick up

I have to thank Simon Sherbourne’s review of the Aturia KeyLab Essential for inspiring the following suggestion. His review appears in the February 2018 issue of Sound On Sound Magazine.

The Genos sliders are noticeably jumpy. Their behavior has prompted several complaints on the PSR Tutorial Forum.

Simon likes the value “take over” implemented in the Arturia KeyLab Essential. Quoting Simon’s review:

“Take over is always smooth. … Sliders take over using Ableton-style scaling. As soon as you move a slider the software knows where it is and draws a ‘ghost’ fader showing the hardware position. Any movement will produce relative adjustment of the mapped parameter until the physical and virtual sliders come together. Clever!”

The Arturia manual calls this “Pickup” behavior: “the faders in your DAW will gradually move to match the current position of the fader on your controller as it moves.”

Yamaha should add pickup behavior to the Genos sliders. Slider mode should be selectable by setting either a utility parameter or a controller function setting.

Genos master compressor

There is an on-going discussion at the PSR Tuturial Forum about the Yamaha Genos™ master compressor.

I did a little “effect sleuthing” and determined that the Genos master compressor is the same algorithm as the Yamaha Montage parallel compressor, PARALLEL COMP. This effect is part of the Montage v1.5 update. The same update added the universal compressor down (UNI COMP DOWN) and universal compressor up (UNI COMP UP) algorithms. All three algorithms can be used as a Montage master effect. On Genos, the parallel compressor is a master effect; the universal compressors can be used only as insertion or variation effects.

How did I run this down? I compared the parameter definitions for the Montage PARALLEL COMP effect algorithm against the parameters of the Genos master compressor. They match exactly. Yamaha often share effect algorithms across their top-of-the-line equipment.The Montage parameters are:

  • Type: Natural, Rich, Punchy, Electronic, Loud
  • Compression: 0 to 100
  • Texture: 0 to 100
  • Output level: -18dB to +18dB (0 to 120)
  • Input level: -18dB to +18dB (0 to 120)

The parameters for the universal compressor algorithms match up, too. However, the Genos user interface (UI) does not allow access to the 17th parameter, Side Chain Input Level. Yamaha need to remove the 16 effect parameter restriction imposed by Genos. (This restriction prevents access to the rotor ramp parameters in the new rotary speaker algorithm, too.)

If you’re a Montage person, you’re probably wondering, “What are ‘Natural,’ ‘Rich,’ etc.?” I’ll quote the Yamaha Genos Reference Manual here:

  • Natural: Natural Compressor settings in which the effect is moderately pronounced.
  • Rich: Rich Compressor settings in which the instrument’s characteristics are optimally brought out. This is good for enhancing acoustic instruments, jazz music, etc.
  • Punchy: Highly exaggerated Compressor settings. This is good for enhancing rock music.
  • Electronic: Compressor settings in which the electronic dance music’s characteristics are optimally brought out.
  • Loud: Powerful Compressor settings. This is good for enhancing energetic music such as rock or gospel music.

Frankly, I don’t know as much about audio compression as I should. Fortunately, Sound On Sound Magazine has an excellent article about parallel compression. The article has terrific background information about all forms of compression including DOWN and UP compression. DOWN compression is the conventional form that we are most familiar with.

Parallel compression puts a very high ratio (limiting) DOWN compression block in parallel with the original audio signal, i.e., it mixes the original signal and the compressed signal.

                ----------------------
               |                      |
     Input ----|                      + ----> Output
               |                      |
                ----> Compressor ---->

Massive gain reduction is applied to the loudest passages. According to SOS, “This means that at those points, its involvement in the mixed output signal is virtually insignificant; the output signal is completely dominated by the original input signal coming via the direct path. As a result, those loud but delicate transients are left completely intact and unchanged — which is the primary aim of this technique.”

No gain reduction is applied to quiet signals below the threshold. Thus, the parallel paths, direct and compressor, pass the same signal. When the two signals are summed (mixed), the quiet passage is +6dB louder. Again, quoting SOS, “this simple form of parallel compression leaves the loud bits unaffected and raises the quiet bits by 6dB, the total reduction in dynamic range is only 6dB.”

I hope this information helps. I recommend reading the SOS article; it has several graphs and goes deeper into this studio technique.

Copyright © 2018 Paul J. Drongowski

Suggestions and questions to Yamaha

The Genos manual should at least mention that the Genos master compressor performs parallel compression. A short explanation would help people apply and tweak the master compressor.

The Genos universal compressor algorithms support side-chain. How can we use side-chaining? How do we get a signal into the side-chain input?

Yamaha engineers are building effect algorithms with more than 16 effect parameters. The Genos user interface needs to provide access to more than 16 effect parameters and to store them.

Genos voice editing: Blending the split point

Recall that our goal is to create a Yamaha Genos™ custom voice with an overlapping split zone between upper and lower instruments. The first step started with factory preset voices to build a split voice using Yamaha Expansion Manager (YEM). The second step used XML Notepad to change the high and low note limits. These steps are demonstrated in the third article in this tutorial series.

The next and final step in our project goes way beyond “extra credit.” The split voice that I created has hard cut-off points for the lower and upper voices. I wanted to take things further and produce a smooth blend across the key range where the upper and lower voices overlap. This problem proved to be more involved than I first thought! Solving this problem turned into a learning experience. 🙂

If you want to experiment on your own, download the ZIP file with the PPF file, UVF files and Java code (SplitVoices_v1.0.zip).

Many synthesis engines implement a form of key scaling in which a parameter (e.g., amplitude, filter cut-off frequency, etc.) changes across the notes of the keyboard. Key scaling allows subtle effects like making higher notes brighter than lower notes. Amplitude key scaling changes volume level across the keyboard. My plan is to use AWM2 amplitude key scaling to make a smooth cross-blend of the upper and lower split voices.

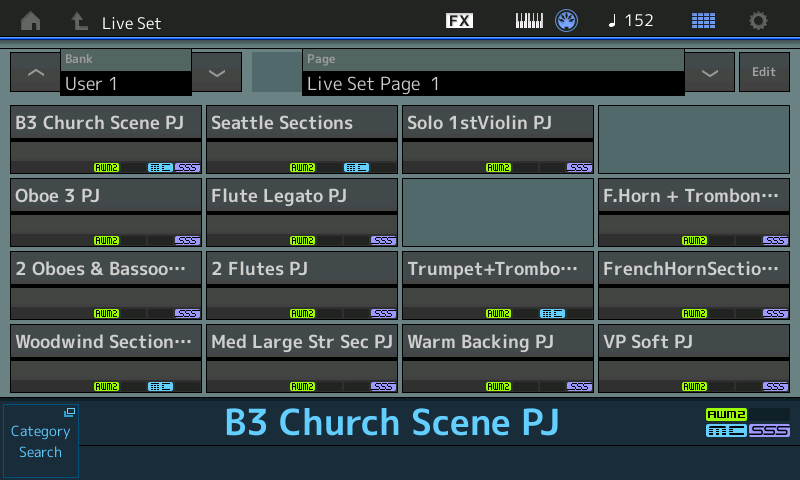
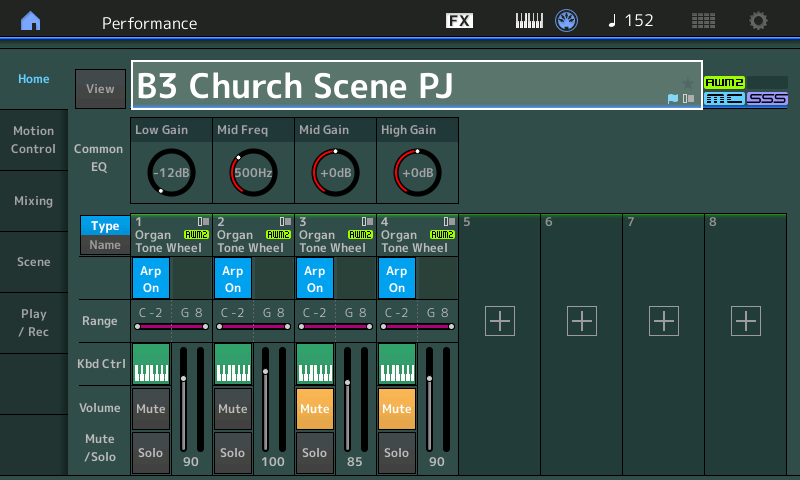
The example voice that we are creating consists of a bassoon in the left hand and two layered oboes in the right hand. I call this voice “2 Oboes & Bassoon” because it is very similar to an MOX patch that gets a lot of play. The table below summarizes the voice design.

Element Name Note lo Note hi Vel lo Vel hi Pan
1 Oboe Hard v3 G#2 G8 101 127 0
2 Oboe Med V3 G#2 G8 1 100 0
3 Bassoon Med St R C-2 E3 1 100 0
4 Bassoon Hard St R C-2 E3 101 127 0
5 [V-645 El-1] G#2 G8 1 127 0

Sharp-eyed readers will notice that the velocity ranges are slightly different than the ranges in the third article. I found that the ranges used in the original MOX patch design made a more playable, easier to control voice.

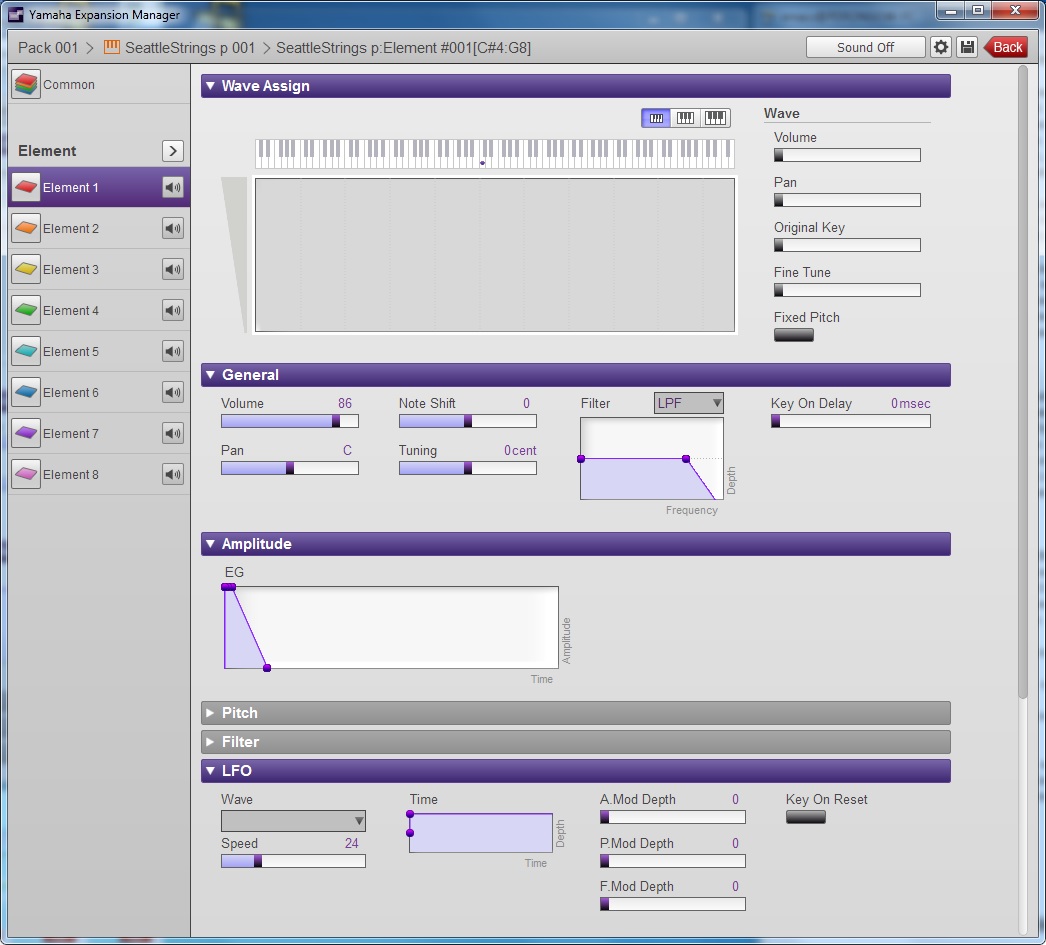
At this point, I must caution the reader that I’m about to dive into the guts of an AWM2 voice. I assume that you’re familiar with AWM2 synthesis and its voice architecture. If not, I recommend reading the Yamaha Synthesizer Parameter Manual and the introductory sections about voice architecture in either the Montage, Motif or MOX reference manuals.

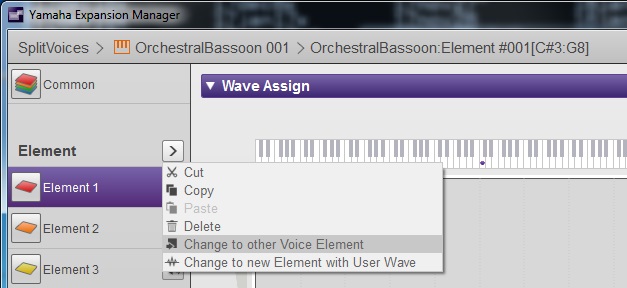
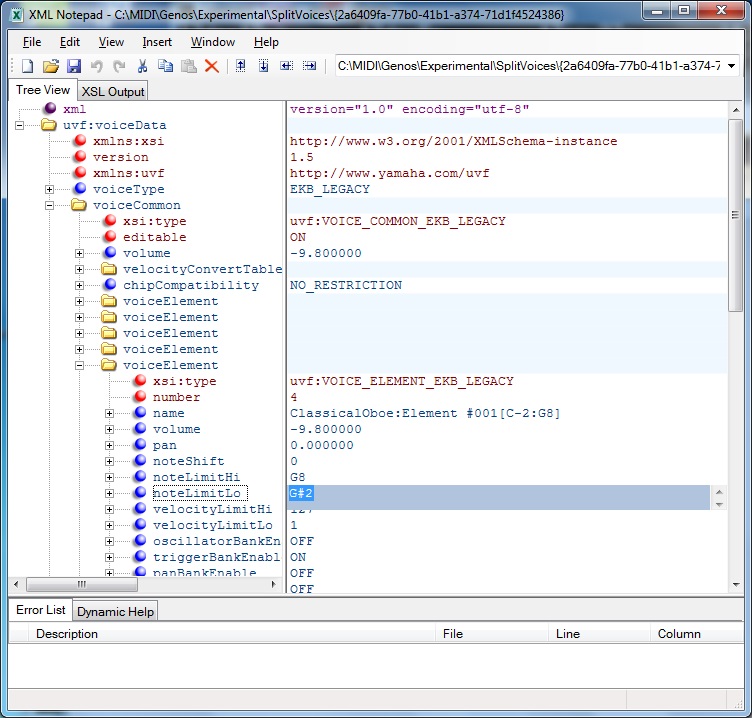
I suggest exploring a few Genos factory voices using XML Notepad or Notepad++ in order to see how the voices are structured and organized. Drill down into the XML voiceEelement entities. You will see several elementBank entities which are the individual key banks within the voice element.

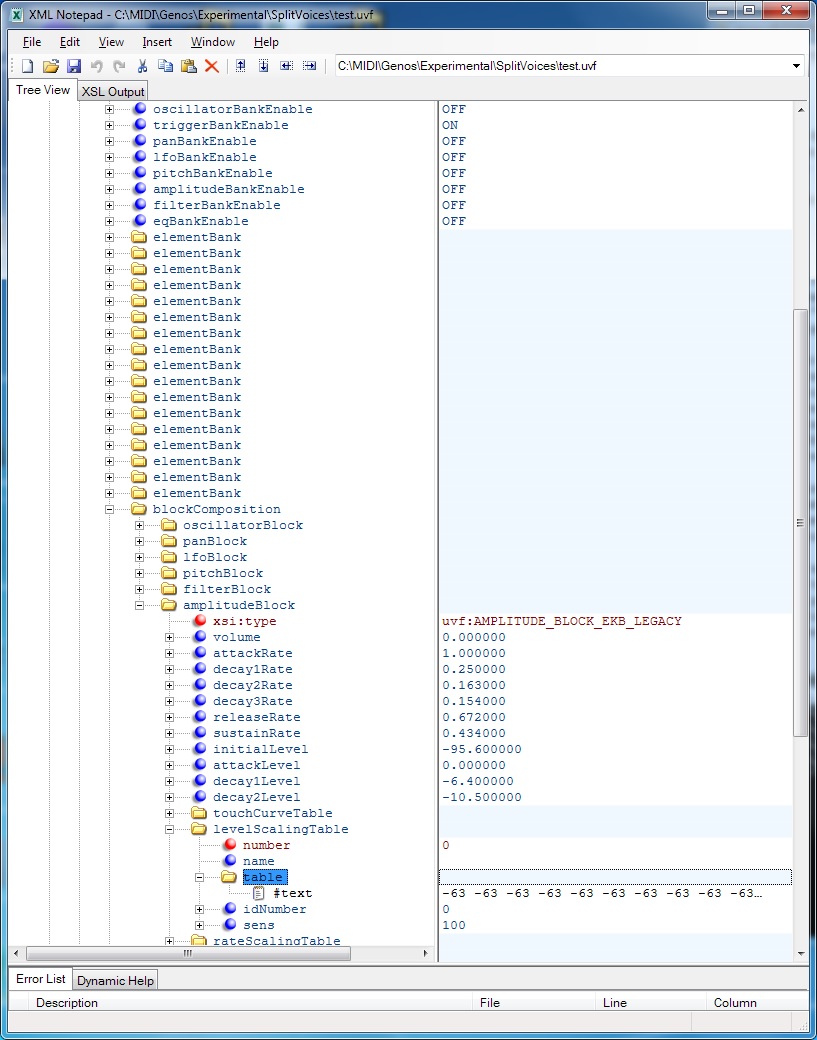
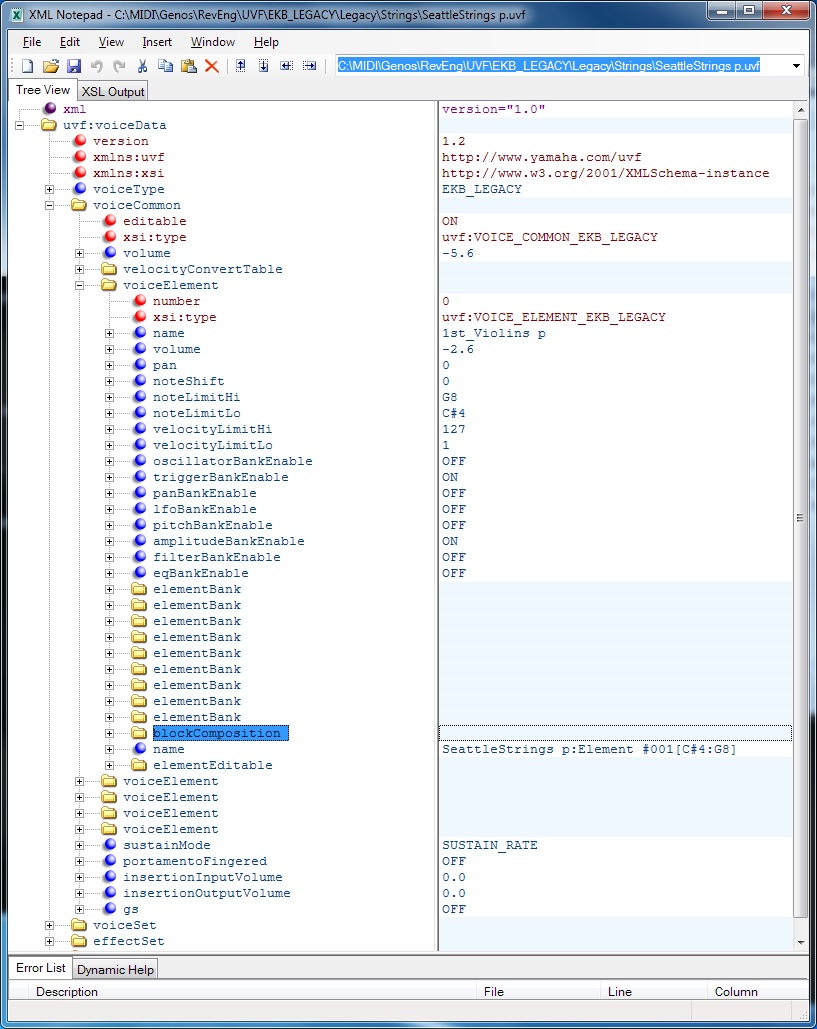
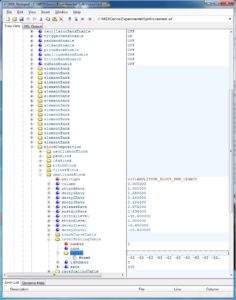
You should see a blockComposition entity, too. This entity has parameters for the oscillator, pan, LFO, pitch, filter and amplitude synthesis blocks. For our purposes, we need the amplitudeBlock because the amplitude key scaling table is located within this block. The table is located within the levelScalingTable entity. See the example screenshot below. [Click screenshots to enlarge.]

An amplitudeBlock may be located in either of two places within the XML tree:

  • It may be part of the blockComposition belonging to the voiceEelement, or
  • It may be part of the blockComposition belonging to each elementBank entity.

In the first case, the parameter amplitudeBankEnable is OFF. In the second case, the the parameter amplitudeBankEnable is ON. Please remember this setting because it was a hard-won discovery. If it seems like the amplitude scaling is not taking effect, check amplitudeBankEnable and make sure it is consistent with the XML structure! The voice definition is flexible enough to allow block parameter specification at the voiceEelement level and, optionally, for each key bank at the elementBank level.

Knowledge of the XML structure is important here. I found that the bassoon voice elements defined the amplitudeBlock at the elementBank level. That meant an instance of the levelScalingTable for each of the seventeen (!) elementBank entities. Since the table contents are the same in every element bank, I did major surgery on the XML tree. I created a single amplitudeBlock at the voiceEelement level and deleted all of the amplitudeBlock entities at the element bank level. Fortunately, XML Notepad has tree cut and paste. I also set amplitudeBankEnable to OFF. (Eventually.)

Once the XML tree is in the desired form, it becomes a matter of setting each levelScalingTable to the appropriate values. A scaling table consists of 128 integer values between -127 and +127. It is stored as one long text string. Each value is the amplitude level offset associated with its corresponding MIDI note. MIDI note numbers run from 0 to 127.

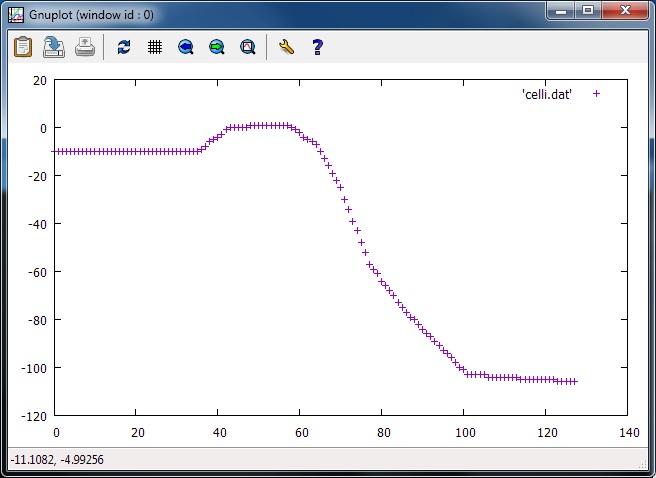
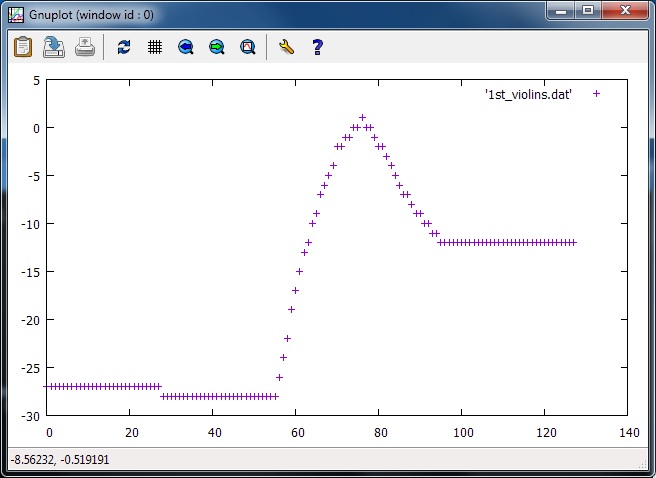
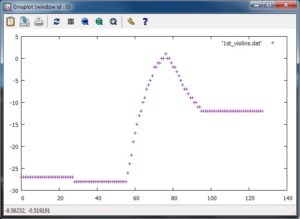
At first, I used the level scaling tables from the “SeattleStrings p” voice as source material. This voice is a nice blend of the five string sections: contrabass, celli, violas, second violins and first violins. Each level scaling table emphasizes its section in the blend. Here are two screen snaps plotting the level scaling tables for the celli and first violins.

Although I abandoned this approach, in retrospect, I think it’s viable. I abandoned ship before I understood the purpose of amplitudeBankEnable. Also, I had not yet developed enough confidence to shift the table up (or down) 12 values in order to compensate for the octave position of the waveforms.

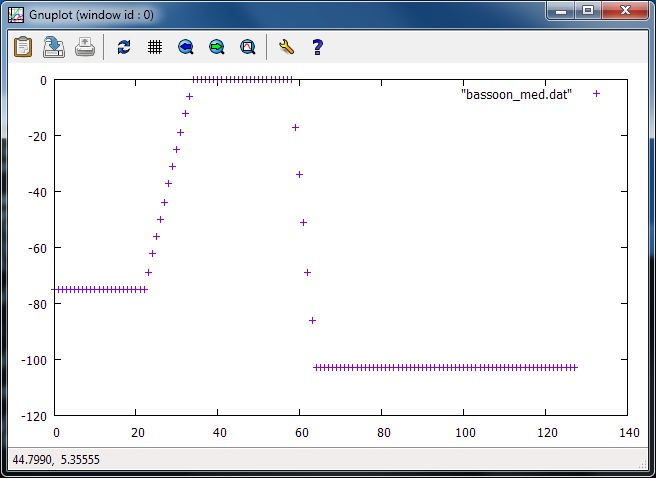
Instead, I decided to control the table contents and to make the tables myself. The MOX (Motif and Montage) define amplitude level scaling using four “break points.” Each break point consists of a MIDI note and level offset. The offset is added to the overall voice volume level and defines the desired level at the corresponding MIDI note. The offset (and resulting volume level) is interpolated between break points. (See the Yamaha Synthesizer Parameter Manual for details.) I wrote a Java program to generate a level scaling table given four break points. The program source code appears at the end of this article (bugs and all).

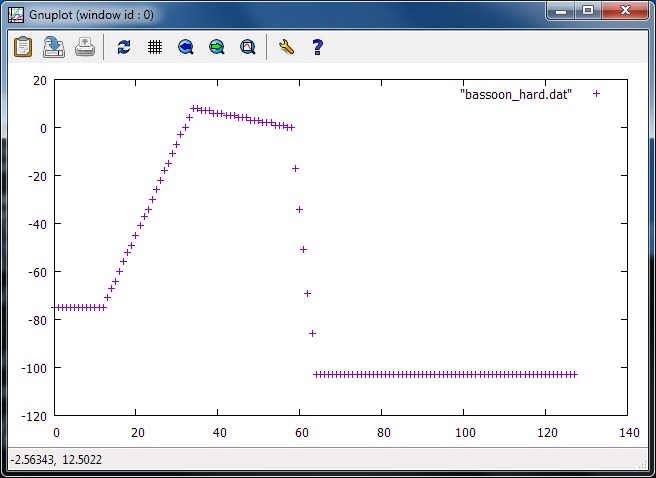
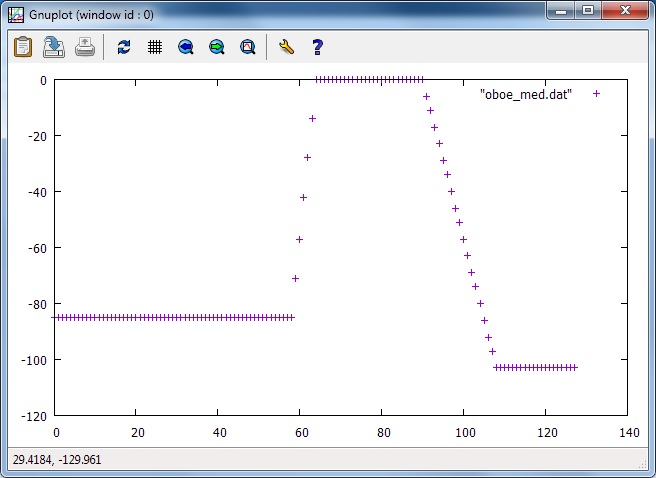
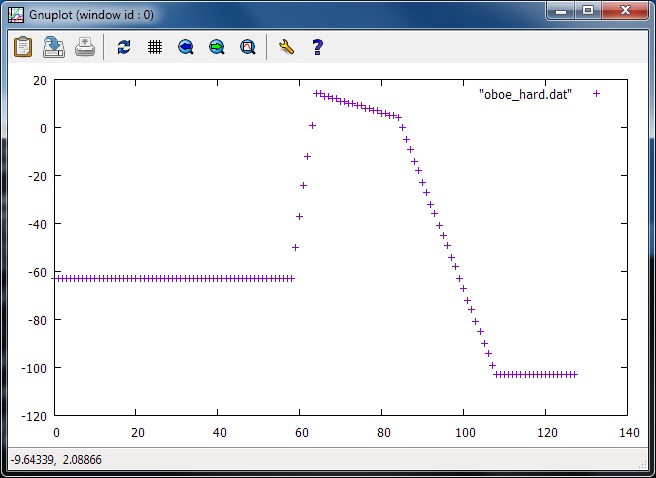
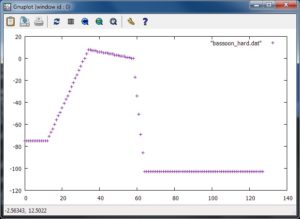
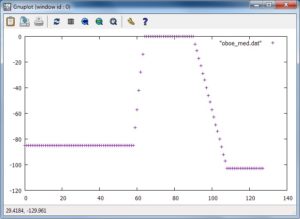
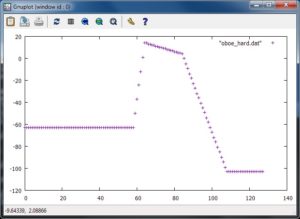
Here are the break points that I used. I took inspiration from the MOX break points for its “2 Oboes & Bassoon” patch.

                      BP1      BP2      BP3      BP4
                   --------  -------  -------  -------
    Bassoon Med    A#-1 -75  A#0  +0  A#2  +0  E3 -103
    Bassoom Hard   C-1  -75  A#0  +8  A#2  +0  E3 -103
    Oboe Med       A#2  -85  E3   +0  F#5  +0  C7 -103
    Oboe Hard      A#2  -63  E3  +14  C5   +4  C7 -103

I ran the program for each set of break points, generating four tables. Table plots are shown below. [Click to enlarge.]

Each table file contains one long line of 128 integer values. In order to change a level scaling table, first open a table file with a text editor (e.g., notepad, emacs, etc.), select the entire line, and copy it to the clipboard. Then, using XML Notepad, navigate to the appropriate levelScalingTable in the XML and replace the content of the #text attribute with the line in the clipboard. Save the UVF (XML) voice file. Save early, save often.

Copy the UVF file to the correct YEM pack directory as demonstrated in the third article. It’s important to be careful at every step in the process because we are making changes directly to YEM’s internal database. We don’t want to introduce any errors into YEM’s pack representation and cause a malfunction that needs to be backed out. Be sure to keep plenty of back-up copies of your work just in case.

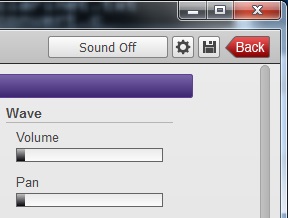
Fire up YEM, open the “2 Oboes & Bassoon” voice for editing, and test. Enable each voice element one at a time and play the keys in the overlapping zone. You should hear the instrument fade-in or fade-out as you play through the zone.

With the offsets given above, I needed to shift each of the tables either “up” (bassoon) or “down” (oboes) to get a better blend. If you take a little off the front of a table (say, 4 values) be sure to add the same number of values to the end of the table. The table must be 128 values in length.

The blending issue is best resolved up front by defining different break points. Of course, the table files must be regenerated, but this is a little bit safer than trimming and lengthening the tables in-place within the XML. Laziness has its advantages and dangers.

If you require background information about YEM, the first article in this series discusses Yamaha Expansion Manager. The second article covers XML Notepad and how it can be used to work around limitations in YEM. The third article, mentioned earlier, demonstrates creation of the basic “2 Oboes & Bassoon” voice.

There are a few other posts related to voice editing with YEM. Check out this short article about creating a PSR/Tyros Mega Voice using YEM. Take a peek at the article about the design and implementation of my jazz scat voices. Then, download the scat expansion pack for PSR-S770/S970 and Tyros 5, import it into YEM, and take things apart.

One final note, I produced the plots shown in this article with the GNU open source GNUPLOT package. Visualization is essential to getting things right. There are other tools to visualize level scaling tables such as spreadsheet charting.

Copyright © 2018 Paul J. Drongowski

Source code: GenScalingTable.java

//
// GenScalingTable: Generate level scaling table from break points
//

import java.io.* ;

/*
 * Author:   P.J. Drongowski
 * Web site: http://sandsoftwaresound.net/
 * Version:  1.0
 * Date:     15 February 2018
 *
 * Copyright (c) 2018 Paul J. Drongowski
 *               Permission granted to modify and distribute
 *
 * The program reads a file named "breakpoints.txt" and generates 
 * a Yamaha  * amplitude level scaling table. The table is written 
 * to standard out. The table is one long string (line) containing 
 * 128 integer values ranging from -127 to +128.
 *
 * The breakpoint file contains four break points, one break point
 * per line. A breakpoint is a MIDI note name and an offset. 
 * Collectively, the break points form a curve that controls 
 * how the Genos (synth) voice level varies across the MIDI note
 * range (from 0 to 127). The curve extends to MIDI notes C-2
 * and G8.
 *
 * Exampe "breakpoints.txt" file:
 * A#2 -85
 * E3 +0
 * F#5 +0
 * C7 -103
 *
 * The file syntax is somewhat brittle: use only a single space 
 * character to separate fields and do not leave extraneous 
 * blank lines at the end of the file.
 */

public class GenScalingTable {
    static String[] bpNotes = new String[4] ;
    static int[] bpOffsets = new int[4] ;
    static int[] bpNumber = new int[4] ;
    final static boolean debug_flag = false ;

    final static String[] noteNames = {
	"C-2","C#-2","D-2","D#-2","E-2","F-2","F#-2","G-2","G#-2","A-2","A#-2","B-2",
	"C-1","C#-1","D-1","D#-1","E-1","F-1","F#-1","G-1","G#-1","A-1","A#-1","B-1",
	"C0","C#0","D0","D#0","E0","F0","F#0","G0","G#0","A0","A#0","B0",
	"C1","C#1","D1","D#1","E1","F1","F#1","G1","G#1","A1","A#1","B1",
	"C2","C#2","D2","D#2","E2","F2","F#2","G2","G#2","A2","A#2","B2",
	"C3","C#3","D3","D#3","E3","F3","F#3","G3","G#3","A3","A#3","B3",
	"C4","C#4","D4","D#4","E4","F4","F#4","G4","G#4","A4","A#4","B4",
	"C5","C#5","D5","D#5","E5","F5","F#5","G5","G#5","A5","A#5","B5",
	"C6","C#6","D6","D#6","E6","F6","F#6","G6","G#6","A6","A#6","B6",
	"C7","C#7","D7","D#7","E7","F7","F#7","G7","G#7","A7","A#7","B7",
	"C8","C#8","D8","D#8","E8","F8","F#8","G8"
    } ;

    public static int findNoteName(String note) {
	for (int i = 0 ; i < noteNames.length ; i++) {
	    if (note.equals(noteNames[i])) return( i ) ;
	}
	System.err.println("Unknown note name: '" + note + "'") ;
	return( 0 ) ;
    }

    // Put scaling values for a segment of the scaling "graph"
    public static void putTableValues(int startNote, int startOffset,
				      int endNote, int endOffset) {
	// Don't put any values if (startNote == endNote)
	if (startNote != endNote) {
	    int numberOfValues = Math.abs(endNote - startNote) ;
	    double foffset = (double) startOffset ;
	    double difference = (double)(endOffset - startOffset) ;
	    double delta = difference / (double)numberOfValues ;
	    for (int i = 0 ; i < numberOfValues ; i++) {
		System.out.print(Math.round(foffset) + " ") ;
		foffset = foffset + delta ;
	    }
	}
    }

    public static void main(String argv[]) {
	int bpIndex = 0 ;

	// Read break points (note+offset), one per line
        try {
	    FileInputStream fstream = new FileInputStream("breakpoints.txt") ;
	    DataInputStream in = new DataInputStream(fstream) ;
	    BufferedReader br = new BufferedReader(new InputStreamReader(in)) ;
	    String strLine ;
	    while ((strLine = br.readLine()) != null) {
		String[] tokens = strLine.split(" ") ;
		if (bpIndex < 4) {
		    bpNotes[bpIndex] = tokens[0] ;
		    bpOffsets[bpIndex] = Integer.parseInt(tokens[1]) ;
		    bpNumber[bpIndex] = findNoteName(tokens[0]) ;
		    bpIndex = bpIndex + 1 ;
		}
	    }
	    in.close() ;
	} catch (Exception e) {
	    System.err.println("Error: " + e.getMessage()) ;
            e.printStackTrace() ;
        }

	// Display the break point values
	if (debug_flag) {
	    for (int i = 0 ; i < 4 ; i++) {
		System.err.println(bpNotes[i] + " " + bpNumber[i]
				   + " " + bpOffsets[i]) ;
	    }
	}

	// Generate the key scaling table to the standard output
	putTableValues(0, bpOffsets[0], bpNumber[0], bpOffsets[0]) ;
	putTableValues(bpNumber[0], bpOffsets[0], bpNumber[1], bpOffsets[1]) ;
	putTableValues(bpNumber[1], bpOffsets[1], bpNumber[2], bpOffsets[2]) ;
	putTableValues(bpNumber[2], bpOffsets[2], bpNumber[3], bpOffsets[3]) ;
	putTableValues(bpNumber[3], bpOffsets[3], 128, bpOffsets[3]) ;
    }
}

Genos voice editing: An example

Welcome to the third article in a short series about Yamaha Genosâ„¢ voice editing with Yamaha Expansion Manager (YEM). The first article introduces YEM and the second article discusses work arounds for a few shortcomings in YEM.

Time for an example! Let’s create a voice similar to the “2 Oboes & Bassoon” voice on the Yamaha MOX. This voice gets a lot of use in situations calling for a delicate solo voice balanced by a heavier single voice in the left hand. The table below summarizes the basic voice design on the MOX:

Element Name Note lo Note hi Vel lo Vel hi Pan
1 Bassoon Med L C-2 E3 1 100 0
2 Bassoon Hard L C-2 E3 101 127 0
3 Oboe2 Med L A#2 G8 1 100 0
4 Oboe2 Hard L A#2 G8 101 127 0
5 Oboe 2 Med R A#2 G8 101 127 0
6 Oboe1 A#2 G8 1 127 0

This voice is not a straight split. The bassoon and the oboes overlap in the key range from A#2 to E3, so there isn’t a sharp sonic break when the melody moves into bassoon range or vice versa. All three independent voices implement two velocity layers: hard (101 to 127) and soft (1 to 100).

The best way to start out is to create a Genos custom regular voice from an existing factory bassoon voice. Earlier, I had browse the Genos factory preset UVF files with XML Notepad as described in the second article. I decided to start with the Genos “OrchestralBassoon” voice because its programming is similar to what we need. In case you want to browse its UVF file with XML Notepad, the full path to the file is:

C:\Program Files (x86)\YAMAHA\Expansion Manager\voices\genos\EKB_LEGACY\Legacy\Woodwind\OrchestralBassoon.uvf

Here is a table summarizing the four elements which make up the “OrchestralBassoon” voice:

Element Name Note lo Note hi Vel lo Vel hi Pan
1 Bassoon Med St R C#3 G8 1 85 0
2 Bassoon Hard St R C#3 G8 86 127 0
3 Bassoon Med St R C-2 C3 1 85 0
4 Bassoon Hard St R C-2 C3 86 127 0

The lower and upper bassoon elements are split at C3. There are two velocity levels: hard (86 to 127) and soft (1 to 85). We will need to extend the lower bassoon elements to E3. Much later in the process, we might want to change the velocity layers to match after we hear how everything sounds and plays.

Here are ten steps to the finished result. This scenario assumes that you have YEM installed and your personal computer is connected to Genos with a USB cable. The best way to test is to actually play the voice while editing! When YEM is launched and Genos is connected, Genos enters a voice editing mode with the new voice in the RIGHT1 part.

1. Create a new pack “SplitVoices”. [Click on screenshots to enlarge.]

2. Create a new Genos custom normal voice starting with “OrchestralBassoon”.

3. Rename the new voice to “2 Oboes & Bassoon”.

4. Edit the new voice.

Copy “OrchestralOboe” element 1 (upper) to element 1 of the new voice.

5. Copy OrchestralOboe element 2 (upper) to element 2 of the new voice.

The new voice contains the following elements at this point in the process:

Element Name Note lo Note hi Vel lo Vel hi Pan
1 Oboe Hard v3 C#4 G8 65 127 0
2 Oboe Med V3 C#4 G8 1 64 0
3 Bassoon Med St R C-2 C3 1 85 0
4 Bassoon Hard St R C-2 C3 86 127 0

This leaves a silent gap between C3 and C#4. Eventually, we need to change bassoon’s note high to E4 and change oboe’s note low to G#2 using XML Notepad. The lower note limit is slightly out of the oboe’s real world range. The overlap is for blending purposes and the bassoon should hide this musical faux pas.

6. Copy “ClassicalOboe” element 1 to element 5 of the new voice.

The new voice contains the following elements at this point in the process:

Element Name Note lo Note hi Vel lo Vel hi Pan
1 Oboe Hard v3 C#4 G8 65 127 0
2 Oboe Med V3 C#4 G8 1 64 0
3 Bassoon Med St R C-2 C3 1 85 0
4 Bassoon Hard St R C-2 C3 86 127 0
5 [V-645 El-1] C-2 G8 1 127 0

We need to change element 5’s note low to G#2 eventually. We’ll make all of these note changes with XML Notepad.

Save your work by clicking the small file (disk) icon in the upper right corner of the editing window.

7. Exit YEM. Find the new pack and voice file using the file browser. Look in the directory:

    C:\Users\XXX\AppData\Local\Yamaha\Expansion Manager\Packs\

Substitute your user name, e.g., “pjd”, where “XXX” appears in the file path. Identify the new pack by its modification date and time, i.e., the date and time when you saved the new voice in YEM. As seen in the screenshot, YEM stores its packs with very cryptic names. Programmers call this kind of name, a “Global Unique Identifier” or “GUID”. The directory named “{1c2a0107-db86-4600-8e0a-b95993120573}” is the example “SplitVoices” pack.

Click to drill down into the pack directory. Copy the UVF file for the new voice to your own working directory. Launch XML Notepad and open your copy of the UVF file. (Save the original to be extra safe!)

Voice file names are also GUIDs. In the example, the file named “{2a6409fa-77b0-41b1-a374-71d1f4524386}” is the new “2 Oboes & Bassoon” voice.

8. Use XML Notepad to change the note limits as required. The “voiceElement” entities are listed in order and you’ll find the note high and low limit parameters within the fifth “voiceElement”.

The final result is:

Element Name Note lo Note hi Vel lo Vel hi Pan
1 Oboe Hard v3 G#2 G8 65 127 0
2 Oboe Med V3 G#2 G8 1 64 0
3 Bassoon Med St R C-2 E3 1 85 0
4 Bassoon Hard St R C-2 E3 86 127 0
5 [V-645 El-1] G#2 G8 1 127 0

We could also change the velocity limits to make them consistent. Save the UVF file. Copy the working file to the pack’s directory, overwriting the original UVF file for the new voice.

9. Launch YEM and open the voice for editing. Play the keyboard and test the new voice where the instruments overlap. We need to set mix levels for both both oboes (elements 1, 2 and 5) and the bassoon (elements 3 and 4). Change the volume level for each element using YEM. Be sure to save your edits when you’re done!

10. Now that the basic voice is finished, feel free to experiment. Try detuning the oboes to get a fatter sound. Let your imagination run free.

In the next article, we will edit the UVF file to get a better blend across the overlapping note region.

Commentary

I hope to attract Yamaha’s attention to the limitations in Yamaha Expansion Manager which are exposed by this scenario. YEM should display all basic information about a factory voice including the element waveform name, low and high note limits, and low and high velocity limits. We should also be able to change these vital parameters for each element. We should not have to reach for a tool like XML Notepad nor should we have to edit parameters behind YEM’s back by changing files in its database. Yamaha must remove these limitations, otherwise users cannot build split and layered voices of moderate complexity.

Copyright © 2018 Paul J. Drongowski

Genos voice editing: XML Notepad

In my previous post about Yamaha Genos™ voice editing, I introduced the voice editing features provided by Yamaha Expansion Manager (YEM). This post describes a way to work around the shortcomings in YEM.

YEM stores low-level voice programming information in XML files with the “UVF” file name extension. In case you’re not familiar with XML, it’s a mark-up language that captures document formating and structure. HTML is the well-known predecessor to XML. XML is quite general and is used to represent structured data files as well as regular ole text documents.

YEM ships with a few hundred UVF files that describe the Genos (and separately, Tyros 5) factory voices. There are files for Regular, Sweet and Live voices. UVF files are not provided for Super Articulation (1 and 2) voices because YEM does not support SA voice editing.

The UVF files are stored in the directory:

    C:\Program Files (x86)\YAMAHA\Expansion\Manager\voices\genos

The UVF directories and files are both hidden and read-only. You need to configure Windows Explorer to display hidden files. On Windows 7, you need to do something like:

  1. Select the Start button, then select Control Panel > Appearance and Personalization.
  2. Select Folder Options, then select the View tab.
  3. Under Advanced settings, select Show hidden files, folders, and drives, and then select OK.

Just to be safe, I make a complete copy of the genos directory in my own working directory elsewhere on disk. That way, I leave the original files alone. I also change the directory and file properties to remove the read-only restriction. Don’t mess with the files in the YAMAHA subdirectories!

There are two subdirectories under “genos“:

    DRUM_KIT            Drums kit definitions
    EKB_LEGACY          Electronic Keyboard (EKB) legacy voices

The EKB_LEGACY subdirectory has the UVF files for the Normal, Sweet and Live voices. The files are organized by category (e.g., “A.Guitar,” “Accordion,” and so forth).

UVF (Universal Voice Format?) contains XML markers and attributes to represent and store voice parameters. If you’ve ever browsed a Yamaha Motif reference manual, you realize the great number and scope of voice parameters. Yes, a typical UVF file is a difficult to navigate jungle of voice information! You can open a UVF file with a text editor, but be prepared to get lost.

Since you can open a UVF file with a text editor, you can change the file, of course. Just be darned sure you know what you’re doing. Tweaking a single parameter here or there is possible, but I wouldn’t make any large scale edits with a text editor.

XML Notepad is a keener way to browse complex XML documents like UVF. XML Notepad was written by Chris Lovett and is distributed by Microsoft. It’s open source and free.

XML Notepad displays an XML document as a tree. The screenshot below shows the top level view of the UVF file named “SeattleStrings p.uvf”. [Click on a screenshot to enlarge.] The tree view on the left side displays the file tree in expandable/collapsible form. The panel on the right side displays the value corresponding to the XML attributes, etc. in the file tree. There are four important subtrees in a UVF document:

  1. voiceCommon: Detailed programming information
  2. voiceSet: Parameters accessible through Genos Voice Set
  3. effectSet: FX sends and insertion effect parameters
  4. information: Voice info such as name, MSB, LSB, etc.

The five subtrees marked “voiceElement” should immediately catch your eye. This is where the element-level voice programming data is stored.

There are five elements in the “SeattleStrings p” voice. Click on the expansion square (i.e., the little plus sign) of the first voiceElement to view its contents. [See the next screenshot below.] Notable element parameters are:

  • name: 1st_Violins p [the waveform name]
  • volume: -2.6 [the element’s volume level]
  • pan: 0 [the element’s pan position, 0 is center]
  • noteShift: 0 [note transposition]
  • noteLimitHi: G8 [highest note for which the element sounds]
  • noteLimitLo: C#4 [lowest note for which the element sounds]
  • velocityLimitHi: 127 [highest velocity level]
  • velocityLimitLo: 1 [lowest velocity level]

This information is essential for understanding the purpose and scope of each individual voice element. You’ll also see nine elementBank entities which represent the nine key banks within the voice element. You shouldn’t really need to mess with the key banks for factory voices.

I put the basic information for all five voice elements into a table for you:

Element Name Note lo Note hi Vel lo Vel hi Pan
0 1st_Violins p C#4 G8 1 127 0
1 2nd Violins p G2 G8 1 127 0
2 Violas mp C2 E5 1 127 0
3 Celli p C1 C4 1 127 0
4 Contrabasses p C-2 E2 1 127 0

A summary table like this reveals the overall voice structure. The “SeattleStrings p” voice consists of five elements, one element for each of the string sections. Each section sounds in a different region of the MIDI keyboard. All voice elements respond for velocities between 1 and 127, so there aren’t any velocity levels. All elements are center-panned (0). Legacy stereo voices have pairs of elements that are panned left (-1) and right (+1).

YEM provides the means to copy an element from a different existing voice. First, select the destination element by clicking on its button. Then, click on the “>” box above the element buttons. [See screenshots below.]

YEM displays a dialog box from which you can choose the element to be copied.

Unfortunately, one really needs to have the basic information as seen in the table above in order to “comp together” new voices from existing elements. It comes down to the question, “How do I know which element in a factory voice to choose and copy?” Yamaha need to display more basic voice information in YEM. For now, one can browse UVF files using XML Notepad and keep personal notes.

XML Notepad is an XML editor as well as a a browser. Let’s say that you want element 1 to sound in the note range C3 to G7. Simply change noteLimitLo to “C3” and change noteLimitHi to “G7”. Then save the UVF. I don’t recommend modifying the factory files, but what about a UVF file of your own creation? That’s the subject of my next post in this series.

Other tools to consider

XML Notepad is one of many tools to try.

If you only want to browse XML without making any changes, most Web browsers can open and display an XML file. Simply open the UVF file in your regular browser.

  • Internet Explorer: Choose File > Open in the menu bar.
  • Mozilla Firefox: Choose File > Open in the menu bar.
  • Google Chrome: Type Control-O to open a file.

Navigate to the UVF file that you want to view using the file selection dialog box, etc. Firefox and Chrome format the XML and use color to enhance keywords.

Another editing tool to try is Notepad++ with its XML plug-in installed. Notepad++ is a source code editor and needs the XML plug-in, which must be separately downloaded and installed. Plug-in installation is a little baroque, so be sure to read the “install.txt” file. You need to copy the plug-in files to the correct Notepad++ program directories.

The Notepad++ plug-in has many options including XML syntax check and pretty printing (formating). If you’re comfortable with XML code, then Notepad++ is a good alternative to XML Notepad.

Copyright © 2018 Paul J. Drongowski

Genos voice editing: YEM

To date, my experience with Yamaha Genos™ has been generally positive. I’ve got a basic set of registrations set up for church tunes and I just converted the PSR-S950 registrations for rock, pop, jazz, funk tunes. Everything — customized styles, WAV files, and registrations — reside in the Genos’ internal memory.

Although some Genos players are reporting divots and a few serious bugs, my use has been quite reliable and error free. The shortcomings which affect me the most are related to drawbar organ (AKA “Organ Flutes”) functionality. I’ll cover that subject in a separate post.

The church registrations make use of left/right voice splits and layers. The Genos, like Tyros 5, breaks the keyboard into four zones/layers: LEFT, RIGHT1, RIGHT2, and RIGHT3. The RIGHTx parts allow two or three voice layers. If the LEFT part is turned off, the RIGHTx voices extend across the full keyboard. If the LEFT part is turned on, the keyboard is divided into LEFT and RIGHTx zones. The LEFT part plays only one voice (no layering).

The Genos allows considerable flexibility within this model. Please see the Owner’s Manual for details and configuration.

By and large, the LEFT/RIGHTx paradigm is sufficient to cover 90% of my needs. However, sometimes the hard split between LEFT and RIGHTx sounds unnatural. Consider a split with strings in the LEFT and oboe in the RIGHT. If the melody line crosses the split point, uh-oh, the melody shifts to the strings.

Now, it may be possible to avoid this issue through Genos ensemble voices, which are a big unexplored territory for me. I will look into ensemble voices eventually. As a synth guy, I’m used to addressing this issue through voice programming. In the synth world, one can have overlapping zones where both left and right voices are heard — usually good enough to fool the ear. Even better, features such as:

  • Level Key Follow Sensitivity
  • Amplitude Scaling

perform a blend across the split point. Think of this as a “horizontal cross-fade” similar to the “vertical cross-fade” which smooths the switch point between velocity levels.

None of these deep techniques is immediately available through the Genos user interface (UI). Genos voice editing reminds me of the TG-500 Quick Edit mode — a way to make fast voice-level changes (via “offsets”) which affect all of the underlying voice elements at once. Quick edit is not unique to Yamaha having seen and used a similar capability on Roland JV/XP gear.

Enter Yamaha Expansion Manager (YEM).

Having a PSR-S950, I nearly and dearly missed Yamaha Expansion Manager. YEM first supported the PSR-S970, S770 and Tyros 5 keyboards, now Genos. YEM is the means to make and install expansion packs. It also allows creation of new voices based on user waveforms (samples). On Tyros 5 and Genos, one can create new voices from preset voices of the “Regular,” “Sweet” or “Live” variety. Super Articulation voices cannot be edited or created via YEM.

My one brush with YEM was the implementation of the Scat Voice expansion pack for the PSR-S970, S770 and Tyros 5. YEM’s voice editing was sufficient to get the job done.

The screenshot below (click to enlarge) shows YEM’s Common voice parameters. YEM has all of the usual sliders and UI gizmos found in a typical computer-based synth voice editor. The Common parameters correspond to the Quick Edit parameters that are accessible through the Genos UI. These tweaks are also the high-level voice parameters found in Yamaha’s XG voice architecture.

The next deeper level of editing adheres to Yamaha’s AWM2 voice architecture. I recommend studying the Motif documentation to learn more about the AWM2 voice architecture, including the Yamaha Synthesizer Parameter Manual. (All manuals are available directly from the Yamaha Web site.) Concisely, a voice consists of one to eight elements. Each element is a mini sample-playback synthesizer with its own waveform, amplitude, pitch, filter and LFO blocks. Through YEM, you can tweak parameters within these blocks as shown in the screenshot below.

When working with user samples, YEM provides access to the key banks which make up an element waveform. In the screenshot above, you can see twelve key banks laid out across the middle of the MIDI keyboard. Velocity for each key bank ranges from 1 to 89. This is a velocity-switched voice, so other elements handle the rest of the full MIDI velocity range of 1 to 127.

I want to mention two major shortcomings of YEM at this point:

  1. YEM does not provide vertical cross-fade to smooth the transition between velocity levels.
  2. YEM does not provide control over velocity sensitivity at the element level.

Lack of vertical cross-fade means a hard sonic change across velocity split points. Inability to control element-level velocity sensitivity prohibits construction of well-behaved Megavoice voices. Yamaha need to add these capabilities to YEM.

As I mentioned earlier, YEM allows Tyros 5 and Genos users to edit preset voices. The screenshot below shows the YEM screen for element 1 in the “SeattleStrings p” voice.

Wow, a big blank where we expect to see the key banks. YEM does not provide access to the individual key banks for the factory waveform assigned to an element. To some extent, this is understandable as they would need to extract and distribute a lot more detail about the factory waveforms with YEM.

However, Yamaha omit vital information:

  • What is the waveform name? A string section? A car horn? What?
  • What range of the keyboard does the waveform cover?
  • How is key amplitude scaling applied to the waveform?
  • How is key velocity scaling applied to the waveform?

These omissions significantly reduce the effectiveness of YEM. Yamaha need to add these capababilities to YEM.

The missing information is available in the Genos voice definition files (UVF) that are distributed with YEM. In my next post on the topic of Genos voice editing, I will describe how to find, access and change the missing parameters.

Copyright © 2018 Paul J. Drongowski

NAMM 2018: And now Yamaha

Yamaha have revamped nearly every model in its previous digital and arranger keyboard line:

  • PSR-S975 Arranger Workstation (MSRP: $2,599 USD)
  • PSR-S775 (MSRP: $1,699) Arranger Workstation
  • PSR-EW410 (MSRP: $599) adds Quick Sampling function – 5 samples (1 Key Follow type + 4 One shot/Loop type) 9.6 sec/sample (maximum) – and Groove Creator
  • PSR-E463 (MSRP: $479) adds Quick Sampling and Groove Creator.
  • KS-SW100 Compact Subwoofer (MSRP: $199) targeted for home keyboard players.

The PSR-S775 and PSR-S975 were announced a few weeks before the NAMM show. The all important Owner’s Manual, Reference Manual and Data List are now available for each model. These documents are very helpful when making purchase or upgrade decisions.

Yamaha are featuring the entire digital and arranger workstation line at Winter NAMM 2018, including the rather wonderful Genos flagship and the lower mid-range PSR-S670. Musicians looking for a MOXF successor will just have to wait a little bit longer.

Copyright © 2018 Paul J. Drongowski