1010Music tangerine: A rough edge here and there

After sampling Genos woodwind voices with 1010Music tangerine, I moved on to horns, strings and simple pads:

    SeattleStrings mf 104   5  50  Live       1-127
    Strings mf          0 118  49  Live       1-127
    Strings             0 117  50  Live

    VP Soft           104   0  90  Regular    1-127
    DarkLight         104   3  90  Regular    1-127
    MellowPad           0 117  96  Regular    1-127
    ButterStrings     104   2  51  Regular    1-127

    OrchHornsPad      104  11  62  Live       30-127, 1-127
    SoftHorns           0 117  61  Live       1-127
    MellowHorns         0 119  62  Regular    1-127

That’s enough to cover my basic needs (for liturgical music).

I dialed back all of the Genos EQ and effects, leaving a small amount of room reverb (Genos Real Room+ algorithm) for a bit of ambience. Yamaha “Live” voices are stereo, so I sampled them in stereo. [Duh.] The pads sound rather plain without Genos effects, but I’m adding modulation, delay and reverb on the tangerine itself.

I’m leaving quite a lot of head room when sampling Genos — a good thing. The Symplesound instruments have a bit of graininess which I chalk up to the high level of Symplesound’s multi-samples. The grain shows up when playing big, two-fisted chords and I think something is getting clipped somewhere. I haven’t experienced the same graininess with my own multi-samples, thanks to the head room.

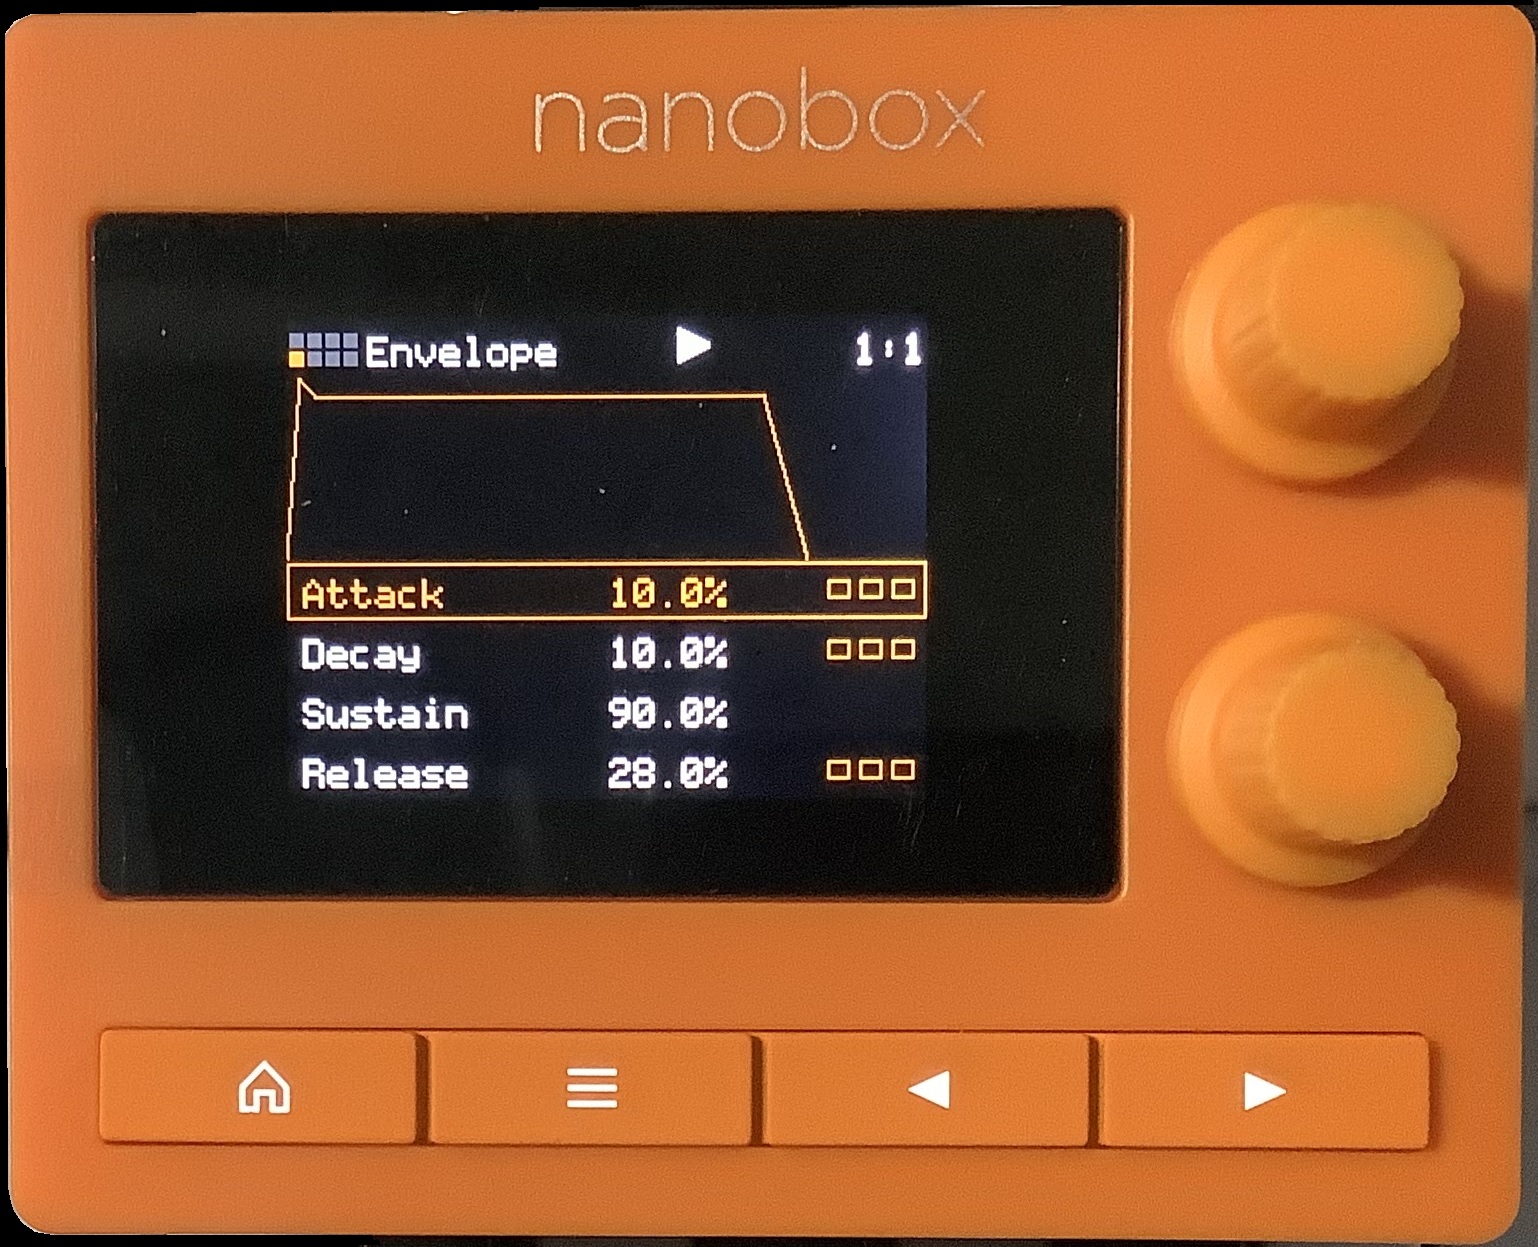
Here are the tangerine voice parameter settings for the SeattleStringsMF preset:

    Level      +3.0dB
    Pitch      +0.00
    Filter     -30.0
    Res         50.0%

    Attack      10.0%
    Decay       10.0%
    Sustain     90.0%
    Release     28.0%
    Velocity    70.0%

    Filter MOD  VEL
    Amount      15.0%
    Filter MOD  KEY
    Amount      30.0%

The level adds a little overall boost. The filter settings bring in LPF through velocity and key scaling. As I said, these voices need sweetening. Reverb is added and I’m still working on chorus…

No filter envelope

My enthusiasm for tangerine has not waned. However, tangerine has a few shortcomings.

The biggest shortcoming is that the envelope does not modulate the filter. Yikes, this could be a deal-breaker for some people. Driving the filter is a pretty basic, needed capability and I hope that 1010Music add a solution in a future update.

What do those numbers mean?

You’ll notice that tangerine states many of its parameters as a percentage. Take the envelope parameters above, for example. Sustain and Velocity as a percentage are meaningful (i.e., percentage of full scale), but what the heck do the time-based parameters mean?

Percentage of what? There must be maximum attack, decay and release times. At the very least, 1010Music should state the maximum times and I’ll do the arithmetic. 1010Music state min and max for the LFO rate, for example.

1010Music need to improve the filter documentation, especially the way filter cut-off interacts with modulation. In particular, I’d like to know when to use negative values to tilt control curves the other way (e.g., key scaling or velocity scaling).

Effects

Based on Web comments, the first version of tangerine’s software implemented a more extensive set of delay and reverb parameters. Early adopters complained about the difficulty of dialing in delays and reverbs. 1010Music responded by “simplifying” the effect parameters.

I think they have gone too far. The reverb parameters are decay, pre-delay and damping — all expressed as percentages. Damping as a percentage makes sense. But, decay and pre-delay are time-based and a percentage is kind of meaningless. I often steal (borrow?) effect parameters from elsewhere and know that a 2.7 second reverb time and 20 millisecond initial delay will get me a large hall. tangerine doesn’t let me dial these basic values in directly and min/max time delays aren’t stated in the manual.

And — I confess — I’m at a total loss with the delay effect. [For now.] I haven’t been able to dial in a chorus effect. The maximum delay is stated, but I can’t get the delay short enough. Chorus needs a delay in the 10 to 50 millisecond range.

Hope these comments are helpful. Fingers are crossed for future updates from 1010Music.

My initial comments about 1010Music tangerine are here.

RTFM (update to an update)

Well, reading the manual can be beneficial. 🙂 You never know what you’ll find.

As to configuring a chorus effect, the manual does specify the maximum delay time: 4 seconds. Thus, the delay time needs to be around one percent (1%) in order to get a chorus-like delay time within 10 to 50 milliseconds.

The real bad news WRT chorus, however, is the lack of LFO modulation. The delay time should be LFO modulated in order to get a dynamic pitch shifting effect. I can hear a difference when delay is set in the 10 to 50 millisecond range, but it ain’t a true chorus without LFO mod. I may experiment with two slightly detuned layers and hear what happens.

So, that’s two big misses for tangerine:

  • The envelope cannot modulate the filter cut-off.
  • The LFO cannot modulate delay time.

Bummer! I hope 1010Music adds these modulation options in a future update. These options are quite essential and expected.

I stumbled across an essential detail about the filter parameter. Filter values between 0 and 100% (positive values) enable a high-pass filter (HPF). Negative filter values enable a low-pass filter (LPF). This explains why I had trouble tuning in the filter and modulation by ear alone. Information like this is someetimes a bear to pull out of the tangerine documentation.

The tangerine manual is pretty good by today’s standards. However, it needs better organization and an index. Some information — like parameter names, description, min and max values — should be collected into a single table. Believe it or not, Yamaha is quite good at organizing this sort of detailed information. See their “Data List” and Synthesizer Parameters PDFs.

Copyright © 2024 Paul J. Drongowski

Peeling a juicy tangerine

A few quick comments and lessons learned with the 1010Music tangerine.

Gotta say, the audio quality is spot on. I haven’t heard any glitches, hiccups, or buzzes. Everything sounds clean. Beauty.

Factory content

Everybody loves factory content! Here’s a quick run-down:

  • There are two acoustic pianos: 10Grand (435MBytes) and 1010Grand (2.24GBytes). 10Grand has three velocity layers (40, 80, 120) taken every three notes. 1010Grand is every note with six layers. 1010Music does not identify the source, but I’m guessing K-Sound? It does sound good.
  • Symplesound consultants provided 20 multi-sampled instruments ranging from AP/EP pianos to synths. You’ll find some lighter weight piano options which will fit into the tangerine’s 64MByte internal memory (no streaming from MicroSD). The Rhodes and Wurlie ain’t bad, but are single strike.
  • Soundtrack Loops provided 800+ loops and kits. The loop names identify BPM and key and are arranged into “construction kit” subdirectories. There are ten kits. In addition to cinematics, you’ll find construction kits for contemporary genres like ambient, tribal, and so forth. Pretty much a sampler for Soundtrack Loops content.
  • Soundopolis is a small collection of FX sounds (e.g., alien spaceship). There is a smattering of percussion (e.g., doumbeck). Have fun. Original source unknown.

These same sounds shipped with the 1010Music Blackbox. tangerine presets are provided for everything, so it’s easy to browse content. It would be nice to know if there are any licensing issues if the sounds are used in a production. 1010Music?

Updating and cloning

My tangerine arrived with firmware version 1.0.1. The current rev is 1.1.6. You’ll need to create an account at 1010Music in order to download the latest release and factory content.

Follow the installation directions. You need to update the internal firmware only once. Thereafter, all of your MicroSD cards will need the latest NANOTANG.BIN file and 1010rsrc.bin file. The tangerine does version checking and tells you if something is missing. It would be great if 1010Music explicitly identified what’s needed to update a cloned MicroSD card. I like to use cloned, working copies and keep the original safe.

It was a good idea…

Plans go astray. My first inclination was to build a multi-sampled instrument from a sampling library. I pulled out an old CD of Q Up Arts Symphonic Fields Forever (SFF). This is a great little collection of symphonic instruments and ensembles a la Mellotron. No loops, but that’s OK.

tangerine likes 48kHz 24-bit. SFF is 44.1kHz 16-bit. Tangerine will do 44.1 with a performance penalty. Enter conversion Hell. On top of sample rate conversion, I want to cover five octaves; SFF is sampled over four octaves. Yada-yada and I decided it was all too much work. I could feel the pull of the black hole that sucks away creative energy…

First sampling session

I chose and auditioned Genos instruments, mainly woodwinds and horns. A few candidates stood out:

    Clarinet&Flutes 104   1  72  Regular  1-74, 75-127
    Clarinet&Oboe   104   1  69  Regular  1-74, 75-127, 1-64, 65-127
    DoubleReeds     104   2  69  Regular  1-64, 65-127, 1-85, 86-127
    Flutes&Oboes    104   2  74  Regular  1-64, 65-127
    FluteSection    104   1  74  Regular  1-127
    OrchWoodwind    104   1  71  Regular  1-85, 86-127, 1-74, 75-127

    OrchHornsPad    104  11  62  Live     30-127, 1-127
    SoftHorns         0 117  61  Live     1-127
    MellowHorns       0 119  62  Regular  1-127

Fortunately, I have the UVF meta-data files for these voices. The meta-data specifies the original velocity splits — helpful information when choosing new sampling levels.

I decided to go simple and sample at a single velocity level. I connected the tangerine to Genos and set the Genos Master Volume level to the 4 o’clock position. [This is a position that I previously ascertained to be +0dBFS.] Parameters on the tangerine side were:

    Rec Input:     Left (tip)
    Gain:          +10.0dB
    Filename:      
    Start note:    C2 (36)
    End note:      C7 (96)
    Sample every:  3
    Vel Layer:     1
    Max Vel:       80
    Note Length:   8
    Release Len:   1
    MIDI Chan:     1
    Rec Thresh:    On
    Threshold:     -60.0dB

The “Regular” Genos voices are MONO, so there isn’t any point in stereo sampling. I recommend setting the Gain first, then the record Threshold. -60.0dB was about 4dB above the quiescent noise floor.

Oh, yeah, remember to kill the reverb, effects and EQ on Genos if you want to sample the dry sound.

Press the record button and let tangerine rip. I cancelled two passes because the level meter crossed into the red zone (probable clipping). The parameters reported here seem satisfactory WRT audio quality.

Hook the tangerine to MODX and use MODX as a MIDI controller. On playback, the audio sounds good! However, the samples are one octave too low. MIDI note 36 should have given me two octaves below Middle C (262Hz). The incoming MIDI may be hitting the Genos voice an octave too low. There are a few ways to fix this and they all require trial and error. Ain’t standards wonderful?

Know thy structure

Nothing like real world experience to test your understanding of UI objects and their relationships. 🙂 I now understand tangerine presets much better. A preset (and its directory) is a container for parameters (preset.xml) and multi-samples. The multi-samples are stored in a subdirectory within the preset directory — presumbly what 1010Music calls “packing”.

The tangerine UI drove me mad when I tried to rename objects. At one point, I gave up and renamed everything on a Windows PC. More learning required…

Well, I could try to remap the samples and fiddle around to make everything right. Or, throw the first burned waffle away and try again from scratch. If I take the latter approach — toss the first attempt away — I have a better chance of outlining a basic procedure and moving forward in the future efficiently.

Copyright © 2024 Paul J. Drongowski

Yamaha announce the Clavinova CLP-800 series

Yamaha have announced the much-anticipated CLP-800 series Clavinova digital pianos.

Personally, I was hoping for a significant bump over the CLP-785, the main reference point for this post. The CLP-785 — and now the CLP-885 — are the flagship “spinet” models. Although I enjoy my CSP-170, my dealer offers an attractive trade-in, trade-up plan which I would exercise given the right motivation. After a quick glance through the Owner’s Manual and Data List, my ardor cooled, sad to say.

Yamaha CLP-845 digital piano

The user interface (i.e., front panel and key functions) and choice of keybed (e.g., GrandTouch and GrandTouch-S) remain largely the same. The piano engine features the same capabilities as the CLP-700 series:

Secondary voices and the XG (GS, GM2) sound set remain the same. Please see the CLP-800 series comparison table as lower-end models may elide specific features and voices.

The CFX Grand and Bösendorfer are the featured pianos, and include Binaural Sampling. The CLP-800 series adds two new acoustic piano voices: Chill Out Piano and Lo-Fi Piano. The same Fortepianos are offered: Scarlatti, Mozart, Beethoven, and Chopin Pianos. All other secondary voices are the same in the CLP-800 series. No big upgrades.

The classical and lesson song lists and rhythm list are the same.

The CLP-800 series Owner’s Manual has many revisions for readability. The different organization makes it difficult to make an exact features by feature comparison between the series. I haven’t spotted any gotta-have new features.

Yamaha have made significant changes in the built-in sound system(s):

Component      CLP-885                  CLP-785
-------------  ------------------------  ------------------------
Amplifiers     (45 W + 30 W + 40 W) × 2  (50 W + 50 W + 50 W) × 2

Speakers       (16 cm with diffuser +    (16 cm + 
               8 cm with diffuser +      8 cm + 
               2.5 cm (dome) with        2.5 cm (dome) +
               Bidirectional Horn) × 2,  transducer) × 2,
               Spruce Cone Speaker       Spruce Cone Speaker

You will find similar changes in spec for other models, should you look at the CLP-800 series comparison chart.

Yamaha have given the DSP effect types a modest boost by adding “Effect types used for a specific Voice”. These effect types are:

    VCM EQ 501             Virtual Circuit Modeling (VCM) vintage EQ
    Comp Distortion        Compressor stage followed by distortion
    Vintage Phaser Stereo  VCM analog vintage phaser
    Stereo Overdrive       Stereo overdrive distortion
    Damper Resonance       Simulates grand piano damper resonance
    Hall 5                 REV-X hall reverb

Yamaha arranger and synth enthusiasts will recognize these effect types. They are DSP algorithms that are typically applied to electric piano and other keyboard voices.

Initial Reaction

My initial reaction is “Big-whoop”. [“Disappointment” for those of you who are not familiar with American sarcasm.]

The big functional change appears to be the use of “diffusers” in the built-in sound system. The CLP-800 Web page has a big chart comparing sound system components. The chart made me feel like I was buying a PA system, not a piano. Yamaha need to find a different way to promote this technology — something to make the technology approachable and cuddly to the average customer. Way too techie!

Frankly, I’m left cold. Since I’m happy with my CSP-170, I cannot find a compelling reason to upgrade to the CLP-800 product line (or the CLP-885, in particular). Guess that trade-up option is going to go unexercised…

Why the underwhelming Clavinova Series 800 update?

We know — from Yamaha’s quarterly call with analysts and investors — that the bottom has fallen out of the world-wide market for home digital pianos. China, in particular, is slow. Possibly, Yamaha did not feel the need or want to drive the home digital piano market too hard at this point in time. Perhaps they are saving bigger updates for the future when the market is more favorable?

This doesn’t mean that the CLP-800 series are bad pianos. I liked the Yamaha CLP-785 very much. As far as I’m concerned, personally, CLP-885 doesn’t give me a compelling reason to upgrade.

Technical footnote

The CLP-700 and CLP-800 series generate high resolution velocity and acceleration data with each MIDI note ON message. Two MIDI continuous controller (CC) messages are generated:

    CC#19    Key acceleration
    CC#88    High-resolution velocity prefix

By “prefix”, I suspect Yamaha mean the high order byte of an extended velocity data value. If you intend to use a “Grand Expression” digital piano with a personal computer-based software instrument (e.g., Modartt Pianoteq, Arturia Piano V, etc.), you will need to filter out or map these “extra” MIDI messages. Check the MIDI Implementation Chart for your model and software instrument (VST).

Copyright © 2024 Paul J. Drongowski

Potential Yamaha P-525 gotcha!

A few recent posts on the Piano World Forum brought a potential Yamaha P-525 issue to my attention. I like the upper-end P-series models, notably the now discontinued P-515 and the P-525. Both models embody good value and sound.

The P-525 improves on the P-515 by adding Grand Expression Modeling (GME). The GME piano engine responds to nuanced playing gestures. That’s a win, in my opinion.

Folks using the P-525 as a piano-action controller have noted two new MIDI continuous controller messages:

    CC#19  Key Acceleration
    CC#88  Expand Velocity

These messages are produced by the Grand Expression Modeling engine. Poly Aftertouch, key acceleration and expand velocity — whatever that is — are sent with every note ON.

That behavior may seems like a desirable feature until you try to drive a piano software instrument like Arturia Piano V (as cited in a Piano World Forum post). These continuous controller messages would also get in the way when using the P-525 as a “bottom” keyboard driving a synth as one might do in a pop/rock gig situation. The latter use-case is what the P-series is for, after all.

Harrumph! As far as I know, there isn’t a way to turn off these messages, sending only MIDI Note ON and Note OFF. Yamaha need to fix this. Until they do, I must issue a strong caution about using the Yamaha P-525 as a piano-action controller.

The P-525 Piano Room implements a Grand Expression parameter. In addition to the Dynamic and Static settings, maybe implement OFF?

Buyer beware! I dare say, this may be an issue for anyone purchasing a Grand Expression model with the intention of driving a piano software instrument (VST). Look before you leap — you may need to filter or remap these extra messages yourself!

Copyright © 2024 Paul J. Drongowski

Chord progressions for Yamaha Chord Looper

Hey, hey, more free content for Yamaha arranger keyboards!

The Yamaha Genos and PSR-SX900 keyboards feature Chord Looper — a chord sequencer that cycles through a user-defined chord progression. Yamaha provides a few example Chord Looper Banks, but folks always wish for more.

So, I collected chord progressions from various public sources and created Chord Looper Banks (and Chord Looper Data files). My Chord Looper Banks have the most common chord progressions and some not-so-common progressions. All are in relatively easy keys and await your creativity.

As an added bonus, I included Java source code for the program that translates Extended ChordPro (CHO text files) to Chord Looper Data (CLD) files. If you don’t care about nerdy stuff and just want to play, then stick with the Chord Looper Banks (CLB) and Chord Looper Data files. 🙂 You don’t need to know anything about Java to use the CLBs and CLDs.

Download the Chord Loops (v1) ZIP file

Check out the README.TXT (in the ZIP file) for more information.

Copyright © 2024 Paul J. Drongowski

Yamaha Montage M internals: First look

Thanks to Dmitry Ko on the Keyboard Corner forum, we have the first solid information about Montage M7 internals! Congratulations, Dmitry!

We owe Dmitry a round of applause and gratitude for providing the first — and extensive — information about Montage M internals. He had to take extra steps to find and identify some components (more than I would have been willing to do with a brand new board, that’s for sure).

Dmitry was kind enough to give me a preview and his analysis is spot on.

Here are my own notes:

IC601 SWP70 #1 (Upper left DM PCB)     YMW832-C    FM-X?

  IC602 Winbond W9812G6KH-5  SDRAM 128 Mbit Parallel 200MHz (8M x 16)

IC401 SWP70 #2 (Middle)                YMW832-C

  IC501 Winbond W9812G6KH-5 SDRAM 128 Mbit Parallel 200MHz (8M x 16)
  IC402 Winbond W9825G6KH-6 SDRAM 256 Mbit Parallel 166MHz (16M x 16)
  IC403 Winbond W29N08GVSIAA NAND flash 8 Gbit (1G x 8)
  IC404 Winbond W29N08GVSIAA NAND flash 8 Gbit (1G x 8)
  IC405 Winbond W29N08GVSIAA NAND flash 8 Gbit (1G x 8)  DM PCB rear
  IC406 Winbond W29N08GVSIAA NAND flash 8 Gbit (1G x 8)  DM PCB rear

IC201 SWP70 #3 (Right)                 YMW832-C

  IC301 Winbond W9812G6KH-5 SDRAM 128 Mbit Parallel 200MHz (8M x 16)
  IC202 Winbond W9825G6KH-6 SDRAM 256 Mbit Parallel 166MHz (16M x 16)
 *IC205 Winbond W29N08GVSIAA NAND flash 8 Gbit (1G x 8)
 *IC206 Winbond W29N08GVSIAA NAND flash 8 Gbit (1G x 8)
 *IC207 Winbond W29N08GVSIAA NAND flash 8 Gbit (1G x 8)  DM PCB rear
 *IC208 Winbond W29N08GVSIAA NAND flash 8 Gbit (1G x 8)  DM PCB rear
  XL201 02238 SWP70 clock

IC701 SSP3                       YJ496A0

  XL701  SSP3 clock
  IC706  TI LV08A 2BK ATPZ
  XL801  SSP3 clock

  XLB02 USB hub clock
  ICB04 GL852G  Genesys Logic 4-port hub USB 2.0 (SSP3 hub)
  Q1102 TPC812S ??? USB2_VBUS

  IC702 SDRAM    No mount?

ICA01 Texas Instruments Sitara AM5728BABCXA

  IC001 NANYA 2245 NT5CC128M16JR-EK DDR3 256MByte
  IC002 NANYA 2245 NT5CC128M16JR-EK DDR3 256MByte
  XLE01 CPU clock

ICB03 GL852G USB 2.0 hub controller (DM PCB rear, CPU hub)

  XLB01 USB hub clock

ICC02 eMMC (Yamaha YN240B0)

ICC01 Fast Ethernet PHY

ICA03 THine THC63LVD1O3D LCD controller (LVDS)

IC904 Texas Instruments TPS659037 Power controller

IC101 Texas Instruments PCM1795 32-bit stereo DAC   DM PCB rear
IC111 Texas Instruments PCM1795 32-bit stereo DAC   DM PCB rear

IC121 Texas Instruments PCM1804 24-bit stereo ADC   DM PCB rear

In a few cases (marked with “*”), copyright labels obscure the chip ID information on the IC package.

Here are a few additional observations.

Yamaha gave the Montage M a major league host CPU: Texas Instruments Sitara AM5728BABCXA. The Sitara is multi-core:

  • Dual-core ARM Cortex-A15 MPU (1.5 GHz)
  • Dual TMS320C66x floating-point VLIW DSP (750 MHz)
  • 2 x dual-core ARM Cortex-M4 co-processors (213 MHz)
  • Dual-core PowerVR SGX544 GPU (532 MHz)

This is a major step up from the single core 800MHz ARM in the original Montage. The Sitara is given twice as much primary memory than the original: 512MBytes of DDR3 RAM.

Thus, folks, you’re going to need a fan. Montage M’s digital logic board (DM) has a substantial metal cover, probably to control RFI. The Sitara has a vanilla heat sink. An opening in the metal cover lets heat escape from the heat sink. The fan draws air from beneath the metal cover/heat sink. This design is different than what I expected, i.e., a very small heat sink plus mini-fan cooler a la Raspberry Pi. This Sitara ain’t no RPi!

The two integrated TMS320C66X DSP cores likely synthesize AN-X. 16 voice AN-X polyphony feels just about right for two TMS320 cores. (Reface CS employs an SSP2 DSP and has 8 voice polyphony.) With compute-intensive AN-X going on, you’re gonna need a fan. I don’t buy the cooling pipe solutions proposed by some and it would be very difficult to position the Sitara in contact with the metal chassis. End of story.

The factory waveform NAND flash is Winbond W29N08GVSIAA. That is the highest capacity ONFI compatible NAND flash made by Winbond. The factory waveforms are compressed (10GB when converted to 16-bit linear format) and reside in 4GBytes of physical NAND flash. User waveforms are uncompressed (3.7GB available capacity) and reside in 4GBytes of (separate) physical NAND flash.

In the original Montage, factory and user waveforms are co-resident in 4GBytes of waveform NAND flash. Yamaha added a third SWP70 tone generator/effects IC and, as we know, dedicated one SWP70 to factory waveforms and another SWP70 to user waveforms. The third SWP70 doesn’t have waveform memory and synthesizes FM-X.

A label covers the top of the eMMC device which provides bulk storage (OS, software, presets, etc.) for the Montage M. The original Montage has a 4GByte eMMC device.

As expected, the SSP2 is out of production and is replaced by SSP3. The SSP3 inherits the digital audio routing and rate conversion chores performed by the original’s SSP2. The SSP3 has its own integrated USB interface and associated USB2.0 4-port hub. All are co-located with the external USB connector.

The THine LVDS handles LCD display duties. The Sitara has serious graphics chops with its dual PowerVR SGX544 GPUs. I haven’t worked out the interface to Montage M’s OLED subdisplay as yet. Genos1 communicates with its subdisplay via SPI.

Thanks, again, Dmitry! This more than enough for the next round of Internet speculations. 🙂

Copyright © 2024 Paul J. Drongowski

Arturia AstroLab: Yes, I played one!

Right from the git-go, I thank Guitar Center Lynnwood for letting me plink away at an Arturia AstroLab. I dropped in to play before sufficient caffeine had kicked in and I wasn’t really feeling the music. Nonetheless, I was glad to actually play an AstroLab and not watch its demo videos. 🙂

Arturia AstroLab

AstroLab and I are not quite ready for each other yet. I really need the Augmented Brass and Augmented Woodwinds. The Augmented series are pretty sweet instruments and acoustic woodwinds, especially, are essential to what I play live. Still, thanks to playing AstroLab now, I will keep AstroLab on my radar screen.

AstroLab or Analog Lab?

In case you haven’t watched a few videos, AstroLab is Analog Lab in a stand-alone keyboard. That’s the short of it. Sitting down to AstroLab is exactly like sitting down with Analog Lab. Most of Lab’s collection of instruments are there along with a number of recognizable presets. I couldn’t perform a systematic check, but I believe Arturia have cooked up additional presets for AstroLab itself.

The big elephant in the room: If you have Analog Lab (or V Collection) on a laptop, why AstroLab? AstroLab is not cheap at $1,599 USD (MAP/street). You can get a pretty decent laptop and Analog Lab for $1,600. For that matter, you can buy Analog Lab V bundled with a KeyLab Essential MK3 for only $270 (MAP). Add on a laptop and you’re ahead of the game. [Analog Lab V is integrated brilliantly with the KeyLab controller series, BTW.] So, AstroLab needs to have significant value-added.

From my own perspective, I’m not wild about using a laptop in a live church setting. I once had a laptop balk in church and when I’ve got to play, I’ve got to play. I like the idea of Analog Lab running on a reliable, dedicated keyboard. On the down-side, AstroLab gives up KeyLab’s sliders, having no sliders at all. (To me, pads are MEH.) On the up-side, working at AstroLab is Analog Lab V déjà vu. And that’s a good thing…

Build

AstroLab is an attractive looking instrument. Visually, it would grace any stage. Dimensionally, it is not much wider than the 61-key keybed and, as a result, is quite compact. That’s why AstroLab’s heft is so surprising. At 22 pounds (10 kg), this instrument has some weight and you won’t be throwing it around with palm swipes. The KeyLab Essential 49 and 61 are only 6.1 and 6.8 pounds, respectively. I love my KeyLab Essential 49 for its light weight and portability. Thus, the relatively weighty AstroLab is a double surprise.

Arturia AstroLab Color Display Encoder

The build, encoder knobs, buttons and keys feel solid and durable. The integrated display knob, not so much. The display knob — what Arturia calls the “Color Screen Encoder” — feels like it rocks around and I feared a bit for its safety in my under-caffeinated hand. I would rather confirm selection with one of those solid-feeling buttons near the display knob.

One near-term suggestion: Ditch the cheesy-assed music stand shown on the Arturia AstroLab “Details” web page. It’s not up to the usually superb Arturia design aesthetics.

Display and UI

I was quite amazed by the amount of detail shown by the color display. You can easily recognize all of the virtual synths and keyboards by their familiar appearance. I didn’t have any trouble reading the instrument, patch, and parameter names. Text is legible.

As to the user interface (UI), you can dial around the menu system (literally). Patches are organized by virtual instrument, sound category (strings, etc.) and artist. The artist category lets you dial in a patch based upon a popular song or what have you, a feature that will be welcomed by cover-band players.

Arturia need to divide a few categories into separate, smaller categories. For example, brass and woodwind instruments are in the same, combined category. In order to find a clarinet, I must scroll through a bunch of brass instruments. It’s bad enough to scroll through a list of instruments, but, hey, lets focus the list and reduce scroll time. How ’bout separate categories for woodwinds and brass?

Splits and layers

My only other source of frustration was trying to create a split. I didn’t have time to browse the AstroLab manual before heading down to the music shop. Intuition alone didn’t cut it and I never succeeded in creating a split. Bummer.

Sounds

I took along this week’s music and a few of the jazz tunes that I’ve been working on. Genre-wise, it’s pop, not electronica.

I was pleasantly surprised to find a large number of patches that could fill-in for the Augmented Brass and Woodwind instruments. That’s a relief. Generally, patches sounded bright and I raised this point with the store manager. The staff had compared AstroLab vs. Nord and found more mid- to low-range with the Nord through the same monitors. Tweaks needed?

Some of the acoustic pianos sounded too bright and brittle. Fortunately, they could be tamed with the “Brightness” and “Timbre” knobs. I felt much better once I got into the Augmented Pianos. Nice work, there. I couldn’t assess piano sustain, not having a sustain pedal attached to the demo unit.

As to the keybed, it is comfortable to play. It’s another one of those “Compromise” keybeds which aim for a sweet-spot between acoustic piano, electric piano, organ and synth. I much prefer the AstroLab keybed to KeyLab Essential — by far. The keybed made playing electric piano enjoyable (something I dread on Yamaha MODX6). B-3 organ didn’t feel bad under the fingers, either.

I have only one small, probably correctable, quibble about the key touch. Sometimes a patch wouldn’t trigger (produce any sound) when using my lightest touch. This seemed to occur with synth-y patches and maybe setting the key touch sensitivity would make the instrument more responsive.

I did notice a delay when switching between “sampled” instrument patches. Arturia acknowledge this delay due to sample loading. Plan for it when playing live. Switching between modeled instruments is darned quick. I didn’t notice any drop-outs due to polyphony limits, but then I wasn’t pushing AstroLab very hard with splits or layers.

Conclusion

Earlier, I addressed the big elephant in the room — what you get for what you pay. Arturia want to compete with the Yamahas, Korgs, Rolands and Nords. In terms of build and keybed, they are on par. As to sonic value-added, the AstroLab is a work in progress (WIP).

Arturia are smart enough to know it’s a WIP. They need to fill out the brass and woodwind offerings, for example.

The big value-add is Arturia’s sound design. AstroLab is Analog Lab V (temporarily minus some goodies). If you want Analog Lab V in a dedicated keyboard, you got it now.

Copyright © 2024 Paul J. Drongowski

Arturia AstroLab announced

Arturia have announced its new Arturia AstroLab featuring many (most?) of their AnalogLab instruments and presets: 34 instruments, 1,300 presets. You’ll find lots of pre-release demos on the Interwebs. I recommend the Arturia playthrough video which doesn’t have any yakking.

I’m excited by the AstroLab if, for no other reason, it’s the first significant alternative to the all-in-ones offered by the kaiju (Yamaha, Roland, Korg, Nord, etc.) The current sound set is very comprehensive even though a few Analog Lab instruments for AstroLab are still in development.

A few quick observations. The AstroLab is bi-timbral. That means splitting two independent voices or layering two voices. That might seem limiting, but I rarely use humungous stacks when playing live. The knobs (endless encoders) light up with the color matching the assigned layer or split voice. Neat. Piano and organ polyphony is 48; poly synth polyphony is 8.

There are four endless encoders to control voice parameters and four encoders to control the effects: effect A, effect B, delay and reverb. No sliders. The lack of sliders may raise eyebrows, but you can add a secondary MIDI controller through a USB-A port.

Speaking of encoders, you probably noticed that dial-like thingy in the middle of the front panel. Arturia have invented an innovative control which merges a big wheel with a high-resolution color display in the middle. The wheel turns left and right, and responds to clicks and pressure from the top. One may need to be a little careful so as to avoid inadvertent clicks while turning the wheel.

The keyboard is described as semi-weighted piano keys, channel aftertouch. Natch, one really needs to get the keys under the fingers to discover if the key-feel is really for you. In such a premium-level keyboard, I doubt if Arturia built in a cheapo keybed.

Internal storage is 22GBytes and only 7GBytes are used. That leaves plenty of room for expansion including the new instruments coming to AstroLab at some future date.

Sound editing is generally limited to what is assigned to the encoders. For deep sound editing, you’ll need a licensed copy of the relevant AnalogLab instrument (bundled or individually). In other words, separate software licenses are needed in order to deep-edit.

Physically, AstroLab is an attractive package weighing 22 pounds. That’s a little hefty for me, but is well within reason for a full 61-key instrument. The chassis is metal with molded end-cheeks. (That ain’t natural wood you’re seeing.) The goes-ins and goes-outs are well-provided for including 1/4 inch pedal jacks and 5-pin MIDI.

I see AstroLab priced at $1,600 USD (MAP or “street”) putting it up against Yamaha MODX, Korg Nautilus, Roland JUNO-X and Fantom-0, just to mention a few other products in this pricing tier.

I — for one — would like to try AstroLab and get a feel for the keybed. I’m also curious to hear and control the Hammond B-3 emulation. Would be nice to have sliders for drawbar control, but there is a nice, big flat area on the AstroLab front panel for my Crumar D9U.

A full demo on the new Arturia AstroLab with Bert Smorenburg — good to see and hear Bert!

Copyright © 2024 Paul J. Drongowski

Ain’t no April Fool: piano evoce ß

The Japanese Yamaha site posted information about a new app called “piano evoce ß”. I’m going to quote the site as translated by the Google:

This is an AI ensemble app that extracts the vocal part of your song and plays it back along with your performance. Feel free to enjoy playing together with your favorite songs!

Practicing the assigned songs alone will not increase your motivation. I want a session buddy who can arrange things freely! I want to be able to play my favorite songs with chords!

This software is a beta version service released primarily for technical verification and service experiments. We hope to continue to make improvements based on the opinions of our users.

piano evoce ß appears to be the next evolutionary step in the Chord Tracker family:

1. Connect your electronic piano/keyboard to your Mac via MIDI.
2. Analyze your own songs.
3. Start playing! When you play the chord displayed on the screen, the vocal part will follow your performance.

To use piano evoce ß, you need to register for a Yamaha Music ID account (free of charge).

Now, that’s pretty neat. Here’s my guess: Yamaha combined a vocal stem extractor with Chord Tracker. The screens look very similar to Chord Tracker. Given the reference to “service” and the need to have a Yamaha account, the heavy lifting (vocal stem extraction) is performed by Yamaha software running on one of its servers. There’s a bunch of terms and conditions to read and accept — Yamaha and its friggin’ lawyers.

The app has two ways of following the vocal part (quoting the usual minimalist manual):

  • Gentle tracking mode: This mode gently follows your playing. The high degree of freedom allows you to arrange and play chords. Even if the performance stops in the middle of a song, the tempo will slow down, but playback will not stop. The AI listens to your chords and sense of rhythm, understands your playing pace, and sings in a way that feels natural to the AI. Avoid sudden tempo changes, and try playing together to create an ensemble.
  • Perfect tracking mode: This mode waits and follows your performance. It will wait until you play at least one note that makes up the correct chord. AI will play according to the timing of your performance. Be sure to play in time with the chord changes.

Can’t wait to try this! I’m guessing it will be available for Clavinova digital pianos and Yamaha arranger keyboards. Bad news for Windows users: “piano evoce ß can be used with macOS 12.0 or higher”. Not a word about Windows.

Copyright © 2024 Paul J. Drongowski

Anavi Macropad8 for MIDI control

Every now and again, ya need a simple, small device to send MIDI commands. The V3 Sound Yammex XXL sound module is one such use case. It requires full Bank Select plus Program Change message sequences to select a voice. You’d be surprised at how many MIDI controllers are incapable of sending a full three message selection sequence! [This is one of my pet peeves about some MIDI controllers,]

So-called “macro keypads” are one possible solution. Typically, macro keypads are used by gamers to send repeated, complicated key sequences. [Hadoken!] The trick is getting the macro keypad to send MIDI instead of ASCII or whatever.

I did a search last year and found the Anavi Macropad8. The Macropad8 has eight keys, a micro USB connector and an optional OLED display. I planned to plug it into the USB host port on the Yammex module and send voice selection messages to it over USB — while the Yammex 5-pin MIDI IN port handles notes from a brain-damaged MIDI keyboard controller.

Anavi’s fulfillment via Tindy.com was really fast. Then, I let the Macropad8 languish for almost a full year. Until now.

First off, I like the Anavi Macropad8 hardware. I bought the Developer Kit which requires some minor assembly. It’s no more complicated than assembling a KORG NTS-1 or NTS-2. Unlike the KORGs, the Macropad8 does not fully enclose the electronics. Still, the final assembly is decently robust. The OLED is probably the most vulnerable component as it sits on top of the plexi top cover. I’m good with this for home use.

After assembly, I wrangled with the QMK (Quantum Mechanical Keyboard) development environment. I figured a few bytes here and there, and the Macropad8 should be good to go. Ha! Two gigabytes of development environment later, I was ready to run the QMK compiler and flash software. Yikes, that is bloated. QMK downloads with the default keymap definitions, etc. for every QMK-compatible macro keypad known to man, woman and dog.

Plus, QMK is, at best, user-hostile for QMK n00bs. Even figuring out where source code goes is an adventure game. Then, the default Macropad8 keymap is too large to flash. QMK doesn’t offer any real hints about reducing code size and one is quickly in the deep water. I turned off tap dancing, N-key rollover and backlighting in order to get the code size down.

Fortunately, there is the shell of an “advanced” MIDI keymap.c file in the documentation from which I did extensive copy and modify. You’ll need to dive into the MIDI library source code to suss out the MIDI API. The API is complete, but it is undocumented.

At long last I had a QMK app ready to go. The concept of operation is pretty simple — respond to key codes and send Bank Select MSB, Bank Select LSB and Program Change for each key press. User code runs in the middle of an infinite loop provided by the QMK infrastructure. QMK calls process_record_user() when a key code is ready for processing. If the OLED is enabled, QMK calls oled_task_user(), so your code can update (redraw) the display.

I did a quick check out with MIDI-OX to make sure the MIDI messages were being sent correctly. The Macropad8 exposes two USB ports — one to send characters to the keyboard stream and one to send MIDI. Fortunately, both Windows (MIDI-OK) and the Yammex immediately recognized the MIDI port.

Hooked up to Yammex, the Macropad8 worked as expected. I couldn’t get the arrangement to glitch even once while practicing. Overall, I would call Anavi Macropad8 a success and I recommend it.

The Macropad8 can run Arduino sketches, too. My back-up plan, in case QMK failed, was to program the Macropad8 as an Arduino (Leonardo). As an Arduino, the Macropad8 makes a neat application-specific system. I wish there was direct hardware access to the Arduino pins, but that would push Macropad8 into a different product direction entirely. Would make an interesting hack, anyway…

I noticed that newer Anavi products have moved to the Raspberry Pi RP2040 Pico. So, exercise care when ordering if you want a Microchip ATmega32U4 microcontroller.

Copyright © 2024 Paul J. Drongowski