There’s been an extended discussion in the YamahaSynth.com Montage Forum about the ability to add Virtual Analog (VA) synthesis to the current Montage and MODX platforms. It’s been a good discussion and it encouraged me to jot down a few musings about the hardware support for AWM2 and FM-X.
In case you don’t visit YamahaSynth.com, I reposted my musings here and added a diagram or two.
Before saying anything, I have to emphasize “Speculatively speaking.” With as much invested in AWM2/FM-X and their implementation in silicon, Yamaha have not published about the internal design. This whole discussion — including my own comments — would be on much sounder footing (no pun intended) if the micro-architecture were published. Yamaha are tight-lipped so “Hah!” to us all. 😀
BTW, we’re lucky that we can speculate at all since Korg, Nord, etc. have largely buttoned up their service manuals.
I’m skeptical
I’m skeptical about adding VA through an update given the current platform because of limitations in the current synthesis pipeline.
Yamaha regard their expertise in large scale integration as a strategically important asset. (Please see their annual financial reports.) The SWP70 is a major investment in the future. It’s a generational step and a design with a long expected life time. A long life is needed in order to recoup Yamaha’s investment. Thus, we haven’t seen all of its potential capabilities as yet.
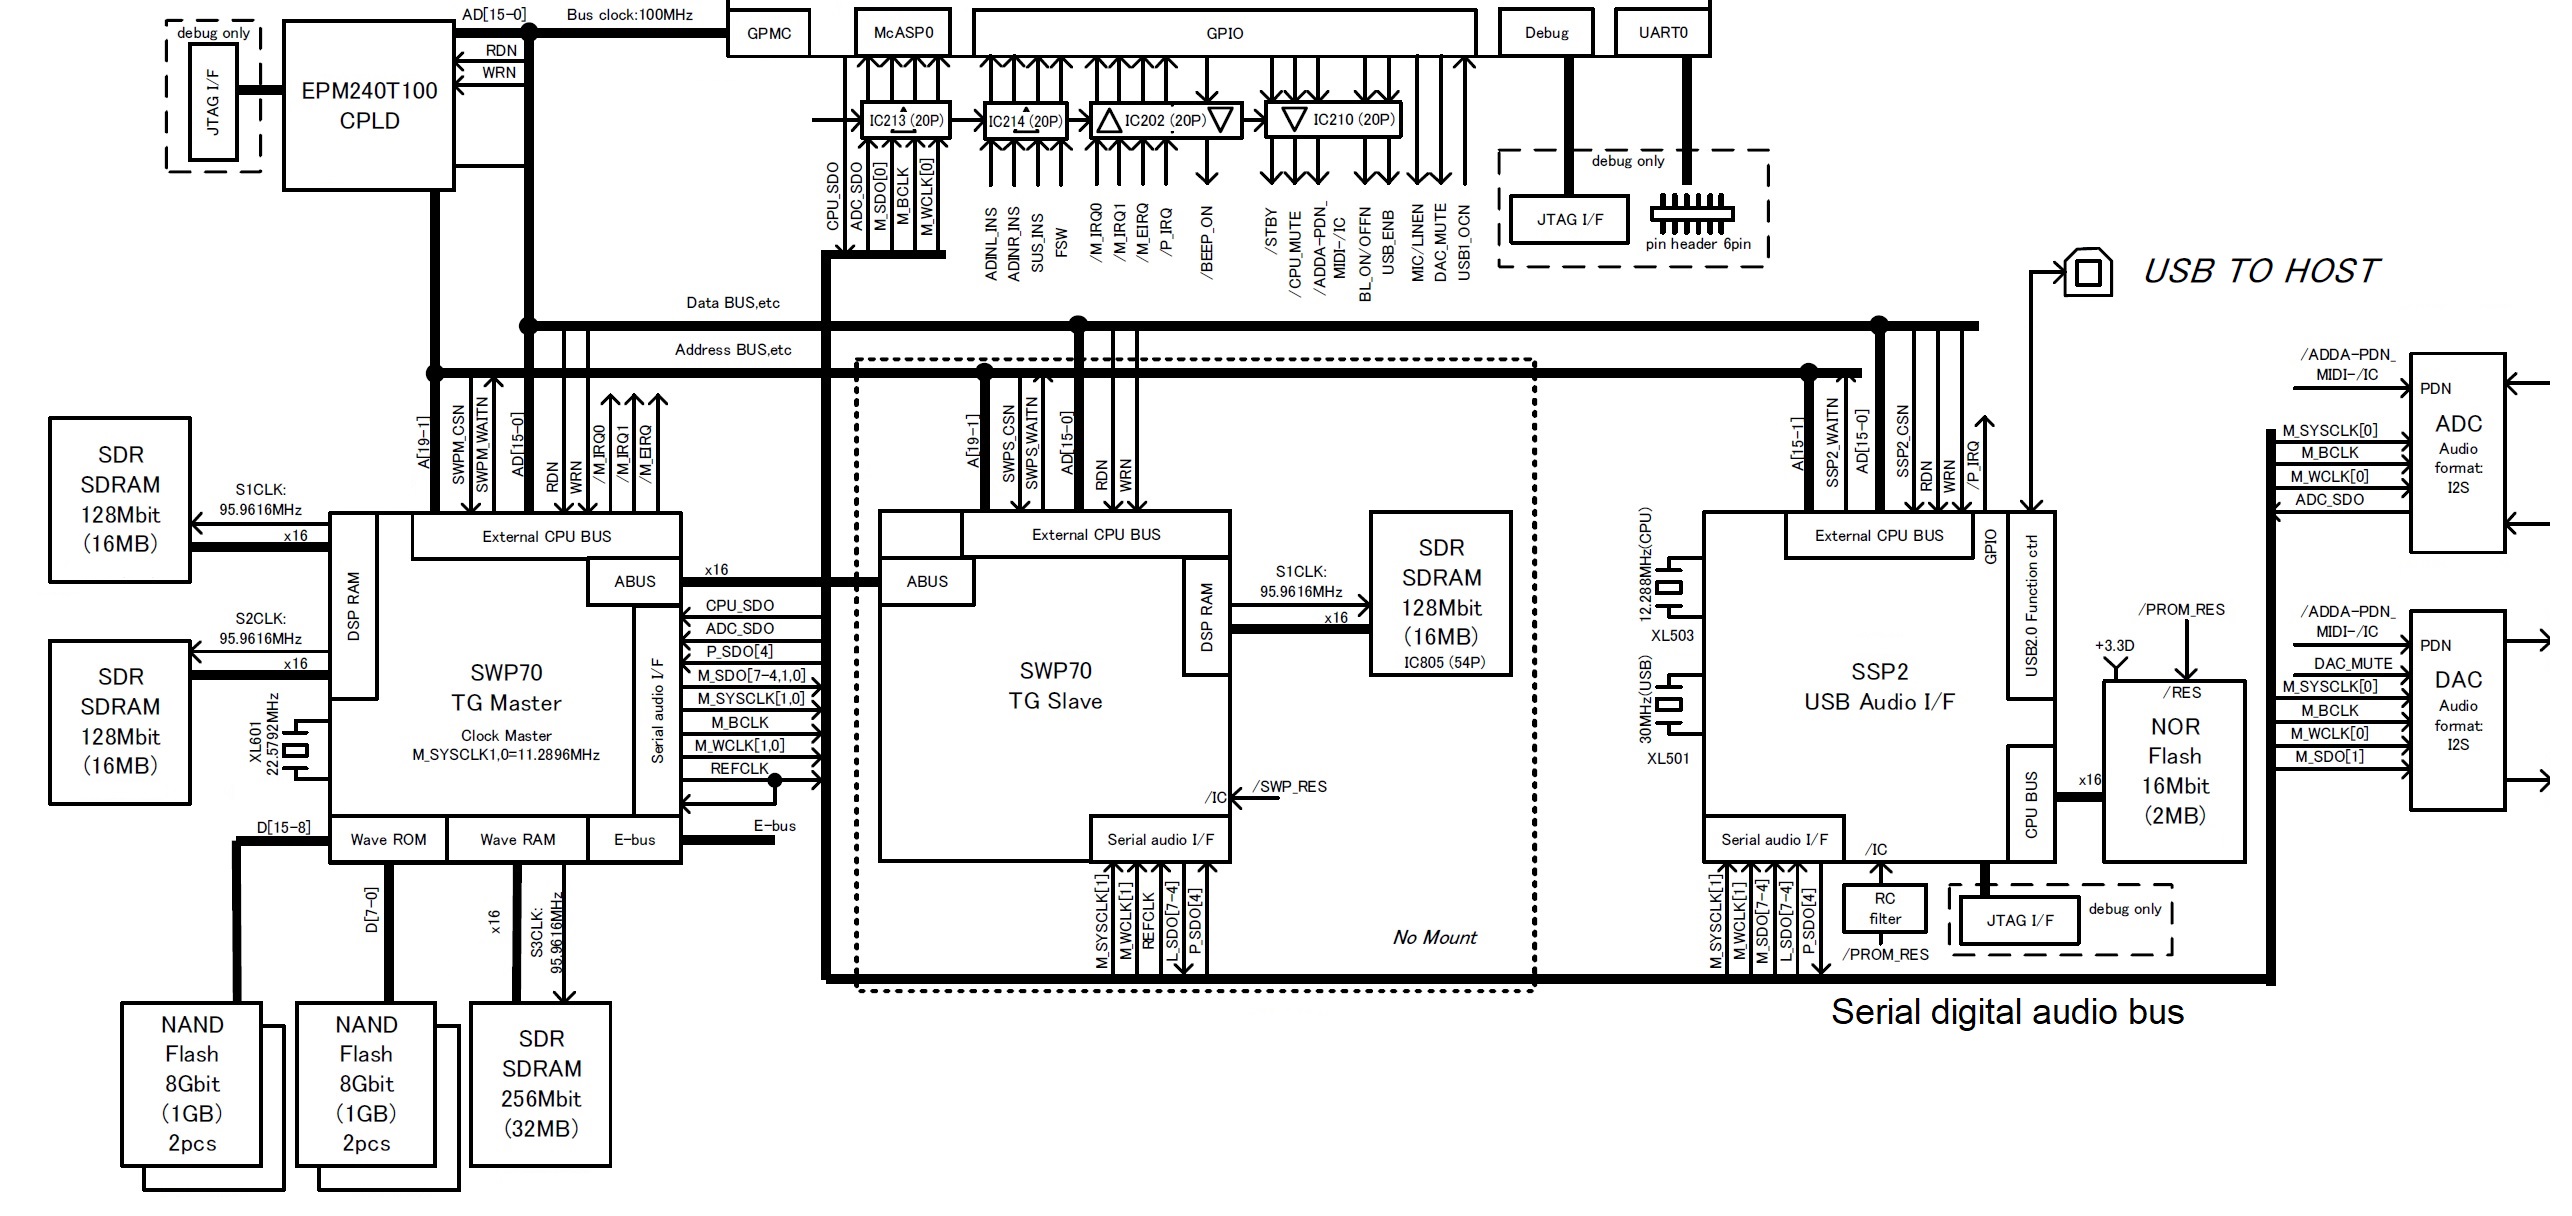
At some point, the current hardware platforms (Montage and MODX) will limit the features which can be delivered solely through software. That will necessitate a new hardware model in each product line. Speculatively speaking, I’m not sure if the SWP70 is capable of CS-like VA synthesis. The Reface CS (and DX) employ a Yamaha SSP2 (SH-2 CPU core) for synthesis. The mere presence of an SSP2 in the Montage is not significant for VA because it clearly supports UR-like digital audio in the existing design.
Of course, business decisions will take precedence eventually. We all love the free updates and improvements in our instruments. (I certainly do!) Like cellphones, tablets and other high-end electronics which enjoy periodic updates, we will need to buy a new upgraded platform in order to fuel the future. Nobody rides for free forever.
My mental model
I suspect that we nerds (and I mean that as a compliment!) have different architectural models in mind as to the SWP70 internals. One model is the “standard DSP” model — a pipelined single instruction, single data (SISD) CPU. Naturally, there may be enhancements for vector processing instructions and so forth.
An example of such a generic model is the Yamaha SSP2, which consists of an SH-2 DSP core and several effect DSP processors. The SSP2 is the heart of Reface CS with an internal clock of 135.4752MHz (a multiple of 44,100Hz, BTW). Another example would be the DSP56362 in early Nord/Korg modeling keyboards. The Reface CS manages 8 voices of polyphony (using the word “voice” loosely) with the effects handled by the SSP2 effect DSP processors. (The effect DSP processors are mini, small core, reprogrammable processors.)
The architectural model which I think is used in the SWP70 is a SIMD architecture more akin to a GPU. The Montage/MODX DSP RAM and wave work RAM memory clock is 95.9616.MHz, also a multiple of 44,100Hz. The SWP70 pumps out a finished sample every 2,176 memory clock ticks. The internal clock is probably a small multiple (maybe two) of the memory clock. Everything needs to run in a modest power envelope without a heat sink, etc., so it’s not possible to run at GHz rates.
After writing this, I realized that the AWM2/FM-X synthesis core may not have an instruction stream at all. It might be a block of 1 to N dedicated pipelines where each pipeline is, roughly speaking, an AWM voice element.
I image a block of tone generation (TG) cores dedicated to AWM2/FM-X. Part of that “dedication” is a pipeline specifically tailored and tuned to AWM2/FM-X. (I believe this design IP (the basic core design) is re-used in other AWM2 products.) Yamaha are in the AWM2/FM-X business so it makes sense to design hardware specific to these tasks. It’s no simple feat to produce 128 channels of tone generation with low latency and no burps and hiccups.
I don’t know how much flexibility is built into the so-called “oscillator” part of a TG core pipeline. Could Yamaha write a new SIMD program for VA using the existing TG core design? I don’t know and hence, my doubt.
That said, since Yamaha haven’t published a darned thing and my job easier (Hah!), I could be totally wrong. Yamaha are smart engineers, especially at the hardware level.
The choices made for Reface may or may not be revealing. Reface YC/CP use the SWX08 for AWM2/SCM synthesis. The SWX08 — in my imagination — use a similar AWM2 TG core assist. Reface DX/CS use SSP2 and its SH-2 core. Was something missing in the SWX08 TG core which was available later in the advanced SWP70 cores? Did SWP70 become VA capable as well?
Example: Yamaha YMW820
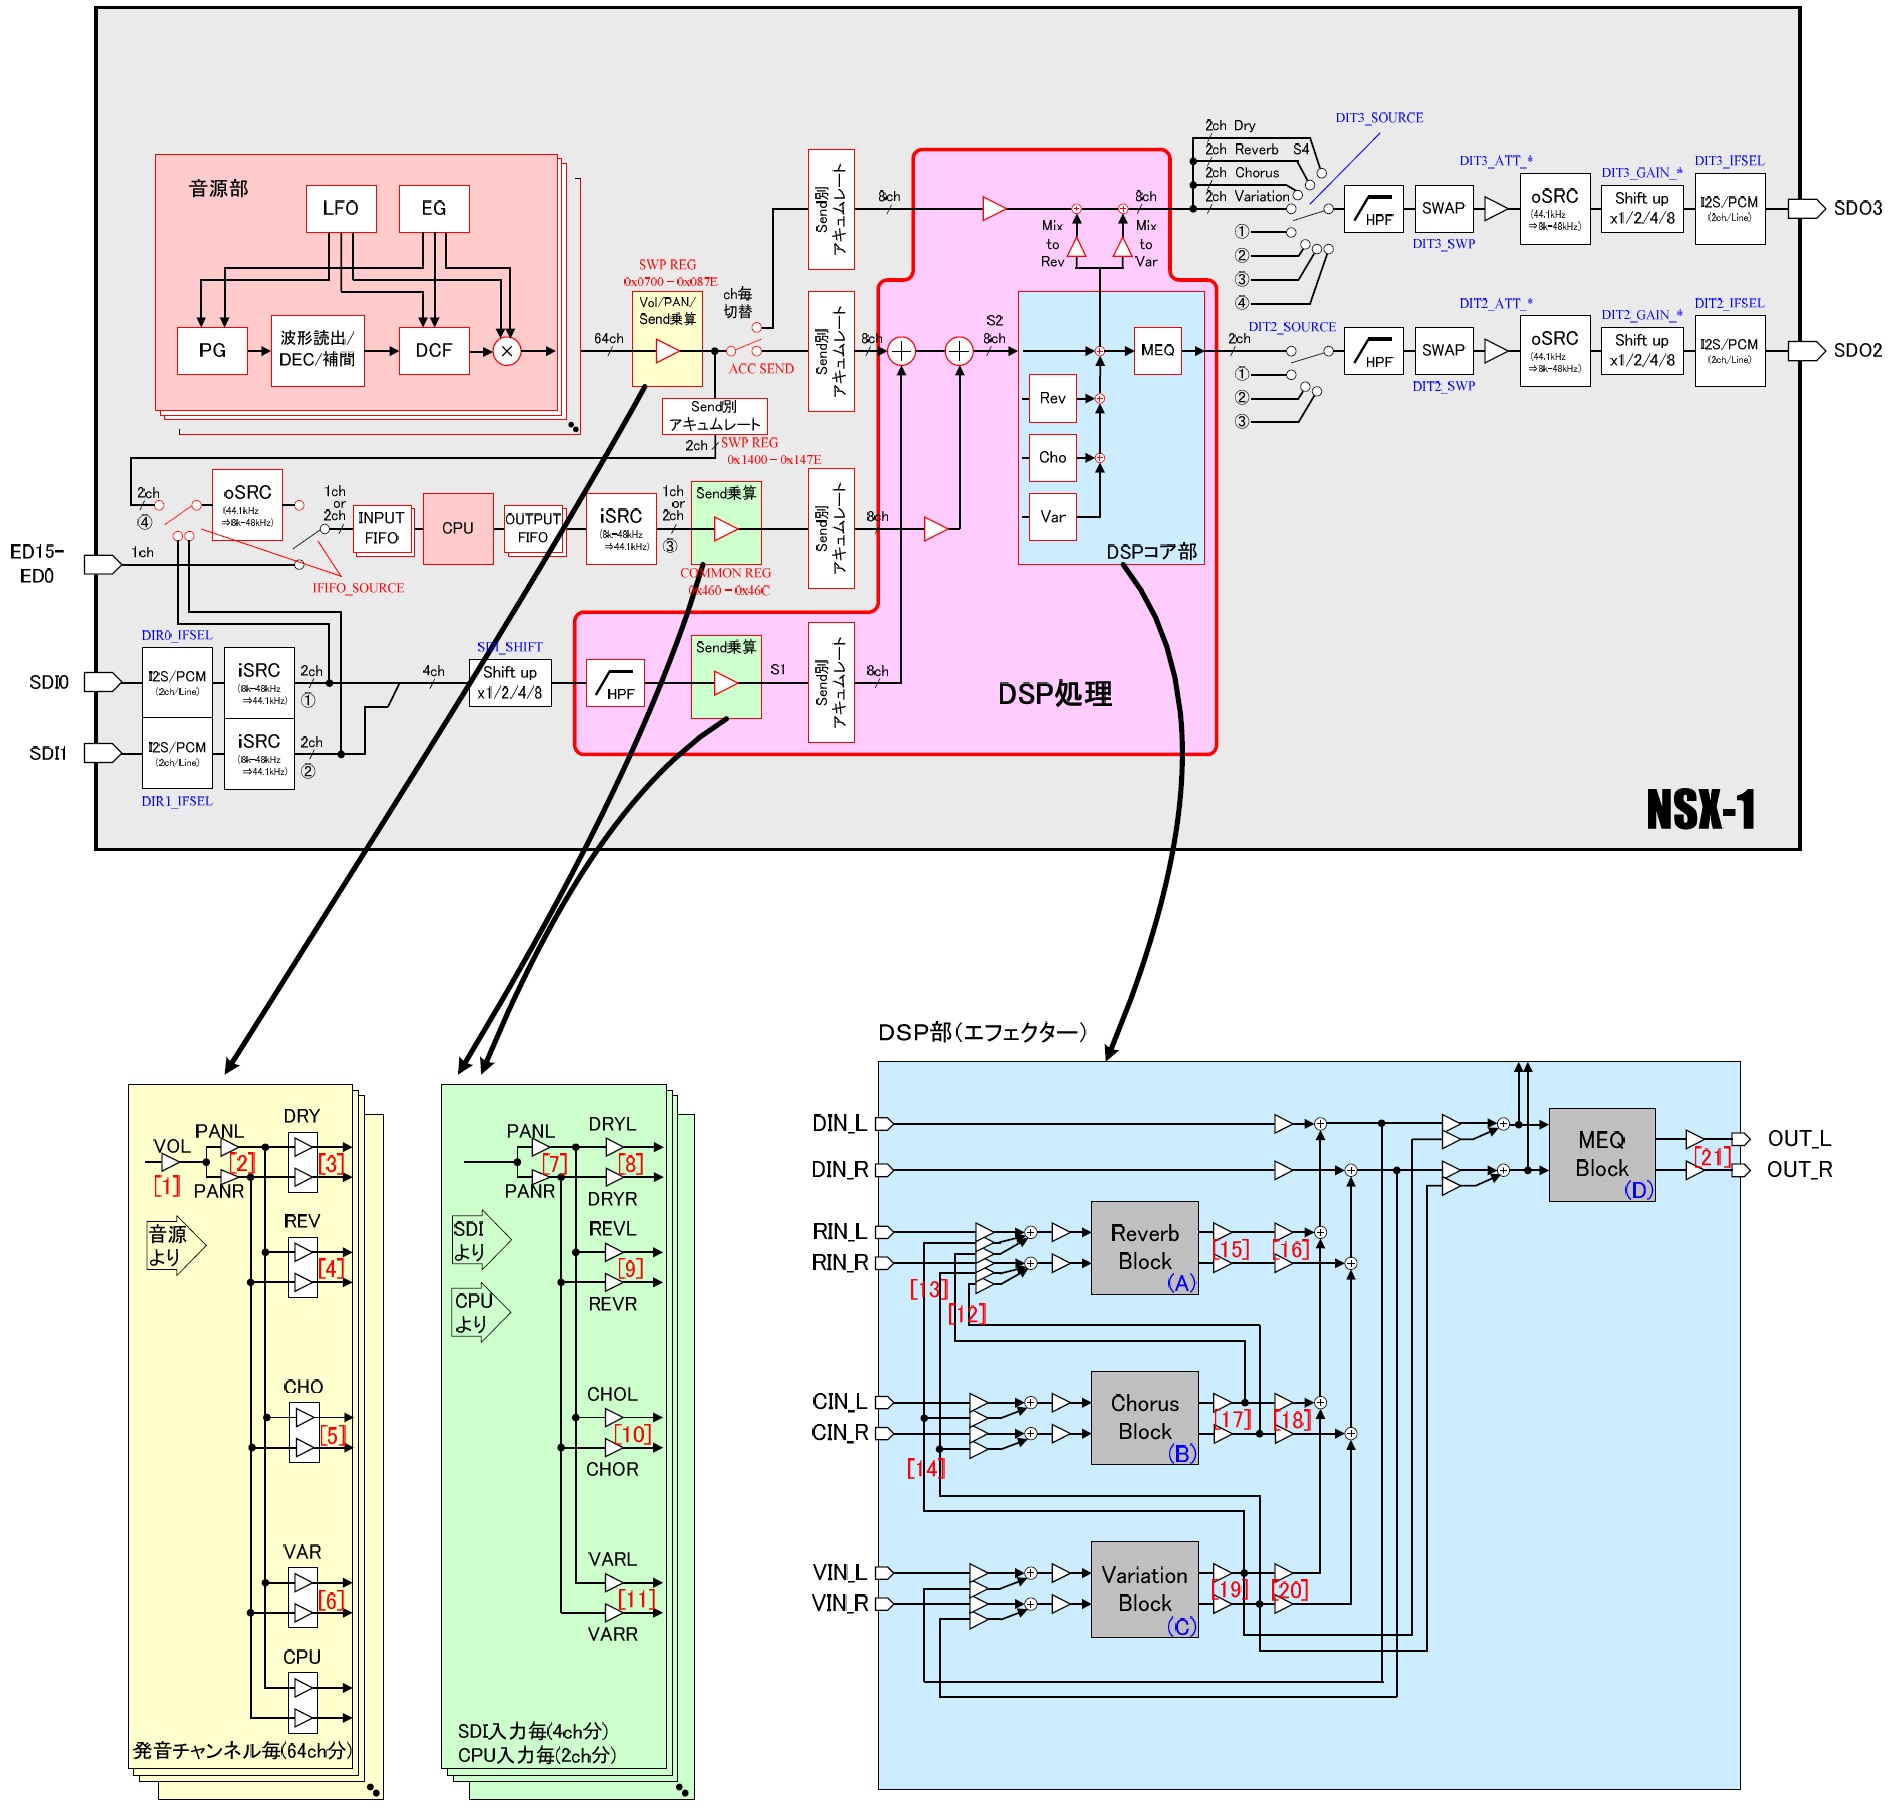
The closest I’ve ever gotten to understanding Yamaha’s approach to AWM2 is by studying the datasheet and MIDI spec for the YMW820 (NSX-1). Admittedly, the YMW820 is a low-end device implementing a large subset of the XG voice architecture with only chorus, reverb and a single variation effect.
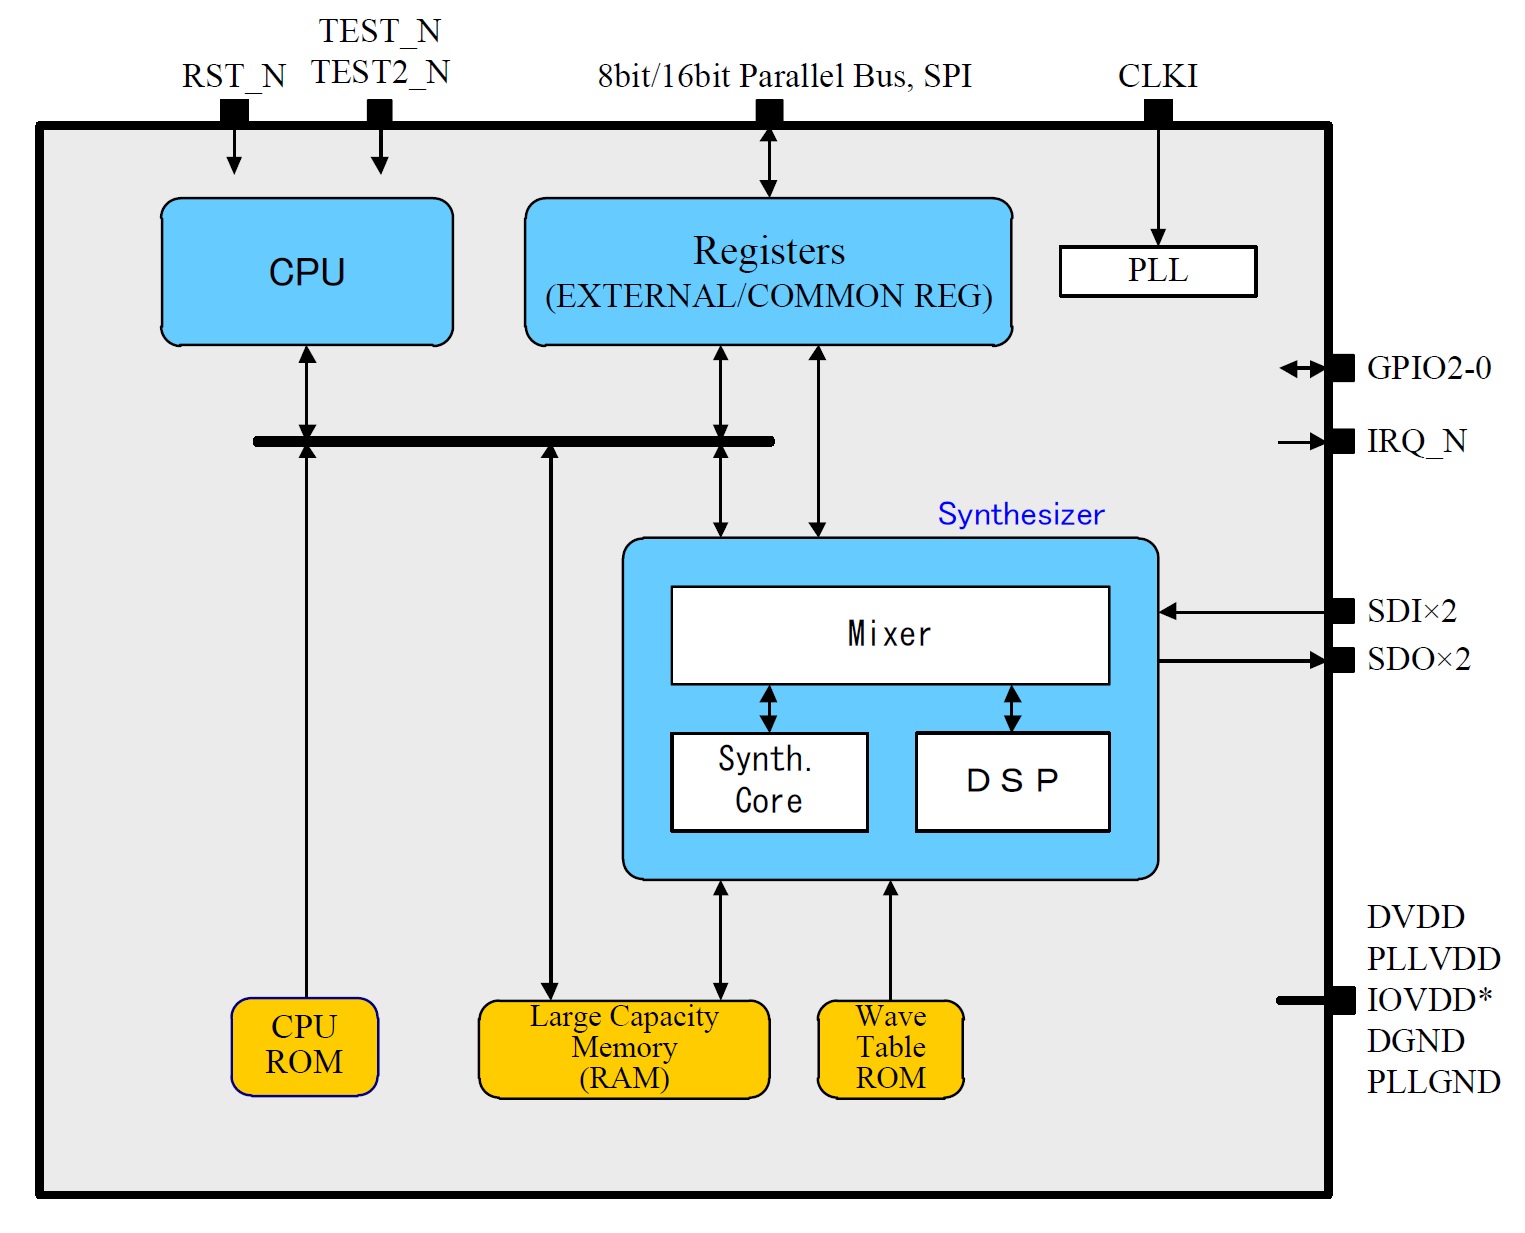
The YMW820 has a control CPU (dual issue, 32-bit RISC), mixer hardware, DSP for effects, and a “wavetable synthesis core” (Yamaha’s exact terminology). Both the synthesis core and DSP are controlled by the CPU.
The wavetable synthesis core supports 64 channels (polyphony). The YMW820 has a 2MByte wavetable ROM which presumably contains the General MIDI waveforms. It also has a 3 MByte wave RAM which can be loaded with eVocaloid waveforms or Real Acoustic Sound (Articulation Element Modeling).
The 64 channel synthesis core is drawn as a distinct hardware subsystem from the effects DSP. Each channel is what we consider an element: pitch generator, oscillator, digitally controlled filter (DCF), envelope generator (EG), LFO. I suspect that other AWM2-based products have similar wavetable synthesis cores, including the SWP70. [Click image below to enlarge.]
Of course, the SWP70 synthesis core is the ultimate in the entire AWM2 family. It also has many effect DSPs for system and insertion effects.
Bottom line, Yamaha exploit massive parallelism for AWM2 synthesis where each channel is a wavetable synthesis element. A true DSP processor like the SSP2 is better suited for VA synthesis which is why the SSP2 is deployed in the Reface CS, not an AWM2-oriented SWX processor. (The SWX has an embedded wavetable synthesis core, too.) I believe that Yamaha will need to add another SSP2 (or some such) to the Montage in order to implement VA. There’s a reason why it’s called a “Standard Wave Processor” — it is hardware specifically designed for AMW2, FM-X, AEM, and SCM synthesis. It isn’t a general purpose programmable DSP. Maybe VA can be warped to the existing pipeline(s), maybe not.
BTW, the new VCM MINI FILTER and MINI BOOSTER are DSP effects. The effect DSPs are programmable — the AWM2 channel filters likely are not.
Big DSP vs. little effect DSPs
I tend to think of the internals as a tone generation front end followed by a flock of small DSP units in the mixer/effects back-end. This seems to be the canonical Yamaha pipeline. In Montage/MODX, some of the small DSPs are routed as insert effects and some as system/master effects. (The effect routing in Genos, BTW, is different and probably different in the high-end digital pianos.) I suspect that the data flow is predominantly (solely?) front to back.
I don’t really know if the small effect DSPs are general purpose or not.They are probably small simple cores because an SWP has at least 15 and real estate is limited. (Lower capacity parts like the SWXs and SWLs have far fewer small DSP cores.) A small core may not have much throughput and the front-to-back dataflow might prevent feeding data from the DSP cores back to the filters, etc. in the front-end.
There is also the issue of getting note and controller data to the effect DSPs in the back end. Note and controller data are delivered on the E-bus directly from the key, knob, slider, etc. scanning processor(s) to the tone generation core. Does all E-bus data get back to the small DSP cores? Certain some data gets through as knobs, sliders, etc. can tweak effect parameters in real-time.
Overall, even as a consumer, I would be happier with a dedicated SSP2 for VA. The VA SSP2 would inject its digital output stream into the existing mixer/DSP infrastructure. [The SSP2 vocal harmony processing does something like this in Tyros5.] The VA SSP2 gets its own DSP RAM and NOR flash for program, and the processing is totally out of the way of FM-X and AWM2. It would be possible to implement different VA algorithms without making compromises. Yamaha could periodically offer new engines as updates/upgrades.
If you’re an ARM aficionado, you might be thinking “big.LITTLE”. It’s a similar concept. Engineers need to make best use of limited real estate. Yamaha need lots of little DSPs for insertion effects. The SSP2 itself is organized as a big SH-2 DSP core and several little effect DSPs (plus a digital mixer). The mix of channel strip and guitar effects is limited.
Down memory lane
The discussion took me down memory lane to the venerable AN-200 and PLG150-AN. Both products use Yamaha’s AN (Analog Physical Modeling) daughter card. I love the old AN-200 and keep one handy. It is a pretty decent approximation of a five voice Prophet 5.
The daughter card contains two Yamaha LSI components:
- YSS-236-F: An enormous 160 pin QFP for analog synthesis
- YSS-233-F: A merely huge 128 pin QFP for mixing and effects
The 236 is also known as the “VOP3” and the 233 is known as the “MDSP”. The MDSP is deployed in the PLG150-DX daughter card, again in the mixing and effects role. The An1x, by the way, has two of each, implementing ten voice polyphony.
Some sites ascribe synthesis to the Hitachi H8/3002 on the daughter card. This is wrong. The H8/3002 is the microcontroller that issues commands and maintains digital communication with the mothership. The VOP3 does synthesis.
The VOP3 moonlights as the vocal harmony processor in early arranger keyboards like the PSR-9000. The VOP3 is the predecessor to the SSP and SSP2. The SSP and SSP2 subsume the mixing and effect DSP roles of the MDSP. Such is the march of large scale integration (LSI) fabrication technology.
Given this history, I’m not surprised that Yamaha chose the SSP2 for Reface CS.
I like surprises
Watch, Yamaha will come up with something completely different. 😀 Maybe an SWP71. There were different spins of the SWP50 family, so why not? 🙂 From the marketing point of view, demand for VA is sufficiently high that they may require everyone to buy a new platform anyway. Perceived value means “mo’ money.”
Copyright © 2019 Paul J. Drongowski