ChordPro auto-accompaniment: Implementation notes

I’m prep’ing my ChordPro to Yamaha accompaniment program (cp2mid) for distribution. Please check out the demo. In the meantime, here are a few comments about the implementation.

Command line interface

cp2mid doesn’t have a fancy graphical user interface (GUI). A GUI is too much for a simple tool that translates an extended ChordPro file into a Standard MIDI File (Type 0).

I’m distributing both Java source code and a JAR file. The JAR file contains the compiled Java — the Java executable, if you will. “JAR” is an acronym for “Java Archive” and is produced by the Java archive program (jar), which is part of the Java development environment (JDK). JAR is a way to package up a compiled Java program, hiding all of the interior classes, etc. An end user doesn’t really need to know about JAR.

Given the JAR file, enter the following command line to run cp2mid:

    java -jar cp2mid.jar AFile.cho

“AFile.cho” is the name of an extended ChordPro file to be translated. You can hide the cp2mid.jar file within a Windows BAT file or shell file. Here is cp2mid.bat:

    java -jar cp2mid.jar %1

Nothing complicated, here.

cp2mid recognizes the “.cho” file name extension. It does not recognize any other extensions. If you snag a ChordPro file from the Web, you may need to change its extension to “.cho”. cp2mid replaces “.cho” with “.mid” in order to make the MIDI file name. Thus, “AFile.cho” is translated to “AFile.mid”.

During development and testing, you can run cp2mid starting with the compiled classes, e.g., cp2mid.class. Enter the command line:

    java cp2mid AFile.cho

to run cp2mid. The Java interpreter will look for “cp2mid.class” and the rest of the compiled classes needed by cp2mid. These compiled classes must be available in the same directory as cp2mid.class. “cp2mid”, by the way, is the main class in the application. You’ll need to specify the main class when creating a JAR file. Again, these steps are relevant only to developers.

Java classes

cp2mid has five Java classes:

  • cp2mid (cp2mid.java) Main class and driver
  • SongElement (SongElement.java) Basic element (parts) of a Song
  • Song (Song.java) Represents a ChordPro song in terms of SongElements
  • Song2mid (Song2mid.java) Translates the internal song representation to MIDI
  • MidiFile (MidiFile.java) Represents and manipulates a standard MIDI File (SMF)

The MidiFile class was used in an earlier prototype and still contains a bit of unused legacy code. This may change in future versions. The MidiFile class exploits the standard Java MIDI packages and classes. It creates a MIDI file and inserts MIDI messages (meta, SysEx and otherwise) into a MIDI file.

cp2mid is the boss. It calls on the other classes to do their jobs. Processing is broken into five phases:

  1. Check and manipulate file names.
  2. Read the ChordPro file into a String array, one line per array element.
  3. Translate each line into one or more SongElements.
  4. Translate the SongElements into MIDI.
  5. Write the internal MIDI representation to a Type 0 SMF.

The translation phases do the heavy lifting.

Song and song elements

A Song is a list of SongElements. A SongElement represents one of several ChordPro song constituents:

  • Directive
  • Chord
  • Lyric
  • Line
  • Annotation
  • Comment
  • Tab

All SongElements have the same data members. Each SongElement has a tag which identifies its type. The type determines the validity and interpretation of the other data members.

The Song class translates extended ChordPro to a list of SongElements. This is, effectively, the intermediate, internal representation of a ChordPro song.

ChordPro directives begin with ‘{‘ and end with ‘}’. Usually ChordPro directives control song formating. Extended ChordPro uses key, tempo, time signature, style code, start accompaniment and stop accompaniment directives to issue MIDI messages that will control the accompaniment engine when the MIDI file is played back.

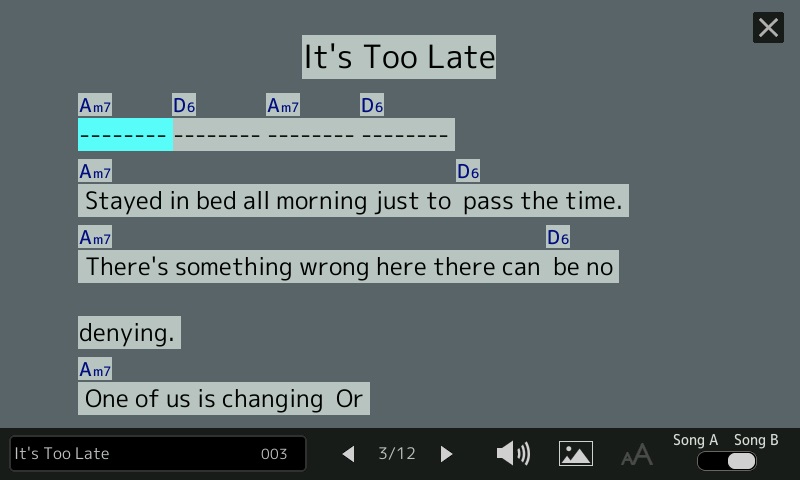
ChordPro chords and lyrics are what it’s all about. Chords begin with ‘[‘ and end with ‘]’. Chords are extended by an optional beat count which specifies how long the chord is held. A lyric is text and may be multiple syllables long (i.e., anything up to the next chord, annotation, or end of line.)

A line element is a marker for important end-of-lines. Line elements affect lyric formating.

Normally, a ChordPro annotation is text added to a song when it is displayed. Annotations begin with ‘*[‘ and end with ‘]’. Certain predefined annotations, e.g., [*MA], [*FA], etc. change the accompaniment section during play-back.

Comments are just that. cp2mid saves the text, but doesn’t do anything with it.

A ChordPro song may contain guitar tablature (tab). Right now, cp2mid ignores tablature. This has not been tested. I’m not sure how to handle or translate tablature as yet.

Song to MIDI

The Song2mid class translates the internal intermediate song representation to MIDI messages and adds the MIDI messages to a MIDI sequence. The MidiFile class helper functions create specific types of messages. Base MIDI message and sequence classes belong to the standard Java MIDI package.

The Song2mid class walks the SongElement list from front to back. Based on element type, it dispatches to an element type-specific handler. The handler adds one or more MIDI messages to the sequence.

A separate blog post describes the MIDI messages.

I tried to encapsulate most of the “Yamaha-ness” in the Song2mid and MidiFile classes. ChordPro is very loose and forgiving when it comes to chord syntax. Song2mid recognizes only the 33 or so Yamaha chord types as defined in the Genos Data List PDF. If Song2mid doesn’t recognize a chord, it issues either a major or minor triad.

Example songs

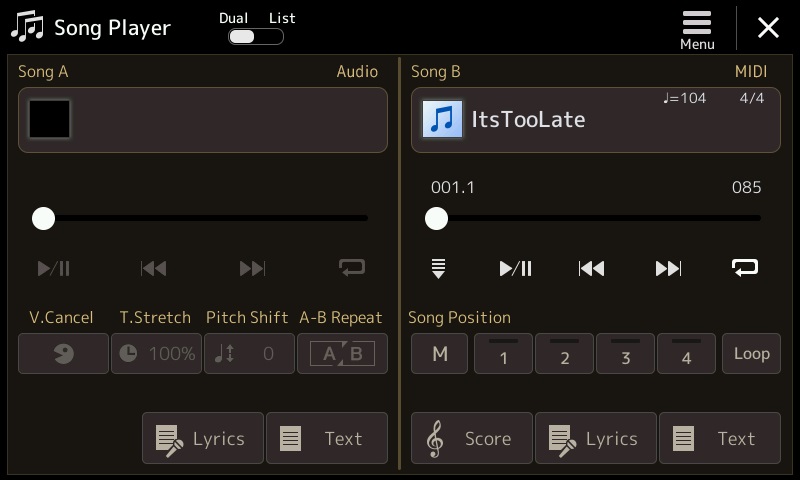
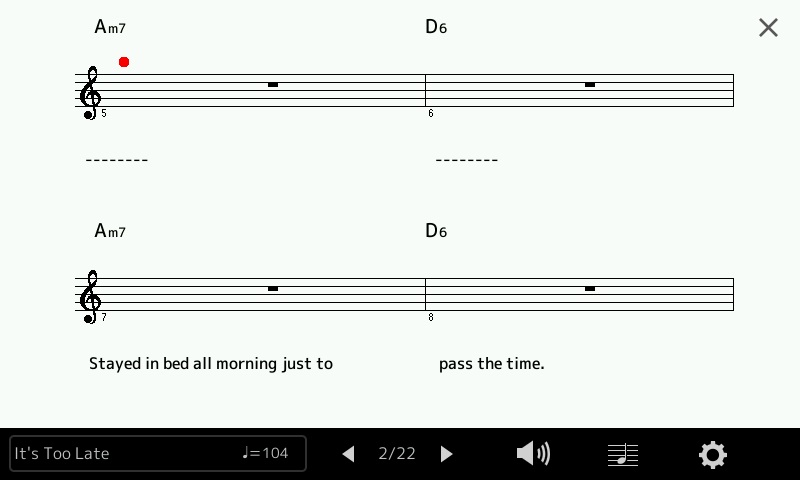
I will distribute 15 example songs in extended ChordPro and MIDI format. Even if you don’t run cp2mid (or look at its implementation), please take a look at the extended ChordPro songs and try the MIDI files on your arranger. All sorts of fun and crazy things happen in real music (key changes, time signature changes, anticipation) and the examples demonstrate how to handle many exceptional situations. I chose certain songs as examples for testing because they are weird. 🙂

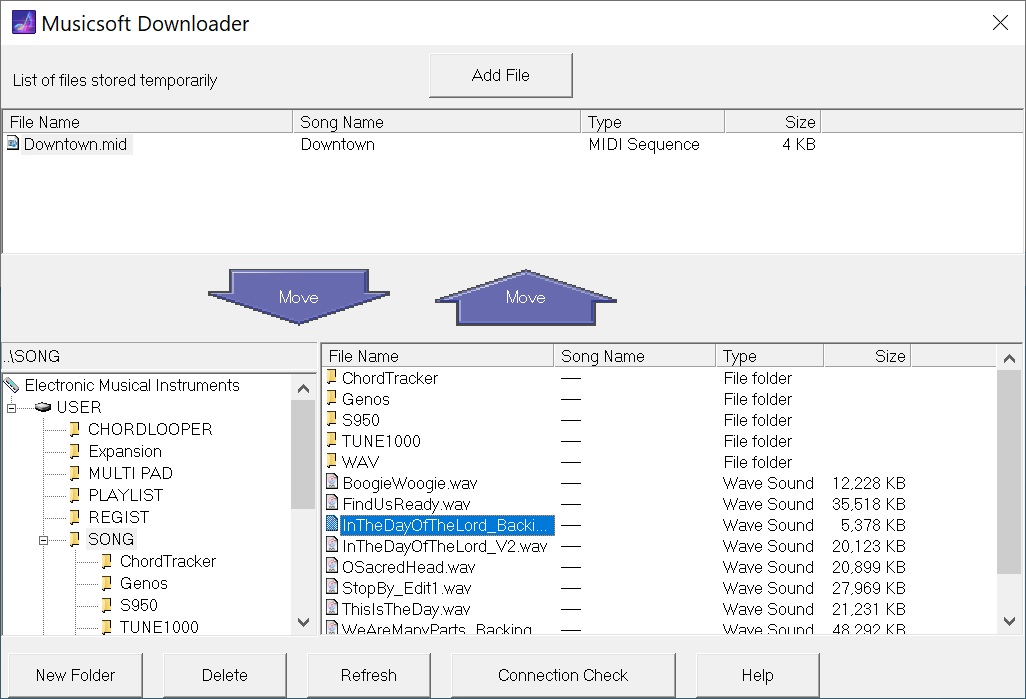
I tested the MIDI files on Genos and I’m curious about their behavior on other arranger keyboards. The MIDI files are similar to those generated by Yamaha ChordTracker. If your arranger plays ChordTracker MIDI files, it should play cp2mid MIDI files.

I don’t want to lead you on — it takes a fair bit of effort to take an Internet ChordPro file and whip it into shape. ChordPro as a formating tool is very lenient and forgiving. Accompaniment requires tighter semantics and precision like most “executable” computer stuff. It’s fun to whip a song into shape, but it requires work.

Copyright © 2022 Paul J. Drongowski

Hidden arranger smarts: file system SysEx

What to do with the ennui that sets in on New Years Day? Explore unexamined territory!

Yamaha Musicsoft Downloader is a valuable tool for Yamaha arranger keyboardists. Downloader lets you transfer MIDI song files, registrations file, text files, etc. between a Windows PC and a compatible Yamaha arranger keyboard. It even works with digital home pianos, too.

Most folks transfer their files using a USB jump drive. This isn’t a big deal when moving a few files maybe once or twice a day. When I’m developing a new style, however, I swap a drive quite frequently — dozens of times a day. All that physical swapping causes wear and tear on USB ports. I often use a short USB extender to reduce wear on the computer and/or instrument USB ports. I’d rather have a cheap cable fail than a USB port on a motherboard.

Downloader saves a lot of that wear and tear by copying data over a cable instead of a USB drive. Downloader supports both USB and good ole 5-pin MIDI transfers. Thus, folks who own older pre-USB keyboards can use Downloader, too.

Downloader has been around a while — one reason why it’s backward compatible. The user interface is a little bit dated, but it works and who cares? To move a file, you add the file to the holding area at the top of the screen, then move the file to its final destination by pressing one of the big arrow buttons. Classic.

Yamaha Musicsoft Downloader in action

The screenshot shows Downloader connected to Genos over 5-pin MIDI. The file “Downtown.mid” is in the temporary storage area. The lower left hand panel navigates instruments, drives and directories. The lower right hand panel selects files within a directory.

So, how does it do the actual transfer?

Because Downloader is old skool, it does it with MIDI. (Even over USB.) Downloader was written back in the day when MIDI was king and could do anything and everything. As another example, I give you the MIDI Sample Dump Standard (SDS) for representing and transferring samples to/from early-day samplers.

Downloader performs a dance with the target instrument. Like SDS, Downloader and the target instrument follow a set of rules — a protocol — for communication. To my knowledge, Yamaha has never published this protocol. It’s all done via MIDI System Exclusive (SysEx) messages although you won’t find these message types in the instrument’s reference manual or data list file. Nonetheless, your instrument is smarter than you think!

Of course, a lot depends upon the storage and capability of the target instrument. Entry-level instruments may be oblivious to Downloader or maybe just transfer back-up files. Mid- to higher-end arrangers are fully capable.

I decided to get a taste of this hidden protocol by monitoring the exchange of MIDI SysEx messages between Downloader and Genos. I split the MIDI stream and watched the dance as Downloader makes contact with Genos and acquires top-level directory information. After watching this process several times, I tried sending my own SysEx messages via MIDI-OX. (What a great tool!)

Here is a typical start-up sequence. It shows Genos’ response for each SysEx message that I sent.

F0 43 50 00 00 00 01 F7 
Genos responds: F0 43 50 00 00 00 02 01 01 F7
F0 43 50 00 00 02 01 F7
Genos responds: F0 43 50 00 00 02 02 33 00 01 00 00 01 00 01 00 00 1B
78 17 3F 01 00 00 00 00 00 00 01 7F 00 00 00 32 00 00
00 00 00 00 00 00 00 00 00 00 00 00 27 08 00 00 02 00
04 7F 7F 7F 7F F7
F0 43 50 00 00 01 01 F7
Genos responds: F0 43 50 00 00 01 02 00 F7
F0 7E 7F 06 01 F7 Identity request
Genos responds: F0 7E 7F 06 02 43 00 44 42 1C 0A 00 00 01 F7
F0 43 50 00 00 01 00 01 F7 Make connection (Genos is connected)
Genos responds: F0 43 50 00 00 01 02 01 F7

The first three out-bound messages test for a response. Downloader uses these messages as a connection check. The identity request message is a MIDI standard message for obtaining the identity of a musical device or instrument. Genos identifies itself as Yamaha (0x43) and model.

After getting the instrument identity, Downloader initiates the actual connection. When connected, the Genos display changes to a special background with the message: “Connected to the computer or smart device.” Genos is now listening for Downloader commands.

Thereafter, Downloader asks Genos for device, file and directory information. Here is the inquiry about top-level devices:

F0 43 50 00 05 0B 00 00 F7     Request drive 0 information 
Genos responds: F0 43 50 00 05 0B 01 42 00 00 05 00 55 53 45 52 F7
U S E R

Yamaha arranger people will recognize the USER drive where all user directories and files are kept. Genos returns the name for device 0: “USER”. If you have a USB jump drive attached, you will see:

F0 43 50 00 05 0B 00 01 F7     Request drive 1 information 
Genos responds: F0 43 50 00 05 0B 01 42 00 00 05 00 55 53 42 31 F7
U S B 1

Makes me think that Genos tells Downloader how many devices are available — maybe in response to the connection command?

Moving on, Downloader interrogates Genos about the directories and files at the next level down in the file hierarchy.

F0 43 50 00 05 04 00 3F 00 08 00 30 3A 5C 2A 2E 2A 00 F7    dir 0:\*.* 
? 0 : \ * . *
Genos responds: F0 43 50 00 05 04 01 10 31 39 38 30 20 31 20 31 20 30
1 9 8 0 1 1 0
20 30 20 30 03 01 00 00 00 03 00 2E 00 F7
0 0 .

You’ll notice that some command arguments and responses are ASCII characters, including the date and time stamps.

The number of subdirectories and files varies. So, Downloader and Genos go into a “loop” in which Downloader asks for the next entry (i.e., list item) and Genos responds with the entry’s information:

F0 43 50 00 05 05 00 F7        Request next dir list item 
Genos responds: F0 43 50 00 05 05 01 10 32 30 32 31 20 36 32 36 20 30
2 0 2 1 6 2 6 0
34 34 35 34 03 01 00 00 00 06 00 53 4F 4E 47 00 00 F7
4 4 5 4 S O N G

This loop continues until the list of available items is empty:

F0 43 50 00 05 05 00 F7        Request next dir list item 
Genos responds: F0 43 50 00 05 7F 01 01 01 42 00 00 F7 End of list

Genos responds with a unique message saying “no more” (0x7F).

Finally, it’s time to close the connection:

F0 43 50 00 00 01 00 00 F7     Disconnect command

Genos drops the connection and returns to normal operation, that is, it displays its usual main screen.

Sharp-eyed readers have noted the “ChordTracker” subdirectory in the “SONG” directory. ChordTracker created this subdirectory when I transfered an accompaniment from my iPad to Genos. How did ChordTracker create the subdirectory and perform the transfer? That’s new territory (more SysEx) to explore!

Well, that was one way to stave off the New Year’s blues. 🙂

Copyright © 2022 Paul J. Drongowski

ChordPro to MIDI accompaniment: Demo

Work continues on my Java program to translate ChordPro songs to Yamaha accompaniment (SMF). The code is fairly stable and mostly I’ve been writing example songs in ChordPro format for testing. The range and variety of musical craziness is amazing: weird chords (“Superstition”, “Michelle”), changing time signatures (“Two Of Us”), changing key signatures (“My Girl”), unusual time signature (“Everybody Wants To Rule The World”), and more.

Today, I want to give a taste of what to expect. I plan to distribute the Java executable as a “jar” file and will also make the source code available. To keep things simple, the program runs from a command line — no graphical user interface:

    java -jar cp2mid.jar ItsTooLate.cho

The program is named “cp2mid” and “cp2mid.jar” is the Java executable. We need to invoke java explicitly because it is an interpreted language and the executable consists of Java bytecodes.

The above command produces a Type 0 Standard MIDI File (SMF) named “ItsTooLate.mid”. This file must be sent to a Yamaha arranger like Genosâ„¢ by whatever means you have at your disposal, i.e., a USB flash drive or Yamaha Musicsoft Downloader.

Here is the first part of “ItsTooLate.cho”. The song begins with set-up directives including “{stylecode: }”, which selects the accompaniment style (“Cool8Beat”). You could leave out key, time, tempo, or stylecode and go with the current panel settings. This flexibility allows experiments with different tempos or different styles, including USER styles.

{t: It's Too Late }   
{key: Am}
{artist:Carole King}
{time: 4/4}
{tempo: 104}
# Style: Cool8Beat
{stylecode: 5635}

{start_accomp}
[Am7][*IA]

# Introduction (intro riff)
{start_of_instrumental}
[Am7][*MA] [D6] [Am7] [D6]
{end_of_instrumental}

{c: Verse 1}
[Am7] Stayed in bed all morning just to [D6] pass the time.
[Am7] There's something wrong here there can [D6] be no denying.
[Am7] One of us is changing
Or [Gm7] maybe we've just stopped [Fmaj7] trying. [Fmaj7][*FA]

{start_of_chorus}
And it's too [Bbmaj7][*MB] late baby now [Fmaj7] it's too late
Though we [Bbmaj7] really did try to [Fmaj7] make it.
[Bbmaj7] Something inside has [Fmaj7] died
And I can't hide [Dm7] and I just can't [Esus4:2][*FB] fake it. [E7#9:2]
{end_of_chorus}

The screenshot above shows the Genos song player with “ItsTooLate.mid” loaded and ready. Choose either the Lyrics or Score display (optional). Then hit play!

The next screenshot shows the Lyrics display. It should look familiar if you have played a Yamaha arranger. The arranger highlights the current lyric syllable or phrase in time with playback. Compare the screenshot with the ChordPro song and you’ll get an idea of what to expect for each ChordPro construct. A lyric phrase is not broken into syllables, but is associated with the chord preceding the phrase.

The following screenshot shows the Score display. It’s a different view of the same song. Lyrics appear below the staff and chords appear above. The time and key signature are displayed on the first page. Follow the bouncing ball during playback.

So, how does it sound? Listen to a quick demo (MP3) with me noodling on top.

That’s a taste of what’s ahead. I hope you will try cp2mid when it’s ready.

Copyright © 2021 Paul J. Drongowski

ChordPro auto-accompaniment: MIDI messages

I’ve made quite a bit of progress with my Java program that translates extended ChordPro songs into a Yamaha-compatible accompaniment MIDI file. This blog post describes the stuff inside the MIDI files produced by the program (cp2mid).

The MIDI file contains MIDI meta and SysEx (System Exclusive) messages which drive the Yamaha accompaniment engine. When the MIDI file is played back on a compatible Yamaha arranger keyboard (e.g., Genos), the keyboard generates an accompaniment as directed by the chord and section change messages in the MIDI file. It may sound odd to hear this, but the MIDI file doesn’t contain a single note ON or note OFF message! It’s all accomplished through control messages and the accompaniment is produced in real-time.

The MIDI file is a Type 0 Standard MIDI File. It starts with a bunch of set-up messages:

  F0 05 7E 7F 09 01 F7                           GM Reset 
F0 08 43 10 4C 00 00 7E 00 F7 XG System ON
FF 58 04 04 02 18 08 Time signature
FF 59 02 02 00 Key signature
FF 51 03 07 EF eb Tempo
F0 0D 43 73 01 51 05 00 03 04 00 00 2C 05 F7 Style code
F0 04 43 60 7A F7 Accompaniment Start

All of these message types are defined in the Yamaha Genosâ„¢ Data List PDF document. The messages beginning with “F0” are System Exclusive (SysEx) messages. Messages starting with “FF” are MIDI SMF meta messages. All messages are Yamaha proprietary (code “43”). The trick, of course, is filling in the correct values for the tempo, key, etc.

GM Reset and XG System ON initialize the tone generator. Time signature, key signature and tempo are SMF meta messages which control and arranger’s sequencing engine. The Style Code message selects one of the many built-in accompaniment styles. The Accompaniment Start message tells the accompaniment engine to get busy.

Once set-up is complete, the rest of the MIDI file consists of Chord, Lyric and Section Control messages. Again, these messages are all defined in the Genos Data List PDF document.

Here is a typical chord message:

    F0 08 43 7E 02 37 08 37 7F F7          Chord Bm/B

It tells the accompaniment engine to play a B minor chord (0x37 0x08) with a B bass note (0x37 0x7F). The neatest thing about the ChordPro conversion program? It makes it easy to play and hear difficult to finger chords like slash chords and unusual chord types like Cminmaj7-9.

Lyrics are inserted into the MIDI file using the SMF Lyric meta message:

    FF 05 len [Data]

For example, this Lyric meta message:

    FF 05 04 79 6F 75 20      0x79='y', 0x6F='o', 0x75='u', 0x20=' '

encodes the syllable text “you “.

No attempt is made to separate lyric text into syllables or to assign syllables to individual beats. When a lyric phrase is encountered in the ChordPro file, the phrase is inserted right after the preceding Chord message, i.e., it has the same MIDI timestamp as the preceding Chord message.

A Section Control message selects the current accompaniment section (pattern). The following message:

    F0 06 43 7E 00 09 7F F7               Section Control Main B: ON

selects the “MAIN B” section (0x09 0x7F). Because playback is fully automated, section changes are precise.

The penultimate message stops accompaniment:

    F0 04 43 60 7D F7                     Accompaniment Stop

The final SMF meta message ends the SMF sequencer track:

    FF 2F 00                              End Of Track (mandatory)

Overall, that’s a lot of power with just a few message types! Most of the Java code involves scanning the ChordPro input, book- and time-keeping. Java has a good MIDI library which makes coding easier.

As to time-keeping, all MIDI events (messages) have a timestamp. Messages issued from set-up directives before start_accomp occur in the first song measure. The start_accomp directive advances the MIDI clock to the first beat of the second measure. Thus, the first chord and lyric (if any) occurs at the beginning of the second measure. Thereafter, MIDI time advances in accord with each chord beat count (default: a full measure as determined by the current time signature).

Look here for more information about ChordPro format.

Copyright © 2021 Paul J. Drongowski

ChordPro for Yamaha accompaniment

Time to take the wrapping paper off my current development project.

It starts with ChordPro. ChordPro Format is perhaps the most popular notation for rock, pop, soul and folk tunes. A ChordPro format song contains lyrics and chords, usually formatted for easy display and reading. Strummers and plinkers everywhere use ChordPro songs as lead sheets.

It ends with Yamaha Genos, Tyros and PSR accompaniment. Genos — and other recent Yamaha arrangers — play MIDI files containing chords and lyrics. Genos displays either a running score or lyrics (plus chords) during playback.

What is missing is the bridge between ChordPro and Genos. My current project is the bridge. It translates an extended ChordPro file to a MIDI file which is compatible with Genos and other mid- to high-end Yamaha arranger keyboards. So far, I have a prototype up-and-running.

I emphasized the word “extended” because ChordPro format by itself is not sufficient for playback. The format does not have a precise notion of time. ChordPro relies on the musician to interpret the song on the fly. It assumes that the musician has heard the song before and knows when to change chords. As usual with computer stuff, playback needs more precise semantics. That’s where the extensions come into play.

Since there are a gazillion ChordPro songs on the Interwebs, I wanted to play back ChordPro files with as few modifications as possible. Thus, the first rule is “Each notated chord is held for one measure.” Of course, many songs change chords within a measure, too. (Even “Louie, Louie”!) Enter the first extension. A notated chord may have an optional beat count which specifies the number of beats to hold the chord, or more precisely, the number of time divisions (quarter notes or eigth notes) to hold the chord.

As I discovered during testing, existing ChordPro song files have a fair number of warts. Sometime the chord progressions are whack. The files often have random playing directions which ChordPro happily snarfs up as lyric text. ChordPro is very forgiving as it is primarily a formatting representation and tool. The initial goal — playing a ChordPro song with just a few additions — is unrealistic; expect to do some clean-ups.

Plain, unchanging accompaniment is pretty boring after a short while. Therefore, I added annotations for section changes, fills and breaks. Certain ChordPro directives are optional, but strongly recommended: key, tempo, and time signature. Tempo and time signature obviously guide playback speed and the interpretation of chord hold time. The key signature will set the arranger’s score display to the appropriate key.

Stylecode is an extension. It is a decimal number that selects the arranger accompaniment style, .e.g., 60sVintageRock, Oldies R&R, etc. A style name would be more convenient, but then I would need to develop a style name to code database for each arranger. Forget it; keep it simple. Besides, the PSR Tutorial site has such spreadsheets — just look up the style code yourself.

Start_accomp and stop_accomp are extensions, too. Start_accomp should (must) appear after all the basic playback settings are made. When the MIDI file is played back, the arranger will start or stop the accompaniment engine as directed. Start_accomp begins playback from the second measure; the first measure is reserved for set-up.

The translation program does not implement every and all ChordPro directive. It ignores formatting related directives and it doesn’t handle tablature (tab).

Let’s put all of this together and look at an example. Here is a snippet of “It’s Too Late” by Carole King.

{t: It's Too Late } 
{key: Am}
{artist:Carole King}
{time: 4/4}
{tempo: 104}
# Style: Cool8Beat
{stylecode: 5635}
{start_accomp}

[Am7][*IA]
# Introduction (intro riff)
[Am7][*MA] [D6] [Am7] [D6]

{c: Verse 1}
[Am7] Stayed in bed all morning just to [D6] pass the time.
[Am7] There's something wrong here there can [D6] be no denying.
[Am7] One of us is changing
Or [Gm7] maybe we've just stopped [Fmaj7] trying. [Fmaj7][*FA]

{start_of_chorus}
And it's too [Bbmaj7][*MB] late baby now [Fmaj7] it's too late
Though we [Bbmaj7] really did try to [Fmaj7] make it.
[Bbmaj7] Something inside has [Fmaj7] died
And I can't hide [Dm7] and I just can't [Esus4:2][*FB] fake it.[E7#9:2]
{end_of_chorus}

Lines beginning with ‘#’ are comments. Lines beginning with ‘{‘ are directives. Each directive must have a closing ‘}’ and consist of one line only. My translation tool supports the following simple directives:

  • title (or ‘t’): Song title
  • key: Song key
  • artist: Performing artist
  • composer: Song composer
  • copyright: Copyright information
  • comment (or ‘c’): Comment to be ignored
  • time: Time signature
  • tempo: Song tempo in BPM
  • stylecode: Yamaha style code (a decimal number)
  • start_accomp, stop_accomp: Starts and stops the accompaniment

As I mentioned, time, tempo and stylecode are optional, but necessary — unless you are willing to roll with the defaults. Start_accomp must be the final directive before the first chord and lyric in the song. Start_accomp generates the magic message needed to start accompaniment.

Chords look like regular ChordPro chords. Chord names are surrounded by square brackets, e.g., “[Am7]”. Nothing looks amiss until the end of the chorus, e.g., “[Esus4:2]” and “[E7#9:2]”. “:2” is a beat count. Each chord is held for two quarter notes — quarter notes because the number of divisions per bar (the “denominator”) of the time signature is four. It’s our job to make sure that the counts add up to a full measure in order to keep everything synchronized to measures.

The translation program (yet unnamed!) is very forgiving when it comes to chord spelling. However, it only recognizes and generates the 34 Yamaha chord types which are supported by Yamaha arrangers:

    Maj        7        min        minMaj      aug      dim 
Maj6 7sus4 min6 minMaj7 aug7 dim7
Maj7 7b5 min7 minMaj7-9
Maj7#11 7-9 min7b5
Maj9 7#11 min9
Maj7-9 7-13 min7-9
Maj6-9 7b9 min7-11
7aug 7aug
8
5
sus2
sus4

If the chord is not recognized, you will get a major or minor triad.

ChordPro allows annotations, that is, constructs beginning with “[*” and ending with “]”. Annotations ordinarily are playing instructions that are displayed in a pretty-printed ChordPro song. Annotations are extended with accompaniment section control commands:

  • Introduction: [*IA] [*IB] [*IC] [*ID]
  • Main section: [*MA] [*MB] [*MC] [*MD]
  • Fill in: [*FA] [*FB] [*FC] [*FD]
  • Break: [*BR]
  • Ending: [*EA] [*EB] [*EC] [*ED]

A section control command usually follows a chord and takes effect at the same time as the chord change.

ChordPro supports paired formatting directives like:

    {start_of_chorus} 
...
{end_of_chorus}

I am currently experimenting with these directives to control lyric and chord formatting. Yamaha’s lyric display allows line breaks and page breaks. Start of chorus (abbreviated “{soc}”) generates a page break. I added a new directive pair for handling long instrumental breaks, e.g.,

    {start_of_instrumental} 
[Cmaj7][*MC] [Fmaj7] [Fmaj7] [Am7] [Gm7] [Fmaj7]
[Dm7] [Esus4:2][*FC] [E7#9:2]
{end_of_instrumental}

Yamaha’s lyric display runs chords together when no lyric text is present. The new directive provides some separation between chords by generating filler lyric text (dashes, to be exact).

That’s the story. Testing continues. I will make the Java source code available as soon as possible. So far, so good. The concept works.

Copyright © 2021 Paul J. Drongowski

Critique: Genos™ drawbar organ

I like the Korg Module Pro “GospelOrgan” patch, so I tried to create a sound-alike voice on Yamaha Genos. Genos and MODX share the same waveforms and DSP effects, and I may port the result to MODX, too.

The experience recalled my previous misgivings about the rotary speaker simulation and limitations of the Genos DSP effect implementation. I will amplify those comments here.

Mid- to upper-level Yamaha arranger workstation have long had a drawbar organ feature which Yamaha calls “Organ Flutes.” This feature dates back to 1999, appearing in the PSR-9000 keyboard. Although a few details have changed over the years, Yamaha has not substantially overhauled Organ Flutes. It’s time, Yamaha — the world has moved on. I’d love to see the new YC organ technology in Genos. It’s the flagship of the arranger line and YC organs would definitely differentiate Genos from its lower-cost brethren.

Yamaha Organ Flutes main voice editing screen

The main, tweakable organ parameters are:

  • Nine drawbars
  • Percussion (first note/each note, length)
  • Percussion pitch (4′, 2-2/3′, 2′)
  • Response (onset delay of drawbar and percussion sounds)
  • Vibrato (on/off, depth, speed)
  • Rotary speaker speed (slow/fast)
  • Volume level (1 to 8)
  • DSP effect (e.g., rotary speaker)

For B-3’ers, the 4′ percussion pitch is the 2nd harmonic setting and the 2-2/3′ percussion pitch is the 3rd harmonic setting. The 2′ pitch supports non-Hammond organs which require it.

Compared with a contemporary clonewheel, one immediately notes a few missing features:

  • Vibrato only, no chorus
  • No key click
  • No rotor noise
  • No leakage

Overall, the Genos B-3 is super clean and polite — not vintage. MODX (Montage) provides key click, rotor noise (grit) and rotor whistle waveforms. Why does Genos lag behind? Although MODX is AWM2, not modeling, these extra waveforms are better than nothing at all.

The Genos synthesis engine is also AWM2 sample-playback and AWM2 provides the Organ Flutes vibrato. Organ Flutes does not simulate the one-of-a-kind Hammond vibrato/chorus scanner. The Korg Module “Gospel Organ” voice incorporates C-3 chorus and the AMW2 vibrato just doesn’t cut it (head-to-head comparison). I had to substitute Genos’ V-2 setting and move on.

Simplified, graphical rotary speaker interface

If you want to change the rotary speaker type, you need to dive through the effect setting button at the top of the Organ Flutes screen. After selecting the insertion effect, Genos displays a skeuomorphic (graphical) rotary speaker cabinet with a few knobs. In the screenshot above, we get rotary speed, horn and rotor balance, and microphone left/right angle. Like many (most?) rotary speaker simulations, the rotary effect emulates the sound of a mic’d up, stereo recording of a Leslie, not a horn and rotor moving air in a room.

Additional rotary speaker (DSP) parameters are changed by tapping the “Detail” button in the lower right corner. deep-diving reveals a few more deficiencies:

  • Missing parameters due to a limitation on the number of DSP effect parameters (16 parameters maximum)
  • Only one insert effect (typically the rotary speaker)
  • Volume control is post-effect and does not affect overdrive

Here is a little more information about each issue.

First page of rotary speaker parameters

At heart, the Genos (PSR, Tyros) sound engine implements the Yamaha XG synthesis and effects architecture. The XG architecture allows up to sixteen (!6) parameters per DSP effect unit. Unfortunately, Yamaha’s DSP engineers are creating effect algorithms (AKA “effect types”) with more than sixteen parameters! The MODX ROTARY SPEAKER 2 algorithm has eighteen (18) parameters. The Genos REAL ROTARY effect type is the same algorithm as MODX. However, only 16 parameters are accessible or stored on Genos. The two missing REAL ROTARY parameters are:

  • Slow-Fast Time of Rotor
  • Fast-Slow Time of Rotor

You cannot change these rotor ramp times on Genos, yet, you can change them on MODX.

This issues affects the Genos UNI COMP compressor algorithm (MODX: UNIVERSAL COMPRESSOR DOWN). Dare I mention the inability to specify a side-chain part, too? People are trying to create EDM on arrangers.

The XG architecture allows only one insert effect per part. The Organ Flutes insertion effect is typically a rotary speaker simulator. The MODX effect architecture, on the other hand, allows two insert effects per part. Yamaha synths take advantage of the second insert effect to add overdrive or vintage EQ:

  • Rotary speaker 1 → Multi FX (Distortion Solo)
  • Rotary speaker 2 → VCM 501 EQ (Flat)
  • Amp Simulator 3 (Tube) → VCM 501 (Flat)
  • Amp Simulator 1 (Stack 2) → Rotary Speaker 1
  • VCM 501 EQ (Flat) → Rotary Speaker 1

The rotary speaker drive alone is not enough to warm up the basic sound nor is it enough to get a sweet, realistic overdrive with guts. I experimented with the Genos REAL ROTARY effect and got some very squirelly results at high drive levels. The algorithm can be pushed in unexpected, undesirable ways while searching for true funk.

Unlike a real Hammond/Leslie combination, the Genos expression pedal controls post-effect part volume. This is like putting the volume control after the Leslie speaker. A Hammond B-3 pedal controls the level into the Leslie pre-amp. Thus, the pre-amp frequency characteristics and overdrive track the Hammond pedal. The Yamaha YC61 modeling gets this right. Putting the volume pedal before the pre-amp lets the player get clean or dirty in the same way a guitarist uses picking and/or the guitar volume knob to distort or clean up their tone.

If the Genos developers must work around the XG architecture, they should consider a new effect algorithm that combines overdrive with the rotary speaker simulation. The algorithm should allow foot pedal control over the Leslie pre-amp input level. Genos and other PSRs allow wah pedal control, so they obviously know how to achieve this capability within the current architecture.

Copyright © 2021 Paul J. Drongowski

PSS chorus: A dusty look back

Here’s a look into the past — and maybe, the present.

A PSR Tutorial Forum member inquired about the chorus effects in the PSR-E463. The PSR-E463 has the usual system chorus effect and the newer DSP chorus effect. I’m going to focus on the older system chorus effect.

The PSR-E series chorus system effect date back to the earliest days of Yamaha XG and arranger keyboards. These are low-cost entry-level keyboards and usually contain a single integrated circuit (IC) which integrates the main processor (CPU), tone generator and effect units. The most price- and cost-sensitive models integrate the wave memory (samples) on the IC, e.g., the SWLL (PSR-F51). Processors in the other models have an external wave memory, e.g., the SWL01 (PSR-E443) and SWX03 (PSR-E463).

Newer DSP effects aside, the E-series models share the same basic reverb and chorus effects. There are three chorus effects:

  • Chorus1 (MSB: 66 LSB: 17)
  • Chorus2 (MSB: 65 LSB: 02)
  • Chorus3 (MSB: 65 LSB: 00)

The LSB has varied, but they all refer to the same CHORUS (CELESTE) effect algorithm. The LSB just selects a set of preset effect parameters. Chorus1, BTW, falls into the XG CELESTE category, not CHORUS.

Due to hardware integration, the chorus effects likely share the same hardware. Since none of these processors have external DSP RAM, the chorus memory is integrated, too.

As far as chorus is concerned, this is the way it has been since the 1990s! Let’s look back to the Yamaha QY-70 XG implementation (1995). I suspect that the current chorus effects are the same or very similar to the good old QY.

The QY-70 had one chorus and celeste effect algorithm:

Param#  Parameter            Value range 
------ ------------------- --------------------
1 LFO Frequency 0.00Hz - 39.7Hz
2 LFO PM Depth 0 - 127
3 Feedback Level -63 - +63
4 Delay Offset 0 - 127
5
6 EQ Low Frequency 50Hz - 2kHz
7 EQ Low Gain -12dB - +12dB
8 EQ High Frequency 500Hz - 16.0kHz
9 EQ High Gain -12dB - +12dB
10 Dry/Wet D63;gt;W - D=W - D<W63
11 ...
15 Input Mode Mono, Stereo
16

These parameters are laid down by the Yamaha XG specification.

The XG specification does not define the preset values, however. Here are the QY-70 preset chorus values:

Param#  Parameter            Chorus1 Chorus2 Chorus3 Chorus4 
------ ------------------- ------- ------- ------- -------
1 LFO Frequency 0.25Hz 0.33Hz 0.16Hz 0.37Hz
2 LFO PM Depth 54 63 44 32
3 Feedback Level +13 +0 +0 +5
4 Delay Offset 106 30 110 104

QY-70 Chorus3 has the same MSB/LSB as PSR-E Chorus2. QY-70 Chorus 1 has the same MSB/LSB as PSR-E Chorus3. Confusing? Yes, but these are probably the PSR values or close to it.

Next are the QY-70 preset celeste values:

Param#  Parameter            Celeste1 Celeste2 Celeste3 Celeste4 
------ ------------------- -------- -------- -------- --------
1 LFO Frequency 0.50Hz 1.17Hz 0.16Hz 0.33Hz
2 LFO PM Depth 32 18 63 29
3 Feedback Level +0 +26 -20 +0
4 Delay Offset 0 2 2 0

None of the QY-70 presets have the same MSB/LSB as PSR, so your guess is as good as mine.

Now, the really bad news. The PSR-E series, at best, is XGlite. XGlite implementations typically don’t support the XG messages that set effect parameters. Therefore, what you hear is that you get. In other words, the effect presets are hardwired.

The Yamaha PSS series with its minimal SWLL processor implements exactly one chorus and exactly one reverb preset. You get what you pay for!

Copyright © 2021 Paul J. Drongowski

PSR-E473 speculation

Update: Yamaha PSR-E473 and PSR-EW425 announcement.

Yamaha have had a busy few years updating their entry-level models, most notably, the PSR-E373 and the DGX-670. We have yet to see the PSR-E473 and PSR-EW425 models which will replace the PSR-E463 and PSR-EW410, respectively.

No doubt, supply chain and global shipping problems have delayed product launch. Prior PSR-E4xx models employ digital-to-analog converters (DAC) including DACs from Asahi Kasei Microdevices (AKM). The AKM plant in Nobeoka city suffered a major fire on October 20, 2020. Japanese authorities just recently gave AKM permission to clean-up and rebuild. The AKM fire caused a mass shortage of its digital-to-analog and analog-to-digital converters. The shortage affects other major audio and digital musical instrument manufacturers, too, not just Yamaha.

In addition, Yamaha is ramping up production at its new OneHub Chennai (India) manufacturing plant. The Chennai plant products acoustic guitars and portable keyboards for the Indian market and for export. According to a May 2019 press release, the initial goal is to make 200,000 acoustic guitars and 150,000 portable keyboards, including the PSR-I500 and the PSS series. Yamaha eventually wants to raise the goal to 400,000 acoustic guitars and 300,000 keyboards per year. Roughly 50% of production will be for export.

My PSS-A50 was manufactured in India. Given kinship to the PSR-I500, I would expect Chennai to make the new PSR-E473 and PSR-EW425. Export data indicate that a few E473s already have been run off and exported. Prototypes? Development? Testing?

Of course, the delayed launch has intensified interest among enthusiasts. The E373 received substantial feature upgrades: Super Articulation Lite (S.Art Lite) voices and new DSP effect types which once could only be found on mid- and upper-range arrangers. A few of the new effects are top-of-the-line: dual rotary speaker, Real Distortion guitar amp effects, vintage stereo phaser, compression and harmonic enhancer. One fully expects to see the same upgrades in the E473 and EW425.

S.Art Lite voices behave somewhat differently than their mid- and upper-level cousins. A dedicated articulation button triggers the articulation effect. The cousins transparently employ software scripting which reacts to player gestures, e.g., legato, intervals, and so forth.

Is this the new Yamaha PSR-EW425?

My first thought was “That looks quite professional,” not just a home keyboard. The live control knobs are re-located to the upper left. This decision will be controversial! The lighted buttons look pleasant (light blue color) and the screen is black and white monochrome. Still only four registrations per bank.

Yamaha did majorly swizzle around a bunch of front panel controls with respect to the E463. The keypad to the right has been significantly redesigned.

The quadrant to the right of the display has a 3×4 button matrix for voice and style selection by category. The buttons above the data wheel control selection mode: voice or style. I wonder if one of the mode buttons turns the matrix into a numeric keypad? The FUNCTION and PORTABLE GRAND buttons are below the matrix along with some kind of BOOST button.

The control groups running above the keyboard are (left to right): master volume, SONG/STYLE control, TRACK control, registration memory, and quick sampling. The large light blue button between the volume knob and the SONG/STYLE control group may be the ARTICULATION button.

The Quick Sampling feature got more real estate. Quick Sampling has several buttons: LOOP HOLD, A, B, C, D, and CAPTURE. I wonder if it’s possible to capture four waveforms? Did Yamaha re-think sample control including sample zones? Do the lighted A, B, C, D buttons reflect sample status like a pad controller? Can we play the pads? Are they velocity sensitive?

The live control knobs are further away from the keyboard in the quadrant to the left of the display. I can’t tell if there is an additional row or not. E463 has five live control rows; EW425 has 6 or 7?

The rest of the buttons in the upper left quadrant must be record, metronome, tap tempo, melody suppressor, voice control and all that miscellaneous stuff. The legends in the picture are too distorted to read.

Yamaha is still using an LCD with pre-defined, fixed icons and legends. Do they really save that much money versus a full graphic, pixel addressable display? What do I know? It probably simplifies the software, but it seems so 90s.

Should be interesting finally to see the specs, and not just guess.

Copyright © 2021 Paul J. Drongowski

Free DJX-II styles: Version 2

I’m happy to announce version 2 of my DJX-II styles for Yamaha Genos, Tyros and PSR arrangers.

These DJ styles are converted from the original Yamaha DJX-II patterns. If you would like to know more about the conversion process, please see: Mining the Yamaha DJX-II.

These are DJ styles, so they only respond to changes in the root note. The chord progressions are cooked into the patterns (just like intros and endings in regular PSR styles). I tried to find the best mapping from DJX-II patterns to style sections. Therefore, some of the DJXII styles have auto-fill, some do not. Longer “fill” patterns are assigned to the intro and ending sections which can play more than one measure.

Feel free to edit, rearrange and customize the styles in order to make them your own. I recommend Jørgen Sørensen’s excellent tools. Jørgen’s site also has documentation and tutorials about styles and style creation to help you along. Please check it out and support his work!

Click on this link to download the ZIP file.

Version 2 includes all of the files in the first collection. Version 2 adds Drum ‘n’ Bass, Disco, House and Trip Hop styles. The ZIP file includes a README.TXT file which should help you get started with the styles. I have also included PDF notation files for people who read music and want to know about the chord progressions, bass lines, and so forth.

Enjoy! The DJX-II style collection is free.

Copyright © 2021 Paul J. Drongowski

Arpeggio to style conversion

Let’s get one out of the vault… 🙂

The Motif XS/XF (MOX/MOXF) and Montage (MODX) arpeggios and performances are a great source of inspiration. Unlike Yamaha’s arranger series, the built-in phrase library is rich in urban and chill patterns. For some odd reason, one of the classic XS/MOX performances — “Dresden At Night” — never made the leap to Motif XF. And, it’s missing from Montage/MODX, too.

A PSR Tutorial forum member sought help resurrecting Dresden At Night, albeit a recreation for the PSR-SX700 arranger. I thought I would help out since I wrote a series of articles about MOX performance to style conversion:

The end result of that work is a small collection of PSR (Tyros, Genos) styles based on MOX (Motif XS) performances.

If you would like to try Dresden At Night or experiment with a conversion of your own, download the free ZIP file.

MOX performances have four parts (voices). Each part has up to six musical phrases (arpeggios) associated with it. Six front-panel buttons select the currently playing set of arpeggios, i.e., button one selects the first arpeggio for each set and so forth. To get the basic MIDI data, I played each arpeggio (group) for four measures while recording in MOX performance quick record mode. I wrote out the MIDI data as a Standard MIDI File (SMF), transfered the SMF to PC, and imported the SMF into a DAW (Sonar).

Dresden At Night is a downtempo (91 BPM), urban-ish chill performance. It has four parts:

Part# Voice    Name              NoteLo NoteHi VelLo VelHi Level Pan
----- -------- ---------------- ------ ------ ----- ----- ----- ---
1 PRE8:070 8Z Heavy Hearts C-2 G8 1 127 81 C
2 PRE3:053 Dark Bass C-2 G8 1 127 51 C
3 PRE7:110 Ibiza Groove C-2 G8 1 127 127 C
4 PRE5:121 Smooth BPF Sweep C-2 G8 1 127 73 C

The first part is the rhythm voice and the second part is the bass voice. As we’ll see below, arpegiation is turned for these two parts. The third and fourth voices are a play-along pad layer and arpeggiation is disabled. Thus, the rhythm and bass parts provide a looped backing while the pad voices provide an atmospheric you-steer-it, right hand part.

Here are the arpeggio assignments:

Arp#1 Tempo:91              Arp#2 
----- -----
1 MA_8Z HeavyHrt1 1 MA_8Z HeavyHrt3 ON
2 MB_WestCoastPop _XS 2 MA_WestCoastPop _XS ON
3 MA_Space Arp 3 MA_Space Arp OFF
4 MA_Up Oct1 4 MA_Up Oct2 OFF
Arp#3 Arp#4
----- -----
1 MA_8Z HeavyHrt4 1 MA_8Z GatedBt3 ON
2 BA_Jazz Pop _XS 2 FB_WestCoastPop _XS ON
3 MA_Space Arp 3 MA_Space Arp OFF
4 MA_Up Oct4 4 MA_Down Oct1 OFF
Arp#5 Arp#6
----- -----
1 MA_8Z ChillBrk4 1 BA_Sp SFX ON
2 MB_WestCoastPop _XS 2 MA_WestCoastPop _XS ON
3 MA_Space Arp 3 Off OFF
4 MA_Down Oct2 4 Off OFF

The Arpeggiator is turned ON for Parts 1 and 2 only.

A big factor is the “8Z Heavy Hearts” drum kit. The “8Z” in its name means “eight zone”. Eight zone (8Z) voices are a Motif innovation beginning with the XS (MOX) family. If you would like more information, check out these earlier posts about eight zone voices:

8Z voices aren’t drum kits. They are implemented as synth voices and are just a clever way of using the eight elements which make up a voice. The eight zones (8Z) are divided across specific note ranges. 8Z Heavy Hearts assigns waveforms (zone sounds) in the following way:

Element#  Note Low  Note High  Waveform 
-------- -------- --------- --------------
1 C0 F#0 Bd T9-1
2 G0 C1 Bd Hard Long
3 C#1 D1 Sd Elec12
4 D#1 F1 Sd HipHop6
5 F#1 A1 HH Closed D&B
6 A#1 C2 HH Open T9
7 C#2 C4 Clap AnSm
8 C#4 C6 Shaker Hip2

Yamaha messes with each of the zones in crazy ways and ties keyboard notes to voice parameters (AKA “key follow”). For 8Z Heavy Hearts, the most notable effect is how the Clap AnSm pitch follows the keyboard.

Arrangers (even Genos!) don’t have 8Z voices. They have standard drum kits where each MIDI note is a separate drum instrument. In order to make a PSR style using a DAW, one must translate the 8Z MIDI notes to standard drum kit notes. You need to assign appropriate drum kits (e.g., DrumMachine, Analog T9, House, Break or HipHop) to style parts 9 and 10 (MIDI channels 9 and 10) and copy the Heavy Hearts MIDI data to both Parts. Then, delete the notes that aren’t needed in a style part, compress each zone into a single drum instrument, and map the resulting “compressed” notes to the appropriate drum instrument(s). So, for example, all of the notes in C0 to F#0 might be compressed into the Kick T9 1 instrument (B0) in the Analog T9 Kit, which is one of the target drum kits.

I found two PSR drum parts to be enough. However, styles are flexible and you could assign a third (fourth, …) drum kit to one of the other style parts. There’s nothing in Yamaha styles that prevents this. It’s just that parts 9 and 10 (MIDI channels 9 and 10) are conventionally assigned to drum parts in a style.

I went with two PSR drum kits: Analog T9 kit and Drum Machine kit. Here is one possible assignment:

Note Low Note High Waveform       Instrument        Note#   Kit 
-------- --------- ------------- ---------------- ------ -----------
C0 24 F#0 30 Bd T9-1 Kick T9 1 35 B0 AnalogT9Kit
G0 31 C1 36 Bd Hard Long BD Hard Long 24 C0 DrumMachine
C#1 37 D1 38 Sd Elec12 Snare Analog CR 63 D#3 DrumMachine
D#1 39 F1 41 Sd HipHop6 Snare Hip 1 86 F#3 DrumMachine
F#1 42 A1 45 HH Closed D&B Hi-Hat Closed Syn 91 A4 DrumMachine
A#1 46 C2 48 HH Open T9 Hi-Hat Open T9 46 A#1 AnalogT9Kit
C#2 49 C4 72 Clap AnSm Clap Analog Sm 27 D#0 AnalogT9Kit
C#4 73 C6 96 Shaker Hip2 Analog Shaker 57 A2 DrumMachine

A lot of detail, huh? Nobody said style conversion was easy. 🙂 In the end, I spread each zone across multiple drum instruments of the same type, i.e., assigning the Shaker Hip2 zone to a few different Analog Shaker sounds in the Drum Machine kit. Part of 8Z Heavy Hearts’ charm is the subtle sonic variation provided by each zone.

Trying to keep this all straight in the DAW piano roll is cognitively challenging. Did I say, style conversion isn’t easy? 🙂

Fortunately, one can loop four bar sections and play the MIDI through the arranger (Genos, in this case) just like a MIDI song. Then, it’s the usual tweak, listen, rinse, repeat edit process. When the MIDI is tweezed to your liking, you need to add MIDI markers to delimit the style sections. (BTW, leave a one bar MIDI set-up measure at the beginning.) Style section markers are:

    Set-up measure 1: SFF1 
Set-up measure 1: SInt
Main sections: Main A, ...
Fill sections: Fill In AA, ...
Break section: Fill In BA, ...
Introduction: Intro A, ...
Ending: Ending A, ...

At a minimum, you need a few MIDI set-up System Exclusive (SysEx) messages at the beginning of the SMF (measure 1, beat 1):

    F0 7E 7F 09 01 F7                 GM Reset 
F0 43 10 4C 00 00 7E 00 F7 XG System ON
F0 43 10 4C 02 01 00 01 16 F7 Reverb type
F0 43 10 4C 02 01 20 16 00 F7 Chorus type

Reverb is the “Light Hall” preset and chorus is the “Tempo Cross 1” preset. The tempo cross delay is an 8-beat echo.

Which brings me to a necessary ingredient: crunch. 8Z Heavy Hearts gets a lot of its appeal from the Lo-Fi effect:

#  Parameter                   Val  Hex   Meaning 
-- -------------------------- --- ---- --------
1 Sampling Frequency Control 4 0x04 8.82kHz
2 Word Length 98 0x62
3 Output Gain 7 0x07 0dB
4 LPF Cutoff Frequency 56 0x38 12kHz
5 Filter Type 1 0x01 PowerBass
6 LPF Resonance 63 0x3F 6.3
7 Bit Assign 4 0x04
8 Emphasis 1 0x01 On
10 Dry/Wet 88 0x58 D<W24
15 Input Mode 1 0x01 Stereo

Since we need Lo-Fi on both style parts 9 and 10, I configured the variation effect as an XG SYSTEM effect. Parts 9 and 10 also require variation send (MIDI CC#94) set to 127. Add a CC#94 message to parts 9 and 10 in the set-up measure. Here are the MIDI System Exclusive messages to add to the set-up measure:

F0 43 10 4C 02 01 40 5E 13 F7       Variation type 
F0 43 10 4C 02 01 5A 01 F7 Variation SYSTEM
F0 43 10 4C 02 01 56 40 F7 Variation return
F0 43 10 4C 02 01 58 10 F7 Variation send to reverb
F0 43 10 4C 02 01 59 10 F7 Variation send to chorus
F0 43 10 4C 02 01 42 00 04 F7 Variation parameter 1
F0 43 10 4C 02 01 44 00 62 F7 Variation parameter 2
F0 43 10 4C 02 01 46 00 07 F7 Variation parameter 3
F0 43 10 4C 02 01 48 00 38 F7 Variation parameter 4
F0 43 10 4C 02 01 4A 00 01 F7 Variation parameter 5
F0 43 10 4C 02 01 4C 00 3F F7 Variation parameter 6
F0 43 10 4C 02 01 4E 00 04 F7 Variation parameter 7
F0 43 10 4C 02 01 50 00 01 F7 Variation parameter 8
F0 43 10 4C 02 01 54 00 58 F7 Variation parameter 10
F0 43 10 4C 02 01 75 01 F7 Variation parameter 15

At this point, you could save the MIDI to “DresdenAtNight.sty” and load it into your arranger as an SFF1 format style. The arranger should create the style CASM segment. As an alternative, you can add a CASM segment to the SMF with Jørgen Sørensen’s CASM editor. You might as well download his OTS editor, too, and use it to add OTS voice settings to the new style as well. Or, you can do this sort of work on your arranger itself. Mid- and high-end Yamaha arrangers save styles as SFF2 format, which is one way to convert from SFF1 to SFF2. I highly recommend Jørgen’s site, tools and style creation tutorial.

BTW, you can recreate Dresden At Night on MODX (Montage). Create a new MODX performance with 8Z Heavy Hearts and Dark Bass. 8Z Heavy Hearts has the appropriate arpeggios by default. You’ll need to assign different arpeggios to the Dark Bass part. Modify effects as needed. Choose and add pad or lead voices to give your right hand something to do. Done! Use the Scene buttons to switch arpeggio groups.

Copyright © 2021 Paul J. Drongowski