Yamaha keyboards: Which amp (sim) is that?

While diving into overdrive and distortion effects for drawbar organ, I challenged readers to identify the real-world amplifiers on which Yamaha based its MODX (Montage, Genos) amp simulators. I took my own challenge over a cup of coffee today and made my own list of best guesses.

Yamaha introduced several new amp simulators during the 2013-2014 time-frame. They first appeared in Tyros 5 under the sobriquet “Real Distortion”. Next, they were added to Motif XF by way of the Motif XF OS1.5 update. Since then, the “Real Distortion” effect algorithms have trickled down to mid-level synthesizer and arranger keyboard products.

Without further ado, here are my best guesses:

Tweed Guy         Fender '59 Bassman Tweed (6L6GC, 4x10) 
Boutique DC Matchless DC-30 (EL84, 2x12)
US Combo Fender Twin Blackface (6L6GC, 2x12, Super Twin?)
Jazz Combo Roland JC-120 Jazz Chorus (Solid state, 2x12)
US High Gain Mesa Boogie Mark II or Mark III (6L6GC, 1x12)
British Lead Marshall Plexi Super Lead (EL34, 4x12)
British Combo Vox AC30 Top Boost (EL84, 1x12 and 2x12)
British Legend Marshall JCM 800 Lead (EL34, 4x12)
Distomp 1980s Yamaha distortion pedals (SHD-100/MBD-100)
Y-Amp Yamaha DG series guitar amplifiers and stomp
Small Stereo Fender inspired?
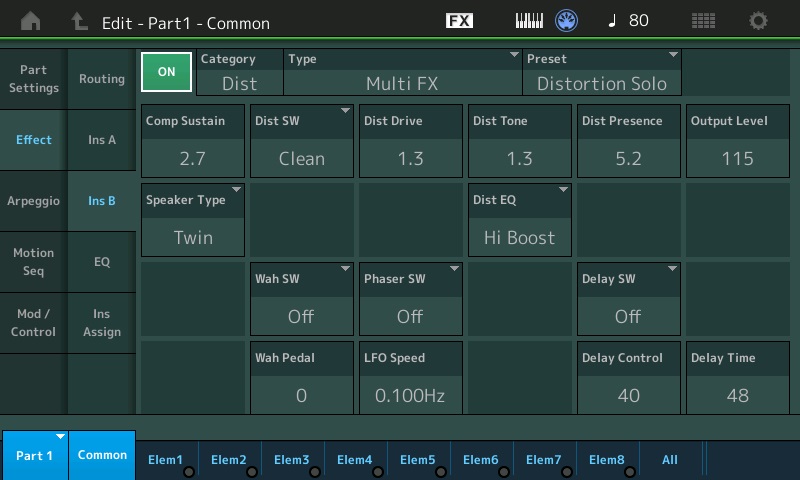
Multi FX Inspired by the Yamaha DG Stomp

Blake Angelos (Yamaha) wrote an early article which provides important clues. Unfortunately, the article doesn’t spill specific amplifier names.

A real Matchless DC-30 and the Boutique DC amp sim front panel

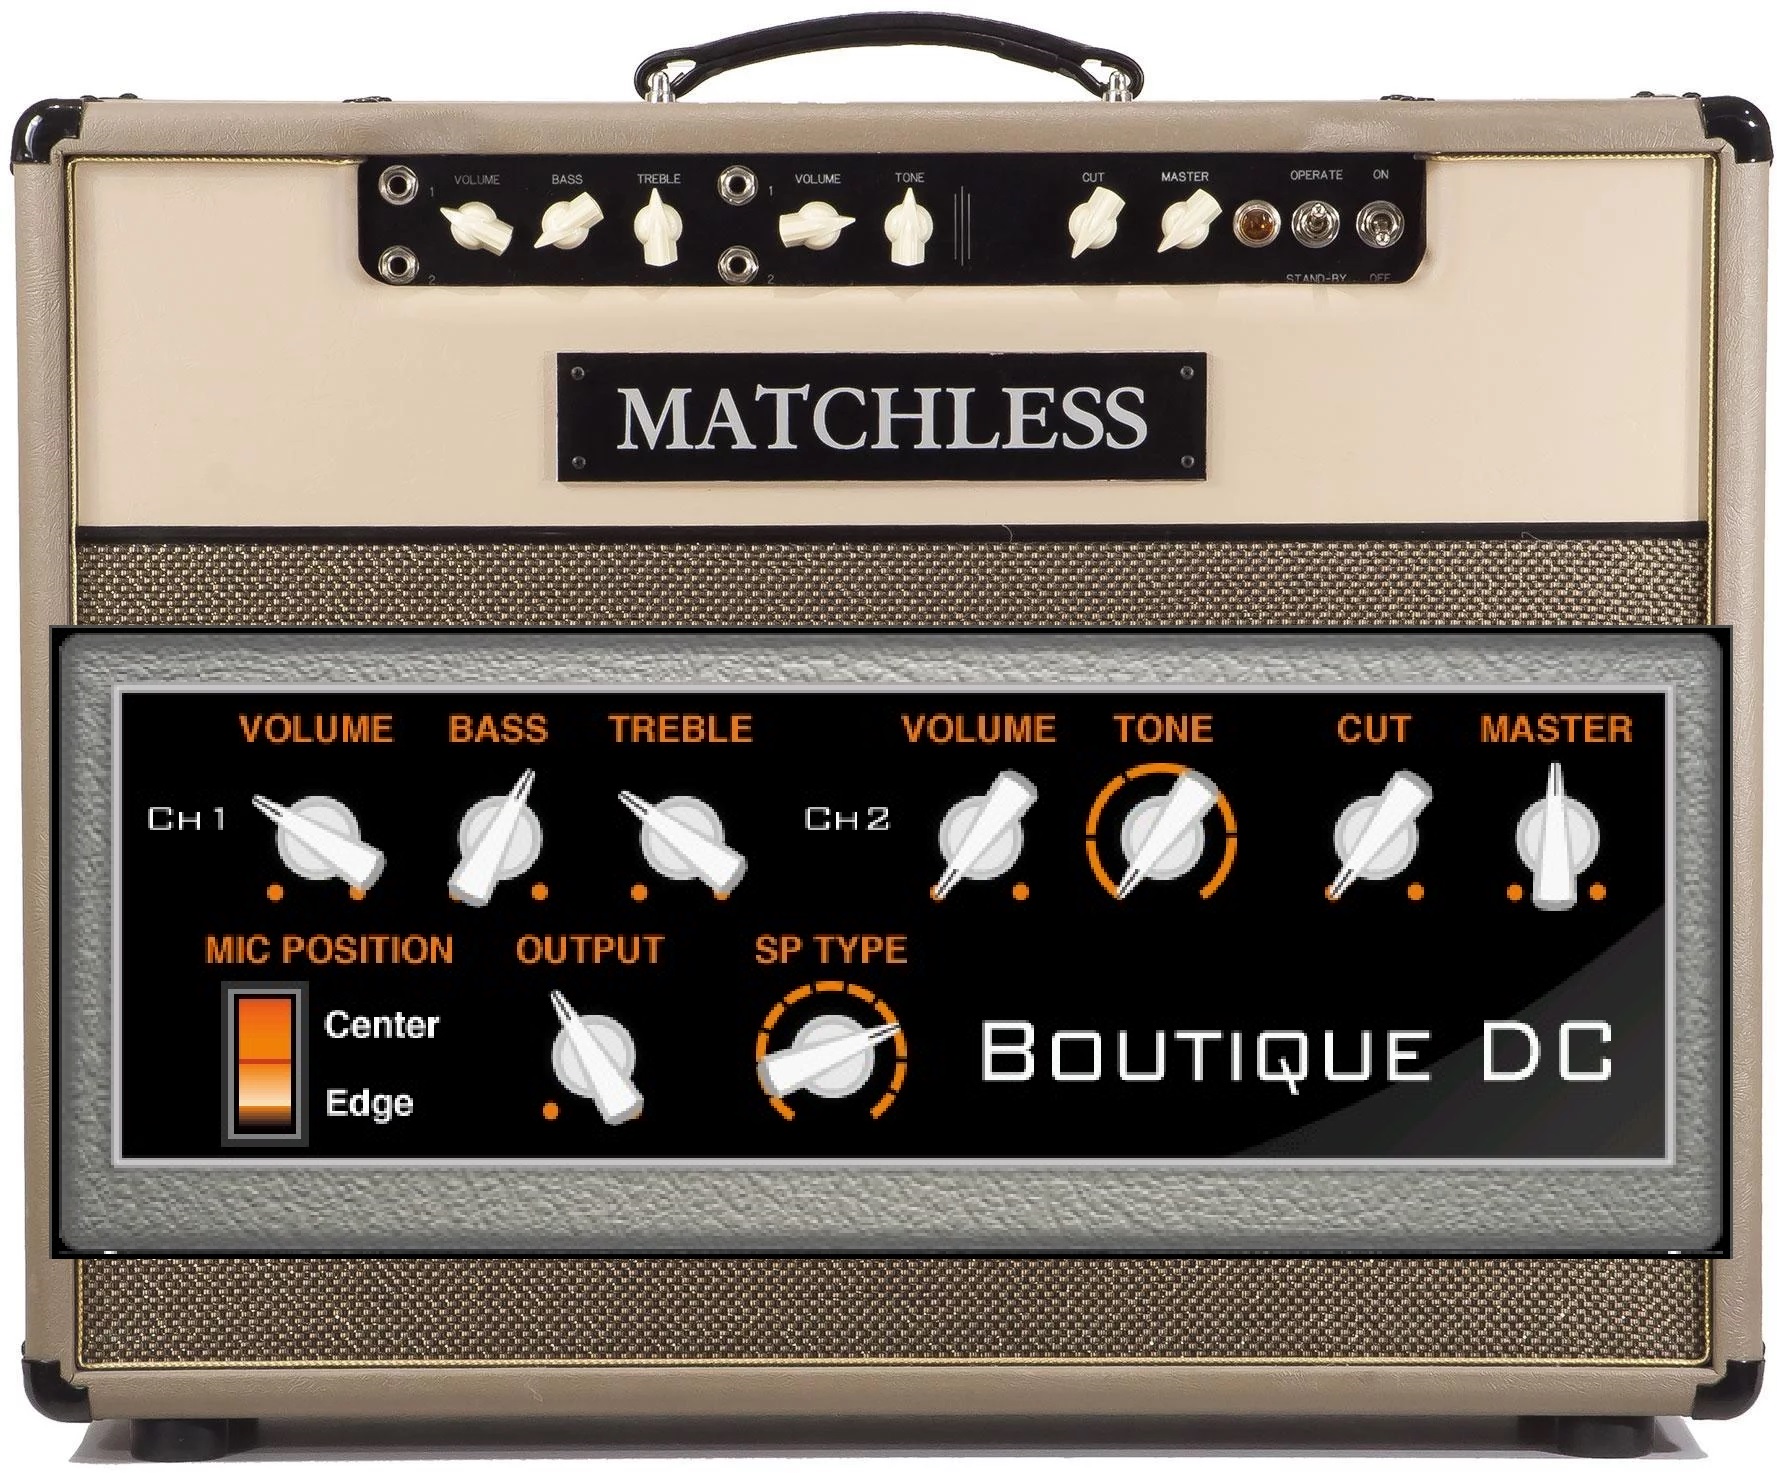
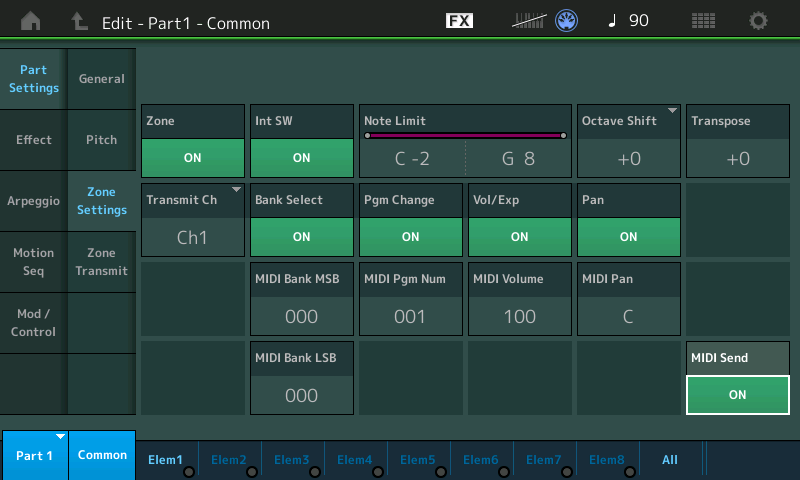
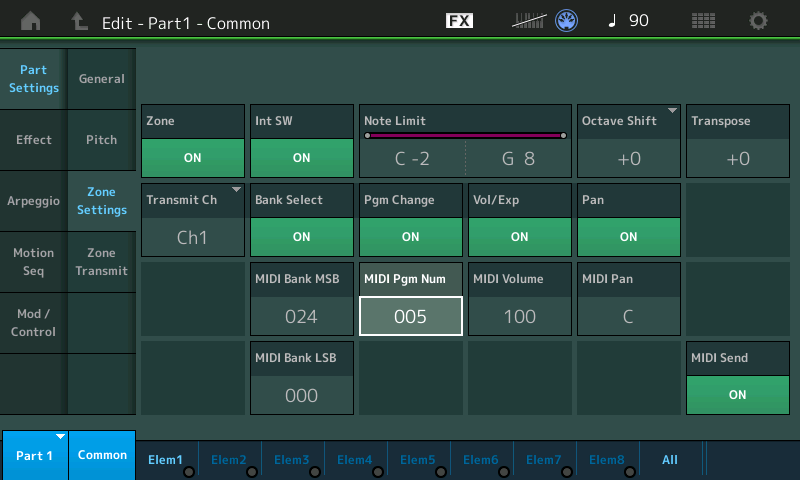
Better clues come from the faux front panel graphics on display in the Genos Mixer. These skeumorphic images resemble the actual amplifiers which inspired the amp simulators. More definitively, the control names resemble or are identical to the front panel knobs, switches and input channels of the original amps. The Fender-style graphic knobs threw me off at first, until I discovered that the first generations of Mesa/Boogie amps were housed in Fender Princetons.

There are a few inconsistencies, though. The “US Combo” clearly models Fender “blackface” amplifiers, most notably the famous Twin. The Fender Twin has a middle EQ knob, but does not have mid cut, width or sweep controls like the amp sim. Perhaps Yamaha’s software engineers replaced the single middle EQ knob with three other parameters giving great control over the mids? Or, maybe the software engineers had the Fender Super Twin in mind which has a five band EQ at fixed frequencies?

The Small Stereo Amp doesn’t claim any particular ancestor. The speaker types include Twin and Tweed, so maybe there is a Fender influence? Whatever its name, Small Stereo Amp is one of my favorites. It’s like Nando’s hot sauce; I use it anytime I want a little grunge.

The Distomp simulator is a blend of 1980s Yamaha distortion pedals. In particular, it combines controls from the SHD-100 Super Hard Distortion and MBD-100 Multi-Band Distortion pedals. Shred on, dudes.

The Y-Amp is clearly based on Yamaha’s own DG guitar amp series. The DG amplifiers are among the first digital modeling amplifiers. (Nerd note: DSP horsepower is delivered by a Yamaha proprietary DSP6 integrated circuit.) I wouldn’t be surprised if some of the DG amp sims and effect models jumped species and landed in Yamaha keyboard products, too.

Yamaha engineers often return to the same wellspring. The DG Series Amp Models (circa 2012) are:

    1) Lead 1 - Marshall 
2) Lead 2 - Soldano
3) Drive 1 - Fender Bassman
4) Drive 2 - Fender Twin
5) Crunch 1 - Vox AC30
6) Crunch 2 - Matchless
7) Clean 1 - Fender Twin Nasal Silverface
8) Clean 2 - Fender Twin Full Blackface

The list makes you go, “Hmmm?” “Soldano” brings the Soldano SLO-100 classic to mind.

Before VCM (Virtual Circuitry Modeling) there was DG’s ECM (Electric Circuit Modeling). In this vein, the Y-Amp sim offers a choice of power tube: 6L6GC, EL34, or KT66. These vacuum tubes were used in some of the most famous and collectible guitar amps:

6L6GC: Fender '59 Bassman and Twin, Ampeg B-15, Mesa/Boogie Mark I  
EL34: Marshall Plexi, DSL 100, Super Lead, Orange
KT66: Marshall JTM45 Bluesbreaker

Oddly, Y-Amp does not have an EL84 option (Vox AC30, Matchless DC-30). The KT66 is an improved version of the 6L6. The KT66 was first made in Britain by Marconi-Osram Valve Co. Ltd.

In addition to guitar amplifiers, the DG series included the DG Stomp multi-effects pedal. I can see where the DG Stomp might have inspired the MULTI FX pedal board simulation. The MULTI FX algorithm is a jack of all trades with compression, wah, distortion, phaser, delay and speaker simulation.

Hope you found this fun!

Before leaving, here is my speaker type decoder, once again, based on a little analysis and guess work.

    BS 4x12    British Stack 
AC 2x12 American Combo
AC 1x12 American Combo
AC 4x10 American Combo
BC 2x12 British Combo
AM 4x12 American Modern
YC 4x12 Yamaha Combo
JC 2x12 Jazz Chorus
OC 2x12 Orange Combo
OC 1x8 Orange Combo

Copyright © 2023 Paul J. Drongowski

MODX: Drawbar overdrive (part 3)

So far on our tour of MODX (Montage) drawbar organ tech, I’ve discussed drawbar control and drawbar waveforms. Convincing overdrive and distortion are essential to an authentic drawbar organ sound (B-3 plus Leslie). Technically, the overdrive (or distortion) is produced by the tube electronics in a Leslie rotary speaker. We synthesizer types must use amp and speaker simulators to produce overdrive or distortion.

Engineers are creatures of habit. After browsing a zillion MODX and Genos organ voices, I noticed that Yamaha engineers kept returning to the same effect algorithms albeit with slightly different parameter values:

    MODX Algorithm    Genos Algorithm    Characteristics 
--------------- --------------- ----------------------
BRITISH COMBO BRITISH COMBO Vox combo amp
MULTI FX MULTI FX Pedal board
AMP SIMULATOR 1 V DISTORTION Vintage amp
AMP SIMULATOR 2 STEREO AMP SIM Vintage stereo amp
SMALL STEREO SMALL STEREO DIST Stereo amp and speaker sim

The MULTI FX pedal board simulator includes the SMALL STEREO (DIST) algorithm. Check out Blake’s article about guitar effects.

Roadmap

We need a roadmap before driving into the weeds.

Usually, overdrive is configured as a MODX (Montage) insert effect. Once you navigate to the effects routing page (or one of the insert effect pages), you can change the effect type (algorithm) and/or effect parameters. Yamaha documentation refers to “effect types”; I use the word “algorithm” instead because we are selecting an algorithm (code) along with its parameters.

MODX/Montage MULTI FX insert effect

Yamaha provide several different distortion, overdrive and amp simulator algorithms. As if that isn’t enough choice, sometimes the kind of overdrive (or distortion) can be chosen by a parameter (e.g., tube, transistor, etc.) In some cases, we can choose the speaker cabinet (e.g., 2×12), too.

Why are there so many choices? If you follow the guitar pedal market, you would ask “Why are there so many distortion pedals?” Like anything else in sound and music, there are many varieties of distortion or overdrive. Some are warm (tubes), some are bright (transistor), and so forth. The trick is to use your ears and find the most appropriate kind of distortion, overdrive or amp type for the sound you want to obtain. Guitarists call this ephemeral quality “tone”.

I’ve cataloged several detailed examples in the next section. These are starting points for experimentation. If you don’t know where to start, choose something and start tweaking! If you can’t get your tone, change the kind of distortion effect if the selected algorithm allows, or move on to a different effect algorithm.

An effect algorithm is a mathematical model of a real-world device. Each algorithm simulates one or more real-world distortion, overdrive, amplifier and/or speaker cabinet effects. The models mimic an audio signal hitting a component like a tube, transistor or a mic’ed speaker cabinet. The amount of distortion usually increases when the incoming audio signal is stronger, i.e., the input level or gain (sometimes called “drive”) is turned up. The input signal drives the simulated device or component harder.

One thing to keep in mind — increasing input level (gain) also increases the output level. When you increase the gain (drive), you must decrease the output level lest you cause nasty digital distortion in the outgoing digital audio stream. Digital distortion (digital clipping) sounds unnatural and is not desirable.

Warning

Increasing drive also raises the volume of the outgoing audio, sometimes to painful levels! Keep volume low when experimenting with high drive. Protect you ears.

Most of the algorithms provide a parameter controlling the Wet/Dry mix. You’ll see settings like “D15>W”. The wet/dry value range is:

     D63>W to (D=W) to D<W63 

This determines the balance between the direct, unprocessed signal (dry) and the processed sound (wet). At dead center, “(D=W)”, the wet and dry signals are equal. Move to either side to pass more of the dry sound or wet/effected sound.

The details and examples

The BRITISH COMBO effect algorithm (Vox AC30) is a Yamaha favorite. In the table below, the first settings are taken from the MODX “All Bar None” Performance, and the second and third settings are from the Genos “ClassicJazz” and “RockOrgan JS” voices, respectively.

                            MODX         Genos        Genos 
## Parameters All Bar None ClassicJazz RockOrgan JS
-- --------------- ------------ ----------- ------------
1 Mode Bright Bright Top Boost
2 Normal 5.8 3.6 4.0
3 Brilliant 6.0 5.4 6.0
4 Bass 4.4 5.0 4.4
5
6 Treble 6.0 6.2 6.0
7 Cut 0.6 0.0 0.6
8
9 Output Level 69 126 71
10
11 Speaker Type AC 4x10 AC 1x12 AC 4x10
12 Speaker Air 2 2 0
13 Mic Position Center Center Center

The parameters “Normal” and “Brilliant” dial in the distortion.

Here’s the rotary speaker settings for two Genos drawbar organ voices. Both voices use the Genos V DISTORTION effects algorithm. The equivalent MODX algorithm is AMP SIMULATOR 1.

                           Genos           Genos 
## Parameters WhiterBars JS RotaryDriveOrg
-- --------------- ------------- --------------
1 Overdrive 28% 24%
2 Device Vintage Tube Transistor
3 Speaker Type Stack Twin
4 Presence 4 10
5 Output Level 88% 100%
10 Dry/Wet D40>W D26>W

The first voice simulates a tube preamp and the second voice simulates a transistor preamp. Tube amps have a warmer sound than transistor amps.

MODX does not have all of the Genos distortion algorithms. MODX implements the latest and greatest algorithms while Genos (Tyros and PSR) retain many legacy algorithms for backward compatibility. The table below shows the settings for the STEREO AMP SIMULATOR used by the “ClassicBars JS” voice.

                              Genos           MODX 
## Parameters ClassicBars JS The Jazz Organ
-- ----------------- -------------- --------------
1 Drive 0 15
2 Amp Type Stack Tube
3 LPF Cutoff Frequency 8.0kHz 5.0kHz
4 Output Level 114 112
10 Dry/Wet D24>W D17>W
11 Edge (Clip Curve) 0 n/a

The nearest equivalent MODX algorithm is AMP SIMULATOR 2. The parameters are the same except “Edge (Clip Curve)” is missing on MODX. Still, I would give these parameter values a try on MODX.

The MULTI FX algorithm simulates a guitar pedal board. The input signal hits a simple compressor (sustain) which drives a distortion block (Dist). The phaser and wah blocks are turned OFF in the examples below.

MODX Performance: More Shade 
MODX Algorithm: MULTI FX MODX Preset: Distortion Solo
MODX MODX
## Parameters More Shade 8.8.8.8.6.2.2.0.0
-- ----------------- ---------- -----------------
1 Comp. Sustain 2.3 2.7
2 Wah SW Off Off
3 Wah Pedal 0 0
4 Dist SW Clean Clean
5 Dist Drive 2.1 1.3
6 Dist EQ High Boost High Boost
7 Dist Tone 0.8 1.3
8 Dist Presence 6.0 5.2
9 Output Level 108 115
10
11 Speaker Type Twin Twin
12 LFO Speed 0.1Hz 0.1Hz
13 Phaser SW Off Off
14 Delay SW Echo1 St Off
15 Delay Ctrl 40 40
16 Delay Time 48 48

The “More Shade” Performance adds a stereo echo effect using the delay block. MULTI FX is a super handy algorithm and I’ve discussed its use with organ and electric piano before.

Yamaha CK- and YC-series

The table below summarized the YC- and CK-series rotary and distortion insert effects.

    YC61 rotary effects 
Rtr A Standard rotary speaker for organ
Rtr B Rotary speaker connected to a transistor
preamplifier with strong distortion
Lead Guitar amp (bass of high sound
pressure and sharp treble)
Crunch Guitar amp (crunch sound)
Double Guitar amp (bright sound)
Case Speaker amp for vintage electric piano
CK61 drive (rotary) effects
Rotary A Standard rotary speaker for organ
Rotary B Rotary speaker connected to a transistor
preamplifier with strong distortion
O.Drive Warm distortion (overdrive)
Dist Hard rock distortion
Comp Compressor controlled by a single knob
YC61 and CK61 insert effects
British Combo Crunch distortion (Vox AC30 Top Boost)
British Lead Hard rock type distortion (Marshall Plexi)
Small Stereo Stereo distortion

I’ll let you guess as to which Yamaha algorithms are (re)used. If you want to re-create the CK sound on MODX (Montage), have at it!

Copyright © 2023 Paul J. Drongowski

MODX: Drawbar waveforms (part 2)

Last time, we looked at the drawbar programming in MODX Performance “The Basics”. The first five voice Elements are each assigned a single drawbar waveform: 16′, 5 1/3′, 8′, 4′ and 2′.

A lot of folks (me!) frequently build on a foundation like pulling the first three or four drawbars and then pull higher bars while playing. Thus, assigning individual drawbars seems a little wasteful in these kinds of registrations, when the foundation doesn’t change. Fortunately, MODX (Montage) provide waveforms for typical drawbar foundations:

    Wave#  Waveform name            Registration? 
----- ---------------------- -------------
441 Rock Chorus Vibrato
442 Rock Percussion
443 Rock2 65 5444 644
446 Jazz w/Percussion
448 Jazz 78 6600 000
451 Full Draw 88 8888 888
454 Swish
456 Bow 87 4323 468
457 Bow Chorus Vibrato
458 Gospel 87 6000 568
459 Soul 80 0050 578
460 1st Four Draw 88 8800 000
479 Draw 1+3 80 8000 000
482 Draw 2+4 08 0800 000
485 Draw Even
488 Draw Odd

The MODX data list PDF has the complete list of waveforms, including the slightly detuned and offset variations. I tried to guess the registrations and please take my guesses with a grain of salt! [See Genos/PSR organ registrations.]

MODX Performance “Vib Chorus AF1” is as simple as you can get:

    Performance: Vib Chorus AF1 
El# Waveform Level Pan Coarse XA Control
--- ------------------ ----- --- ------ ----------
1 Bow 100 C 0 A.SW Off
2 Bow Chorus Vibrato 102 C 0 A.SW1 On

It consists of two Elements. “Bow” refers to the overall shape of the drawbars with the lowest and highest drawbars pulled out the farthest. You might hear this registration in a gospel music or soul setting.

The Elements depend on the state of the ASSIGN 1 front panel button. The Extended Articulation (XA) control parameter chooses the first Element when the A.SW switches are OFF and chooses the second Element when the A.SW1 switch is ON. This configuration conserves polyphony and Elements sparingly. You can add or disable chorus/vibrato (C/V) by pressing the ASSIGN 1 switch. The C/V is sampled into the “Bow Chorus Vibrato” waveform and you do not have the option of selecting V1, C1, etc. Unlike real world Hammond, C/V is added (or removed) only on new notes played after switching. It’s not an independent effect unit.

You could use “Vib Chorus AF1” as the basis for new Performances that switch between drawbar registrations. Why not switch between “Jazz” and “Jazz w/Percussion”, for example? Simply change Element 1 to the “Jazz” waveform and change Element 2 to the “Jazz w/Percussion” waveform.

Here are the Element assignments for another simple Performance, “Draw Control”:

    Performance: Draw Control 
El# Waveform Level Pan Coarse XA Control
--- ------------------ ----- --- ------ ----------
1 Draw 1+3 100 C 0 Normal
2 Draw 2+4 67 C 0 Normal
3 Draw Even 0 C 0 Normal
4 Draw Odd 0 C 0 Normal

You can go from quiet to shoutin’ with this one! For extra credit, learn how to add rotor grit and rotor whistle Elements in order to sweeten the pot. [Hint: Learn how to copy Elements with SHIFT+EDIT.]

New waveforms in Montage/MODX

There are several new drawbar organ waveforms in Montage (MODX) which don’t get mentioned very often. These waveforms have the Leslie speaker effect sampled in:

Wave#  Waveform Name        Performance         Registration? 
----- ------------------- -------------- -------------
495 Tonewheel1 Fast Whiter Bars 68 8600 000
496 Tonewheel1 Slow
497 Tonewheel2 Fast All Bar None 88 8888 888
498 Tonewheel2 Slow
499 Tonewheel3 Fast L The Jazz Organ, Groove Organ
500 Tonewheel3 Fast R
501 Tonewheel3 Fast St
502 Tonewheel3 Slow L
503 Tonewheel3 Slow R
504 Tonewheel3 Slow St
505 Tonewheel4 Fast 88 8888 888
506 Tonewheel5 Fast Rich Bars 63 8457 530
507 Tonewheel6 Fast

Sampled-in Leslie doesn’t get much love because the effect cannot be modified and the switch from slow speed to fast is abrupt — no acceleration ramp between the two speeds.

The first three sets of tonewheel waveforms cover the three most common registrations: 1. Whiter Shade Of Pale, 2. full drawbars, and 3. jazz organ a la Jimmy Smith and Groove Holmes. If you want to try them out, I took note of the MODX Performances built on these tonewheel sample sets.

I believe these tonewheel waveforms are used in the Genos™ “joystick (JS)” voices: “WhiterBars JS”, and “AllBarsOut JS” and “JazzRotary JS”. The ears don’t lie. Tonewheel4, 5 and 6 are probably in the Genos ROM somewhere, too. No time for an Easter egg hunt today. 🙂

Here is what you will see if you look inside of these Performances:

Performance: The Jazz Organ 
El# Waveform Level Pan Coarse
--- ------------------ ----- --- ------
1 Tonewheel 3 Slow L 115 L63 0
2 Tonewheel 3 Slow R 115 R63 0
3 Tonewheel 3 Fast L 0 L63 0
4 Tonewheel 3 Fast L 0 R63 0
5 Draw 16' Of 32 C +20
6 Rotor Whistle 0 C +17
7 Rotor Grit 1 0 C 0
8 Draw 4' Of 0 C 0

Performance: Whiter Bars
El# Waveform Level Pan Coarse XA Control
--- ---------------- ----- --- ------ ----------
1 Tonewheel 1 Slow 127 C 0
2 Tonewheel 1 Fast 0 C 0
3 Draw 16' Of 23 C +20 Key off - Rel key click
4 Rotor Whistle 0 C +17
5 Rotor Grit 1 0 C 0
6 Draw 4' Of 127 C 0 Assign SW #1 - Percussion

Performance: All Bar None
El# Waveform Level Pan Coarse XA Control
--- ---------------- ----- --- ------ ----------
1 Tonewheel 2 Slow 127 C 0
2 Tonewheel 2 Fast 0 C 0
3 Draw 16' Of 32 C +20 Key Off - Rel key click
4 Rotor Whistle 5 C +17

Example performance

I set out to build a new Performance, “8888+”, using a few of the ideas that I outlined above. The new Performance puts the “1st Four Draw” waveform in the first Element and places four individual drawbar waveforms into Elements 2 through 5:

    Performance: 8888+ 
El# Waveform Level Pan Coarse
--- ------------------ ----- --- ------
1 1st Four Draw 127 C 0
2 Draw 2 2/3 0 C 0
3 Draw 2' 0 C 0
4 Draw 1 1/3 0 C 0
5 Draw 1 3/5 0 C 0
6 Rotor Grit 2 70 C -24
7 Rotor 127 C -17
8 Percussion 0 C -7

Elements 6 and 7 add rotor noise. Element 8 handles percussion.

I didn’t build “8888+” from scratch. I started out with the Performance “More Shade” and modified it, following the basic editing procedure which I outlined in my last post.

MODX “8888+” All Elements

In the MODX All table, tap the name of the waveform that you want to change in order to select it. MODX (Montage) displays two buttons on the left-hand side of the display. Tap the “Category Search” button.

MODX Waveform (category) search

MODX displays waht looks like a category search page. Instead of Performances, this category search displays and searches waveforms. You can scroll through the waveform or type in the name of the waveform that you’d like to find. Select a waveform and press the ENTER button.

I followed his basic procedure for each of the first five Elements. Yeah, the 1 1/3 and 1 3/5 drawbars are not in the usual order, but I want to have 1 1/3 in the first group of sliders. I’m more likely to pull that drawbar than 1 3/5.

If you ride the sliders and noodle around, the individual drawbar sounds will be louder than the “1st Four Draw” sound. We need to rebalance the choir so that no individual drawbar will sound out-of-place with its peers.

MODX Performance 8888+ first Element AEG

In order to balance the bars, I visited the Amplitude EG page for drawbars 1 through five. The picture above is the Amplitude EG page for the first Element, “1st Four Draw”. Please notice the envelope Levels: Initial, Attack. Decay1 and Decay2. Attack, Decay1 and Decay2 levels are the maximum, 127. That’s good. We want the “1st Four Draw” waveform at the maximum output level.


MODX Performance 8888+ second Element (2 2/3) AEG

The next screen capture shows the Amplitude EG for the “Draw 2 2/3” Element. I reduced the four envelope levels. Attack, Decay1 and Decay2 levels are 70, which will make the “Draw 2 2/3” blend into the overall drawbar choir. I programmed Elements 3, 4 and 5 in the same way. If 70 doesn’t sound/feel right to you, dial in a different level!


MODX Performance 8888+ sixth Element (rotor noise) AEG

I also adjusted the envelope levels for Elements 6, 7, and 8. In the case of 6 (above) and 7, lower envelope levels prevent outrageously loud rotor noise if I accidently push the sliders up for 6 and 7. This can happen in the heat of battle when I’m concentrating on the music and not watching my hands on the sliders. 🙂 Similarly, I set the envelope levels for Element 8, percussion, to obtain soft percussion when its slider is all the way up.

I hope this discussion encourages experiments of your own. I also hope that you are becoming more comfortable with MODX (Montage) editing.

Copyright © 2023 Paul J. Drongowski

MODX: Drawbar control (part 1)

Test driving Yamaha’s CK88 motivated me to get off my tail and learn how to make the experience of playing MODX more CK-like. In particular, I want to make better use of the MODX front panel sliders for drawbar control.

This requires the most basic knowledge of MODX (Montage) Performance structure. All MODX folk should read through the first section of the MODX Reference Manual, titled “Basic Structure.” In this post, I’m going to concentrate on the Tone Generator Block.

Now, honestly, I don’t expect you to recall and understand every detail! Here are the essential basics:

  • A Performance is a single set of sounds consisting of multiple Parts.
  • Each Performance has two types of parameters; parameters unique to each Part and parameters common to all Parts.
  • An Element is the basic, smallest unit for an AWM2 Normal Part.
  • A Normal Part consists of up to eight Elements.
  • Each Part is created by editing parameters unique to each Element and parameters common to all the Elements.

Yep, those are direct quotes from the manual (with a few simplifying tweaks). That’s pretty much all of the “theory” that you need to know. The rest is button pushing. 🙂

I’m going to focus on single part organ Performances in this article. That will streamline the discussion. If you understand single part Performances, you should be able to scale up to multi-part. When navigating the CATEGORY screen, single part Performances are displayed in green text; multi-part Performances are displayed in blue text. I assume you know how to select a Performance…

Deconstruction

Knowing how to deconstruct a Performance is an essential MODX skill, even if you’re a player and not a sound designer. This is the way to wring the most out of the factory presets whether you ever intend to change a single preset or not.

MODX Performance “The Basics”

To get started, press the CATEGORY button, then find and select the organ Performance named “The Basics”. This is a single part Performance and, yeah, it’s basic. 🙂 Press the ENTER button to go to the main screen.

When the Performance name is highlighted, pressing the EDIT button takes you to the COMMON parameters for the Performance. I’ll discuss some of those parameters in a future note about effects (i.e., system-level effects like reverb).

“The Basics” Part COMMON parameters

For now, use the arrow keys to navigate down to the first part. (You can touch the first part, too, to select it.) Press the EDIT button and MODX displays the COMMON parameters for the first and only part in “The Basics”. There’s tons of fun stuff here including access to the insert effects like rotary speaker. [Another day.]

What we really want is information about the Elements in “The Basics”. You’ll find a row of on-screen buttons along the bottom of the display. These buttons are especially handy when navigating through Parts, COMMON parameters and Elements. We could step through the Elements one by one by pressing the “ElemX” on-screen buttons. Let’s hit “All” instead.

“The Basics” Osc table

MODX displays a table showing all of essential parameters (information) about the Part (the “Osc” tab). Each row in the table is an Element showing:

  • Element ON/OFF status
  • Extended Articulation (XA) control
  • Waveform
  • Velocity limit
  • Note limit
“The Basics” Balance table

Press the “Balance” tab. MODX displays another table showing:

  • Element ON/OFF status
  • Coarse tuning (semitones)
  • Fine tuning (cents)
  • Filter cutoff
  • Pan
  • Level

Wow, this is a terrific overview! Now you know how I populate and compose all of these kinds of tables on my site.

Drawbars and settings

Let’s stop here and reflect on what we’re seeing.

    MODX/Montage Performance: The Basics 

El# Waveform Level Coarse
--- ------------ ----- ------
1 Draw 16' 106 0
2 Draw 5 1/3 127 0
3 Draw 8' 100 0
4 Draw 4' 26 0
5 Draw 2' 9 0
6 Rotor Grit 2 5 -24
7 Rotor 16 -17
8 Percussion 47 0

“The Basics” consists of five individual drawbars: 16′, 5 1/3′, 8′, 4′ and 2′. In Hammond language, the registration is (roughly) 68 6210 000. There is also percussion, provided by Element 8. Element 6 adds a little bit of rotor grit. Element 7, rotor whine, is turned off initially. Press the on-screen ON/OFF button for Element 7 if you want to add rotor whine to the mix.

Extra credit. Press the on-screen “Elem7” button. This takes you to the main page of parameters for Element 7. You can turn Element 7 ON/OFF there and do a whole lot more damage to it! Press “All” to return to the table(s).

You can change the drawbar registration by adjusting one or more of the Element levels. For example, touch the Level parameter for Element 1 in order to select it. Then, hold a key, spin the data wheel and listen to the sound change. More dramatically, change the Element 5 level and listen to the 2′ drawbar come in.

Play the drawbars

Of course, this isn’t a practical way to change a registration while playing. That’s where the MODX front panel sliders come in.

MODX sliders controlling Elements 5 through 8

As shown in the picture above, use the top button to select ELEMENT/OPERATOR. Use the middle button to select Elements 5 through 8. Now move the first slider and watch Element 5 level change. Hold a key and hear the change.

Congratulations! You can now play the drawbars and you understand the relationship between the sliders and Element levels.

But, wait, there’s more. Move the fourth slider to change Element 8 level. This adds and removes percussion. Move the second slider (Element 6 level) and listen to the rotor grit. Now you know how to make your Leslie sound busted. 🙂

If you grok all of this, try deconstructing the “More Shade” Performance. Judging from its name, this Performance tries to emulate “Whiter Shade Of Pale.”

    MODX/Montage Performance: More Shade 

El# Waveform Level Coarse
--- ------------ ----- ------
1 Draw 16' 127 0
2 Draw 5 1/3 41 0
3 Draw 8' 127 0
4 Draw 4' 107 0
5 Draw 1 3/5 18 0
6 Rotor Grit 2 18 -24
7 Rotor 23 -17
8 Percussion 0 -7

Copyright © 2023 Paul J. Drongowski

AWM, AN and VL in one Yamaha synth

What if you could buy a Yamaha synth with AWM2, AN and VL synthesis and buy it today? It’s not the unicorn super-Montage, it’s the Yamaha EX5 (released in 1998). The EX5 supports:

  • AWM tone generation
  • VL tone generation
  • AN tone generation, and
  • FDSP tone generation.

The EX5 had brothers, the EX5R rack module, and the diminuitive EX7. The EX7 is more limited in a number of ways including the absence of VL. Formulated Digital Sound Processing (FDSP) is a note- and velocity-dependent effect processor — an early version of Virtual Circuit Modeling. FDSP models electromagnetic pick-ups, water, PWM, flanger, phaser, etc. [I won’t say too much more about FDSP.]

AWM, AN, VL and FDSP can be combined (layered) in a variety of ways. (See the EX5/EX7 manual for details.) All of the synthesis methods share a common element structure as shown in the image below.

Yamaha EX5 common element structure [Yamaha]

The main difference between the synthesis types is how the “oscillator” is handled:

  • AWM: The oscillator is formed via sample-playback.
  • VL: The oscillator is the instrument model (mouthpiece, bow/string, etc.)
  • AN: The oscillator is a simulated VCO (Voltage Controller Oscillator).
  • FDSP: Same as AWM.

The remainder of sound processing is based on the standard AWM pipeline with the addition of a few extra VL, AN and FDSP parameters.

Yamaha EX5 allowed combinations of synthesis methods

All is exciting and fantastic until one reads the polyphony spec:

    Voice Type      EX5/5R Polyphony  EX7 Polyphony 
-------------- ---------------- -------------
AWM/Drum 126 64
VL+AWM 1+AWM
FDSP 16 8
AN(Poly)+AWM 2+AWM 1+AWM
AN(Layer)+AWM 1+AWM
AN+FDSP AN:1; FDSP:8

So, I would forget about that fat stack of AN or VL oscillators (layers). Forget phat two-handed analog chords.

How did Yamaha create this many-headed beast? Glancing at the EX5 service manual, the EX5 tone generation hardware consists of two SWP30B processors configured in the age-old master/slave tandem. (The SWP30B is two generations older than the current SWP70.) The EX7 has only one SWP30B. Further clues come from Yamaha itself:

The DSP (Digital Signal Processing) system used to create the EX effects is also used by the AN, FDSP, and VL (EX5/5R only) tone generators to create voices. This means that less DSP capacity is available to produce effects when the aforementioned voice types are used. This imposes limitations which are different for the EX5/5R and EX7. The Reverb and Chorus effect units function normally regardless of the type of voice used.

There are no limitations to using insertion effects in the EX5 or EX5R Voice mode. In the Performance mode, however, insertion effects can be used on a maximum of 4 parts (voices) if the performance setup consists entirely of AWM voices. If a VL, AN, or FDSP voice is used in the performance setup, however, an insertion effect can only be used on one part (voice).

Colloquially, Yamaha have robbed Peter to give to Paul.

Yamaha EX5 DSP limitations [Yamaha]

In EX5, DSP1 is always assigned to reverb, chorus and one level of insert effects. DSP2, however, is flexibly assigned between insert (AWM), VL, AN, and FDSP. Likely, Yamaha returns DSP2 output to a single TG channel in the front-end of the AWM2 pipeline (i.e., a return datapath).

Given the limitations in the EX5 internal architecture, I understand why Yamaha deployed the SSP2 digital signal processor in the Reface CS. Reface CS uses AN Analog Physical Modeling and is eight voice polyphonic. Although Yamaha don’t say much about its filter, Reface CS is not restricted as to filter algorithm (i.e., can be something other than the AWM2 hardware filters).

Sometimes you need to look back in order to see forward. AN-X™ is on the horizon and we will soon see if Yamaha raids its treasure vault. [Again, 25 years later.]

Copyright © 2023 Paul J. Drongowski

Yamaha CK61™ and CK88™

Update: Product pages and manuals are now available at Yamaha sites everywhere.

Pre-announcement information is breaking out all over. I recommend the GAK Music CK series video with Luke Juby. It gives a great overview and demonstrates the preset sounds and effects. The CK has sliders, knobs and buttons dedicated to program/effect selection and tweaking (attack, release, cut-off and resonance). The drawbar sliders are short-throw like the Reface YC. The physical controls should reduce menu-diving.

A few interesting tidbits from the video. The CK has the ability to trigger backing tracks from the keyboard. Foot pedal control is assignable. There are four zones for external control and 5-pin MIDI IN and OUT. Split and layer are supported with two split points.

Here are Yamaha CK88™ specifications:

  • 88 keys, weighted GHS keyboard, initial touch
  • Tone Generator: AWM2 and AWM for Organ Flutes
  • 128 voices of polyphony
  • Integrated Effects, Master EQ
  • 363 Voices, 160 Live Set Sounds (80 preset)
  • Pitch Bend and Modulation Wheel
  • Nine Organ Footage Sliders, three Part Volume Sliders, eleven control Knobs
  • Built-in amplifiers (2 ✗ 6 W) and speakers (2 ✗ (12cm ✗ 6cm)); Can be switched off
  • Battery powered operation (eight AA alkaline or Ni-MH batteries) or AC adaptor
  • Monochrome LCD display (128 x 64 dots)
  • Stereo Line Output: 6.3 mm mono phone jack x2
  • Stereo Input: 6.3 mm mono phone jack x2
  • Stereo Phones Output: 6.3 mm stereo phone jack
  • Two connectors for Footswitches or Foot controllers
  • MIDI [IN]/[OUT] 5-pin DIN
  • USB [TO DEVICE] to connect USB memory sticks
  • USB [TO HOST] to connect to PCs, USB-Audio-Interface function (two stereo channels from PC to CK, two stereo channels from CK to PC)
  • Bluetooth connectivity to play back audio from a Bluetooth device
  • Dimensions (W x D x H): 1,333 mm × 354 mm × 148 mm
  • Weight: 13.1 kg (28.9 pounds)
  • Included accessories: Owner’s Manual, AC adaptor (PA-150B)
  • Optional accessories: Footswitches and Foot controllers (FC3A, FC4A, FC5, FC7), Soft Case SC-DE88, Music Rest YMR-03

The CK61 weighs 5.6kg (12.3 pounds) and has a new synth action keybed (the FSB action borrowed from the PSR SX line).

Sounds like an entry-level keyboard for price-sensitive customers. I anticipated a battery power option, but the in-built amplification (2 ✗ 6W) and speakers are unexpected. Given the entry-level spec, I suspect that SWX09 is the internal host/tone generator engine.

Yamaha CK88 portable stage synthesizer

The CK is a “poor man’s” combination of Reface YC and Reface CP. Or, stated another way, CK is someone’s dream combination of Reface YC and Reface CP with full-size controls. A lot of people pined for a combined organ/EP Reface with a full-sized keybed. They got it. 🙂

363 voices aren’t many. I expect to see promotion reading “363 voices from the acclaimed Montage, YC stage organ and CP stage piano.” This smacks of the way a few new voices were lifted from Motif and built into the ill-fated MM series. I expect recycled effects from MODX, etc. and CK will not include the new, improved YC rotary speaker algorithm.

We’ll need to hear more details, of course. I don’t think the CK directly replaces the MX series. A lot hinges on its DAW/VI integration which is an MX strong point. The MX88 weighs 13.9kg, so the CK88 (13.1kg) does not have a weight advantage over MX88. CK61 weighs 5.6 kg, not much less than MODX6. Based on weight alone, I don’t have much reason to spurn my MODX6 for CK61.

Yamaha CK61 portable stage keyboard

If you own an MODX, I don’t think you’re going to be green with G.A.S. The extra sliders are nice, but MODX (MODX+) is so much more. The CK series should appeal to the weekend warrior with a family on a tight budget. CK61 MSRP is $1,249 USD and MAP is $999; CK88 MSRP is $1,899 and MAP is $1,499. Yamaha got the CK61 MAP under the psychological $1,000 barrier.

The pictures are fuzzy. We’ll know more and have better pictures after the official product announcement tomorrow when Yamaha releases high res assets.

Copyright © 2023 Paul J. Drongowski

CK: Scraps from the dustbin

Today’s tidbits are from Jason at the YamahaSynth.com forum.

First, a major shout out to Jason. Every forum has one or two people who energetically answer questions and keep a forum community alive. Jason is that guy on the Yamaha synth forum, especially after Phil’s (Badmister’s) retirement. Thank you, Jason!

Have you thanked a forum contributor recently?

I’ve been searching for evidence of Yamaha’s CK61™ and CK88™ as we run up to NAMM 2023 (13-15 April 2023). Jason’s diligence has paid off; I’m too freakin’ lazy. 🙂

He scraped a document listing the recyclable content for various Yamaha products. [A document required by some civil authority, no doubt.] I don’t like to post information unless I can verify it independently. More eyes on a problem or situation are always good. Fortunately, I found the same document.

It’s quite a comprehensive list of products all the way down to pedals, stands, power adapters and soft cases. The products are list by category: piano, digital piano (CL), music production (MP), portable keyboard (PK), etc.

Lo and behold, under “MP”, we find CK61™ and CK88™ with product codes VDY9110 and VDY9230. So, these products are not phantoms — unless Yamaha is playing an enormous joke on us! 🙂

Given the list’s completeness, it’s interesting that “Montage” does not appear. I searched and scoured the list. Not there. This could be a mere oversight or what? Have Yamaha decided that MODX+ has overtaken (subsumed) Montage and that’s it for the heavy grey lady? Is Montage necessary if the CKs implement AN-X™? All speculative, of course. [Yamaha’s product strategy smacks of “Pokémon Gotta Catch ‘Em All.]

I have not been able to independently verify Jason’s other information:

STAGE PIANOS

CK61 New generation 61-key portable stage synthesizer inc. adapter $22,630.00

CK88 New generation 88-key portable stage synthesizer inc. adapter $34,736.00

Prices are given in Mexican Pesos. If these are pesos and genuine prices, that’s approximately $1,250 USD and $1,920 USD, respectively. I think the use of “STAGE PIANOS”, here, means stage keyboards. I don’t think “synthesizer” is accidental, tho’.

Blake Angelos (Hi, Blake) has posted an invite to “Join us for the Tech Talk Season 3 finale on March 14. We’ll be revealing something new you won’t want to miss! It all happens Tuesday, March 14 1:00 PM PDT, 10:00 PM CET. Hope to see you there!”

Please check out the discussion on the YamahaSynth forum and let Jason take a victory lap. Thanks, again.

Update. And the thread is gone from YamahaSynth. If you would like to join a discussion, Yamaha Musicians Forum has knowledgeable and passionate members who are engaged with this topic. You might also consider the Music Player Keyboard Corner, too.

Yamaha may be trying to stuff the toothpaste back into the tube, but their own site has pages referring to the CK88™. That’s why I don’t believe in conspiracy theories. 🙂

Copyright © 2023 Paul J. Drongowski

V3 Sound YAMMEX: Progress report

Here’s a quick update on my progress with the V3 Sound YAMMEX XXL sound module.

The V3 Sound XXL series are very compact, light-weight MIDI sound modules based on the Dream S.A.S. SAM5716B synthesis engine. The YAMMEX and its sister, the V3 Sound Grand Piano XXL, have hundreds of high quality voices — 3GBytes of factory samples in a 4GByte waveform memory. The modules also provide two multi-effect (MFX) pipelines which enrich the sound.

V3 Sound YAMMEX XXL expansion module

The XXL modules do not have a built-in user interface (UI) having no display or buttons for selecting voices. All sounds and effects are selected through the MIDI and USB-A ports. V3 Sound provide the tablet-based V3 Sound Control app and two comprehensive MIDI Designer UI templates. The V3 Sound Control app, unfortunately, does not support the YAMMEX. V3 Sound considers the YAMMEX as a Genos/PSR expansion only and expect users to control YAMMEX through a set of predefined voice (VCE) files and the normal Genos/PSR voice selection process.

Well, those VCE files do send MIDI Bank Select MSB, Bank Select LSB and Program Change messages. I can now assure you that these messages are enough to select YAMMEX voices even if you are not using a Genos or PSR.

Yamaha MODX Zone Master works quite well. You need to build MODX Performances consisting of external MIDI zones. Thanks to Zone Master you can select, split and layer YAMMEX voices. The trick is to assign a separate YAMMEX voice to each MIDI channel and use Zone Master channel and note ranges to affect splits and layers.

I have also successfully used the Arturia Keylab Essential with YAMMEX. It took only 15 minutes work to make a control template using Arturia’s MIDI Control Center application. I assigned eight of my favorite YAMMEX voices to the eight Keylab pads and assigned the most common MIDI continuous controllers to the knobs and sliders.

Both of these scenarios are dirt-simple involving a direct 5-pin MIDI connection. Unfortunately, Keylab Essential by itself cannot do splits and layers over 5-pin MIDI. Keylab Essential does not provide the functional equivalent of Zone Master. Keylab Essential can send on only one MIDI channel at a time and doesn’t implement the concept of key ranges (zones). Keylab Essential also restricts the number of selectable voices to what you can programmed into its key pads.

All is not lost, however, as MIDI Designer once again comes to the rescue. First, you need to make connections:

                                 iPad 
|
Keyboard controller --> iRig MIDI --> YAMMEX

The keyboard controller sends MIDI over a 5-pin cable to the iPad which, in turn, sends MIDI to the YAMMEX over a second 5-pin cable. Bonus: I successfully tested Bluetooth MIDI input from Korg Microkey Air. The iPad acts as a Bluetooth wireless interface to YAMMEX.

The iPad runs two applications: StreamByter and MIDI Designer:

    MIDI IN --> StreamByter --> MIDI Designer --> MIDI OUT

Incoming note messages are passed THRU StreamByter and MIDI Designer. StreamByter remaps (rechannelizes) the MIDI notes to three zones/streams:

    Channel 1: UPPER1 
Channel 2: UPPER2
Channel 4: LOWER

UPPER1 and UPPER2 form a two-voice layer above the split point. LOWER is a solo left-hand voice below the split point. I borrowed this simple zone structure from the Casio CT-S1000V. It’s intuitive and is quite powerful even in its simplicity.

StreamByter maps and mangles MIDI data according to user-defined rules. The rules are rather cryptic, so I refer you to the StreamByter documentation. Currently, I am using the following rules to split/layer:

    NX 00-3A = X3 
NX 3A-7F = X0
NX 3A-7F = X1 +C

Yes, the UPPER and LOWER zones have a one note overlap. I’m still experimenting and may make the overlap larger, if a bigger overlap is useful. I don’t like abrupt breaks between upper and lower zones.

Well, the rest of the work is done by MIDI Designer and my YAMMEX control template. The V3 Sound templates struck me as too complicated — the main reason why I went with “the Casio voice structure” and my own template. Here is the first prototype, work-in-progress template:

MIDI Designer template for YAMMEX (work in progress)

There are eight radio buttons to select the UPPER1, UPPER2, and LOWER voices. [Well, I need to add three more voices to LOWER, as you can see.] These are my favorite YAMMEX voices and they will let me build my most frequently used combinations. Knobs set the voice and reverb level for each zone.

The MFX controls do not function correctly at this time. I seem to be missing some magic; YAMMEX is not responding to the MIDI messages sent by the template even though the V3 Sound “factory” template sends the same darned messages! At this point, I need to ask V3 Sound for advice.

All in all, things are coming along — many successes, a few failures. That’s to be expected at this stage!

Copyright © 2022 Paul J. Drongowski


In the house: V3 Sound YAMMEX XXL

Thought I would post a quick note about the new unit under test — the V3 Sound YAMMEX XXL tone module. The YAMMEX is a member of the V3 Sound XXL family of tone modules. They all share the same triangular shape and are light as a feather:

V3 Sound YAMMEX XXL expansion tone module

The lump-in-the-middle power supply is roughly the same weight!

You might have seen and heard Piano Man Chuck demonstrate the V3 Sound Grand Piano XXL module. [Piano Man Chuck is a V3 Sound dealer, BTW.] Well, the YAMMEX has the same sound set as the Grand Piano XXL. The main differences are:

  • The MIDI bank and program change layouts are different: Grand Piano XXL for general use as an expander, YAMMEX XXL as a Genos/PSR expander.
  • Grand Piano XXL is supported by the V3 Sound Control app; the YAMMEX XXL is not.
  • Grand Piano XXL is supported by two different MIDI Designer templates; the YAMMEX is not.
  • YAMMEX XXL voices are selected using custom Genos/PSR user voices.

YAMMEX XXL arrives from the factory with a USB flash drive containing the custom user voices (VCE files) needed to select voices through Genos/PSR. It’s all described in the YAMMEX XXL manual. [Henceforth, “Yammex” means “YAMMEX XXL”.]

I found a Yammex on ebay at a price that was impossible to refuse. It would be a shame to confine Yammex to Genos duty alone, so I studied the heck out of its MIDI implementation. I also examined the VCE files available from the V3 Sound Web site. Hmmm, looks like it’s a simple matter of uttering the appropriate Bank Select MSB, Bank Select LSB and Program Change messages. We can do that!

An inquiry to V3 Sound about compatibility was answered quickly, but implied that Yammex was only for Genos/MIDI. If you know MIDI and your controller’s capabilities, and if you don’t mind a little work, Yammex definitely can do more than Genos/PSR.

I was sorely tempted by the V3 Sound XXL series because it is based on the Dream S.A.S. SAM5716B synthesis chip. After hearing the SAM2635 and its GM/GS sound set, I wanted to hear what a high-end Dream chip could do with 3GBytes of professionally produced instrument samples. Cut to the chase, V3 Sound do not disappoint especially at the price I paid.

Jeff’s Music Gear is Sweetwater!

The box arrives. I open the shipping carton and what the? The Yammex box is in fine shape, but is covered in round “Demo” labels. I instantly smell “Sweetwater”. And there’s candy, and a Sweetwater “Thank You” card. The ebay seller is Jeff’s Music Gear. After a Google, I discover that Jeff’s Music Gear is Sweetwater’s ebay consignment shop! Nice to know that I was in good hands all along.

OK, then, plug everything up using Yamaha MODX as a controller. (See my article about Yamaha MODX Zone Master.) Ooops, no flashing MIDI light and no sound. I’m already composing a message to Jeff’s when I remember this note in the Yammex manual:

No sound? The YAMMEX XXL sound expander only creates a tone when you call up a sound from the V3 folder in your keyboard’s display. Just connecting it to your keyboard is not enough.

They aren’t kidding! I select a voice through the MODX Zone Master screen and suddenly the MIDI light starts flashing and Yammex starts talking. Delete the message to Jeff’s.

One other note from the manual is helpful during bring up:

Testing MIDI connections and settings. After connecting your MIDI cable and making sure your MIDI settings are correct, select a V3 User Voice. The MIDI LED on the YAMMEX XXL should now blink with every keystroke.

I find this behavior to be a dubious design decision. The purpose of a MIDI light is to indicate MIDI reception under any condition. While troubleshooting, I connected the Yammex THRU port to MIDI-OX on a PC and verified MIDI operation. Most of V3 customers will not be that savvy…

I’ve just begun auditioning sounds and already I’m pleased. I like and prefer the Bösendorfer Imperial 290 (Vienna) over the Steinway Model D (Hamburg). I fell in love with Bösendorfer when I first touched one in 1980. The electric pianos are good although too clean and polite. The organ samples are damned good. There are two flavors: No Leslie and Leslie sampled in. Sans-Leslie voices are meant to be dirtied up by an external pedal. I’ll try the Electro-Harmonix Lester K for spin and throw some overdrive on the EPs, too.

I like the Oberheim pads — another love. The classical strings are solid. That’s as far as I’ve gotten into the sound set. I’m looking forward to hearing the rest.

As to the supplied USB flash drive, the previous customer zorched the factory VCE files. I found an X6A file instead which I recognize as a Yamaha MOXF dump file. I guess the previous customer tried Yammex with MOXF and was disappointed. Fortunately, V3 Sound provide the Genos/PSR VCE files on their Web site. The supplied drive is only 64MB. [Not really a complaint.]

Experiments to come? Once I get my faves down to 8, 16 voices or so, I’ll configure the Arturia Keylab Essential. The extra knobs and sliders will come in handy. Also, I will whip up a simplified MIDI Designer template for the Yammex. The existing templates are comprehensive — yet overwhelming. I’m thinking about a UI similar to Korg Module. Those Korg folks are definitely on to something. Simplicity is king. MIDI Designer (with StreamByter) on iPad should give me splits and layers — maybe even a wireless Bluetooth interface to Yammex? Finally, Dream multi-FX.

Copyright © 2022 Paul J. Drongowski

Yamaha MODX: Zone Master

If you mix and match your gear over MIDI, you will eventually need to send a program change message. Yesterday, I wanted to audition the sounds in my hacked Akai MPK Mini Play and needed to send a full Bank Select MSB (CC#0), Bank Select LSB (CC#32) and Program Change message sequence to the Akai MPK Mini Play.

Usually I scramble around looking for cables and hook up a MIDI controller like the Arturia Keystep or Keylab Essential. Inevitably, I scratch my head trying to remember how to send a full sequence of bank and program change messages from the controller. Maybe a trip through a PC-based control editor is required. It’s amazing that in this day and age, it is still difficult or impossible to send a full three message sequence in one go! [Grr.]

This time I said “Why not MODX?” and the best solution of all was in front of me.

The trick is to use the MODX Zone Master feature. I don’t intend to deep-dive Zone Master here and recommend the Mastering MONTAGE: Zone Master FAQ on the Yamaha Synth site. The MODX and Montage are enough alike such that the Montage tutorial applies to MODX, too.

The basic concept is simple. When Zone Master is enabled, a part in an MODX Performance can send MIDI messages over the 5-pin MIDI OUT. One needs to configure a few things before setting up a part and zone in a Performance.

Yamaha MODX MIDI I/O settings

For my experiment, I hit the UTILITY button and tapped the MIDI I/O tab under Settings. There, I made two changes:

  • I changed MIDI IN/OUT to MIDI in order to send MIDI messages through the 5-pin MIDI OUT. If this parameter is USB, you won’t send or see messages on the 5-pin port.
  • I turned Local Control OFF. If MODX isn’t connected to a powered speaker (or whatever), this step is optional.

Don’t forget to change these settings back to what they were when you’re done. MODX remembers them across power down and you may be surprised to find a silent MODX when you turn it on again.

MODX advanced settings (including Zone Master)

Next, tap the Advanced tab. Turn Zone Master ON. Zone Master is not enabled by default. If you don’t enable Zone Master, you will not see zone-related tabs and parameters when editing the Performance part.

Create an empty MODX Performance

Hit the EXIT button and click CATEGORY. We’re going to create a new, empty Performance. Tap the Init category button. Then tap Init Normal (AWM2). This creates a new empty (AWM2) Performance.

A brand new empty Performance to edit
MODX Zone Master settings

Cursor over to the part and hit the EDIT button. You should see two additional Zone Master tabs that normally aren’t displayed in Part Common Edit (i.e., when Zone Master is disabled). Tap the Zone Settings tab. Make the following changes:

  • Turn Zone ON.
  • Set the Transmit Channel to Channel 1 or your heart’s desire.
  • Turn MIDI Send ON.

Make sure Bank Select and Program Change are enabled (ON). Now you’re ready to send bank and program change messages to the target device. You did connect your target device to the 5-pin MIDI OUT port, right?

For those of you who are building a Performance to be saved and used in the future, check out the Internal Switch (Int SW) parameter. Turn it OFF if you don’t want MODX to send messages to the internal tone generator, that is, make this a locally silent part.

Cursor over to (or tap) the MIDI Bank MSB, MIDI Bank LSB and MIDI Program Number parameters to change values. MODX sends a full three message sequence when the Program Number is changed. So, if you change Bank MSB or LSB, you must send a Program Number to send the full sequence and make the actual patch change in the target device.

MODX bank select and program change example

In the screenshot above, Bank MSB 24, Bank LSB 0, and Program Change 5 selects the 60’s vintage electric piano (Wurli) in the Akai MPK Mini Play tone generator. Oh, you didn’t know the MPK Mini Play had a Wurli variation? Read on, below.

Conveniently, you can send MIDI volume (CC#7) and MIDI pan (CC#10) messages from this same screen. You can mess with local Octave Shift and Transpose. Pitch bend and mod wheel messages go out, too, and you can play away and freely audition sounds in the target device/module.

Overall, I find the MODX Zone Master method an easy way to experiment with a target device or tone module. If you’re a MODX owner, give it a try!

Hacked Akai MPK Mini Play?

In case you missed it, I added 5-pin MIDI to the Akai MPK Mini Play (Mk1) and gained full access to the Dream S.A.S. SAM2635 synthesizer chip within. The mod is fairly simple and relatively risk free as far as mods go. [Please remember that any mod has risk and voids your warranty.]

The MPK Mini Mod is functioning quite well and is stable. Just remember that only one source can send MIDI messages to the SAM2635 at a time, i.e., either the MPK Mini Play host microcomputer or the 5-pin DIN MIDI IN, not both. Messages are not merged and will collide electrically, leaving the SAM2635 confused.

The Dream SAM2635 is a full Roland GS implementation, not just General MIDI. The SAM2635 offers variation sounds including different organs and electric pianos. I really need to write a short run-down and review…

MODX screen capture

Just in case you’ve forgotten the steps to capture a MODX screen, here they are:

  1. Insert A USB flash drive into the USB To DEVICE port on the back panel.
  2. Press and hold the A/D INPUT ON/OFF button.
  3. Press and release the AUDITION button.
  4. Release the A/D INPUT ON/OFF button.

Simple, eh? And so easy to forget. 🙂 The screen shots are written to the USB flash drive in PNG files.

BTW, according to my web stats, my MODX split/layer tutorial remains popular. Take a look if you’re still puzzled about splits and layers. I also have a simple MODX Super Knob example.

Copyright © 2022 Paul J. Drongowski